


简述
http://www.jianshu.com/p/313f11bccb33?utm_source=tuicool&utm_medium=referral(本文针对于有Vue有一定基础的人学习了解,环境搭建等入门教程网上很多,大家自行学习,也可留言,我会给出一些不错的教程博客供大家学习。)
一、通过一个小demo,让大家深入了解组件开发。并将教会大家以下知识。
- (特色) v-model 在自定义组件中的使用。在送索引擎中,搜索 v-model 相关知识,绝大部分都是如何使用v-model这个指令进行数据双向绑定。然而,如何自定义一个组件,并且使用这个组件时可以用v-model,让自己的组件也支持数据双向绑定,是一个问题,也很少有教程。
2.自定义组件,组件的使用。这部分内容网络上的教程很多,不作为重点介绍。
3.组件间的通讯。本章中将会使用$emit进行父子组件中的通讯。并且提供工具类,降低耦合性。
4.(特色)两个组件配合使用,完成特定功能两个组件嵌套使用,完成效果和对数据的管理。
二、demo 说明
废话不多说,先上效果图。
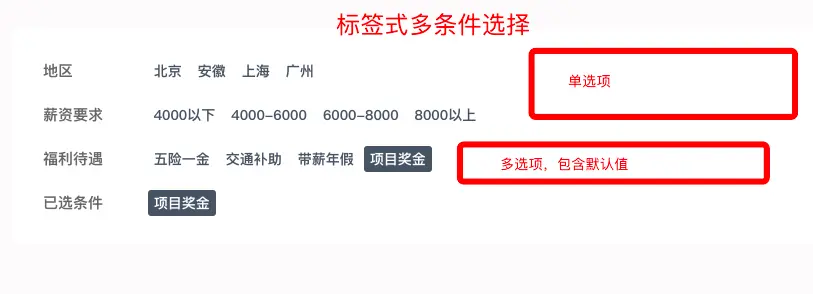
实现思路,自定义两个组件,一个标签组件“seltipoption”,方便使用v-for进行渲染,一个父组件"seltiplist",管理v-model,接收"seltipoption"事件等。
编写
1 新建组件“seltipoption.vue”
该组件需要完成的功能是:显示标签内容、响应点击事件、高亮显示是否被选中。
<template>
  <span class="tip" @click="selectOptionClick" :class="{'active':itemSelected }">{{currentLabel}}</span>
</template>
<script type="text/ecmascript-6">
  import Emitter from "../emitter";
  var underscore = require("../underscore-min");
  export default{
    mixins: [Emitter],
    componentName: "seltipoption",
    props: {
      value: {
        required: true
      },
      label: [String, Number],
    },
    //属性计算
    computed: {
      currentLabel() {
        return this.label || ((typeof this.value === 'string' || typeof this.value === 'number') ? this.value : '');
      },
      parent() {
        let result = this.$parent;
        while (!result.istipSelect) {
          result = result.$parent;
        }
        return result;
      },
      itemSelected() {
        if (!this.parent.multiple) {
//由于现实问题,此处underscore..isEqual中间为下划线
           return underscore..isEqual( this.parent.value, this.value);
        } else {
          let isSelected = false;
          this.parent.value.forEach((item, index) => {
//由于现实问题,此处underscore..isEqual中间为下划线
            if (underscore..isEqual(item, this.value)) {
              isSelected = true;
            }
          });
          return isSelected;
        }
      },
    },
    methods: {
      selectOptionClick(){
        this.dispatch('seltiplist', 'handleOptionClick', this.value);
      }
    }
  }
</script>
2 新建组件 “seltiplist.vue”
该组件需要实现的功能:子组件内容分发、响应子组件“seltipoption”选中和取消选中事件、实现v-model的数据双向绑定。
<template>
  <div>
    <slot></slot>
  </div>
</template>
<script type="text/ecmascript-6">
 import Emitter from "../emitter";
var underscore = require("../underscore-min");
export
default {
        mixins:[Emitter],
        componentName: "seltiplist",//组件名称,自定义字段。方便用这个属性进行组件间交流
        data() {
            return {
                istipSelect: true
            }
        },
        props: {
            value: {},
            multiple: {
                type: Boolean,
                default:false
            }//属性标识筛选条件是单选项还是多选项
        },
        mounted() {
            this.$on('handleOptionClick', this.handleOptionSelect);
        },
        methods: {
            handleOptionSelect(val) {
//由于现实问题,此处underscore..isArray中间为下划线
                if (this.multiple && underscore..isArray(this.value) )  {
                    this.value.forEach( (item, index ) => {
//由于现实问题,此处underscore..isEqual中间为下划线
                        if (underscore._.isEqual(item, val)) {
                            optionIndex = index;
                        }
                    });
                    if (optionIndex < 0) {
                        this.value.push(val);
                    } else {
                        this.value.splice(optionIndex, 1)
                    }
                } else {
                    if (val != this.value) {
                        this.$emit('input', val);
                    } else {
                        this.$emit('input', "");
                    }
                }
            }
        }
    }
</script>
3 组件使用
 <div class="selectlist">
        <div class="title">地区</div>
        <div class="select-box">
          <seltiplist  v-model="loacl_select">
            <seltipoption v-for=" item in local " :label="item.label" :value="item"></seltipoption>
          </seltiplist>
        </div>
      </div>
      <div class="selectlist">
        <div class="title">薪资要求</div>
        <div class="select-box">
          <seltiplist  v-model="salary_select">
            <seltipoption v-for=" item in salary " :label="item.label" :value="item"></seltipoption>
          </seltiplist>
        </div>
      </div>
      <div class="selectlist">
        <div class="title">福利待遇</div>
        <div class="select-box">
          <seltiplist :multiple="true"  v-model="treatment_select">
            <seltipoption v-for=" item in treatment " :label="item.label" :value="item"></seltipoption>
          </seltiplist>
        </div>
      </div>
<script>
  import seltiplist from "./seltiplist.vue";
  import seltipoption from "./seltipoption.vue";
  export default{
    components: {
      seltiplist,
      seltipoption
    },
    data(){
      return{
        loacl_select:"",
        treatment_select:[{
          id:4,
          label:"项目奖金"
        }],
        salary_select:"",
        local:[{
          id:1,
          label:"北京"
        },{
          id:2,
          label:"安徽"
        },{
          id:3,
          label:"上海"
        },{
          id:4,
          label:"广州"
        }],
        treatment:[{
          id:1,
          label:"五险一金"
        },{
          id:2,
          label:"交通补助"
        },{
          id:3,
          label:"带薪年假"
        },{
          id:4,
          label:"项目奖金"
        }],
        salary:[{
          id:1,
          label:"4000以下"
        },{
          id:2,
          label:"4000-6000"
        },{
          id:3,
          label:"6000-8000"
        },{
          id:4,
          label:"8000以上"
        }]
      }
    },
    methods: {}
  }
</script>
4 代码解读
1,如何实现的自定义组件v-model数据双向绑定?
如果要让组件的 v-model 生效,则这个组件它必须:
- 接受一个 value 属性
- 在有新的 value 时触发 input 事件,直接赋值给
this.value是无效的,无法触发更新。 - 当为多选项时,更新seltiplist组件的value数组即可,但是当为单选项时,需要使用
this.$emit('input', val);来触发更新。
2,父子组件通讯。
我加入了一个minx混合,也就是组件中看到引入的Emitter
function broadcast(componentName, eventName, params) {
  this.$children.forEach(child => {
    var name = child.$options.componentName;
    if (name === componentName) {
      child.$emit.apply(child, [eventName].concat(params));
    } else {
      broadcast.apply(child, [componentName, eventName].concat(params));
    }
  });
}
export default {
  methods: {
//事件向上传播,参数:接收事件组件的componentName属性,事件名称,传入的参数
    dispatch(componentName, eventName, params) {
      var parent = this.$parent || this.$root;
      var name = parent.$options.componentName;
//根据组件的componentName值,找到父组件
      while (parent && (!name || name !== componentName)) {
        parent = parent.$parent;
        if (parent) {
          name = parent.$options.componentName;
        }
      }
///父组件触发$emit回调
      if (parent) {
        parent.$emit.apply(parent, [eventName].concat(params));
      }
    },
//事件向下传播,参数:接收事件组件的componentName属性,事件名称,传入的参数(原理同上)
    broadcast(componentName, eventName, params) {
      broadcast.call(this, componentName, eventName, params);
    }
  }
};
当 seltipoption.vue 响应click事件后,通过
this.dispatch('seltiplist', 'handleOptionClick', this.value);
触发父组件 seltiplist.vue 的监听
this.$on('handleOptionClick', this.handleOptionSelect);
实现组件间的通讯。并且在一定程度上可以起到解耦的作用。
3, seltipoption 的选择状态判断
当为单选项时 ,判断seltipoption的value是否等于seltiplist的value;
当为多选项时,seltipoption的value存在于seltiplist value的数组中。
为了判断两个value是否值相等。此处引入工具underscore
github:https://github.com/jashkenas/underscore,
文档:http://underscorejs.org/
总结
代码量不多,也没有对每个方法进行说明,但是非常适合准备入手自定义组件同行们。提供了一些组件开发的思路,有很多时候组件配合使用更为便捷。
demo的代码已上传至github,以便参考学习。
github:https://github.com/DevilLeven/select_tip
-
顶


 431
431

 被折叠的 条评论
为什么被折叠?
被折叠的 条评论
为什么被折叠?
 到【灌水乐园】发言


