


Android bootchart 工具使用
1、bootchart工具简介:
bootchart是一个用于linux启动过程性能分析的开源软件工具,在系统启动过程自动收集CPU占用率、进程等信息,并以图形方式显示分析结果,可用作指导优化系统启动过程。
2、bootchart在Android平台使用情况:
Android系统中已有一份bootchart的c实现,位于system/core/init/bootchart.c中。bootchart对Android开机测量是通过内建在init进程中实现的,在后台执行测量。不过bootchart的测量时段是从bootchart被初始化之后到home screen出来之前,不包括bootloader和kernel的执行时间(bootchart的原理是取代init process或是内建在init process里,所以只能取得initial script的开机过程报告)。
3、bootchart在Android平台使用步骤:
1) Ubuntu 12.04下bootchart工具安装
2) bootchart在Android下编译
3) bootchart在Android下的应用
4) bootchart测量结果图形化显示
下面依次对上述4个步骤做详细说明
1)、Ubuntu 12.04下bootchart工具安装:
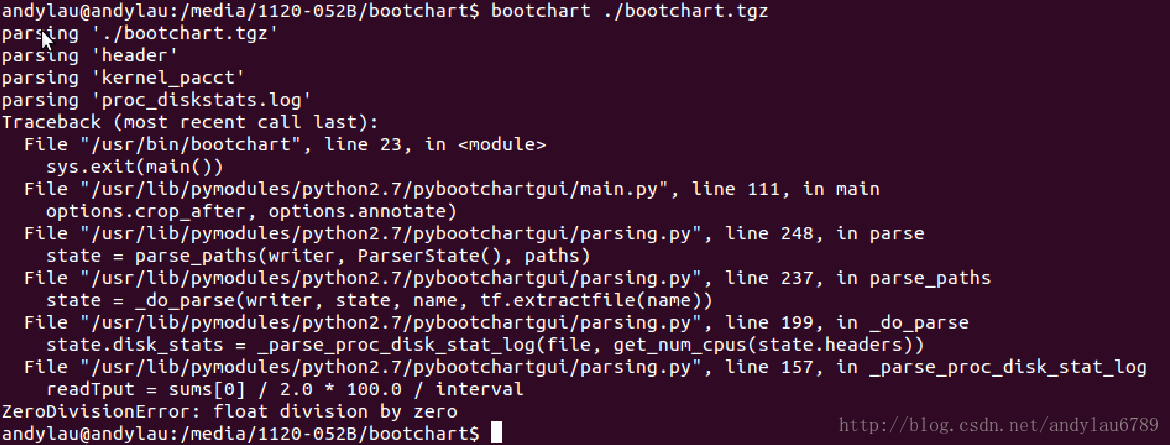
网上很多教程说要安装下面两个工具,经个人验证最后在制作图形化显示时,出现bootchart无法正常解析android中生成的bootchart.tgz文件。
- sudo apt-get install bootchart
- sudo apt-get install pybootchartgui
异常情况如下,需要下载旧版本的bootchart工具,最终问题得到解决。
下载bootchart_0.9-0ubuntu6_all.deb工具,下载地址:http://download.csdn.net/detail/sckgenius/7166477
安装方法:sudo dpkg -i bootchart_0.9-0ubuntu6_all.ded
2)、bootchart在Android下编译:
1、 vi system/core/init/bootchart.h 修改define BOOTCHART 0 为 define BOOTCHART 1
- *
- * Copyright (C) 2008 The Android Open Source Project
- *
- * Licensed under the Apache License, Version 2.0 (the "License");
- * you may not use this file except in compliance with the License.
- * You may obtain a copy of the License at
- *
- * http://www.apache.org/licenses/LICENSE-2.0
- *
- * Unless required by applicable law or agreed to in writing, software
- * distributed under the License is distributed on an "AS IS" BASIS,
- * WITHOUT WARRANTIES OR CONDITIONS OF ANY KIND, either express or implied.
- * See the License for the specific language governing permissions and
- * limitations under the License.
- */
- #ifndef _BOOTCHART_H
- #define _BOOTCHART_H
- #ifndef BOOTCHART
- # define BOOTCHART 0 // 修改define BOOTCHART 1
- #endif
- #if BOOTCHART
- extern int bootchart_init(void);
- extern int bootchart_step(void);
- extern void bootchart_finish(void);
- # define BOOTCHART_POLLING_MS 200 /* polling period in ms */
- # define BOOTCHART_DEFAULT_TIME_SEC (2*60) /* default polling time in seconds */
- # define BOOTCHART_MAX_TIME_SEC (10*60) /* max polling time in seconds */
- #endif /* BOOTCHART */
- #endif /* _BOOTCHART_H */
2、添加bootchart进入系统中,执行如下命令:
- touch system/core/init/init.c
- export INIT_BOOTCHART=true
3) bootchart在Android下的应用:
1、将编译生成的带有bootchart工具的Android系统重新烧录到开发板上,并启动系统。
2、在系统data目录创建文件/data/bootchart-start,其内容是bootchart的采样时间:
- adb shell 'echo $TIMEOUT > /data/bootchart-start'
- adb shell 'echo 120 > /data/bootchart-start'
- adb shell 'mkdir /data/bootchart'
4、重新启动开发板,在开发板的Android系统的/data/bootchart/目录下将看到以下5个文件组成:

到此为止,bootchart执行测量后生成的测量数据已经完成,看上面有3个.log文件,下面进行生成美观的图形化显示。
需要注意,在开发板上运行bootchart采样完成后若不再使用bootchart则需手工删除文件/data/bootchart-start,否则开发板每次重启时都会运行bootchart。
4) bootchart测量结果图形化显示:
1、生成bootchart.tgz 在data/bootchart目录执行以下命令:
- busybox tar -czf bootchart.tgz *
2、生成美观的图形化显示
拷贝/data/bootchart下刚才生成的 bootchart.tgz到Linux环境下,执行:
- java -jar /usr/share/bootchart/bootchart.jar /path/bootchart.tgz
- sudo mv bootchart.svgz bootchart.svg.gz
- sudo gzip -d bootchart.svg.gz

转载地址:http://blog.csdn.net/andylau6789/article/details/24654385


 1万+
1万+


 被折叠的 条评论
为什么被折叠?
被折叠的 条评论
为什么被折叠?
 到【灌水乐园】发言


