


 本文提供了一步式指南,详细介绍如何快速搭建Android开发环境,包括JDK安装、ADT-Bundle下载与配置、Android SDK与AVD设置、创建HelloWorld项目并运行,以及解决常见配置问题的方法。
( 由于现在Google已经推出了android studio,想快速加入到android开发的同学也能更便捷的配置开发环境了,有兴趣的同学可以在这里找到android studio的一些资料。http://www.android-studio.org/ )
正文:
ADT-Bundle for Windows 是由Google Android官方提供的集成式IDE,已经包含了Eclipse,你无需再去下载Eclipse,并且里面已集成了插件,它解决了大部分新手通过eclipse来配置Android开发环境的复杂问题。
有了ADT-Bundle,新涉足安卓开发的同学也无需再像以前那样在网上参考繁琐的配置教程,可以轻松一步到位进行Android应用开发。
第一步:JAVA SDK(JDK)的安装:
可以去问百度下载JDK,也可以到官方下载JDK。
官方下载地址: http://www.oracle.com/technetwork/java/javase/downloads/index.html
第二步: 下载ADT-Bundle for Windows
官方下载地址:http://developer.android.com/sdk/index.html
第三步:安装ADT-Bundle
直接把下载下来的的adt-bundle-windows-xxx-xxx.zip,解压到你需要安装的位置。
第四步:安装Android SDK
打开解压出来的文件夹里面的 SDK Manager.exe (也可以运行eclipse/eclipse.exe 然后通过Windows -> Android SDK Manager打开)

勾选上你想要开发的目标手机安卓版本,最好是全部勾上,然后点击Install Package 按提示 next,accept允许等待安装(这是一个慢长的过程)

特别注意1:
有可能在这一步会出现:Failed to fetch URL https://dl-ssl.google.com/android/repository/addons_list-2.xml, reason: Connecti的问题
解决办法:打开SDK Manager.exe,选中tool栏,点Android SDK Manager ,在下面Force https://...sources to be fetched using http://... 打上勾就行了,这个主要是把受保护的协议 https 转成普通http
解决办法转自:http://jingyan.baidu.com/article/2c8c281df3dcd50009252a56.html
特别注意2:在按了“install .. packages”后也会出现 Connection to http://dl-ssl.google.com refused 问题
解决办法:改hosts文件的方法,更新速度较快。Windows在C:\WINDOWS\system32\drivers\etc目录下,Linux用户打开/etc/hosts文件。
打开文件后添加以下内容。
#Google主页
203.208.46.146 www.google.com
#这行是为了方便打开Android开发官网 现在好像不翻墙也可以打开
74.125.113.121 developer.android.com
#更新的内容从以下地址下载
203.208.46.146 dl.google.com
203.208.46.146 dl-ssl.google.com
特别注意2解决办法转自:http://blog.csdn.net/foxeatapple/article/details/8450372
第五步:配置Android AVD(虚拟模拟器)
打开Eclipse(eclipse/eclipse.exe),(运行启动的eclipse可能看上去有些不一样,可以通过windows把一些常用的窗口,工具条显示出来),然后从Windows->Android Virtual Device Manger打开AVD管理器。
点击 New按钮 创建你一新的AVD,如下图,我做了一个简单说明,参数其实你都是可以自己随意填的,点击OK就行了。
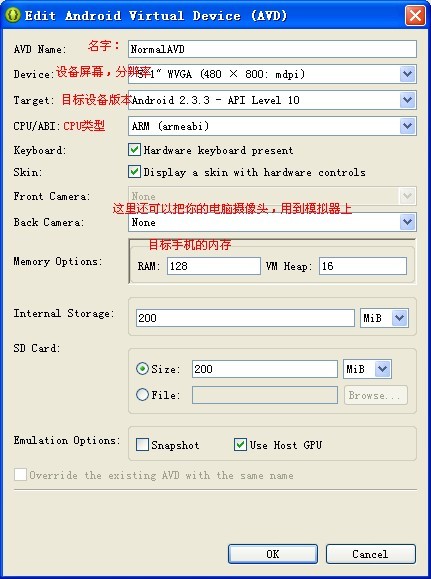
你配置的这个AVD是会做为你安卓应用的默认调试摸拟器,当然你也可以配置多个。
第六步:创建一个Hello World项目
通过File -> New-> Android Application Project, 然后输入Hello World(项目名字),next,finish。
第七步:从运行Hello World
直接点击Run Debug(快捷键F11)就可以在你配置的模拟器里运行了。
有了ADT-Bundle这个东西,方便了很多。
在打开myeclipse的时候又出现了location of the android sdk has not been setup in the preference的错误,再次百度解决:
重新安装完的SDK和现有的ADT不匹配、所以需要重新下载Tools,如下图

下面是另外一些网友出现的问题解决办法:
location of the android sdk has not been setup in the preferences
androidandroid sdk 版本出错, eclipse 无法使用android sdk
打开eclipse时出现无法识别android的项目,即所有android项目均显示红色错误标记。点击eclipse管理android SDK and AVD Manager 插件的标志时出现错误:
location of the android sdk has not been setup in the preferences
如图-1

图-1 location of the android sdk has not been setup in the preferences
点击eclipse->Window->Preferences出现了如下错误:Could not find D:\android-sdk\tools\adb.exe!
如图-2

图-2 Could not find D:\android-sdk\tools\adb.exe!
在android sdk 目录(D:\android-sdk)下,确实找不到adb.exe文件。才想起了原来之前曾经用eclipse 管理插件更新过android sdk,但没有成功,最后连相关的adb文件都丢失。既然是android sdk的版本问题,更新应该就是了。但由于eclipse插件已经无法识别android sdk,所有只能进入android sdk 的安装目录(D:\android-sdk),找到SDK Manager.exe文件,双击弹出如下界面(图-3):

图-3 Choose Packages to Install 选择相应的android sdk进行安装
安装 新的SDK

图-4 安装新的sdk版本
点击安装android完成以后,还需要进行对eclipse关于android 管理插件的更新,否则即使安装了新版本的android SDK,由于新版本的android sdk 目录结构与就版本有所不同,而旧的eclipse 旧的android管理插件因无法识别而报错。
更新android管理插件的办法:eclipse ->Help->Install New Software,选择Android – Android – http://dl-ssl.google.com/Android/eclipse/(原来的安装插件的链接),如图-5
接下来的步骤就是安装,步骤省略。

图-5 更eclipse android管理插件
更新完成后,重启eclipse ,再看看android都安装了哪些sdk。如图-6

图-6 更新后的android sdk各版本。
顺便说一句,要更新android的最新版本,最好用android目录的SDK Manager.exe。
解决办法转自:http://63230860.blog.163.com/blog/static/65880996201322010420432/


 被折叠的 条评论
为什么被折叠?
被折叠的 条评论
为什么被折叠?
 到【灌水乐园】发言


