


Part 1: 基础
简介
那么libtins是如何工作的呢?libtins由PDU类、sender和sniffer类、表示地址的类以及一些使您的生活更轻松的辅助函数来实现。
PDUS
我们首先来看看PDU对象是什么。在库中实现的每个PDU(比如IP、TCP、UDP等)都是一个类,它继承了一个名为PDU的抽象类。
这个类包含可以检索实际协议数据单元大小及其类型等的方法。它还包含一个名为send的方法,允许您通过网络有效地发送数据包。
PDU对象也支持堆叠。这意味着一个PDU对象(不考虑其实际类型)可以具有0或1个内部PDU。这是一种非常合乎逻辑的想象网络数据包的方式。假设您创建了一个以太网II帧,然后在其顶部添加一个IP数据报,然后添加一个TCP帧。这个结构在libtins内部看起来是这样的:
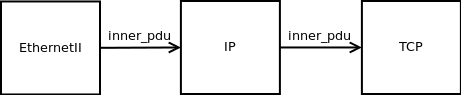
正如您所想象的,可以使用方法PDU::inner_pdu() 来检索PDU的内部PDU。让我们看看如何重现这种情况的代码示例:
#include <tins/tins.h>
using namespace Tins;
int main() {
EthernetII eth;
IP *ip = new IP();
TCP *tcp = new TCP();
// tcp is ip's inner pdu
ip->inner_pdu(tcp);
// ip is eth's inner pdu
eth.inner_pdu(ip);
}
那么我们在这里做了什么?方法PDU::inner_PDU(PDU*)将给定参数设置为被叫方的内部PDU。作为参数传递的对象必须使用运算符new进行分配,从那时起,该PDU现在归其父PDU所有,这意味着该对象的销毁将由其处理。因此,在上面的示例中,没有实际的内存泄漏。在eth的析构函数上,分配的IP和TCP对象都将被销毁,并释放它们的内存。
请注意,如果要存储副本而不是实际指针,可以使用PDU::clone函数,该函数返回该PDU的具体类型的副本,包括其所有堆叠的内部PDU。
有一种更简单的方法来嵌套PDU。对于那些使用过scapy的用户,您可能习惯于使用除法运算符创建PDU堆栈。libtins也支持这一点!
上面的代码可以重写如下:
#include <tins/tins.h>
using namespace Tins;
int main() {
// Simple stuff, no need to use pointers!
EthernetII eth = EthernetII() / IP() / TCP();
// Retrieve a pointer to the stored TCP PDU
TCP *tcp = eth.find_pdu<TCP>();
// You can also retrieve a reference. This will throw a
// pdu_not_found exception if there is no such PDU in this packet.
IP &ip = eth.rfind_pdu<IP>();
}
请注意,上面示例中创建的IP和TCP临时对象是使用PDU::clone()方法克隆的。
Address 类
IP地址和硬件地址都使用IPv4Address、IPv6Address和HWAddress类来处理。所有这些类都可以由包含适当表示形式(IPv4Address的点符号、IPv6地址的分号符号等)的std::string或c-string构造。
std::string lo_string("127.0.0.1");
IPv4Address lo("127.0.0.1");
IPv4Address empty; // represents the address 0.0.0.0
// IPv6
IPv6Address lo_6("::1");
// Write it to stdout
std::cout << "Lo: " << lo << std::endl;
std::cout << "Empty: " << empty << std::endl;
std::cout << "Lo6: " << lo_6 << std::endl;
这些地址可以隐式转换为整数值,但这是在库中使用的,所以你不必担心。正如你从上面可以注意到的,默认构造的IPv4Address对应于点符号地址0.0.0.0。
这些类还提供了一个使用uint32_t的构造函数,当函数/构造函数使用某些参数的默认值时,这非常有用。在上面示例的最后几行中,IPv4和IPv6地址都被写入stdout。这些类定义了输出运算符(运算符<<),因此序列化它们更容易。
HWAddress<>类模板定义如下:
template<size_t n, typename Storage = uint8_t>
class HWAddress;
其中,n个非类型模板参数表示地址的长度(网络接口为6),存储模板参数表示这n个元素中每个元素的类型(通常不应更改,uint8_t应更改)。
HWAddress对象可以由std::string、c-字符串、const Storage*和任意长度的HWAddress构成。它们也可以进行相等性比较,并提供一些辅助函数以允许在地址上进行迭代:
HWAddress<6> hw_addr("01:de:22:01:09:af");
std::cout << hw_addr << std::endl;
std::cout << std::hex;
// prints individual bytes
for (auto i : hw_addr) {
std::cout << static_cast<int>(i) << std::endl;
}
Address range 类
libtins还支持地址范围。这对于几个目的非常有用,例如将流量分类到不同的子网络中。
使用斜线点或网络掩码创建地址范围非常直观:
/* IPv4 */
// 192.168.1.0-255
IPv4Range range1 = IPv4Address("192.168.1.0") / 24;
// Same as above
IPv4Range range2 = IPv4Range::from_mask("192.168.1.0", "255.255.255.0");
/* IPv6 */
// dead:0000:0000:0000:0000:0000:0000:0000-00ff
IPv6Range range3 = IPv6Address("dead::") / 120;
// Same as above
IPv6Range range4 = IPv6Range::from_mask("dead::", "ffff:ffff:ffff:ffff:ffff:ffff:ffff:ff00");
现在,你能对地址范围做些什么?您可以对其进行迭代,也可以询问网络中是否有特定地址:
IPv4Range range = IPv4Address("192.168.1.0") / 24;
range.contains("192.168.1.250"); // Yey, it belongs to this network
range.contains("192.168.0.100"); // NOPE
// Let's print 'em all
for (const auto &addr : range) {
std::cout << addr << std::endl;
}
但等等,还有更多。您还可以创建硬件地址范围。为什么这很有用?使用此选项,您可以使用OUI说明符来确定特定网络设备的供应商:
// Some OUI which belongs to Intel
auto range = HWAddress<6>("00:19:D1:00:00:00") / 24;
// Does this address belong to Intel?
if (range.contains("00:19:d1:22:33:44")) {
std::cout << "It's Intel!" << std::endl;
}
Network 接口
这里回顾的最后一个助手类是NetworkInterface。这个类表示网络接口的抽象。它可以根据接口的名称(作为字符串)和IPv4Address构建。如果某些数据包要发送到给定的ip地址,最后一个构造函数将创建作为网关的接口:
NetworkInterface lo("lo");
// this would be lo
NetworkInterface lo1(IPv4Address("127.0.0.1"));
您也可以使用NetworkInterface::name()检索接口的名称。请注意,此函数会搜索系统的接口,并在每次调用时检索名称,因此您可能需要调用一次并存储返回值。
Writing pcap files
将数据包写入pcap文件也非常简单。PacketWriter类将要在其中存储数据包的文件的名称作为其参数,并使用数据链路类型指示写入文件的最低层。这意味着,如果您正在编写EthernetII PDU,则应使用DataLinkType<EthernetII>标志,而在无线接口上,则应根据设备中使用的封装使用DataLinkType<RadioTap>或DataLinkType<Dot11>。
// We'll write packets to /tmp/test.pcap. Use EthernetII as the link
// layer protocol.
PacketWriter writer("/tmp/test.pcap", DataLinkType<EthernetII>());
// Now create another writer, but this time we'll use RadioTap.
PacketWriter other_writer("bleh.pcap", DataLinkType<RadioTap>());
一旦创建了PacketWriter,就可以使用PacketWriter::write方法向其写入PDU。这个方法包含两个重载:一个重载一个PDU&,另一个重载两个模板前向迭代器,start和end。后者将遍历范围[start,end),并写入存储在该范围的每个位置的PDU。如果*start产生PDU&,或者如果多次取消传递导致PDU&。这将起作用。这意味着std::vector<std::unique_ptr<PDU>>迭代器也将起作用。
此示例创建一个包含一个EthernetII PDU的std::vector,并使用两个重载将其写入pcap文件:
#include <tins/tins.h>
#include <vector>
using namespace Tins;
int main() {
// We'll write packets to /tmp/test.pcap. The lowest layer will be
// EthernetII, so we use the appropriate identifier.
PacketWriter writer("/tmp/test.pcap", DataLinkType<EthernetII>());
// A vector containing one EthernetII PDU.
std::vector<EthernetII> vec(1, EthernetII("00:da:fe:13:ad:fa"));
// Write the PDU(s) in the vector(only one, in this case).
writer.write(vec.begin(), vec.end());
// Write the same PDU once again, using another overload.
writer.write(vec[0]);
}
整合到一起
现在,我们将使用上面列出的大多数类来创建数据包并发送它:
#include <tins/tins.h>
#include <cassert>
#include <iostream>
#include <string>
using namespace Tins;
int main() {
// We'll use the default interface(default gateway)
NetworkInterface iface = NetworkInterface::default_interface();
/* Retrieve this structure which holds the interface's IP,
* broadcast, hardware address and the network mask.
*/
NetworkInterface::Info info = iface.addresses();
/* Create an Ethernet II PDU which will be sent to
* 77:22:33:11:ad:ad using the default interface's hardware
* address as the sender.
*/
EthernetII eth("77:22:33:11:ad:ad", info.hw_addr);
/* Create an IP PDU, with 192.168.0.1 as the destination address
* and the default interface's IP address as the sender.
*/
eth /= IP("192.168.0.1", info.ip_addr);
/* Create a TCP PDU using 13 as the destination port, and 15
* as the source port.
*/
eth /= TCP(13, 15);
/* Create a RawPDU containing the string "I'm a payload!".
*/
eth /= RawPDU("I'm a payload!");
// The actual sender
PacketSender sender;
// Send the packet through the default interface
sender.send(eth, iface);
}
请注意,该数据包的创建可以在一行中完成,使用运算符/而不是运算符/=:
// same as above, just shorter
EthernetII eth = EthernetII("77:22:33:11:ad:ad", info.hw_addr) /
                 IP("192.168.0.1", info.ip_addr) /
                 TCP(13, 15) /
                 RawPDU("I'm a payload!");
Part 2: Sniffing
在本节中,我们将更深入地了解如何使用libtins执行嗅探。
Sniffing 基本
嗅探是通过Sniffer类完成的。这个类接受libpcap字符串过滤器,并允许您探查某些网络设备,解释通过它发送的数据包,并为您提供PDU对象,以便您可以轻松地使用它们。
一旦设置了过滤器,就有两个功能可以检索嗅探的数据包。其中之一是Sniffer::next_packet。此成员函数允许您使用提供的筛选器检索数据包:
// We want to sniff on eth0. This will capture packets of at most 64 kb.
Sniffer sniffer("eth0");
// Only retrieve IP datagrams which are sent from 192.168.0.1
sniffer.set_filter("ip src 192.168.0.1");
// Retrieve the packet.
PDU *some_pdu = sniffer.next_packet();
// Do something with some_pdu...
....
// Delete it.
delete some_pdu;
Sniffer 配置
自3.2版本以来,有一个类表示可以给嗅探器的不同参数,以便影响嗅探会话。它们都是不同libpcap函数的包装器,如pcap_setfilter、pcap_set_promisic等。这是对其他Sniffer构造函数所采用的许多参数的改进。
例如,如果您想在端口80上捕获数据包,在混杂模式下嗅探并将快照长度设置为400字节,您可以这样做:
// Create sniffer configuration object.
SnifferConfiguration config;
config.set_filter("port 80");
config.set_promisc_mode(true);
config.set_snap_len(400);
// Construct a Sniffer object, using the configuration above.
Sniffer sniffer("eth0", config);
注意:如果你注意到嗅探的数据包是突发的,或者它们的捕获有延迟(例如1秒),这很可能是由于libpcap>=v1.5默认使用缓冲模式。如果要尽快获取数据包,请确保使用SnifferConfiguration::set_immediate_mode使用即时模式。
Loop 嗅探
除了Sniffer::next_packet之外,还有另一种从Sniffer对象提取数据包的方法。在满足某些特定条件之前,您想要嗅探大量数据包,这是非常常见的。在这种情况下,最好使用Sniffer::sniff_loop。
此方法将模板函数作为参数,该参数必须定义具有以下签名之一的运算符:
bool operator()(PDU&); bool operator()(const PDU&); // These are only allowed when compiling in C++11 mode. bool operator()(Packet&); bool operator()(const Packet&);
对Sniffer::sniff_loop的调用将使嗅探器开始处理数据包。将使用每个处理过的数据包作为参数来调用函数。如果在某个时刻,您想要停止嗅探,那么您的函子应该返回false。否则返回true,Sniffer对象将继续循环。
函子对象将是复制构造的,因此它必须实现复制语义。有一个helper模板函数,它获取指向模板参数类型的对象的指针,还有一个成员函数,并返回HandlerProxy。该对象实现了所需的运算符,在该运算符中,它使用给定的对象指针将调用转发到所提供的成员函数指针:
#include <tins/tins.h>
using namespace Tins;
bool doo(PDU&) {
return false;
}
struct foo {
void bar() {
SnifferConfiguration config;
config.set_promisc_mode(true);
config.set_filter("ip src 192.168.0.100");
Sniffer sniffer("eth0", config);
/* Uses the helper function to create a proxy object that
* will call this->handle. If you're using boost or C++11,
* you could use boost::bind or std::bind, that will also
* work.
*/
sniffer.sniff_loop(make_sniffer_handler(this, &foo::handle));
// Also valid
sniffer.sniff_loop(doo);
}
bool handle(PDU&) {
// Don't process anything
return false;
}
};
int main() {
foo f;
f.bar();
}
正如您所看到的,使用Sniffer::sniff_loop进行嗅探不仅是处理多个数据包的简单方法,而且在使用类时可以使代码更加整洁。
现在是有趣的部分。在上面的例子中,我们知道我们正在嗅探IP地址192.168.0.100发送的IP PDU,但我们的函数采用PDU&。我们想搜索存储在参数内的IP PDU(可能是EthernetII类型)。幸运的是,您可以要求PDU在其整个PDU堆栈(包括其自身)中搜索特定的PDU类型,并返回对它的引用。如果在数据包中找不到此类PDU,则会引发pdu_not_found异常:
bool doo(PDU &some_pdu) {
// Search for it. If there is no IP PDU in the packet,
// the loop goes on
const IP &ip = some_pdu.rfind_pdu<IP>(); // non-const works as well
std::cout << "Destination address: " << ip.dst_addr() << std::endl;
// Just one packet please
return false;
}
void test() {
SnifferConfiguration config;
config.set_promisc_mode(true);
config.set_filter("ip src 192.168.0.100");
Sniffer sniffer("eth0", config);
sniffer.sniff_loop(doo);
}
使循环嗅探机制比逐个获取数据包更好的另一件事是异常处理。Sniffer::sniff_loop捕获函数体中抛出的pdu_not_found和malformed_packet异常。这意味着您可以使用PDU::rfind_PDU,甚至不在乎是否找不到这样的PDU,因为Sniffer将捕获异常,并且嗅探会话将继续。
Windows用户注意:您可能需要查看本教程的Windows嗅探附加部分,以确保在该平台上开始数据包捕获之前知道需要做什么。
Sniffing 使用 iterators
还有另一种方法可以从Sniffer对象中检索数据包。这个类定义了两个方法,begin()和end(),它们返回前向迭代器。这些可以用于在嗅探数据包时检索数据包:
Sniffer s = ...;
for (auto &packet : s) {
    // packet is a Packet&
    process(packet);
}
Packet 对象
如果需要将PDU与时间戳对象一起存储,则应使用Packet类。数据包包含一个PDU和时间戳,可以复制和移动。
让我们看一个例子,在这个例子中,我们将把从导线读取的10个数据包存储到一个向量中:
#include <vector>
#include <tins/tins.h>
using namespace Tins;
int main() {
std::vector<Packet> vt;
Sniffer sniffer("eth0");
while (vt.size() != 10) {
// next_packet returns a PtrPacket, which can be implicitly converted to Packet.
vt.push_back(sniffer.next_packet());
}
// Done, now let's check the packets
for (const auto& packet : vt) {
// Is there an IP PDU somewhere?
if (packet.pdu()->find_pdu<IP>()) {
// Just print timestamp's seconds and IP source address
std::cout << "At: " << packet.timestamp().seconds()
<< " - " << packet.pdu()->rfind_pdu<IP>().src_addr()
<< std::endl;
}
}
}
正如您可能已经注意到的,Packet对象也可以与Sniffer::next_Packet一起使用:
Sniffer sniffer("eth0");
// PDU pointer, as mentioned at the beginning
std::unique_ptr<PDU> pdu_ptr(sniffer.next_packet());
// auto cleanup, no need to use pointers!
Packet packet = sniffer.next_packet();
// If there was some kind of error, packet.pdu() == nullptr,
// so we need to check that.
if (packet) {
process_packet(packet); // whatever
}
Sniffer::sniff_loop上使用的函数对象上也可以接受Packets,但仅当您在C++11模式下编译时。
读取 pcap 文件
读取pcap格式的文件非常简单。FileSniffer类以要打开的文件的名称为参数,并允许您处理其中的数据包。Sniffer和FileSniffr都继承自BaseSniffer,后者是实际实现next_packet和sniff_loop的类。因此,我们可以像在上面的例子中使用Sniffer一样使用FileSniffer类:
#include <tins/tins.h>
#include <iostream>
#include <stddef.h>
using namespace Tins;
size_t counter(0);
bool count_packets(const PDU &) {
counter++;
// Always keep looping. When the end of the file is found,
// our callback will simply not be called again.
return true;
}
int main() {
FileSniffer sniffer("/tmp/some_pcap_file.pcap");
sniffer.sniff_loop(count_packets);
std::cout << "There are " << counter << " packets in the pcap file\n";
}
数据包解释
现在我们已经了解了读取pcap文件和从网络接口嗅探的方法,我们将了解如何执行数据包解释。 每次从其中一个源读取数据包时,都会创建该源的链接层类型的对象(EthernetII、RadioTap等)。这些类型的对象中的每一种都根据其内部标志检测下一个PDU的类型,创建它,将它添加为其子对象,并传播相同的操作。 此操作由每个实例化的PDU执行,传输层协议除外。这意味着,例如,如果从以太网接口上嗅探DNS数据包,您将获得以下结构:
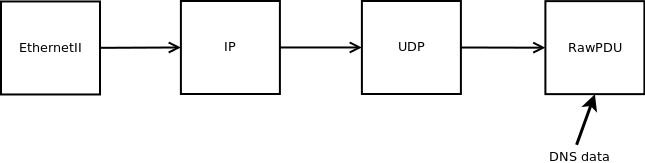
然后,您可以使用该RawPDU的有效载荷来解释构建DNS对象的DNS数据包:
// This is a handler used in Sniffer::sniff_loop
bool handler(const PDU& pkt) {
    // Lookup the UDP PDU
    const UDP &udp = pkt.rfind_pdu<UDP>();
    // We need source/destination port to be 53
    if (udp.sport() == 53 || udp.dport() == 53) {
        // Interpret it as DNS. This might throw, but Sniffer catches it
        DNS dns = pkt.rfind_pdu<RawPDU>().to<DNS>();
        // Just print out each query's domain name
        for (const auto &query : dns.queries()) {
            std::cout << query.dname() << std::endl;
        }
    }
    return true;
}
相同的机制应该用于其他协议,例如DHCP。如果您想知道为什么应用层协议不能由传输层PDU自动解释,原因是效率。与较低层协议相比,应用层协议(如DNS)需要更多的处理才能解析它们。此外,一些应用程序甚至可能不需要使用这些协议,因此让它们为额外的处理是不可取的。
Part 3: 发送包
简介
PacketSender类负责通过网络发送数据包。在内部,它存储不同套接字层(例如2和3)的原始套接字。 当调用PacketSender::send(PDU&)时,PDU参数被序列化为一个字节数组,并通过适当的套接字发送。
发送网络层 PDUs
发送网络层PDU(如IP和IPv6)非常直观:
PacketSender sender;
IP pkt = IP("192.168.0.1") / TCP(22) / RawPDU("foo");
sender.send(pkt);
请注意,在IP构造函数中没有指定任何源地址。默认情况下使用地址0.0.0.0。然而,当发送网络层PDU时,如果源地址为0.0.0.0,PDU将在路由表上执行查找,找出哪个应该是源地址,并自动设置它。这已经由网络驱动程序完成了,但一些传输层协议(如TCP)在计算校验和时需要此地址,因此这也必须由库完成。
发送链路层PDU
在发送链路层PDU(如EthernetII)时,还有一件事需要牢记。在这种情况下,数据包必须通过特定的网络接口发送。您可以在发送时指定:
PacketSender sender;
EthernetII pkt = EthernetII() / IP() / TCP() / RawPDU("foo");
sender.send(pkt, "eth0"); // send it through eth0
// if you're sending multiple packets, you might want to create
// the NetworkInterface object once
NetworkInterface iface("eth0");
sender.send(pkt, iface);
这将通过eth0接口发送数据包。 使用同一网络接口发送多个数据包是很常见的。PacketSender包含一个默认接口,当使用PacketSender::send(PDU&)重载时,将在该接口中发送链路层PDU:
PacketSender sender("eth0");
EthernetII pkt = EthernetII() / IP() / TCP() / RawPDU("foo");
sender.send(pkt); // send it through eth0 as well
std::cout << sender.default_interface().name() << std::endl;
sender.default_interface("eth1");
sender.send(pkt); // now we're sending through eth1.
请注意,默认情况下此接口无效,因此您需要在发送链路层PDU之前进行设置,如上图所示:
PacketSender sender;
EthernetII pkt = EthernetII() / IP() / TCP() / RawPDU("foo");
sender.send(pkt); // throws invalid_interface
发送和接收响应
到目前为止,我们已经了解了如何发送数据包,但如果您希望收到对该数据包的响应呢?让我们以ARP请求为例。发送后,您很可能希望收到回复。 这可以通过在发送数据包时进行嗅探来实现,检查每个嗅探的数据包,直到找到响应。然而,为了匹配数据包响应,有必要执行几个与协议相关的比较。在ARP响应的情况下,它将相当简单。然而,其他协议需要检查目的地和源地址、端口、标识符编号等。 幸运的是,库中已经包含了发送和接收机制。这可以通过使用PacketSender::send_recv来实现,它提供了两个重载:
PDU *send_recv(PDU &pdu);
PDU *send_recv(PDU &pdu, const NetworkInterface &iface);
NetworkInterface参数的作用与PacketSender::send中的作用相同。 让我们看看如何使用它来执行ARP请求并接收其响应:
// The address to resolve
IPv4Address to_resolve("192.168.0.1");
// The interface we'll use, since we need the sender's HW address
NetworkInterface iface(to_resolve);
// The interface's information
auto info = iface.addresses();
// Make the request
EthernetII eth = ARP::make_arp_request(to_resolve, info.ip_addr, info.hw_addr);
// The sender
PacketSender sender;
// Send and receive the response.
std::unique_ptr<PDU> response(sender.send_recv(eth, iface));
// Did we receive anything?
if (response) {
const ARP &arp = response->rfind_pdu<ARP>();
std::cout << "Hardware address: " << arp.sender_hw_addr() << std::endl;
}
请注意,在PacketSender::send_recv中,从套接字读取的数据包将与发送的数据包相匹配,直到找到有效的数据包为止。 顺便说一句,使用Utils:resolve_haddr:可以很容易地解析硬件地址
// The sender
PacketSender sender;
// Will throw std::runtime_error if resolving fails
HWAddress<6> addr = Utils::resolve_hwaddr("192.168.0.1", sender);
std::cout << "Hardware address: " << addr << std::endl;
回到发送和接收机制,我们还可以使用它来确定TCP端口是否打开:
// The sender
PacketSender sender;
// The SYN to be sent.
IP pkt = IP("192.168.0.1") / TCP(22, 1337);
pkt.rfind_pdu<TCP>().set_flag(TCP::SYN, 1);
// Send and receive the response.
std::unique_ptr<PDU> response(sender.send_recv(pkt));
// Did we receive anything?
if (response) {
TCP &tcp = response->rfind_pdu<TCP>();
if (tcp.get_flag(TCP::RST)) {
std::cout << "Port is closed!" << std::endl;
}
else {
std::cout << "Port is open!" << std::endl;
}
}
最后一个例子是,以下代码使用PacketSender::send_recv解析域名:
// The sender
PacketSender sender;
// The DNS request
IP pkt = IP("8.8.8.8") / UDP(53, 1337) / DNS();
// Add the query
pkt.rfind_pdu<DNS>().add_query({ "www.google.com", DNS::A, DNS::IN });
// We want the query to be resolverd recursively
pkt.rfind_pdu<DNS>().recursion_desired(1);
// Send and receive the response.
std::unique_ptr<PDU> response(sender.send_recv(pkt));
// Did we receive anything?
if (response) {
// Interpret the response
DNS dns = response->rfind_pdu<RawPDU>().to<DNS>();
// Print responses
for (const auto &record : dns.answers()) {
std::cout << record.dname() << " - " << record.data() << std::endl;
}
}
检查和校验
在上面的示例中,所使用的一些协议(如IP和TCP)包含校验和字段。每次发送数据包时都必须计算此校验和。libtins会自动执行此操作:每次序列化数据包(这种情况发生在PacketSender::send内部)时,都会计算校验和;所以你没有必要担心他们。
线程安全性
需要注意的一点是,原始套接字打开操作不是线程安全的,因此,如果您有多个编写器,您应该自己显式打开所需的套接字(这可以通过PacketSender::open_l2_socket和PacketSender::open_l3_socket来完成)。否则socket将在需要时打开。
Part 4: TCP streams
简介
从3.4版本开始,libtins提供了一组类,允许以一种非常简单但功能强大的方式重新组装TCP流。在引入这些类之前,有一个TCPStreamFollower类可以做到这一点,但其扩展性不高,不可用。 这些新类旨在使用一个简单的基于回调的接口,提供一种非常简单的方式来跟踪流、处理它们的数据、获取它们的属性等等。流将处理无序的数据,重新组装数据,并让用户处理数据,而不必处理数据包、有效载荷、序列号等。 所有这些类都需要使用C++11,因为它们使用std::function作为指定回调的方法。因此,你应该使用一些相当新的编译器来使用它。如果你使用GCC,4.6可能就足够了,甚至可能是更旧的版本。
StreamFollower
您应该了解的主要类是StreamFollower。此类将处理TCP数据包,查看其中使用的IP地址和端口。每当看到一个新的4元组(客户端地址、客户端端口、服务器地址、服务器端口)时,它都会为该TCP流创建一些上下文,并执行用户提供的回调来通知其创建。之后,属于该流的所有数据包都将转发到正确的对象,让它处理数据并更新其内部状态。 StreamFollower的另一项职责是检测流中出现的问题。假设您的数据包丢失率很高(例如,您的程序无法足够快地处理数据包),您不想为永远不会重新组装的流保留缓冲数据,也不想为实际关闭但未捕获FIN/RST数据包的流存储状态和数据。因此,此类将检测这些事件(缓冲数据包过多、流超时等),并在发生这种情况时删除它们的状态。 作为如何创建StreamFollower并设置一些回调的简单示例:
#include <tins/tcp_ip/stream_follower.h>
using Tins::TCPIP::Stream;
using Tins::TCPIP::StreamFollower;
// New stream is seen
void on_new_stream(Stream& stream) {
}
// A stream was terminated. The second argument is the reason why it was terminated
void on_stream_terminated(Stream& stream, StreamFollower::TerminationReason reason) {
}
// Create our follower
Tins::TCPIP::StreamFollower follower;
// Set the callback for new streams. Note that this is a std::function, so you
// could use std::bind and use a member function for this
follower.new_stream_callback(&on_new_stream);
// Now set up the termination callback. This will be called whenever a stream is
// stopped being followed for some of the reasons explained above
follower.stream_termination_callback(&on_stream_terminated);
// Now create some sniffer
Sniffer sniffer = ...;
// And start sniffing, forwarding all packets to our follower
sniffer.sniff_loop([&](PDU& pdu) {
follower.process_packed(pdu);
return true;
})
请注意,StreamFollower::process_packet有另一个重载,它占用了一个数据包。您应该尝试使用此重载,因为它会使流在实际数据包时间超时,而不是使用系统时钟。 因此,这是重新组装TCP流的第一步。在接下来的部分中,我们将看到如何利用它做一些有用的事情。
使用 Stream
一旦您在StreamFollower上配置了新流的回调,您可能想对该新流做点什么。流允许您为流上发生的不同事件配置回调。 只要有新的、准备处理的数据,就会生成数据事件。这意味着具有下一个预期序列号的数据包到达,其有效载荷可用,加上之前可能接收到的所有无序有效载荷,由于第一个数据包的数据丢失而无法处理。 您可以选择订阅客户端和服务器数据事件。这意味着,每当每个流上有来自客户端或服务器的新数据时,都可以通过不同的回调通知您。让我们在一个简短的例子中使用这个:
// This will be called when there's new client data
void on_client_data(Stream& stream) {
// Get the client's payload, this is a vector<uint8_t>
const Stream::payload_type& payload = stream.client_payload();
// Now do something with it!
}
// This will be called when there's new server data
void on_server_data(Stream& stream) {
// Process the server's data
}
// New stream is seen
void on_new_stream(Stream& stream) {
// Configure the client and server data callbacks
stream.client_data_callback(&on_client_data);
stream.server_data_callback(&on_server_data);
// Done!
}
就这样,我们之前构建的StreamFollower将继续处理数据包,并将它们转发到正确的Stream对象,后者将在适当的时候执行这些回调。 您还可以订阅每个流上的其他事件。其中之一是关闭事件,只要流正确关闭,就会执行该事件。您可以通过调用Stream::Stream_closed_callback来完成此操作。
处理Streams的数据
现在我们已经了解了如何使用流的基本知识,让我们看看其他一些功能。 默认情况下,每当流有新数据可用时,该数据将被移动到流的有效负载中,执行数据回调,然后擦除该数据。这样做是为了使数据不会开始缓冲,从而使内存使用率上升,直到流关闭(或者内存用完)。如果您想缓冲数据并使用自己的处理方式,则应调用以下函数:
// New stream is seen
void on_new_stream(Stream& stream) {
// Disables auto-deleting the client's data after the callback is executed
stream.auto_cleanup_client_data(true);
// Same thing for the server's data
stream.auto_cleanup_server_data(true);
// Or a shortcut to doing this for both:
stream.auto_cleanup_payloads(true);
}
如果您只计划处理客户端的数据,而不是服务器的数据,那么您应该调用ignore_client/server_data。否则,即使不设置回调,数据仍将根据需要进行缓冲和重新排序:
// New stream is seen
void on_new_stream(Stream& stream) {
    // We don't even want to buffer the client's data
    stream.ignore_client_data():
}
总结
这本应该为您提供一个关于如何使用StreamFollower和Stream类的相当好的介绍。您可以查看HTTP请求示例,以查看一个非常简单的示例。
Part 5: Protocols
简介
libtins提供了对几种网络协议的支持。文档包含有关库中每个类、方法和函数的信息。但是,您可能不想仅仅为了学习如何制作一个简单的TCP数据包而阅读整个文档。 在本节中,我们将了解您最有可能在家庭网络中看到的一些协议是如何在库中实现的。
Ethernet II
Ethernet II协议由EthernetII类表示,并且实际上非常简单。它只包含获取和设置目的地和源地址以及有效负载类型的方法。它还包含一个构造函数,可以选择指示以下两个地址:
// Both addresses are 00:00:00:00:00:00
EthernetII eth;
eth.dst_addr("01:02:03:04:05:06");
eth.src_addr("00:01:02:03:04:05");
// Same as above, just shorter
EthernetII eth2("01:02:03:04:05:06", "00:01:02:03:04:05");
IP
IP类包含更多的方法,既用于访问协议的字段,也用于添加和检索存储的选项。在本例中,我们将修改其中的一些字段:
// Both addresses are 0.0.0.0
IP ip;
ip.dst_addr("192.168.0.100");
ip.src_addr("192.168.0.50");
// Same as above, just shorter
IP ip2("192.168.0.100", "192.168.0.50");
// Set the time-to-live attribute
ip2.ttl(10);
// Set the type-of-service attribute
ip2.tos(3);
IP是许多支持TLV(类型长度值)编码选项的协议之一。这意味着存储在协议中的每个选项都包含一个指示其类型的字段,另一个保持其长度的字段,以及第三个携带实际数据的字段。 每个包含选项(如IP、TCP和DHCP等)的类的行为都是相同的。对于任何包含选项的类型T,T::option是该选项实际存储的类型。每个协议都提供两个成员功能:
void T::add_option(const T::option&)
Which adds an option to that PDU.
const T::option* T::search_option(T::option::option_type)
Which finds and option.
使用这些成员函数,有必要知道组成每个选项类型的字段的长度及其字节序。由于这非常繁琐,因此这些协议中的每一个都为每个有效选项提供了getter和setter。如果选项不在PDU中,getter将始终抛出option_not_found异常。 在IP的情况下,以下是一些受支持的选项getters/ssetters:
IP ip;
// Sets the Stream Identifier option.
ip.stream_identifier(165);
// Sets the Record Route option.
ip.record_route(
{ // Constructing a record_route_type object
2, // pointer
{ "192.168.0.1", "192.168.0.2" } // routes
}
);
// Retrieve the Record Route option.
IP::record_route_type routes = ip.record_route();
// Echo
std::cout << static_cast<int>(routes.pointer) << std::endl;
std::copy(
routes.routes.begin(),
routes.routes.end(),
std::ostream_iterator<IP::address_type>(std::cout, "\n")
);
// This will throw an option_not_found exception.
auto x = ip.security();
TCP
TCP也包含几个选项类型,所以上面提到的关于它们的所有内容仍然有效。让我们来看看如何制作一些基本的TCP帧:
// Both source and destination ports are 0.
TCP tcp;
tcp.dport(22);
tcp.sport(22334);
// Same as above
TCP tcp2(22, 22334);
// Set the sequence number
tcp.seq(0x9283);
// Set the acknowledge number
tcp.ack_seq(0x9283);
// Set the SYN flag
tcp.set_flag(TCP::SYN, 1);
// This will be available as of libtins 1.2
tcp.flags(TCP::SYN | TCP::ACK);
// Get the SYN flag
auto s = tcp.get_flag(TCP::SYN);
// This will be available as of libtins 1.2
bool is_syn_ack = (tcp.flags() == (TCP::SYN | TCP::ACK));
// Set some options
tcp.sack_permitted();
if (tcp.has_sack_permitted()) {
// whatever
}
tcp.altchecksum(TCP::CHK_8FLETCHER);
Part 6: IEEE 802.11
在本节中,我们将了解IEEE 802.11协议是如何在libtins中实现的。
IEEE 802.11
libtins非常支持IEEE 802.11协议。像aircrack ng套件中包含的那些工具应该很容易使用这个库来实现。 整个协议是使用一个基类Dot11实现的,该基类包含其中每个帧共享的字段。每个帧类型都由继承自它的某个类表示。
管理帧
让我们来看看管理框架,它们由抽象类Dot11Management表示。此类包含几个辅助方法,允许您从框架中搜索和添加标记选项。我们将以Dot11Beacon为例,它是表示信标帧的类:
Dot11Beacon beacon;
// Make this a broadcast frame. Note that Dot11::BROADCAST
// is just the same as "ff:ff:ff:ff:ff:ff"
beacon.addr1(Dot11::BROADCAST);
// We'll set the source address to some arbitrary address
beacon.addr2("00:01:02:03:04:05");
// Set the bssid, to the same one as above
beacon.addr3(beacon.addr2());
// Let's add an ssid option
beacon.ssid("libtins");
// Our current channel is 8
beacon.ds_parameter_set(8);
// This is our list of supported rates:
beacon.supported_rates({ 1.0f, 5.5f, 11.0f });
// Encryption: we'll say we use WPA2-psk encryption
beacon.rsn_information(RSNInformation::wpa2_psk());
// The beacon's ready to be sent!
请注意,调用Dot11Beacon::supported_rates时使用的上述大括号语法仅适用于最新的C++ISO标准C++11。该方法以std::vector<float>为参数,因此我们从initializer_list调用vector的构造函数。如果我们不使用这个功能,我们将不得不创建一个临时向量,填充它,并将其作为参数传递。如果你还没有学习过C++11,你应该学习一下,它太棒了。
数据帧
如果你对802.11中如何封装更高的协议有基本的概念,那么数据帧应该很容易处理。 假设我们的数据帧中没有加密。在libtins中,TCP数据包将如下所示:

A non-encrypted IEEE 802.11 packet.
这里,SNAP类表示LLC+SNAP封装。只有当你真的在制作包的时候,你才应该关心这个结构。嗅探时,应始终使用PDU::find_PDU方法模板来查找要查找的层。请注意,如果数据经过加密,则可能只有一个RawPDU,而不是SNAP+IP+TCP。为了创建如上所示的数据包,您可以执行以下操作:
// Yikes! Simple stuff :D
Dot11Data data = Dot11Data() / SNAP() / IP() / TCP() / RawPDU("Hallou");
解密数据帧
libtins支持对WEP和WPA2(AES和TKIP)加密的802.11帧进行解密。当然,库不会破解用于加密数据包的密码/PSK,您需要自己提供。
解密WEP加密帧
WEPDecryptor类位于命名空间Crypto中,是处理WEP解密的类。您创建一个该类型的对象,添加元组(bssid,password),并让它解密数据包。让我们看一个例子:
Crypto::WEPDecrypter decrypter;
// Packets sent to/from the AP whose BSSID is the one provided below,
// will be decrypted using the password "passw"
decrypter.decrypter.add_password("00:01:02:03:04:05", "passw");
// Just asume we get an encrypted frame from somewhere
Dot11Data some_data = generate_dot11data();
if (decrypter.decrypt(some_data)) {
    // Data was decrypted
    std::cout << "Data was successfully decrypted!\n";
}
else {
    // Data couldn't be decrypted
    std::cout << "Decryption failed!\n";
}
好吧,这个例子很简单。我想指出的一件事是,为什么解密会失败?假设与数据帧相关联的BSSID实际上是我们提供密码的BSSID,可能会发生解密后数据帧中的校验和字段无效的情况。在这种情况下,包含数据的RawPDU将被删除,因此some_data.inner_pdu()将有效地为nullptr。我将在下面解释为什么这个类会这样表现。 在解密成功的情况下,RawPDU将被SNAP PDU取代,后面跟着该数据包所包含的内容。例如,此图片说明了如果成功解密TCP数据包会发生什么:
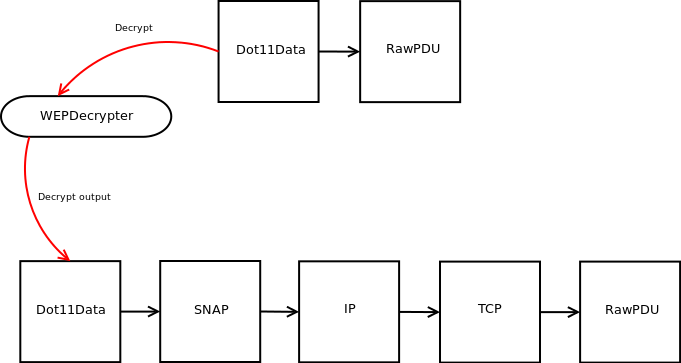
The result of decryption applied to an encrypted packet.
请注意,SNAP PDU后面的所有内容显然都取决于要解密的实际数据包。此外,如果数据帧没有被加密,或者相关联的BSSID不是给定的BSSID,则分组将保持原样。 如果您阅读了上面的内容,并想知道为什么校验和无效的数据包会被修改,并且包含加密数据的RawPDU会被删除,那么原因如下。几行显示的片段中给出的情况并不常见。如果你想解密一个数据包,你肯定是从你的网络接口或pcap文件中取出它。WEPDecryptor类被设计为插入嗅探器和嗅探器回调之间。这可以使用DecryptorProxy类模板来实现。你会这样做:
bool handler(PDU &pdu) {
// process....
return true;
}
// ....
// This creates a decrypter proxy class.
auto decrypt_proxy = make_wep_decrypter_proxy(&handler);
// Same as in the previous example.
decrypt_proxy.decrypter().add_password("00:01:02:03:04:05", "passw");
// Create a sniffer
Sniffer sniffer("wlan0", Sniffer::PROMISC);
// Sniff and decrypt!
sniffer.sniff_loop(decrypt_proxy);
上面显示的代码将是使用WEPDecrypter的更常见情况。让我们来分析一下: 我们定义了一个处理程序函数,称为“handler”。 我们创建一个解密器代理。使用了“auto”说明符,也是C++11的一个功能,因此我们实际上不会写下该对象的类型,它应该是类似于DecryptorProxy<bool(*)(PDU&),WEPDecryptor>的类型。是的,这是一个很长的名字,这就是我使用这个说明符的原因。这个代理类实现了一个运算符(),适合用作Sniffer::sniff_loop的参数。它还存储了一个解密器,在本例中是WEPDecrypter,您可以使用方法DecrypterProxy::decrypter访问它 相同的元组(bssid,password)被添加到代理类所持有的解密器中。 将创建一个嗅探器,用于解释来自wlan0接口的数据包。
嗅探循环启动。这就是代理发挥魔力的地方。它不会简单地调用我们的处理程序,而是会拦截在这种情况下发送到由所提供的BSSID标识的AP的数据帧,并对内容进行解密。当执行“处理程序”回调时,您知道如果PDU参数是一个应该解密的数据帧,那么它就会解密。来自BSSID的帧(而不是所提供的帧)将保持不变,您仍然可以在同一回调中处理它们。校验和无效的数据包将被丢弃。这在某种程度上解释了几排人所指出的行为。
使用这种设计,当添加新的解密器时,您只需将它们链接在一起,并使用某种程度上的“解密链”。
解密WPA2加密的帧
与libtins v1.1一样,该库支持WPA2(AES和TKIP)加密帧的解密。这是通过WPA2Decrypter类完成的。 WPA2解密比WEP解密更复杂,因为你不能只挑选一个随机数据包并对其进行解密。每个客户端和接入点之间都有一次握手,在握手中交换一些随机数,这些随机数后来在解密过程中需要。 此外,为了创建第一组密钥(PMK),还需要访问点的SSID,因此您也必须提供该SSID。该对象将分析信标帧以寻找该SSID,从而可以使用适当的BSSID来过滤针对该接入点执行的握手。 WPA2解密程序将寻找4路握手。每次检测到一个,都会生成PTK密钥(验证握手中的MIC),从那时起,从/发送到该客户端的每个数据包都将被解密,就像WEPDecryptor所做的那样。 让我们看一个关于如何做到这一点的小示例:
bool handler(PDU &pdu) {
// pdu here is not encrypted!
return true;
}
// ....
// This creates a decrypter proxy class.
auto decrypt_proxy = make_wpa2_decrypter_proxy(&handler);
// Same as in the previous example.
decrypt_proxy.decrypter().add_ap_data("my_secure_psk", "my_access_point_ssid");
// Create a sniffer
Sniffer sniffer("wlan0", Sniffer::PROMISC);
// Sniff and decrypt!
sniffer.sniff_loop(decrypt_proxy);
802.11封装
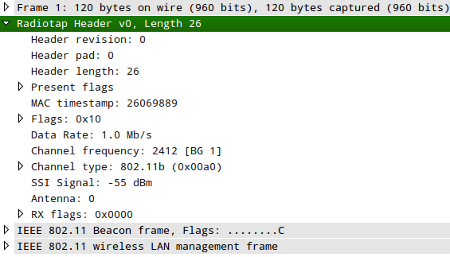
正如您所知,网络接口驱动程序通常使用某种形式的封装,而不是使用原始802.11帧。一种广泛使用的封装形式是RadioTap协议。如果您的驱动程序使用RadioTap,则从中提取的数据包将如下所示:

RadioTap encapsulated 802.11 frame.
RadioTap协议为您提供有关802.11帧的更多信息。您可以检索信号强度、噪声、帧检查序列是否用于提供完整性等信息。 RadioTap类使用了一些有用的默认值,因此您不必提供每个选项,因为大多数时候您都会使用相同的值。例如,这个片段:
#include <tins/tins.h>
using namespace Tins;
int main() {
RadioTap radio = RadioTap() / Dot11Beacon();
PacketWriter writer("/tmp/output.pcap", PacketWriter::RADIOTAP);
writer.write(radio);
}
生成以下数据包:
RadioTap packet generated with libtins, as displayed by wireshark.
请注意,一些驱动程序实际上使用原始802.11帧,而没有任何封装。其他人可能使用AVS或Prism,但不幸的是,libtins还不支持它们。但是,添加它们在TODO列表中,因此它们可能很快就会被包括在内。
Part 7:添加新协议
在本节中,我们将了解如何实现自己的协议并将其与库集成。
扩展PDU类
您应该已经知道,每个协议都必须派生PDU类。因此,如果你想添加新的协议,那么你的类必须这样做。现在,你应该实现哪些成员函数才能使其工作?以下是一个可以用作模板的伪PDU:
/*
* This is a dummy PDU. It behaves very similarly to Tins::RawPDU.
*/
class DummyPDU : public PDU {
public:
/*
* Unique protocol identifier. For user-defined PDUs, you **must**
* use values greater or equal to PDU::USER_DEFINED_PDU;
*/
static const PDU::PDUType pdu_flag;
/*
* Constructor from buffer. This constructor will be called while
* sniffing packets, whenever a PDU of this type is found.
*
* The "data" parameter points to a buffer of length "sz".
*/
DummyPDU(const uint8_t* data, uint32_t sz)
: buffer_(data, data + sz) {
}
/*
* Clones the PDU. This method is used when copying PDUs.
*/
DummyPDU* clone() const {
return new DummyPDU(*this);
}
/*
* Retrieves the size of this PDU.
*/
uint32_t header_size() const {
return buffer_.size();
}
/*
* This method must return pdu_flag.
*/
PDUType pdu_type() const {
return pdu_flag;
}
/*
* Serializes the PDU. The serialization output should be written
* to the buffer pointed to by "data", which is of size "sz". The
* "sz" parameter will be equal to the value returned by
* DummyPDU::header_size.
*
* Note that before libtins 4.0, there would be an extra
* const PDU* parameter after "sz" which would contain the parent
* PDU. On libtins 4.0 this parameter was removed as you can get
* the parent PDU by calling PDU::parent_pdu()
*/
void write_serialization(uint8_t *data, uint32_t sz) {
std::memcpy(data, buffer_.data(), sz);
}
// This is just a getter to retrieve the buffer member.
const std::vector<uint8_t>& get_buffer() const {
return buffer_;
}
private:
std::vector<uint8_t> buffer_;
};
// Let's assign some value to the pdu_flag.
const PDU::PDUType DummyPDU::pdu_flag = PDU::USER_DEFINED_PDU;
注册新协议
好的,我们已经定义了一个新的PDU,但现在我们需要注册它,这样它下面的层就可以在嗅探和序列化时识别它。 注册协议非常简单。让我们想象一下,我们的DummyPDU是一个网络层协议。因此,我们希望EthernetII、Dot3和其他链路层协议能够识别它。为了做到这一点,应该使用以下代码行:
// Allocators::register_allocator is defined in tins/pdu_allocator.h // This registers it for every link layer protocol. Allocators::register_allocator<EthernetII, DummyPDU>(0x8ae); // If we wanted a transport layer which can appear after an // IP or IPv6 PDUs, we'd call: // // Allocators::register_allocator<IP, DummyPDU>(0x12);
您可能想知道上面使用的0x8ae常量是什么。这是链路层PDU将用于识别我们的协议的标识符,就像ARP在EthernetII内部使用0x806常量进行识别一样。
现在我们的PDU已经注册,将发生以下情况:
在嗅探数据包时,如果嗅探的链路层PDU发现网络层协议标识符字段为0x8ae,则它将使用DummyPDU::DummyPDU(const uint8_t*,uint32_t)构造函数从嗅探的字节构造DummyPPDU 在序列化PDU时,我们的常量将用于网络层的协议标识符字段。
请注意,Allocators::register_allocater的第一个模板参数只能是以下类型之一
-
EthernetII
-
SNAP
-
SLL
-
Dot1Q
-
IP
-
IPv6
实例
作为最后一个例子,让我们探查一个包含DummyPDU的数据包。这是我生成的数据包:
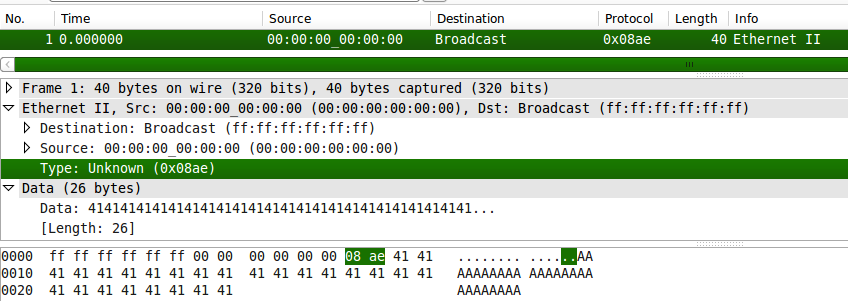
A DummyPDU serialized and inspected using wireshark.
如您所见,网络层协议类型为0x8ae。现在,让我们探查数据包并显示有效载荷!
#include <iostream>
#include <tins/tins.h>
#include "dummy_pdu.h";
using namespace Tins;
int main() {
Allocators::register_allocator<EthernetII, DummyPDU>(0x8ae);
FileSniffer sniffer("/tmp/dummy.pcap");
Packet pkt = sniffer.next_packet();
if (!pkt) {
std::cout << "Oops, didn't sniff anything.\n";
}
else {
const DummyPDU& dummy = pkt.pdu()->rfind_pdu<DummyPDU>();
// Convert the contents of the DummyPDU to a std::string
std::string payload(dummy.get_buffer().begin(), dummy.get_buffer().end());
std::cout << "Payload: " << payload << std::endl;
}
}
执行完这个例子后,我得到的输出是:
matias@master:/tmp$ ./dummy_test
Payload: AAAAAAAAAAAAAAAAAAAAAAAAAA


 1531
1531

 被折叠的 条评论
为什么被折叠?
被折叠的 条评论
为什么被折叠?
 到【灌水乐园】发言


