


Android的三种网络通讯方式
1.标准Java接口
java.net.*提供与联网有关的类,包括流、数据包套接字(socket)、Internet协议、常见Http处理等。比如:创建URL,以及URLConnection/HttpURLConnection对象、设置链接参数、链接到服务器、向服务器写数据、从服务器读取数据等通信。这些在Java网络编程中均有涉及,我们看一个简单的socket编程,实现服务器回发客户端信息。
下面用个例子来说明:
A、客户端:
新建Android项目工程:SocketForAndroid(这个随意起名字了吧,我是以这个建立的!)
下面是main_activity.xml的代码:
|
1
2
3
4
5
6
7
8
9
10
11
12
13
14
15
16
17
18
19
20
21
22
23
|
<?
xml
version
=
"1.0"
encoding
=
"utf-8"
?>
<
LinearLayout
xmlns:android
=
"http://schemas.android.com/apk/res/android"
android:layout_width
=
"fill_parent"
android:layout_height
=
"fill_parent"
android:orientation
=
"vertical"
>
<
TextView
android:layout_width
=
"fill_parent"
android:layout_height
=
"wrap_content"
android:text
=
"@string/hello"
/>
<
EditText
android:id
=
"@+id/message"
android:layout_width
=
"match_parent"
android:layout_height
=
"wrap_content"
android:hint
=
"@string/hint"
/>
<
Button
android:id
=
"@+id/send"
android:layout_width
=
"fill_parent"
android:layout_height
=
"wrap_content"
android:text
=
"@string/send"
/>
</
LinearLayout
>
|
MainActivity.java的代码入下:
|
1
2
3
4
5
6
7
8
9
10
11
12
13
14
15
16
17
18
19
20
21
22
23
24
25
26
27
28
29
30
31
32
33
34
35
36
37
38
39
40
41
42
43
44
45
46
47
48
49
50
51
52
53
54
55
56
57
58
59
60
61
62
63
64
65
66
67
68
69
70
71
72
73
74
75
76
77
78
79
80
|
package
com.yaowen.socketforandroid;
import
android.os.Bundle;
import
android.support.v7.app.AppCompatActivity;
import
android.view.View;
import
android.widget.Button;
import
android.widget.EditText;
import
java.io.BufferedReader;
import
java.io.BufferedWriter;
import
java.io.IOException;
import
java.io.InputStreamReader;
import
java.io.OutputStreamWriter;
import
java.io.PrintWriter;
import
java.net.Socket;
public
class
MainActivity
extends
AppCompatActivity {
private
EditText message;
private
Button send;
@Override
protected
void
onCreate(Bundle savedInstanceState) {
super
.onCreate(savedInstanceState);
setContentView(R.layout.activity_main);
//初始化两个UI控件
message = (EditText) findViewById(R.id.message);
send = (Button) findViewById(R.id.send);
//设置发送按钮的点击事件响应
send.setOnClickListener(
new
View.OnClickListener() {
@Override
public
void
onClick(View v) {
Socket socket =
null
;
//获取message输入框里的输入的内容
String msg = message.getText().toString() +
"\r\n"
;
try
{
//这里必须是192.168.3.200,不可以是localhost或者127.0.0.1
socket =
new
Socket(
"192.168.3.200"
,
18888
);
PrintWriter out =
new
PrintWriter(
new
BufferedWriter(
new
OutputStreamWriter(
socket.getOutputStream()
)
),
true
);
//发送消息
out.println(msg);
//接收数据
BufferedReader in =
new
BufferedReader(
new
InputStreamReader(
socket.getInputStream()
)
);
//读取接收的数据
String msg_in = in.readLine();
if
(
null
!= msg_in) {
message.setText(msg_in);
System.out.println(msg_in);
}
else
{
message.setText(
"接收的数据有误!"
);
}
//关闭各种流
out.close();
in.close();
}
catch
(IOException e) {
e.printStackTrace();
}
finally
{
try
{
if
(
null
!= socket) {
//socket不为空时,最后记得要把socket关闭
socket.close();
}
}
catch
(IOException e) {
e.printStackTrace();
}
}
}
});
}
}
|
最后别忘记添加访问网络权限:
<uses-permission android:name="android.permission.INTERNET" />
B、服务端:
|
1
2
3
4
5
6
7
8
9
10
11
12
13
14
15
16
17
18
19
20
21
22
23
24
25
26
27
28
29
30
31
32
33
34
35
36
37
38
39
40
41
42
43
44
45
46
47
48
49
50
51
|
package
service;
import
java.io.BufferedReader;
import
java.io.BufferedWriter;
import
java.io.IOException;
import
java.io.InputStreamReader;
import
java.io.OutputStreamWriter;
import
java.io.PrintWriter;
import
java.net.ServerSocket;
import
java.net.Socket;
public
class
ServerAndroid
implements
Runnable {
@Override
public
void
run() {
Socket socket =
null
;
try
{
ServerSocket server =
new
ServerSocket(
18888
);
// 循环监听客户端链接请求
while
(
true
) {
System.out.println(
"start..."
);
// 接收请求
socket = server.accept();
System.out.println(
"accept..."
);
// 接收客户端消息
BufferedReader in =
new
BufferedReader(
new
InputStreamReader(socket.getInputStream()));
String message = in.readLine();
System.out.println(message);
// 发送消息,向客户端
PrintWriter out =
new
PrintWriter(
new
BufferedWriter(
new
OutputStreamWriter(socket.getOutputStream())),
true
);
out.println(
"Server:"
+ message);
// 关闭流
in.close();
out.close();
}
}
catch
(IOException e) {
e.printStackTrace();
}
finally
{
if
(
null
!= socket) {
try
{
socket.close();
}
catch
(IOException e) {
e.printStackTrace();
}
}
}
}
// 启动服务器
public
static
void
main(String[] args) {
Thread server =
new
Thread(
new
ServerAndroid());
server.start();
}
}
|
C、启动服务器,控制台会打印出“start...”字符串!
D、运行Android项目文件,如下图:

在输入框里输入如下字符串,点发送按钮:

服务器收到客户端发来的消息并打印到控制台:

2、Apache接口
对于大部分应用程序而言JDK本身提供的网络功能已远远不够,这时就需要Android提供的Apache HttpClient了。它是一个开源项目,功能更加完善,为客户端的Http编程提供高效、最新、功能丰富的工具包支持。
下面我们以一个简单例子来看看如何使用HttpClient在Android客户端访问Web。
首先,要在你的机器上搭建一个web应用test,有两个很简单的PHP文件:hello_get.php和hello_post.php!
内容如下:
hello_get.php的代码如下:
|
1
2
3
4
5
6
|
<html>
<body>
Welcome <?php
echo
$_GET
[
"name"
]; ?><br>
You connected this page on : <?php
echo
$_GET
[
"get"
]; ?>
</body>
</html>
|
hello_post.php的代码如下:
|
1
2
3
4
5
6
|
<html>
<body>
Welcome <?php
echo
$_POST
[
"name"
]; ?><br>
You connected this page on : <?php
echo
$_POST
[
"post"
]; ?>
</body>
</html>
|
在原来的Android项目里新建一个Apache活动类:Apache.java,代码如下:
|
1
2
3
4
5
6
7
8
9
10
11
12
13
14
15
16
17
18
19
20
21
22
23
24
25
26
27
28
29
30
31
32
33
34
35
36
37
38
39
40
41
42
43
44
45
46
47
48
49
50
51
52
53
54
55
56
57
58
59
60
61
62
63
64
65
66
67
68
69
70
71
72
73
74
75
76
77
78
79
80
81
82
83
84
85
86
87
88
89
90
91
92
93
94
95
96
97
98
99
100
101
102
103
104
105
106
107
108
109
110
111
112
113
114
115
116
117
118
119
120
121
122
123
124
125
126
127
128
129
130
131
132
133
134
135
136
137
138
139
140
141
142
143
144
145
146
147
148
149
150
151
152
153
154
155
156
157
158
159
160
161
162
163
164
165
166
167
168
169
170
171
|
package
com.yaowen.socketforandroid;
import
android.os.Bundle;
import
android.support.v7.app.AppCompatActivity;
import
android.view.View;
import
android.widget.Button;
import
android.widget.TextView;
import
org.apache.http.HttpEntity;
import
org.apache.http.HttpResponse;
import
org.apache.http.NameValuePair;
import
org.apache.http.client.ClientProtocolException;
import
org.apache.http.client.HttpClient;
import
org.apache.http.client.entity.UrlEncodedFormEntity;
import
org.apache.http.client.methods.HttpGet;
import
org.apache.http.client.methods.HttpPost;
import
org.apache.http.impl.client.DefaultHttpClient;
import
org.apache.http.message.BasicNameValuePair;
import
java.io.BufferedReader;
import
java.io.IOException;
import
java.io.InputStreamReader;
import
java.io.UnsupportedEncodingException;
import
java.util.ArrayList;
import
java.util.List;
/**
* Created by YAOWEN on 2015/11/10.
*/
public
class
ApacheActivity
extends
AppCompatActivity
implements
View.OnClickListener {
private
TextView textView;
private
Button get1, post1;
@Override
protected
void
onCreate(Bundle savedInstanceState) {
super
.onCreate(savedInstanceState);
setContentView(R.layout.apache);
textView = (TextView) findViewById(R.id.textView);
get1 = (Button) findViewById(R.id.get);
post1 = (Button) findViewById(R.id.post);
get1.setOnClickListener(
this
);
post1.setOnClickListener(
this
);
}
@Override
public
void
onClick(View v) {
if
(v.getId() == R.id.get) {
//注意:此处ip不能用127.0.0.1或localhost,Android模拟器已将它自己作为了localhost
String url =
"http://192.168.3.200/test/hello_get.php?name=yaowen&get=GET"
;
textView.setText(get(url));
}
if
(v.getId() == R.id.post) {
String url=
"http://192.168.3.200/test/hello_post.php"
;
textView.setText(post(url));
}
}
/**
* 以post方式发送请求,访问web
*
* @param url web地址
* @return 响应数据
*/
private
String post(String url) {
BufferedReader reader =
null
;
StringBuffer sb =
null
;
String result =
""
;
HttpClient client =
new
DefaultHttpClient();
HttpPost requset =
new
HttpPost(url);
//保存要传递的参数
List<NameValuePair> params =
new
ArrayList<NameValuePair>();
//添加参数
params.add(
new
BasicNameValuePair(
"name"
,
"yaowen"
));
params.add(
new
BasicNameValuePair(
"post"
,
"POST"
));
try
{
HttpEntity entity =
new
UrlEncodedFormEntity(params,
"utf-8"
);
requset.setEntity(entity);
HttpResponse response = client.execute(requset);
if
(response.getStatusLine().getStatusCode() ==
200
) {
System.out.println(
"post success"
);
reader =
new
BufferedReader(
new
InputStreamReader(response.getEntity().getContent()));
sb =
new
StringBuffer();
String line =
""
;
String NL = System.getProperty(
"line.separator"
);
while
((line = reader.readLine()) !=
null
) {
sb.append(line);
}
}
}
catch
(UnsupportedEncodingException e) {
e.printStackTrace();
}
catch
(ClientProtocolException e) {
e.printStackTrace();
}
catch
(IOException e) {
e.printStackTrace();
}
finally
{
if
(
null
!= reader) {
try
{
reader.close();
}
catch
(IOException e) {
e.printStackTrace();
}
}
if
(
null
!= sb) {
result = sb.toString();
}
}
return
result;
}
/**
* 以get方式发送请求,访问web
*
* @param url web地址
* @return 响应数据
*/
private
static
String get(String url) {
BufferedReader bufferedReader =
null
;
StringBuffer sb =
null
;
String result =
""
;
HttpClient client =
new
DefaultHttpClient();
HttpGet request =
new
HttpGet(url);
//发送请求,得到响应
try
{
HttpResponse response = client.execute(request);
//请求成功
if
(response.getStatusLine().getStatusCode() ==
200
) {
bufferedReader =
new
BufferedReader(
new
InputStreamReader(
response.getEntity()
.getContent()
)
);
sb =
new
StringBuffer();
String line =
""
;
String NL = System.getProperty(
"line.separator"
);
while
((line = bufferedReader.readLine()) !=
null
) {
sb.append(line);
}
}
}
catch
(IOException e) {
e.printStackTrace();
}
finally
{
if
(
null
!= bufferedReader) {
try
{
bufferedReader.close();
//bufferedReader=null;
}
catch
(IOException e) {
e.printStackTrace();
}
}
if
(
null
!= sb) {
result = sb.toString();
}
}
return
result;
}
}
|
新建一个apache.XML文件,如下:
|
1
2
3
4
5
6
7
8
9
10
11
12
13
14
15
16
17
18
19
20
21
22
23
24
25
|
<?
xml
version
=
"1.0"
encoding
=
"utf-8"
?>
<
LinearLayout
xmlns:android
=
"http://schemas.android.com/apk/res/android"
android:layout_width
=
"fill_parent"
android:layout_height
=
"fill_parent"
android:orientation
=
"vertical"
>
<
TextView
android:id
=
"@+id/textView"
android:layout_width
=
"fill_parent"
android:layout_height
=
"wrap_content"
android:gravity
=
"center"
android:text
=
"通过按钮选择不同方式访问网页"
/>
<
Button
android:id
=
"@+id/get"
android:layout_width
=
"match_parent"
android:layout_height
=
"wrap_content"
android:text
=
"get"
/>
<
Button
android:id
=
"@+id/post"
android:layout_width
=
"match_parent"
android:layout_height
=
"wrap_content"
android:text
=
"post"
/>
</
LinearLayout
>
|
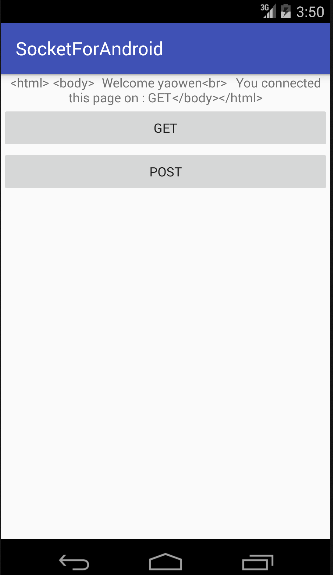
结果运行如下:

3.android.net编程:
常常使用此包下的类进行Android特有的网络编程,如:访问WiFi,访问Android联网信息,邮件等功能。
这里就不详细做例子了,因为这个接触比较多~~~。


 2438
2438

 被折叠的 条评论
为什么被折叠?
被折叠的 条评论
为什么被折叠?
 到【灌水乐园】发言


