


文章目录
引入
Glide是一个快速高效的Android图片加载库
专门用来帮助开发者从网络、文件系统或应用资源中加载图片,并显示在
ImageView或其他 UI 组件上。它具备高效的缓存机制和解码能力,能够处理图片、GIF、视频缩略图等多种媒体文件。
优点
- 高效的图片加载和缓存:Glide 会自动处理图片的内存和硬盘缓存,减少内存消耗,优化性能。
- GIF 和视频帧加载支持:除了常规图片,Glide 还能加载 GIF 动画和视频缩略图,这让它在处理多媒体内容时非常灵活。
- 动态调整图片大小:Glide 可以根据 ImageView 的大小自动调整图片尺寸,避免加载过大或过小的图片,从而减少内存占用。
- 高度可配置:Glide 提供了丰富的 API,允许开发者自定义加载行为,比如设置占位符、错误图标、图片变换等。
- 与 RecyclerView、ListView 集成良好:Glide 可以高效地加载和显示大批量图片,特别是在使用 RecyclerView 或 ListView 时,滑动时的图片加载更加顺畅。
- 后台线程自动处理:Glide 会自动将图片加载任务放在后台线程中执行,避免在主线程中进行 I/O 操作,提升应用响应速度。
- 灵活的网络栈集成:Glide 默认使用的是基于
HttpUrlConnection的网络请求栈,但它的设计允许开发者轻松替换成其他网络库,比如 Google 的 Volley 或 Square 的 OkHttp。
使用步骤
导入依赖
    implementation 'com.github.bumptech.glide:glide:4.11.0'
    annotationProcessor 'com.github.bumptech.glide:compiler:4.11.0'
权限
<!--    如果需要从 URL 或一个网络连接中加载数据-->
    <uses-permission android:name="android.permission.INTERNET" />
<!--    如果需要从本地文件夹或 DCIM 或图库中加载图片-->
    <uses-permission android:name="android.permission.READ_EXTERNAL_STORAGE" />
使用
- 使用 Glide 加载本地图片并将其显示到 ImageView 中
public class MainActivity extends AppCompatActivity {
@Override
protected void onCreate(Bundle savedInstanceState) {
super.onCreate(savedInstanceState);
setContentView(R.layout.activity_main);
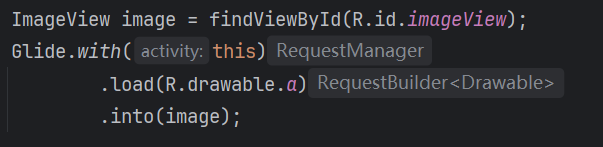
ImageView image = findViewById(R.id.imageView);
Glide.with(this)
.load(R.drawable.a)
.into(image);
}
}
- 加载网络图片
Glide.with(this).load("https://i0.hdslb.com/bfs/archive/d04368506b906a0d4ac62217e93467cdaa29af90.jpg").into(image);
- 加载本地文件
File file = new File("/storage/emulated/0/Download/example.jpg");
Glide.with(this).load(file).into(image);

Glide.with(this):- 这是 Glide 的入口,用于获取一个
RequestManager实例,它负责后续的图片加载请求。 - 参数
this通常是当前的Activity或Fragment,表示 Glide 的生命周期将与该Activity或Fragment绑定。这样可以确保在Activity或Fragment销毁时,Glide 也会自动取消图片请求,避免内存泄漏。
- 这是 Glide 的入口,用于获取一个
load(R.drawable.dp):- 这里的
load()方法用来指定要加载的图片资源,获取到一个RequestManager实例,通过RequestManager,Glide 可以自动管理图片的内存缓存和磁盘缓存,避免重复加载和浪费资源。RequestManager提供了各种链式调用方法来配置加载选项,比如占位符、错误图片、缩放类型等。 - 该方法也可以接收其他类型的参数,比如图片的 URL、文件路径、Bitmap 对象等。
- 这里的
into(image):into()方法指定目标ImageView,即将图片加载到哪个控件上。
其他用法
- 占位符:设置图片加载前的占位图片。
- 错误图片:设置图片加载失败时显示的图片。
- 裁剪模式:指定图片如何适应
ImageView的大小(例如:居中裁剪、适应宽高等)。 - 缓存策略:指定图片的内存缓存和磁盘缓存策略。
- 圆角/圆形图片:对图片进行圆角处理或转换为圆形。
占位符
占位符是当请求正在执行时被展示的 Drawable 。
当请求成功完成时,占位符会被请求到的资源替换。
如果被请求的资源是从内存中加载出来的,那么占位符可能根本不会被显示。
如果请求失败并且没有设置
error Drawable,则占位符将被持续展示。如果请求的url/model为
null,并且error Drawable和fallback都没有设置,那么占位符也会继续显示。
错误图片
error Drawable在请求永久性失败时展示。
error Drawable在请求的url/model为null,且并没有设置fallback Drawable时展示。
Glide.with(this)
        .load("https://i1.hdslb.com/bfs/archive/bea5b65f3328a6027ca6ab173c3e3ccaa98f5d21.jpg")
        .placeholder(R.drawable.img_loading) // 占位图
        .error(R.drawable.img_error) // 错误显示图片
        .into(image);
- 占位符是在主线程从Android Resources加载的
后备回调符
fallback Drawable 在请求的url/model为 null 时展示。目的是允许用户指示 null 是否为可接受的正常情况。
例如,一个用户的个人资料 URL 为 null,这可能意味着用户没有设置头像。在这种情况下,应该使用默认头像。
默认情况下Glide将 null 作为错误处理,所以可以接受 null 的应用应当显式地设置一个 fallback Drawable 。
Glide.with(fragment)
  .load(url)
  .fallback(R.drawable.fallback)
  .into(view);
圆角
Glide.with(this)
                .load("https://i0.hdslb.com/bfs/archive/d04368506b906a0d4ac62217e93467cdaa29af90.jpg")
                .placeholder(R.drawable.img_loading)
                .error(R.drawable.img_error)
                .transform(new CircleCrop())// 裁剪为圆形
                .into(image);
Glide.with(this)
                .load("https://i0.hdslb.com/bfs/archive/d04368506b906a0d4ac62217e93467cdaa29af90.jpg")
                .placeholder(R.drawable.img_loading)
                .error(R.drawable.img_error)
                .transform(new RoundedCorners(200)) //圆角
                .into(image);
过渡动画
TransitionOptions用于决定你的加载完成时会发生什么
可以应用以下变换:
- View淡入
- 与占位符交叉淡入
- 或者什么都不发生
与占位符交叉淡入效果:
Glide.with(context)
     .load(imageUrl)
     .transition(DrawableTransitionOptions.withCrossFade()) // 使用淡入淡出效果
     .into(imageView);
自定义过渡动画:
如果需要自定义过渡动画,可以使用 TransitionOptions 类和 Glide 的 RequestOptions 结合使用。可以通过 TransitionDrawable 或其他动画效果进行实现。
Glide.with(context)
     .load(imageUrl)
     .transition(GenericTransitionOptions.with(R.anim.zoom_in)) // 使用自定义动画
     .into(imageView);
大小调整
override()
override(width, height) 方法可以让你明确指定加载图片的宽度和高度,强制 Glide 调整图片大小。
Glide.with(context)
     .load(imageUrl)
     .override(300, 200) // 将图片调整为 300x200 像素
     .into(imageView);
fitCenter()
fitCenter() 方法会将图片等比例缩放到 ImageView 中,确保整个图片都能显示出来,而不裁剪图片。
Glide.with(context)
     .load(imageUrl)
     .fitCenter() // 等比例缩放,确保整个图片适应 ImageView
     .into(imageView);
centerCrop()
centerCrop() 方法会将图片等比例缩放并裁剪,确保填满整个 ImageView。如果图片的比例与 ImageView 不符,图片的边缘会被裁剪掉。
Glide.with(context)
     .load(imageUrl)
     .centerCrop() // 裁剪并填充 ImageView
     .into(imageView);
scale()
如果需要手动控制缩放因子,可以使用 scale() 方法来实现。这个方法允许你通过传入缩放因子来调整图片。
Glide.with(context)
     .load(imageUrl)
     .scale(0.5f) // 将图片缩放至原始大小的 50%
     .into(imageView);
gif
- 加载 GIF
如果你想强制将 GIF 作为动画加载,可以使用 asGif() 方法:
Glide.with(this)
    .load("https://pa1.narvii.com/7938/29d490319494e7cc1b4713464a64ce8b35a22099r1-498-446_hq.gif")
    .into(image);
- 将 GIF 当作 Bitmap 显示
Glide.with(this)
    .asBitmap()
    .load(gifUrl)
    .into(image);
- 显示本地视频缩略图
要从本地视频文件中加载缩略图,你可以使用以下代码:
String filePath = "/storage/emulated/0/Pictures/targetVideo.mp4";

GlideApp
    .with(context)
    .asBitmap()  // 加载为 Bitmap
    .load(Uri.fromFile(new File(filePath)))  // 指向本地视频文件的 URI
    .into(imageViewGifAsBitmap);  // 目标 ImageView
缩略图
在加载主图像时同时加载其低分辨率的缩略图。提升用户体验,减少用户等待加载主图像时看到空白或加载指示器的时间。
thumbnail()允许你为主请求指定一个缩略图请求,这样在主图像加载期间会先展示缩略图,提升用户体验
- 加载远程图像和缩略图
Glide.with(fragment)
  .load(url)  // 主图像的 URL
  .thumbnail(Glide.with(fragment)
    .load(thumbnailUrl))  // 缩略图的 URL
  .into(imageView);
- 注意:确保
thumbnailUrl指向的图片分辨率低于主 URL 指向的图片。
- 加载本地图像和缩略图
int thumbnailSize = 100; // 指定缩略图的大小

Glide.with(fragment)
  .load(localUri)  // 主图像的本地 URI
  .thumbnail(Glide.with(fragment)
    .load(localUri)  // 再次加载相同的本地图像
    .override(thumbnailSize))  // 强制设置缩略图的尺寸
  .into(imageView);
使用RequestOptions
- 想让你的应用的不同部分之间共享相同的加载选项,你也可以初始化一个新的
RequestOptions对象,并在每次加载时通过apply()方法传入这个对象:
RequestOptions是一个类,用来配置图片加载请求的各种选项。通过它可以更加灵活地定制图片加载过程,包括设置占位符、错误图片、图片缩放方式、裁剪模式、缓存策略等。
RequestOptions requestOptions = new RequestOptions()
        .placeholder(R.drawable.img_loading) // 占位图
        .error(R.drawable.img_error) // 错误显示图片

ImageView image = findViewById(R.id.imageView);
Glide.with(this)
        .load("https://i1.hdslb.com/bfs/archive/bea5b65f3328a6027ca6ab173c3e3ccaa98f5d21.jpg")
        .apply(requestOptions)
        .into(image);
apply()方法可以被调用多次,因此RequestOption可以被组合使用。如果RequestOptions对象之间存在相互冲突的设置,那么只有最后一个被应用的RequestOptions会生效。
缓存机制
Glide 的缓存主要分为两个层次:
-
内存缓存:
- 内存缓存用于快速加载已经加载过的图像,避免重复下载。这可以显著提高图像的显示速度。
- 默认情况下,Glide 会在内存中缓存加载的图像
-
磁盘缓存:
- 磁盘缓存用于存储较大的图像资源,Glide 会将图像下载到设备的存储中。
- 磁盘缓存的好处是即使在应用重启或用户下次打开应用时,已经缓存的图像仍然可用,减少了不必要的网络请求。
默认会使用内存和硬盘缓存
设置缓存策略
你可以使用 Glide 提供的缓存策略来控制缓存行为:
-
跳过内存缓存:
禁用内存缓存,使用skipMemoryCache(true):Glide.with(context) .load(imageUrl) .skipMemoryCache(true) // 跳过内存缓存 .into(imageView); -
自定义磁盘缓存策略:
Glide.with(context)
    .load(imageUrl)
    .diskCacheStrategy(DiskCacheStrategy.ALL)  // 缓存所有版本的图像
    .into(imageView);
磁盘缓存策略选项
- DiskCacheStrategy.NONE:不使用磁盘缓存
- DiskCacheStrategy.SOURCE:只缓存原始数据(未转换的图像)
- DiskCacheStrategy.RESULT:只缓存转换后的结果(例如,缩略图)
- DiskCacheStrategy.ALL:缓存所有版本的图像(原始数据和转换后的结果)
- DiskCacheStrategy.AUTOMATIC (远程数据:存储原始数据;本地数据:存储变换过的缩略图)
清理缓存
如果需要清理 Glide 的缓存,可以在适当的地方调用如下方法:
-
清理内存缓存:
Glide.get(context).clearMemory(); -
清理磁盘缓存:
new Thread(new Runnable() {
    @Override
    public void run() {
        Glide.get(context).clearDiskCache();
    }
}).start();
使用集成库
OkHttp
添加一个对 OkHttp 集成库的依赖:
compile "com.github.bumptech.glide:okhttp3-integration:4.11.0"
添加 OkHttp 集成库的 Gradle 依赖将使 Glide 自动开始使用 OkHttp 来加载所有来自 http 和 https URL 的图片。
Volley
compile "com.github.bumptech.glide:volley-integration:4.11.0"
添加 Volley 集成库的 Gradle 依赖将使 Glide 自动开始使用 Volley 来加载所有来自 http 和 https URL 的图片。
with源码解析
// with的重载的五个方法
RequestManager with(Context context)
RequestManager with(android.app.Activity)
RequestManager with(android.app.Fragment)
RequestManager with(android.support.v4.app.Fragment)
RequestManager with(android.support.v4.app.FragmentActivity)
// grdle.java

public static RequestManager with(@NonNull FragmentActivity activity) {
    return getRetriever(activity).get(activity);
  }
RequestManager 主要两个作用:
- 创建 RequestBuilder ;
- 通过生命周期管理请求的启动结束等。
getRetriever
getRetriever 方法通过传入 Context 获取 RequestManagerRetriever 的实例,然后通过该实例的 get 方法,最终返回一个 RequestManager 的实例。
RequestManagerRetriever是 Glide 用于管理和分发RequestManager实例的一个工具类
  private static RequestManagerRetriever getRetriever(@Nullable Context context) {
    //...
        return Glide.get(context).getRequestManagerRetriever();
    }
调用 Glide.get(context).getRequestManagerRetriever():通过 Glide.get(context) 获取 Glide 的实例,然后调用 getRequestManagerRetriever() 方法获取 RequestManagerRetriever。
Glide.get
  public static Glide get(@NonNull Context context) {
    // 双层检测单例
    if (glide == null) {
      GeneratedAppGlideModule annotationGeneratedModule =
          getAnnotationGeneratedGlideModules(context.getApplicationContext());
      synchronized (Glide.class) {
        if (glide == null) {
          checkAndInitializeGlide(context, annotationGeneratedModule);
        }
      }
    }
返回 glide 实例:如果 Glide 已经被初始化,直接返回这个全局的 Glide 单例。
没有的话调用checkAndInitializeGlide方法,该方法最后会进入到下面方法:
initializeGlide
用于初始化Glide的单例
 @GuardedBy("Glide.class")
 private static void initializeGlide(
      @NonNull Context context, @Nullable GeneratedAppGlideModule generatedAppGlideModule) {
    initializeGlide(context, new GlideBuilder(), generatedAppGlideModule);
  }
private static void initializeGlide(
    @NonNull Context context,
    @NonNull GlideBuilder builder,
    @Nullable GeneratedAppGlideModule annotationGeneratedModule) {

    // 1. 获取应用的 ApplicationContext,确保在应用级别构建 Glide 实例,这样 Glide 可以全局使用
    Context applicationContext = context.getApplicationContext();

    // 2. 创建一个空的 GlideModule 列表。如果传入的 GeneratedAppGlideModuleImpl(注解生成的 GlideModule 实现类)为空
    // 或者允许从 AndroidManifest 中解析 GlideModule 则解析 Manifest 文件获取 GlideModule 实例列表
    List<GlideModule> manifestModules = Collections.emptyList();
    if (annotationGeneratedModule == null || annotationGeneratedModule.isManifestParsingEnabled()) {
        manifestModules = new ManifestParser(applicationContext).parse();
    }

    // 3. 如果传入的 GeneratedAppGlideModuleImpl 不为空且有需要排除的 GlideModule,则从解析出的 ManifestModule 列表中排除掉
    if (annotationGeneratedModule != null
        && !annotationGeneratedModule.getExcludedModuleClasses().isEmpty()) {
        Set<Class<?>> excludedModuleClasses = annotationGeneratedModule.getExcludedModuleClasses();
        Iterator<GlideModule> iterator = manifestModules.iterator();
        while (iterator.hasNext()) {
            GlideModule current = iterator.next();
            // 如果当前的 GlideModule 在排除列表中,则从 manifestModules 列表中移除
            if (!excludedModuleClasses.contains(current.getClass())) {
                continue;
            }
            if (Log.isLoggable(TAG, Log.DEBUG)) {
                Log.d(TAG, "AppGlideModule excludes manifest GlideModule: " + current);
            }
            iterator.remove();
        }
    }

    // 4. 如果是调试模式,打印出从 AndroidManifest 中发现的所有 GlideModule 实例
    if (Log.isLoggable(TAG, Log.DEBUG)) {
        for (GlideModule glideModule : manifestModules) {
            Log.d(TAG, "Discovered GlideModule from manifest: " + glideModule.getClass());
        }
    }

    // 5. 从注解生成的 GeneratedAppGlideModuleImpl 中获取 RequestManagerRetriever.RequestManagerFactory 工厂
    // 用于创建 RequestManagerRetriever,这个工厂用于管理 Glide 图片加载的生命周期
    RequestManagerRetriever.RequestManagerFactory factory =
        annotationGeneratedModule != null
            ? annotationGeneratedModule.getRequestManagerFactory()
            : null;

    // 6. 将工厂设置到 GlideBuilder 中,方便后续构建 Glide 时使用
    builder.setRequestManagerFactory(factory);

    // 7. 遍历 manifestModules 中的每一个 GlideModule,调用其 applyOptions 方法
    // 让这些模块可以自定义 Glide 的配置选项
    for (GlideModule module : manifestModules) {
        module.applyOptions(applicationContext, builder);
    }

    // 8. 如果传入的 GeneratedAppGlideModuleImpl 不为空,调用其 applyOptions 方法
    // 让注解生成的 GlideModule 实现类也可以自定义 Glide 的配置选项
    if (annotationGeneratedModule != null) {
        annotationGeneratedModule.applyOptions(applicationContext, builder);
    }

    // 9. 最终通过 GlideBuilder 使用构造者模式创建 Glide 实例,传递 applicationContext、解析出的 GlideModule 列表
    // 以及注解生成的 GlideModule 实现类
    Glide glide = builder.build(applicationContext, manifestModules, annotationGeneratedModule);

    // 10. 将创建的 Glide 实例注册到 ApplicationContext 中,以便管理应用的生命周期回调
    applicationContext.registerComponentCallbacks(glide);

    // 11. 将构建出来的 Glide 实例赋值给 Glide 类的静态变量,这样全局都可以通过 Glide.get() 方法获取这个实例
    Glide.glide = glide;
}
getRequestManagerRetriever
调用 Glide 的 getRequestManagerRetriver()就能拿到 RequestManagerRetriver对象
public RequestManagerRetriever getRequestManagerRetriever() {
  return requestManagerRetriever;
}
RequestManagerRetriever#get
拿到 RequestManagerRetriver对象后回到with方法中的调用get方法,获取 RequestManager 对象
get方法也要很多重载方法
@NonNull
public RequestManager get(@NonNull Context context) {
    // 检查传入的 context 是否为 null,如果为 null 则抛出异常
    if (context == null) {
        throw new IllegalArgumentException("You cannot start a load on a null Context");
    }
    // 检查是在主线程并且context不是Application类型
    else if (Util.isOnMainThread() && !(context instanceof Application)) {
        if (context instanceof FragmentActivity) {
            return get((FragmentActivity) context);
        }
        else if (context instanceof Activity) {
            return get((Activity) context);
        }
        else if (context instanceof ContextWrapper
            && ((ContextWrapper) context).getBaseContext().getApplicationContext() != null) {
            return get(((ContextWrapper) context).getBaseContext());
        }
    }
    // 子线程或context为application时
    return getApplicationManager(context);
}
以进入FragmentActivity为例
 @NonNull
  public RequestManager get(@NonNull FragmentActivity activity) {
    // 判断当前是否为后台线程
    if (Util.isOnBackgroundThread()) {
      return get(activity.getApplicationContext());
    } else {
      assertNotDestroyed(activity);
       // Glide 与 Fragment 的生命周期绑定
      FragmentManager fm = activity.getSupportFragmentManager();
      return supportFragmentGet(activity, fm, /*parentHint=*/ null, isActivityVisible(activity));
    }
  }
后台线程:
避免与特定活动的生命周期绑定,使用全局上下文来获取RequestManager,这样可以不受单个活动生命周期的影响。
主线程:
通过 FragmentManager 添加一个 RequestManagerFragment(隐藏的 Fragment)来管理图片加载请求的生命周期。例如,当 FragmentActivity 销毁时,RequestManagerFragment 能够取消所有未完成的图片加载请求,避免资源浪费
private RequestManager supportFragmentGet(
    @NonNull Context context,
    @NonNull FragmentManager fm,
    @Nullable Fragment parentHint,
    boolean isParentVisible) {

  // 获取当前 Activity 或 Fragment 关联的 SupportRequestManagerFragment
  // 这就是隐藏的空白Fragment,用于管理 Glide 的 RequestManager 和生命周期
  SupportRequestManagerFragment current =
      getSupportRequestManagerFragment(fm, parentHint, isParentVisible);

  // 检查是否已经存在一个与当前 Activity 或 Fragment 绑定的 RequestManager
  RequestManager requestManager = current.getRequestManager();

  // 空白Fragment负责保存并复用RequestManager实例。,如果存在则直接复用,而不需要重新创建。
  if (requestManager == null) {
    // 获取全局 Glide 实例
    Glide glide = Glide.get(context);

    // 使用 RequestManagerFactory 创建一个新的 RequestManager
    // factory.build() 需要传入 Glide 实例、生命周期管理器、请求管理树节点和上下文
    requestManager =
        factory.build(
            glide, current.getGlideLifecycle(), current.getRequestManagerTreeNode(), context);

    // 将创建的 RequestManager 绑定到当前的 SupportRequestManagerFragment 中,以便后续复用
    current.setRequestManager(requestManager);
  }

  // 返回这个 RequestManager,供 Glide 加载图片时使用
  return requestManager;
}
空白 Fragment 是一个不可见的 Fragment,它的任务是监听并响应宿主 Activity 或 Fragment 的生命周期变化。当宿主 Activity 或 Fragment 发生生命周期变化时,系统会自动调用 SupportRequestManagerFragment 的回调方法
SupportRequestManagerFragment 持有一个 ActivityFragmentLifecycle 实例,该类负责跟踪生命周期的变化,并且能够通知所有的生命周期监听器。
具体生命周期的监听流程:
-
当宿主
Activity或Fragment的生命周期发生变化时,空白的Fragment(SupportRequestManagerFragment)的相应生命周期回调方法会被自动触发。 -
空白
Fragment生命周期方法会调用其内部的ActivityFragmentLifecycle对象的对应方法(如onStart()、onStop()、onDestroy())。
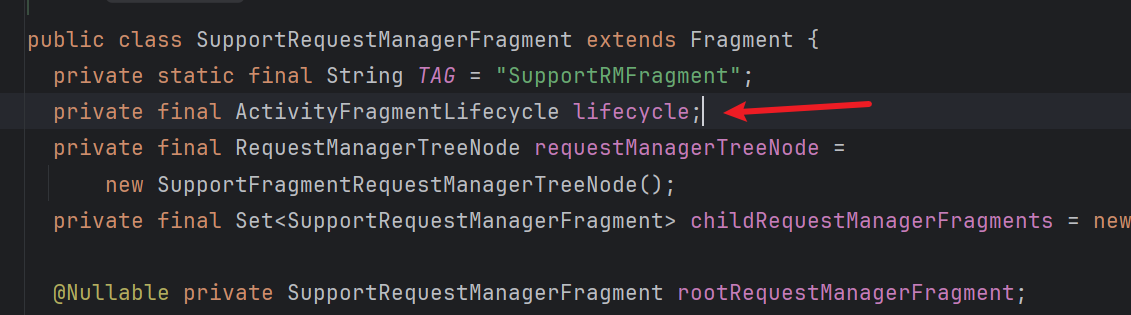
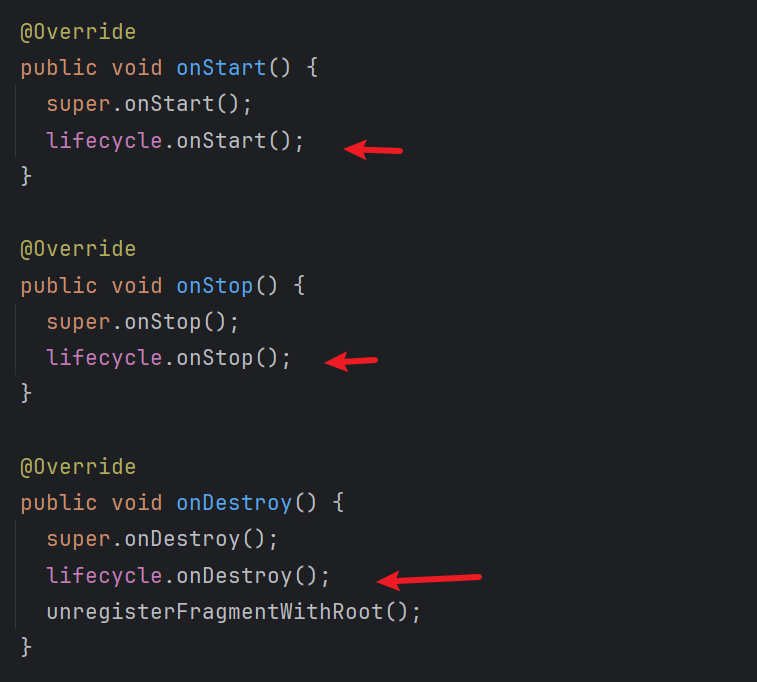
-
ActivityFragmentLifecycle会遍历LifecycleListener集合,依次调用每个监听器的生命周期方法(如onStart()、onStop()、onDestroy())。ActivityFragmentLifecycle类:
// 维护了一个 LifecycleListener 集合,并在生命周期事件(onStart, onStop, onDestroy)发生时通知所有监听器。
class ActivityFragmentLifecycle implements Lifecycle {

     // 使用 WeakHashMap 来管理 LifecycleListener 集合,以防止内存泄漏。
     private final Set<LifecycleListener> lifecycleListeners =
         Collections.newSetFromMap(new WeakHashMap<LifecycleListener, Boolean>());

     private boolean isStarted;
     private boolean isDestroyed;

     // 添加一个新的 LifecycleListener 监听器。
     @Override
     public void addListener(@NonNull LifecycleListener listener) {
       lifecycleListeners.add(listener);
       if (isDestroyed) {
         listener.onDestroy();
       } else if (isStarted) {
         listener.onStart();
       } else {
         listener.onStop();
       }
     }

     @Override
     public void removeListener(@NonNull LifecycleListener listener) {
       lifecycleListeners.remove(listener);
     }

     // 当 Fragment 或 Activity 进入 onStart() 状态时调用。
     void onStart() {
       isStarted = true;
       for (LifecycleListener lifecycleListener : Util.getSnapshot(lifecycleListeners)) {
         lifecycleListener.onStart();
       }
     }

     // 当 Fragment 或 Activity 进入 onStop() 状态时调用。
     void onStop() {
       isStarted = false;
       for (LifecycleListener lifecycleListener : Util.getSnapshot(lifecycleListeners)) {
         lifecycleListener.onStop();
       }
     }

     // 当 Fragment 或 Activity 进入 onDestroy() 状态时调用。
     void onDestroy() {
       isDestroyed = true;
       for (LifecycleListener lifecycleListener : Util.getSnapshot(lifecycleListeners)) {
         lifecycleListener.onDestroy();
       }
     }
   }
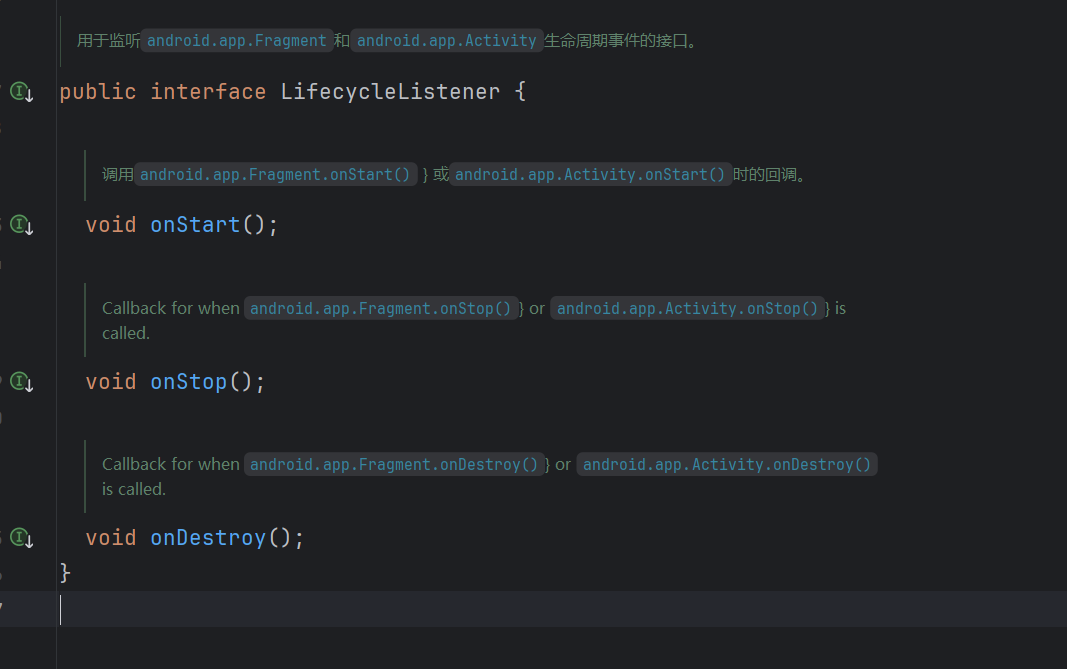
ActivityFragmentLifecycle内部维护了一个LifecycleListener的集合,RequestManager作为其中的一个监听器(即实现了LifecycleListener接口),会在这些生命周期事件中被通知。
RequestManager实现了LifecycleListener接口,因此它能够在接收到生命周期变化通知时,执行其自身的生命周期管理逻辑:
- 在
onStart()中恢复暂停的图片请求。- 在
onStop()中暂停正在进行的图片请求。- 在
onDestroy()中取消所有的图片请求并释放资源,防止内存泄漏。

总结:
Activity的生命周期改变(如进入前台时onStart())。- Android 自动调用所有
Fragment的onStart()方法,包括隐藏的SupportRequestManagerFragment。SupportRequestManagerFragment的onStart()方法被调用,进而调用ActivityFragmentLifecycle的onStart()方法。ActivityFragmentLifecycle遍历其持有的所有LifecycleListener(如RequestManager),调用它们的onStart()方法。RequestManager的onStart()方法被调用,恢复暂停的图片请求。
感谢您的阅读
如有错误烦请指正
参考:


 被折叠的 条评论
为什么被折叠?
被折叠的 条评论
为什么被折叠?
 到【灌水乐园】发言


