今天看了一下黑马程序员的视频,上面讲到一个使用spring AOP + 自定义注解的方式来实现权限控制的一个小例子,个人觉得还是可以借鉴,整理出来与大家分享。
需求:service层有一些方法,这些方法需要不同的权限才能访问。
实现方案:自定义一个PrivilegeInfo的注解,使用这个注解为service层中的方法进行权限配置,在aop中根据PrivilegeInfo注解的值,判断用户是否拥有访问目标方法的权限,有则访问目标方法,没有则给出提示。
关键技术:自定义注解及注解解析,spring aop
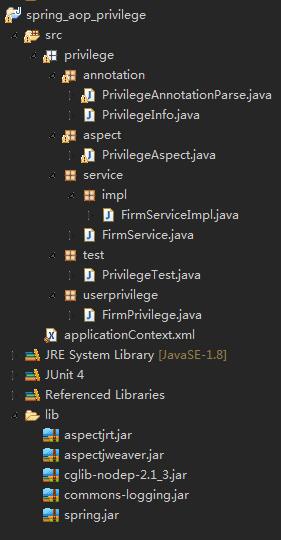
最终实现后的目录结构:
具体步骤:
下面我们来具体实现这个需求。
首先来实现这个自定义注解,为了简单起见,我们演示的这个注解,只是给了一个权限名的属性。
package privilege.annotation;

import java.lang.annotation.ElementType;
import java.lang.annotation.Retention;
import java.lang.annotation.RetentionPolicy;
import java.lang.annotation.Target;

/**
 * 权限注解
 * @author Minhellic
 *
 */
@Target(ElementType.METHOD)//这个注解是应用在方法上
@Retention(RetentionPolicy.RUNTIME)
public @interface PrivilegeInfo {
    /**
     * 权限的名称
     * @return
     */
    String value() default "";
}
- 1
- 2
- 3
- 4
- 5
- 6
- 7
- 8
- 9
- 10
- 11
- 12
- 13
- 14
- 15
- 16
- 17
- 18
- 19
- 20
- 21
- 1
- 2
- 3
- 4
- 5
- 6
- 7
- 8
- 9
- 10
- 11
- 12
- 13
- 14
- 15
- 16
- 17
- 18
- 19
- 20
- 21
为这个自定义的注解,写一个解析器,主要是用于返回目标方法上的注解PrivilegeInfo设置的value值
package privilege.annotation;

import java.lang.reflect.Method;

/**
 * 权限注解解析器
 * 这个解析器的主要功能,是解析目标方法上如果有PrivilegeInfo注解,那么解析出这个注解中的value值(权限的值)
 * @author Minhellic
 *
 */
public class PrivilegeAnnotationParse {
    /**
     * 解析注解
     * @param targetClass 目标类的class形式
     * @param methodName 在客户端调用哪个方法,methodName就代表哪个方法
     * @return
     * @throws Exception
     */
    public static String parse(Class targetClass, String methodName) throws Exception {
        String methodAccess = "";
        /*
         * 为简单起见,这里考虑该方法没有参数
         */
        Method method = targetClass.getMethod(methodName);
        //判断方法上是否有Privilege注解
        if (method.isAnnotationPresent(PrivilegeInfo.class)) {
            //得到方法上的注解
            PrivilegeInfo privilegeInfo = method.getAnnotation(PrivilegeInfo.class);
            methodAccess = privilegeInfo.value();
        }
        return methodAccess;
    }
}
- 1
- 2
- 3
- 4
- 5
- 6
- 7
- 8
- 9
- 10
- 11
- 12
- 13
- 14
- 15
- 16
- 17
- 18
- 19
- 20
- 21
- 22
- 23
- 24
- 25
- 26
- 27
- 28
- 29
- 30
- 31
- 32
- 33
- 34
- 1
- 2
- 3
- 4
- 5
- 6
- 7
- 8
- 9
- 10
- 11
- 12
- 13
- 14
- 15
- 16
- 17
- 18
- 19
- 20
- 21
- 22
- 23
- 24
- 25
- 26
- 27
- 28
- 29
- 30
- 31
- 32
- 33
- 34
自定义的注解和解析器有了,我们把对应的Service层写出来,并在需要使用这个注解配置权限的方法上,添加上这个注解。我们知道Service层是由接口和实现类组成,这是规范,虽然对我们这次的演示没有什么作用,但我们还是遵守一下:
接口源码:
package privilege.service;

/**
 * 用户业务接口
 * @author Minhellic
 *
 */
public interface FirmService {
    /**
     * 在需要权限的目标方法上,使用PrivilegeInfo注解,配置权限为save
     */
    public void save();
    /**
     * 在需要权限的目标方法上,使用PrivilegeInfo注解,配置权限为update
     */
    public void update();
    /**
     * 不需要权限的目标方法上,则不添加PrivilegeInfo注解
     * 在切面中,默认用户拥有权限
     */
    public void get();
}
- 1
- 2
- 3
- 4
- 5
- 6
- 7
- 8
- 9
- 10
- 11
- 12
- 13
- 14
- 15
- 16
- 17
- 18
- 19
- 20
- 21
- 22
- 23
- 1
- 2
- 3
- 4
- 5
- 6
- 7
- 8
- 9
- 10
- 11
- 12
- 13
- 14
- 15
- 16
- 17
- 18
- 19
- 20
- 21
- 22
- 23
实现类源码:
package privilege.service.impl;

import privilege.annotation.PrivilegeInfo;
import privilege.service.FirmService;

/**
 * 用户业务实现
 * @author Minhellic
 *
 */
public class FirmServiceImpl implements FirmService {

    /**
     * 在需要权限的目标方法上,使用PrivilegeInfo注解,配置权限
     */
    @Override
    @PrivilegeInfo("save")
    public void save() {
        System.out.println("FirmServiceImpl.save()");

    }

    /**
     * 在需要权限的目标方法上,使用PrivilegeInfo注解,配置权限
     */
    @Override
    @PrivilegeInfo("update")
    public void update() {
        System.out.println("FirmServiceImpl.update()");

    }

    /**
     * 不需要权限的目标方法上,则不添加PrivilegeInfo注解
     * 在切面中,默认用户拥有权限
     */
    @Override
    public void get() {
        System.out.println("FirmServiceImpl.get()");

    }
}
- 1
- 2
- 3
- 4
- 5
- 6
- 7
- 8
- 9
- 10
- 11
- 12
- 13
- 14
- 15
- 16
- 17
- 18
- 19
- 20
- 21
- 22
- 23
- 24
- 25
- 26
- 27
- 28
- 29
- 30
- 31
- 32
- 33
- 34
- 35
- 36
- 37
- 38
- 39
- 40
- 41
- 42
- 43
- 1
- 2
- 3
- 4
- 5
- 6
- 7
- 8
- 9
- 10
- 11
- 12
- 13
- 14
- 15
- 16
- 17
- 18
- 19
- 20
- 21
- 22
- 23
- 24
- 25
- 26
- 27
- 28
- 29
- 30
- 31
- 32
- 33
- 34
- 35
- 36
- 37
- 38
- 39
- 40
- 41
- 42
- 43
为了更好地管理权限,我们专门建立一个权限类,当然,为了简单,这里还是只封装了权限的名称
package privilege.userprivilege;

/**
 * 封装用户权限
 * 为简单,只封装了权限的名称
 * @author Minhellic
 *
 */
public class FirmPrivilege {
    /**
     * 用户权限的名称
     */
    private String value;

    public String getValue() {
        return value;
    }

    public void setValue(String value) {
        this.value = value;
    }

    public FirmPrivilege(String value) {
        this.value = value;
    }

    public FirmPrivilege() {
    }

}
- 1
- 2
- 3
- 4
- 5
- 6
- 7
- 8
- 9
- 10
- 11
- 12
- 13
- 14
- 15
- 16
- 17
- 18
- 19
- 20
- 21
- 22
- 23
- 24
- 25
- 26
- 27
- 28
- 29
- 30
- 31
- 1
- 2
- 3
- 4
- 5
- 6
- 7
- 8
- 9
- 10
- 11
- 12
- 13
- 14
- 15
- 16
- 17
- 18
- 19
- 20
- 21
- 22
- 23
- 24
- 25
- 26
- 27
- 28
- 29
- 30
- 31
现在Service层和注解都已经有了,就需要写切面的代码了。
在切面中,我们使用环绕通知,在调用目标方法之前,我们先用目标方法上的PrivilegeInfo注解配置的权限,与用户拥有的权限进行匹配,如果匹配成功,则认为用户拥有这个目标方法的权限,则调用目标方法,否则,给出提示信息,不调用目标方法。
这里之所以不使用前置通知的方式来匹配权限,就是因为前置通知虽然也可以检查,但是无论检查是否通过,目标方法都会被调用,起不到根据权限来控制目标方法调用的目的。
package privilege.aspect;

import java.util.List;

import org.aspectj.lang.ProceedingJoinPoint;

import privilege.annotation.PrivilegeAnnotationParse;
import privilege.userprivilege.FirmPrivilege;

/**
 * 权限检查切面
 * 根据用户原有的权限,与目标方法的权限配置进行匹配,
 * 如果目标方法需要的权限在用户原有的权限以内,则调用目标方法
 * 如果不匹配,则不调用目标方法
 * @author Minhellic
 *
 */
public class PrivilegeAspect {
    /**
     * 用户本身的权限
     */
    private List<FirmPrivilege> privileges;

    public List<FirmPrivilege> getPrivileges() {
        return privileges;
    }

    public void setPrivileges(List<FirmPrivilege> privileges) {
        this.privileges = privileges;
    }

    /**
     * aop中的环绕通知
     * 在这个方法中检查用户的权限和目标方法的需要的权限是否匹配
     * 如果匹配则调用目标方法,不匹配则不调用
     * @param joinPoint 连接点
     * @throws Throwable
     */
    public void isAccessMethod(ProceedingJoinPoint joinPoint) throws Throwable {
        /**
         * 1.获取访问目标方法应该具备的权限
         *  为解析目标方法的PrivilegeInfo注解,根据我们定义的解析器,需要得到:目标类的class形式 方法的名称
         */
        Class targetClass = joinPoint.getTarget().getClass();
        String methodName = joinPoint.getSignature().getName();
        //得到该方法的访问权限
        String methodAccess = PrivilegeAnnotationParse.parse(targetClass, methodName);
        /*
         * 2.遍历用户的权限,看是否拥有目标方法对应的权限
         */
        boolean isAccessed = false;
        for (FirmPrivilege firmPrivilege : privileges) {
            /*
             * 如果目标方法没有使用PrivilegeInfo注解,则解析出来的权限字符串就为空字符串
             * 则默认用户拥有这个权限
             */
            if ("".equals(methodAccess)) {
                isAccessed = true;
                break;
            }
            /*
             * 用户原有权限列表中有的权限与目标方法上PrivilegeInfo注解配置的权限进行匹配
             */
            if (firmPrivilege.getValue() != null &&
                    firmPrivilege.getValue().equalsIgnoreCase(methodAccess)) {
                isAccessed = true;
                break;
            }
        }
        /*
         * 3.如果用户拥有权限,则调用目标方法 ,如果没有,则不调用目标方法,只给出提示
         */
        if (isAccessed) {
            joinPoint.proceed();//调用目标方法
        } else {
            System.out.println("你没有权限");
        }
    }
}
- 1
- 2
- 3
- 4
- 5
- 6
- 7
- 8
- 9
- 10
- 11
- 12
- 13
- 14
- 15
- 16
- 17
- 18
- 19
- 20
- 21
- 22
- 23
- 24
- 25
- 26
- 27
- 28
- 29
- 30
- 31
- 32
- 33
- 34
- 35
- 36
- 37
- 38
- 39
- 40
- 41
- 42
- 43
- 44
- 45
- 46
- 47
- 48
- 49
- 50
- 51
- 52
- 53
- 54
- 55
- 56
- 57
- 58
- 59
- 60
- 61
- 62
- 63
- 64
- 65
- 66
- 67
- 68
- 69
- 70
- 71
- 72
- 73
- 74
- 75
- 76
- 77
- 78
- 79
- 80
最后,配置好spring的配置文件,要使用spring aop,配置文件中,必须包含有aop的命名空间,并引入相应的xsd
配置文件的源码为:
<?xml version="1.0" encoding="UTF-8"?>
<beans xmlns="http://www.springframework.org/schema/beans"
       xmlns:aop="http://www.springframework.org/schema/aop"
       xmlns:xsi="http://www.w3.org/2001/XMLSchema-instance"
       xsi:schemaLocation="http://www.springframework.org/schema/beans
           http://www.springframework.org/schema/beans/spring-beans-2.5.xsd
           http://www.springframework.org/schema/aop
           http://www.springframework.org/schema/aop/spring-aop-2.5.xsd">

    <bean id="firmService" class="privilege.service.impl.FirmServiceImpl"></bean>
    <bean id="privilegeAspect" class="privilege.aspect.PrivilegeAspect"></bean>

    <!-- 配置切面 -->
    <aop:config>
        <!--
            切入点表达式,确认目标类
            privilege.service.impl包中的所有类中的所有方法
        -->
        <aop:pointcut expression="execution(* privilege.service.impl.*.*(..))" id="perform"/>
        <!-- ref指向的对象就是切面 -->
        <aop:aspect ref="privilegeAspect">
            <!-- 环绕通知 -->
            <aop:around method="isAccessMethod" pointcut-ref="perform"/>
        </aop:aspect>
    </aop:config>

</beans>
- 1
- 2
- 3
- 4
- 5
- 6
- 7
- 8
- 9
- 10
- 11
- 12
- 13
- 14
- 15
- 16
- 17
- 18
- 19
- 20
- 21
- 22
- 23
- 24
- 25
- 26
- 27
- 1
- 2
- 3
- 4
- 5
- 6
- 7
- 8
- 9
- 10
- 11
- 12
- 13
- 14
- 15
- 16
- 17
- 18
- 19
- 20
- 21
- 22
- 23
- 24
- 25
- 26
- 27
所有的工作都已做好,我们来测试一下:
package privilege.test;

import java.util.ArrayList;
import java.util.List;

import org.junit.Before;
import org.junit.Test;
import org.springframework.context.ApplicationContext;
import org.springframework.context.support.ClassPathXmlApplicationContext;

import privilege.aspect.PrivilegeAspect;
import privilege.service.FirmService;
import privilege.userprivilege.FirmPrivilege;

/**
 * aop+注解权限控制测试类
 *
 * @author Minhellic
 *
 */
public class PrivilegeTest {
    /**
     * 客户端直接调用这个Service的方法,而不需要关心权限问题
     */
    private FirmService firmService;

    /**
     * 在初始化方法中,初始化firmService
     * 同时为用户赋上原始权限,这个在项目中,会使用别的方式实现,这里只是模拟,就不搞那么复杂了
     */
    @Before
    public void init() {
        ApplicationContext context = new ClassPathXmlApplicationContext("applicationContext.xml");
        firmService = (FirmService) context.getBean("firmService");

        /*
         * 给用户添加默认权限
         */
        PrivilegeAspect privilegeAspect = (PrivilegeAspect) context.getBean("privilegeAspect");
        List<FirmPrivilege> privileges = new ArrayList<FirmPrivilege>();
        //privileges.add(new FirmPrivilege("save"));
        privileges.add(new FirmPrivilege("update"));
        privilegeAspect.setPrivileges(privileges);
    }

    /**
     * 客户端直接调用Service中的方法,而不需要关心权限问题,会有切面去做
     */
    @Test
    public void test() {
        firmService.save();
        firmService.update();
        firmService.get();
    }
}
- 1
- 2
- 3
- 4
- 5
- 6
- 7
- 8
- 9
- 10
- 11
- 12
- 13
- 14
- 15
- 16
- 17
- 18
- 19
- 20
- 21
- 22
- 23
- 24
- 25
- 26
- 27
- 28
- 29
- 30
- 31
- 32
- 33
- 34
- 35
- 36
- 37
- 38
- 39
- 40
- 41
- 42
- 43
- 44
- 45
- 46
- 47
- 48
- 49
- 50
- 51
- 52
- 53
- 54
- 55
- 56
- 1
- 2
- 3
- 4
- 5
- 6
- 7
- 8
- 9
- 10
- 11
- 12
- 13
- 14
- 15
- 16
- 17
- 18
- 19
- 20
- 21
- 22
- 23
- 24
- 25
- 26
- 27
- 28
- 29
- 30
- 31
- 32
- 33
- 34
- 35
- 36
- 37
- 38
- 39
- 40
- 41
- 42
- 43
- 44
- 45
- 46
- 47
- 48
- 49
- 50
- 51
- 52
- 53
- 54
- 55
- 56
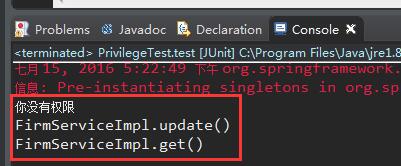
运行test方法,根据控制台的输出结果,就可以看到权限控制是起到了作用,因为用户初始权限中的save权限被注释掉,则用户不会拥有save权限,调用save方法时,提示没有权限。
从上面的测试方法可以看出,使用了aop之后,我们只需要关心主要业务,而不需要再分心去管理权限问题。
这篇博客,虽是我本人整理,但所有的思路及实现方式,都来源于黑马程序员的视频,算是半原创吧。如写得很烂,欢迎大神


 1万+
1万+

 被折叠的 条评论
为什么被折叠?


