


 本文深入讲解Java NIO的基础概念及核心组件,包括Buffer、Channel、Selector等,介绍如何利用NIO进行高效的文件读写操作,并探讨了散射与聚集等高级特性。
前言
Java标准I/O中,提供了基于流的I/O实现,即InputStream和OutputStream,以字节为单位处理数据,并且非常容易建立各种过滤器。NIO是New I/O的简称,具有以下的几个特点:
1.为所有的原始类型提供(Buffer)缓存支持;
2.使用Java.nio.charset.Charset作为字符集编码解码解决方案;
3.增加通道(Channel)对象,作为新的原始I/O抽象;
4.支持锁和内存映射文件的文件访问接口;
5.提供基于Selector的异步网络I/O;
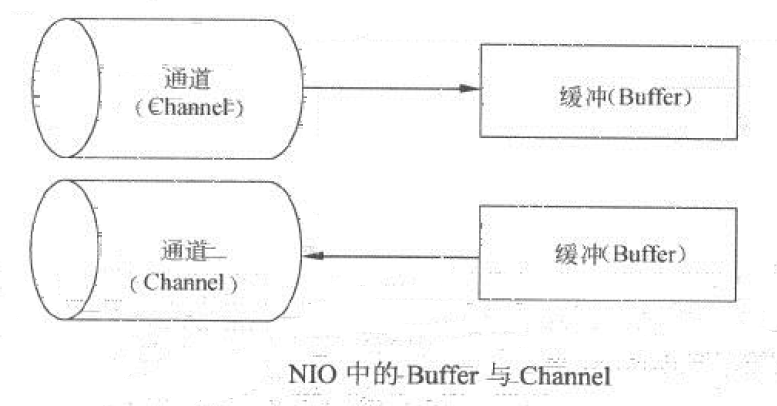
与流式I/O不同的是,NIO是基于块(Block)的,它以块为基本单位处理数据。最重要的两个组件是缓冲Buffer和通道Channel。缓冲是一块连续的内存块,是NIO读写数据的中转地。通道Channel表示缓冲数据的源头或目的地,它用于向缓冲写入或读取数据,是访问数据的接口。
Buffer和Channel用法概述
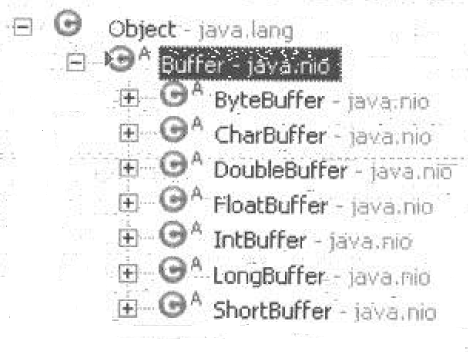
Buffer是一个抽象类,JDK为每一种Java原生类型都创建了Buffer实现类。除了ByteBuffer外,其他的Buffer实现类都具有完全一样的操作方法。因为ByteBuffer一般用于标准I/O操作。
//读取文件时,首先将文件打开,并取得文件的Channel
FileInputStream fin = new FileInputStream(new File("d:\\tmp_buffer.tmp"));
FileChannel fc = fin.getChannel();
//要从文件Channel中读取数据,必须使用Buffer
ByteBuffer  byteBuffer = ByteBuffer.allocate(1024);
fc.read(bytrBuffer);
//此时,文件的内容已经存在于ByteBuffer中,因此可以关闭通道了,并准备读取ByteBuffer
fc.close();
byteBuffer.flip();
//通过NIO进行文件读取和文件写入操作例子如下
public static void nioCopyFile(String resource,String destination) throw IOException {
FileInputStream fis = new FileInputStream(resource);
FileOutputStream fos = new FileOutputStream(destination);
FileChannel readChannel = fis.getChannel(); //读文件通道
FileChannel writeChanel = fos.getChannel(); //写文件通道
ByteBuffer buffer = ByteBuffer.allocate(1024); //分配数据缓存
while(true){
buffer.clear();
int len = readChanel.read(buffer); //从文件中读取文件到Buffer中去
if(len == -1){
break; //读取完毕
}
buffer.flip(); //重置position的值,通常,将Buffer从写模式转换为读模式时需要执行该方法
writeChannel.write(buffer); //从Buffer获得数据写入到文件中去
}
readChannel.close();
writeChannel.close():
}Buffer的基本原理
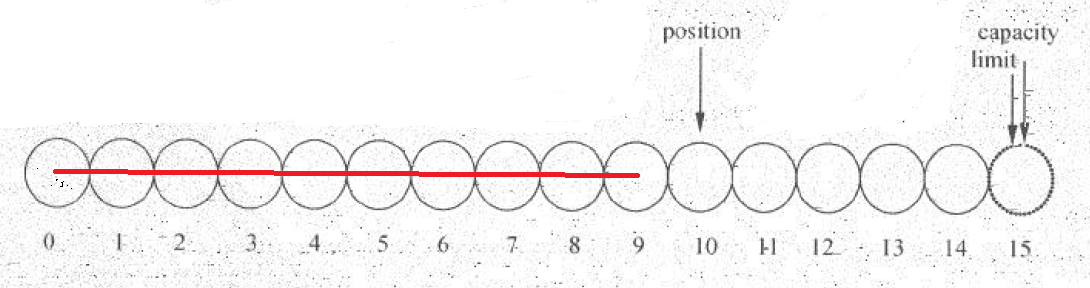
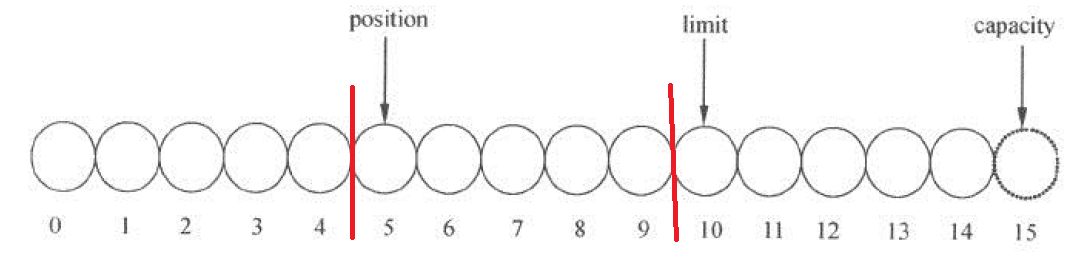
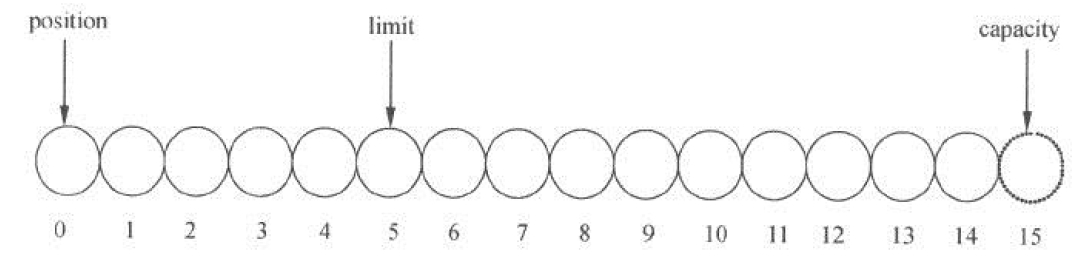
Buffer有三个重要的参数:位置(position),容量(capacity)和上限()
| 参数 | 读模式 | 写模式 |
|---|---|---|
| 位置 | 当前缓冲区的位置,将从position的下一个位置写数据 | 当前缓冲区读取的位置,将从此位置后,读取数据 |
| 容量 | 缓冲区的总容量上限 | 缓冲区的总容量上限 |
| 上限 | 缓冲区的实际上限,它总是小于等于容量。通常情况下,和容量相等 | 代表可读取的总容易,和上次写入的数据量相等 |
public class BufferTest {
public static void main(String[] args) {
ByteBuffer buffer=ByteBuffer.allocate(15); //15个字节的缓冲区
System.out.println("limit="+buffer.limit()+" capacity="+buffer.capacity()+" position="+buffer.position());
//存入10个字节的数据
for(int i=0;i<10;i++) {
buffer.put((byte)i);
}
System.out.println("limit="+buffer.limit()+" capacity="+buffer.capacity()+" position="+buffer.position());
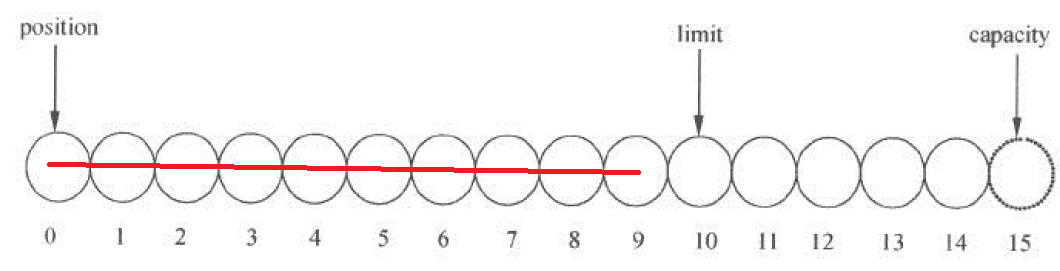
buffer.flip(); //重置position
System.out.println("limit="+buffer.limit()+" capacity="+buffer.capacity()+" position="+buffer.position());
for(int i=0;i<5;i++) {
System.out.print(buffer.get());
}
System.out.println();
System.out.println("limit="+buffer.limit()+" capacity="+buffer.capacity()+" position="+buffer.position());
buffer.flip();
System.out.println("limit="+buffer.limit()+" capacity="+buffer.capacity()+" position="+buffer.position());
}
}首先分配一个15个字节大小的缓冲,初始情况如下图所示,需要注意的是,索引为15的位置实际上是不存在的。

接着,Buffer中的被放入10个byte,因此,position的位置会向前移动,因为position位置始终指向下一个即将输入的位置,所以position变为10。
Buffer的相关操作
Buffer的创建
//Buffer的创建有两种方式,

//使用静态方法allocate()从堆中分配
ByteBuffer buffer = ByteBuffer.allocate(1024);

//从既有数组中创建
byte array[] = new byte[1024];
ByteBuffer buffer = ByteBuffer.wrap(array);
重置和清空缓冲区
//Buffer提供了三个重置Buffer的各项标志位,并不真正清空Buffer的内容
public final Buffer rewind()
public final Buffer clear()
public final Buffer flip()

//将position置为0,并清除标志位(mark),它的作用在于为提取Buffer的有效数据做准备
out.write(buf);  //从Buffer读取数据写入到Channel
buf.rewind();    //回滚Buffer
buf.get(array);  //将Buffer的有效数据复制到数据中

//clear()将position设置为0,将limit设置为capacity的大小,清除标志mark
//由于清空了limit,因此无法知道Buffer内哪些数据是有效的
//这个方法为重新写Buffer做准备
buf.clear();
//in.read(buf);

//flip()将limit设置到position的位置,然后将position设置为0,并清除标志位mark。它通常在读写转换的时候使用
buf.put(magic);
in.read(buf);
buf.flip();        //将Buffer从写状态转换为读状态
out.write(buf);| rewind() | clear() | flip() | |
|---|---|---|---|
| position | 设置为0 | 设置为0 | 设置为0 |
| mark | 清空 | 清空 | 清空 |
| limit | 未改动 | 设置为capacity | 设置为position |
| 作用 | 为读取Buffer中的有效数据做准备 | 为重新写入Buffer做准备 | 在读写切换时调用 |
读写缓冲区
//以ByteBuffer为例子,下面只是常用的几个方法
//返回当前position上的数据,并将position位置向后移一位
public byte get()
//读取当前Buffer的数据道dst中,并恰当地移动position位置
public ByteBuffer get(byte[] dst)
//读取给定index索引上的数据,不改变position的位置
public byte get(int index)
//当前位置写入给定的数据,position向后移动一位
public ByteBuffer put(byte b)
//将数据b写入当前Buffer的index位置
public ByteBuffer put(int index,byte b)
//将给定的数据写入当前Buffer
public final ByteBuffer put(byte[] src)
标志缓冲区
标志(mark)缓冲区,像书签一样,在数据处理过程中,可以随时记录当前位置。然后在任意时刻,回到这个位置,从而加快或简化数据处理流程。
//用于记录当前位置
public final Buffer mark()
//用于恢复到mark所在的位置
public final Buffer reset()
ByteBuffer b = ByteBuffer.allocate(15);
for(int i=0;i<10;i++){
b.put((byte)i);
}
b.flip(); //切换为读模式
for(int i=0;i<b.limit();i++){
System.out.print(b.get());
if(i==4){
b.mark(); //在第4个位置做mark
System.out.print("(mark at "+i+")");
}
}
b.reset(); //回到mark的位置,并处理后续数据
System.out.println("reset to mark");
while(b.hasRemaining()){
System.out.print(b.get()); //输出mark后的所有数据
}
System.out.println();
复制缓冲区
复制缓冲区是指以原缓冲区为基础,生成一个完全一样的新的缓冲区。新生成的缓冲区和原缓冲区共享相同的内存数据。并且,对任意一方的数据改动都是互相可见的,但二者又独立维护了各自的position,limit和mark。
这为多方同时处理数据提供了可能。
public ByteBuffer duplicate();ByteBuffer b = ByteBUffer.allocate(15);
for(int i=0;i<10;i++){
b.put((byte)i);
}
ByteBuffer c = b.duplicate(); //复制当前缓冲区,会产生两个完全一样的Buffer
System.out.println("After b.duplicate()");
System.out.println(b);
System.out.println(c);
c.flip(); //重置缓冲区c,两个Buffer各自维护自己的position和limit
System.out.println("Afterc.flip()");
System.out.println(b);
System.out.println(c);
c.put((byte)(100)); //向c放入数据,这个操作对两个Buffer都可见
System.out.println("After c.put((byte)(100))");
System.out.println("b.get(0)="+b.get(0));
System.out.println("c.get(0)="+c.get(0);缓冲区分片
用slice()方法在现有缓冲区中,创建新的子缓冲区,子缓冲区和父缓冲区共享数据。但需要处理Buffer的一个片段时,可以使用slice()方法取得一个子缓冲区,然后就像处理普通的缓冲区一样处理这个片段,而无需考虑缓冲区的边界问题。
ByteBuffer b = ByteBuffer.allocate(15);
for(int i=0;i<10;i++){
     b.put((byte)i);   //填充数据
}
b.position(2);
b.limit(6);
ByteBuffer subBuffer = b.slice();    //生成子缓冲区
只读缓冲区
而且,由于共享内存,对原始缓冲区的修改,只读缓冲区也是可见的。
ByteBuffer readOnly = buffer.asReadOnlyBuffer(); //创建只读缓冲区文件映射到内存
NIO提供了一种将文件映射到内存,进行I/O操作的方法,它可以比常规的基于流的I/O的操作快很多。这个操作主要由FileChannel.map()方法实现。
RandomAccessFile raf = new RandomAccessFile("C:\\mapfile.txt","rw");
FileChannel fc = raf.getChannel();

//将文件映射到内存中
//MappedByteBuffer是ByteBuffer的子类,可以像使用ByteBuffer一样使用它
MappedByteBuffer mbb = fc.map(FileChannel.MapMod.READ_WRITE,O,raf.length());

while(mbb.hasRemaining()){
    System.out.print((char)mbb.get());   //直接从内存中读取文件
}
mbb.put(0,(byte)98);       //通过修改Buffer,将实际数据写到对应的磁盘文件中
raf.close();
处理结构化数据
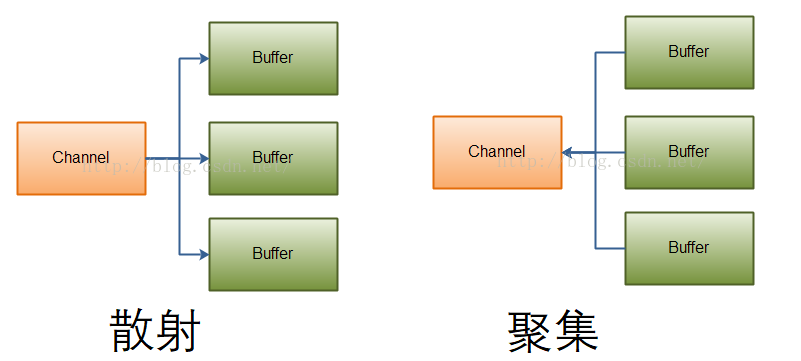
NIO提供了散射和聚集的方法处理结构化的数据。散射是指从一个Channel将数据读入一组Buffer中。而聚集与之相反,是将数据从一组Buffer写入一个Channel中。
散射和聚集的使用方法与Buffer的操作类似。
//散射:ScatteringByteChannel的主要方法如下:
pubic long read(ByteBuffer[] dsts) throws IOException
public long read(ByteBuffer[] dsts,int offset,int length) throws IOException

//聚集:GatheringByteChannel
public long write(ByteBuffer[] srcs) throws IOException
public long write(ByteBuffer[] srcs,int offset,int length) throws IOException此时,通过散射读的方式可以一次将文件装配到各个对应的Buffer。
如果需要创建指定格式的文件,只有先构造好大小合适的Buffer对象,使用聚集写的方式就可以创建出文件了。
//聚集
ByteBuffer bookBuf = ByteBuffer.wrap("java编程思想".getBytes("utf-8"));
ByteBuffer autBuf  = ByteBuffer.wrap("fgg".getBytes("utf-8"));
booklen = bookBuf.limit();
authlen = autBuf.limit():
ByteBuffer[] bufs = new ByteBuffer[]{bookBuf,autBuf};

File file = new File(FPATH):
FileOutputStream fos = new FileOutputStream(file);

FileChannel fc = fos.getChannel();
fc.write(bufs);     //聚集写文件
fos.close():
//散射
ByteBuffer b1 = ByteBuffer.allocate(booklen);
ByteBuffer b2 = ByteBuffer.allocate(authlen); //根据实际信息构造Buffer
ByteBuffer[] bufs = new ByteBuffer[]{b1,b2};
File file = new File(FPATH):
FileInputStream fis = new FileInputStream(file);
FileChannel fc = fis.getChannel();
fc.read(bufs); //读入数据
String bookname = new String(bufs[0].array(),"utf-8"); //直接读数据


 被折叠的 条评论
为什么被折叠?
被折叠的 条评论
为什么被折叠?
 到【灌水乐园】发言


