


本文是学习CA Harvest的时候,参考 手册的基本理论部分进行了翻译,供自己日后方便学习,也可供相关的朋友参考,翻译的内容错误很多,有些地方词义表达也不是很清晰,如果您有更好的见解,希望您能给出宝贵的意见,谢谢!
2007-3-13 第一版
理解Harvest
Harvest的体系结构
Harvest是一个C/S结构的应用,它支持分布式的开发,最大化应用各种平台。被Harvest应用的C/S结果是一个应用服务器模型。
在这个模型中,客户端进程展现数据和管理键盘及输入设备,应用逻辑由远程的专用应用服务定义和处理,依次的,应用服务器提供了对数据库的存储访问。以下显示了在Harvest中主要的组件。
图一:

客户端是用来处理用户接口的程序,它从用户处接受输入并且把发送到服务器端处理,客户端同样也可以展现和返回信息给用户。服务器端执行由客户端请求的操作,通信服务提供了服务器和客户端间的连接,通信服务包含一组设置的协议,可以让Harvest的组件能一起工作。
Broker程序是通信服务的一部分,由于许多客户机和服务器存在在一个网络,Broker就分配一个合适的服务器给客户端。每台服务器向Broker注册并提供足够的信息,以便让客户端发出请求服务的时候,能找到合适的服务器。每个客户端然后就向Broker请求合适的服务器。Agent对于远程计算机来说,它扮演了一个文件服务器的角色。
Harvest维护数据在它控制下的一个或多个被存储在关系数据库中的仓库中,ODBC 层能使服务器和数据库通信。
客户端接口
各种各样的客户端允许你访问和使用Harvest。
根据你选择的Harvest程序,图形用户界面包括管理员应用或Workbench。管理应用提供了合适的管理功能,但是Workbench提供了对所有用户功能的访问。
Harvest Web界面(Harweb)允许你通过Web浏览器是用Harvest。
命令行界面允许你直接使用命令行来执行Harvest功能。
可选择的浏览接口(HarWind)允许从Windows浏览界面执行Check-in,Check-out进程。
Harvest版本控制接口允许你在图形化的集成开发环境(IDE)下使用微软的Developer Studio直接执行大多数Harvest功能。要获得更多关于Harvest版本控制接口的信息,请参见Version Control Interface用户指导。
Harvest Change Manager针对Eclipes的插件允许你在Eclipse的环境中执行很多Harvest的功能,要获得更多关于Harvest Change Manager针对Eclipes的插件的信息,从Http://ca.com/support的客户支持中下载AllFusion Harvest Change Manager Plug-in for Eclipse的用户手册。
Harvest和其他各种各样的开发IDEs的集成。针对具体的和IDEs的集成,参见ReadMe和集成工具用户指导。
为了用户能成功地启动客户端,以下条件必须符合:
数据库进程必须运行
Harvest Broker必须运行
至少一个Harvest 服务进行运行
Harvest 对象
复杂的CCM解决方案能通过使用基本的对象类型而创建。在Harvest中的关键对象包括工程(projects),用户(users), 用户组(user groups), repositories, 说明(states), 进程(processes), 包(packages), 表格(forms),包组( package groups) ,试图( views), 项目路径(item paths),项目(items), 和版本(versions)
以下例图显示了各种对象在Harvest中的层次。
.
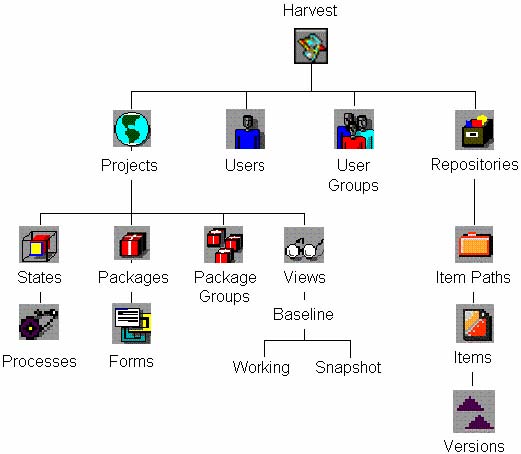
第一行(从项目到仓库)显示Harvest水平的对象,这些对象是全局的,这意味着在Harvest安装的任何项目定义中是可以用的。
注:Forms是全局对象,然后,他们必须总是和包(Packages)关联在一起。
第二行(丛说明到项目路径)显示Harvest水平的对象。这些对象对单个Harvest项目来说是具体的,他们包括states, packages, package groups, views, item paths, Projects衍生了他们。从Objects衍生出来的用图形表示的被显示在第三列。举例,Processes从States衍生,Items从Item Paths衍生。
每个Harvest 对象在以下的各章节将被介绍,在剩余的部分进行详细的描述。
Harvest Level Object
Projects-Project这个术语涉及到Harvest中的整体控制框架,它支持特定的开发和维护活动。一个项目包括了在开发生命周期如何的改动进展、可能出现的活动、访问的数据和用户职责的信息。
注:在Harvest的早期版本中,environment这个术语用于project,这些术语是同义的。
你可以有很多不同的项目,根据这些应用是受控的和一种开发活动的承担。举例,你可能有一个项目是维护一个已经发布的一个应用的版本,另一个是开发下一个版本,第三个维护在不同版本中共享的代码。为了跟踪事件和问题,你可能有一个支持组用户的完全不同的项目。
Users and User Groups-在Harvest中用户是个体定义,当Harvest安装,一个初始化的用户被自动安装(参见安装手册),这名用户必须添加其他涉及在安装活动中的用户。
用户组是Harvest对象,它为目标的访问、批准、通知的目的而在组中分配用户。在Harvest中提供了两个预先的用户组Public和Administrator。
Users和User Groups在Harvets的层次中是全局的,这意味着它们对所有的Harvest项目来说是可用的。一个用户可以属于不同的用户组,组不暗示任何层次。举例,一个在开发管理组的用户没有必要在开发组。
创建用户和创建用户组是紧密关联的。如果你首先创建用户,你可以在创建组的时候把他们加入组中。如果你首先创建组,你可以在创建用户的时候把用户添加到相关的组中。
Repositories-Harvest存储和维护项目(Item)和它们的改变在数据库中的一个设置好的表-Repository中。在Harvest控制下的Repository中项目(Item)是一个独立的数据组件。一个项目在Repository等同于在文件系统中的一个文件。举例,如果你从Repository中捡出一个项目叫test1.c,一个叫test1.c的文件将在你的计算机文件系统上被创建。每个在Repository的项目由各种不同版本的项目组成.Harvest维护在Repository中所有的Item的版本。为了阐明在Repository的数据和在之外数据的差异,一个更进一步的管理被使用,外部的路径命名为客户端目录,在Repository中的目录被命名为视图路径(View Path)。
Forms-Harvest 窗体可以作为一个页面窗体类似的使用。比如,他们可以跟踪版本和问题或者作为一个交流方法的结构。
Forms通常和Packages紧密联系,这种联系在Harvest中提供了问题跟踪和改变跟踪功能的链接。所有的信息收集都通过Form,同时也受关联的Packages的直接影响。
Project Level Object
States-它是一个截然不同的工作区域在一个确定的活动,这个活动作为一个包从定义到完成的移动而发生。一个生活周期可以包含几个States。
State通常和视图(View)联系在一起。在一个State中使用视图,试图就决定了那个项目版本最易为用户所操作。一个State可以被定义不用视图,如果用户不需要访问数据项目的话。比如,一个初始的State命名为Open,就是一个最简单持续区域对最新创建的更改请求,就不需要视图。
Processes-进程就是在Harvest中能被对象执行的一个动作,对State进程的定义决定了在State中那些活动能被执行。Harvest包含一组预定义的进程类型。
进程的名称可以被指定每个进程的定义去添加清楚地和区分同一种类型的多个进程,当一个进程被添加到state中,它的名字就出现在State进程的菜单下。
两个进程决定了在生命周期中更改包程序的顺序:Promote,Demote,Promote进程移动一个更改包从一个State到下一个State;Demote还原更改包到前一个State。
Packages-包是一个在生命周期中可以移动的基本工作单元。它典型的呈现一个问题或请求一个跟踪的需要,反映一个问题或请求的改动,和其他关联信息。包是一个针对实际数据的用户链接在更改进程中,每个包存在于生命周期中特定的State中。
包和一个或多个Forms关联,它们被用来组织和维护关联的信息。Package-Form是一个很强大的方式联合问题跟踪和改变控制。
包的生命跨度通常被现在一个项目内,然而,包可以在一个项目中被创建然后被移动到另一个项目中去开始它的新的生命周期。通过更改控制项目,包紧密链接问题跟踪项目。比如,给用户支持小组的问题可以通过穿越在支持项目中的不同阶段的跟踪而报告出来,当一个问题被指派分配修复,你可以在针对开发项目中的支持项目移动完整的历史包来代替通过在开发项目中开始的新包。
Package Groups-一个典型的项目包含了许多包。包组为操作包提供了一个更高的逻辑级别。一个包可以归属一个组,几个组,或者不属于任何组。 在包组中一个操作可以在一个或者所有的包中被执行。
包组同样提供了对过滤操作的支持,例如查找版本,允许你对不同的包创建不同的进程。举例说明,在特定组中的包可能需要穿越过额外的state在继续完成它的生命周期之前。比如,包详细说明文档的改变必须通过专用的文档的state在通过质量保证(QA)和版本周期的移动之前。没有其他的包可以通过文档state。
绑定的包特征执行限制当一个包归属一个包组,如果包是被限制包组的一部分并且Enforce Bind是激活的在Demote和Promote的属性框中,在组中的所有包都必须被一起Demote或Promote。
Views-试图决定项目(Item)指定了哪些用户和用户组能访问和在repositories中的视图。
Baseline-每个项目都有一个试图的类型被称为基线。基线定义了项目中可用的仓库项目(repository items),在共享代码的情况下,基线可以包含一个或多个repositories中的项目(item)。
Working and Snapshot Views-工作和快照视图从基线中创建。每个试图和基线一样,都有共同的路径和项目(item),但是没有必要是项目(item)中的相同版本。
工作视图定义了功能工作区域,你可以通过把它们和一个或多个state联系起来把工作视图整合到生命周期中,一些state可以共享同一个工作视图,但是一个state不能不能使用多于一个的工作视图。工作试图决定了哪些项目(item)版本可以供用户访问,通过包的更改可视的在包的当前视图中,一个包的state决定了包当前的视图。当包在生命周期中移动,只有当它到达一个视图的state的时候,它的版本才可以在另外一个视图中可见。需要获得更多信息,参见“Managing Your Changes” 和 “Using Packages and Forms.”章节。
快照视图在一个指定的时间只是工作视图一个只读的镜像。快照视图捕获数据的详细目录在软件开发重要的点,比如,发布版本。在快照视图被创建后,它可以被用来支持其他的应用功能管理,比如基线(baselining) 。
通过选择State Properites对话框上的所有快照视图选项,state可以和在项目中创建的所有快照视图进行关联。当这个选项被选中,state仅仅和项目中创建的快照视图关联。通过快照捕获的版本可以check-out,但是由于快照视图只有只读属性,项目(items)不能被check-in。
视图在软件生命周期的模版中已被预定义,或你也可以创建它们。需要获得更多信息,请参见《管理员手册》。
Item Paths-在repository中的目录被称为Item Paths,它用来区别它们和外部文件系统的路径。
Item-Repositories由items组成。在Harvest的控制下,在Repository中的一个项目(Item)包含了实际的数据。一个Item等同于在外部文件系统中的文件。如果你从Repository中检出一个项目(item)名字叫file1.c,一个叫file1.c的文件就在你的文件系统中创建。
Version-每个在repository中的项目(item)是由项目(item)的版本组成的。项目(itme)的版本对使用视图的用户是可视的,针对Workbenc中的state的数据视图显示了在项目基线视图和state下的工作视图的版本。
当一个用户检入一个项目(item)的新版本,那个新版本只有在它的版本被检出的那个state中可视,比如,一个用户从代码State检入了版本2的file1.c,同时Unit State和Coding State共享一个视图,版本2的file1.c就可以同时在两个state中可视。然而,颁布2在发布State是不可见的,那是因为该State没有和它们共享同一个视图。为了版本2也能在发布状态中可视,被用来创建版本的包必须被promote到发布state。
版本被Harvest中的一个叫三角树的树型结构所管理。下面的插图描述了单个项目(item)被升级到多个包。Δ代表了一个三角形或者更改,对原始项目(item)的改动在它被添加到repository中。每个三角形代表了一个新的版本。
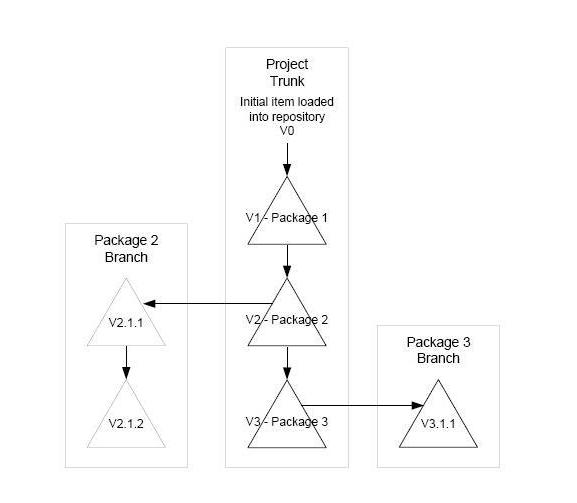
原始的项目(item)被存储在repository中。工程使用这个项目(item)创建版本,这个版本在从repository中延伸出来的三角树的主干上,这个主干可以支持在多个分支上的版本。分支是独立的三角链,这个链从工程主干版本延伸出来。要获得更多关于分支和版本的信息,请参考“Managing Your Changes”。
A Sample Life Cycle
Harvest 允许你创建适合你开发应用程序的生命周期。下图显示了你用来创建生命周期的一些基本的组成部分。
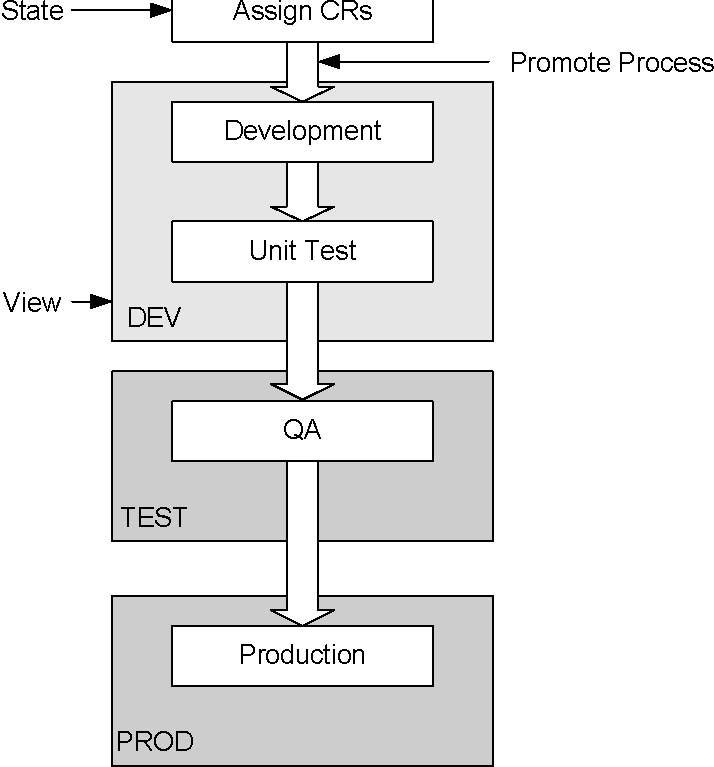
在这个例子中,生命周期有5个状态。在Assign CRs (Change Requests)状态,管理员创建包去固定变动请求;开发者创建和修改代码在开发状态(Development state)并且测试代码在单元测试状态(Unit Test State);在QA状态,QA人员测试新代码;在Production状态,代码做最后的发布。
状态的命名完全的由用户定义,在先前的生命周期示例中,Assign CRs状态的名字是根据变动请求的,如果你的公司创建的是问题报告而不是变更报告,你可以初始化的命名为Assign CRs或者其他类似的名字。
在同一生命周期的垂直箭头显示了Promote进程,它定义了包如何从一个状态到另一个状态。状态和promote进程从路线图中结合,这个路线图穿越了一个应用程序从它开始到发布,它依赖的介质就是包,这个包典型的展示了对应用程序的变更请求(CR)。
在生命周期的示例中,包从Assign CRs状态开始,promote到Development状态,视图不和Assign CRs联合,因为在这个状态没有影响实际数据的活动。
注意在生命周期中的视图,开发者在开发状态访问的包能开发视图中修改项目版本。在DEV中的更改在它的任何视图中都不可见,除非在视图中的包被提升到一个状态。当在测试单元的一个包完成了测试,它就被提升到了在测试视图中的QA,当包进入了QA,测试视图就随着包的改动而更新。通过其它包在DEV视图中的改动不会在测试视图出现直到这些包被提升到QA状态。
Welcome to AllFusion Harvest. Harvest tasks are divided into administrative tasks and day-to-day operational tasks. The day-to-day operational tasks are described in this guide. These tasks include using the Harvest interface to manage change packages and execute processes in the development life cycle. Administrative tasks include defining the software development life cycle to use, setting up user groups, and initializing the physical repository. For a complete description of the Harvest administrative tasks, see the Administrator Guide.
Harvest Basics
Today’s development teams build large, distributed application systems. They work from heterogeneous platforms at remote locations and make simultaneous changes to several interrelated components of software and systems documentation. The only way to effectively track this complex, enterprise-wide development activity is with a comprehensive, repository-based change and configuration management (CCM) solution. Manual methods and simple file-control systems are not robust enough to help you improve delivery and service levels.
Harvest helps you synchronize development team activities on heterogeneous platforms, across your enterprise and throughout the entire application development life cycle. Harvest scales up to serve project teams working on your largest client/server enterprise systems and scales down to meet the needs of your smallest development teams.
Both the client and server portions can be executed on the same computer or be distributed across multiple platforms. The client portion of Harvest consists of the graphical user interface (GUI) and the command line interface. The server portion contains most of the program logic.
The open architecture of Harvest lets users take advantage of most CCM functions externally from the user interface. This open architecture lets users use Harvest as the focal point for integrating application development with traditionally systems-oriented functions, such as automation, electronic software delivery, and helpdesk tools. The open architecture of Harvest also provides easy access to CCM information. Rather than developing yet another database standard, Harvest stores control information in a relational database. For information about using Harvest in other development environments, see the Version Control Interface User Guide and the Integration Tools User Guide.
Adaptability
One of the most powerful features of Harvest is its adaptability. An organization can define and follow a software development life cycle in Harvest, modeling it to the customary workflow. An organization can also integrate its own tools and processes into Harvest. Furthermore, Harvest synchronizes development, maintenance, test, and problem-tracking activities across all platforms.
Usability
The Harvest user interface is built using state-of-the-art technology. It is designed for ease-of-use and minimal training time. Standardized icons and toolbars are used throughout the interface. As an alternative to using a mouse, keyboard equivalents to toolbar menu items are provided.
Harvest uses an object-oriented design. Icons or selection lists represent objects and objects are associated with actions. This design lets you apply multiple unrelated actions to individual objects or groups of objects from a single location. It also means that you never have to remember the name of an object.
In addition to the Harvest GUI, you can use a variety of client interfaces to perform CCM functions. For more information, see Client Interfaces.
Harvest Architecture
Harvest is a client/server application that supports distributed development and maximizes the strengths of various platforms. The client/server model used by Harvest is an application server model. In this model, the client process presents data and manages keyboard and device input. The application logic is defined and processed remotely by dedicated application servers. The application servers, in turn, provide access to database servers.
The following illustration shows the relationships of major components in the Harvest architecture:
The client is the program that handles the user interface. It receives input from the user and sends it to the server for processing. The client also presents the returned information to the user. The server program executes operations requested by the Harvest clients. Communication services provide the connection between the Harvest client and server. The communication services consist of a set of protocols that let the Harvest components work together.
Part of the communication services is a program named the broker. Because many clients and servers exist in one network, the broker assigns each client an appropriate server. Each server registers with the broker and provides the broker with enough information so the client can find the appropriate server when requesting service. Each client then requests the broker to connect to an available server. The agent program acts as a file server to remote computers.
Harvest maintains the data under its control in one or more repositories stored in a relational database. The ODBC layer enables communication between the server and the database.
Client Interfaces
A variety of clients let you access and use Harvest:
The graphical user interface consists of the Administrator application or the Workbench, depending on your Harvest program selection. The Administrator application provides you with functionality suitable for administrators, whereas the Workbench provides you with access to all user functions.
The Harvest Web Interface (Harweb) lets you use Harvest through a web browser.
The command line interface lets you execute Harvest functions directly from the command line.
The optional Explorer interface (HarWind) lets you perform check-in and check-out processes from the Windows Explorer.
The Harvest Version Control Interface lets you perform many Harvest functions directly from the Microsoft’s Developer Studio in a graphical integrated development environment (IDE). For more information about the Harvest Version Control Interface, see the Version Control Interface User Guide.
The Harvest Change Manager Plug-in for Eclipse lets you perform many Harvest functions in an Eclipse environment. For more information about the AllFusion Harvest Plug-in for Eclipse, download the AllFusion Harvest Change Manager Plug-in for Eclipse User Guide from Customer Support at http://ca.com/support.
Harvest integrates with various other development IDEs. For more information about the specific Harvest integrations with IDEs, see the Readme and the Integration Tools User Guide.
The ISPF client interface for mainframe platforms offers a subset of functions that lets OS/390 users check data in and out of the Harvest database without requiring them to leave their ISPF environment.
For users to successfully start the Harvest client, the following conditions must be met:
The database processes must be running.
The Harvest broker must be running.
At least one Harvest server process must be running.
Harvest Objects
Complex CCM solutions can be built using basic object types. Key objects in Harvest include projects, users, user groups, repositories, states, processes, packages, forms, package groups, views, item paths, items, and versions.
The following illustration shows the hierarchy of the various objects in Harvest.
The first row (projects through repositories) shows Harvest level objects. These objects are global, meaning that they are available in all projects defined in a Harvest installation.
Note: Forms are global objects; however, they must always be associated with a package.
The second row (states through item paths) shows project level objects. These objects are specific to a single Harvest project. These include states, packages, package groups, views, item paths, and the objects that derive from them. The objects that derive from them are listed in the third row, as shown in the graphic. For example, processes derive from states, and items derive from item paths.
Each Harvest object is introduced in the sections that follow and is described in more detail in the remainder of this guide.
Harvest Level Objects
Projects—The term project refers to the entire control framework in Harvest that supports a particular development or maintenance activity. A project includes information about how changes progress through the development life cycle, the activities that can occur, what data to access, and user responsibilities.
Note: In previous releases of Harvest, the term environment was used for project; these terms are synonymous.
You can have many different projects, depending on the applications being controlled and the kind of development activity undertaken. For example, you might have one project for maintaining an already released version of an application, another for developing the next release, and a third for maintaining code shared among various applications. You might have an entirely different project that the support group uses for tracking incidents and problems.
Users and User Groups—Users are individuals defined in Harvest. When Harvest installs, an initial user is automatically created (see the Installation Guide). This user must add other users who are involved in the setup activities.
A user group is a Harvest object that arranges users in groups for the purpose of access, approval, or notification. Two predefined user groups, Public and Administrator, are provided in Harvest.
Users and user groups exist at the global level in Harvest, meaning that they are available to all Harvest projects. A user can belong to several user groups, and the groups imply no hierarchy. For example, a user in the Development Manager group does not necessarily belong to the Developer group.
Creating users and creating user groups are closely related. If you create users first, you can add them to the groups when you create the groups. If you create groups first, you can add the users to the groups when you create the users.
Repositories—Harvest stores and maintains items and their changes in a set of database tables named a repository. An item is an individual data component under Harvest control in a repository. An item in the repository is equivalent to a file on the external file system. For example, if you check out an item named test1.c from the repository, a file named test1.c will be created on your computer's file system. Each item in a repository consists of versions of the item. Harvest maintains all versions of each item in the repository. To clarify the distinction between data outside the repository and data in it, a further convention is used: external directories are named client directories, whereas directories in the repository are named view paths.
Forms—Harvest forms can be used in a similar way as paper forms are used. For example, they can be used to track issues and problems or as a structured method of communication.
Forms are always associated with packages. This association provides the link between the problem tracking and change tracking functions in Harvest. All the information gathered through a form is also directly accessible from the associated package.
Project Level Objects
States—States are distinct work areas in which certain activities can take place as packages move from definition to completion. A life cycle can include several states.
A state is usually associated with a view. The view determines which item versions are accessible to users operating in a state using that view. A state can be defined without a view, if users do not need access to data items. For example, an initial state named Open, which is simply a holding area for newly created change requests, would not need a view.
Processes—A process is an action that can be executed on an object in Harvest. The processes defined for a state determine what activities can be performed in that state. Harvest includes a predefined set of process types. A process name can be specified for each process defined to add clarity and to distinguish between multiple processes of the same type. When a process is added to a state, its name appears on that state’s Processes menu.
Two processes determine the order in which change packages progress through a life cycle: promote and demote. A promote process moves change packages from one state to the next. A demote process returns change packages to a previous state.
Packages—A package is the basic unit of work that moves through a life cycle. It typically represents a problem or a request that needs to be tracked, the changes made in response to the problem or the request, and any other associated information. The package is the user's link to the actual data accessed during the change process. Each package resides in a particular state of the life cycle.
Packages are associated with one or more forms, which are used to organize and maintain related information. The package-form association is a powerful way to combine problem tracking with change control.
The life span of a package is usually limited to one project; however, packages can be created in one project and then moved to another to begin a new life cycle. This use of packages closely links a problem-tracking project with a change control project. For example, problems reported to a customer support group can be tracked by packages that pass through several stages in the support project. When a problem is assigned to be fixed, instead of beginning a new package in the development project, you can move the package with its history intact from the support project to the development project.
Package Groups—A typical project can include numerous packages. A package group provides a higher logical level for operating on related packages. A package can belong to one group, several groups, or no groups. Any operation that can be performed on a package can be performed on all packages in a package group.
Package groups also provide support for filtering operations, such as Find Version, and let you set up different handling processes for different kinds of packages. To illustrate, packages in a certain group might need to pass through an extra state before continuing through the life cycle. For example, packages specifying documentation changes must pass through a special documentation state before moving on through the normal quality assurance (QA) and release cycles. No other packages are passed through the documentation state.
The bind packages feature enforces restrictions to packages belonging to a package group. If a package is part of a bound package group and if Enforce Bind is enabled on the Demote or Promote Properties dialog, all packages in the group must be demoted or promoted together.
Views—Views determine what items specific users or user groups can access and view in repositories.
Baseline—Each project has one type of view named baseline. The baseline defines the repository items available to the project. A baseline can include items from more than one repository, as in the case of shared code.
Working and Snapshot Views—Working and snapshot views are created from the baseline. Each view looks at the same paths and items as the baseline, but not necessarily at the same versions of items.
Working views define functional work areas. You can integrate working views into a life cycle by associating them with one or more states. Several states can share the same working view, but a state cannot use more than one working view. The working view determines which item versions are accessible to users. Changes introduced by a package are visible only in the package's current view; a package’s state determines the package’s current view. As a package moves through a life cycle, the versions associated with it become visible in another view only when it reaches a state in that view. For more information, see the chapters “Managing Your Changes” and “Using Packages and Forms.”
A snapshot view is a read-only image of a working view at a specific point in time. Snapshots capture a data inventory at significant points in the software's development, such as a release. After a snapshot is created, it can be used to support other application management functions such as baselining.
A state can be associated with all the snapshot views created in its project by selecting the All Snapshot Views option in the State Properties dialog. When this option is selected, the state is associated with only the snapshots created from that project. The versions captured by snapshots can be checked out but because snapshot views are read-only, items cannot be checked in.
Views are predefined in the life cycle templates, or you can create them. For more information, see the Administrator Guide.
Item Paths—Directories in the repository are named item paths to distinguish them from directories in the external file system.
Items—Repositories are composed of items. An item in a repository contains the actual data under Harvest control. An item is equivalent to a file on the file system. If you check out an item named test1.c from the repository, a file named test1.c is created on your file system.
Versions—Each item in a repository consists of versions of the item. Item versions are visible to users only through views. The Data Views for a state in the Workbench displays versions in the project baseline view and versions in the state’s working view.
When a user checks in a new version of an item, that new version becomes visible only in the states that use the same view as the state in which the version was checked in. For example, if a user checks in version 2 of file1.c from the Coding state, and the Unit Test state shares the same view as the Coding state, version 2 of file1.c is visible in both states. However, version 2 is invisible in the Release state because that state does not share the same view. For version 2 to show up in the Release state, the package that was used to create the version must be promoted to the Release state.
Versions are managed in Harvest in a tree structure named a delta tree. The following illustration depicts a single item that has been updated in multiple packages. The triangle Δ represents a delta, or change, made to the original item since it was added to the repository. Each delta represents a new version.
Project
Trunk
Initial item loaded into repository V0
The original item is stored in the repository. Projects use this item to create versions on trunks of the delta tree that extend from the repository. These trunks can support versions on multiple branches. Branches are independent delta chains that extend from versions on a project trunk. For more information about branches and versions, see the chapter “Managing Your Changes.”
A Sample Life Cycle
Harvest lets you create a life cycle that suits your application development procedures. The following illustration shows some basic building blocks you use to create a Harvest life cycle:
In this example, the life cycle has five states. In the Assign CRs (Change Requests) state, administrators create packages to fix change requests. Developers create and modify code in the Development state and test the code in the Unit Test state. In the QA state, QA personnel test the new code. In the Production state, the code is held for final release.
State names are completely user-defined. In the previous sample life cycle, the name of the Assign CRs state is based on the term change requests. If your company creates trouble reports rather than change requests, you can name the initial state Assign TRs or something similar.
The vertical arrows in the sample life cycle indicate promote processes that define how packages move from one state to another. The states and promote processes combine to form a road map through which an application ”travels” on its way to release. The vehicle by which it travels is a package. A package typically represents a change request (CR) for the application.
In the sample life cycle, a package starts in the Assign CRs state and is promoted to the Development state. A view is not associated with the Assign CRs state, because no activities in this state affect actual data.
Note the views in the sample life cycle. In this sample, developers accessing a package in the Development state can modify versions of items in the DEV view. The changes made in DEV are not visible in any other view until the package is promoted to a state in that view. After a package has completed testing in Unit Test, it is promoted to QA, which is in the TEST view. When the package enters QA, the TEST view is updated with the package changes. Changes made in the DEV view by other packages do not appear in TEST until those packages are promoted to QA.


 427
427

 被折叠的 条评论
为什么被折叠?
被折叠的 条评论
为什么被折叠?
 到【灌水乐园】发言


