


一. UINavgationViewController简介
1.继承关系
UINavgationViewController继承自UIViewController,它的内部结构为:导航条,导航控制器的view,存放导航控制器子控制器的view
2.使用场景
UINavigationController一般用来管理有层次关系的视图,它可以轻松地管理多个控制器,轻松完成控制器之间的切换,典型例子就是系统自带的“设置”应用到导航控制器
3.基本概念
父控制器:通过导航控制器管理多个子控制器,导航控制器就称为父控制器
子控制器:压入栈的控制器都做作为导航控制器的子控制器
栈底控制器:压入栈的第一个子控制器称栈底控制器,也叫导航控制器的根控制器
栈顶控制器:当前显示在导航控制器上的子控制器
自动出栈:点击导航条上的返回按钮,系统会让当前控制器出栈
主动出栈:通过调用导航控器提供的出栈方法执行出栈
导航条:为APP使用者提供一定的途径,使其可以方便地访问到所需的内容
工具条:和导航条类似
导航控制的代理:用于监听导航控制器的操作
二. UINavgationViewController常见属性
// 栈顶控制器
@property(nonatomic,readonly,retain) UIViewController *topViewController;
// 当前显示的控制器
@property(nonatomic,readonly,retain) UIViewController *visibleViewController;
// 栈里的所有控制所组成的数组
@property(nonatomic,copy) NSArray *viewControllers;
// 设置隐藏导航条,默认NO
@property(nonatomic,getter=isNavigationBarHidden) BOOL navigationBarHidden;
// 导航条
@property(nonatomic,readonly) UINavigationBar *navigationBar;
// 隐藏工具条,默认YES
@property(nonatomic,getter=isToolbarHidden) BOOL toolbarHidden
// 工具条
@property(nonatomic,readonly) UIToolbar *toolbar;
// 设置手势识别
@property(nonatomic, readonly) UIGestureRecognizer *interactivePopGestureRecognizer;
// 当键盘出现的时候隐藏导航条与工具条
@property (nonatomic, readwrite, assign) BOOL hidesBarsWhenKeyboardAppears;
// 上下滑动的时,隐藏和显示导航条与工具条
@property (nonatomic, readwrite, assign) BOOL hidesBarsOnSwipe;
// 设置手势识别滑动,隐藏和显示导航条与工具条
@property (nonatomic, readonly, retain) UIPanGestureRecognizer *barHideOnSwipeGestureRecognizer;
// 当导航栏的垂直size比较紧凑时,导航栏自动隐藏
@property (nonatomic, readwrite, assign) BOOL hidesBarsWhenVerticallyCompact;
// 点击屏幕,隐藏和显示导航条与工具条
@property (nonatomic, readwrite, assign) BOOL hidesBarsOnTap;
// 设置手势识别点击,隐藏和显示导航条与工具条
@property (nonatomic, readonly, assign) UITapGestureRecognizer *barHideOnTapGestureRecognizer;
三. UINavgationViewController常见方法
// 用自定义的导航条类和工具条类初始化导航控制器,为空时,默认是UINavigationBar和UIToolbar
- (instancetype)initWithNavigationBarClass:(Class)navigationBarClass toolbarClass:(Class)toolbarClass;
// 用控制器rootViewController初始化导航控制器的根控制器
- (instancetype)initWithRootViewController:(UIViewController *)rootViewController;
// 控制器入栈
- (void)pushViewController:(UIViewController *)viewController animated:(BOOL)animated;
// 控制器出栈,方法返回出栈的控制器
- (UIViewController *)popViewControllerAnimated:(BOOL)animated;
// 出栈到子控制器viewController,方法返回所有出栈的控制器组成的数组
- (NSArray *)popToViewController:(UIViewController *)viewController animated:(BOOL)animated;
// 出栈到根控制器,方法返回所有出栈的控制器组成的数组
- (NSArray *)popToRootViewControllerAnimated:(BOOL)animated;
// 显示控制vc
- (void)showViewController:(UIViewController *)vc sender:(id)sender
四. UINavigationController的代理
要先设置UINavigationController的代理,并且实现代理方法
// 当即将显示viewController时调用
- (void)navigationController:(UINavigationController *)navigationController willShowViewController:(UIViewController *)viewController animated:(BOOL)animated;
// 当显示完成viewController时调用
- (void)navigationController:(UINavigationController *)navigationController didShowViewController:(UIViewController *)viewController animated:(BOOL)animated;
五. UINavigationController的知识点
(一). 关于导航控制器
1. 添加导航控制器的根控制器,默认第一个子控制器叫根控制器
a. push一个控制器
  // 创建导航条的根控制器
  UIViewController *vc = [[OneViewController alloc] init];
  // push一个控制器,第一个控制默认是根根控制器
  [nav pushViewController:vc animated:YES];
b. 创建导航控制器的时候就给一个根控制器
  // 创建导航条的根控制器
  UIViewController *vc = [[OneViewController alloc] init];
  // 创建导航条控制
  UINavigationController *nav = [[UINavigationController alloc] initWithRootViewController:vc];
2. 管理很多子控制器
a. Push或者Pop子控制器就可以进行管理
b. 不要一下子Push或者Pop很多个控制器,跳转控制器的权利应该交给用户,由用户决定进入那个界面
3. 控制器之间的导航
给A控制器添加导航功能,是点击A控制器上的控件,导航到B控制器
4. 导航控制器的作用
用来做导航功能,一个控制器如果想拥有导航功能,就要包装成导航控制器
5.导航控制器的管理原理
a. 导航控制器是通过栈来管理子控制器,栈是先进后出
b. push把控制器压入栈,然后创建控制器的view,再把控制器的view添加到导航控制器上
c. 子控制器入栈后,显示到导航控制器上,在栈里的其他子控制器的view不会被销毁,只是移除了父视图
d. 点击返回按钮,移除栈顶控制器,被移除的控制器会在新的顶控制器完全显示的时候被销毁
6. 导航控制的主动出栈注意
出栈的控制器必须是栈里的子控制器,不能自己创建一个控制器出栈,会报出栈的控制器不存在的错误
(二). 关于导航条
1. 简介
导航条继承自UIView,一个导航控制器只有一个导航条,子控制器共用一个导航条;创建一个导航控制器,就默认自动创建一个导航条
2. 常用属性和方法
// 设置导航条的样式
@property(nonatomic,assign) UIBarStyle barStyle;
// 设置导航条的代理
@property(nonatomic,assign) id<UINavigationBarDelegate> delegate;
// 设置导航条是否透明,iOS6之前默认为NO,如果设置barStyle属性为UIBarStyleBlackTranslucent,者默认为YES
@property(nonatomic,assign,getter=isTranslucent) BOOL translucent;
// 获取栈顶控制器的导航条的数据模型
@property(nonatomic,readonly,retain) UINavigationItem *topItem;
// 获取返回按钮对应的控制器的导航条的数据模型
@property(nonatomic,readonly,retain) UINavigationItem *backItem;
// 获取所有的数据模型
@property(nonatomic,copy) NSArray *items;
// iOS7之前,tintColor可以修改背景色
@property(nonatomic,retain) UIColor *tintColor;
// iOS7之后,修改背景色只能用barTintColor
@property(nonatomic,retain) UIColor *barTintColor;
// 要先设置导航条的背景图片,在设置阴影图片才有效果
@property(nonatomic,retain) UIImage *shadowImage;

// 将新的UINavigationItem 压入栈
- (void)pushNavigationItem:(UINavigationItem *)item animated:(BOOL)animated;
// 将顶部的UINavigationItem 推出栈
- (UINavigationItem *)popNavigationItemAnimated:(BOOL)animated;
// 获取所有的数据模型
- (void)setItems:(NSArray *)items animated:(BOOL)animated;
// 设置导航条的背景图片
- (void)setBackgroundImage:(UIImage *)backgroundImage forBarMetrics:(UIBarMetrics)barMetrics;
3. 导航条的代理方法
// 是否允许入栈
- (BOOL)navigationBar:(UINavigationBar *)navigationBar shouldPushItem:(UINavigationItem *)item;
// 入栈后调用
- (void)navigationBar:(UINavigationBar *)navigationBar didPushItem:(UINavigationItem *)item;
// 是否允许出栈
- (BOOL)navigationBar:(UINavigationBar *)navigationBar shouldPopItem:(UINavigationItem *)item;
// 出栈后调用
- (void)navigationBar:(UINavigationBar *)navigationBar didPopItem:(UINavigationItem *)item;
4. 导航条的内容
导航条的内容由navigationItem属性决定,但是navigationItem不是导航控制器的属性,也不是导航条的属性,而是控制器UIViewController的属性,因此导航控制器必须要有一个控制器,才能设置导航条的内容
@interface UIViewController (UINavigationControllerItem)

// 只读,导航条内容
@property(nonatomic,readonly,retain) UINavigationItem *navigationItem;
// 当显示新的控制器的时候,隐藏底部的工具条,默认为NO
@property(nonatomic) BOOL hidesBottomBarWhenPushed;
// 只读,导航控制器
@property(nonatomic,readonly,retain) UINavigationController *navigationController;

@end
5. 导航条的数据模型
设置导航条的内容实质是设置导航条的数据模型,因为UINavigationItem继承于NSObject,不是UIView
@interface UINavigationItem : NSObject <NSCoding>

// 导航条的标题
@property(nonatomic,copy) NSString *title;
// 设置返回按钮,返回按钮在下一个控制器中生效
@property(nonatomic,retain) UIBarButtonItem *backBarButtonItem;
// 自定义一个标题视图
@property(nonatomic,retain) UIView *titleView;
// 说明标题,用于叙述
@property(nonatomic,copy) NSString *prompt;
// 隐藏返回按钮
@property(nonatomic,assign) BOOL hidesBackButton;
// 自定义多个左边的按钮
@property(nonatomic,copy) NSArray *leftBarButtonItems;
// 自定义多个右边的按钮
@property(nonatomic,copy) NSArray *rightBarButtonItems;
// 是否显示返回按钮
@property(nonatomic) BOOL leftItemsSupplementBackButton;
// 设置一个左边按钮
@property(nonatomic,retain) UIBarButtonItem *leftBarButtonItem;
// 设置一个右边按钮
@property(nonatomic,retain) UIBarButtonItem *rightBarButtonItem;

// 初始化UINavigationItem对象的标题
- (instancetype)initWithTitle:(NSString *)title;
// 隐藏返回按钮
- (void)setHidesBackButton:(BOOL)hidesBackButton animated:(BOOL)animated;
// 自定义多个左边的按钮
- (void)setLeftBarButtonItems:(NSArray *)items animated:(BOOL)animated ;
// 自定义多个右边的按钮
- (void)setRightBarButtonItems:(NSArray *)items animated:(BOOL)animated ;
// 设置一个左边按钮
- (void)setLeftBarButtonItem:(UIBarButtonItem *)item animated:(BOOL)animated;
// 设置一个右边按钮
- (void)setRightBarButtonItem:(UIBarButtonItem *)item animated:(BOOL)animated;

@end
6. 导航条上的返回按钮的标题由上一个控制器决定
(1). 如果上一个控制器没有设置标题,默认back
(2). 如果上一个控制器设置标题,并且没有超过12个字符,默认返回按钮的标题和上一个控制器的标题一致
(3). 如果上一个控制器设置标题,但是超过12个字符,返回按钮的标题就会变成back
(4). 还可以主动直接设置的返回按钮的标题,得通过上一个控制器的backBarButtonItem属性设置
(三). 关于工具条
1. 简介
工具条继承自UIView,一个导航控制器只有一个工具条,子控制器共用一个工具条;创建一个导航控制器,就默认自动创建一个工具条,但默认是隐藏的,可以设置toolbarHidden属性为NO,即可显示
2. 常用属性
// 设置工具条类型
@property(nonatomic) UIBarStyle barStyle;
// 设置工具条上可见的的按钮UIBarButtonItem
@property(nonatomic,copy) NSArray *items;
// 设置导航条是否透明,iOS6之前默认为NO,如果设置barStyle属性为UIBarStyleBlackTranslucent,者默认为YES
@property(nonatomic,assign,getter=isTranslucent) BOOL translucent;
// iOS7之前,tintColor可以修改背景色
@property(nonatomic,retain) UIColor *tintColor;
// iOS7之后,修改背景色只能用barTintColor
@property(nonatomic,retain) UIColor *barTintColor;
// 设置代理
@property(nonatomic,assign) id<UIToolbarDelegate> delegate;
3. 工具条的内容
(1). 工具条的内容由toolbarItems属性决定,但是toolbarItems不是导航控制器的属性,也不是工具条的属性,而是控制器UIViewController的属性,因此导航控制器必须要有一个控制器,才能设置工具条的内容
(2). toolbarItems是一个数组,因此要先创建好所需要的按钮,再在一个数组中添加新建的按钮,才能把这个数组赋值给toolbarItems
@interface UIViewController (UINavigationControllerContextualToolbarItems)

// 设置工具条的内容
@property (nonatomic, retain) NSArray *toolbarItems NS_AVAILABLE_IOS(3_0);
// 设置工具条的内容
- (void)setToolbarItems:(NSArray *)toolbarItems animated:(BOOL)animated NS_AVAILABLE_IOS(3_0);

@end
4. 工具条上的按钮的数据模型
设置工具条的内容实质是设置工具条的数据模型,因为toolbarItems继承于UIBarItem,而UIBarItem又继承自NSObject
@interface UIBarButtonItem : UIBarItem <NSCoding>
// 设置按钮类型
@property(nonatomic) UIBarButtonItemStyle style;
// 设置高,默认为0.0
@property(nonatomic) CGFloat width;
// 这个属性暂时不理解怎么使用!!!
@property(nonatomic,copy) NSSet *possibleTitles;
// 自定义view
@property(nonatomic,retain) UIView *customView;
// 响应方法
@property(nonatomic) SEL action;
// 响应方法的对象
@property(nonatomic,assign) id target;
// 设置按钮的颜色
@property(nonatomic,retain) UIColor *tintColor;
七、导航控制的创建
这里只给出一部分代码
#import "AppDelegate.h"
#import "OneViewController.h"

@interface AppDelegate ()

@end

@implementation AppDelegate


- (BOOL)application:(UIApplication *)application didFinishLaunchingWithOptions:(NSDictionary *)launchOptions {


  // 1.创建窗口
  self.window = [[UIWindow alloc] initWithFrame:[UIScreen mainScreen].bounds];


  // 2.1创建导航条的根控制器
  UIViewController *vc = [[OneViewController alloc] init];

  // 设置根控制(方式一)
  // 2.2创建导航条控制
  //UINavigationController *nav = [[UINavigationController alloc] init];
  // 2.3设置第一个控制器,第一个子控制器默认是导航控制器的根控制器
  //[nav pushViewController:vc animated:YES];

  // 设置根控制(方式二)
  // 2.2创建导航控制器,并使用控制器初始化导航控制器的根控制器
  UINavigationController *nav = [[UINavigationController alloc] initWithRootViewController:vc];


  // 2.创建窗口的根控制器
  self.window.rootViewController = nav;


  // 3.显示窗口
  [self.window makeKeyAndVisible];


#pragma mark - 设置导航控制器的工具条

  // 显示工具条,默认是隐藏的
  nav.toolbarHidden = NO;

  // 设置一个有加号图案按钮
  UIBarButtonItem *one = [[UIBarButtonItem alloc] initWithBarButtonSystemItem:UIBarButtonSystemItemAdd target:nil action:nil];

  // 设置加号按钮的颜色
  one.tintColor = [UIColor redColor];

  // 设置一个有书籍图案按钮
  UIBarButtonItem *two = [[UIBarButtonItem alloc] initWithBarButtonSystemItem:UIBarButtonSystemItemBookmarks target:nil action:nil];

  // 设置一个有处理图案按钮
  UIBarButtonItem *three = [[UIBarButtonItem alloc] initWithBarButtonSystemItem:UIBarButtonSystemItemAction target:nil action:nil];

  // 设置一个有编辑图案按钮
  UIBarButtonItem *four = [[UIBarButtonItem alloc] initWithBarButtonSystemItem:UIBarButtonSystemItemEdit target:nil action:nil];

  // 设置一个灵活间隔,能自适应配置横向的各个按钮的位置
  UIBarButtonItem *flexItem = [[UIBarButtonItem alloc] initWithBarButtonSystemItem:UIBarButtonSystemItemFlexibleSpace target:nil action:nil];

  // 调用控制器的方法向工具条添加按钮
  [vc setToolbarItems:[NSArray arrayWithObjects:flexItem, one, flexItem, two, flexItem, three, flexItem, four, flexItem,nil]];


  return YES;
}

@end
八. 补充:窗口、导航控制器、控制器之间的关系
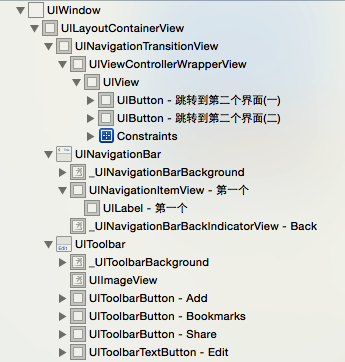
新建的窗口UIWindow:没有子控件
新建的控制器UIViewController:没有子控件
新建的导航控制器UINavigationController默认有两个子控件:UINavigationTransitionView、UINavigationBar、UIToolbar,其中UIToolbar默认是隐藏的
新建的导航控制器的子控件UINavigationTransitionView :没有子控件
添加了根控制的导航控制器,其子控件UINavigationTransitionView自动添加一个UIViewControllerWrapperView
UIViewControllerWrapperView有一个子控件:根控制器的View
添加了根控制器的窗口UIWindow有了一个子控件:UILayoutContainerView


 1044
1044

 被折叠的 条评论
为什么被折叠?
被折叠的 条评论
为什么被折叠?
 到【灌水乐园】发言


