


1、Spring Boot跨域配置有两种方法
在后端使用Spring Boot。Spring Boot跨域非常简单,只需书写以下代码即可。
@Configuration
public class CustomCORSConfiguration {
  private CorsConfiguration buildConfig() {
    CorsConfiguration corsConfiguration = new CorsConfiguration();
    corsConfiguration.addAllowedOrigin("*");
    corsConfiguration.addAllowedHeader("*");
    corsConfiguration.addAllowedMethod("*");
      corsConfiguration.setAllowCredentials(true);
     return corsConfiguration;
  }

  @Bean
  public CorsFilter corsFilter() {
    UrlBasedCorsConfigurationSource source = new UrlBasedCorsConfigurationSource();
    source.registerCorsConfiguration("/**", buildConfig());
    return new CorsFilter(source);
  }
}
2.Nginx跨域配置
Spring Boot应用用Nginx反向代理。而前端跨域请求的需求不减。
Nginx跨域也比较简单,只需添加以下配置即可。
location / {
proxy_pass http://localhost:8080;
if ($request_method = 'OPTIONS') {
add_header 'Access-Control-Allow-Origin' '*';
add_header 'Access-Control-Allow-Methods' 'GET, POST, OPTIONS';
add_header 'Access-Control-Allow-Headers' 'DNT,X-CustomHeader,Keep-Alive,User-Agent,X-Requested-With,If-Modified-Since,Cache-Control,Content-Type,Content-Range,Range,Token';
add_header 'Access-Control-Max-Age' 1728000;
add_header 'Content-Type' 'text/plain; charset=utf-8';
add_header 'Content-Length' 0;
return 204;
}
if ($request_method = 'POST') {
add_header 'Access-Control-Allow-Origin' '*';
add_header 'Access-Control-Allow-Methods' 'GET, POST, OPTIONS';
add_header 'Access-Control-Allow-Headers' 'DNT,X-CustomHeader,Keep-Alive,User-Agent,X-Requested-With,If-Modified-Since,Cache-Control,Content-Type,Content-Range,Range,Token';
add_header 'Access-Control-Expose-Headers' 'DNT,X-CustomHeader,Keep-Alive,User-Agent,X-Requested-With,If-Modified-Since,Cache-Control,Content-Type,Content-Range,Range,Token';
}
if ($request_method = 'GET') {
add_header 'Access-Control-Allow-Origin' '*';
add_header 'Access-Control-Allow-Methods' 'GET, POST, OPTIONS';
add_header 'Access-Control-Allow-Headers' 'DNT,X-CustomHeader,Keep-Alive,User-Agent,X-Requested-With,If-Modified-Since,Cache-Control,Content-Type,Content-Range,Range,Token';
add_header 'Access-Control-Expose-Headers' 'DNT,X-CustomHeader,Keep-Alive,User-Agent,X-Requested-With,If-Modified-Since,Cache-Control,Content-Type,Content-Range,Range,Token';
}
}
其中:add_header 'Access-Control-Expose-Headers' 务必加上你请求时所带的header。
例如本例中的“Token”,其实是前端传给后端过来的。如果记不得也没有关系,浏览器的调试器会有详细说明。
三、浏览器设置跨域
Chrome、Firefox本身是可以通过配置支持跨域请求的。
-
Chrome跨域:参考文档:Chrome跨域
-
四、前端Vue设置跨域
先设置 axios
axios.defaults.withCredentials = true;psot 请求加入axios.defaults.headers.common['X-Requested-With'] = 'XMLHttpRequest'; //证明是ajax 请求
headers: {
    'Content-Type': 'application/x-www-form-urlencoded; charset=UTF-8',
}设置Config 文件下面的index.js 然后就可以再其它页面访问了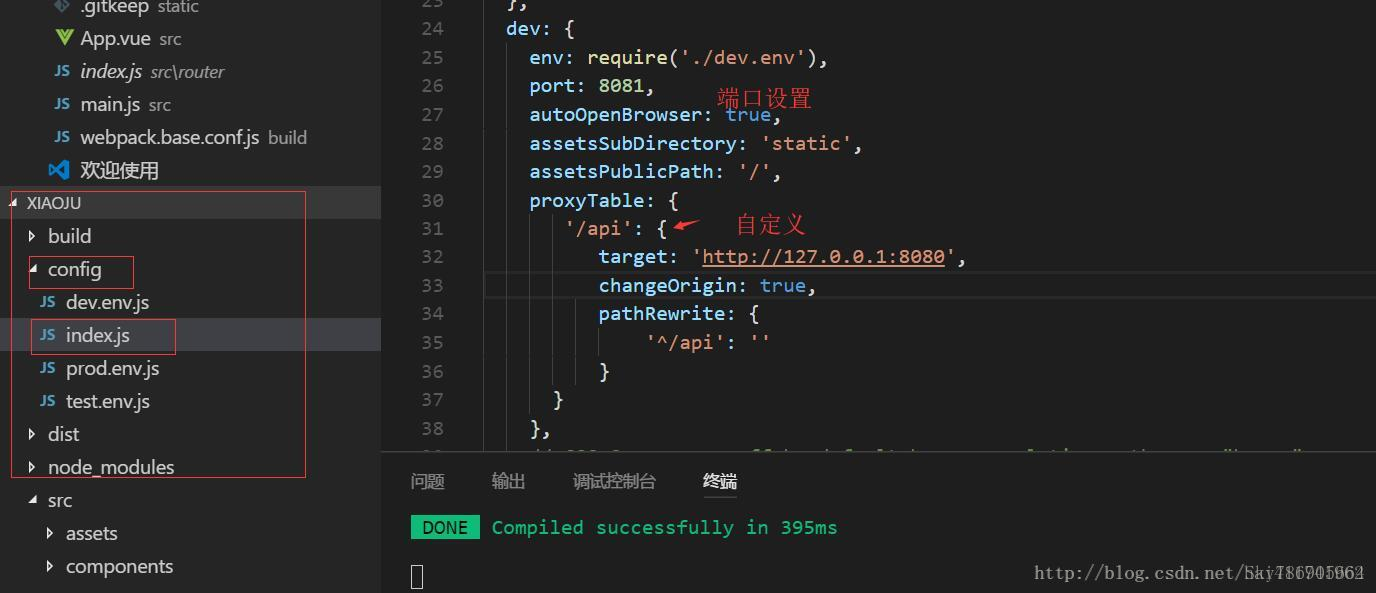


 2168
2168


 被折叠的 条评论
为什么被折叠?
被折叠的 条评论
为什么被折叠?
 到【灌水乐园】发言


