


Android 图片下载本地内存的缓存方式
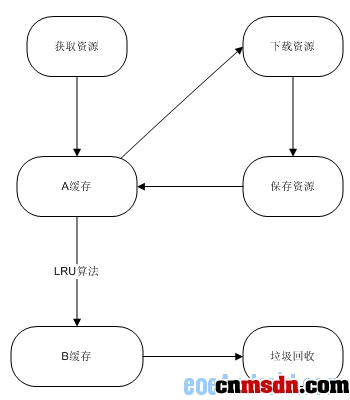
在内存中保存的话,只能保存一定的量,而不能一直往里面放,需要设置数据的过期时间、LRU等算法。这里有一个方法是把常用的数据放到一个缓存中(A),不常用的放到另外一个缓存中(B)。当要获取数据时先从A中去获取,如果A中不存在那么再去B中获取。B中的数据主要是A中LRU出来的数据,这里的内存回收主要针对B内存,从而保持A中的数据可以有效的被命中。
先定义A缓存:
java代码:
private final HashMap<String, Bitmap>mHardBitmapCache = new LinkedHashMap<String, Bitmap>(HARD_CACHE_CAPACITY/ 2, 0.75f, true) {
@Override
protected booleanremoveEldestEntry(LinkedHashMap.Entry<String, Bitmap> eldest) {
if (size() >HARD_CACHE_CAPACITY) {
//当map的size大于30时,把最近不常用的key放到mSoftBitmapCache中,从而保证mHardBitmapCache的效率
mSoftBitmapCache.put(eldest.getKey(), newSoftReference<Bitmap>(eldest.getValue()));
return true;
} else
return false;
}
};
再定义B缓存:
java代码:
/**
*当mHardBitmapCache的key大于30的时候,会根据LRU算法把最近没有被使用的key放入到这个缓存中。
*Bitmap使用了SoftReference,当内存空间不足时,此cache中的bitmap会被垃圾回收掉
*/
private final staticConcurrentHashMap<String, SoftReference<Bitmap>> mSoftBitmapCache =new ConcurrentHashMap
从缓存中获取数据:
java代码:
/**
* 从缓存中获取图片
*/
private Bitmap getBitmapFromCache(Stringurl) {
// 先从mHardBitmapCache缓存中获取
synchronized (mHardBitmapCache) {
final Bitmap bitmap =mHardBitmapCache.get(url);
if (bitmap != null) {
//如果找到的话,把元素移到linkedhashmap的最前面,从而保证在LRU算法中是最后被删除
mHardBitmapCache.remove(url);
mHardBitmapCache.put(url,bitmap);
return bitmap;
}
}
//如果mHardBitmapCache中找不到,到mSoftBitmapCache中找
SoftReference<Bitmap>bitmapReference = mSoftBitmapCache.get(url);
if (bitmapReference != null) {
final Bitmap bitmap =bitmapReference.get();
if (bitmap != null) {
return bitmap;
} else {
mSoftBitmapCache.remove(url);
}
}
return null;
}
如果缓存中不存在,那么就只能去服务器端去下载:
java代码:
/**
* 异步下载图片
*/
class ImageDownloaderTask extendsAsyncTask<String, Void, Bitmap> {
private static final int IO_BUFFER_SIZE= 4 * 1024;
private String url;
private finalWeakReference<ImageView> imageViewReference;
public ImageDownloaderTask(ImageViewimageView) {
imageViewReference = newWeakReference<ImageView>(imageView);
}
@Override
protected BitmapdoInBackground(String... params) {
final AndroidHttpClient client =AndroidHttpClient.newInstance("Android");
url = params[0];
final HttpGet getRequest = newHttpGet(url);
try {
HttpResponse response =client.execute(getRequest);
final int statusCode =response.getStatusLine().getStatusCode();
if (statusCode !=HttpStatus.SC_OK) {
Log.w(TAG, "从" +url + "中下载图片时出错!,错误码:" + statusCode);
return null;
}
final HttpEntity entity =response.getEntity();
if (entity != null) {
InputStream inputStream =null;
OutputStream outputStream =null;
try {
inputStream =entity.getContent();
finalByteArrayOutputStream dataStream = new ByteArrayOutputStream();
outputStream = newBufferedOutputStream(dataStream, IO_BUFFER_SIZE);
copy(inputStream,outputStream);
outputStream.flush();
final byte[] data =dataStream.toByteArray();
final Bitmap bitmap =BitmapFactory.decodeByteArray(data, 0, data.length);
return bitmap;
} finally {
if (inputStream !=null) {
inputStream.close();
}
if (outputStream !=null) {
outputStream.close();
}
entity.consumeContent();
}
}
} catch (IOException e) {
getRequest.abort();
Log.w(TAG, "I/O errorwhile retrieving bitmap from " + url, e);
} catch (IllegalStateException e) {
getRequest.abort();
Log.w(TAG, "Incorrect URL:" + url);
} catch (Exception e) {
getRequest.abort();
Log.w(TAG, "Error whileretrieving bitmap from " + url, e);
} finally {
if (client != null) {
client.close();
}
}
return null;
}
主要信息来源 移动开发者联盟


 被折叠的 条评论
为什么被折叠?
被折叠的 条评论
为什么被折叠?
 到【灌水乐园】发言


