


Java Web的三大组件是
Filter、Servlet和Listener。
Get和Post请求形式区别
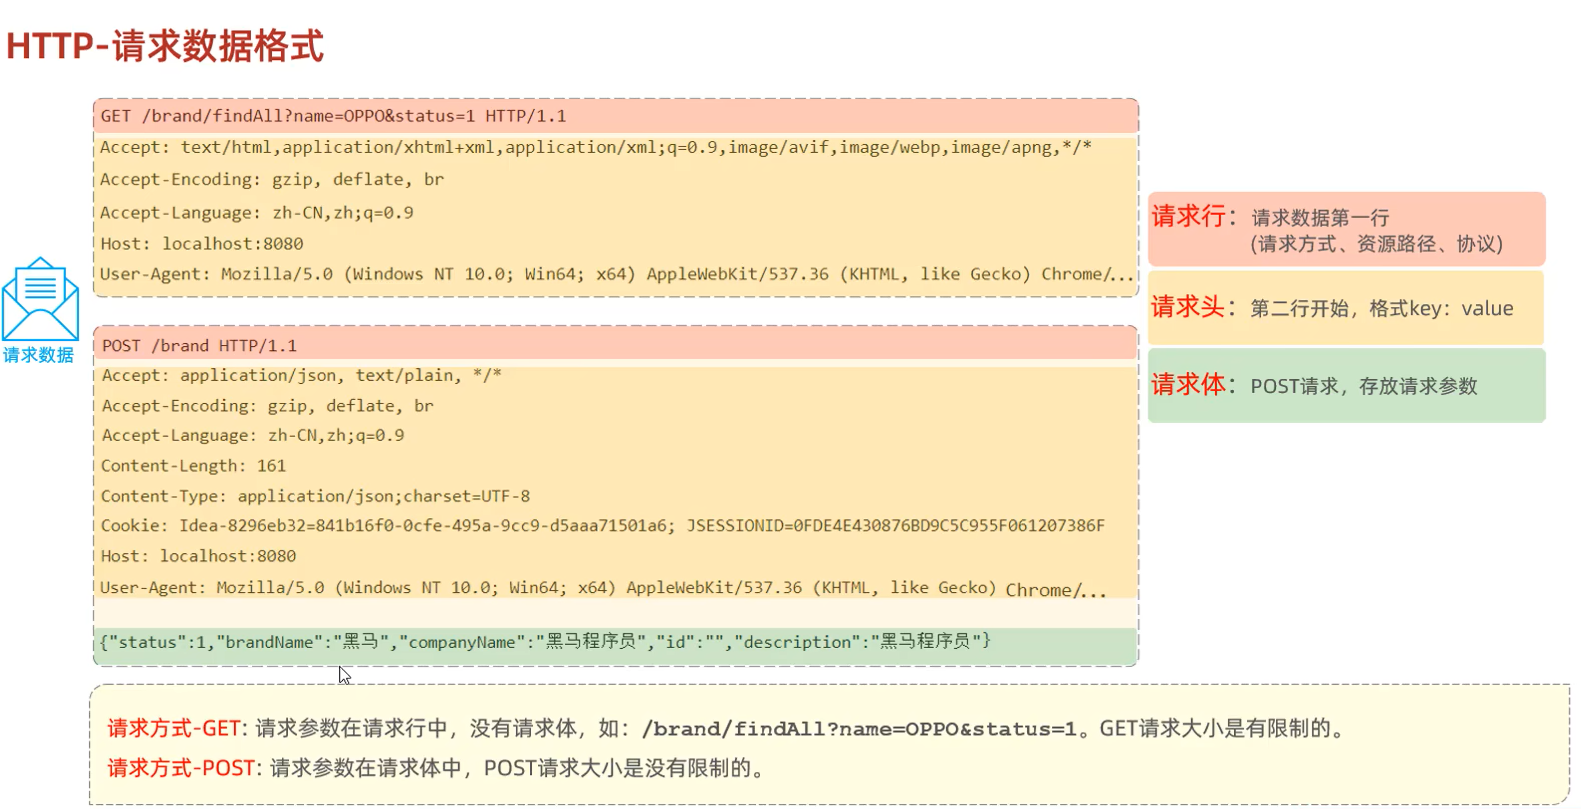
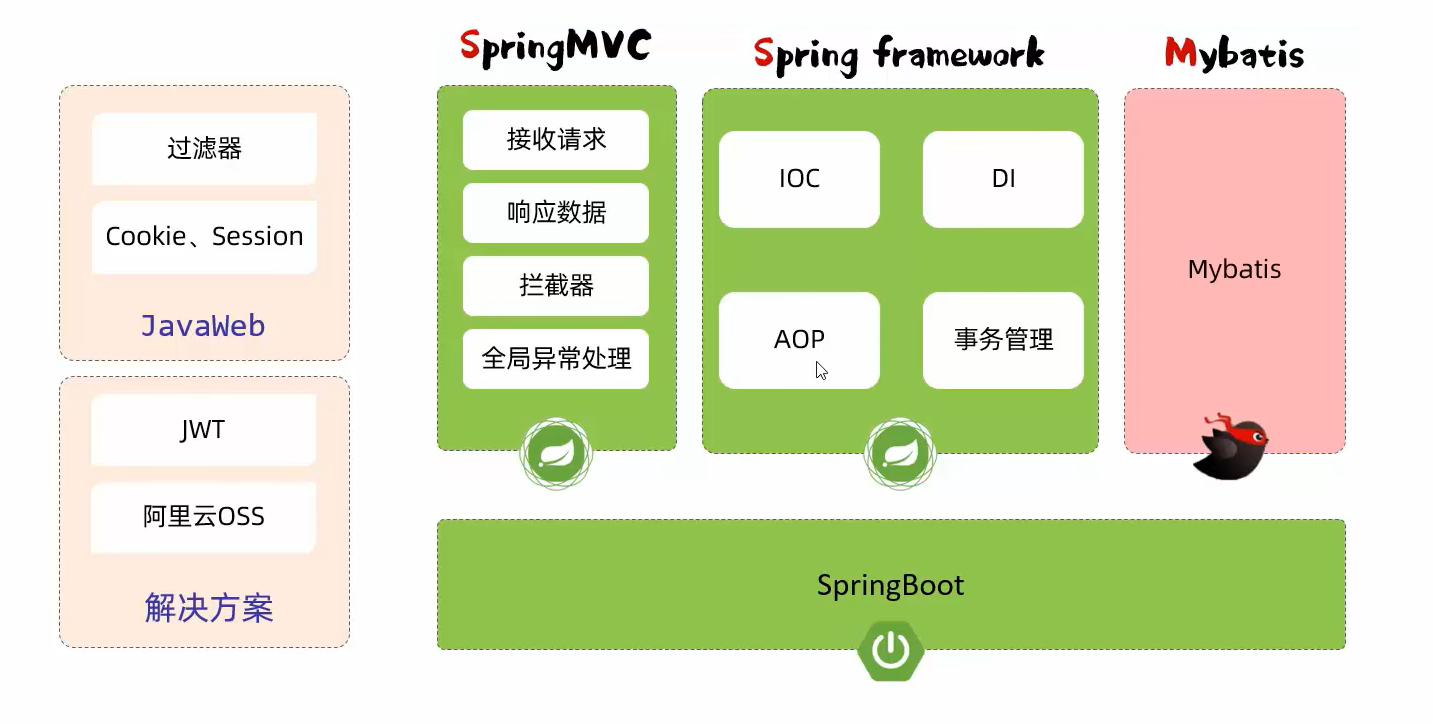
请求和响应
DispatcherServlet(类) :核心/前端控制器
解析前端信息并封装到:HttpServletRequest
响应前端并封装到:HttpServletReponse
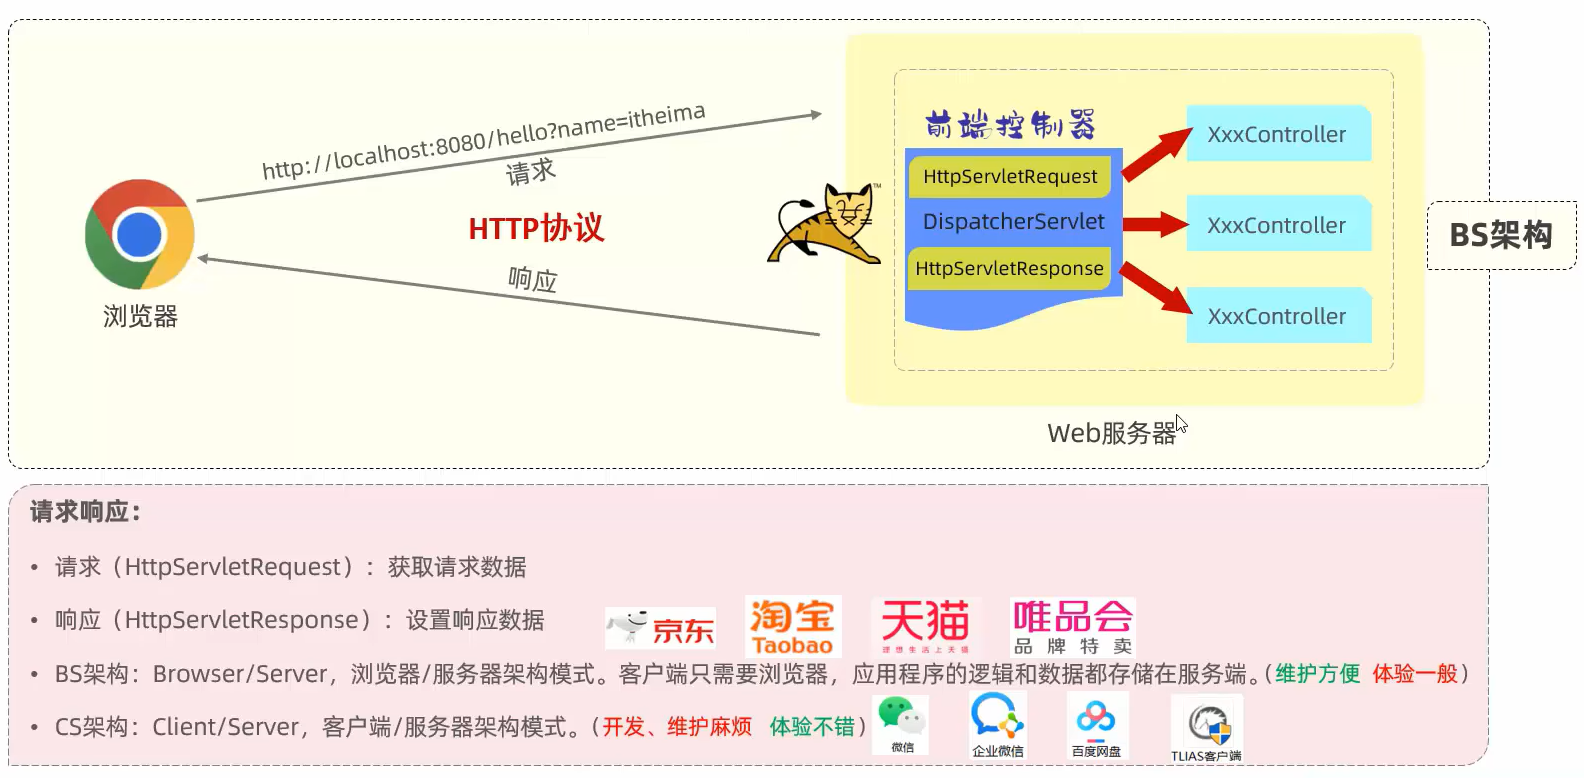
请求
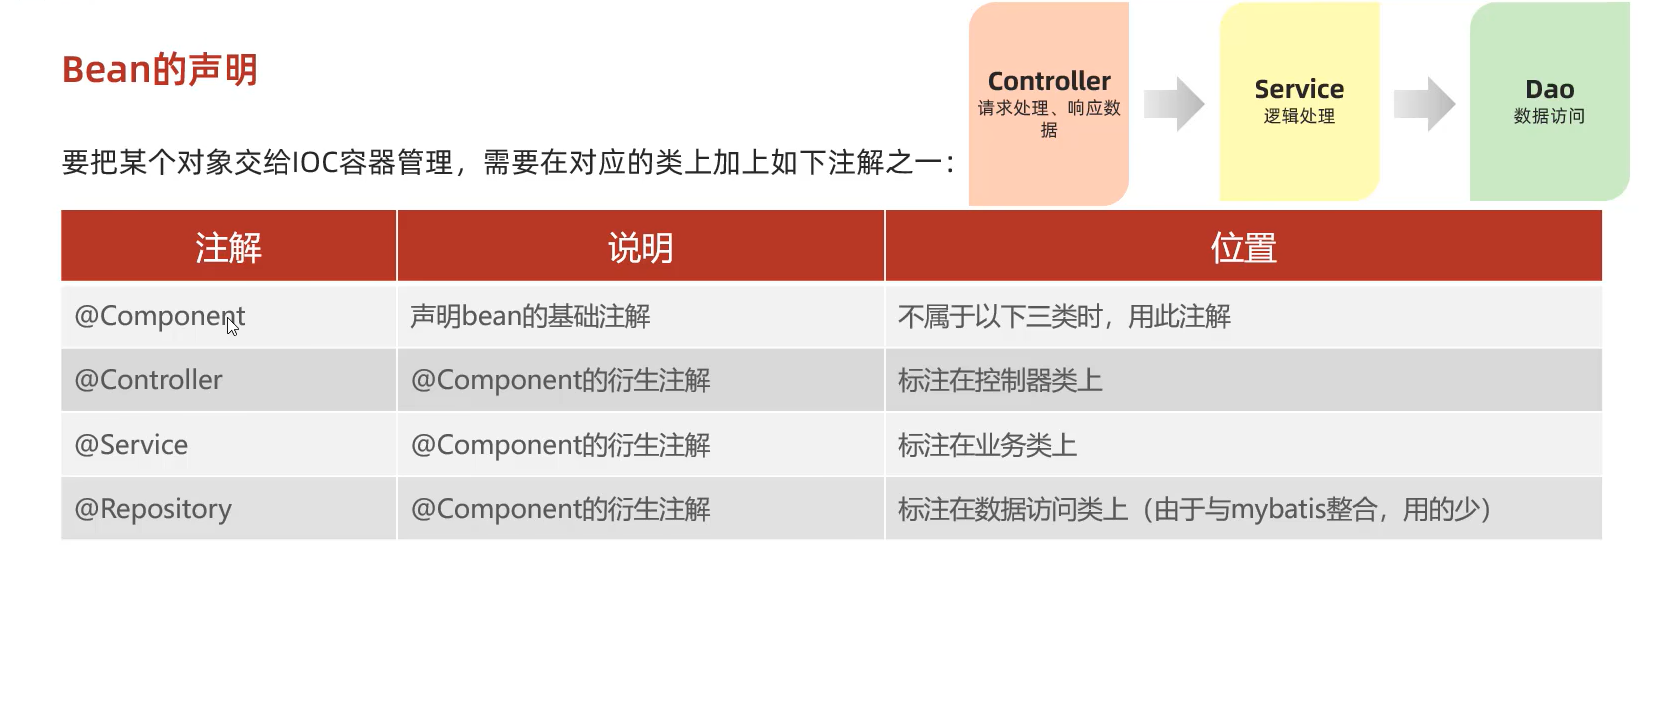
@RestController作用(类 Mapper层)
一、在Spring中@RestController的作用等同于@Controller + @ResponseBody。
所以想要理解@RestController注解就要先了解@Controller和@ResponseBody注解。
二、@Controller注解
在一个类上添加@Controller注解,表明了这个类是一个控制器类。这里省略对Controller注解的说明了。
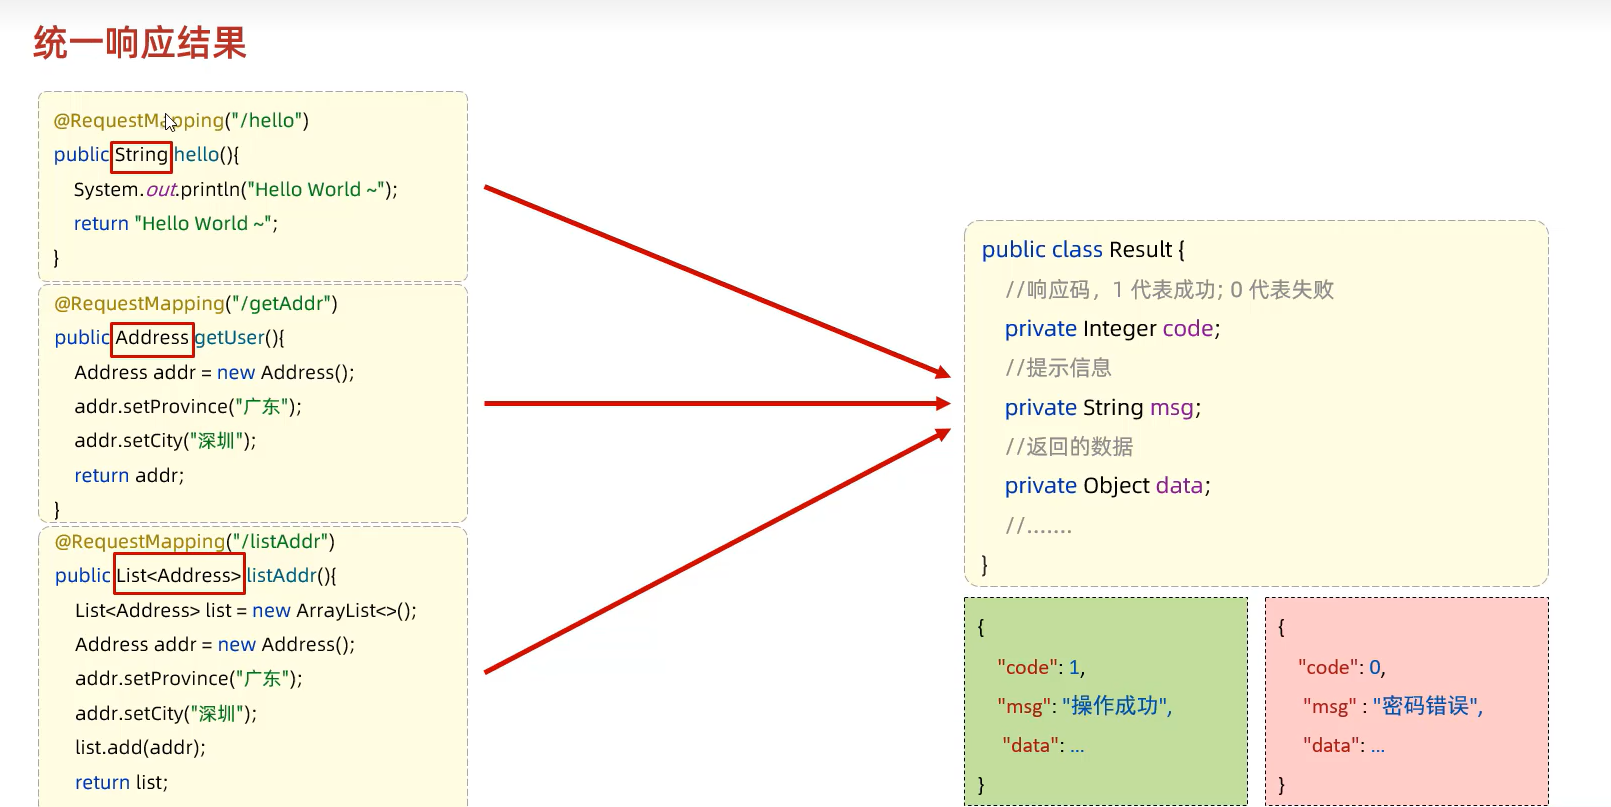
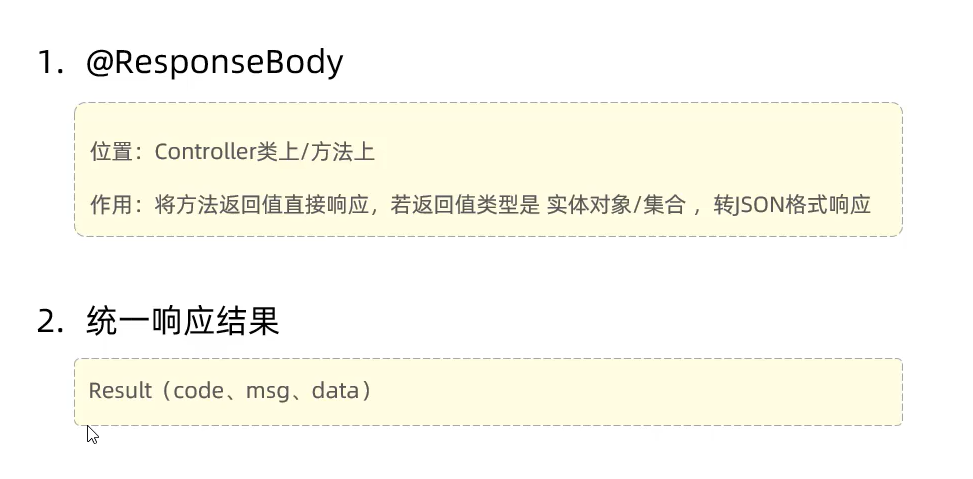
三、@ResponseBody注解
@ResponseBody可以将对象中的Result对象转为json数据格式返回给前端。
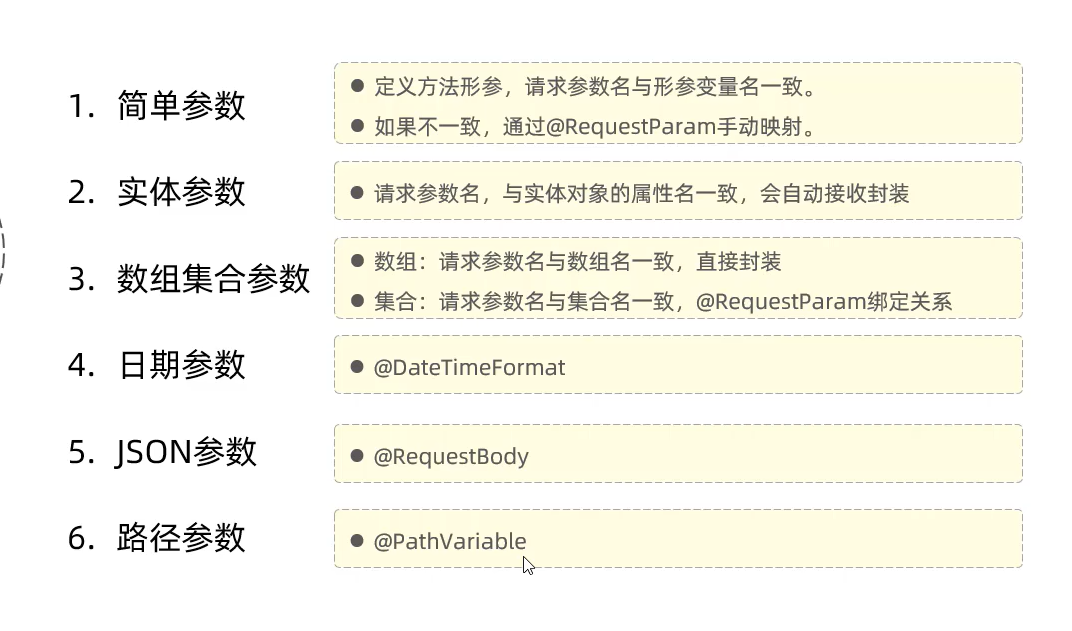
参数
在集合中需要使用@RequestPara注解:将请求参数绑定到方法的参数上。
@RestController
public class hello {
    @RequestMapping("/hello")
    public String hello() {
        System.*out*.println("hello");
        return "hello";
    }


    @RequestMapping("/simple")
    public String simple1(@RequestParam(name = "name",required = false) String username, Integer age){  //name设置不是必须的
        System.*out*.println("name:"+username+",age:"+age);
        return "OK";
    }
    @RequestMapping("/simple1")
    public String simple2(User user) {
        System.*out*.println(user);
        return "OK";
    }
    @RequestMapping("/simple2")
    public String arrayParam(String[] hobby) {
        System.*out*.println(Arrays.*toString*(hobby));
        return "OK";
    }


    //列表参数
    @RequestMapping("/simple3")
    public String listParam(@RequestParam List<String> hobby) {
        System.*out*.println(hobby);

        return "OK";
    }
    //日期时间参数
    @RequestMapping("/simple4")
    public String dataParam(@DateTimeFormat(pattern = "yyyy-MM-dd HH:mm:ss") LocalDateTime localDateTime) {
        System.*out*.println(localDateTime);
        return "OK";
    }

    //json参数
    @RequestMapping("jsonParam")
    public String jsonParam(@RequestBody User user){
        System.*out*.println(user);
        return "OK";
    }

    @RequestMapping("/path/{id}/{name}")
    public String pathParam(@PathVariable Integer id,@PathVariable String name){
        System.*out*.println(id+'\n'+name);
        return "Ok";
    }

}
响应
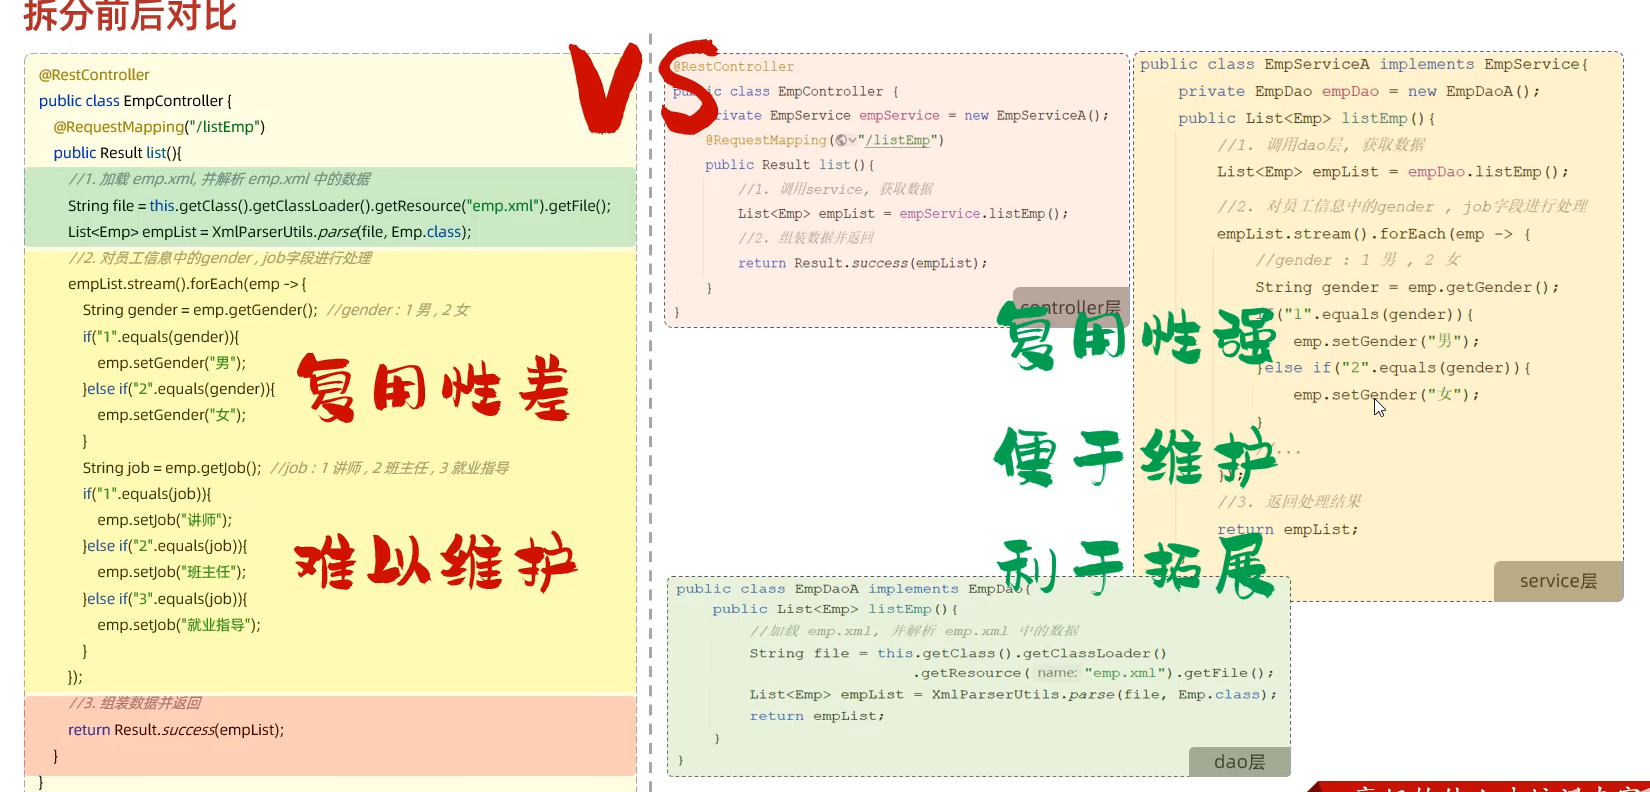
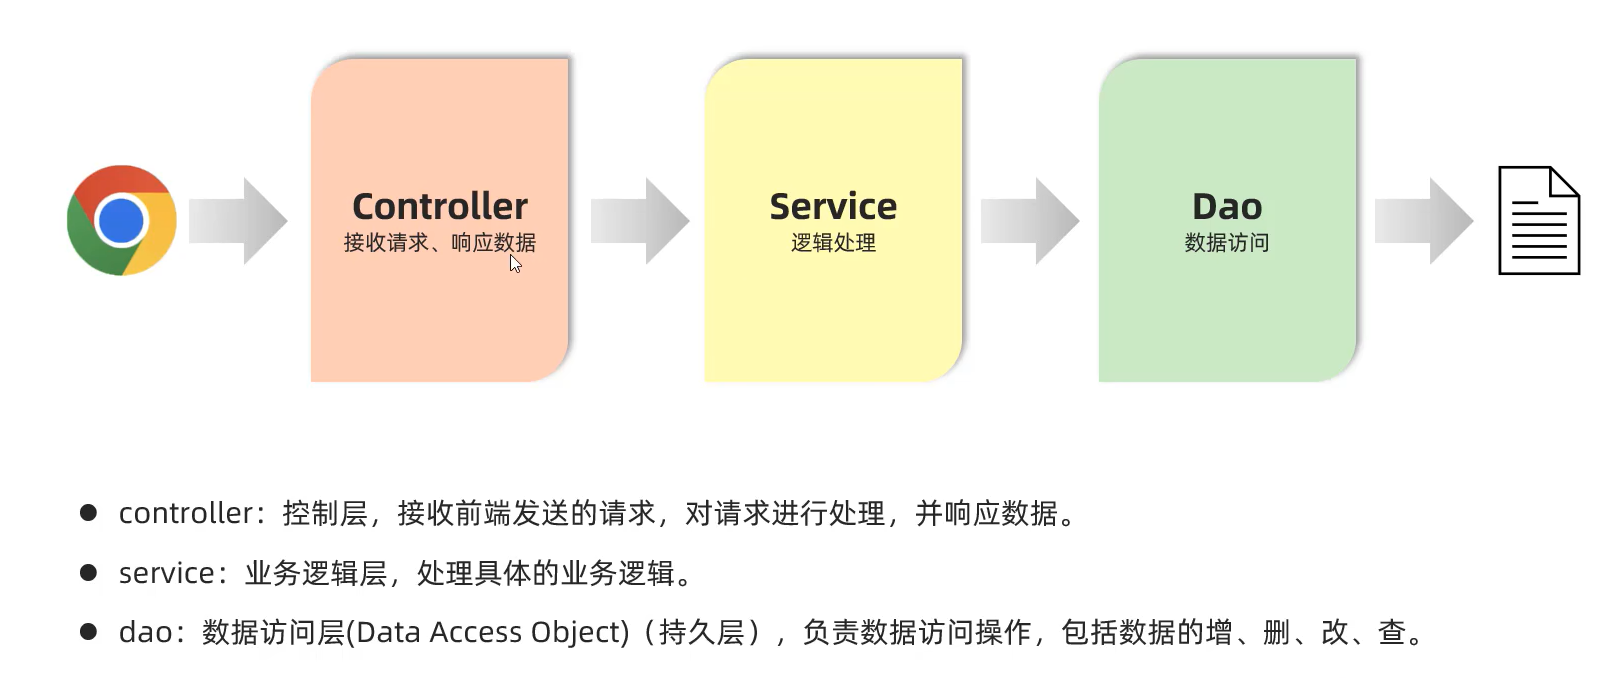
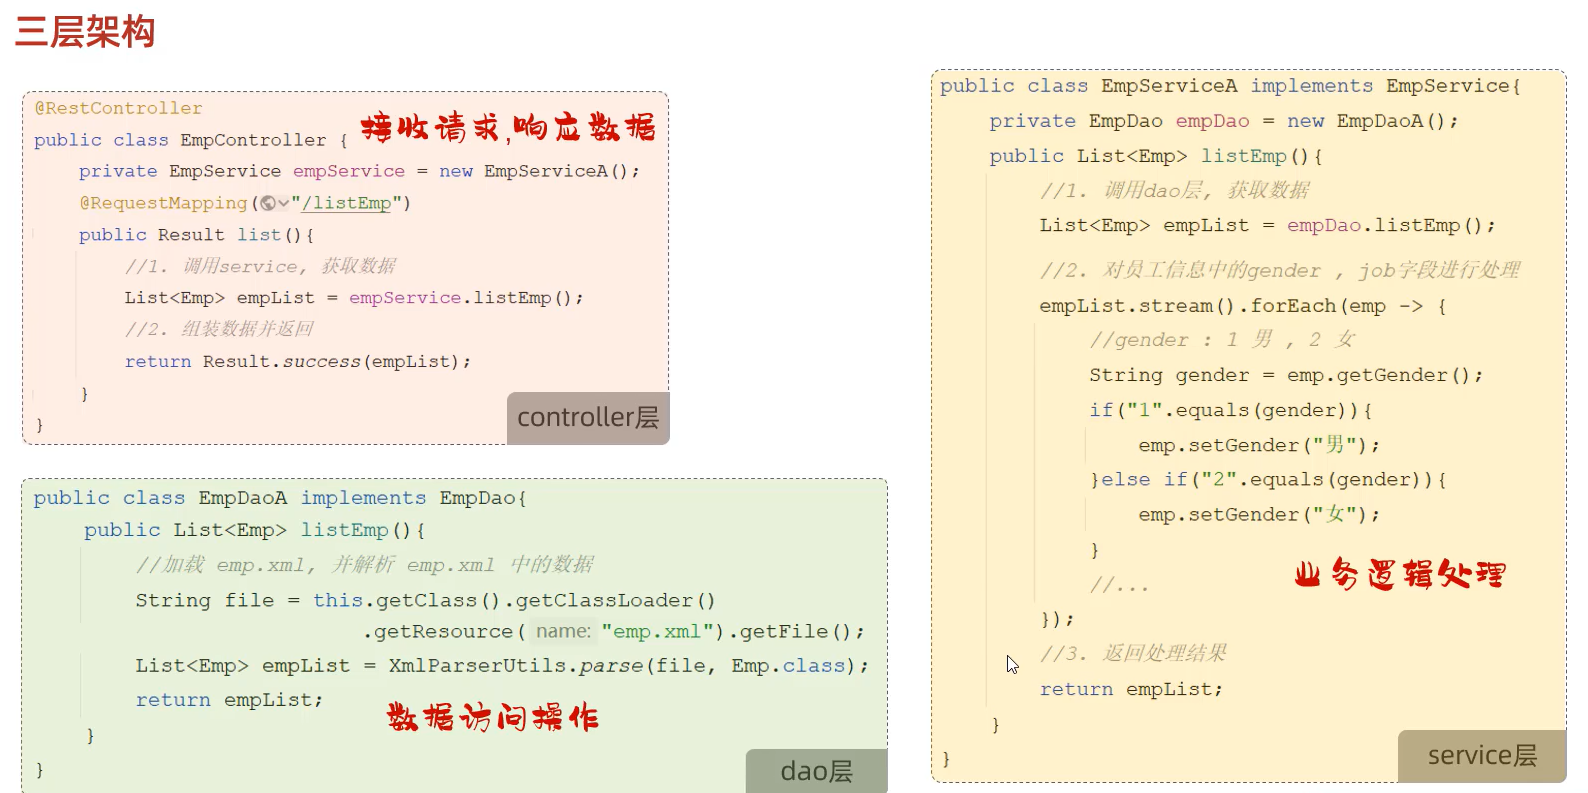
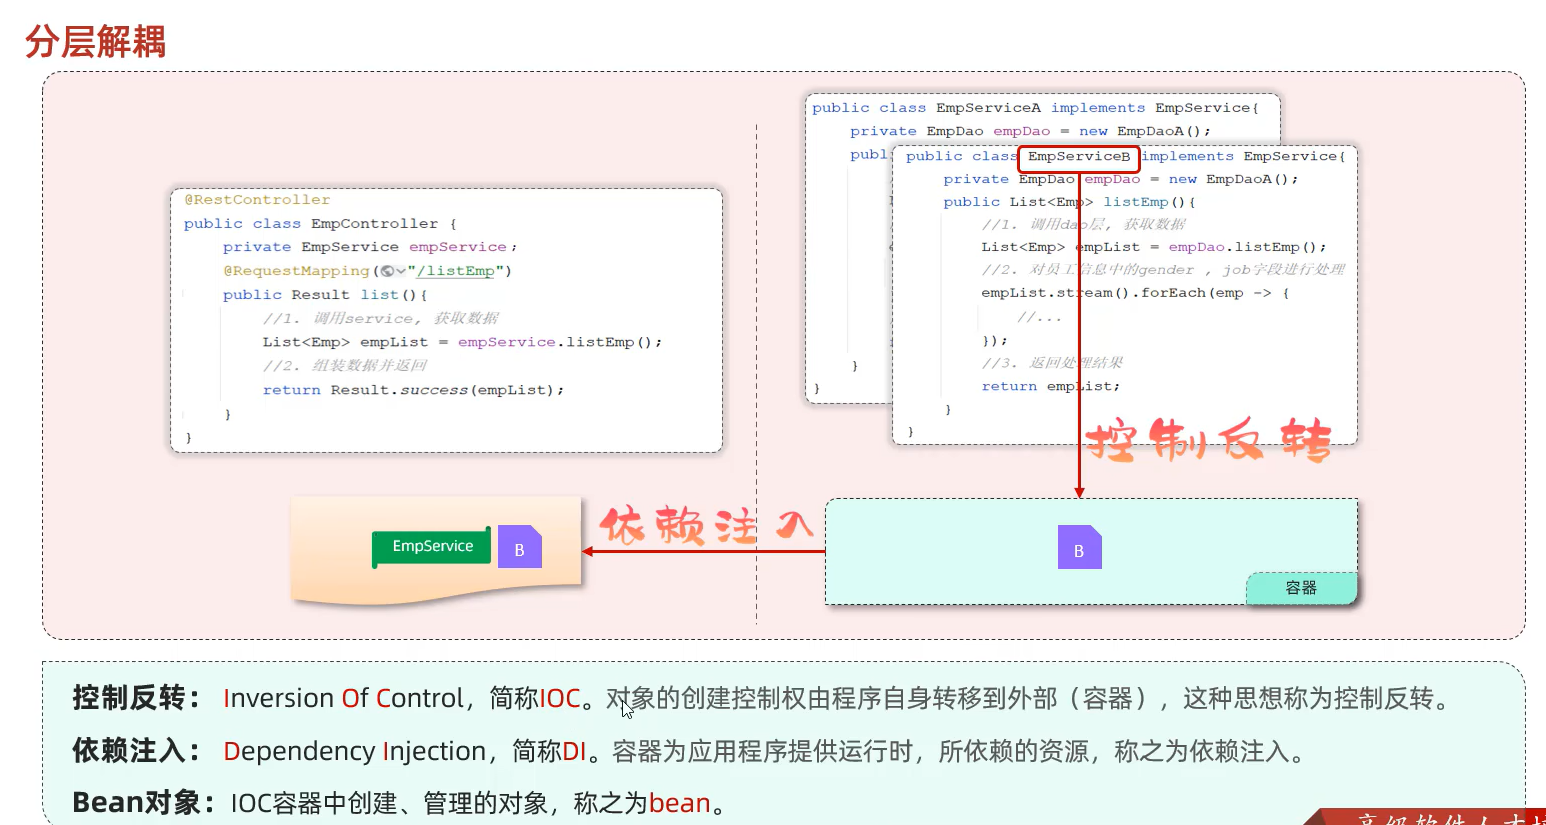
以下要进行分层解耦:
分层解耦IOC/DI
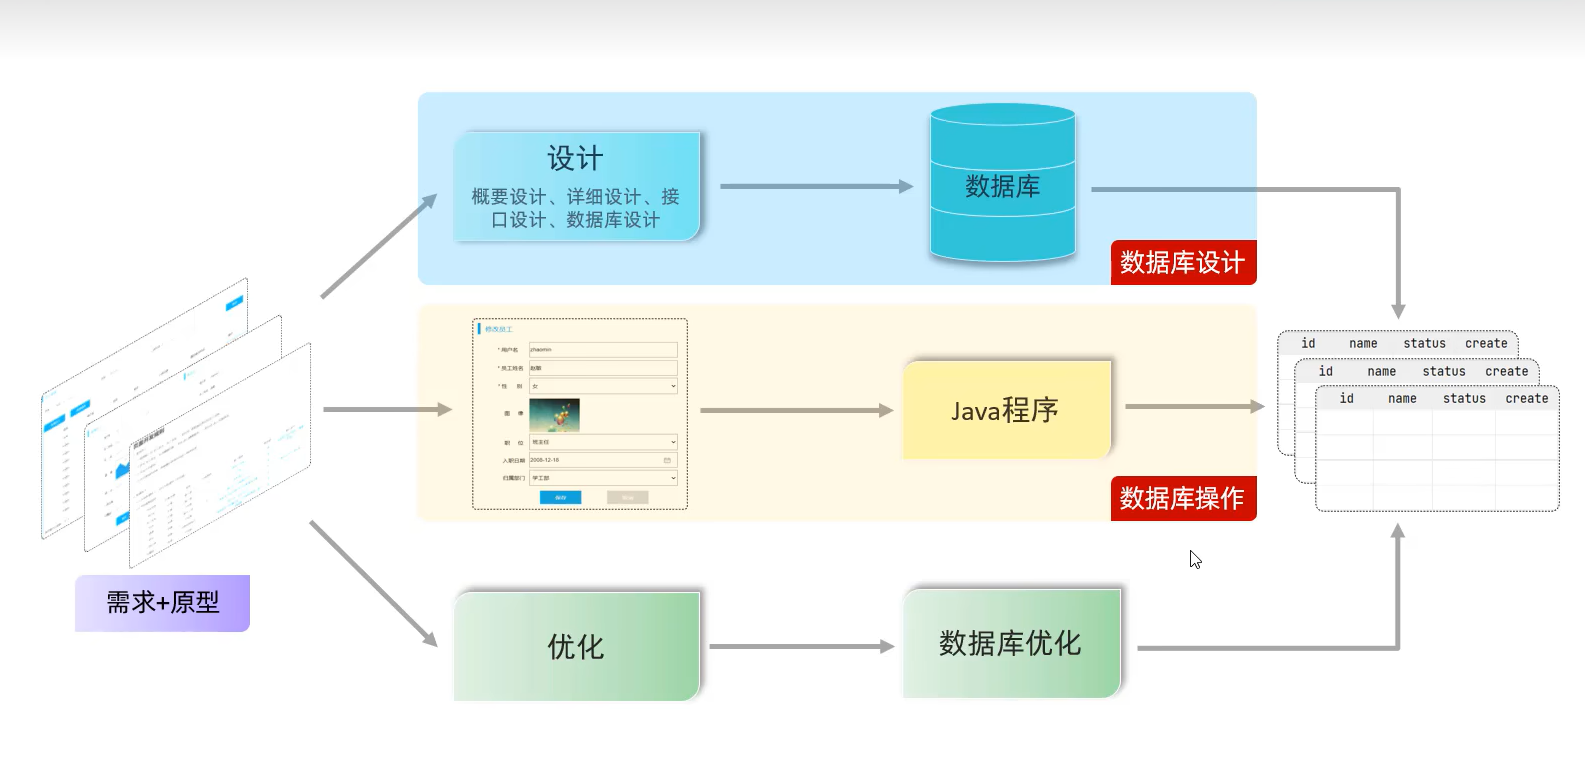
数据库
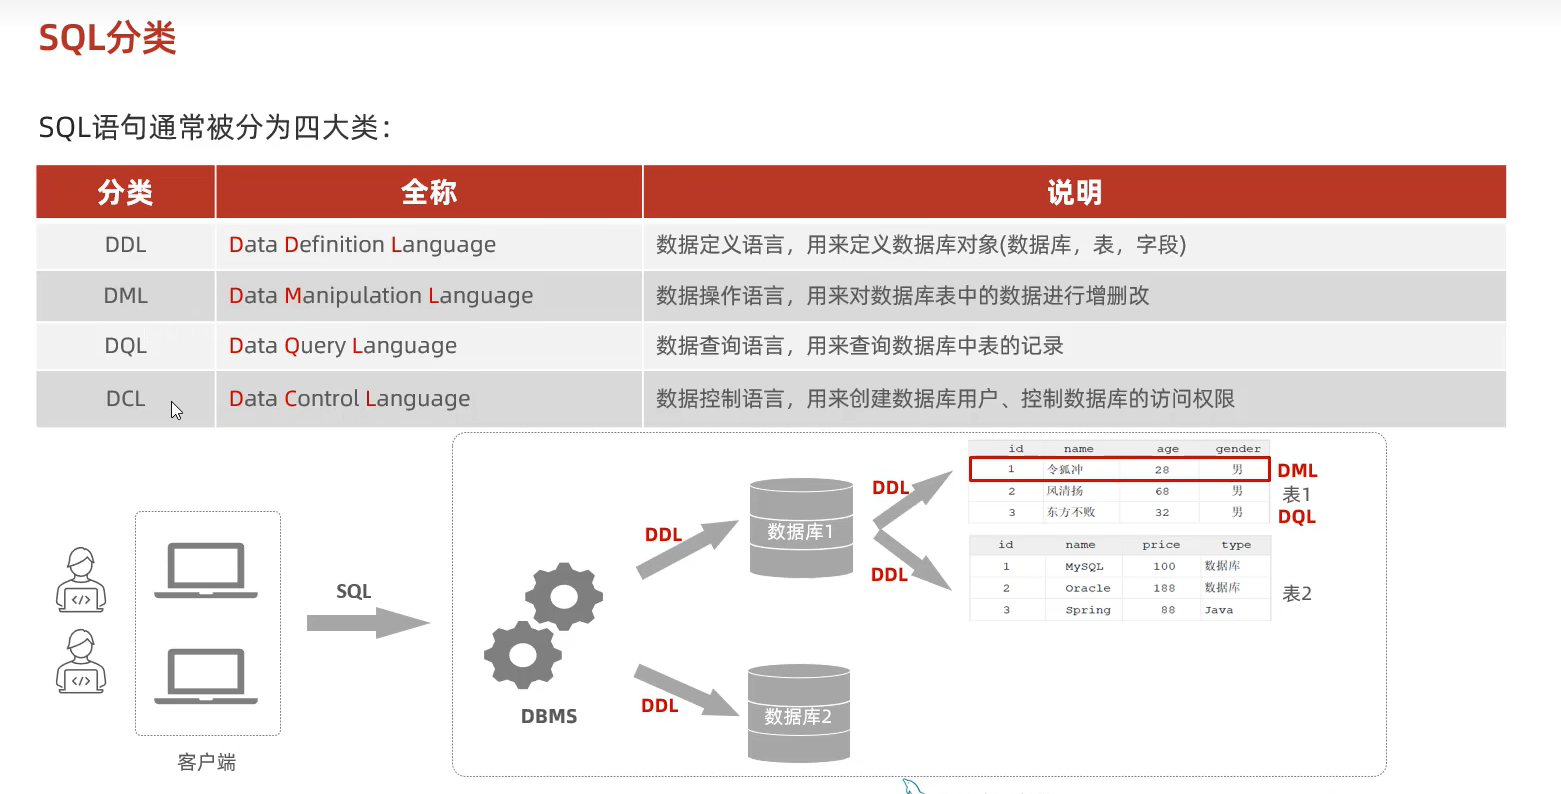
Sql分类
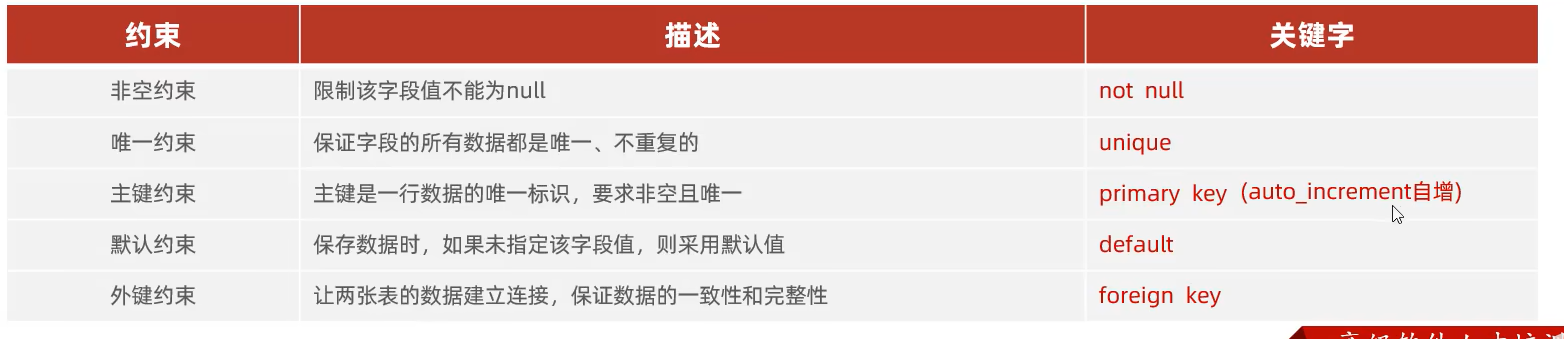
数据库约束
基本
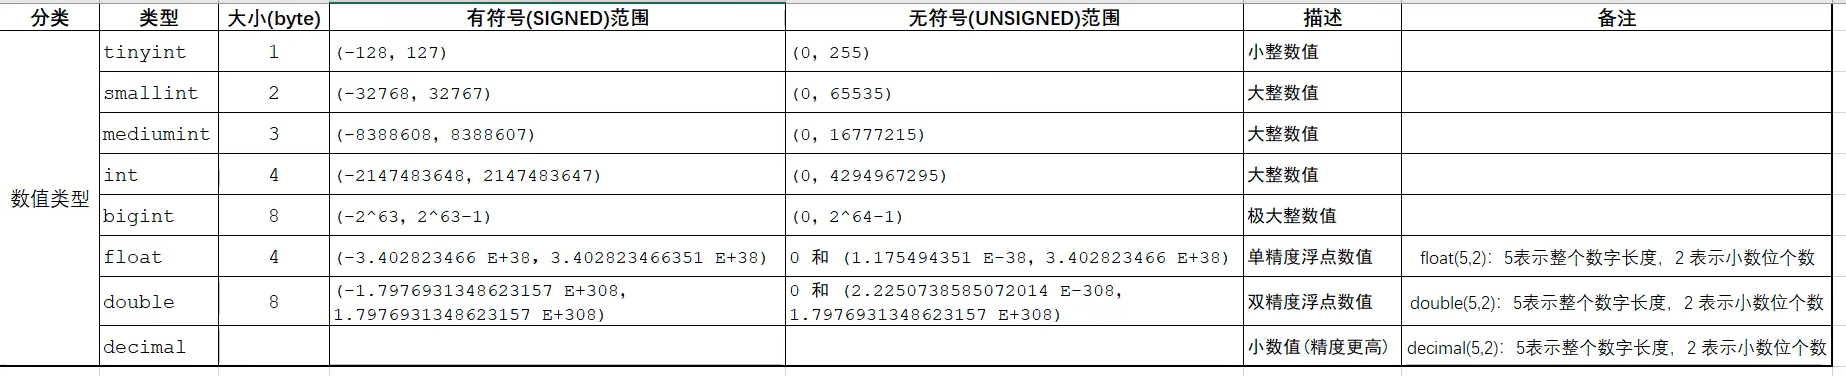
数据类型

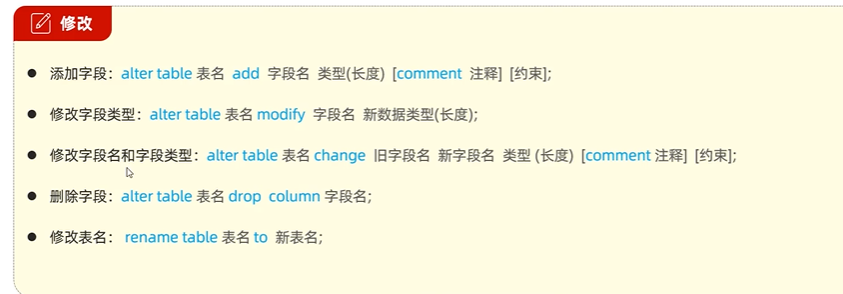
DDL
建表语句:show create table 表名;
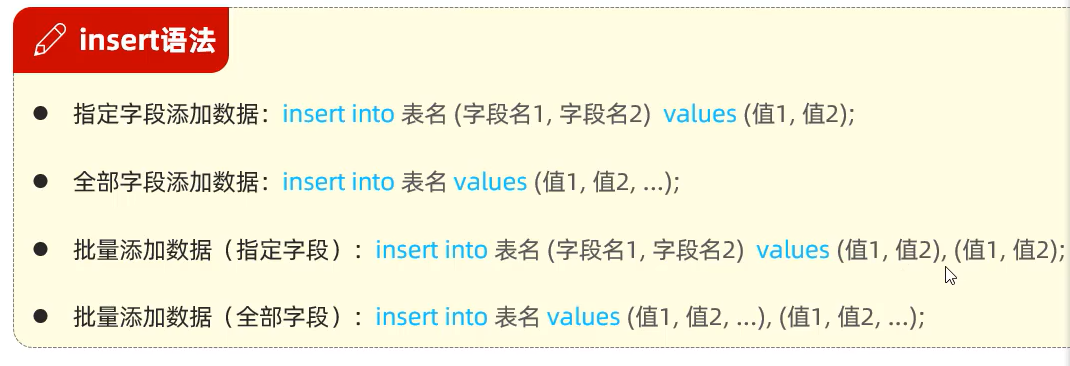
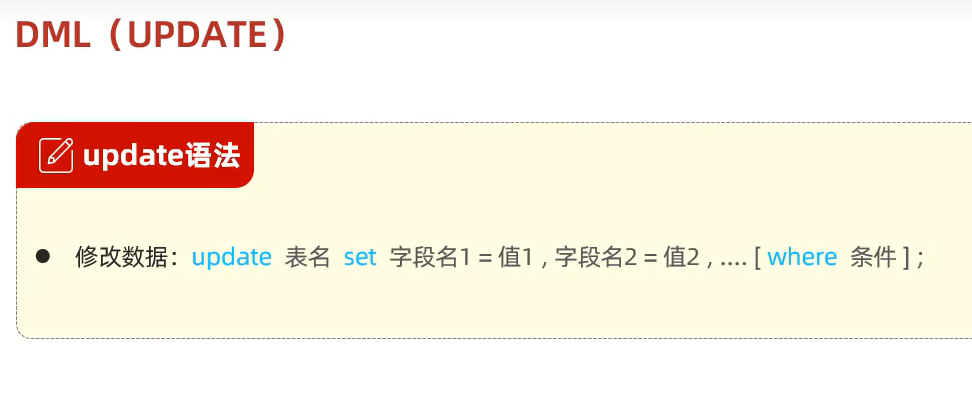
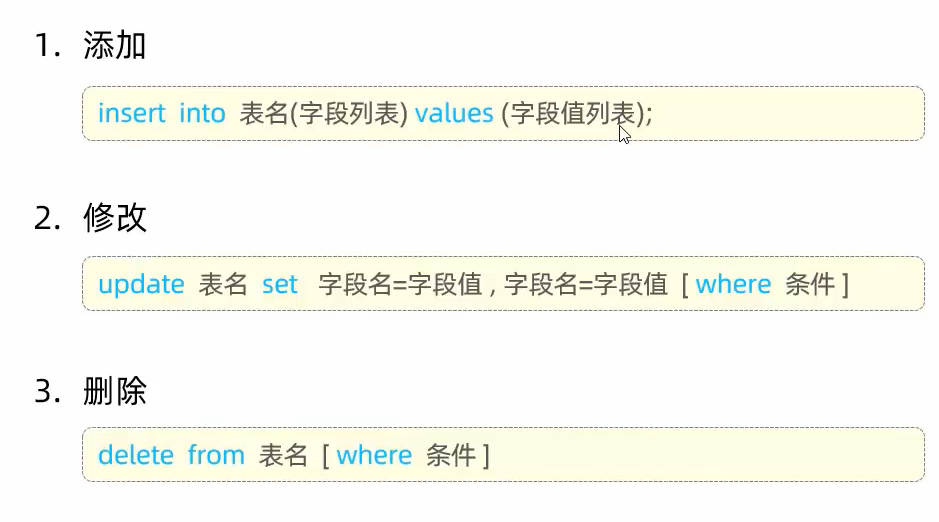
DML
date_time:可以使用now()函数获取当前时间
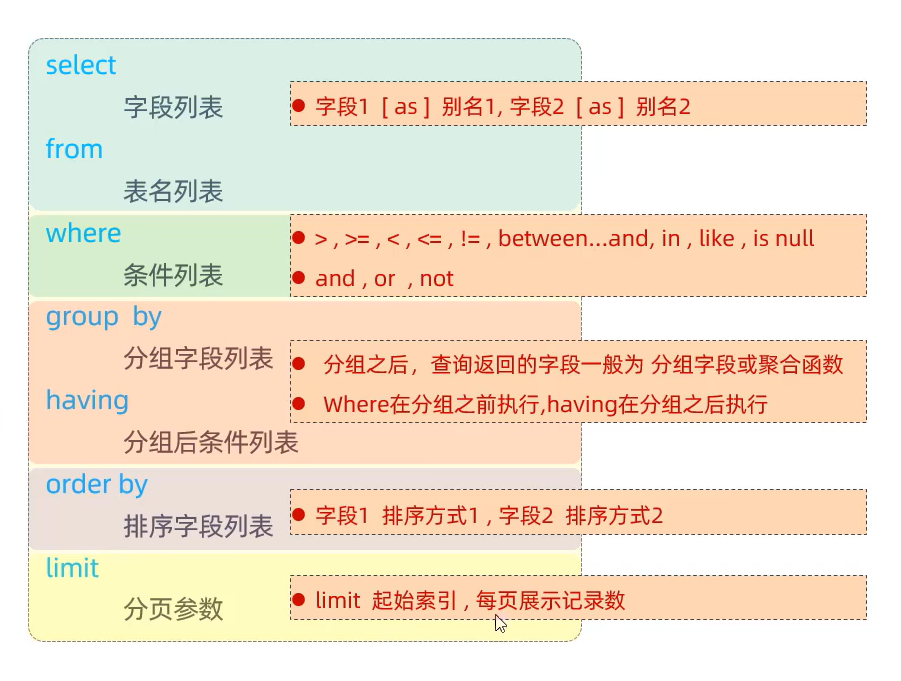
DQL
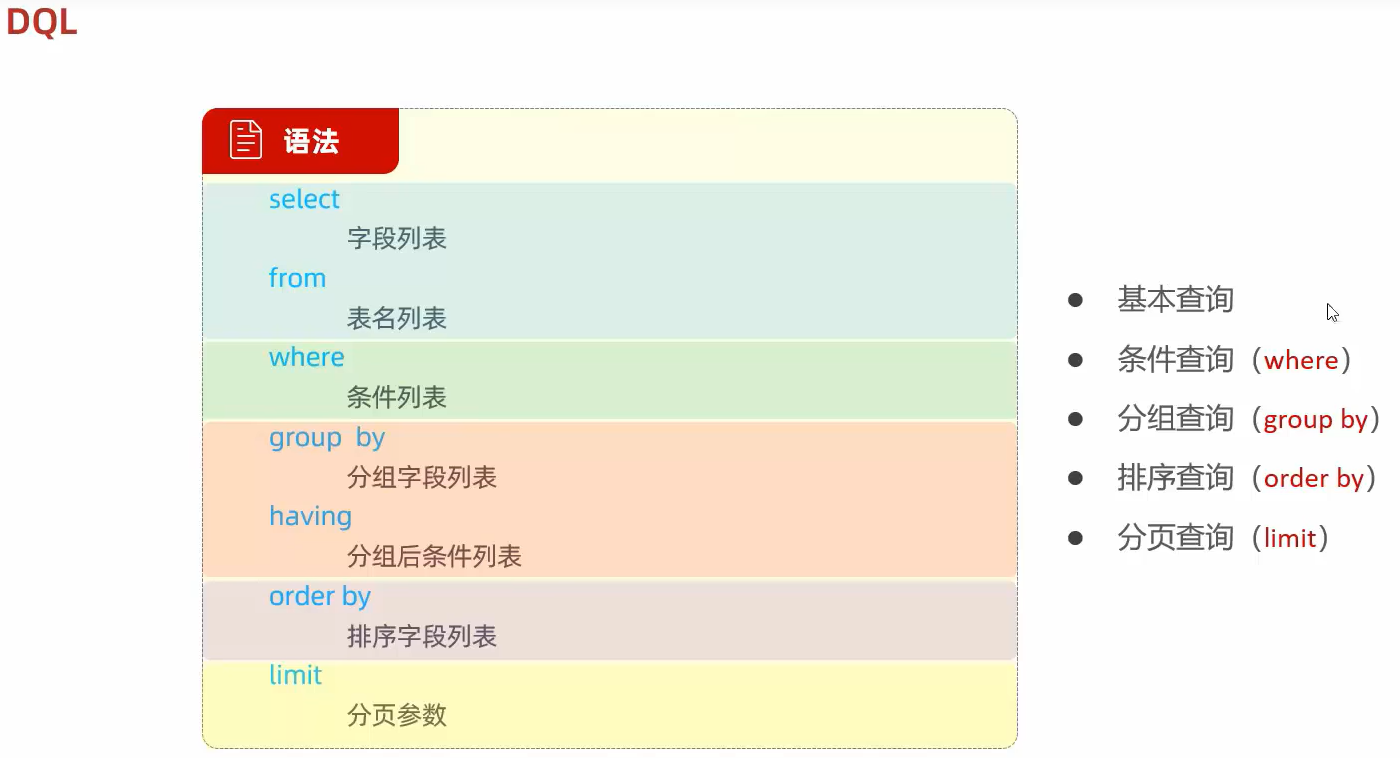
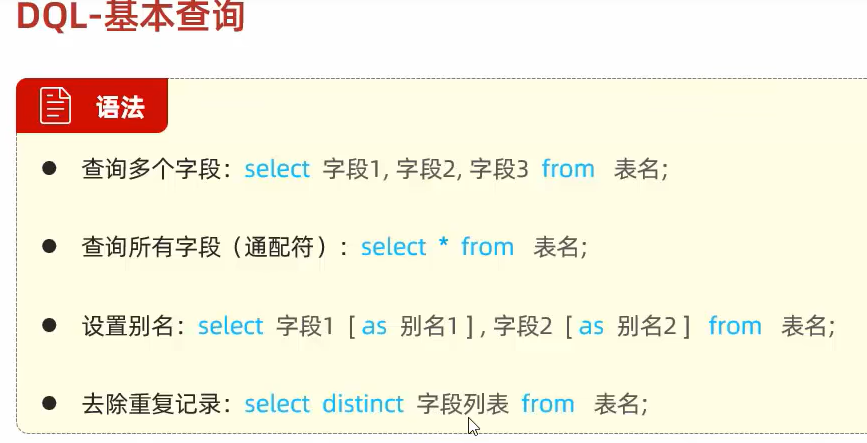
基本查询
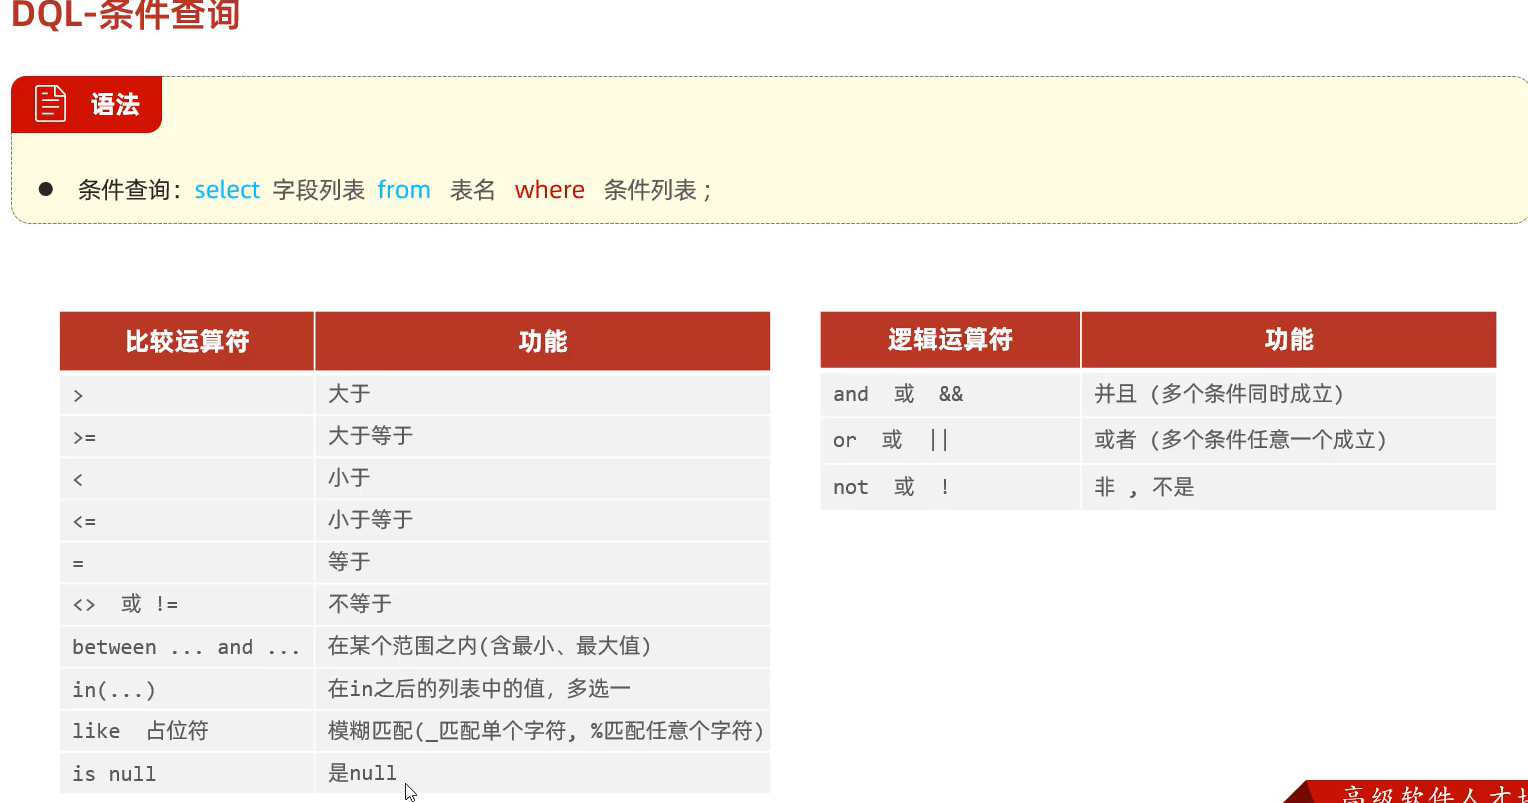
条件查询
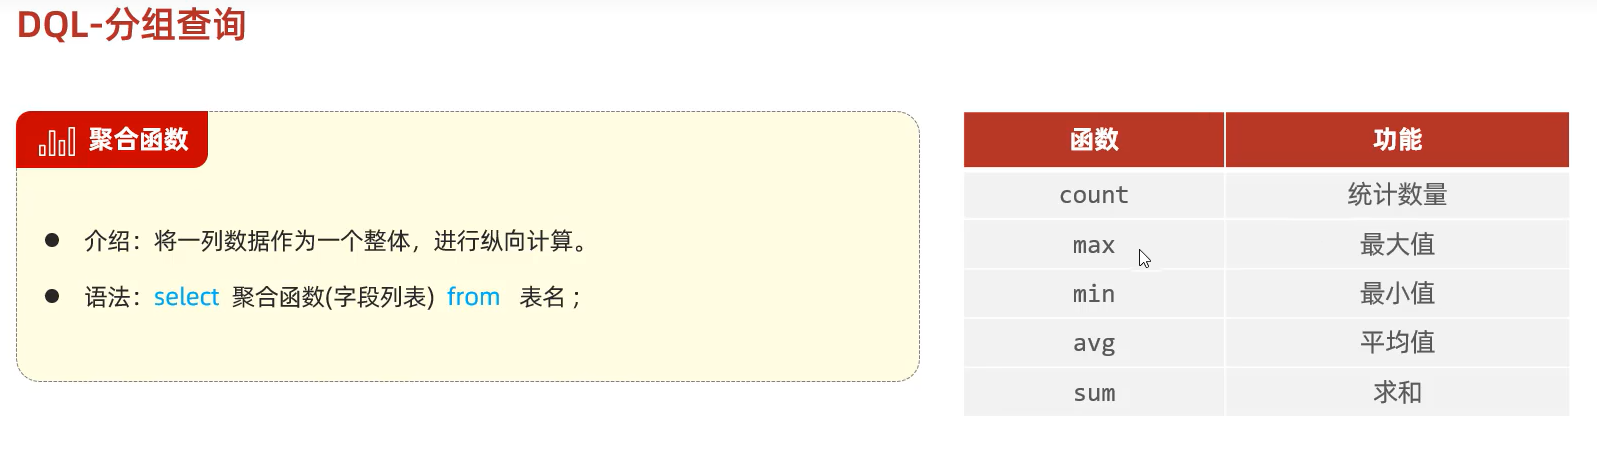
聚合函数
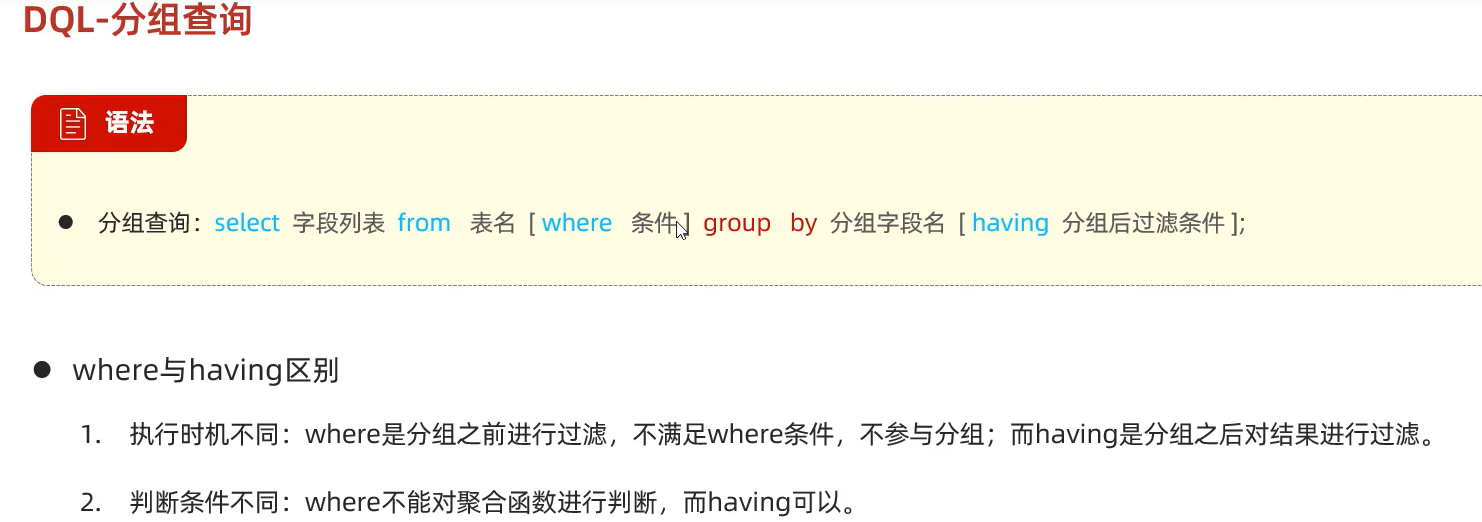
分组查询
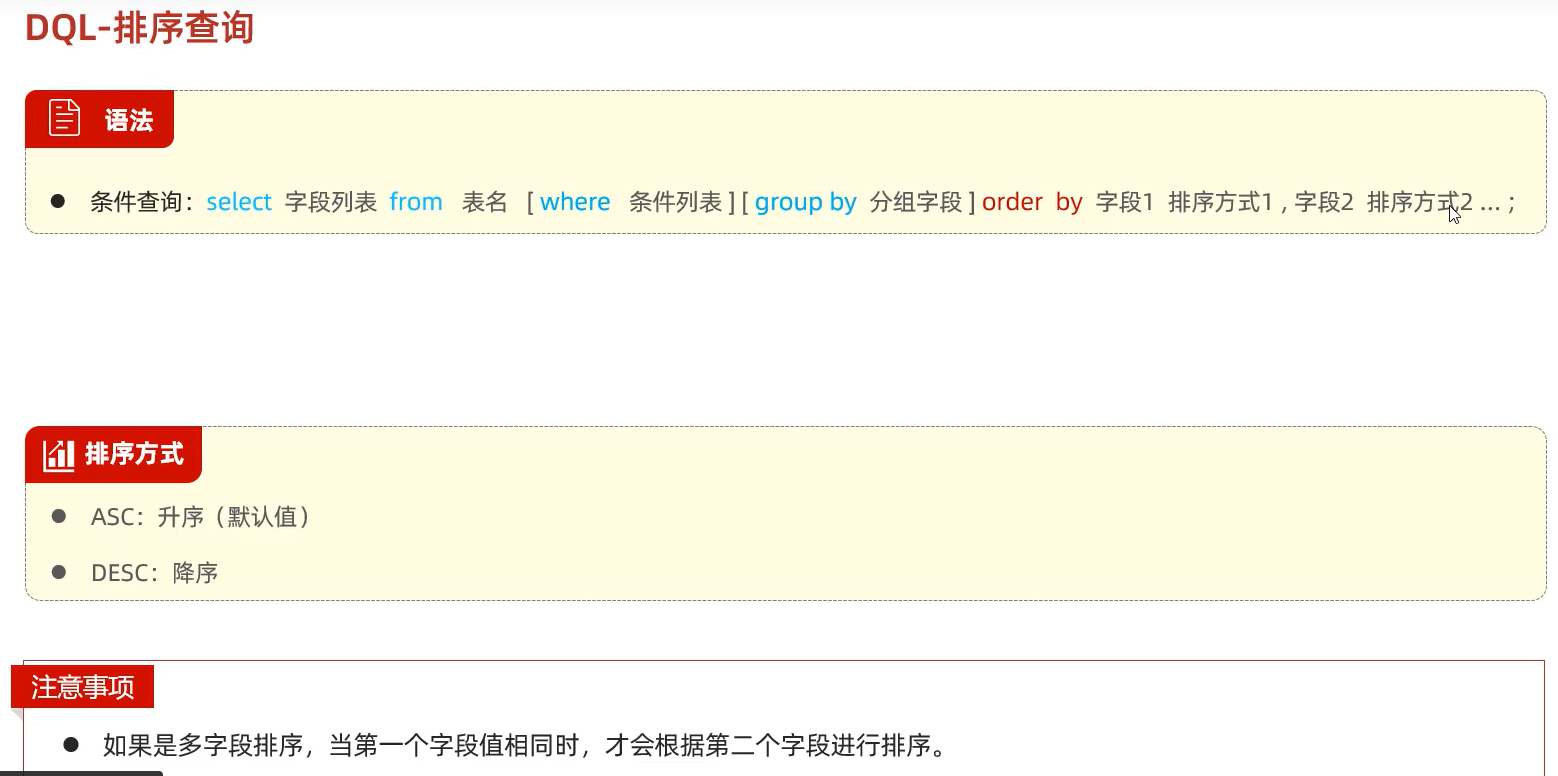
排序查询
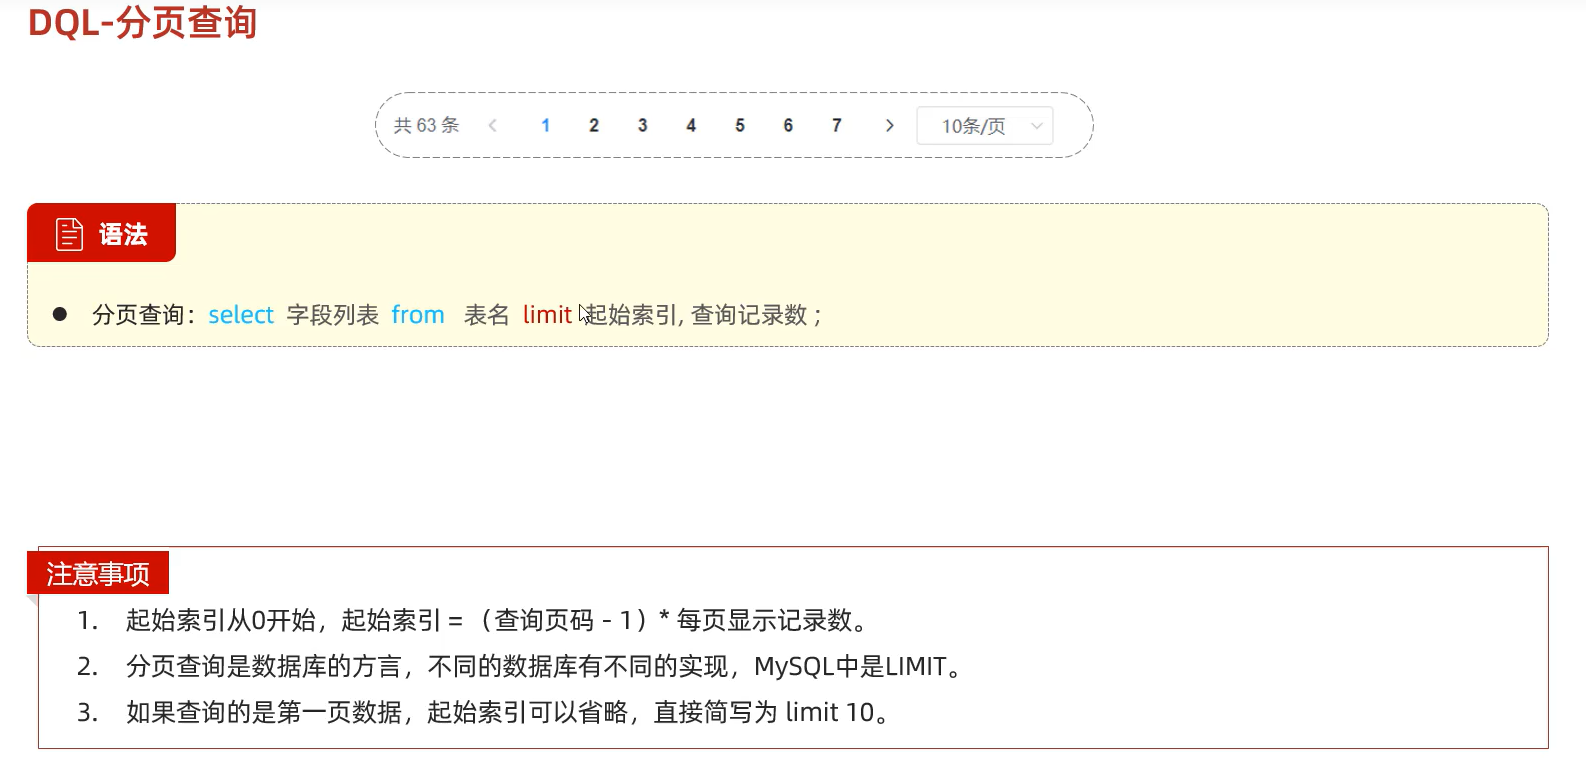
分页查询
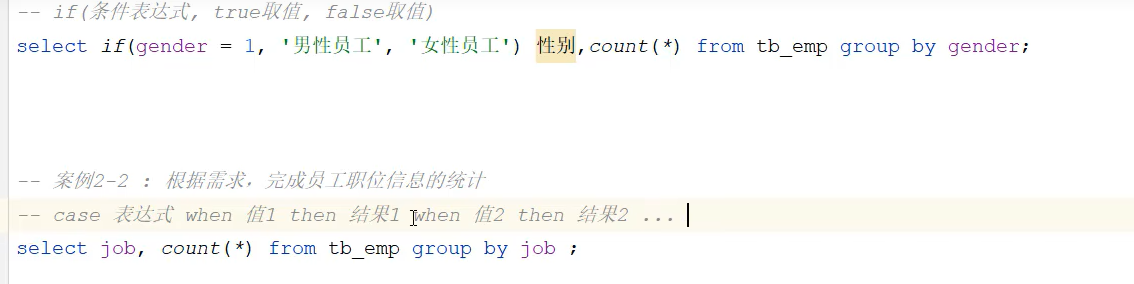
表达式
if(gender = 1,‘男’,‘女’)别名
(case job when 1 then ‘班主任’ when 2 then ‘讲师’ else ‘未分配职位’ end) 别名

外键约束
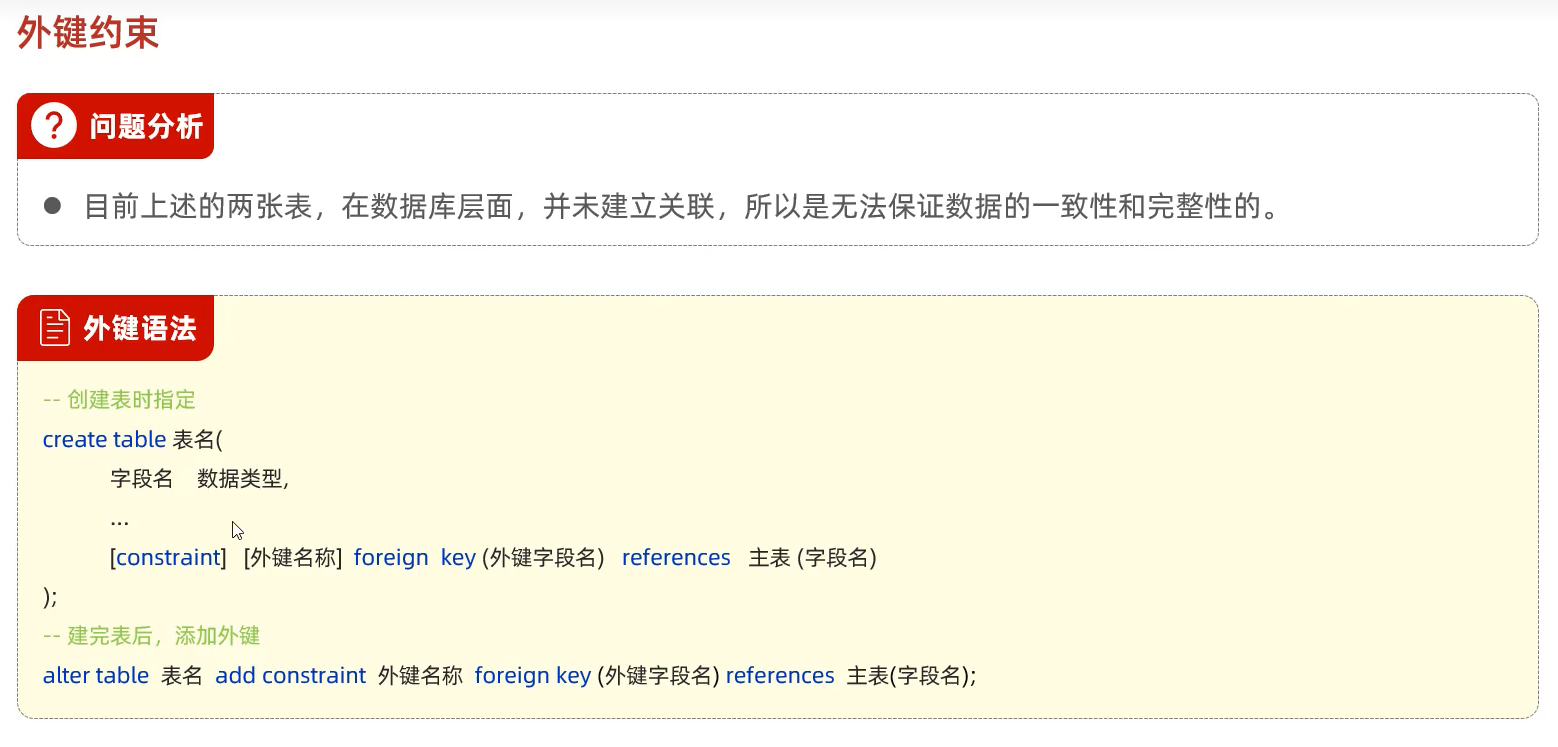
已经不推荐使用物理外键,而是从代码上进行逻辑外键的构建!
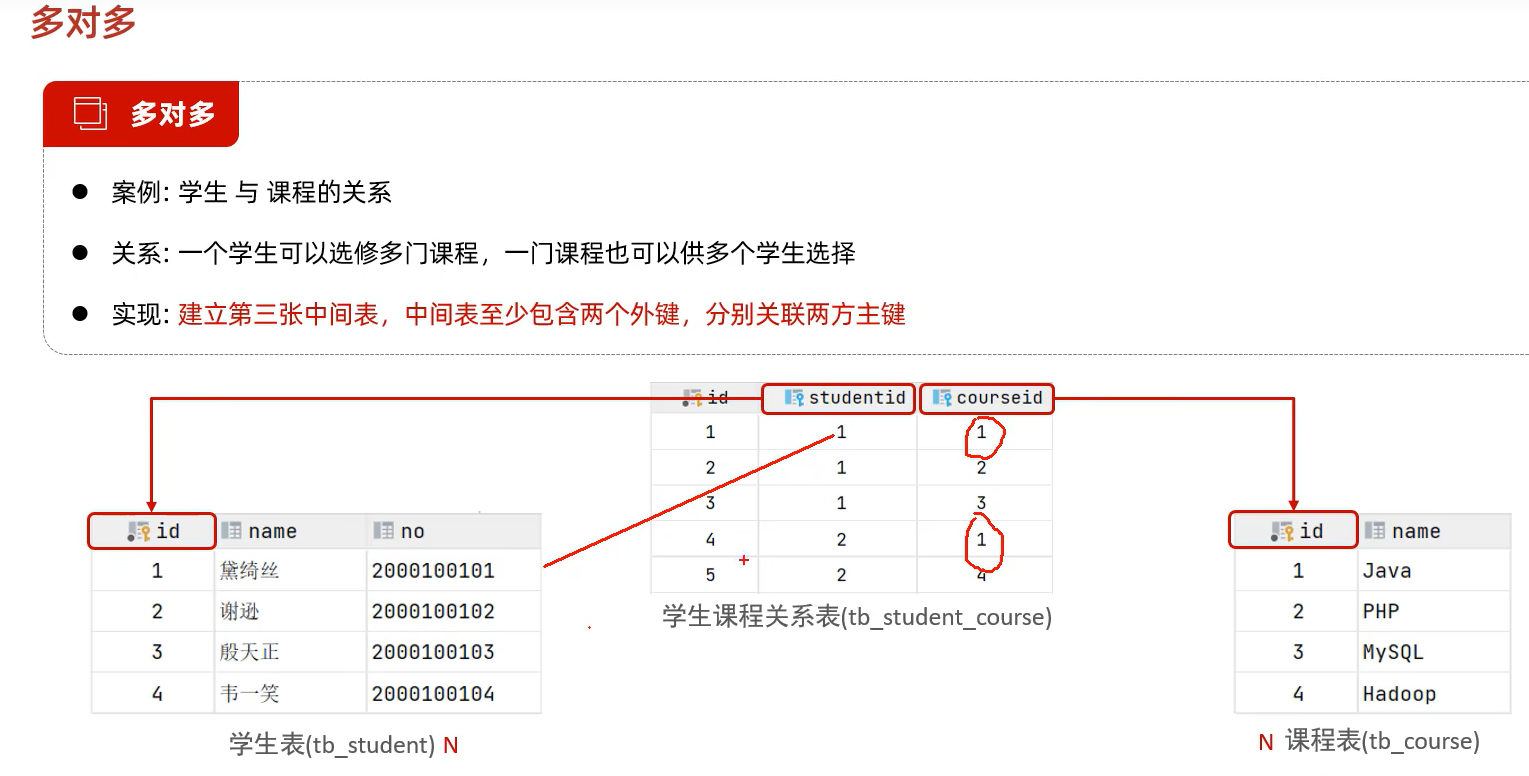
多对多
表连接
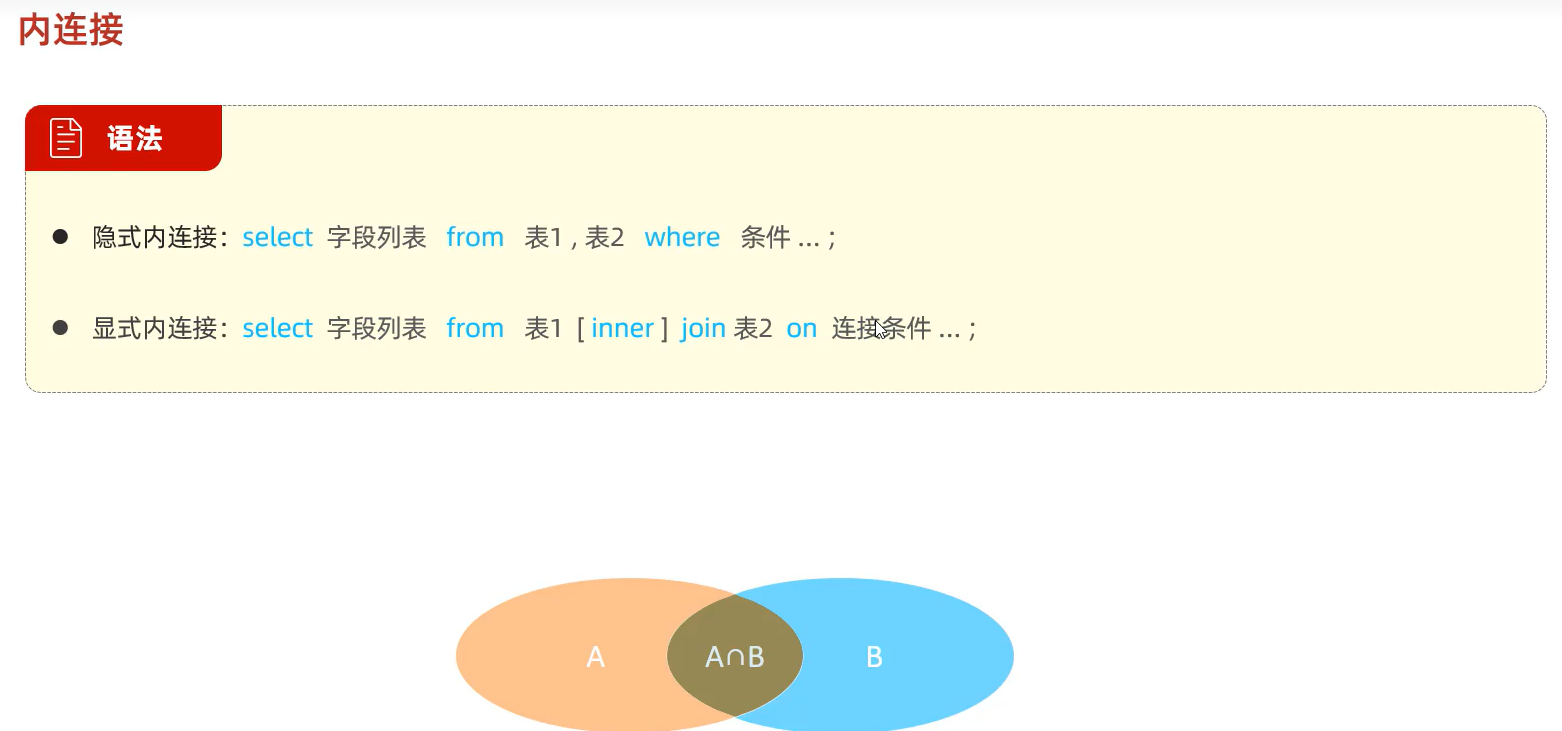
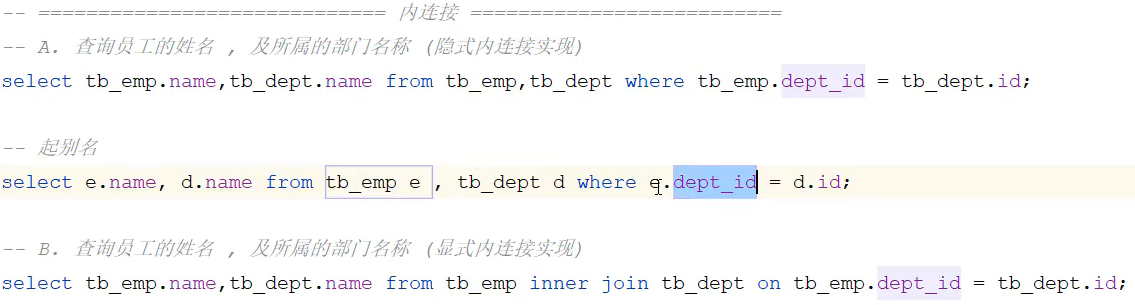
内连接
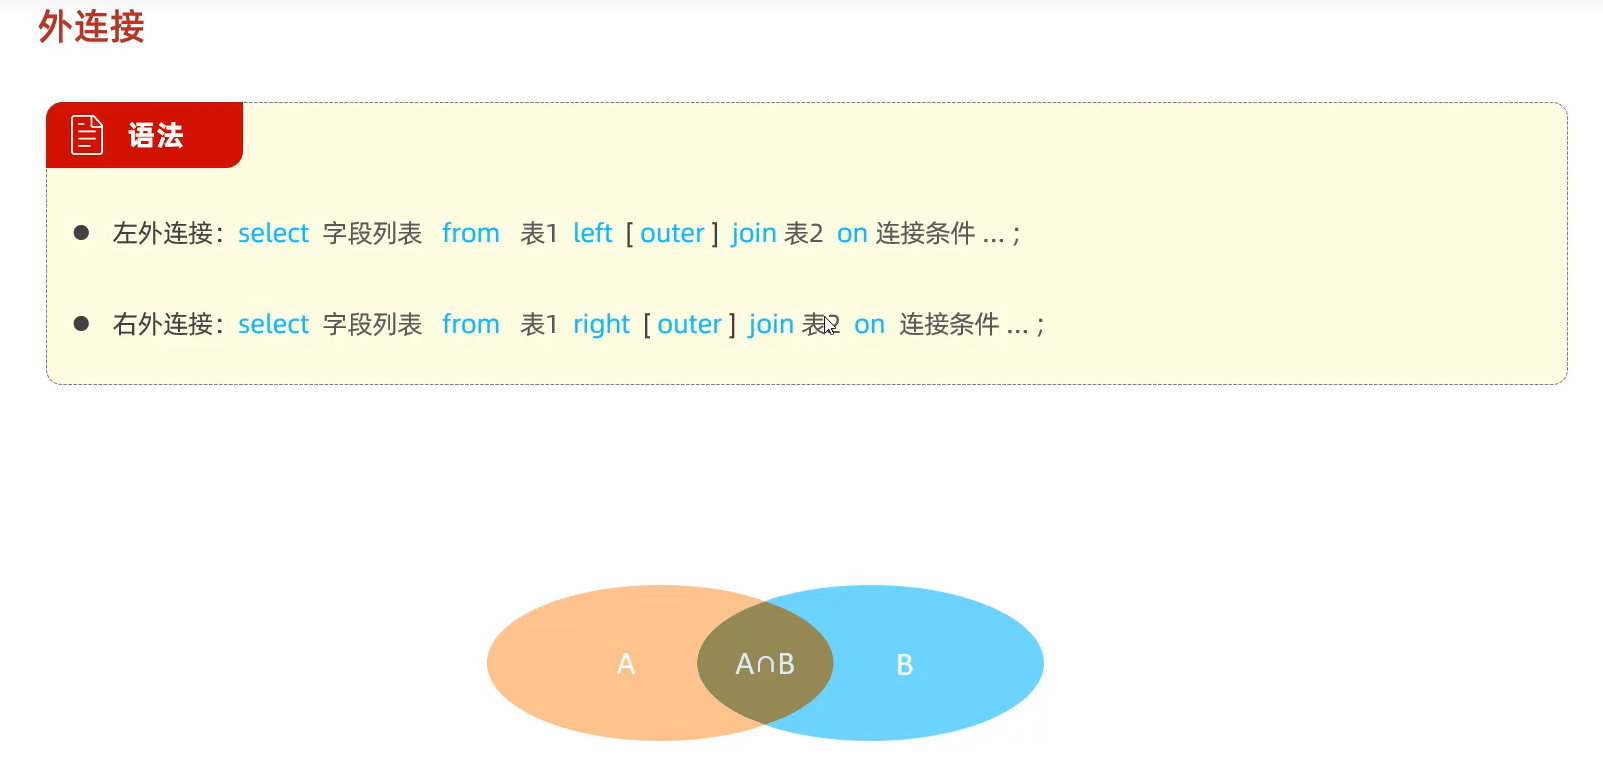
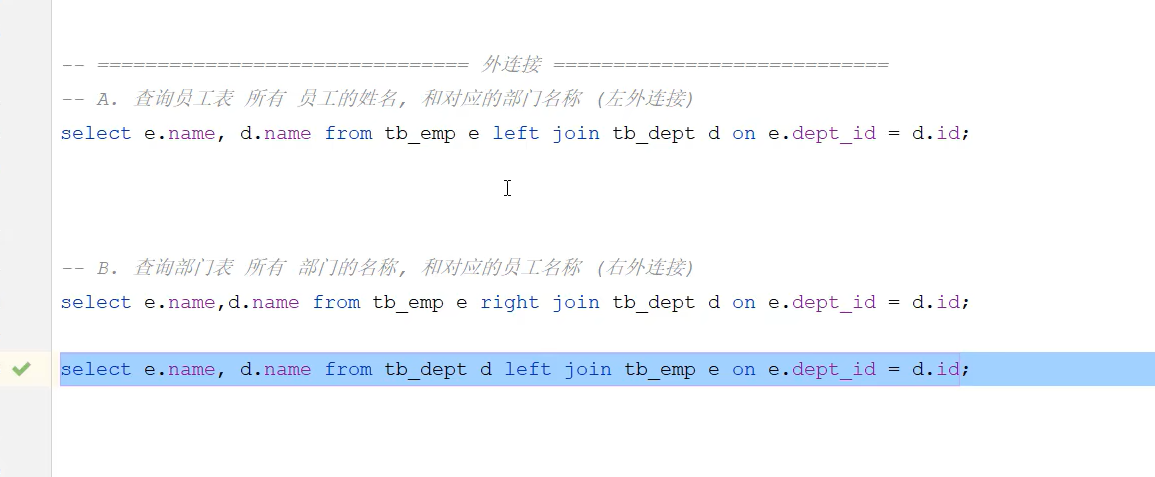
外连接
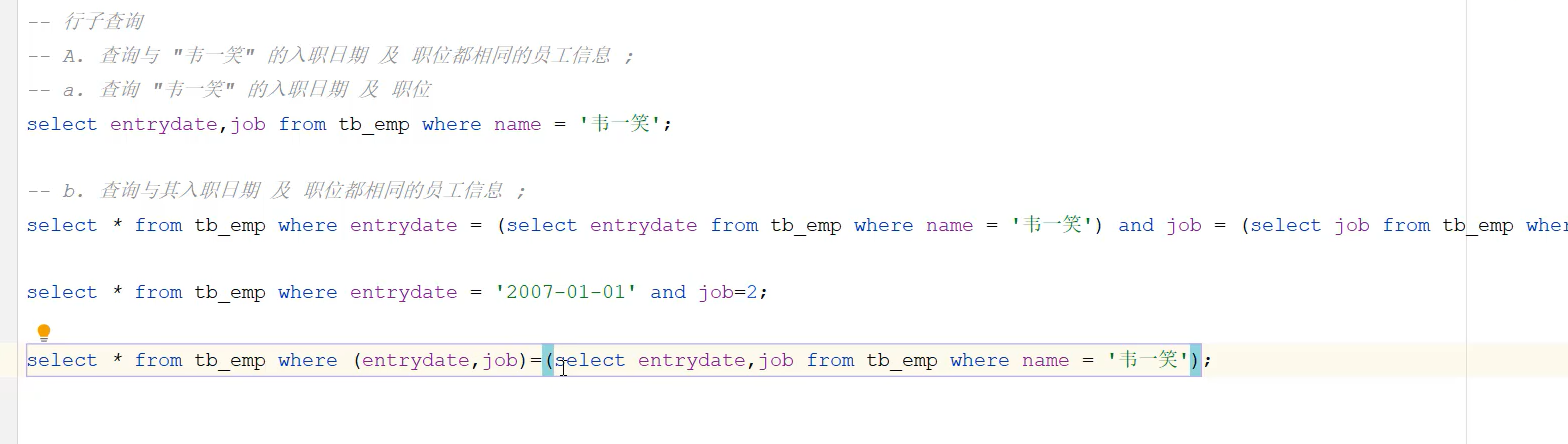
子查询
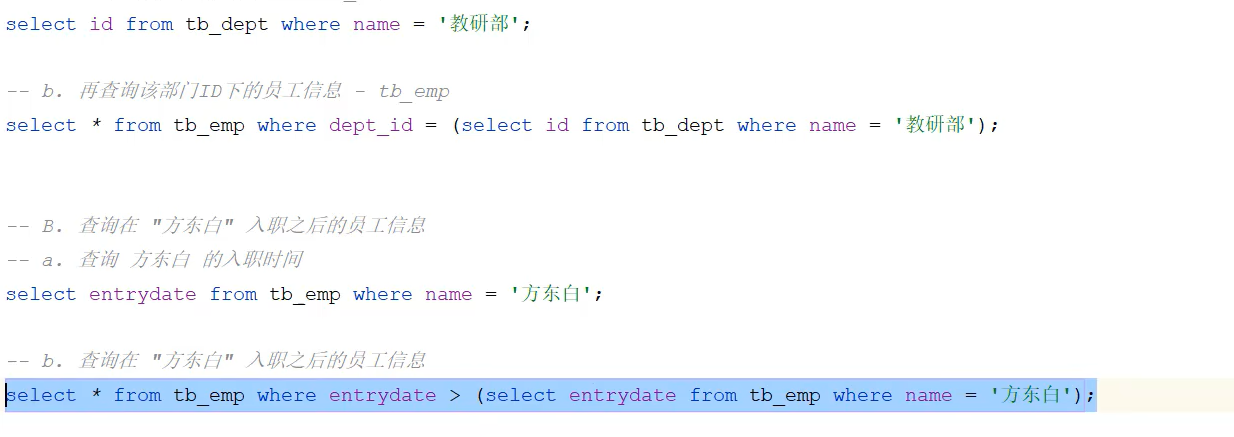
标量子查询
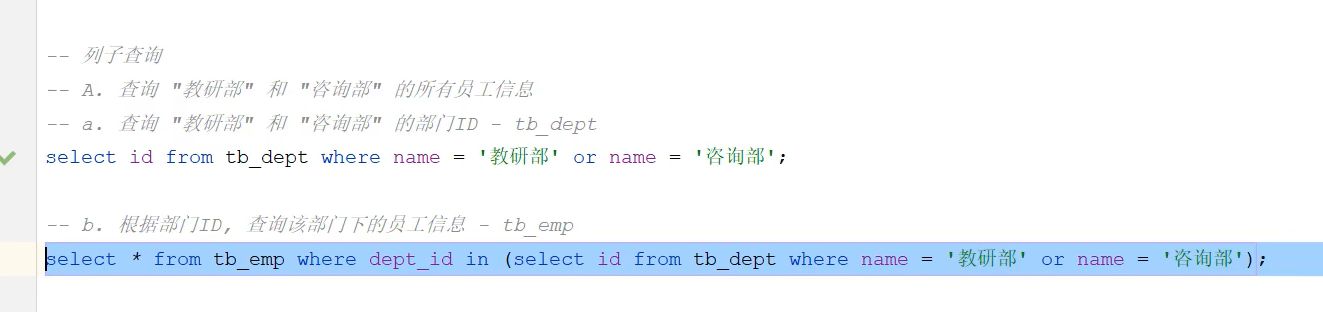
列子查询
行子查询
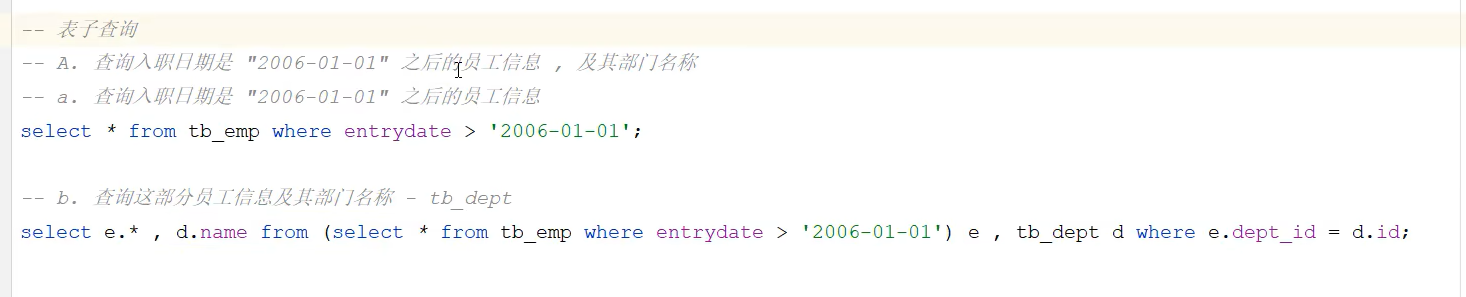
表子查询
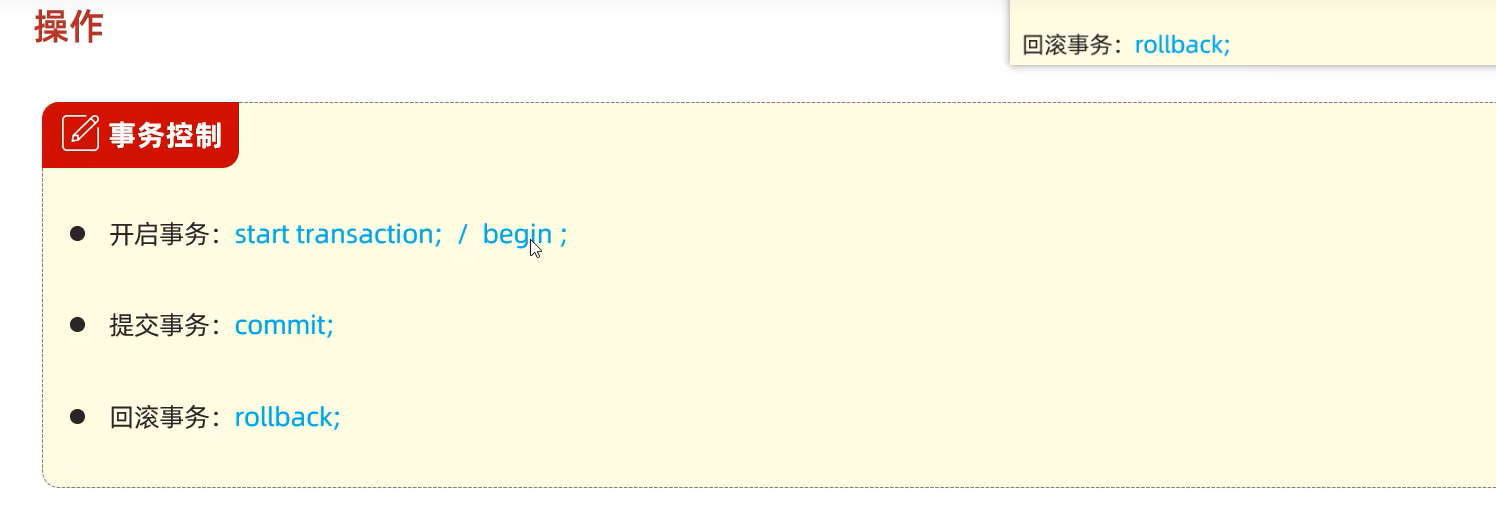
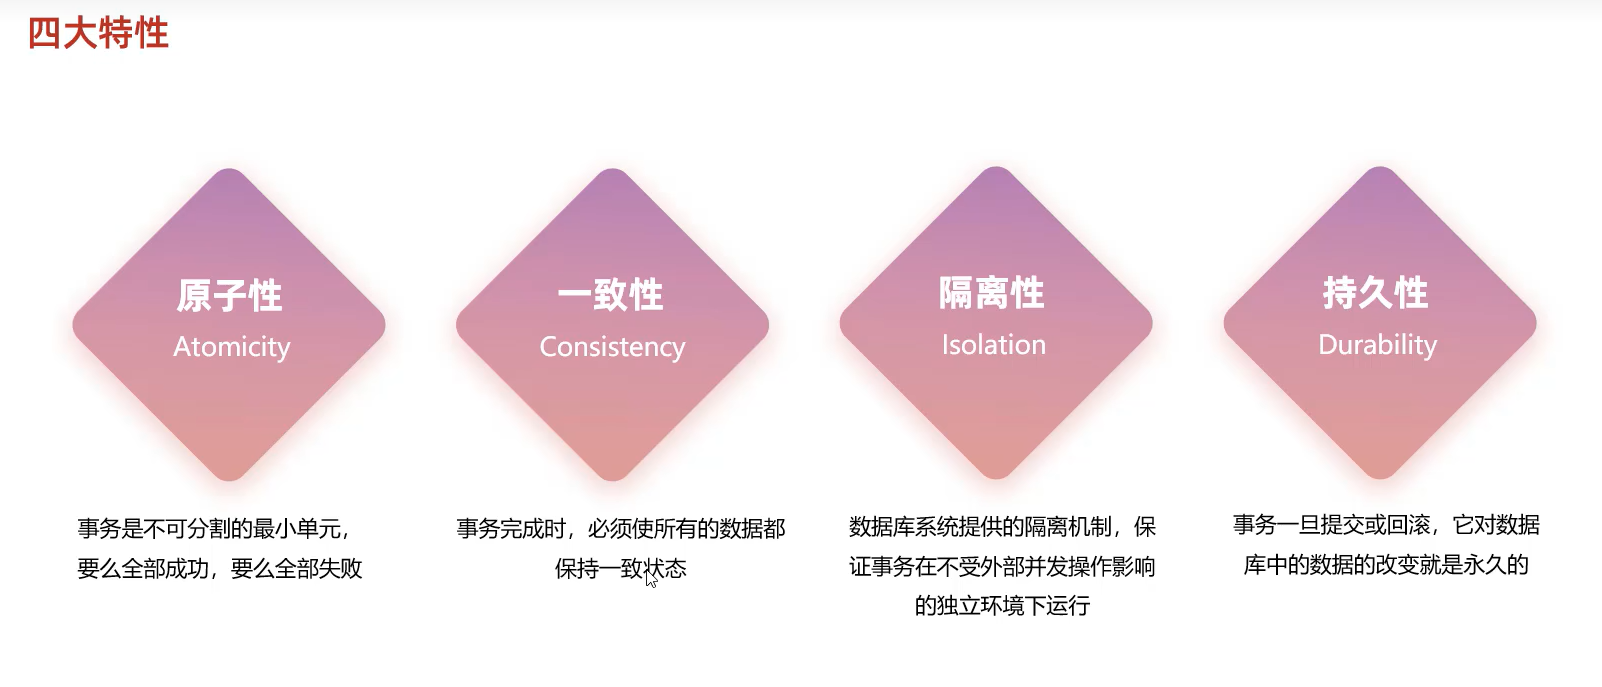
事务
原子性
四大特性:
原子性、一致性、隔离性、持久性
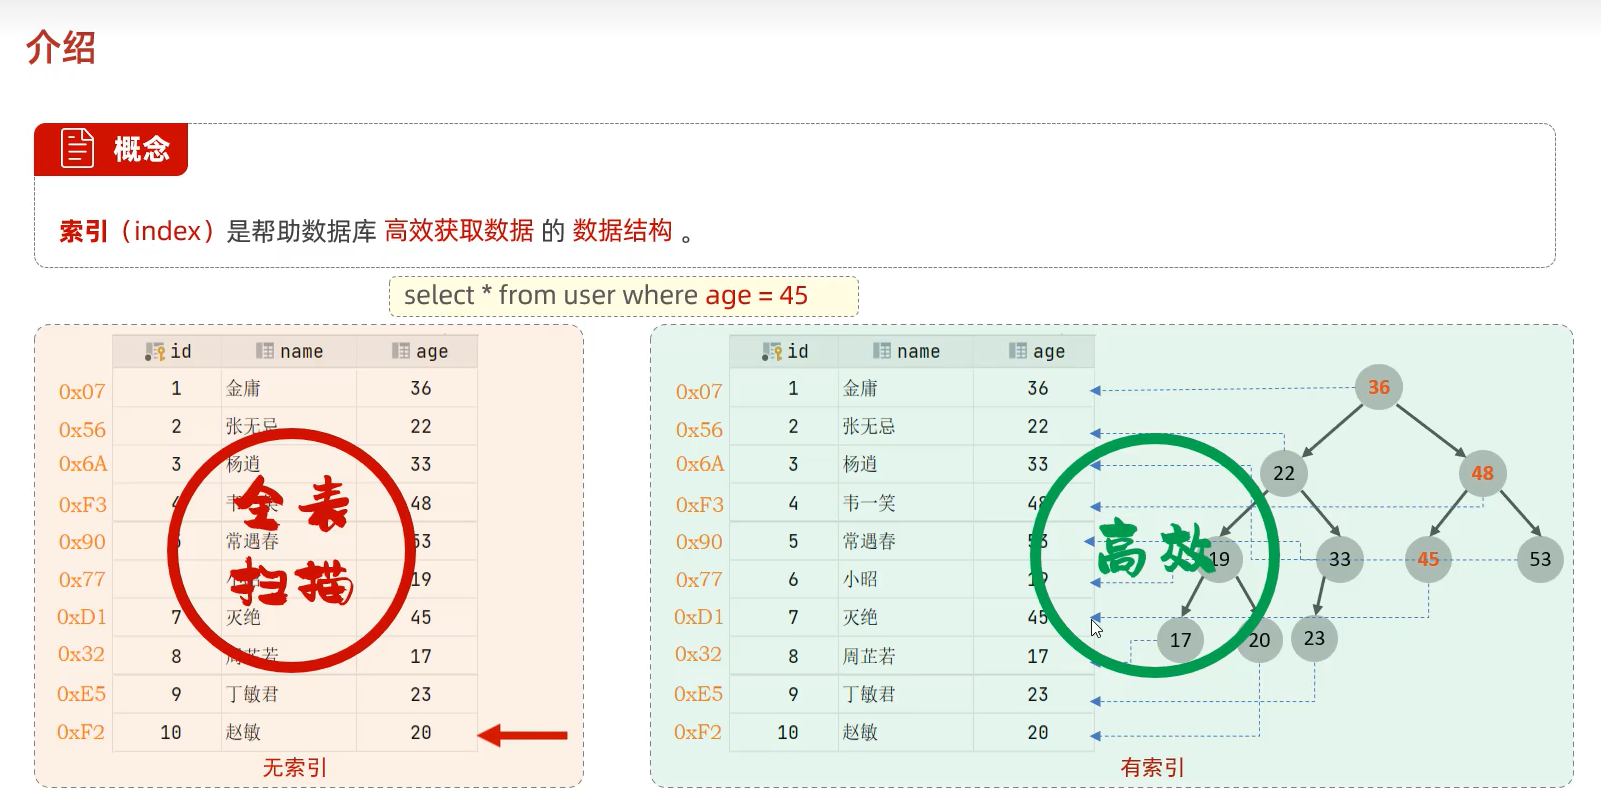
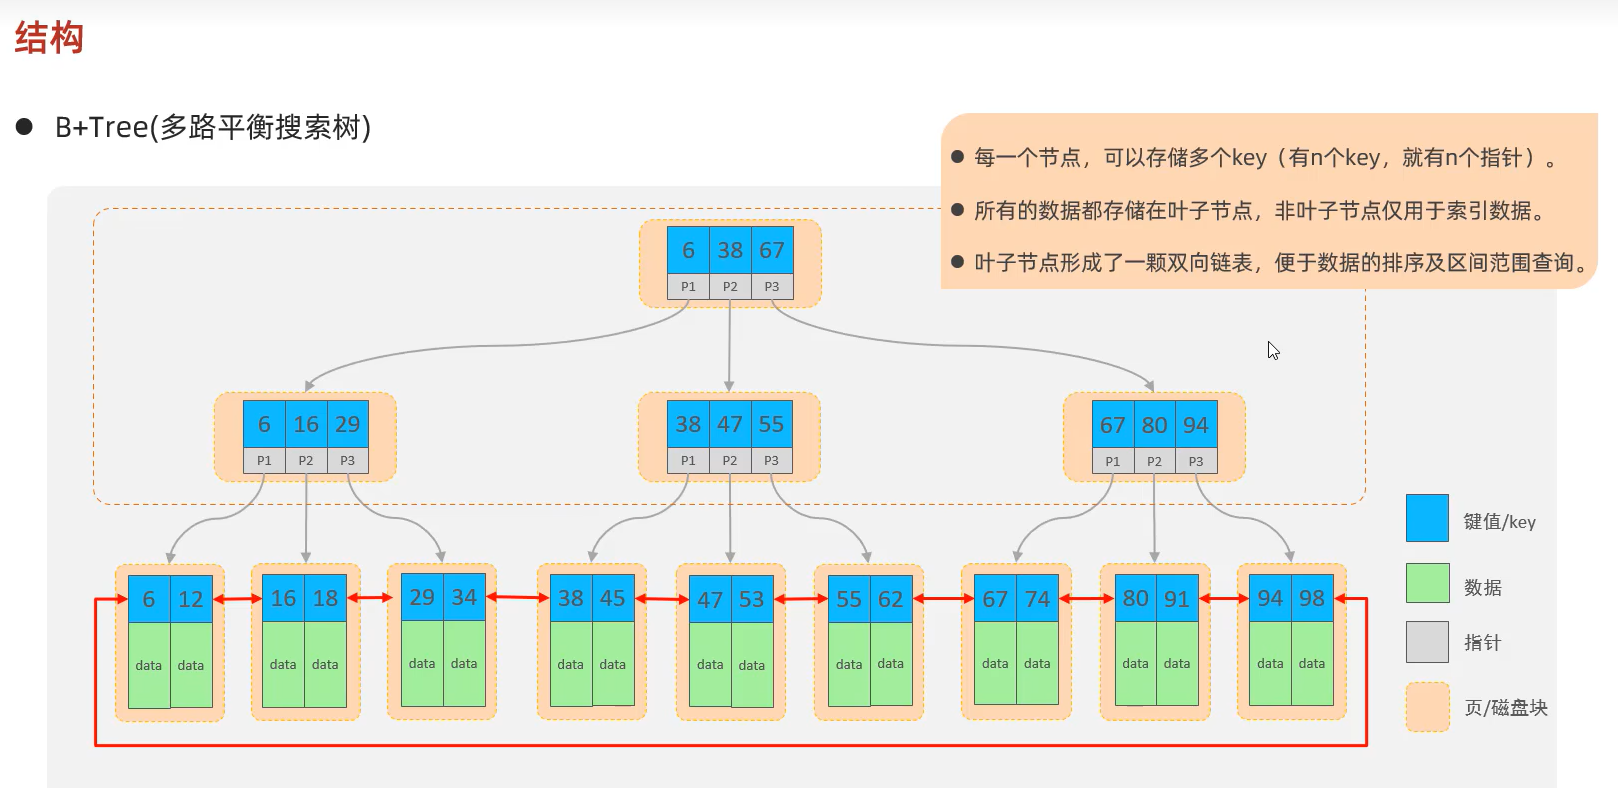
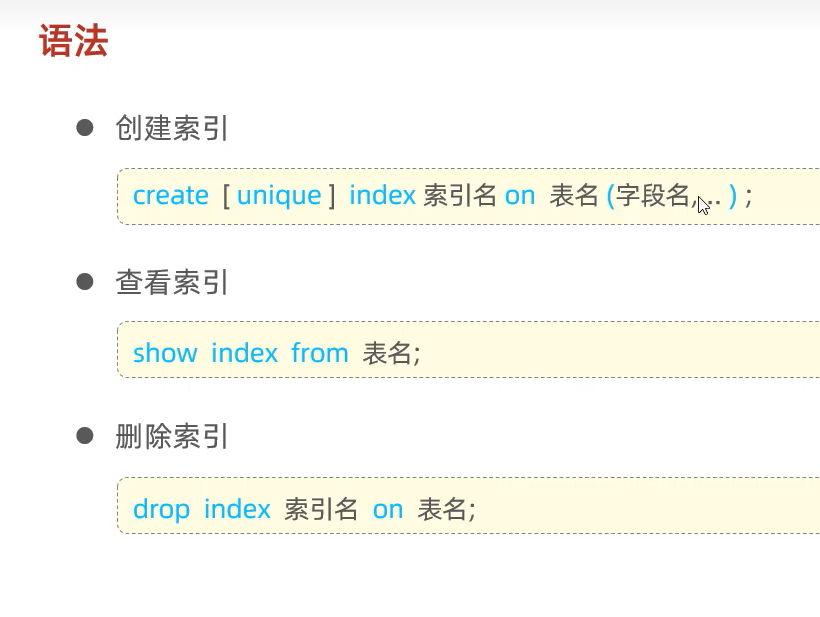
索引

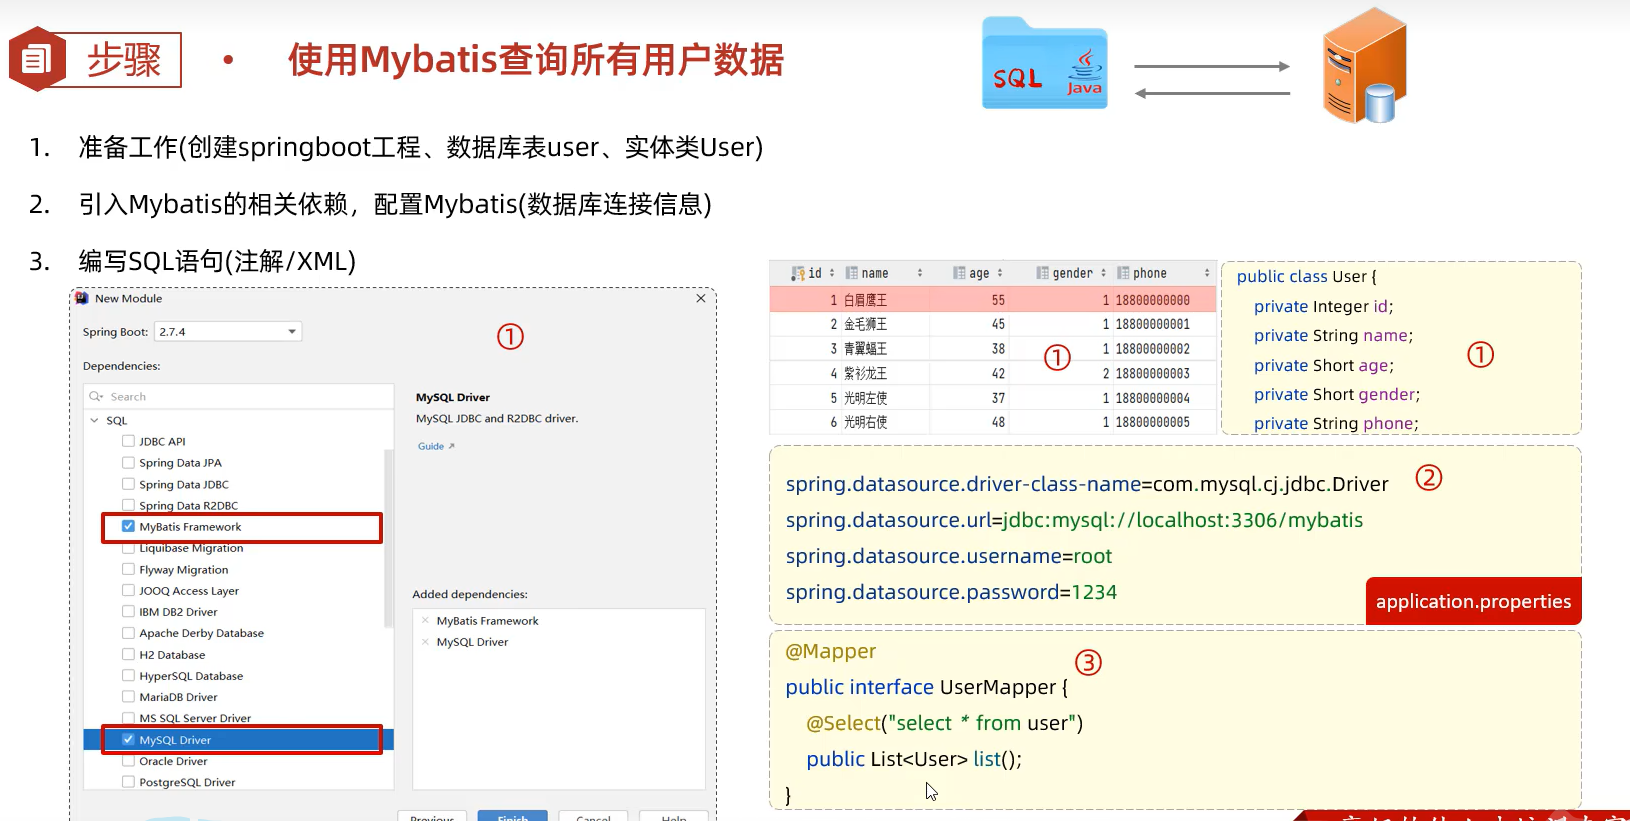
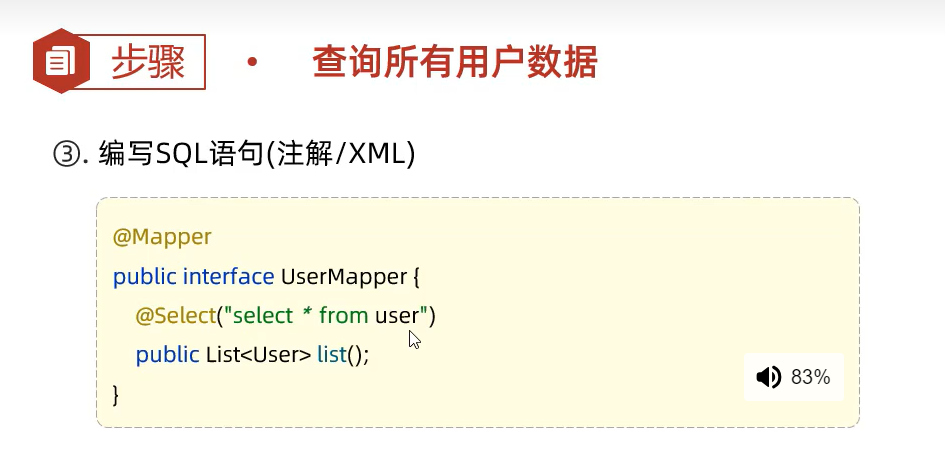
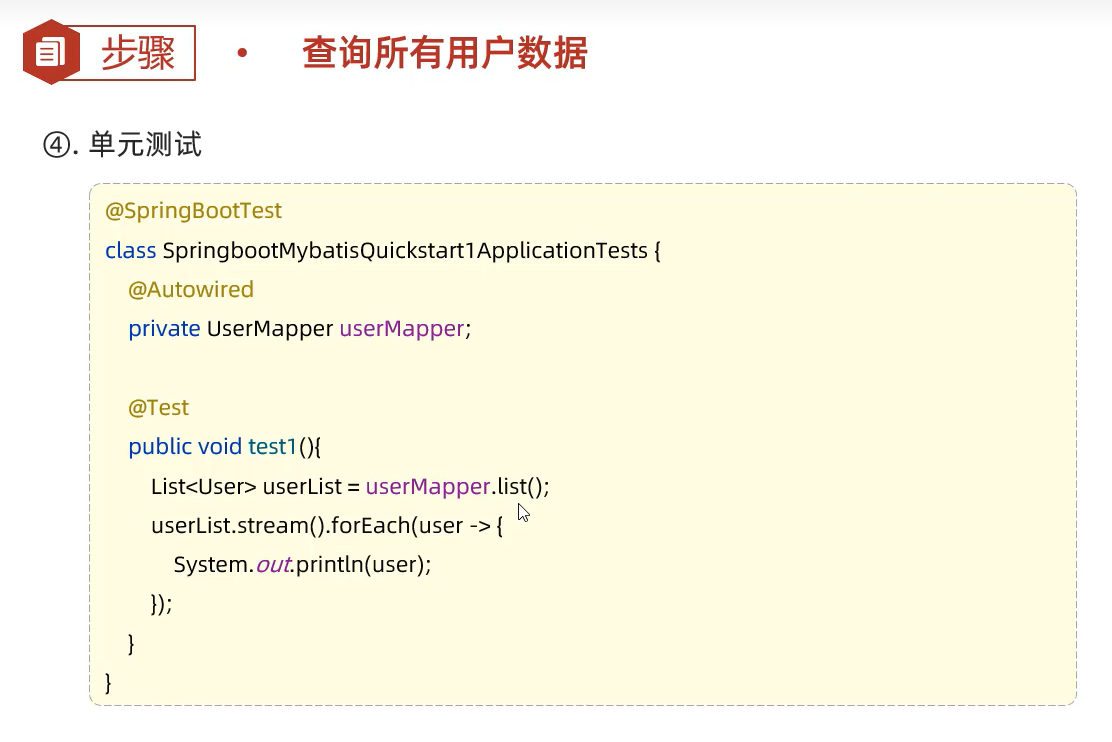
Mybatis
是一款优秀的持久层框架,用于简化JDBC的开发。
JDBC与Mybatis
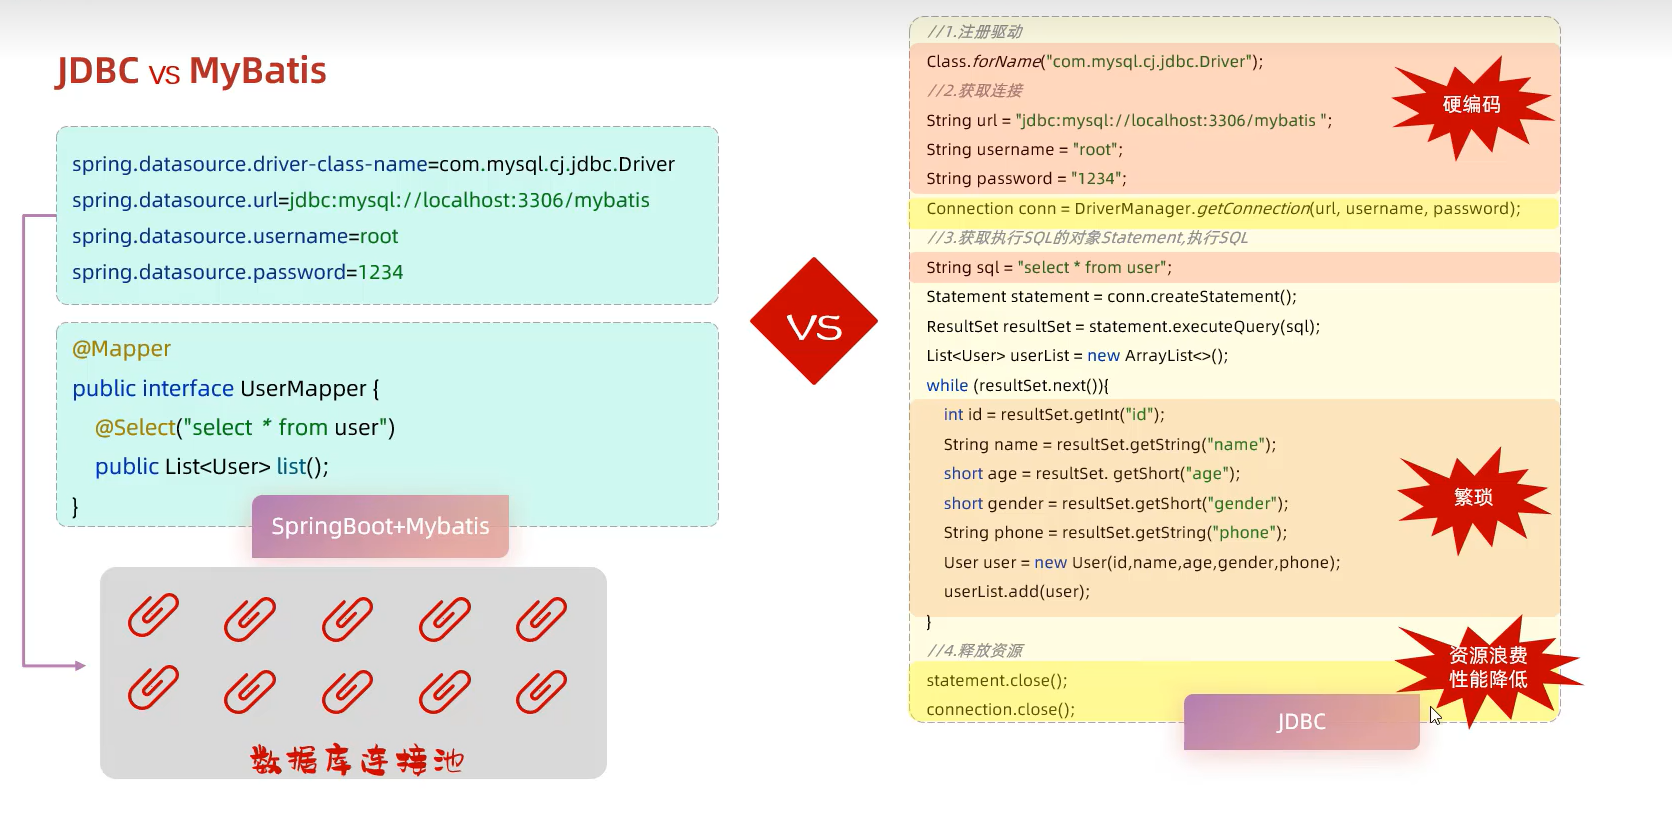
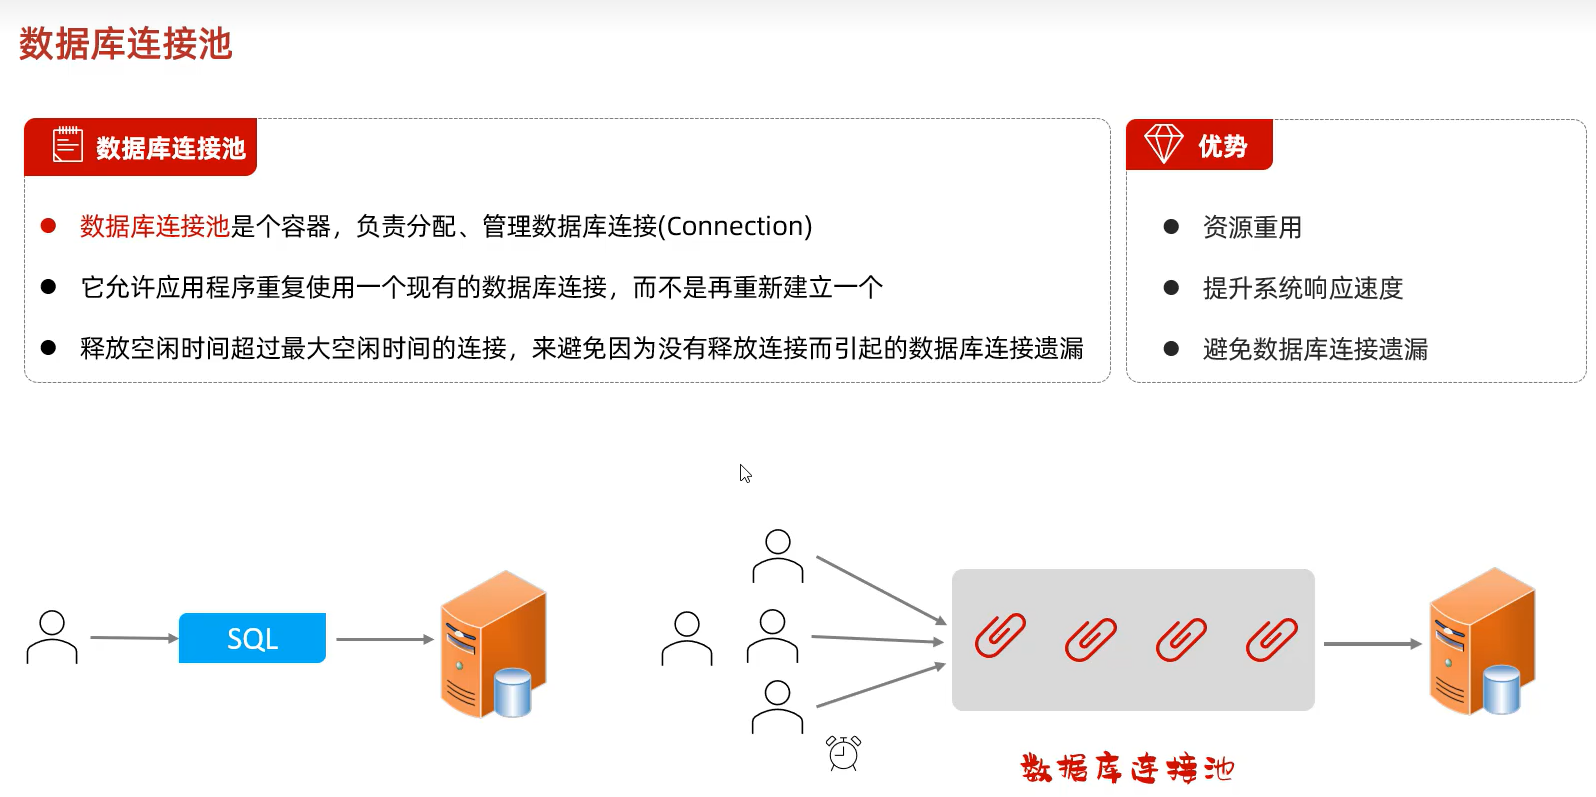
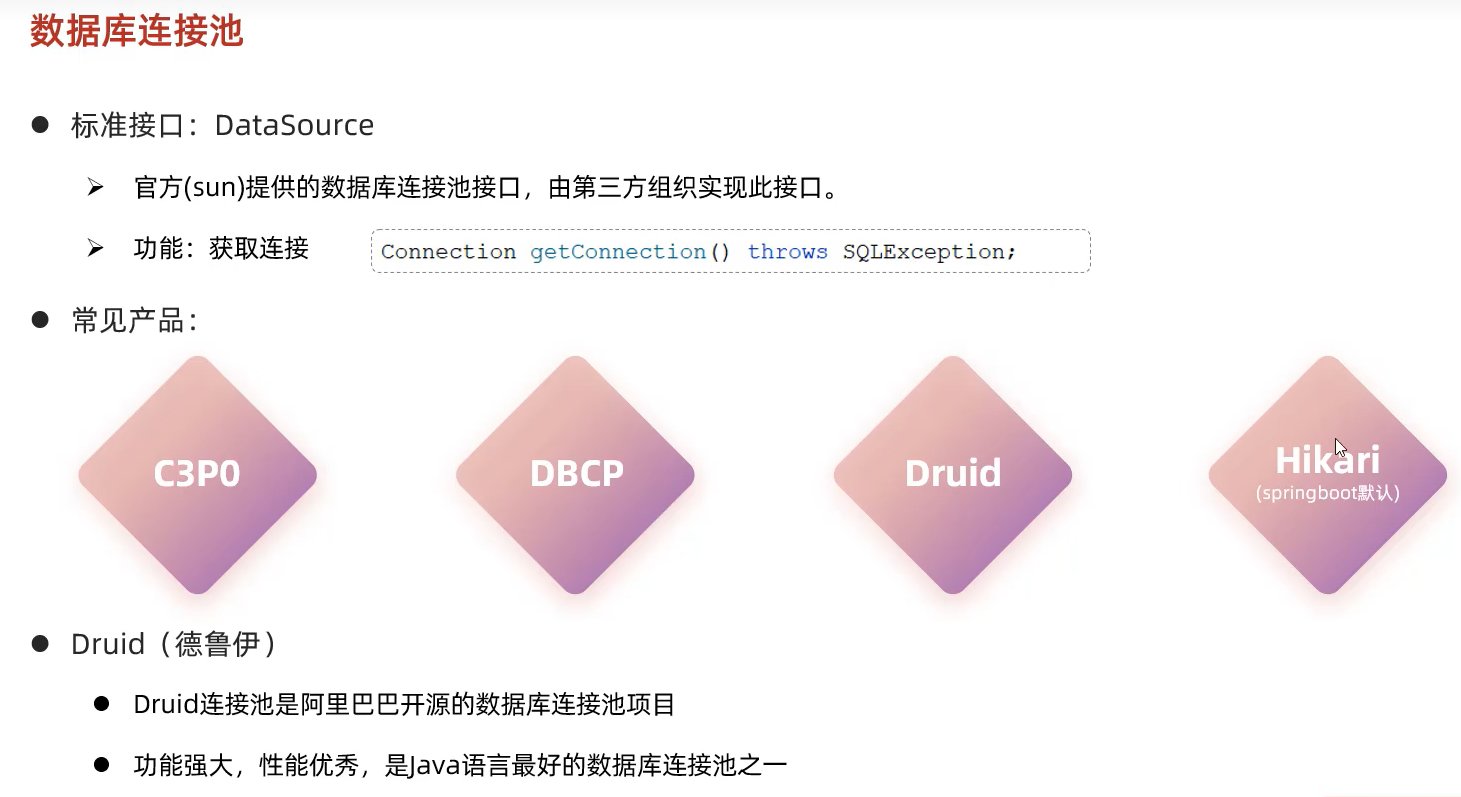
数据库连接池
lombok

基本操作
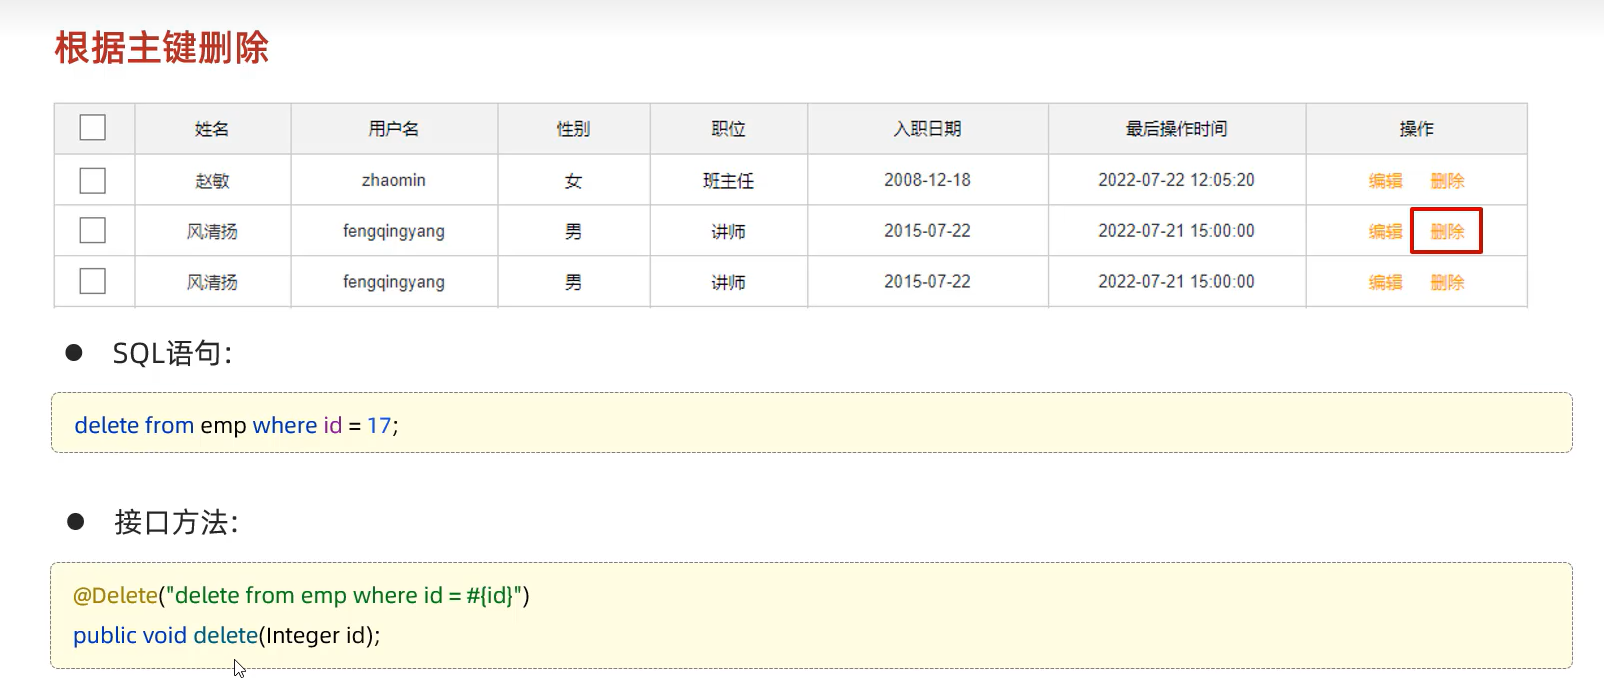
删除
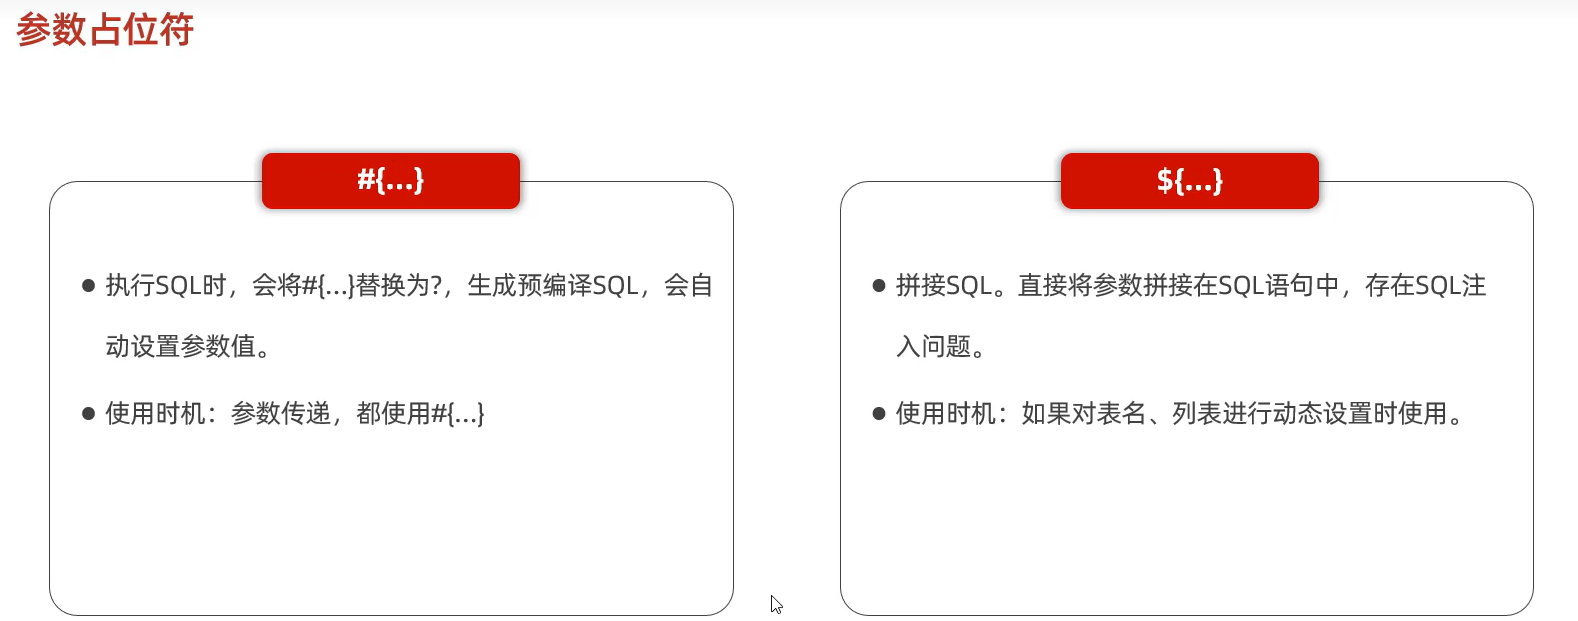
预编译优势
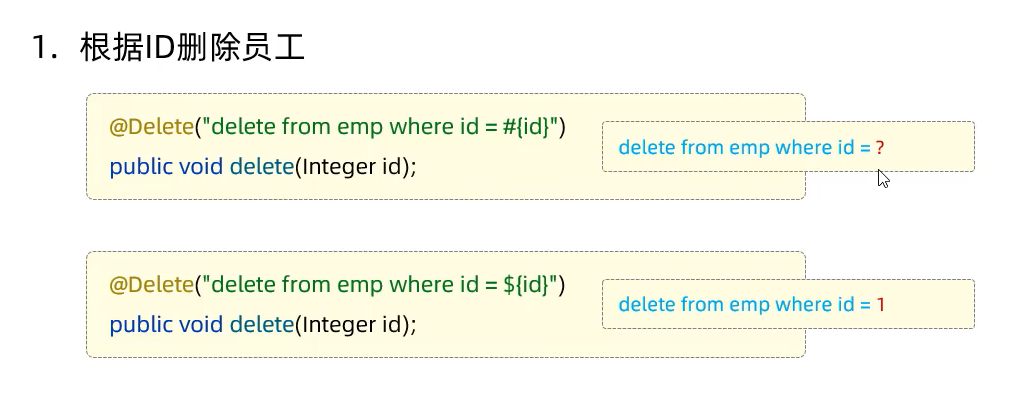
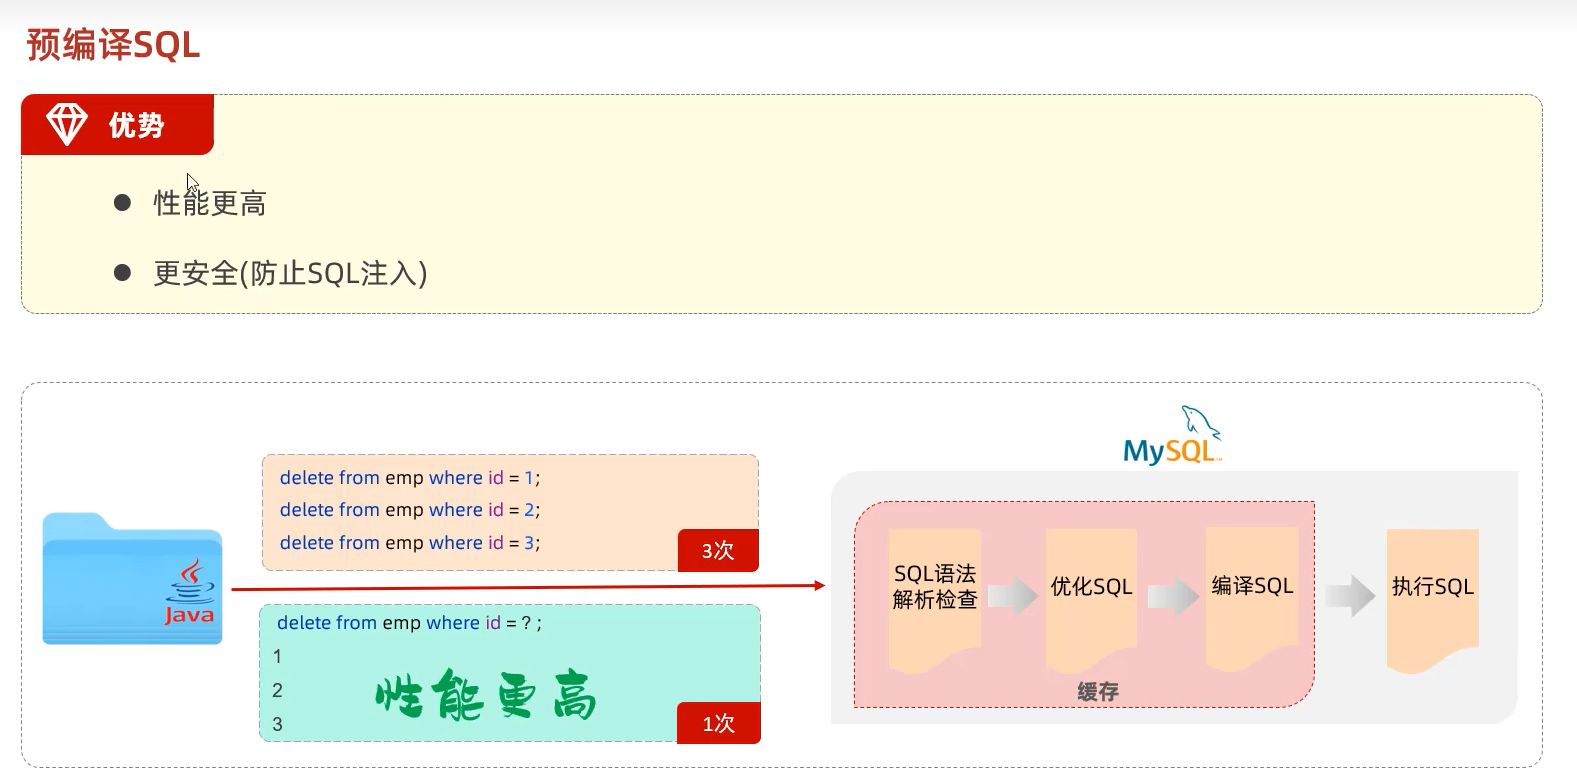
安全#{}:预编译
不安全${}:拼接
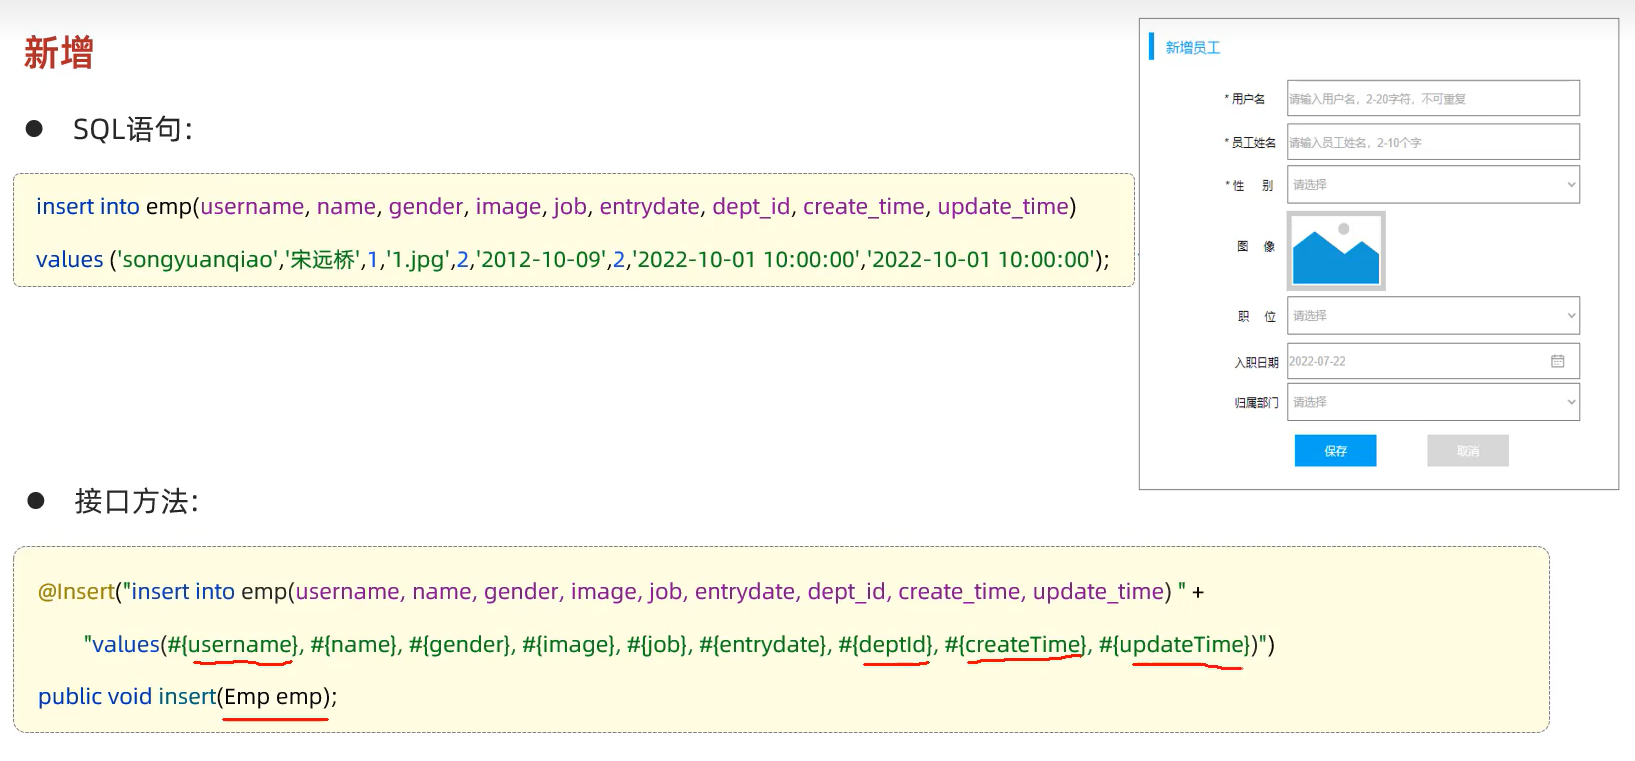
插入(新增)
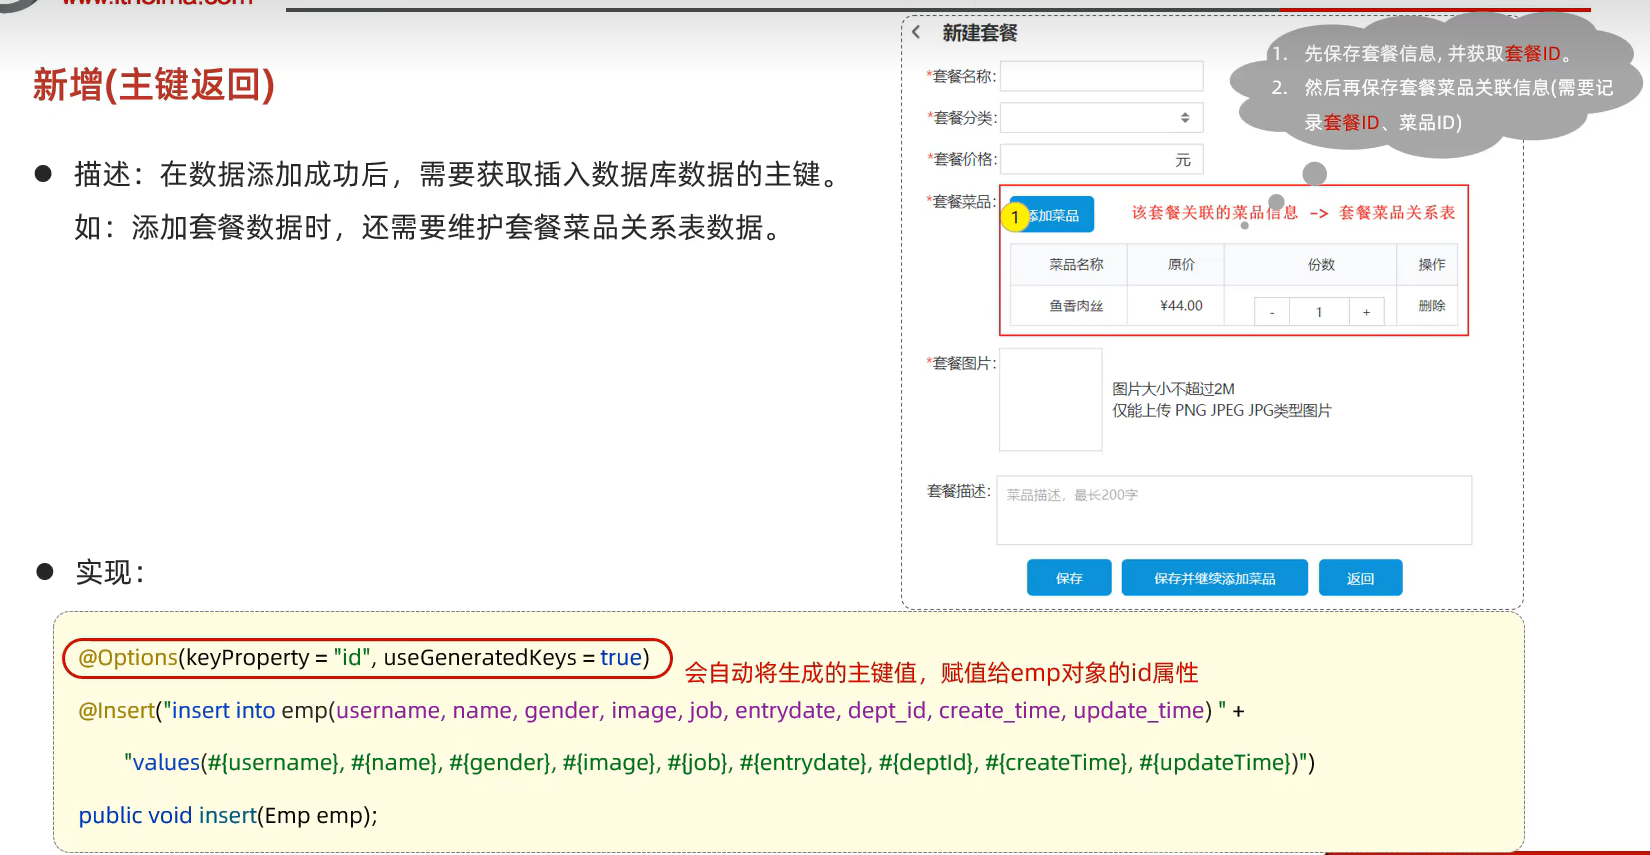
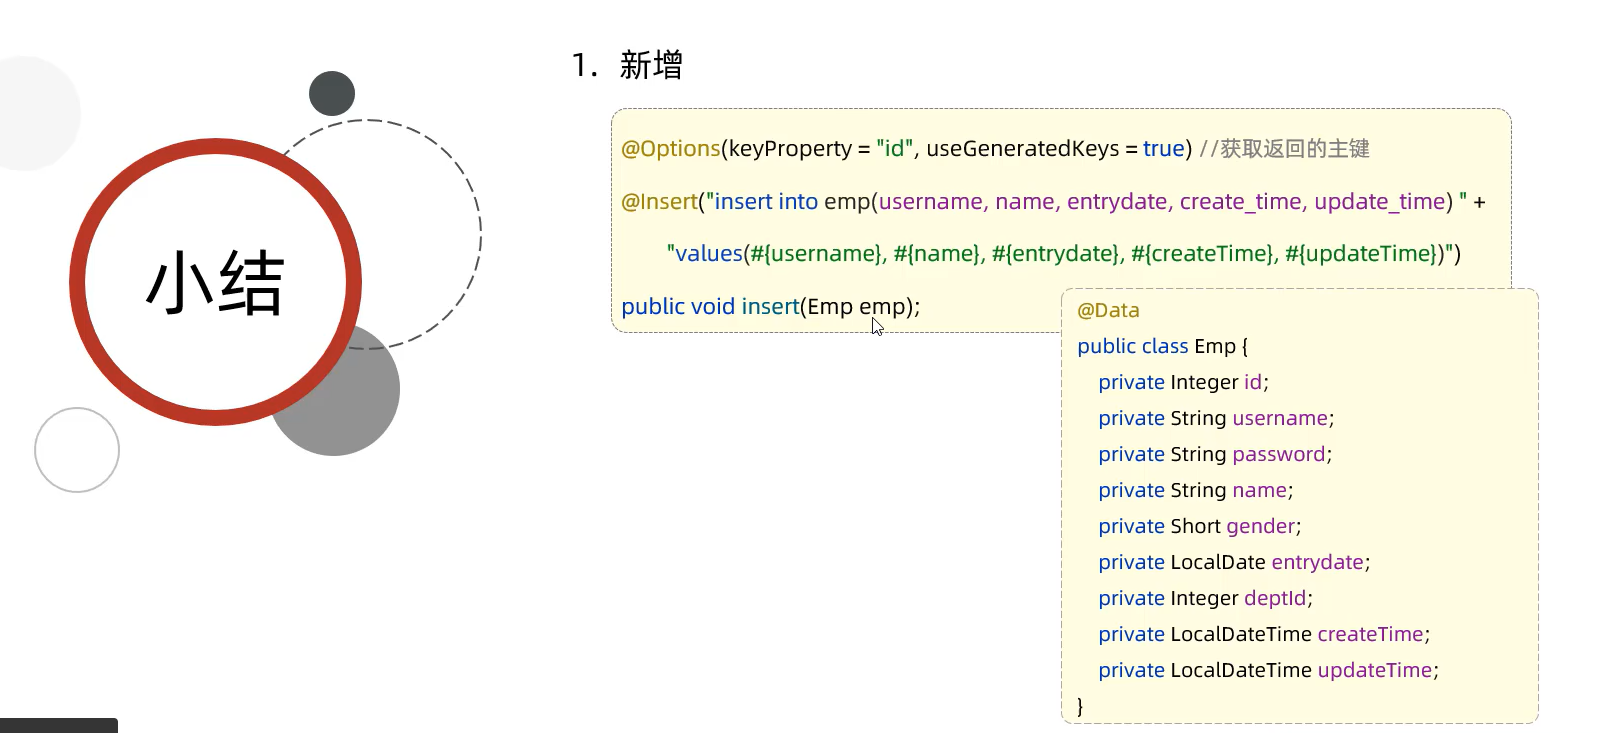
新增的主键返回
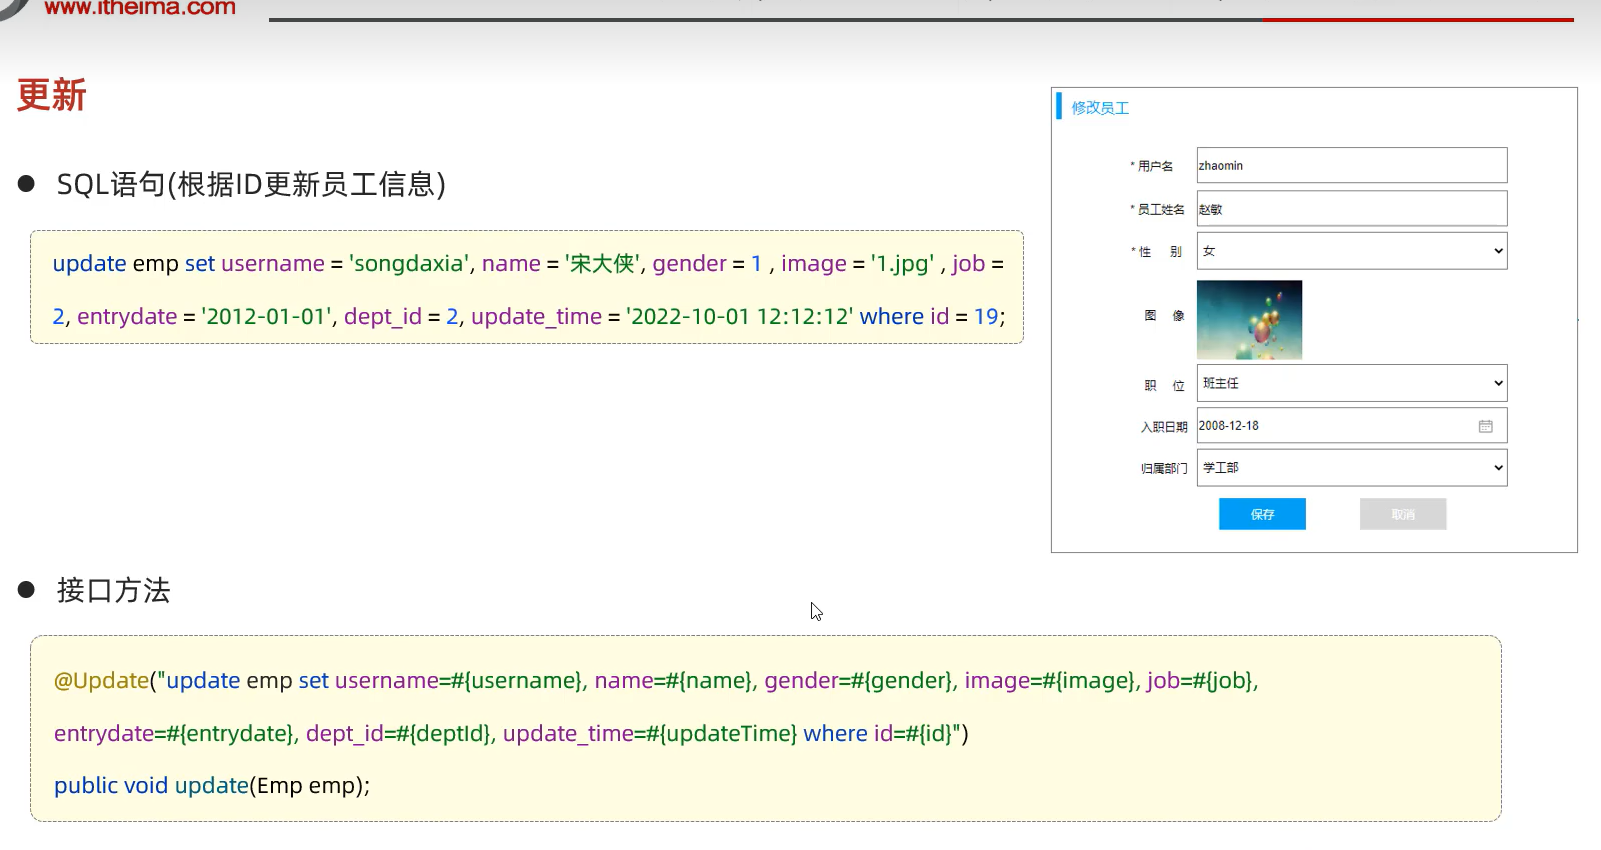
修改(更新)
查询(根据ID)
封装问题:
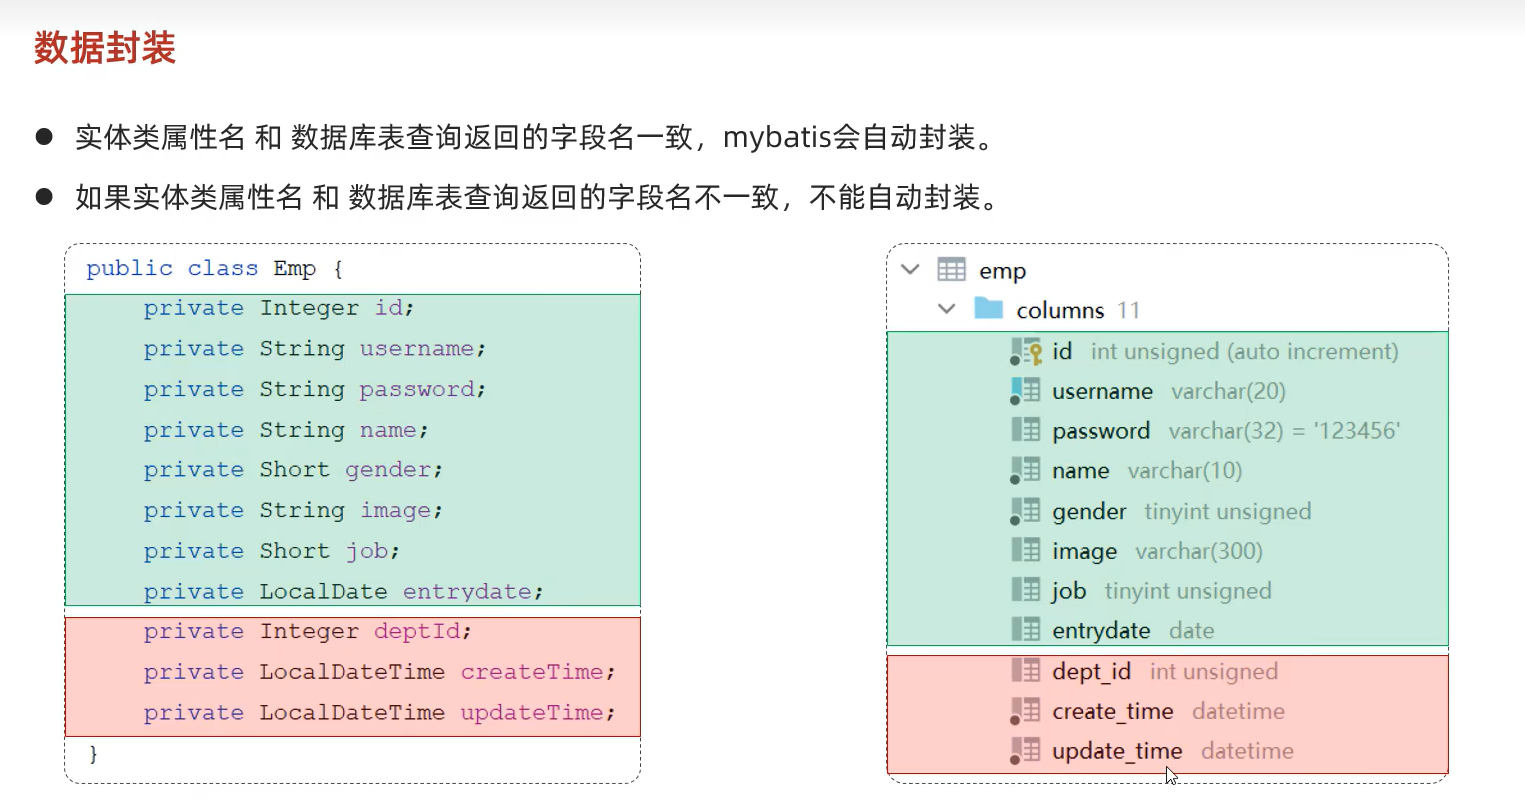
解决:
1.起别名与实体类属性一致就行

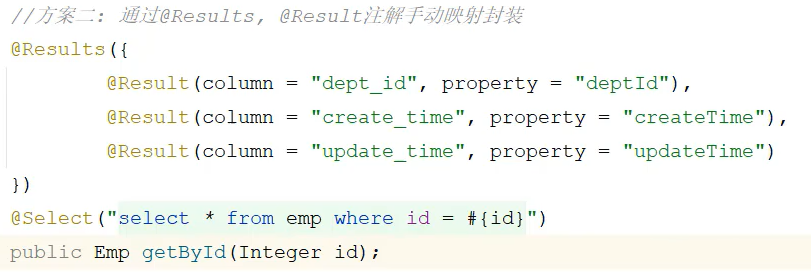
- 通过@Results,@Results注解手动封装(繁琐)
3.开启mybatis的驼峰命名自动映射开关(严格命名:推荐)

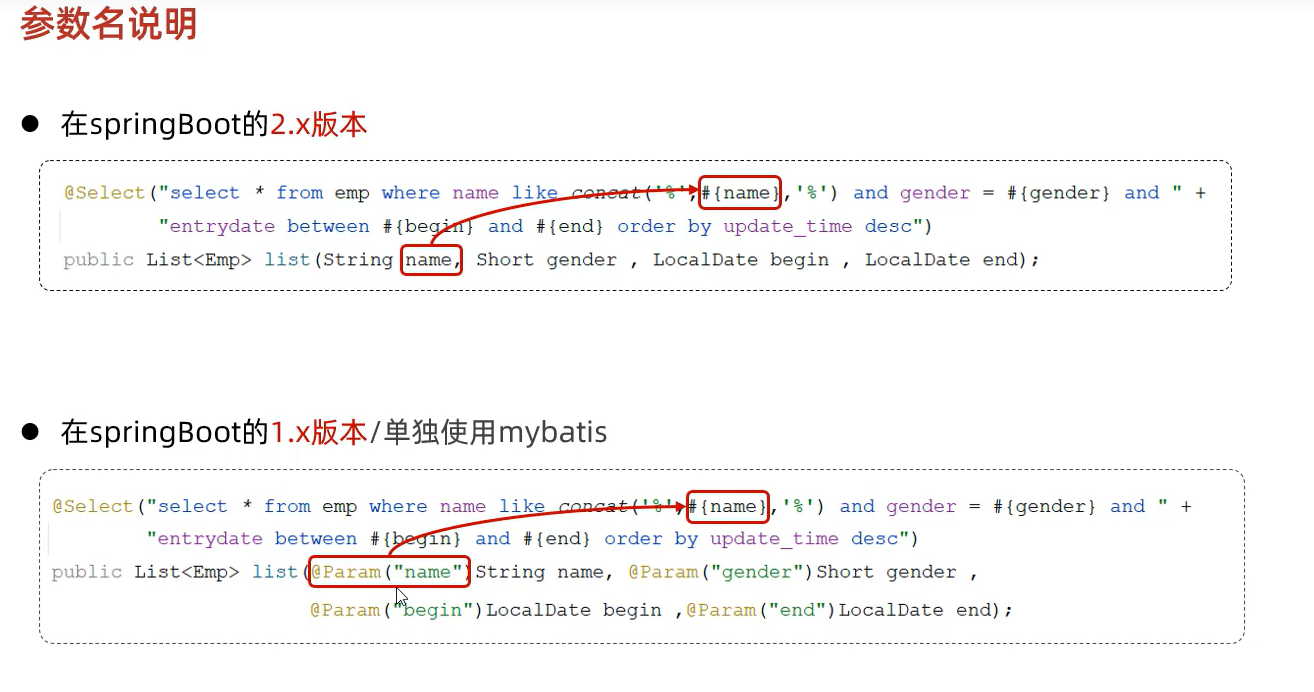
条件查询
第一个不安全
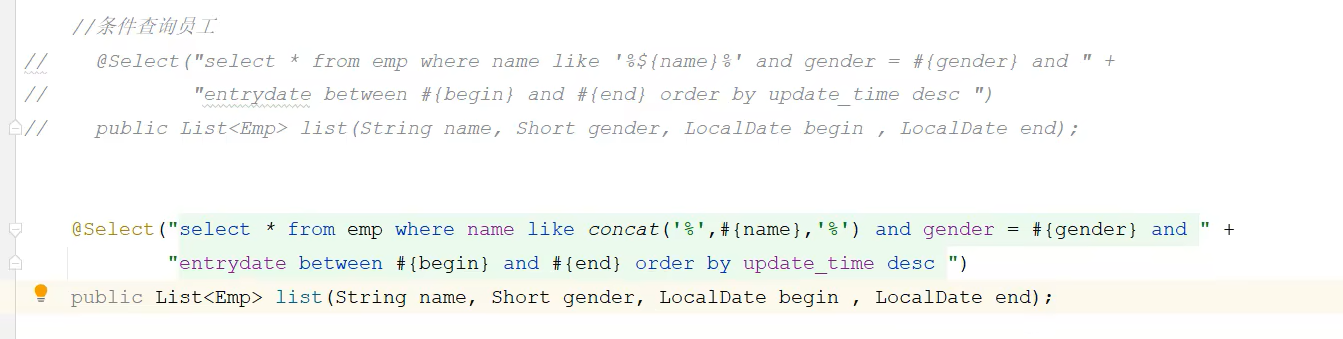
上边使用到了concat拼接函数;
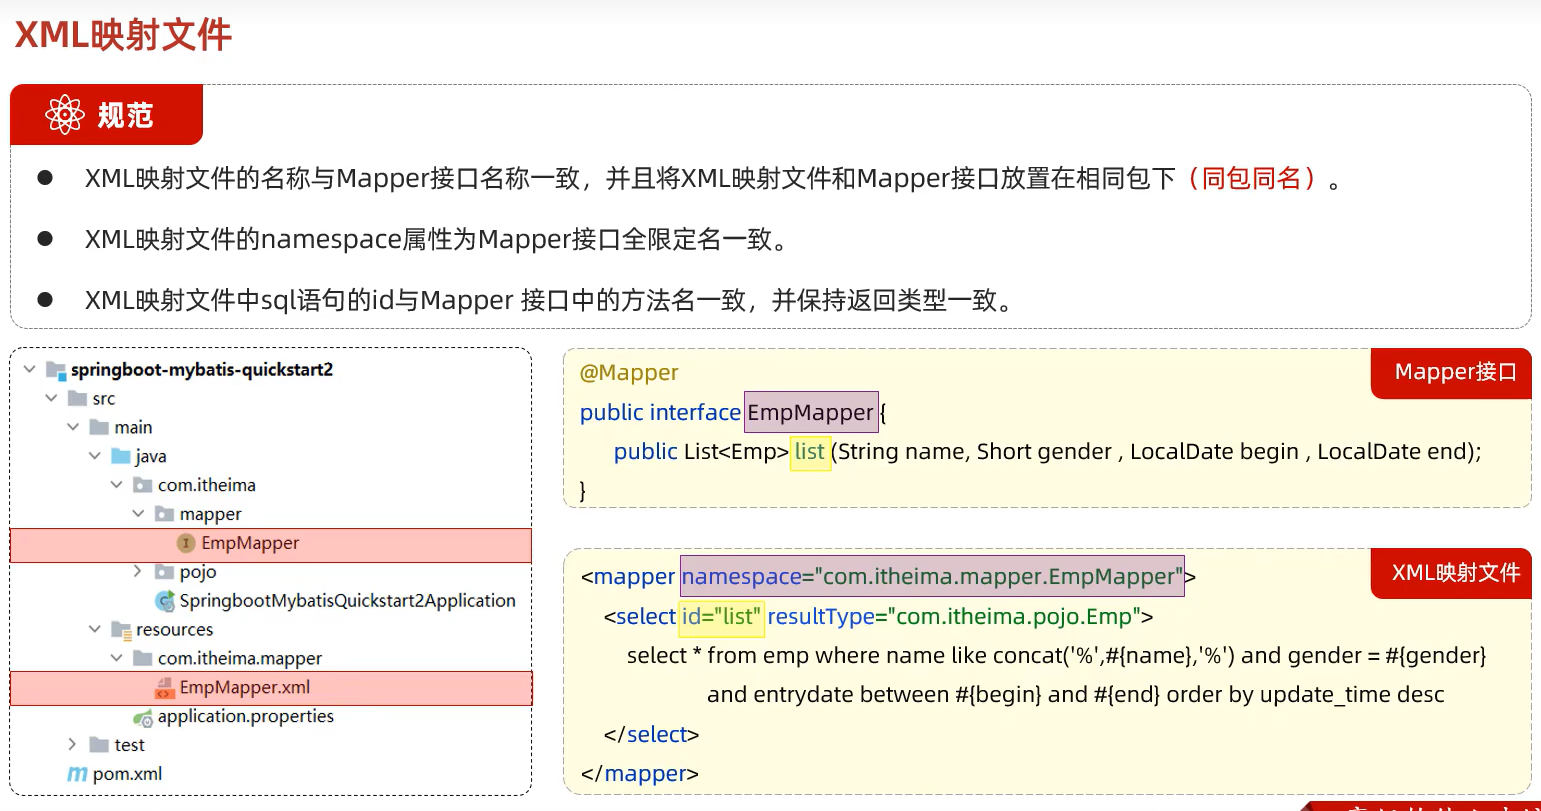
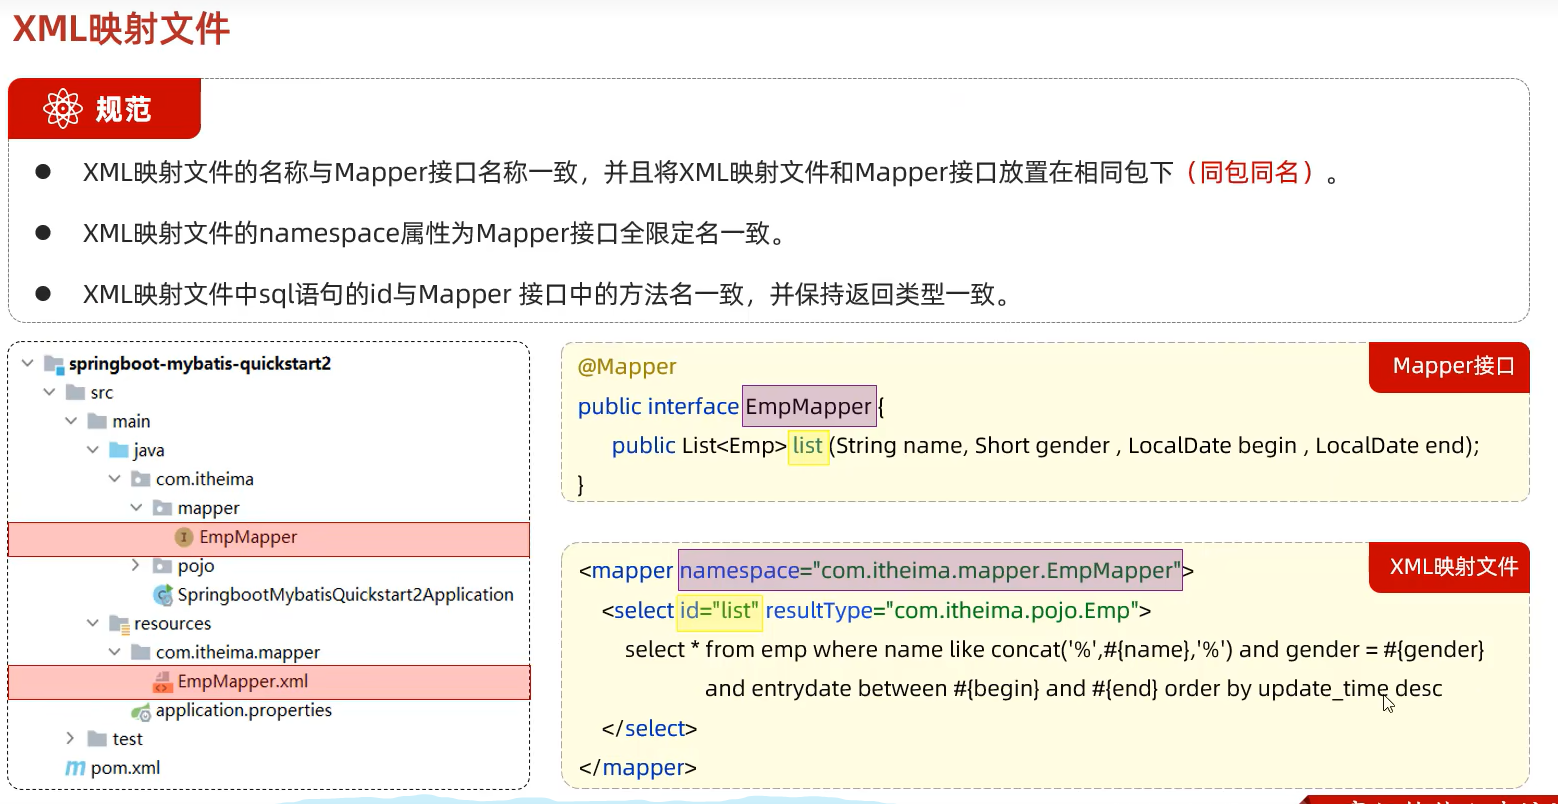
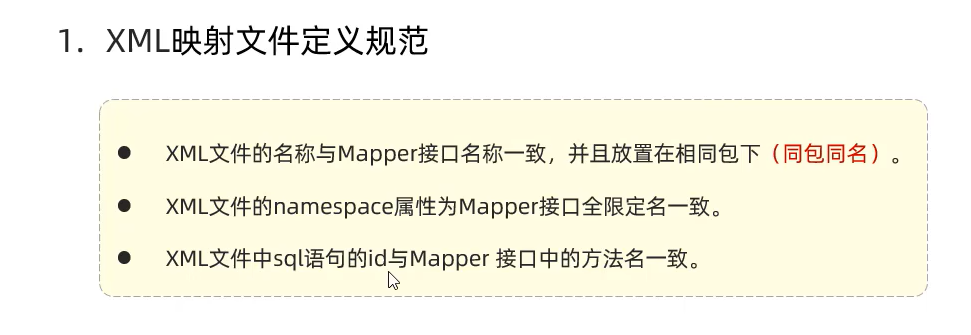
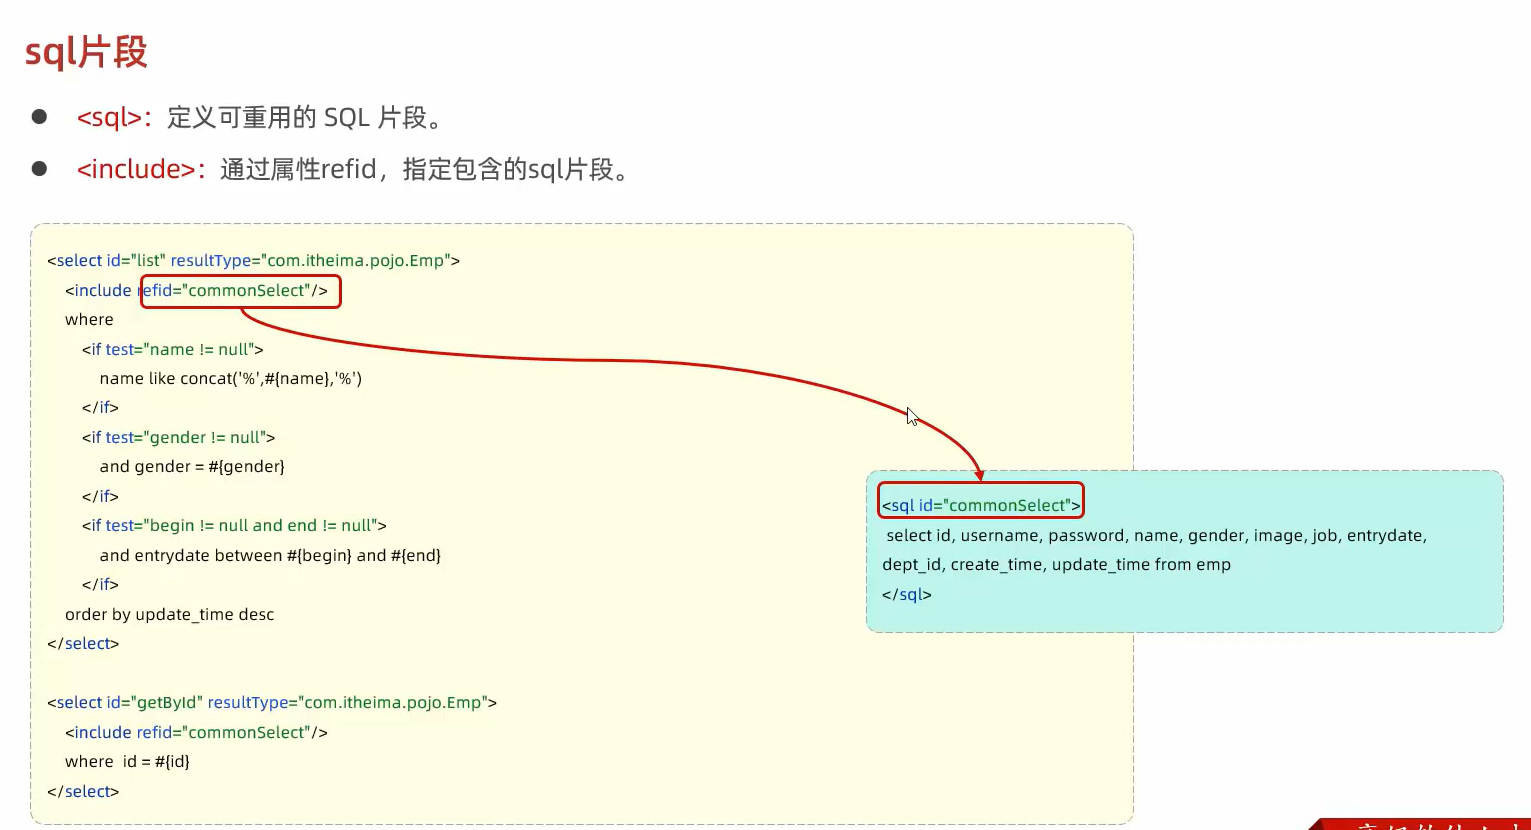
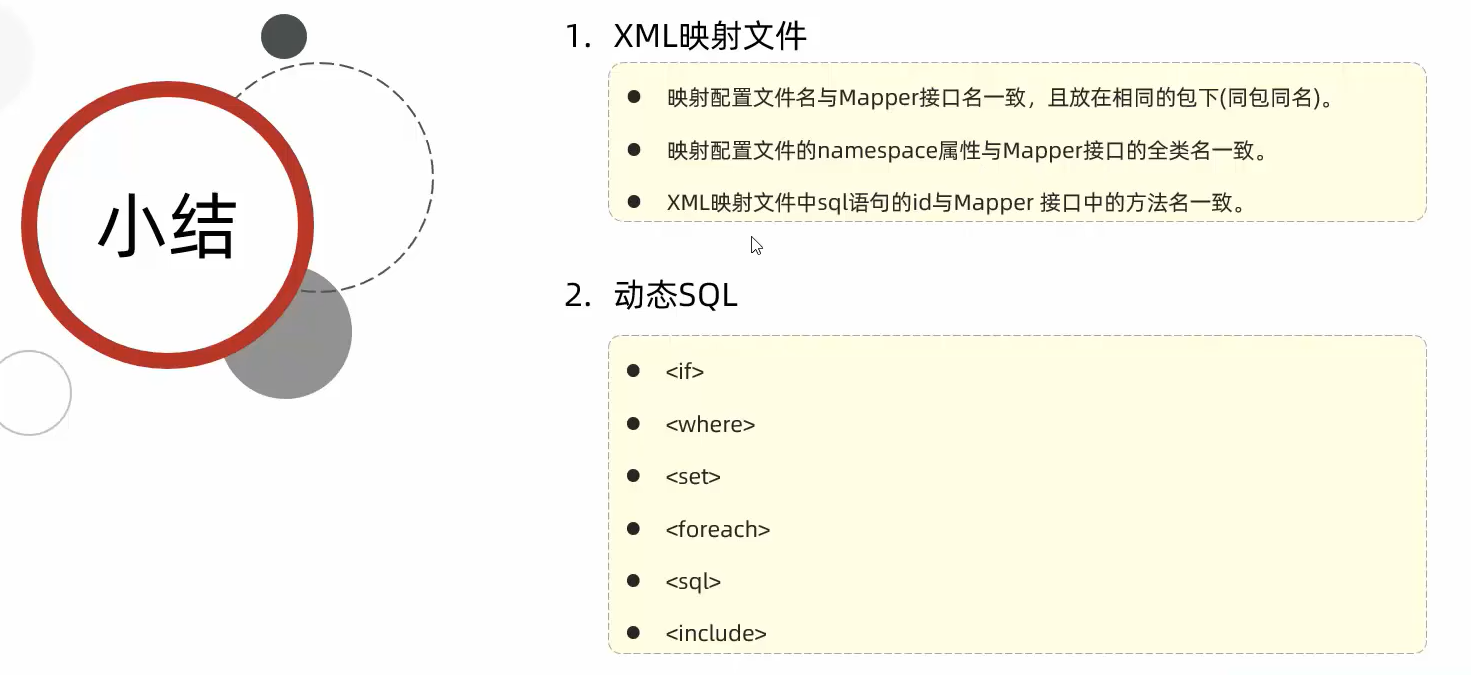
XML映射文件
高度规范
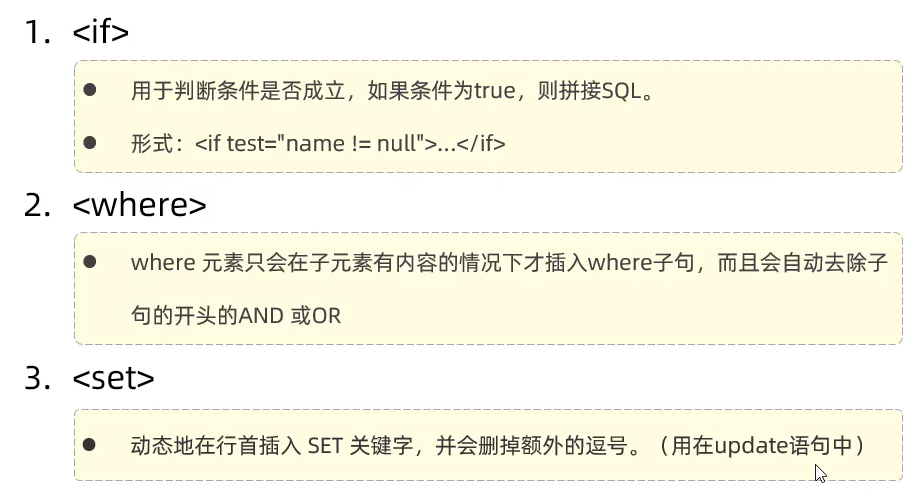
动态SQL
三个标签
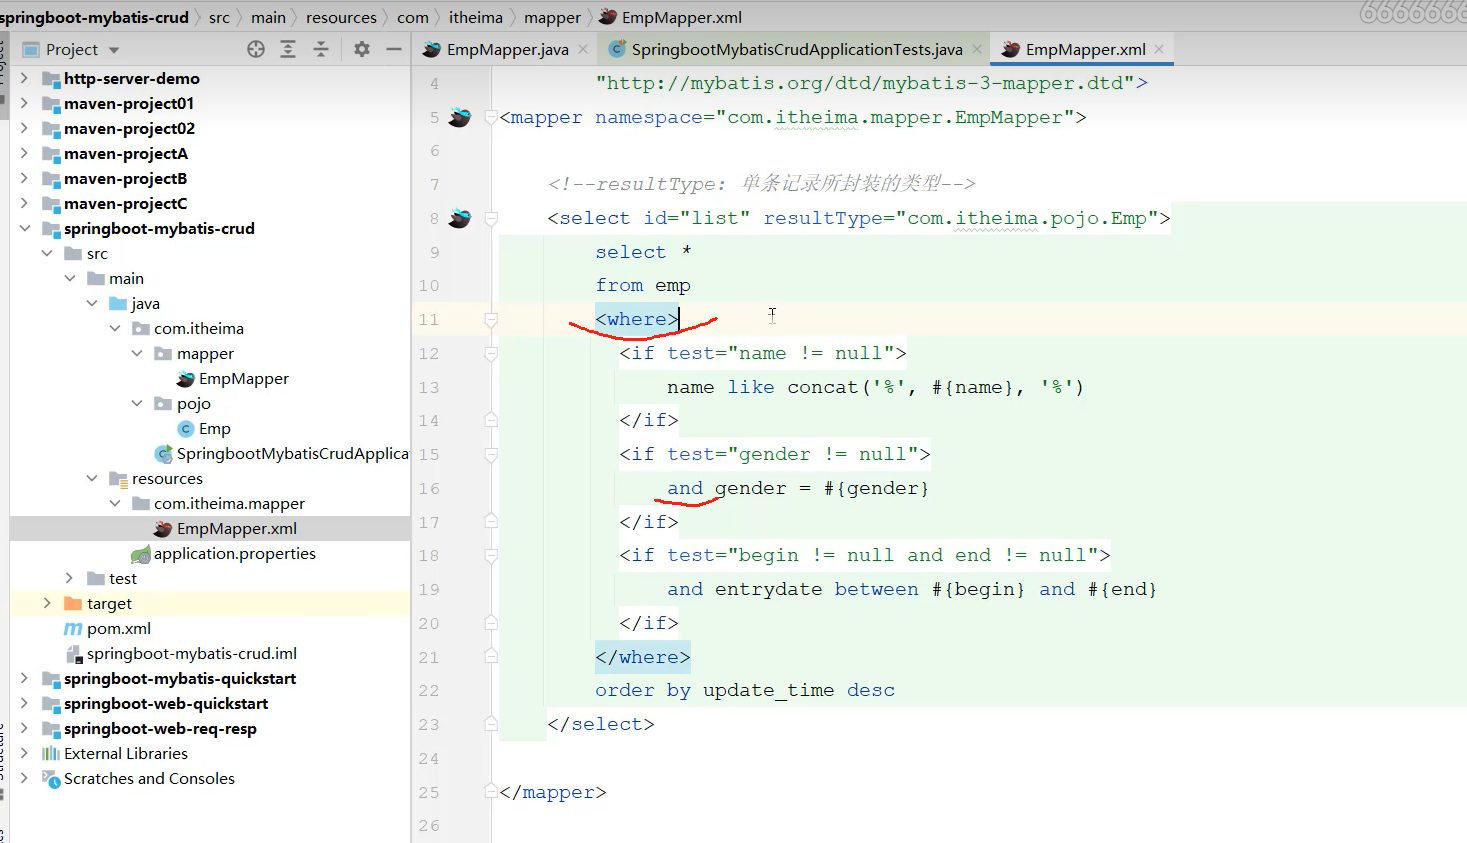
< where >标签会自动排除and
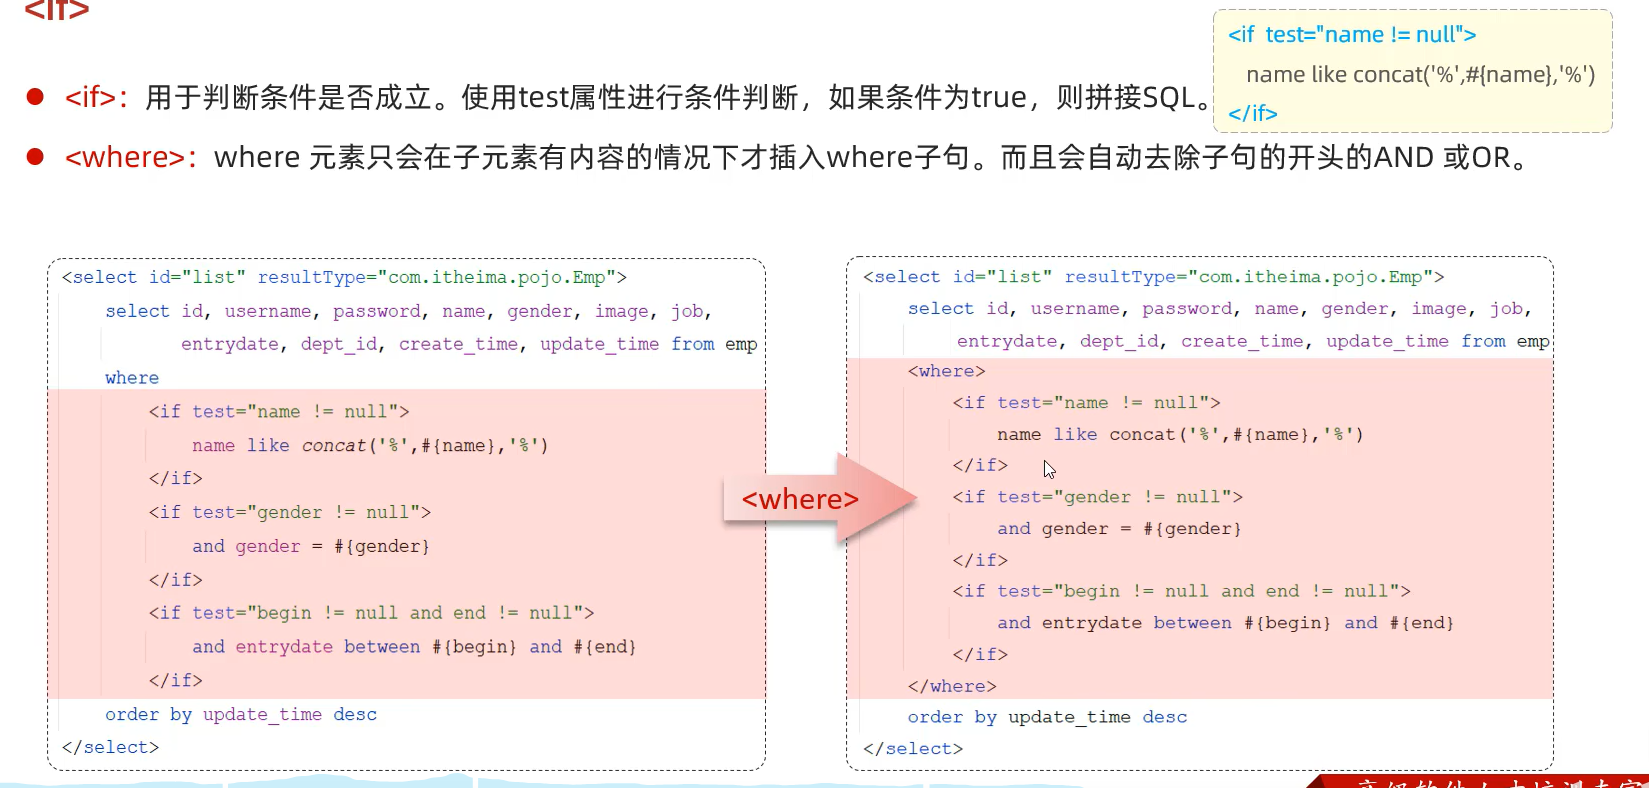
< set >自动排除多余的”,“
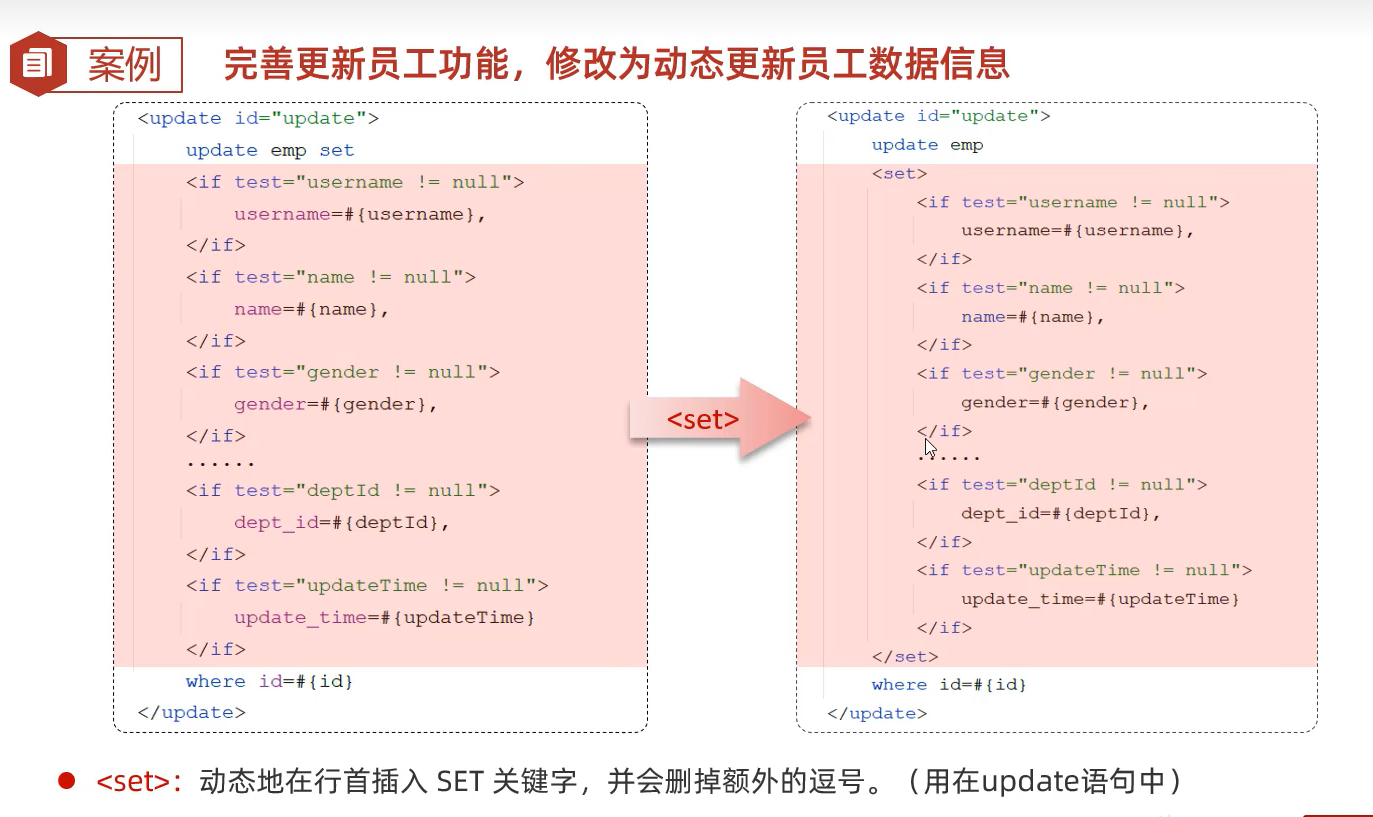
案例
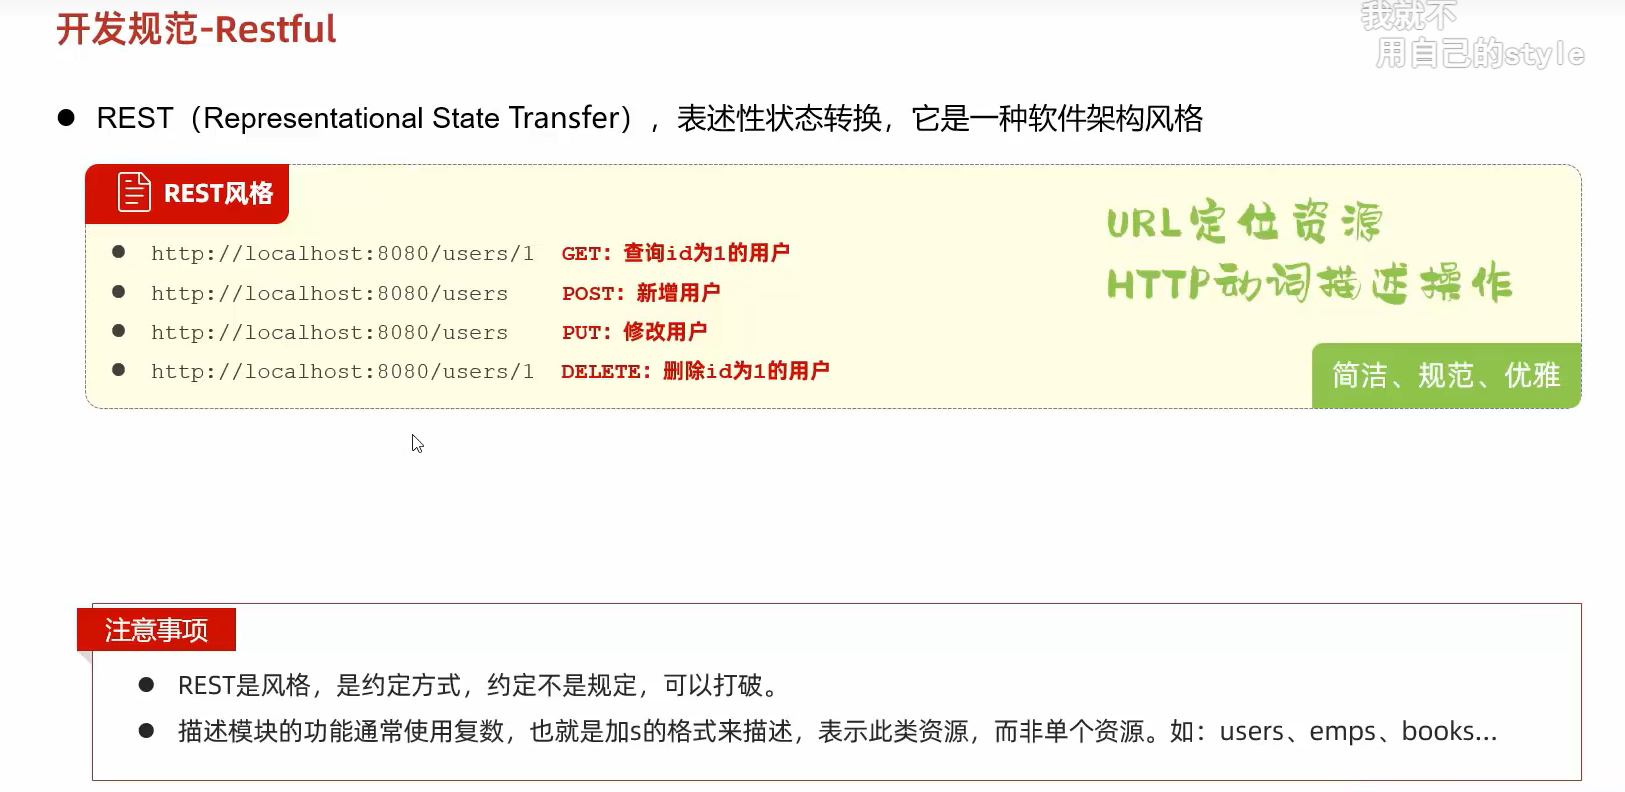
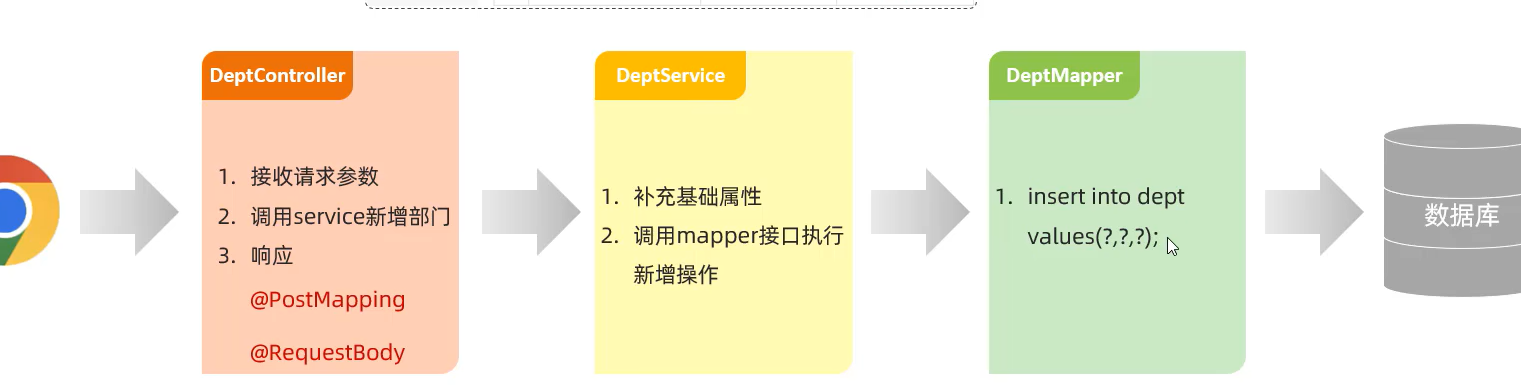
开发规范

查询部门

@slfj4作用(方法 Mapper层)
自动生成记录日志对象,then log.info(“查询全部部门数据”);
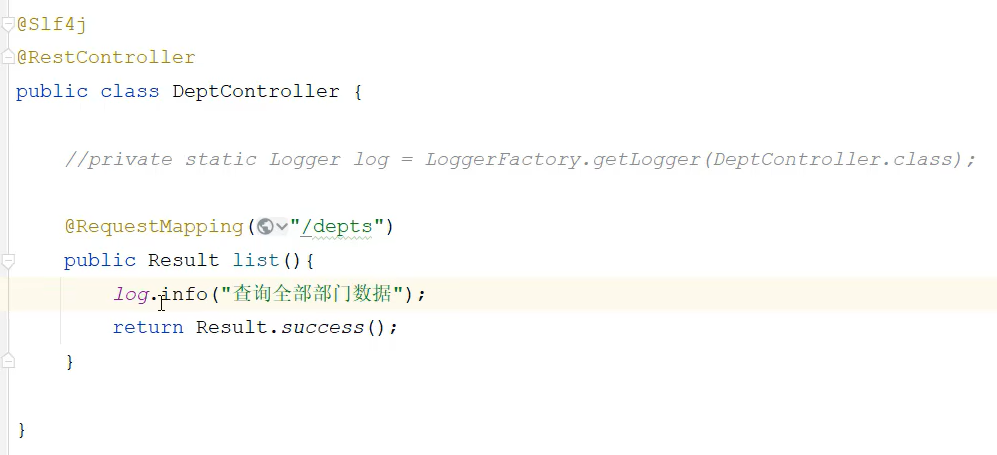
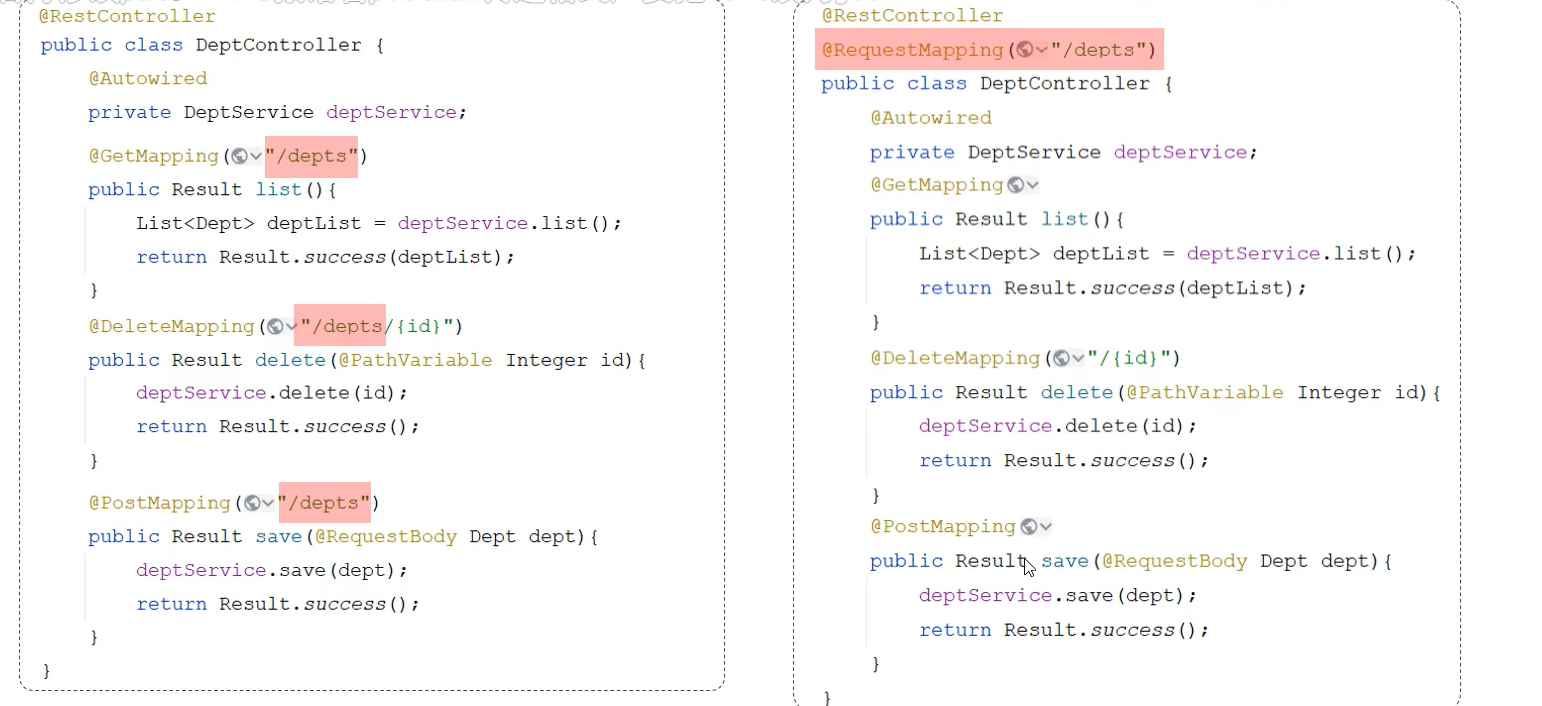
@RequestMapping @GetMapping(方法 Mapper层)
@RequestMapping(“/depts”):映射到/dept前端地址:localhost:8080/depts
@GetMapping(“/depts”):限制请求方式为GET
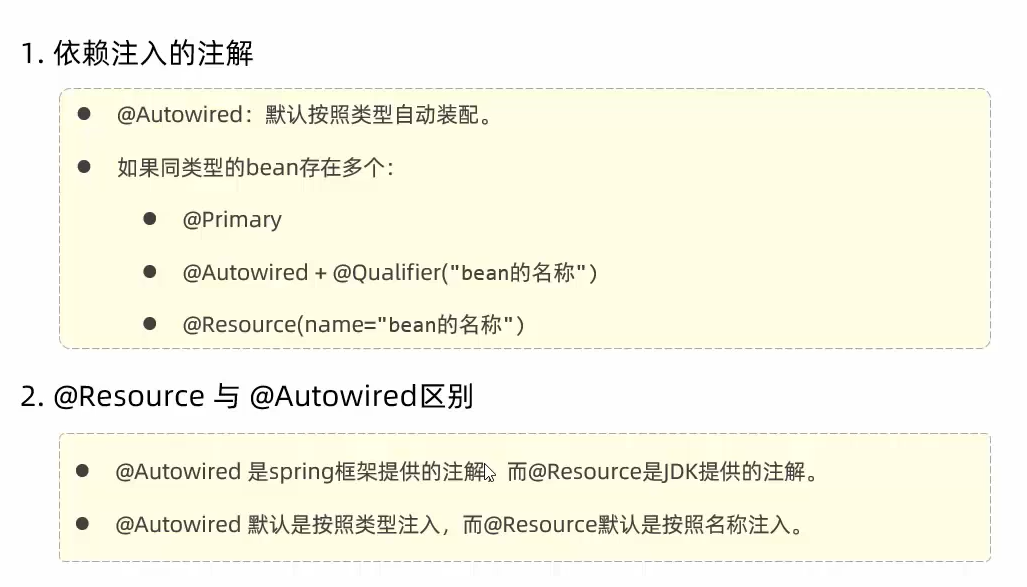
@Autowired(方法)
依赖注入
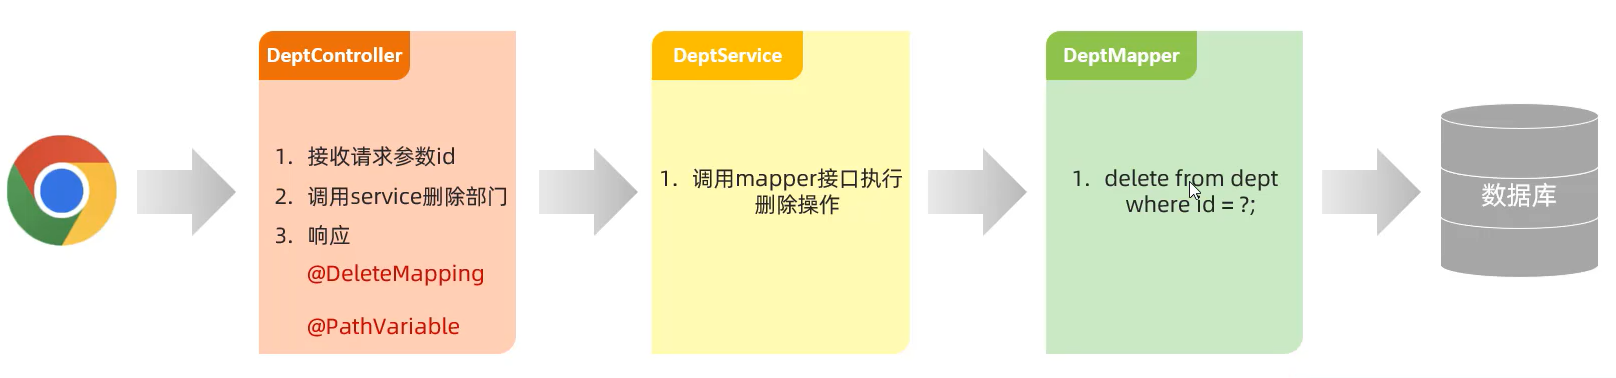
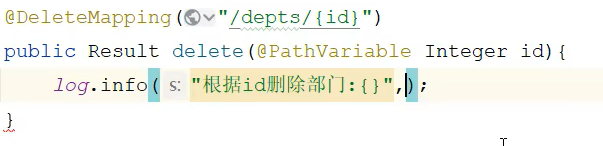
删除部门
@PathVariable
路径参数注解
增加部门
@RequestBody
将json数据封装到实体类中
分页查询条件
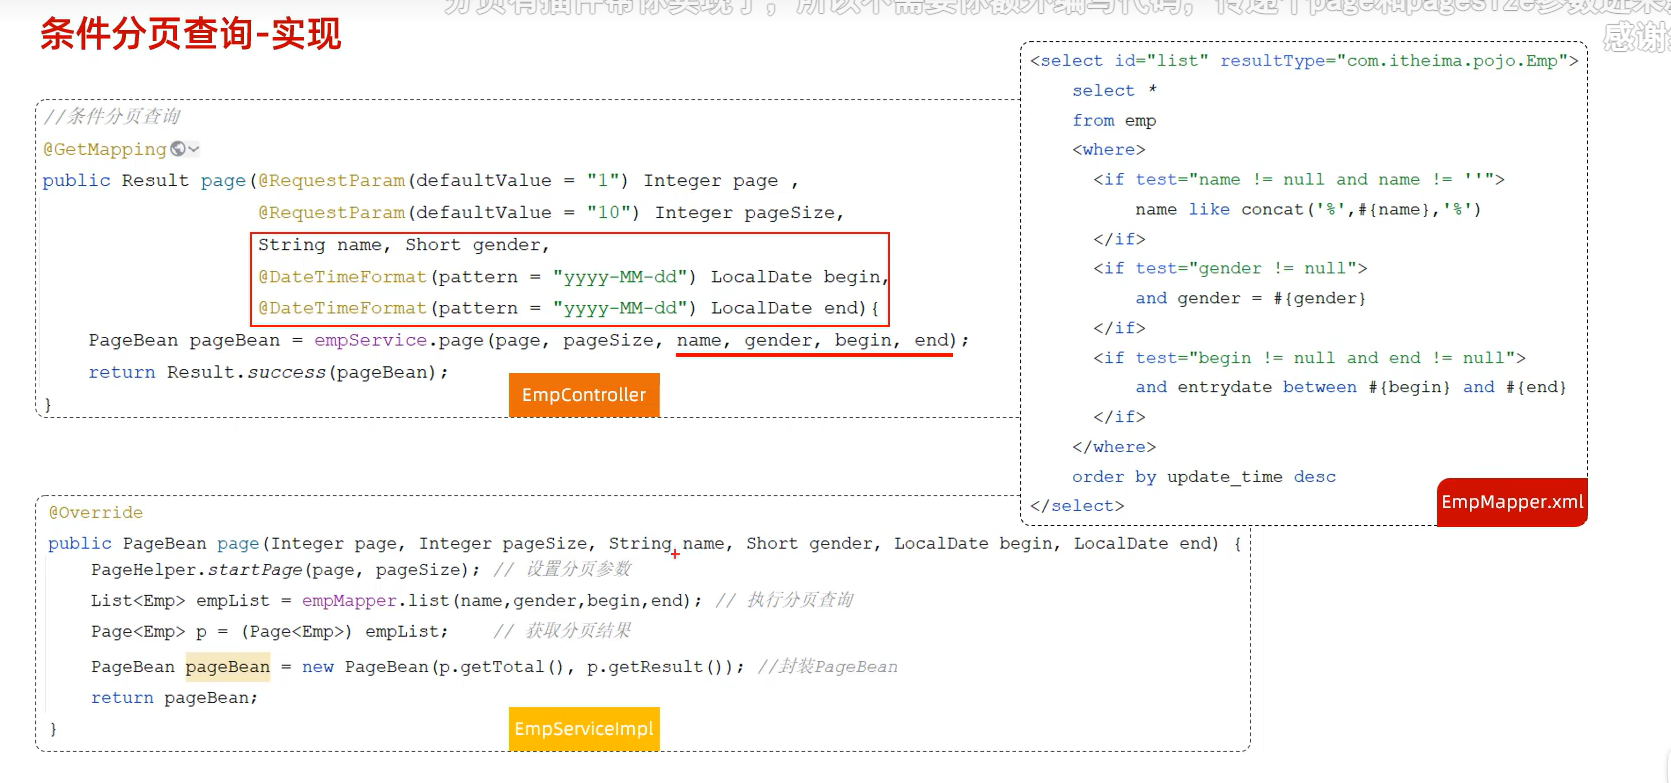
映射文件中的sql语句不要加分号“;”
类型是LocalDate不是LocalDateTime
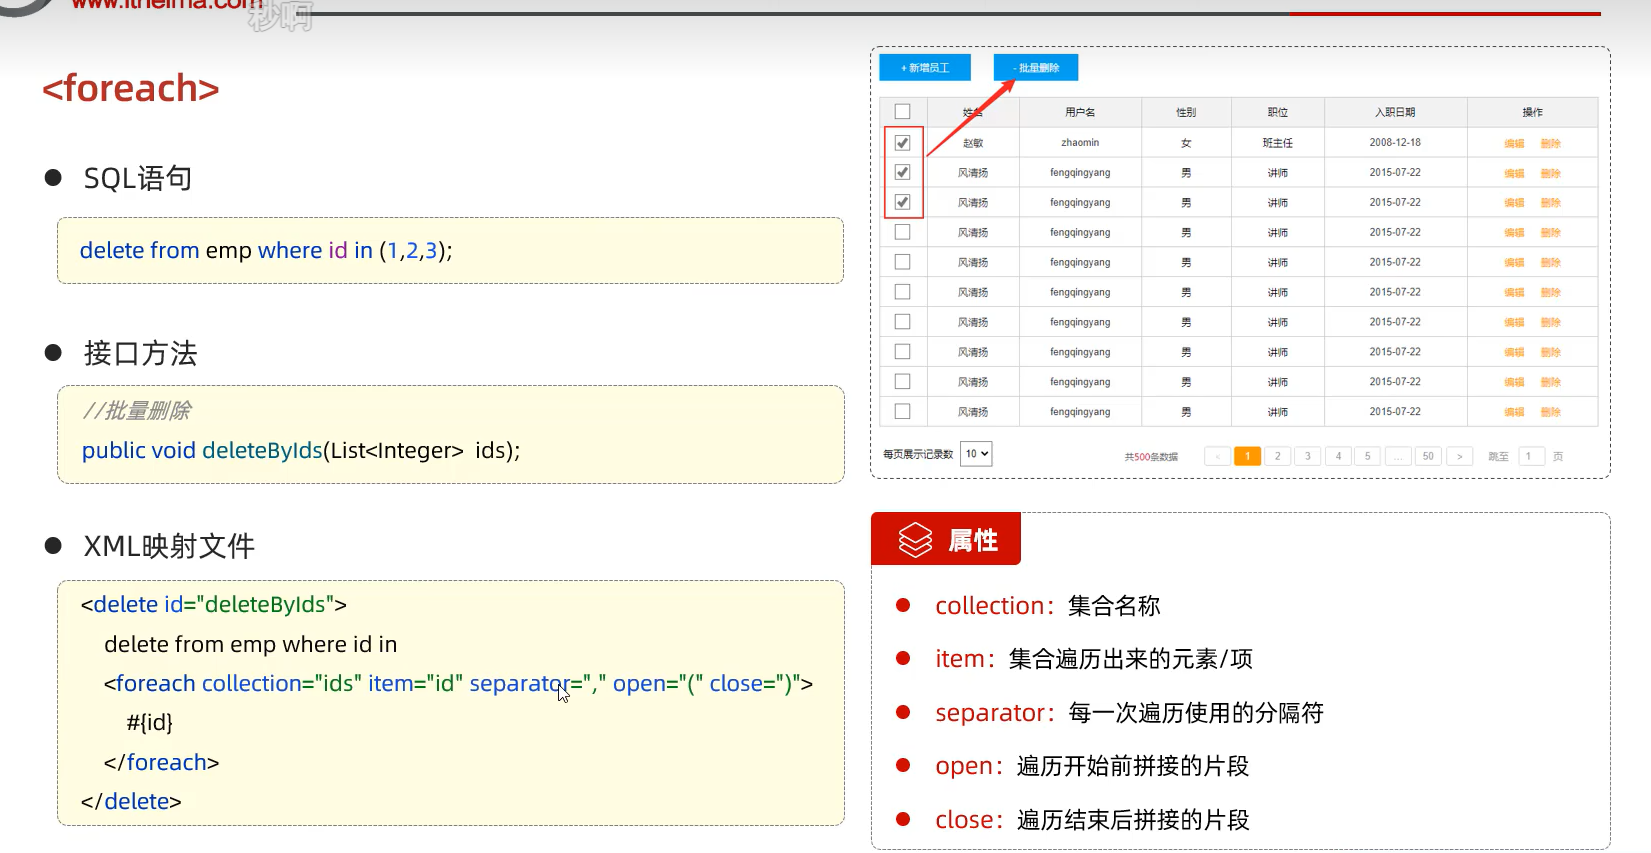
批量删除
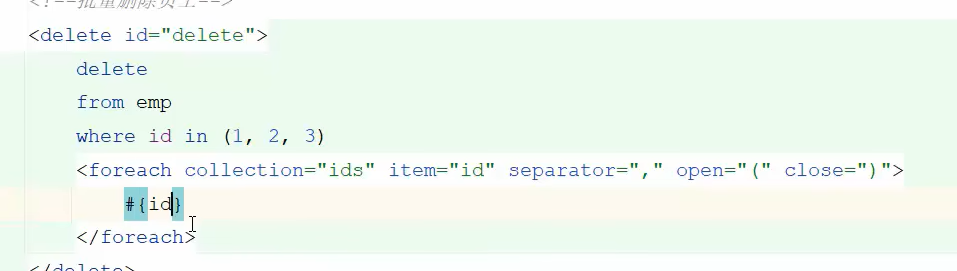
(1,2,3)和
foreach是等效的
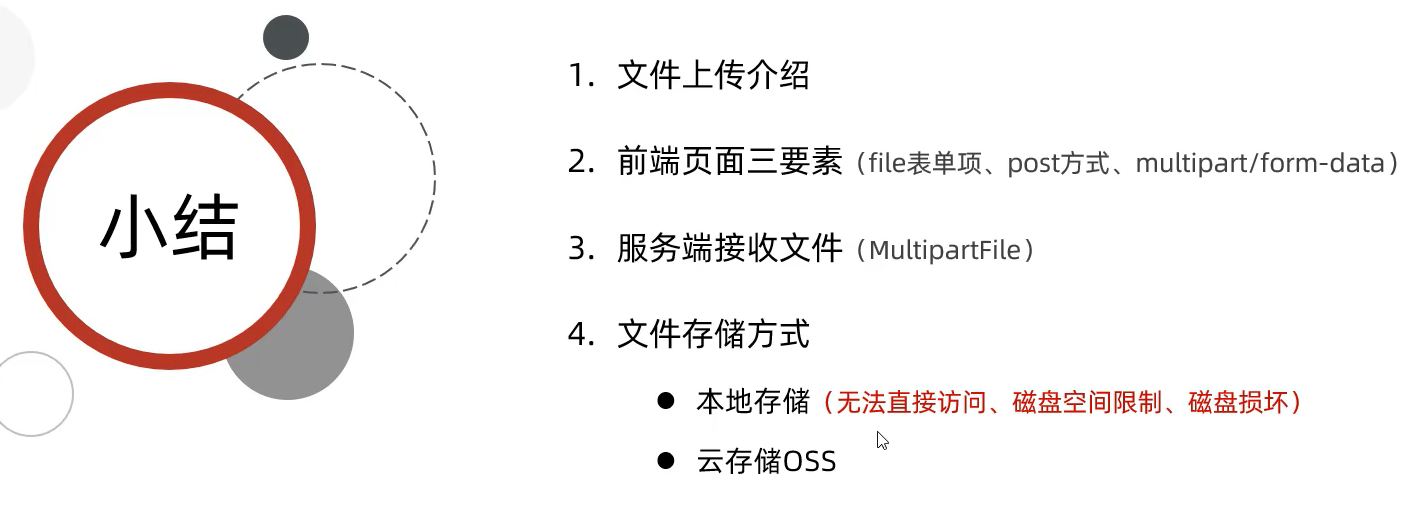
文件上传


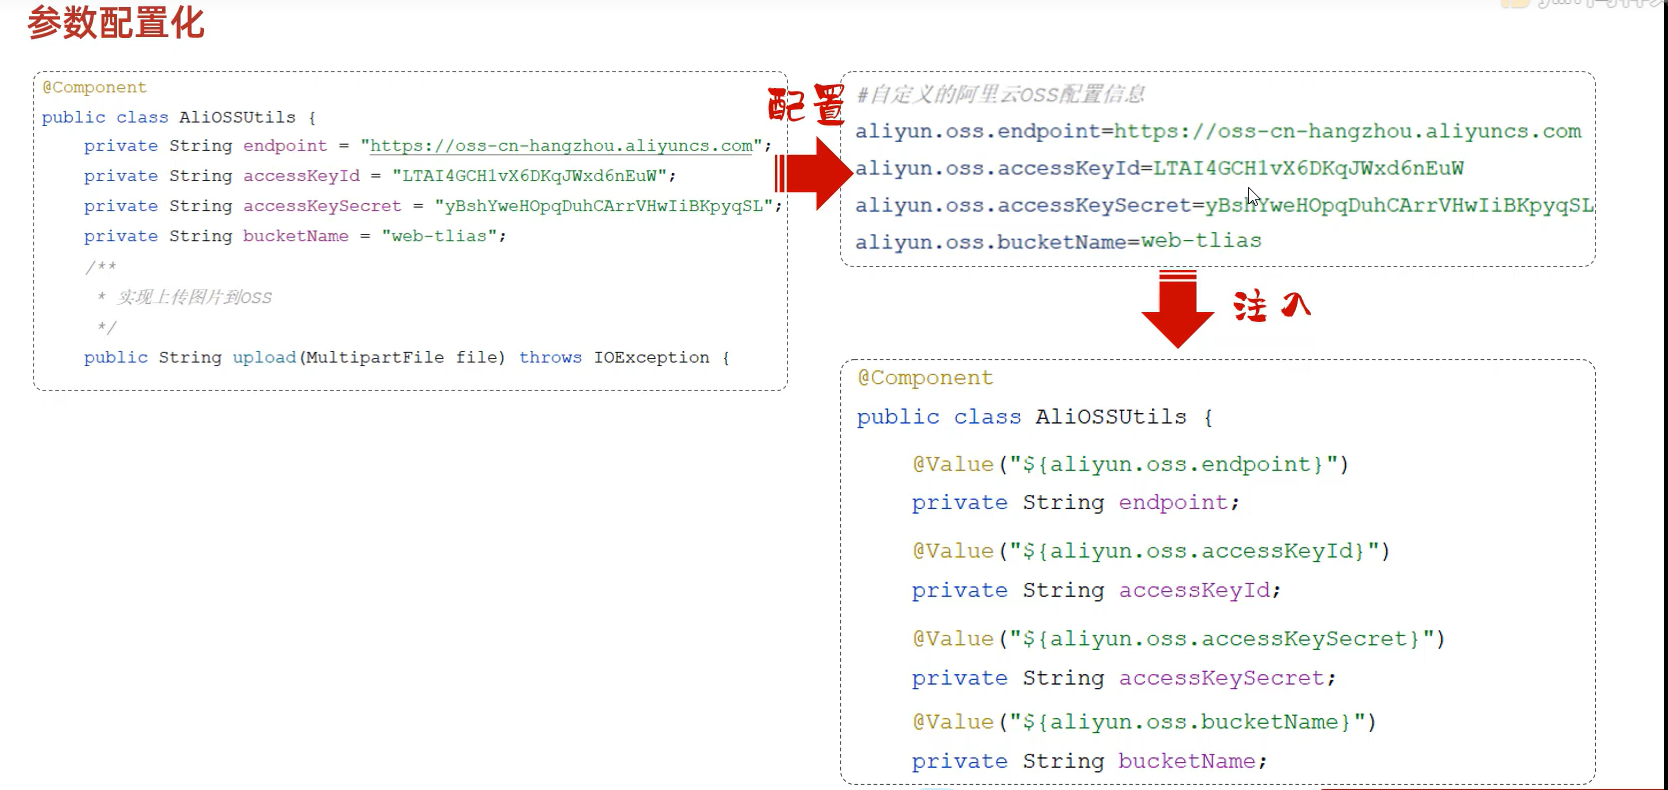
阿里云配置:
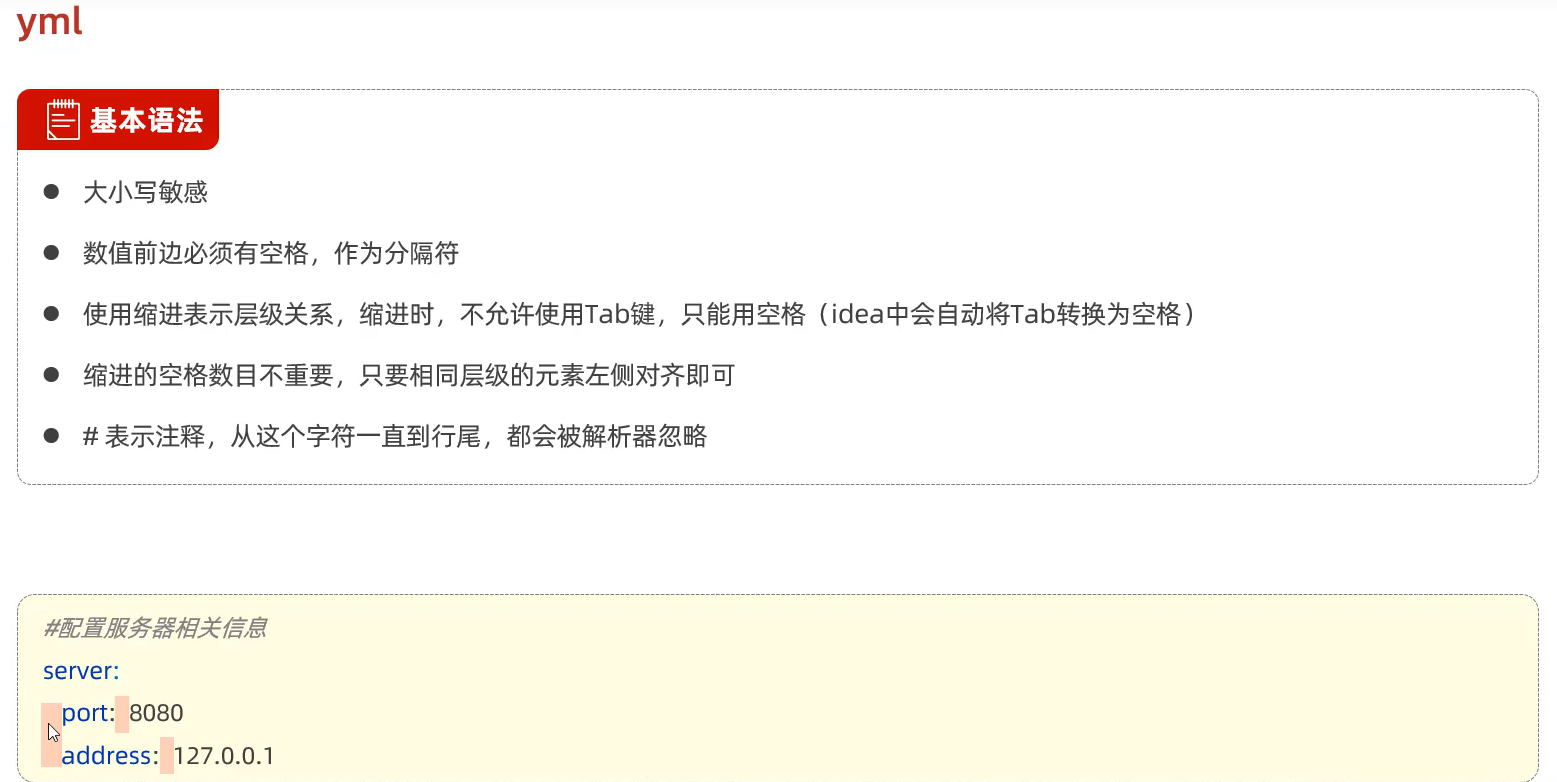
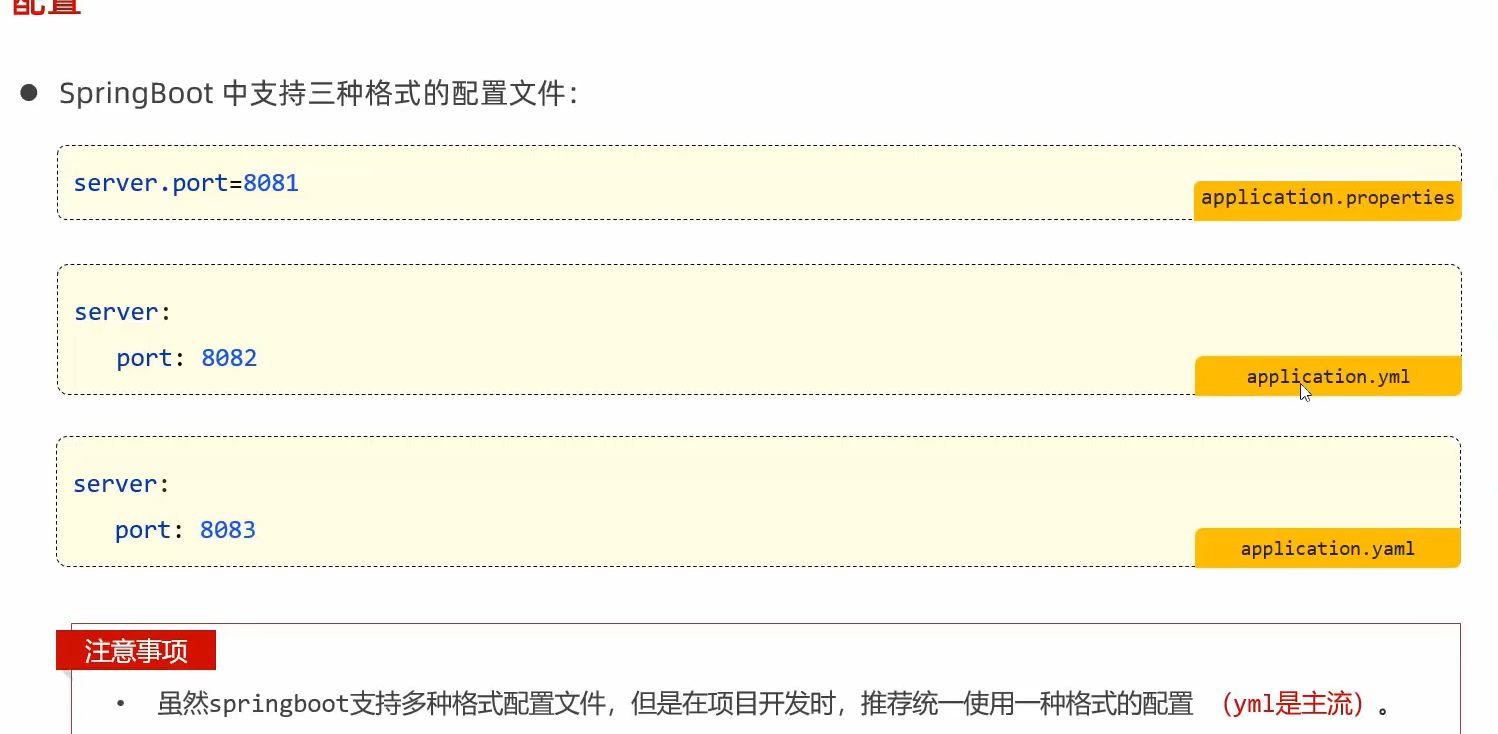
yml和yaml配置文件
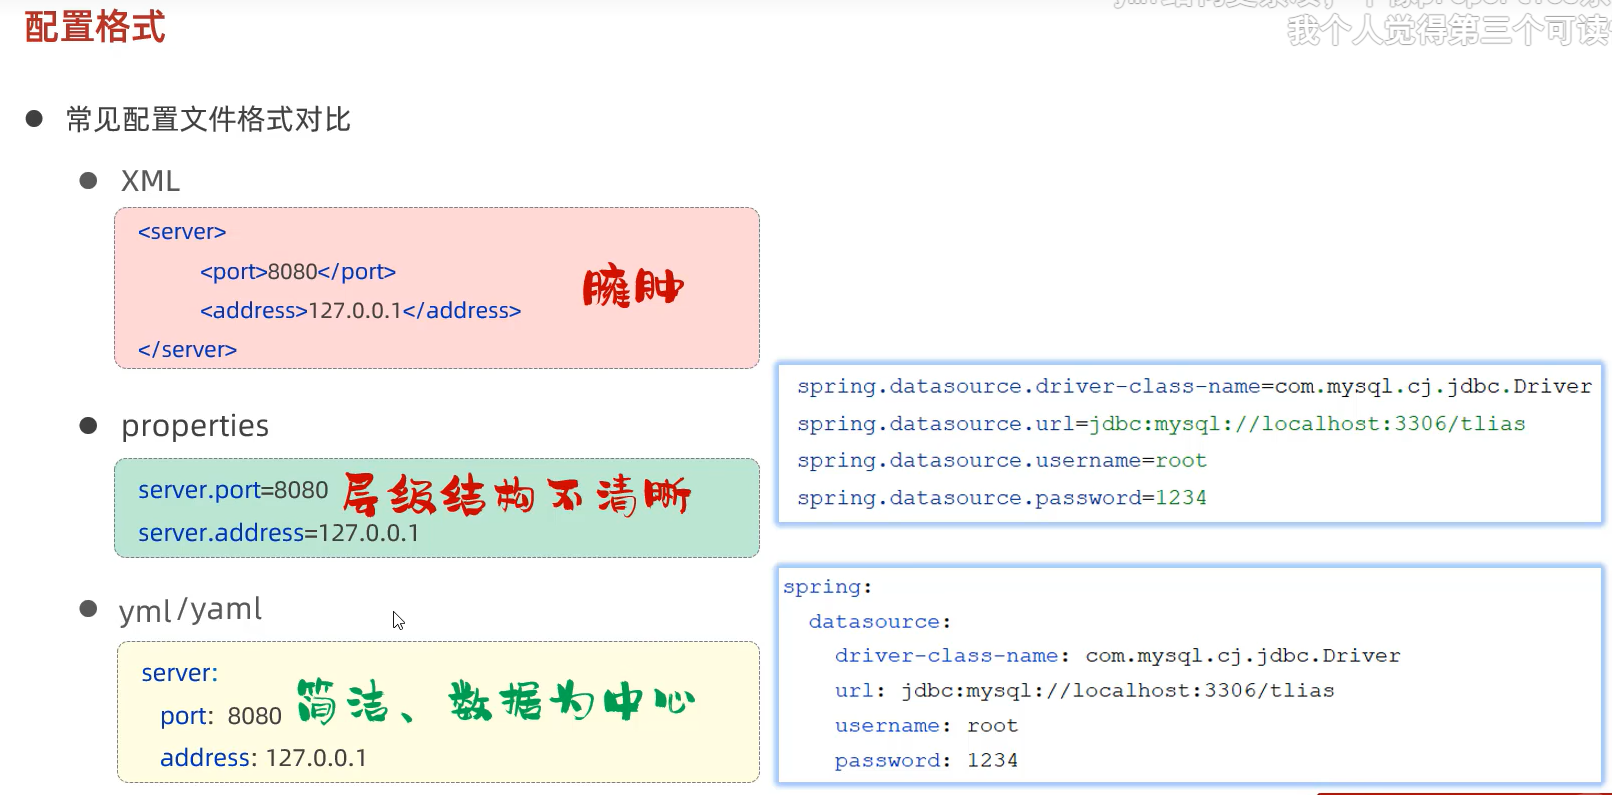
只支持yml/yaml和properties配置文件
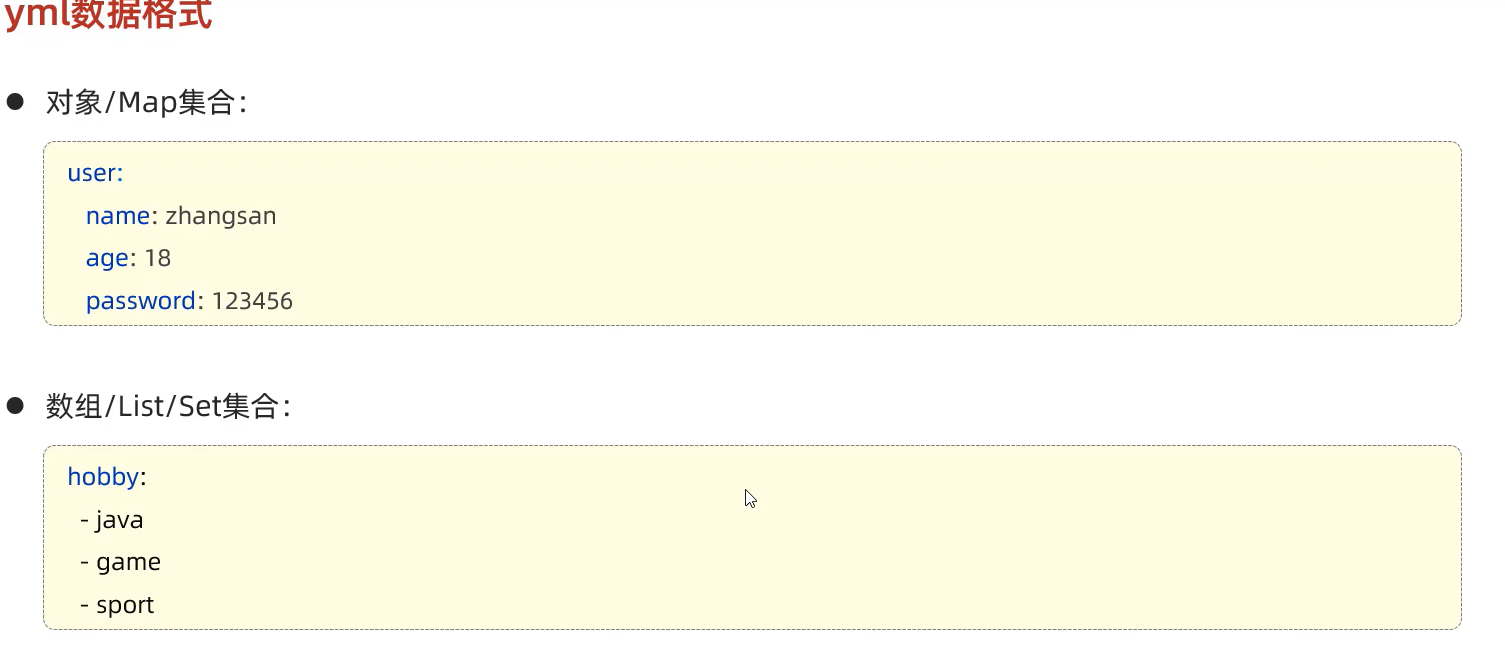
基本语法
数据格式
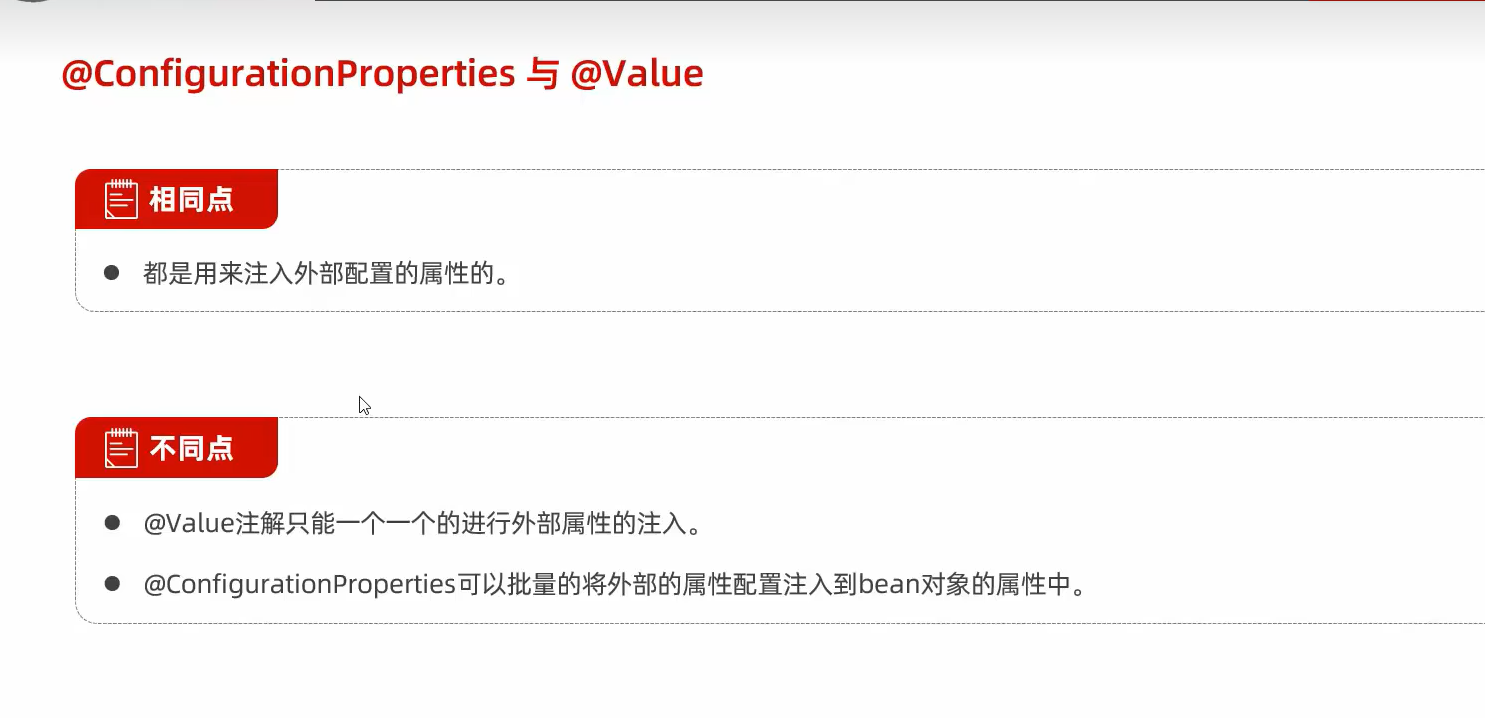
@ConfigurationProperties注解和@Value
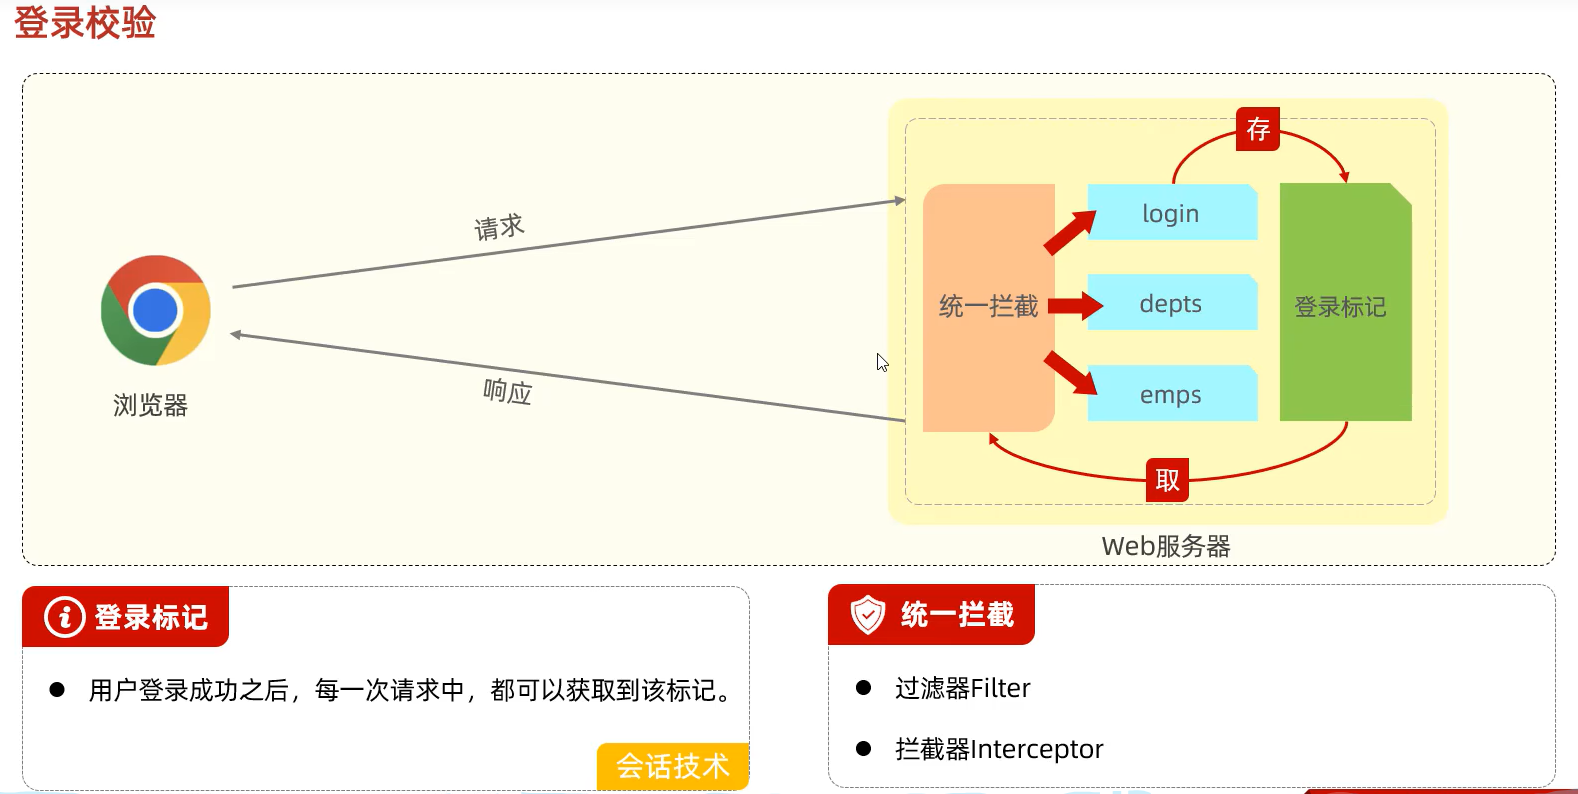
登录校验
统一拦截
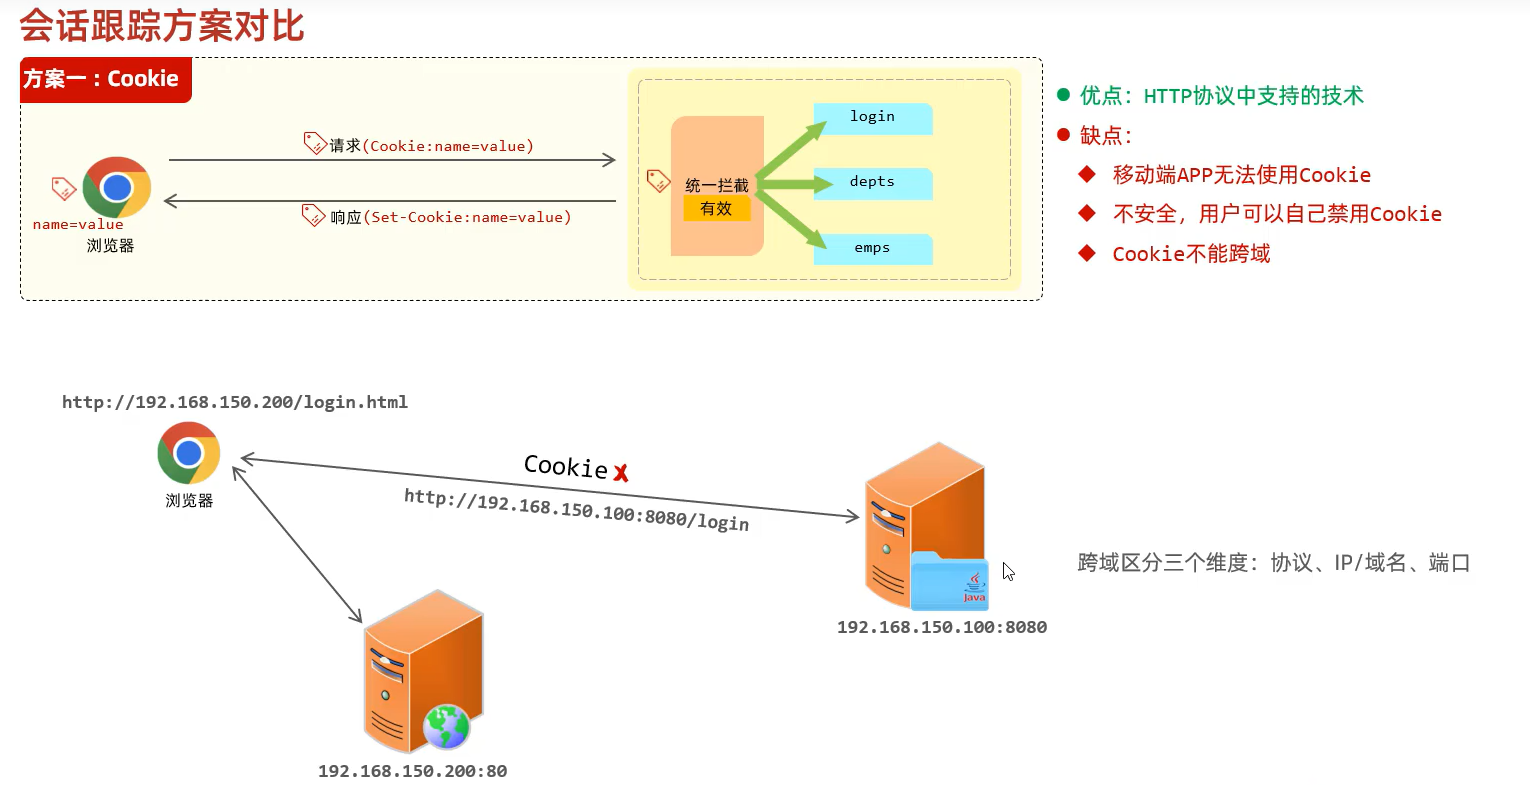
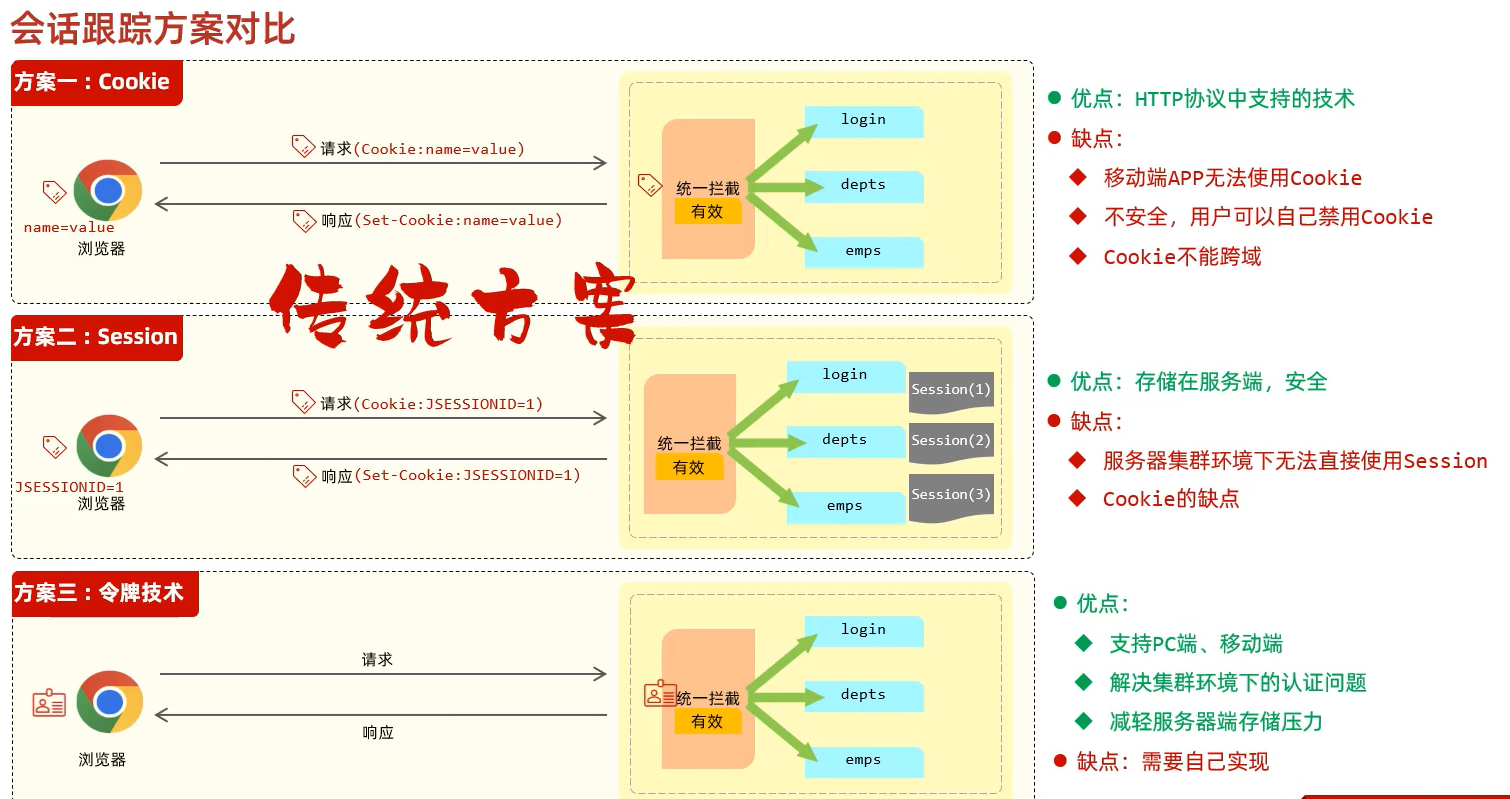
会话
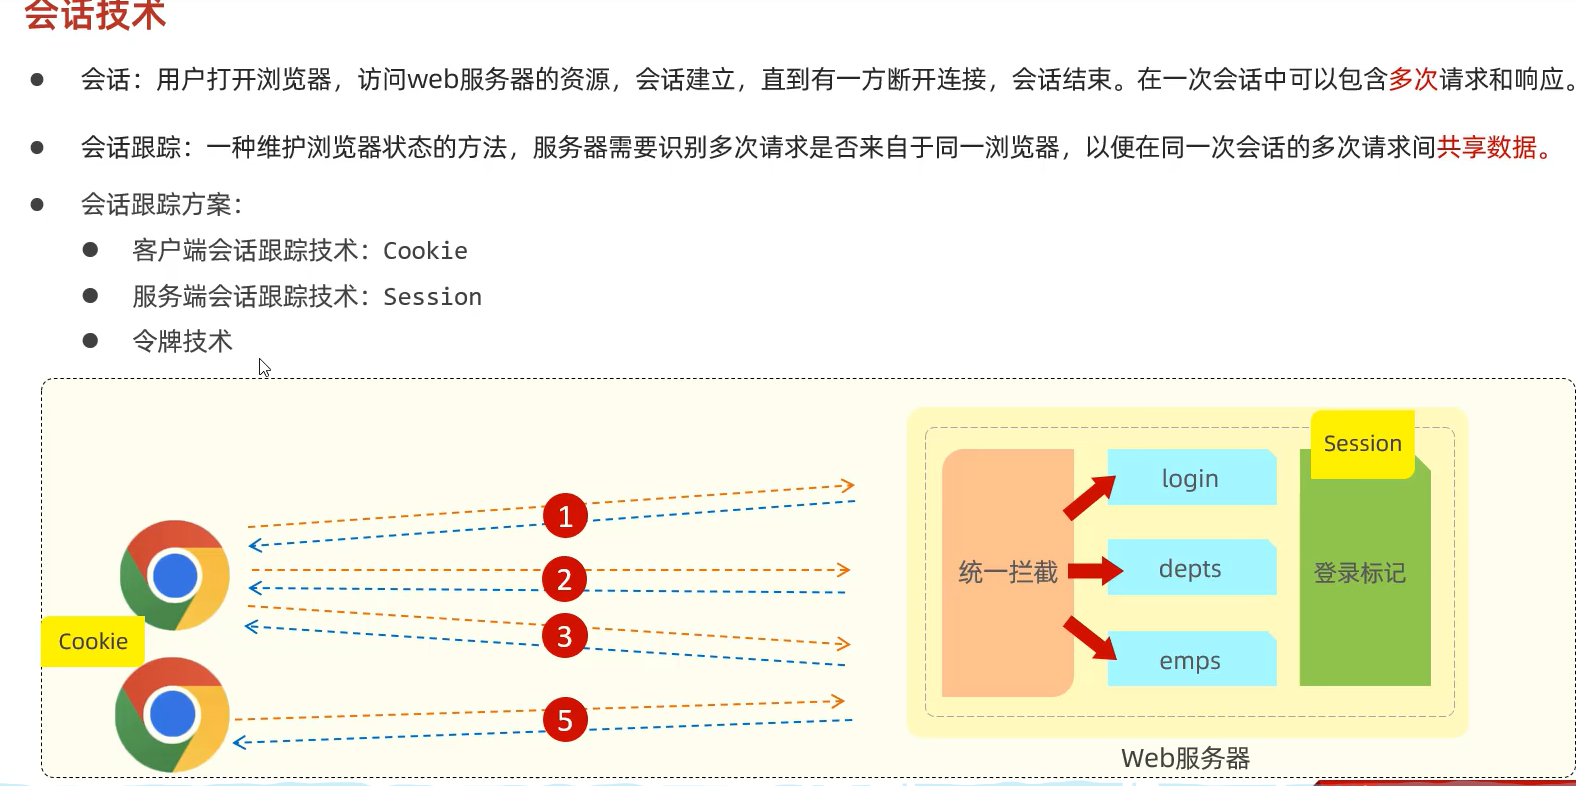
三种会话跟踪技术对比
cookie
Session和令牌
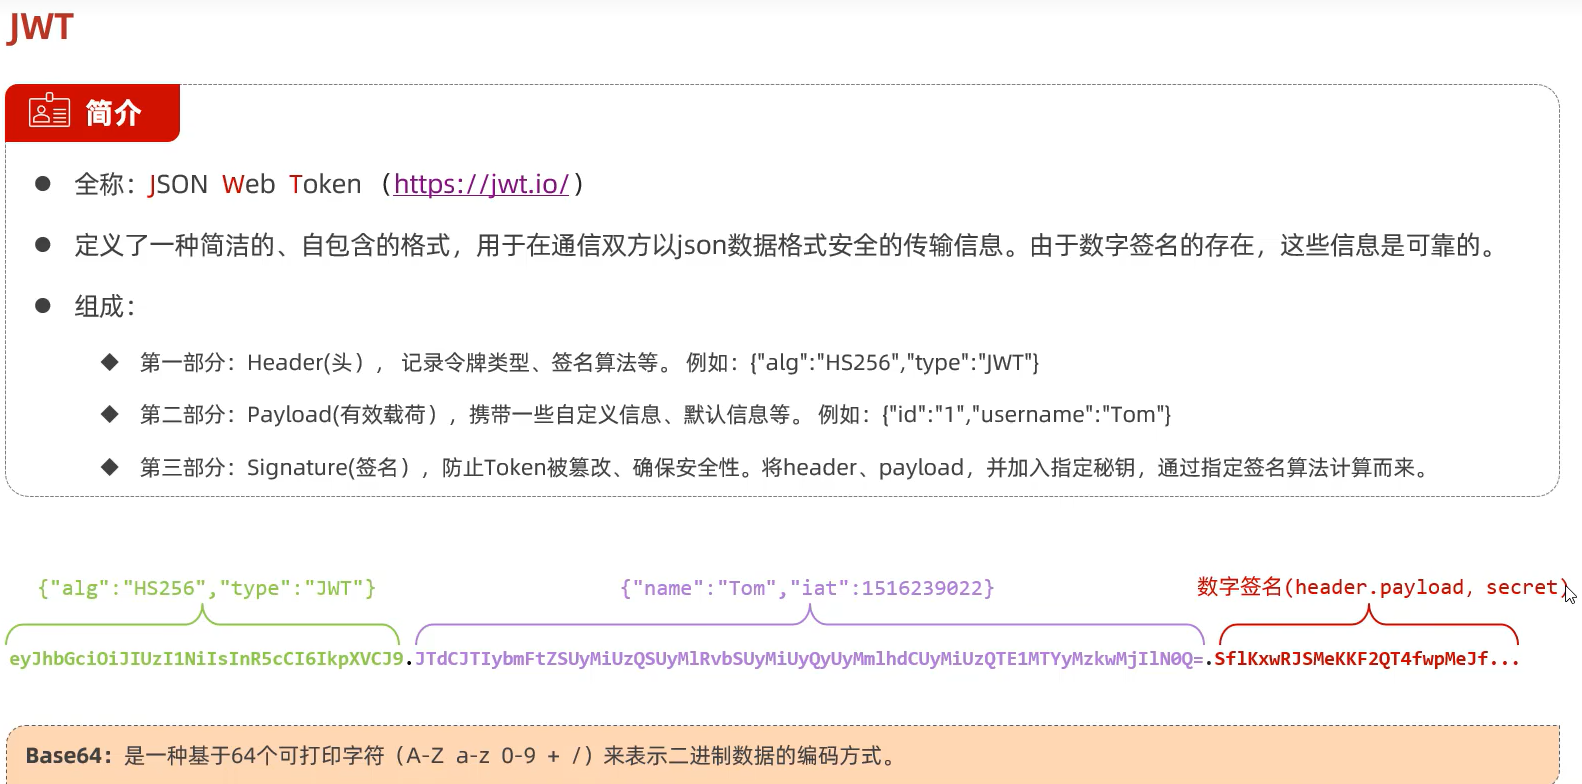
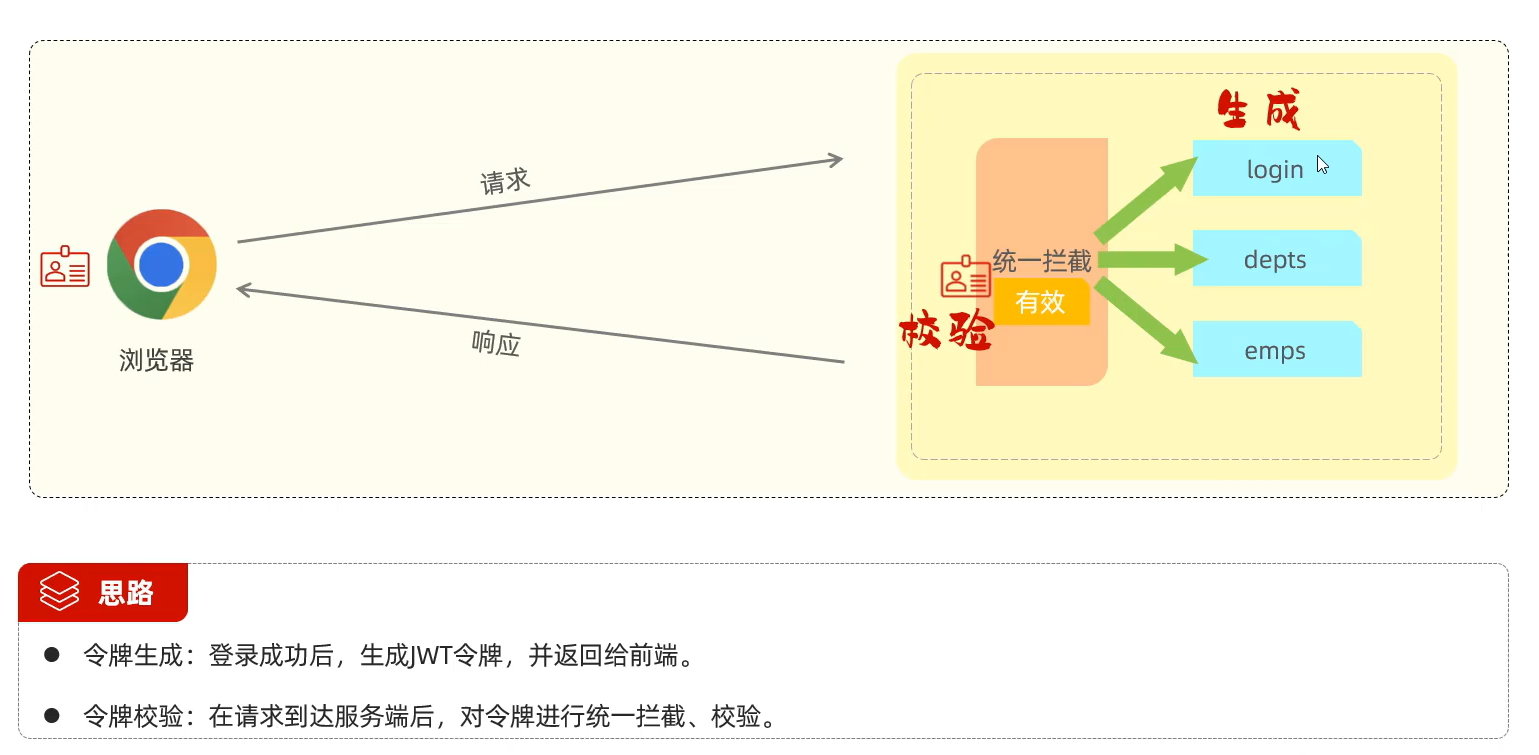
JWT令牌(登录校验)
Json Web Token
JWT-生成
@Test
public void testGenJWT(){
    Map<String,Object> claims = new HashMap<>();
    claims.put("id",1);
    claims.put("name","tom");
    String jwt = Jwts.*builder*()
            .signWith(SignatureAlgorithm.*HS256*,"ICEi")//签名算法:至少4个字符
            .setClaims(claims)//自定义内容(载荷)
            .setExpiration(new Date(System.*currentTimeMillis*() + 3600 * 1000))
            .compact();//设置有效期为1H
    System.*out*.println(jwt);
}

//解码
@Test
    public void testParseJwt(){
        Claims claims = Jwts.parser()
                .setSigningKey("ICEi")//指定签名密钥             		.parseClaimsJws("eyJhbGciOiJIUzI1NiJ9.eyJuYW1lIjoidG9tIiwiaWQiOjEsImV4cCI6MTcxODcyMTM2N30._sXspQGLMg6tzCyl4AZeOiwGwnliu-81pETRVndXz_Y")
                .getBody();
        System.out.println(claims);
    }
过滤器(Filter 拦截)
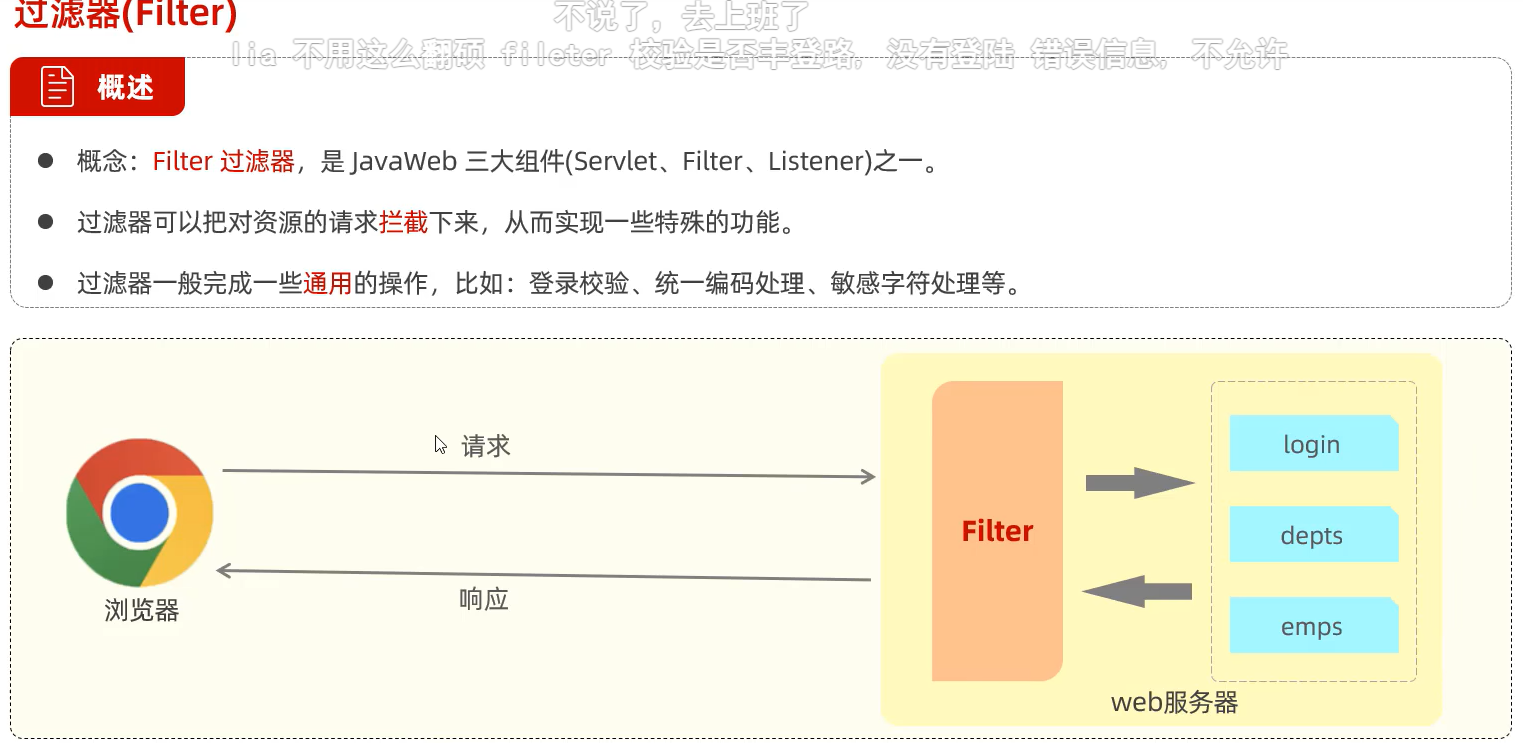
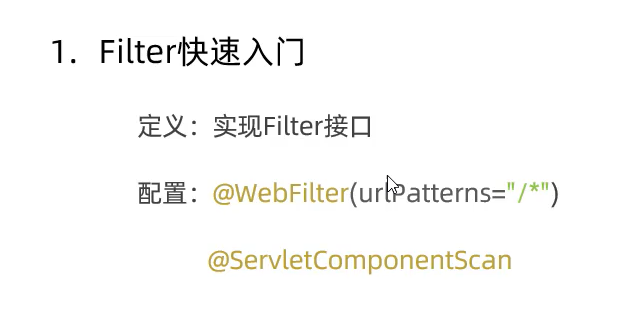
入门
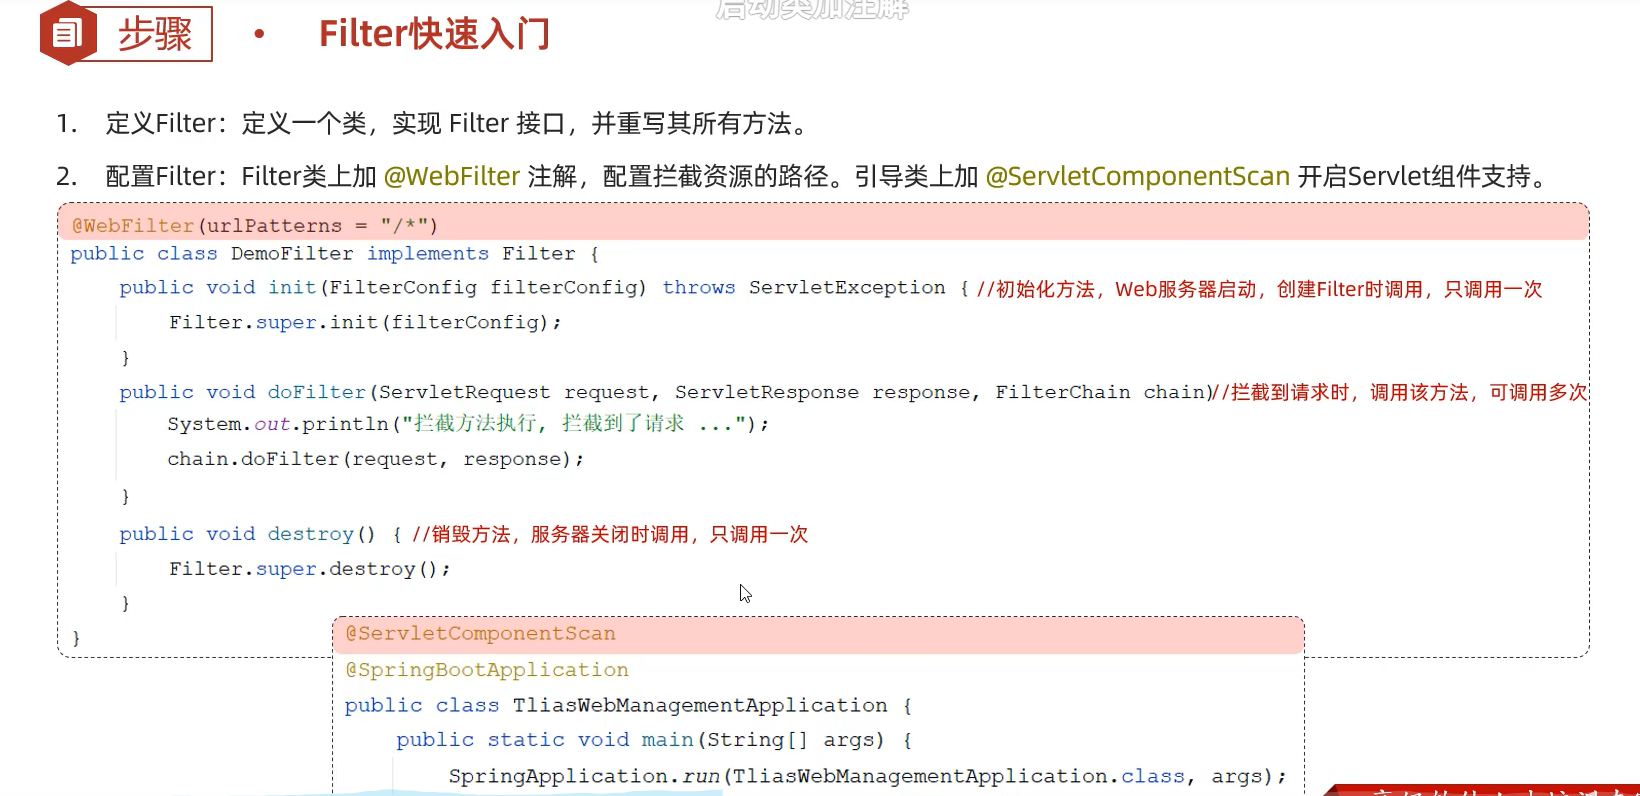
拦截实现
@WebFilter(urlPatterns = "/*")
public class Demofilter implements Filter {

   @Override//初始化方法,只调用一次
   public void init(FilterConfig filterConfig) throws ServletException {
        System.out.println("Init初始化发法执行!");
    }

    @Override//拦截到请求后调用,调用多次
    public void doFilter(ServletRequest servletRequest, ServletResponse servletResponse, FilterChain filterChain) throws 	IOException, ServletException {
        System.out.println("拦截到了请求!");
        //放行
        filterChain.doFilter(servletRequest,servletResponse);
    }

    @Override//只调用一次
    public void destroy() {
        System.*out*.println("销毁!");
    }
}
详解
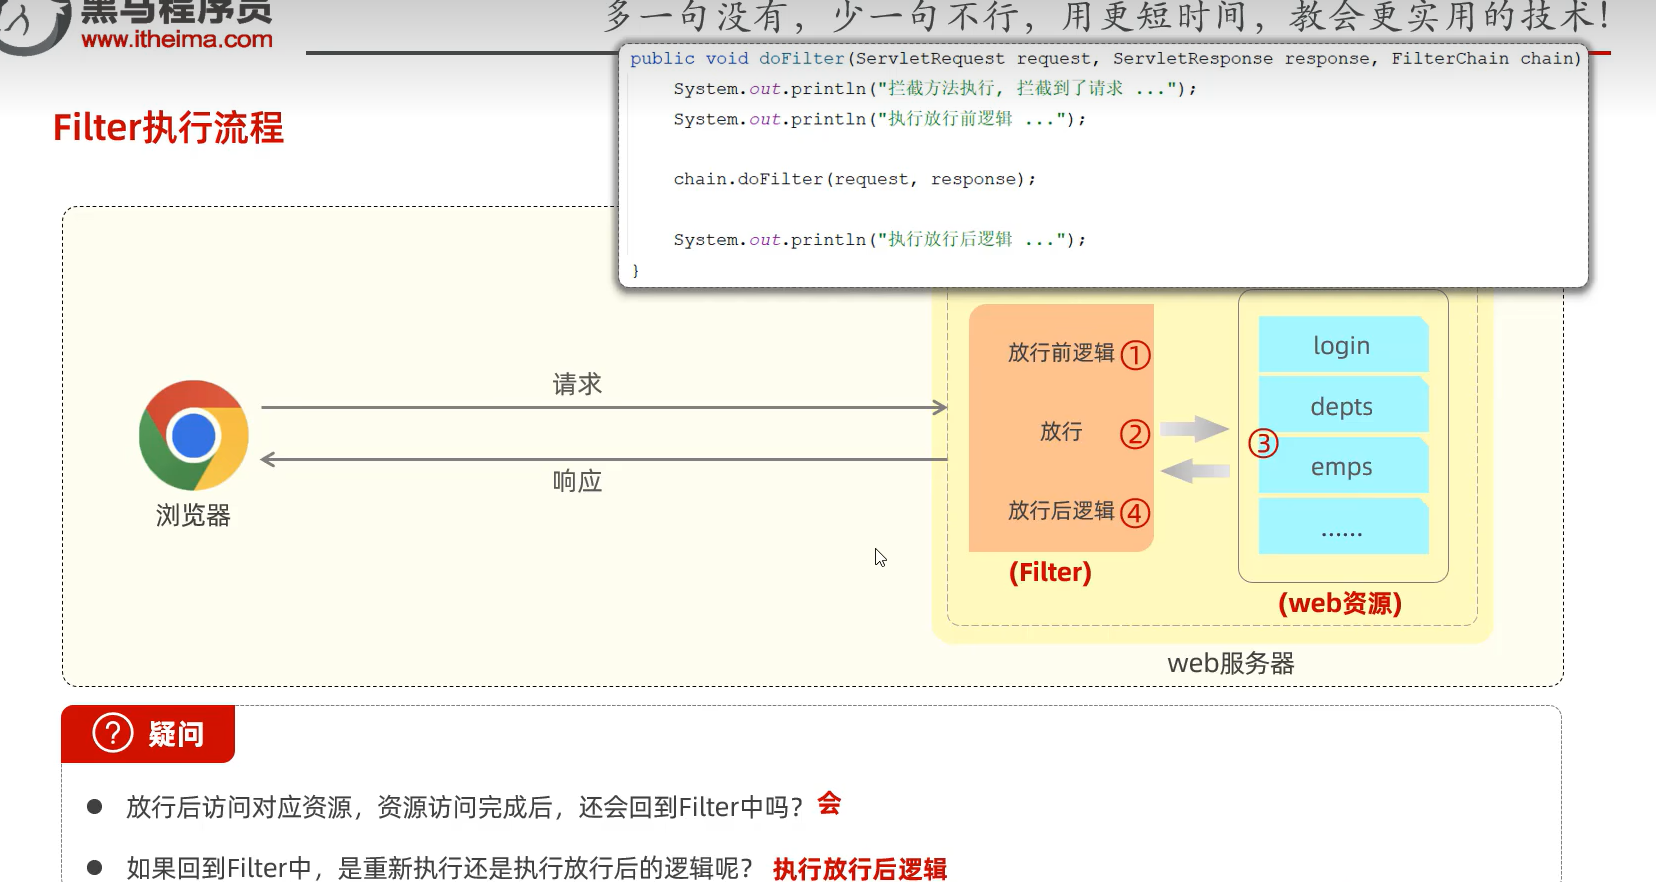
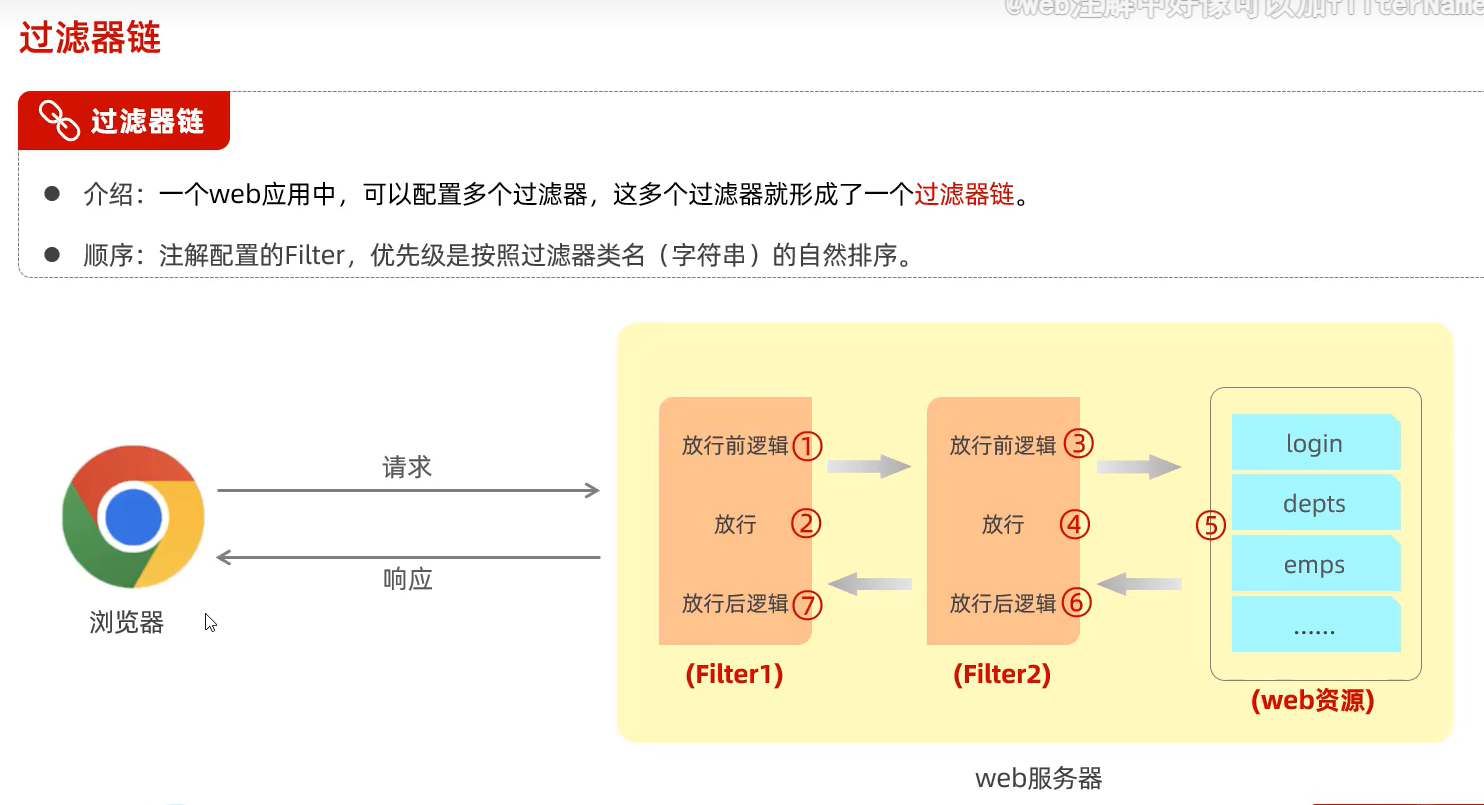
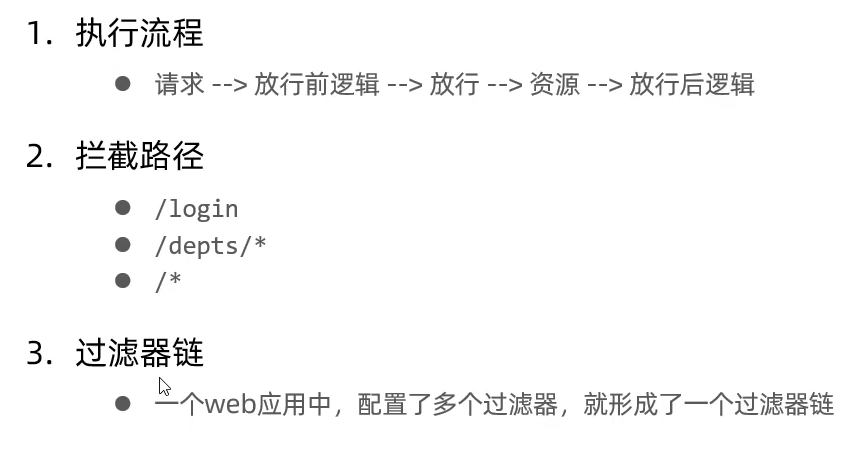
过滤器链
按类名首字母进行排序
Filter登录校验过滤
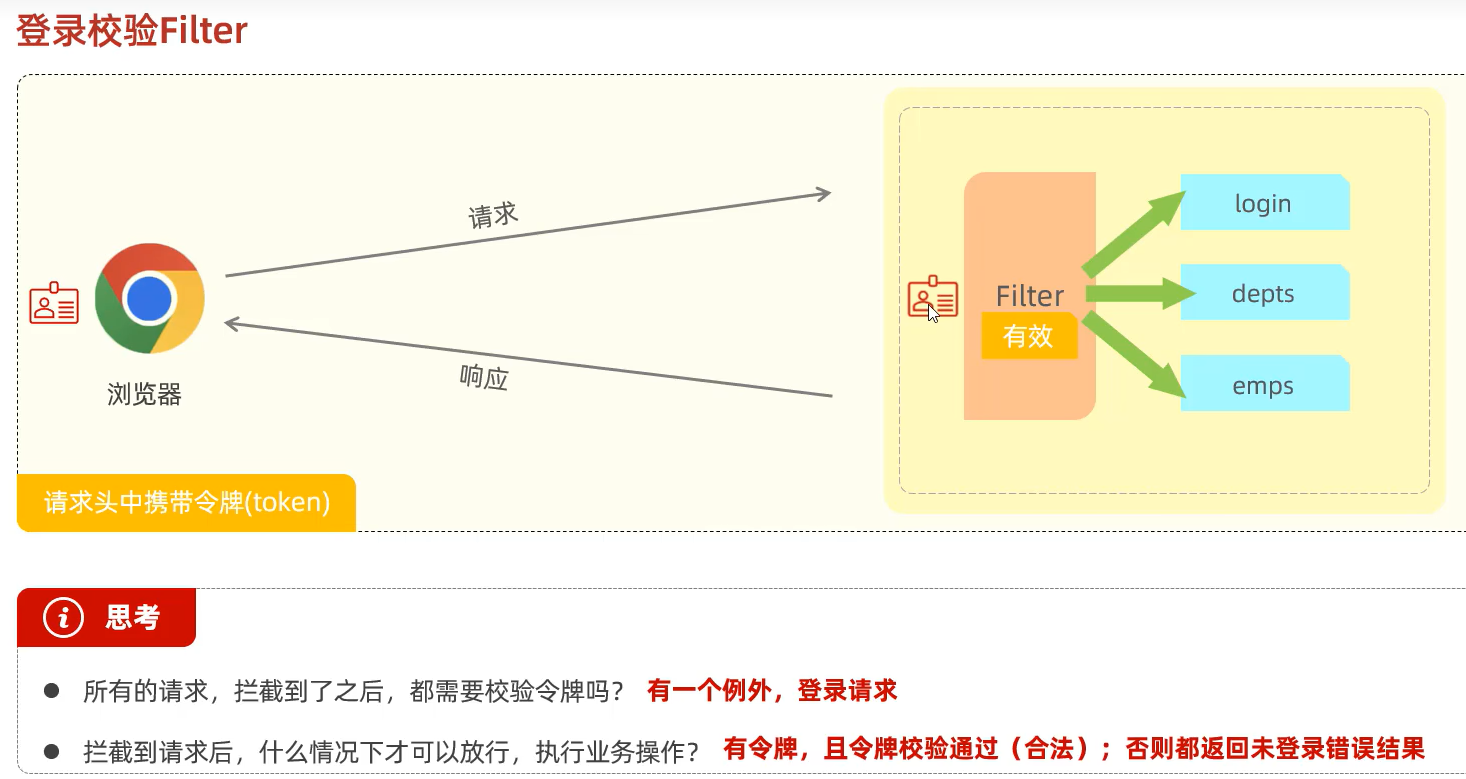
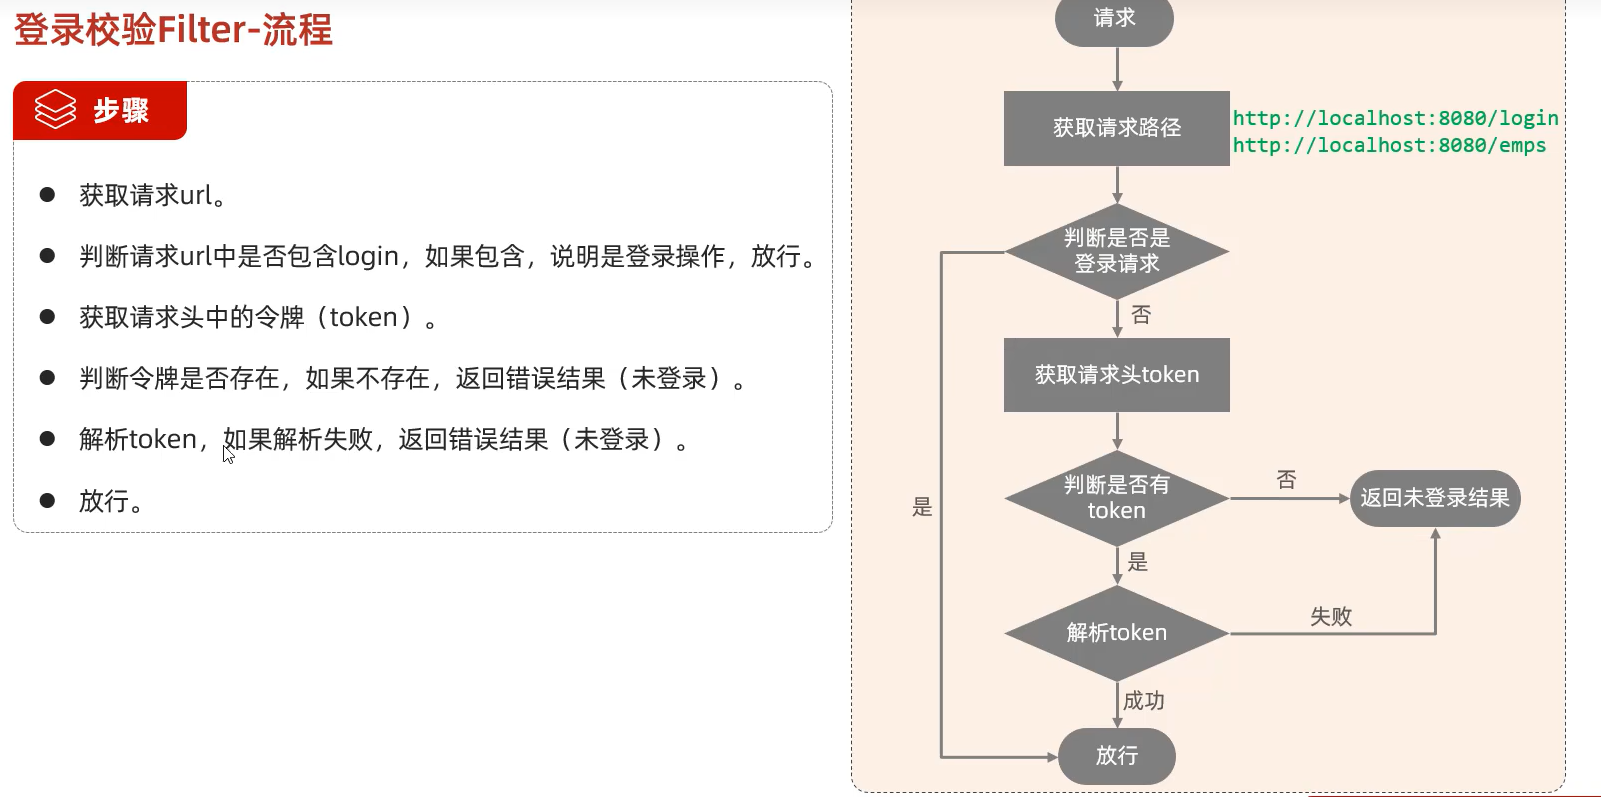
Login过滤
@Slf4j
@WebFilter
public class LoginCheckFilter implements Filter {
    @Override
    public void doFilter(ServletRequest servletRequest, ServletResponse servletResponse, FilterChain filterChain) throws IOException, ServletException {
        HttpServletRequest req = (HttpServletRequest) servletRequest;
        HttpServletResponse resp = (HttpServletResponse) servletResponse;
        //1获取请求url
        String url = req.getRequestURL().toString();

        //2判断请求头是否包含login
        if (url.contains("login")){
            *log*.info("登录login放行...");
            filterChain.doFilter(servletRequest,servletResponse);
            return;
        }
        //3获取请求头中的令牌
        String jwt = req.getHeader("token");
        //4判断令牌是否存在
        if (!StringUtils.*hasLength*(jwt)){
            *log*.info("token为空,令牌不存在!");
            Result error = Result.*error*("NOT_LOGIN");
            String nologin = JSONObject.*toJSONString*(error);
            resp.getWriter().write(nologin);
            return;
        }
        //5解析token 失败返回(未登录)
        try {
            JwtUtils.*parseJWT*(jwt);
        }catch (Exception e){
            e.printStackTrace();
            *log*.info("令牌解析失败,返回未登录信息!");
            Result error = Result.*error*("NOT_LOGIN");
            String nologin = JSONObject.*toJSONString*(error);
            resp.getWriter().write(nologin);
            return;
        }
        //6放行
        filterChain.doFilter(servletRequest,servletResponse);
    }
}
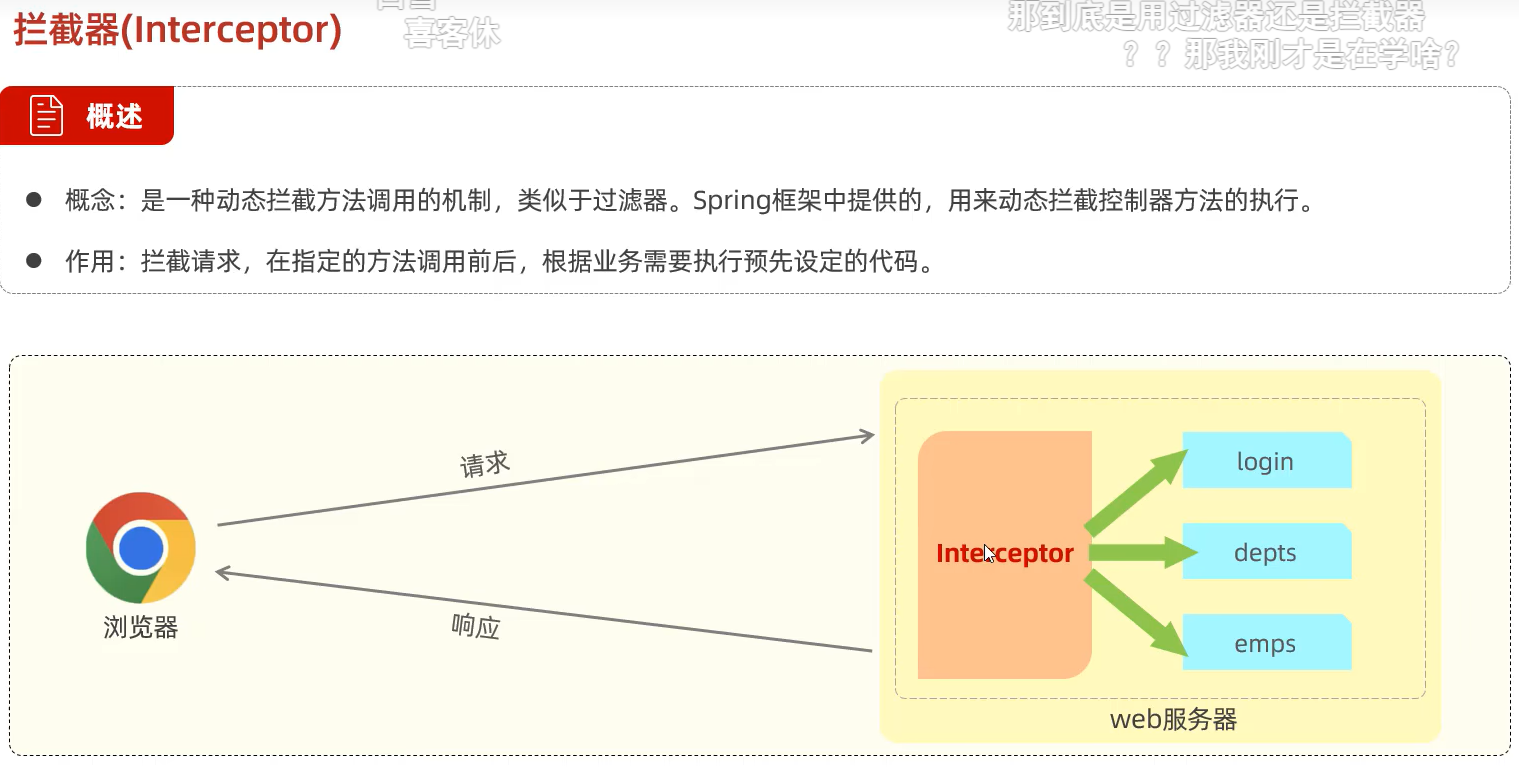
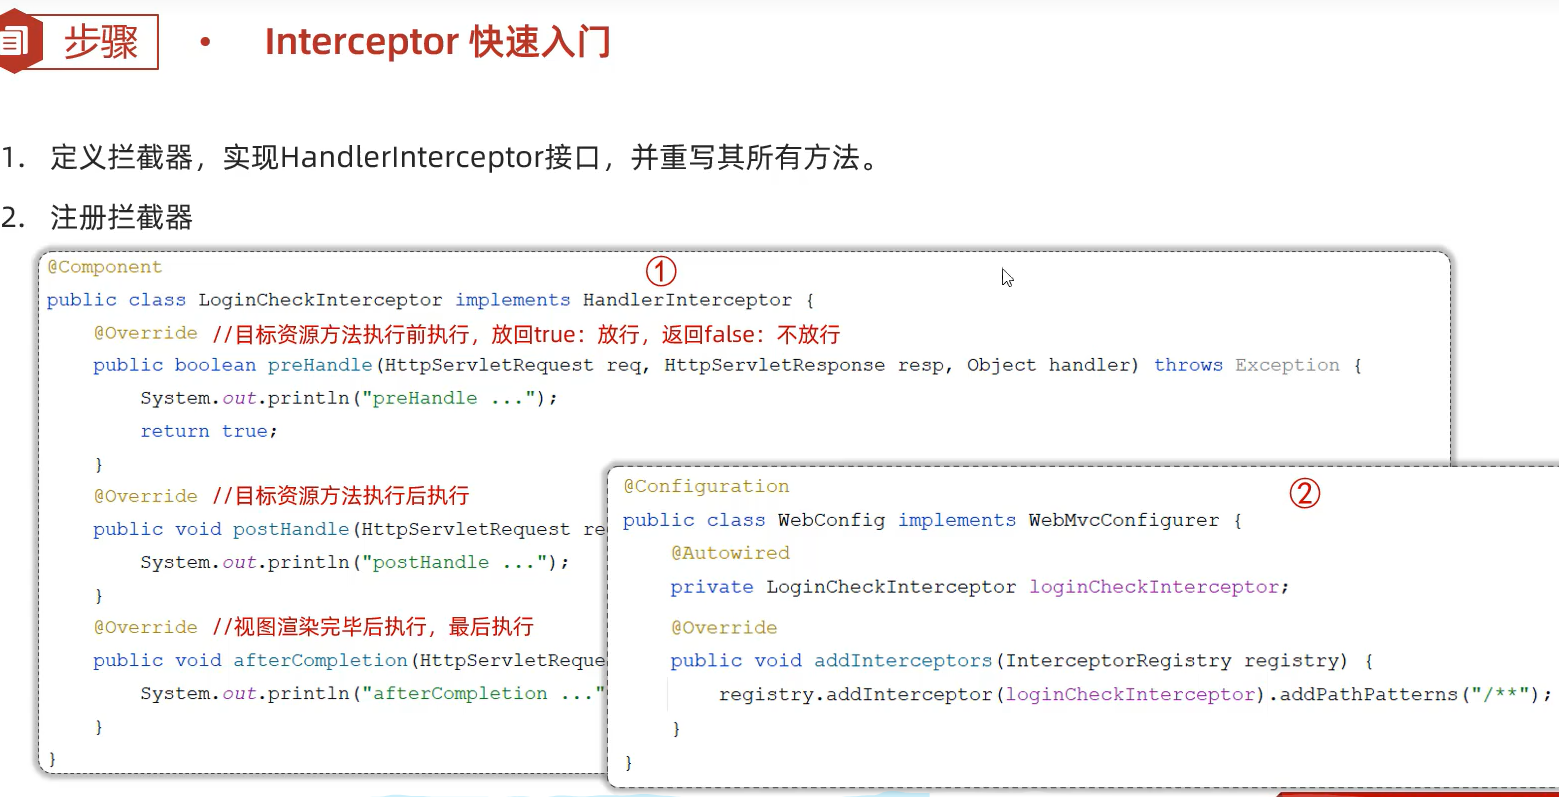
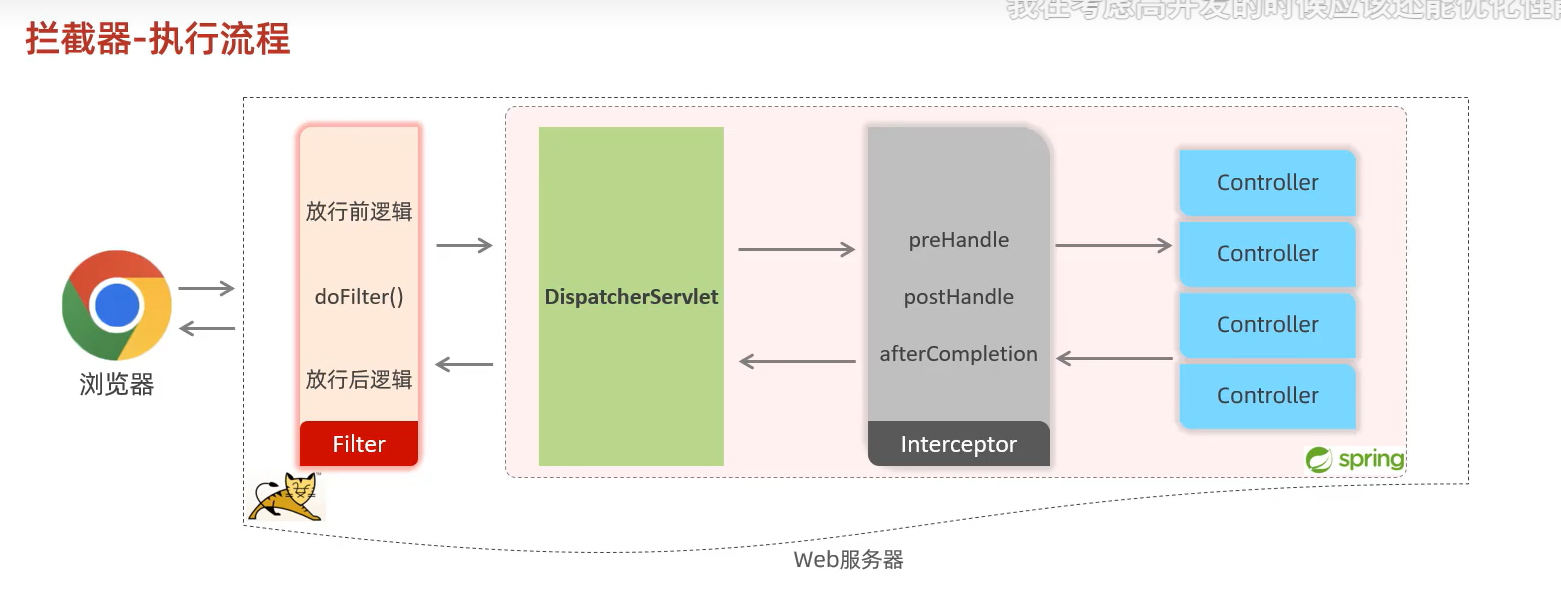
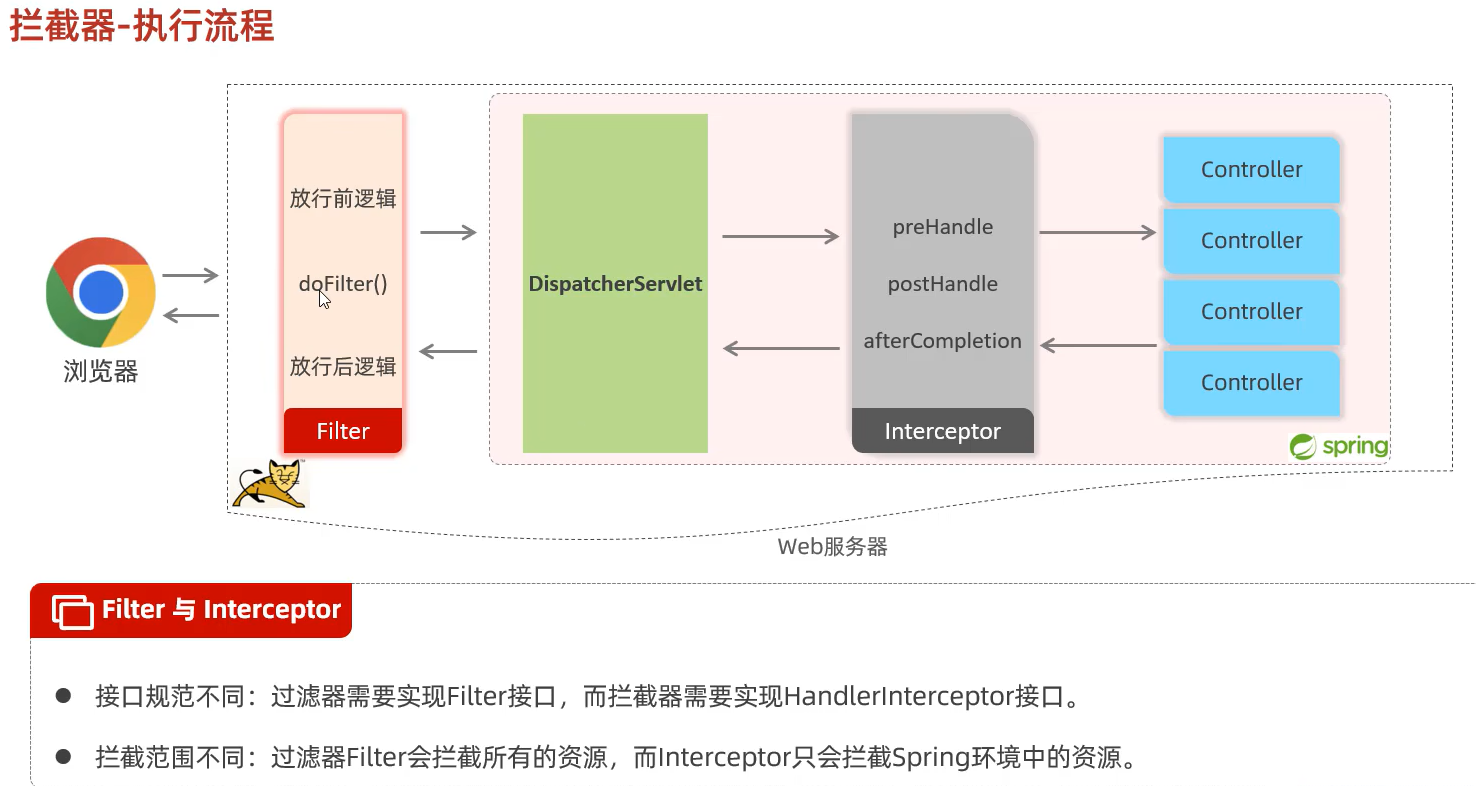
Interceptor拦截器
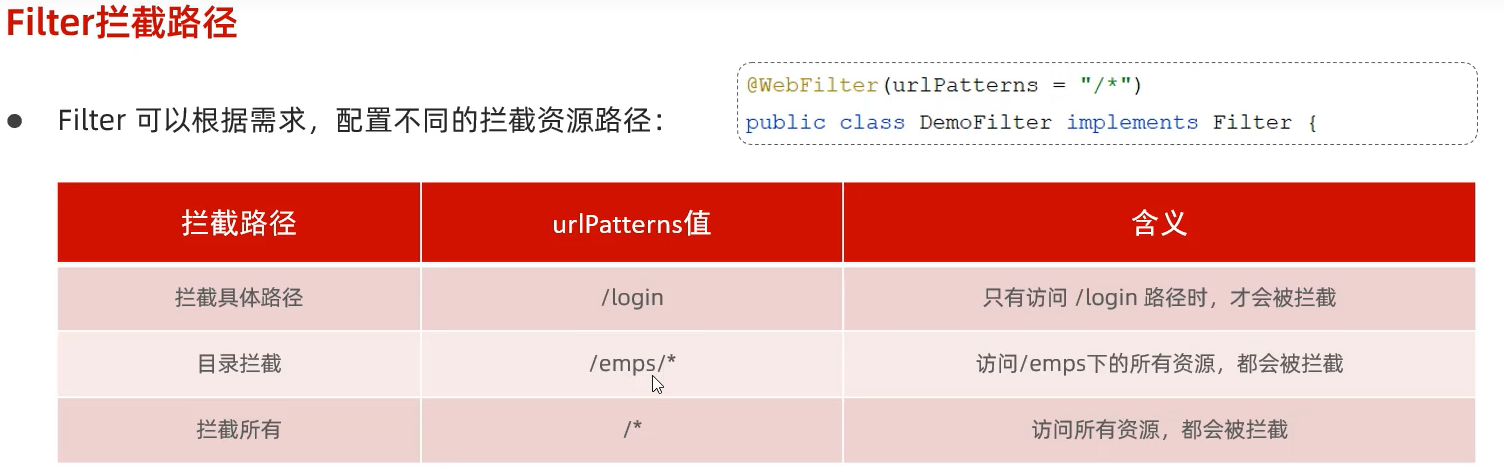
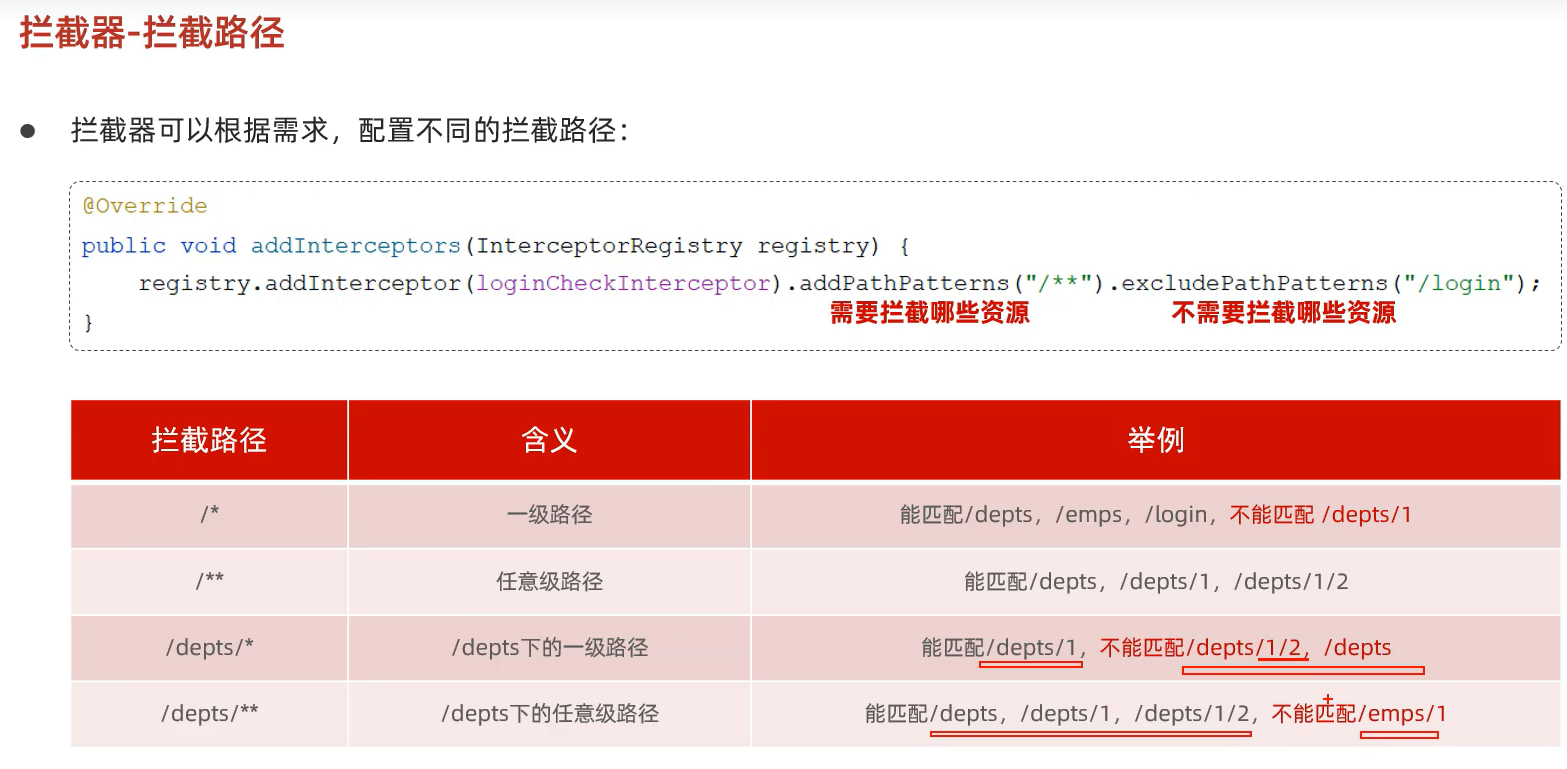
拦截路径
执行流程
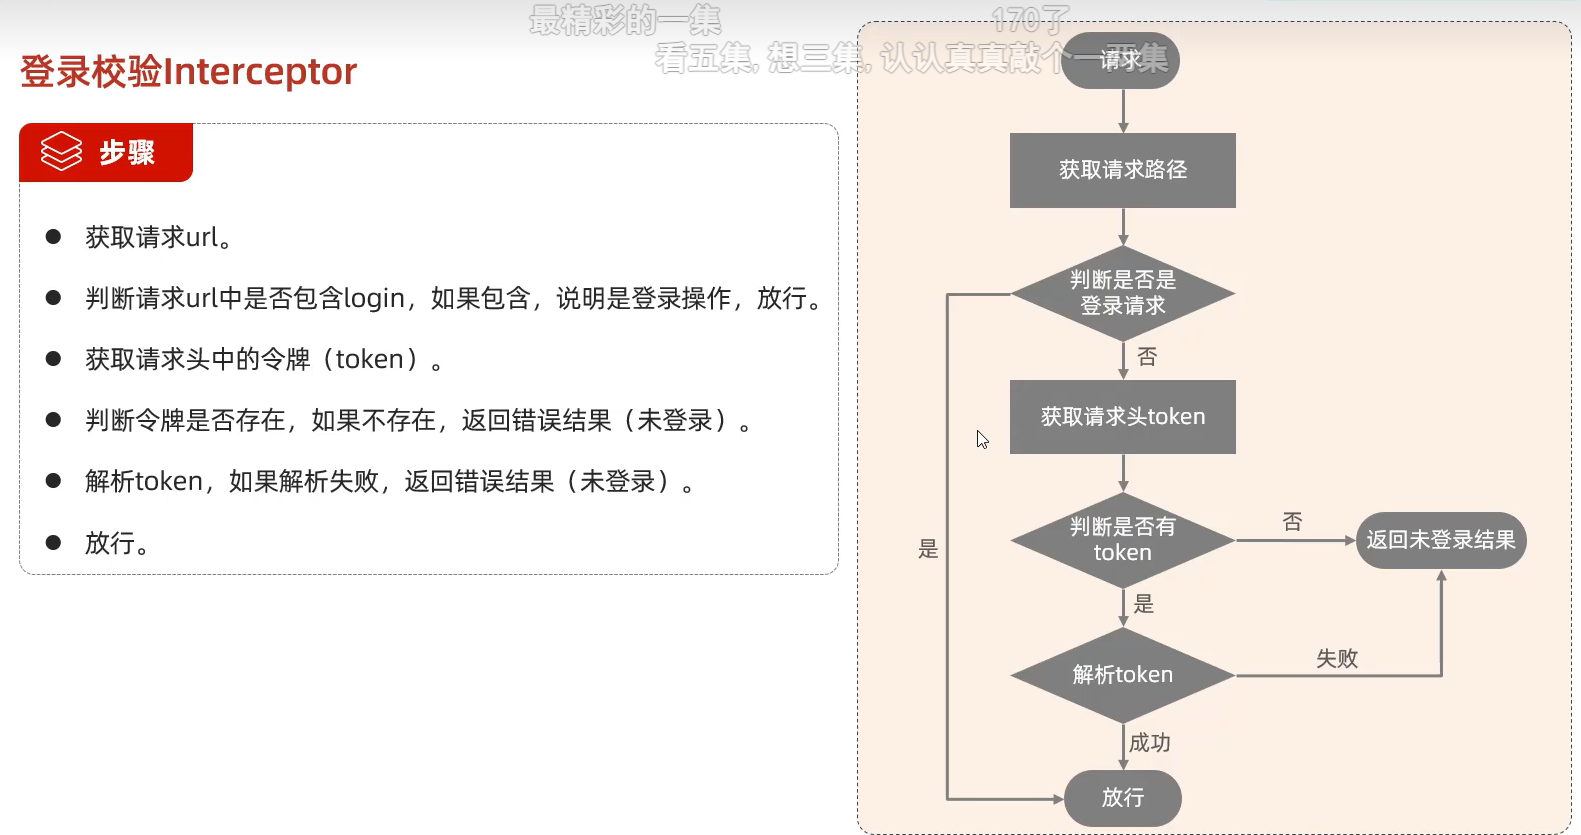
登录校验
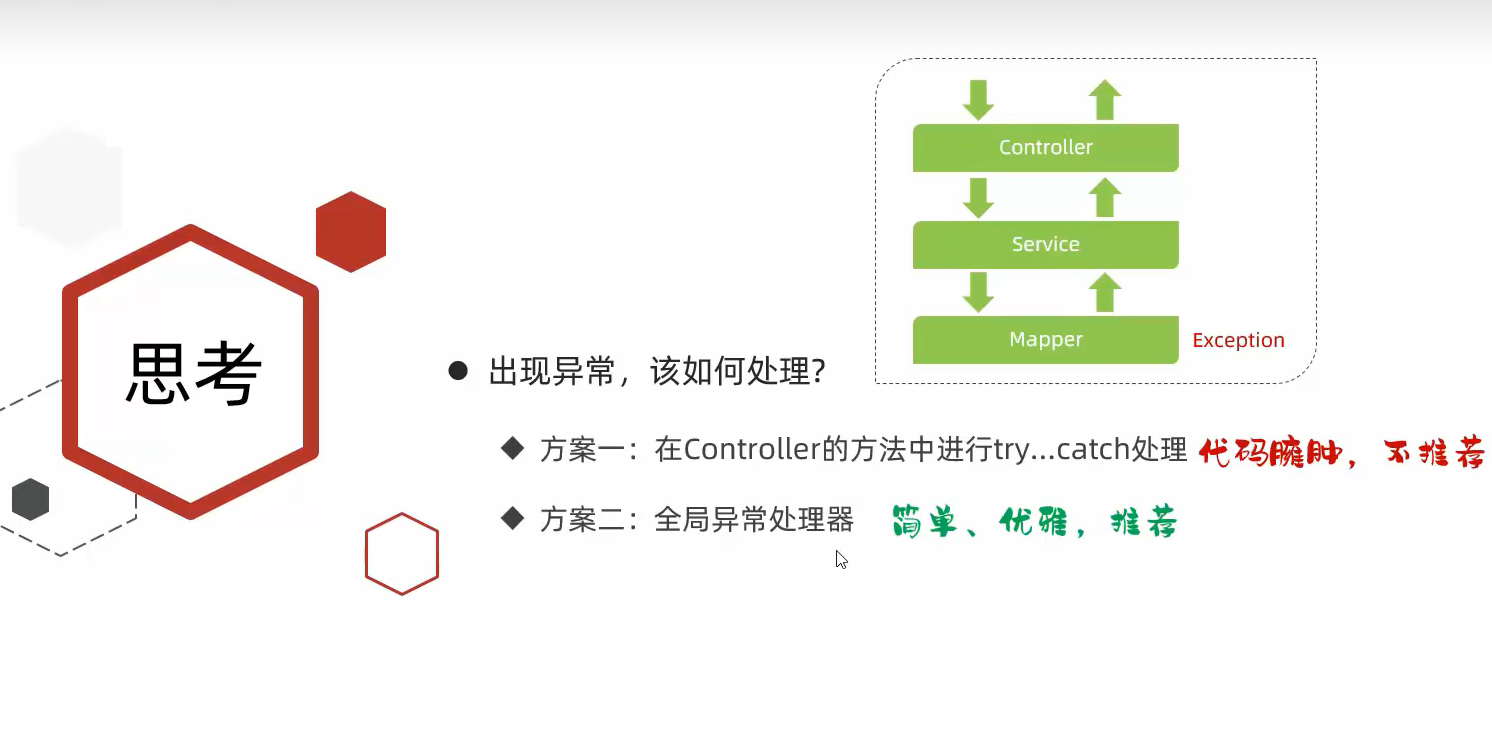
异常处理
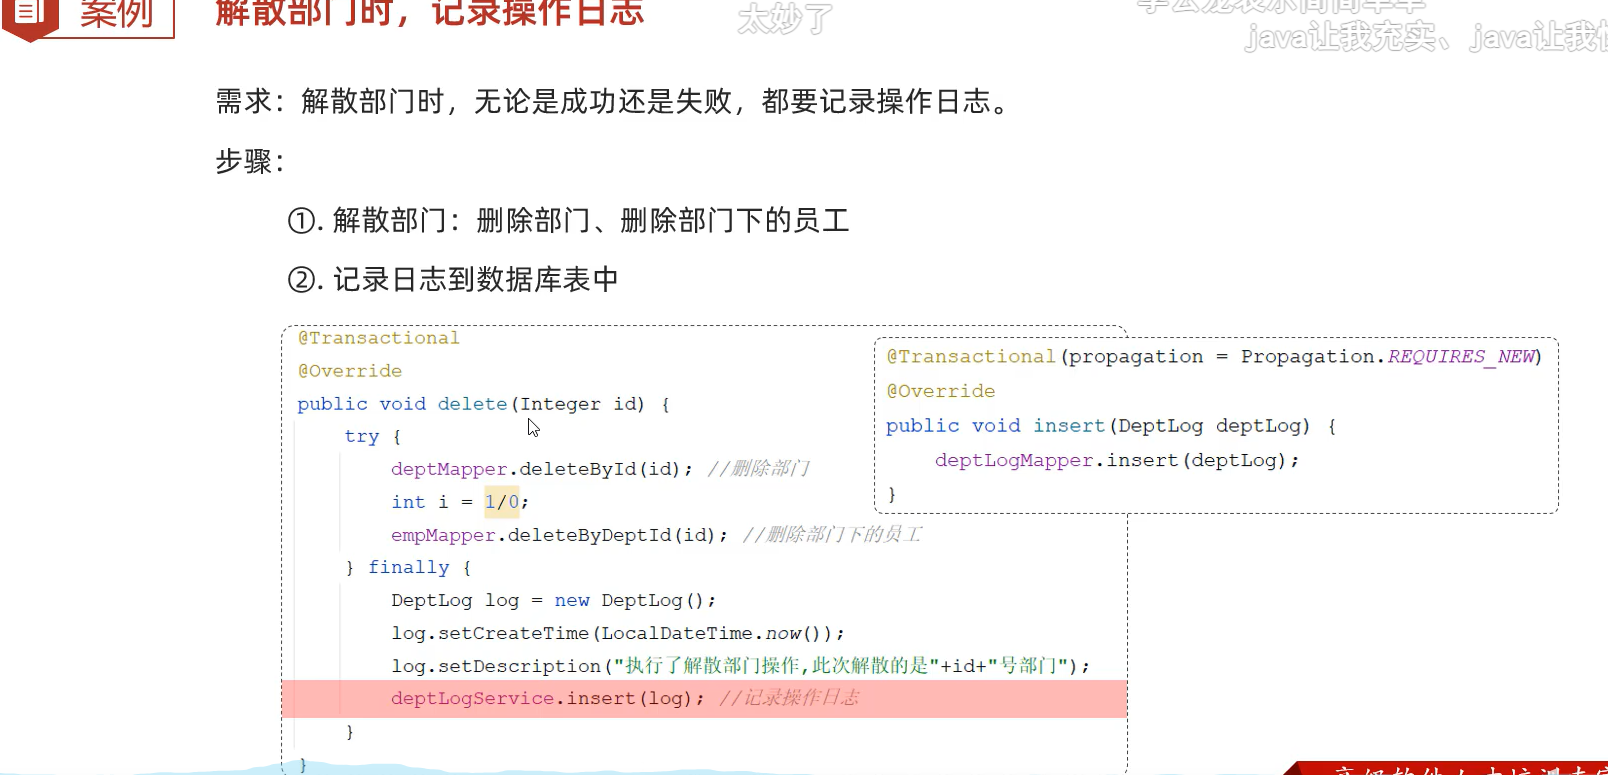
事务
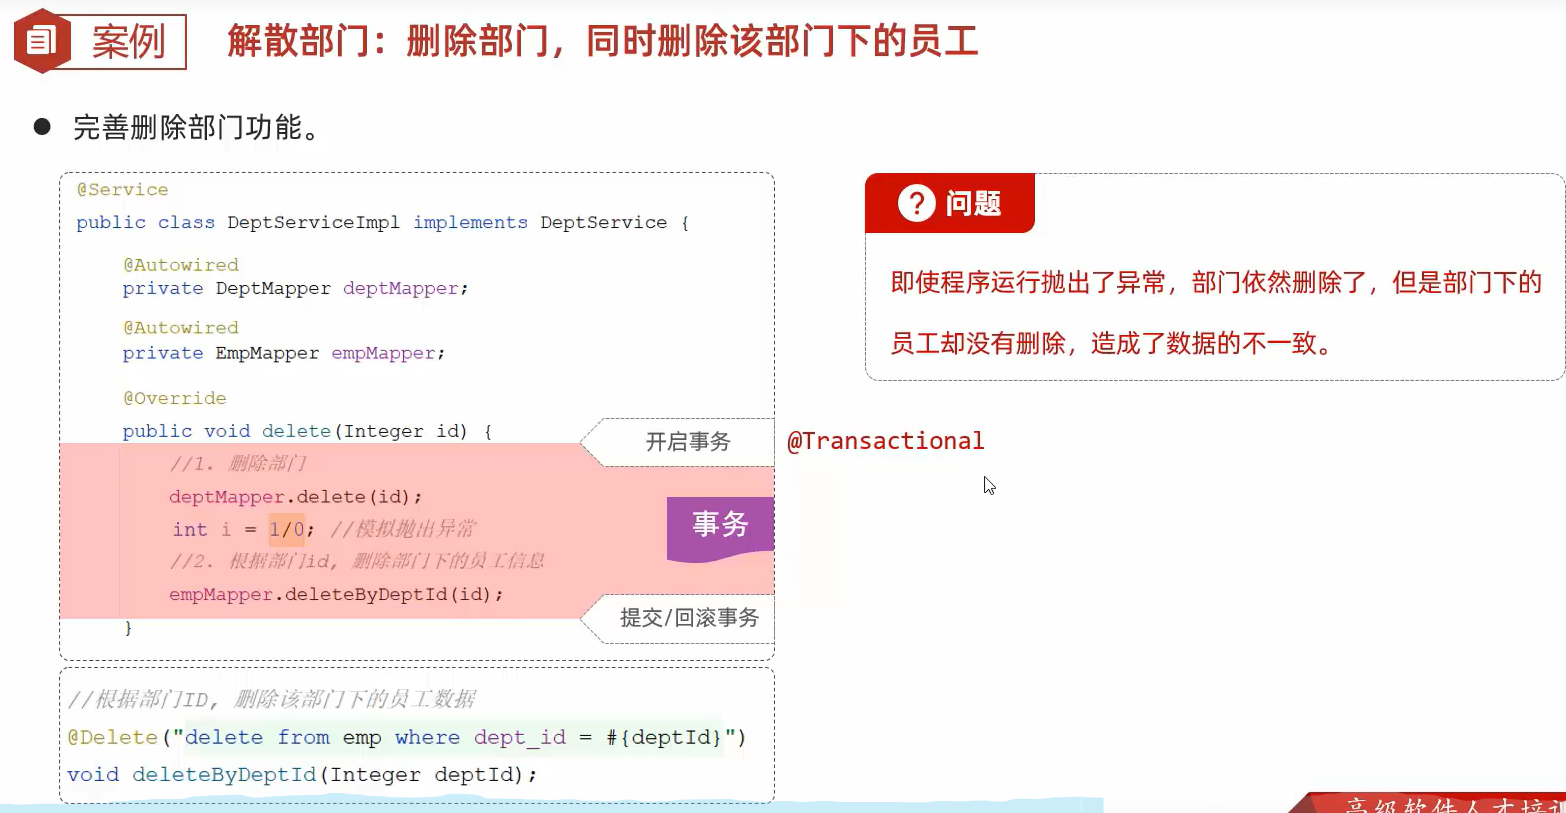
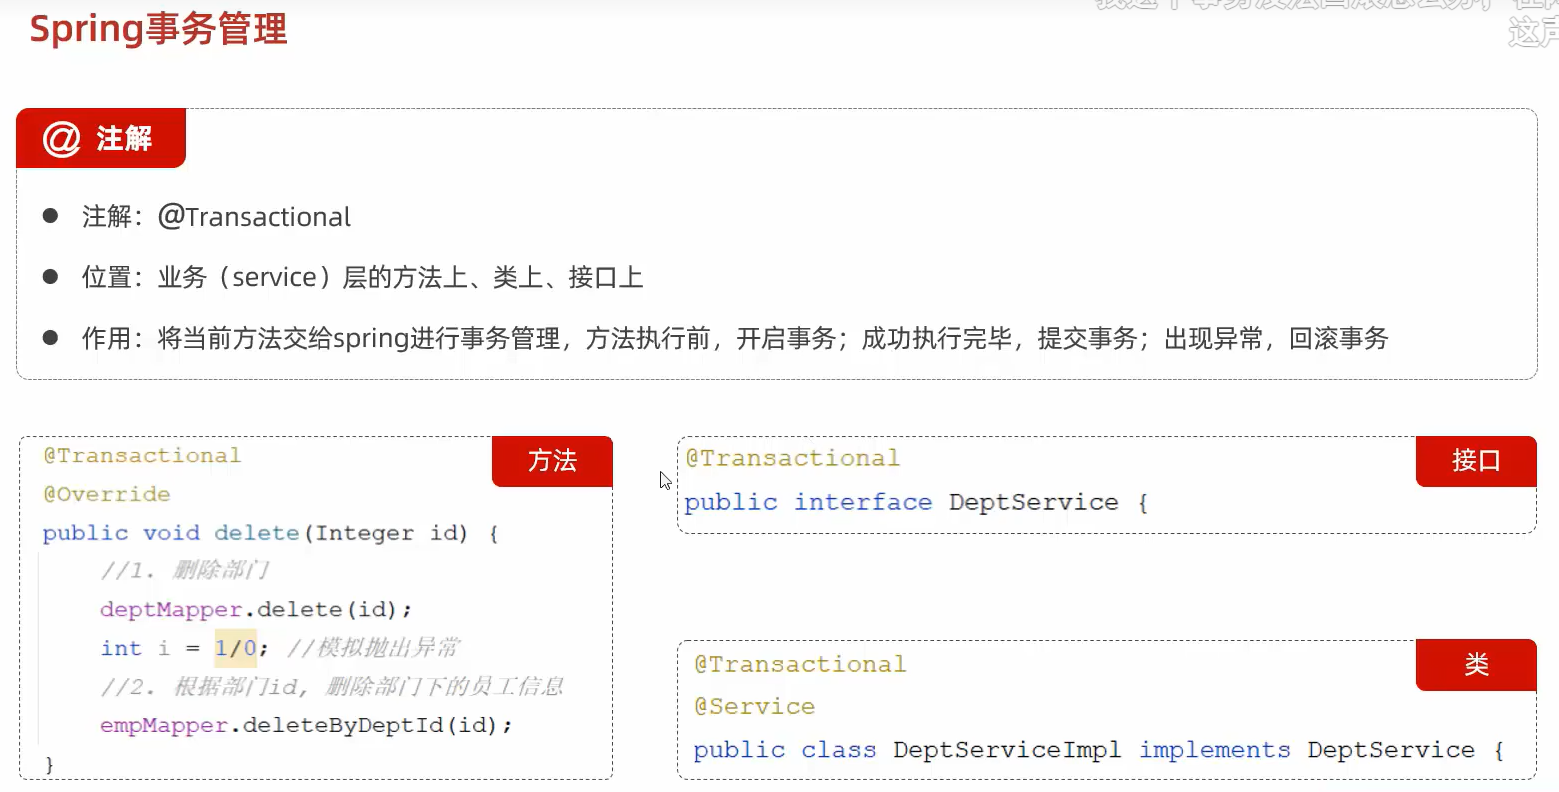
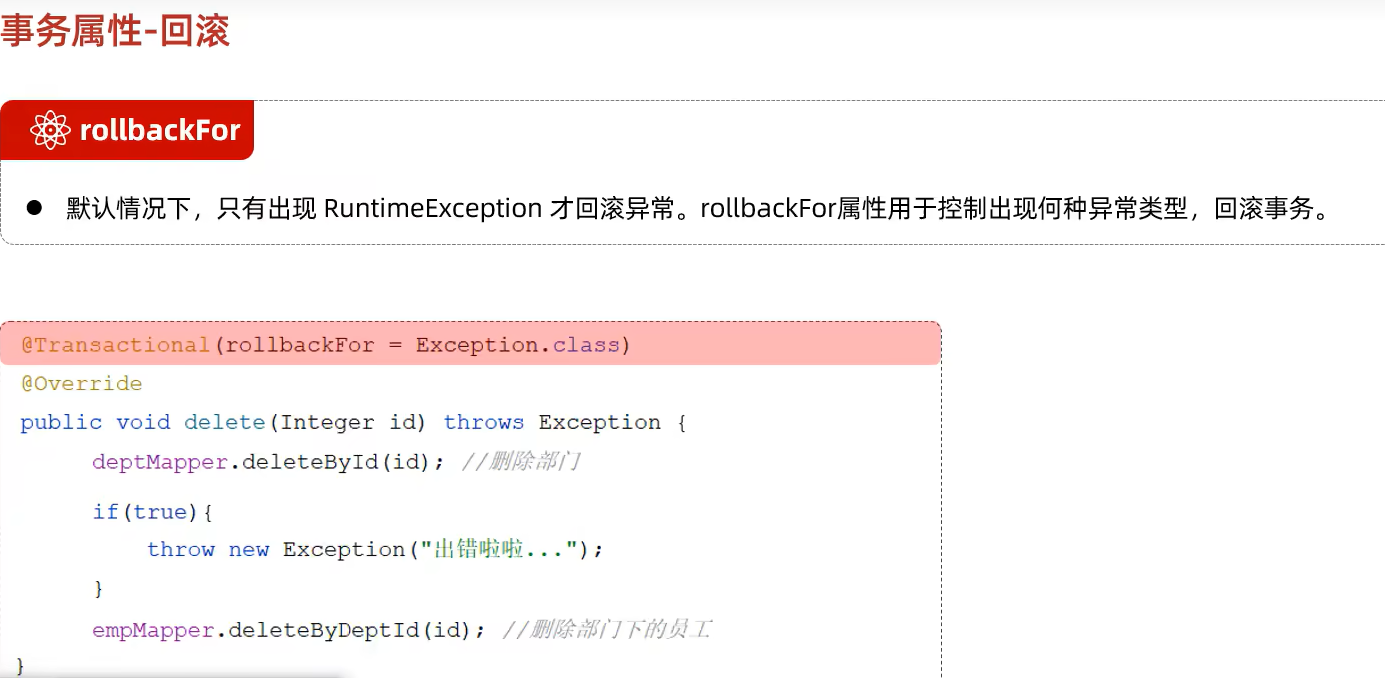
@Transactional
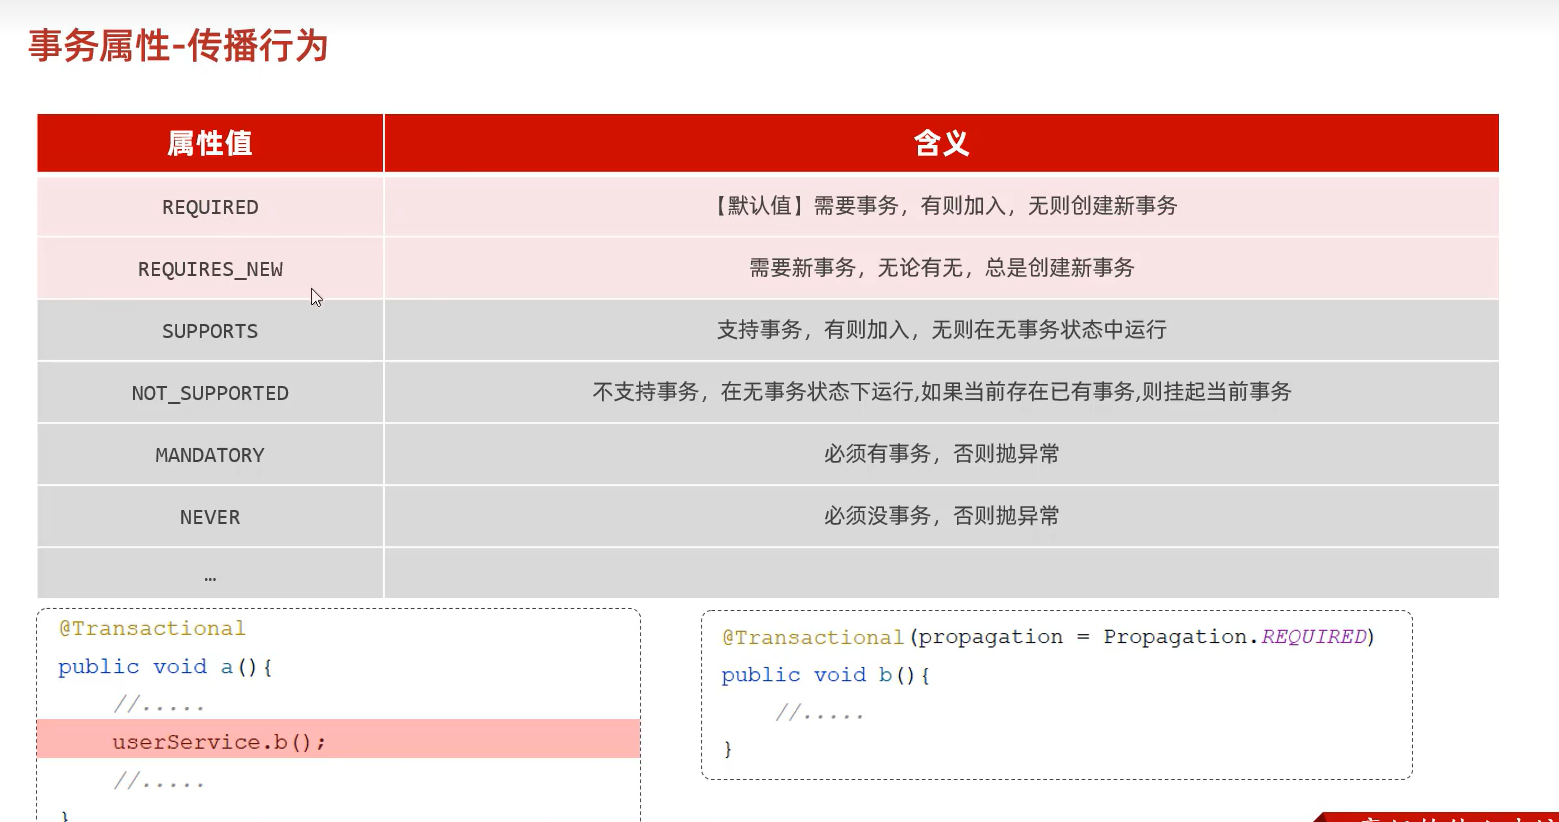
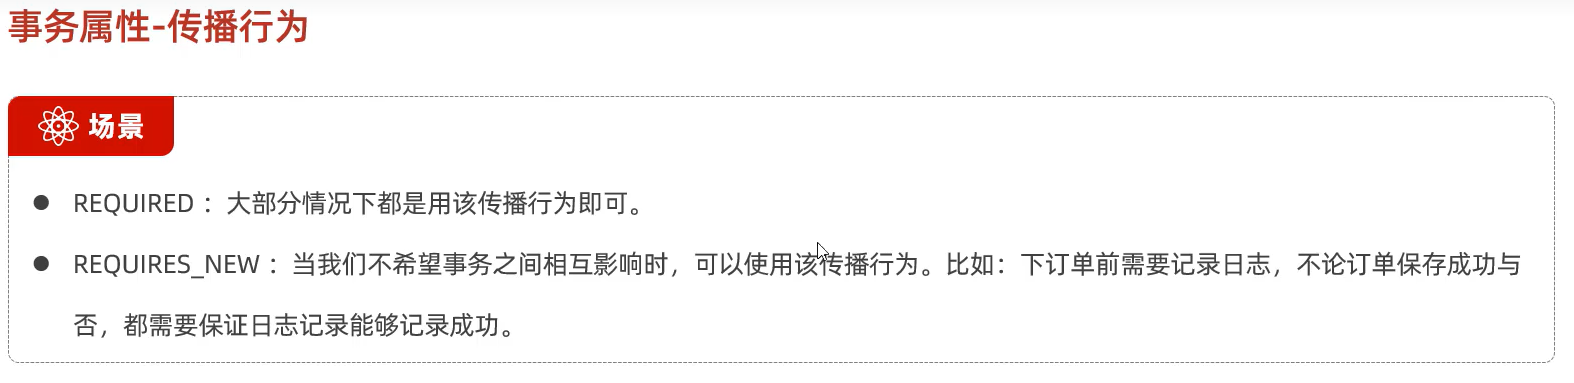
事务传播行为
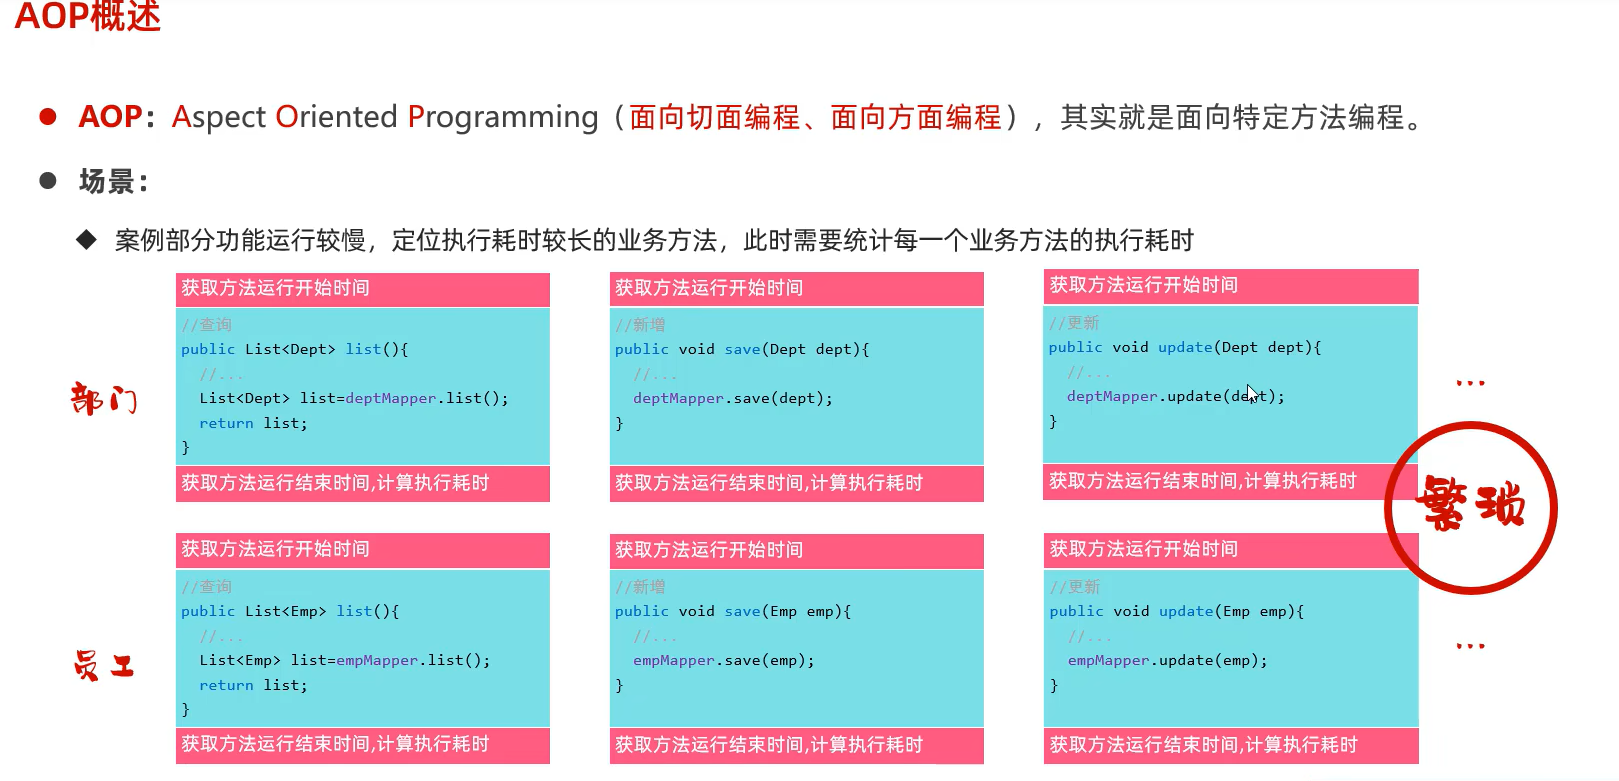
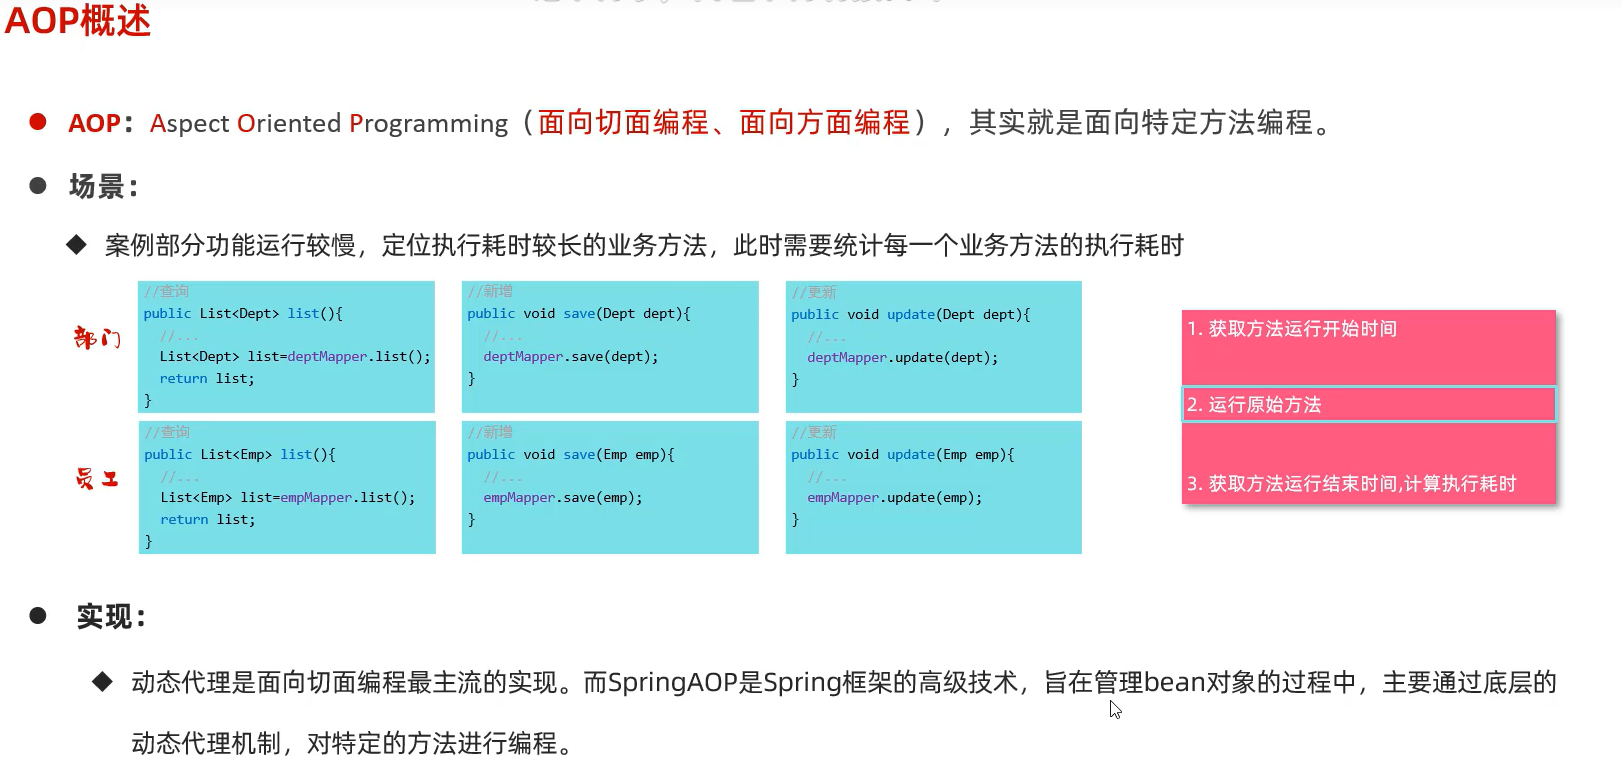
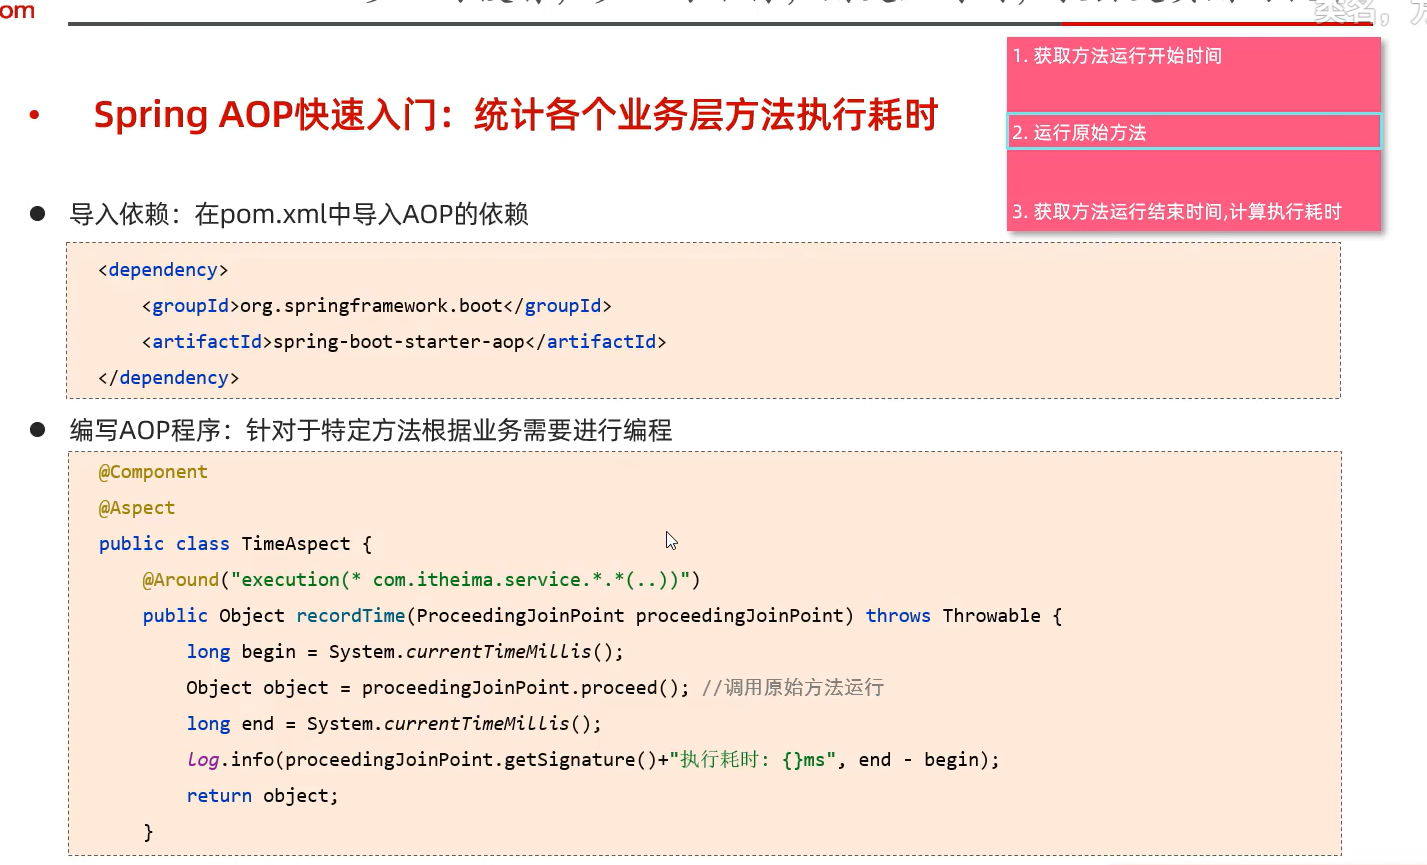
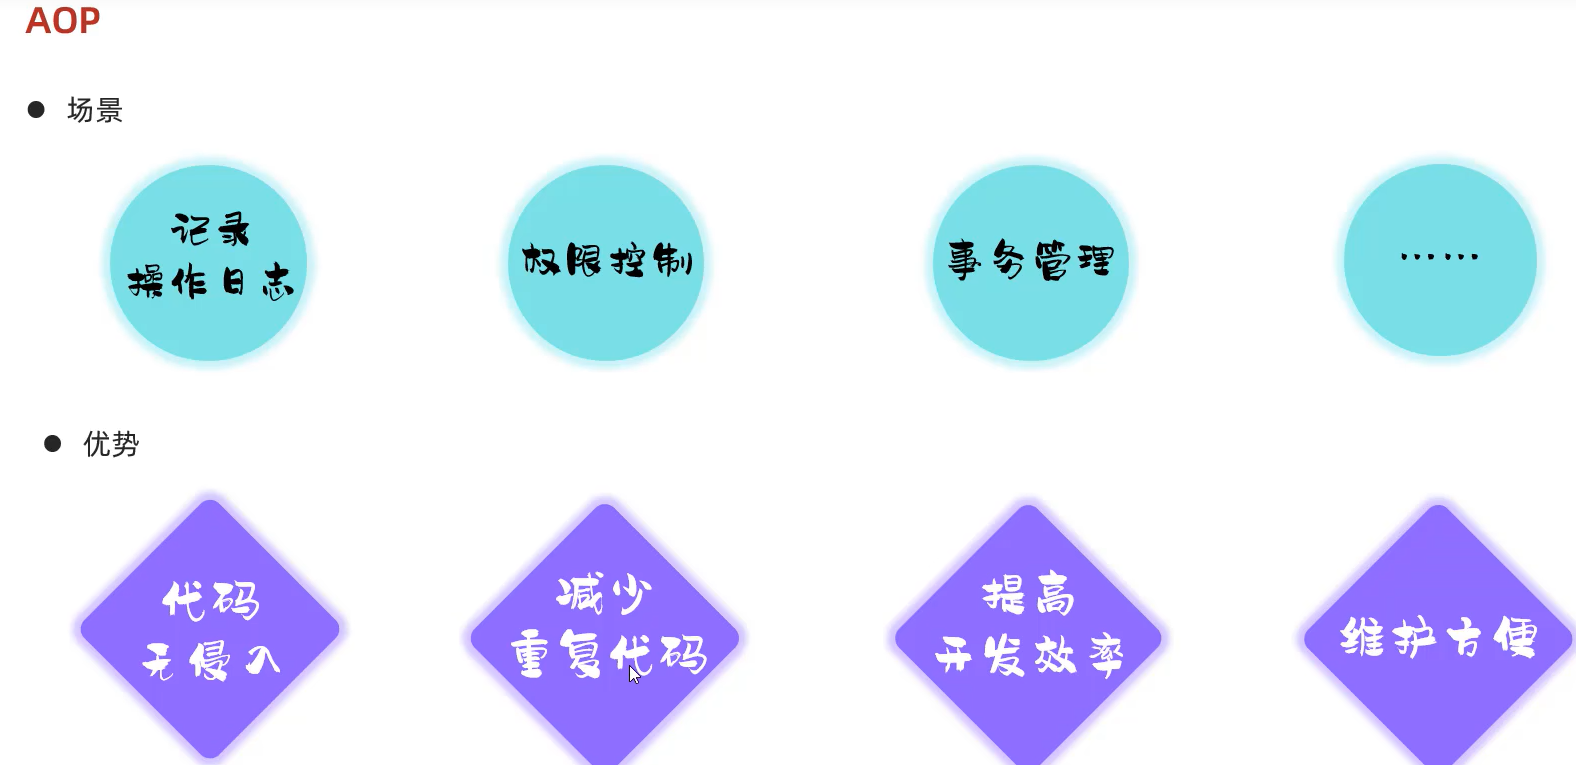
AOP(面向切面编程)
快速入门
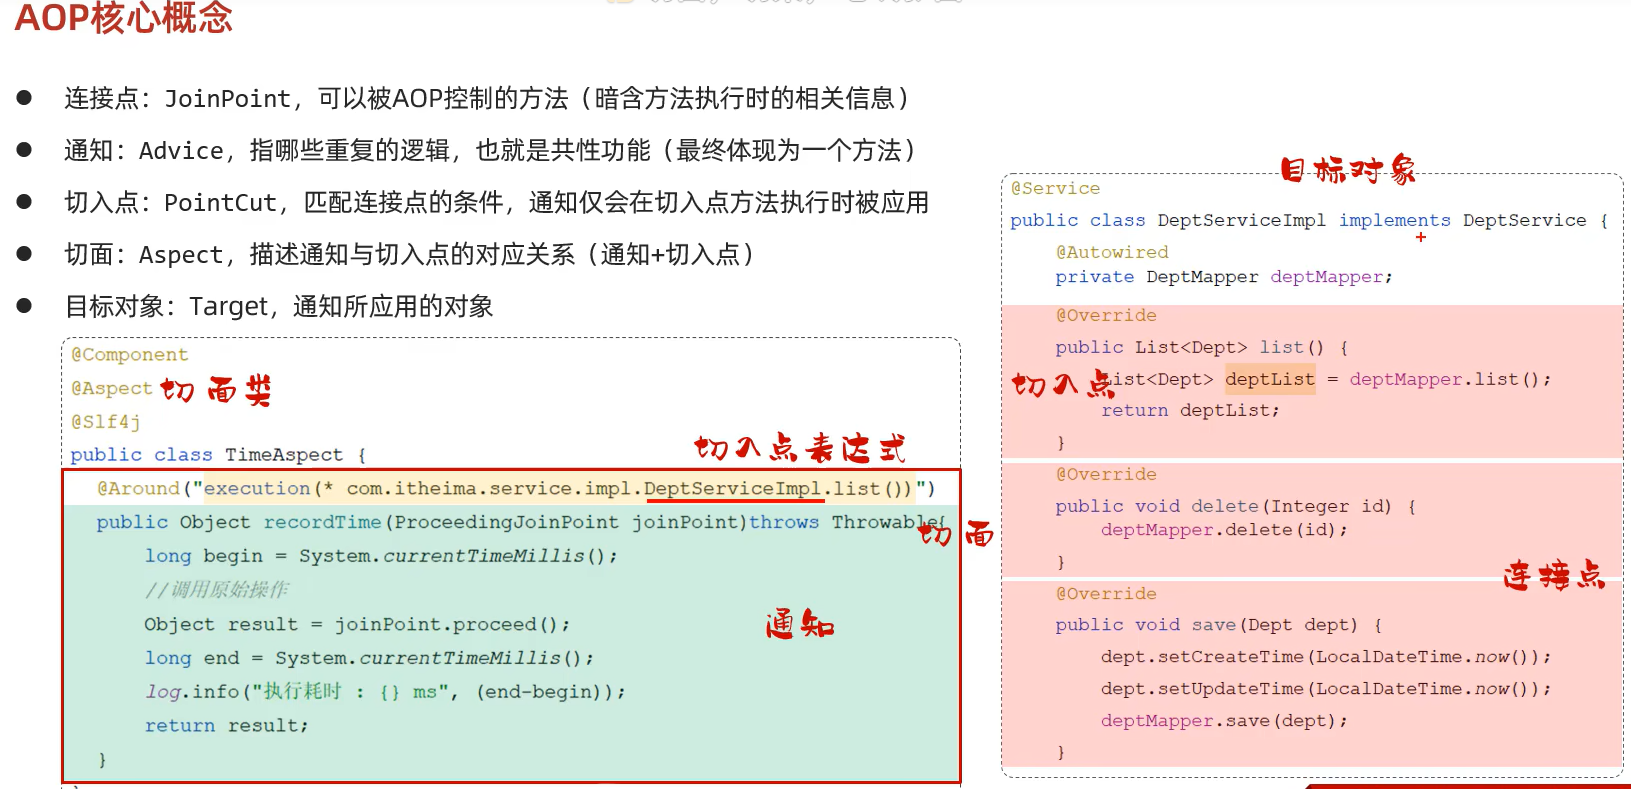
AOP核心概念
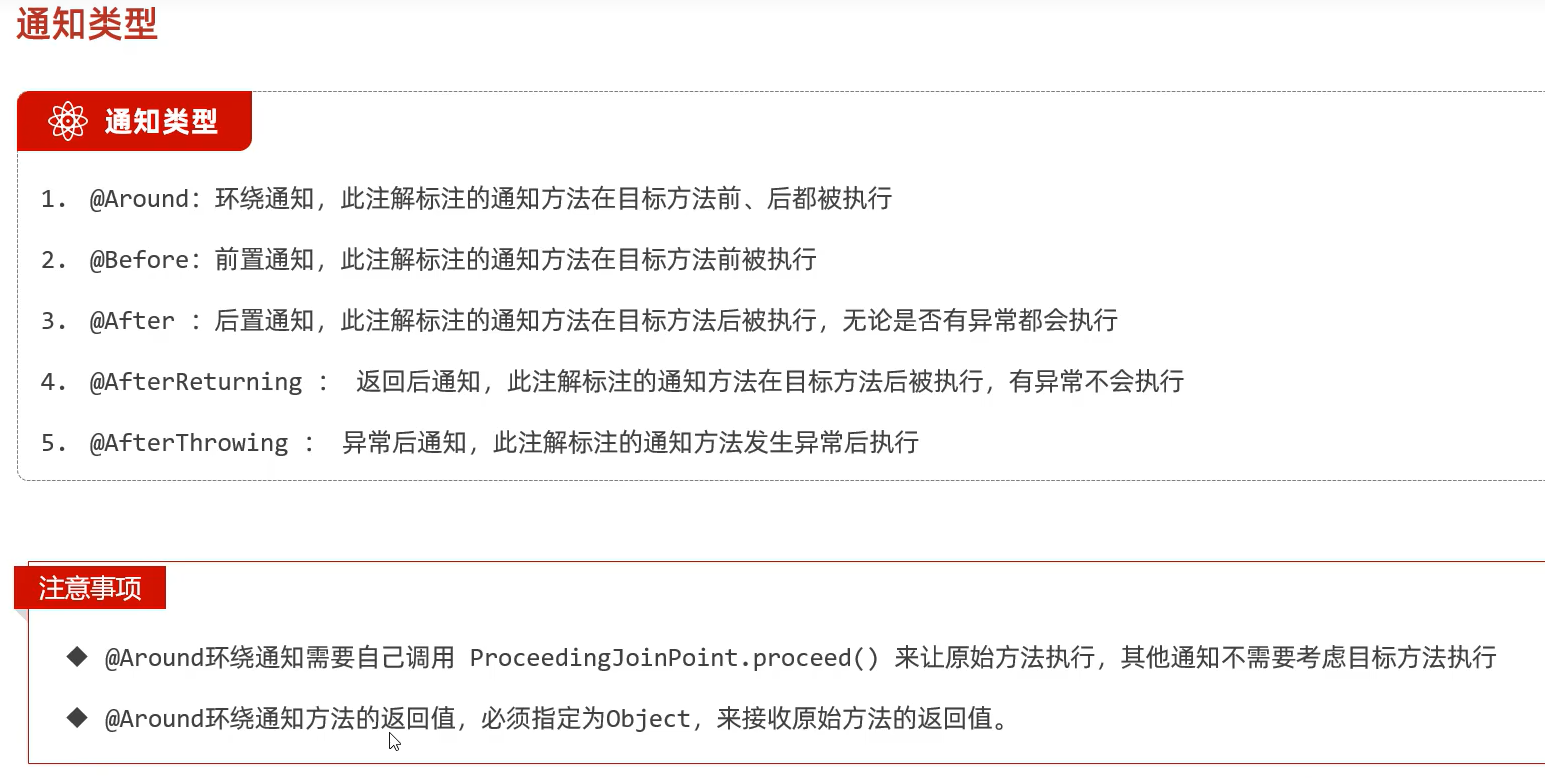
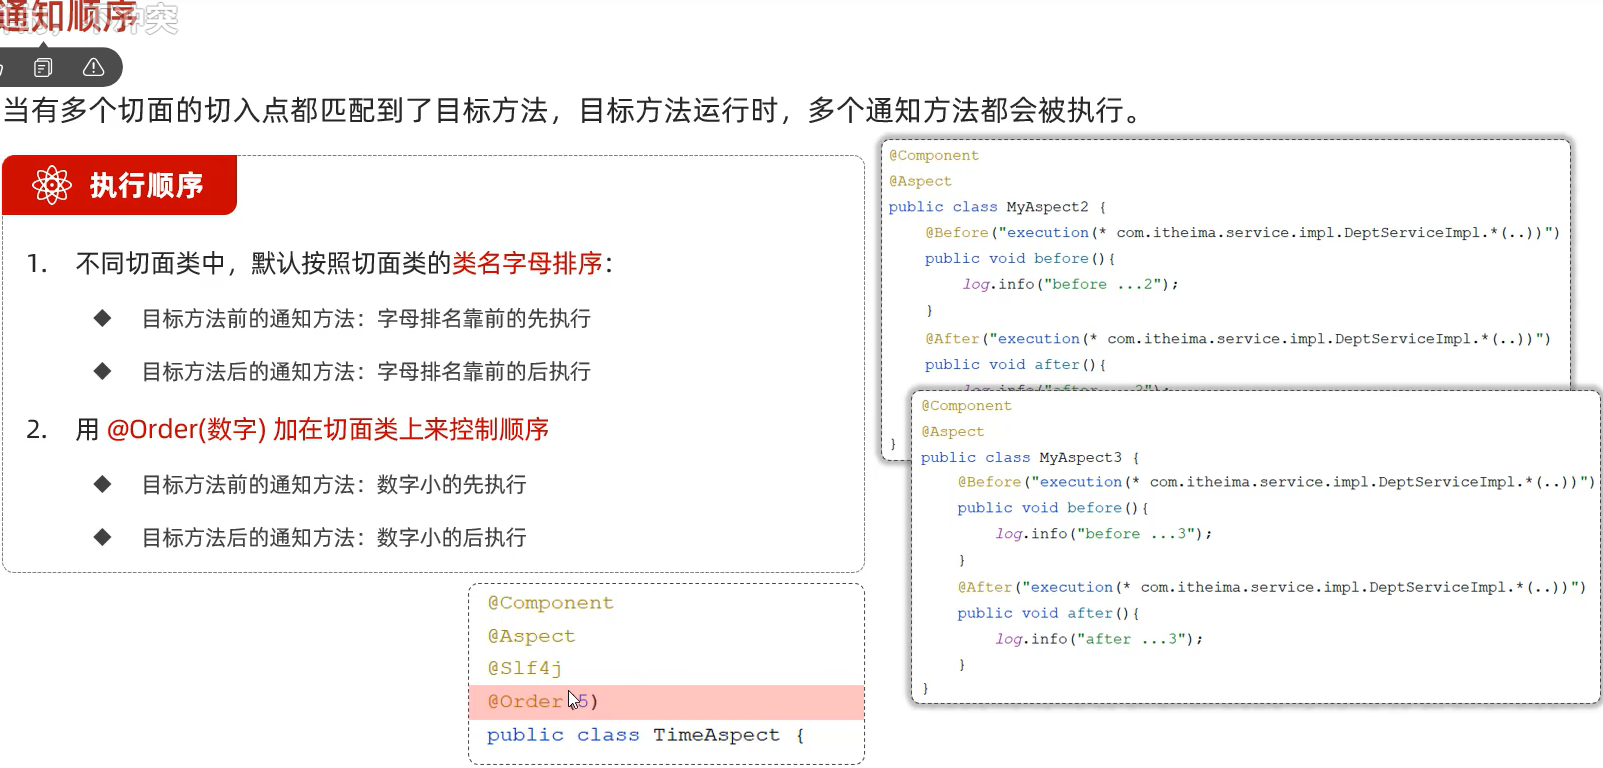
通知顺序
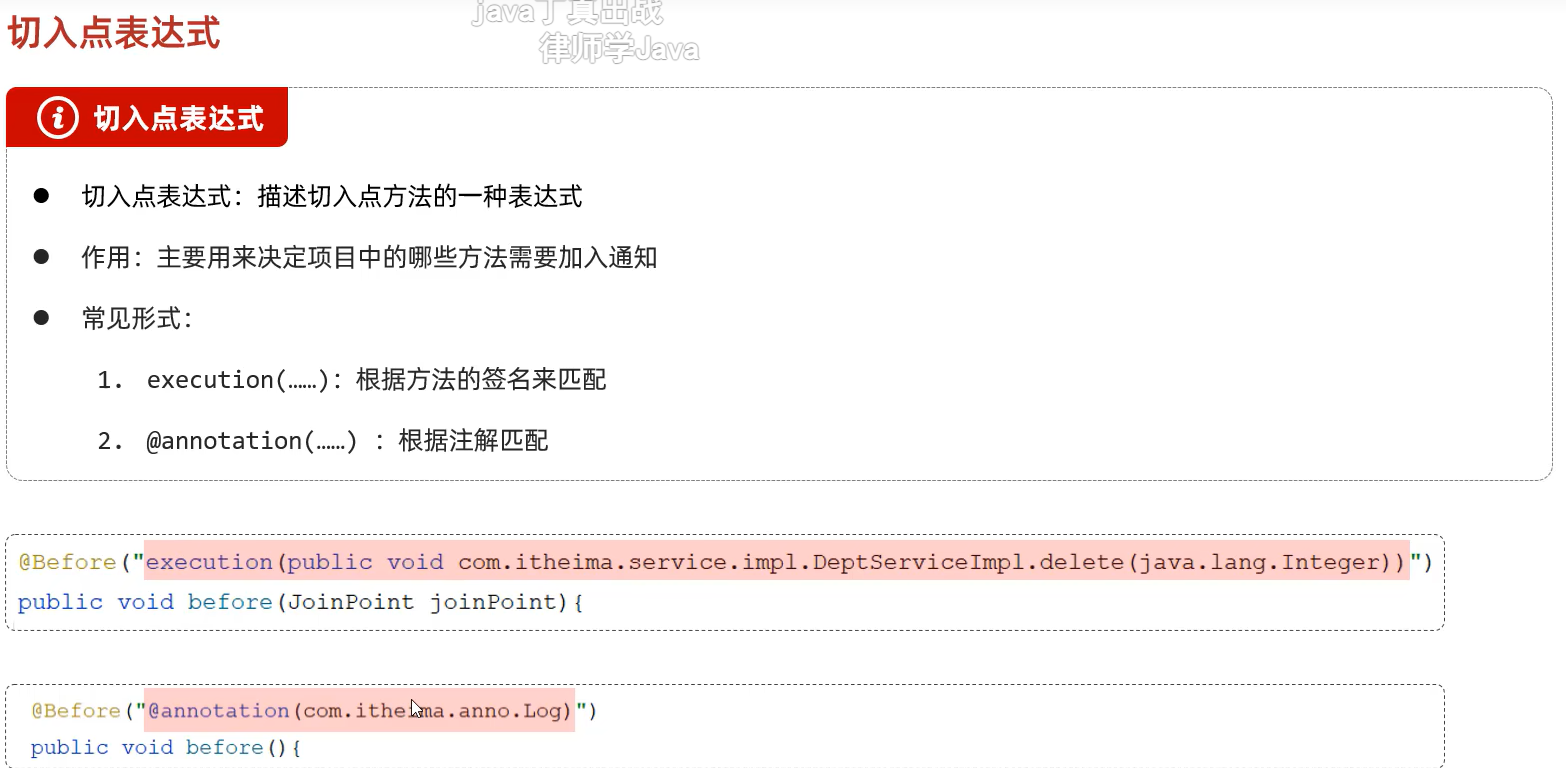
切入点表达式(使用execution())
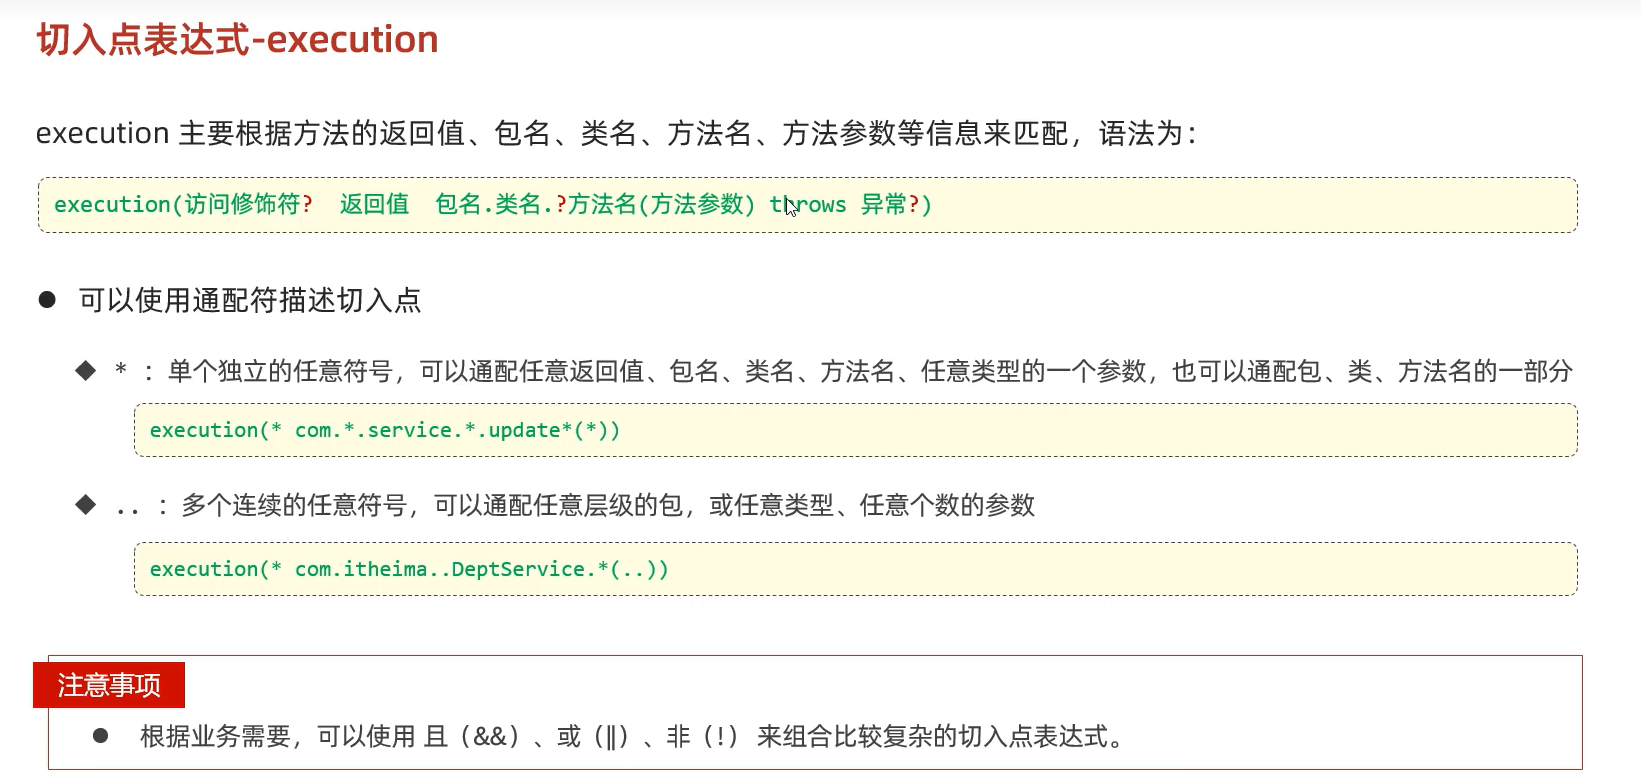
@PointCut("execution(访问修饰符? 返回值 包名.类名.?方法名(方法参数) throws 异常?)")

@PointCut("execution(public void com.example.sevice.DeptService.Delete(java.lang.Integer))")
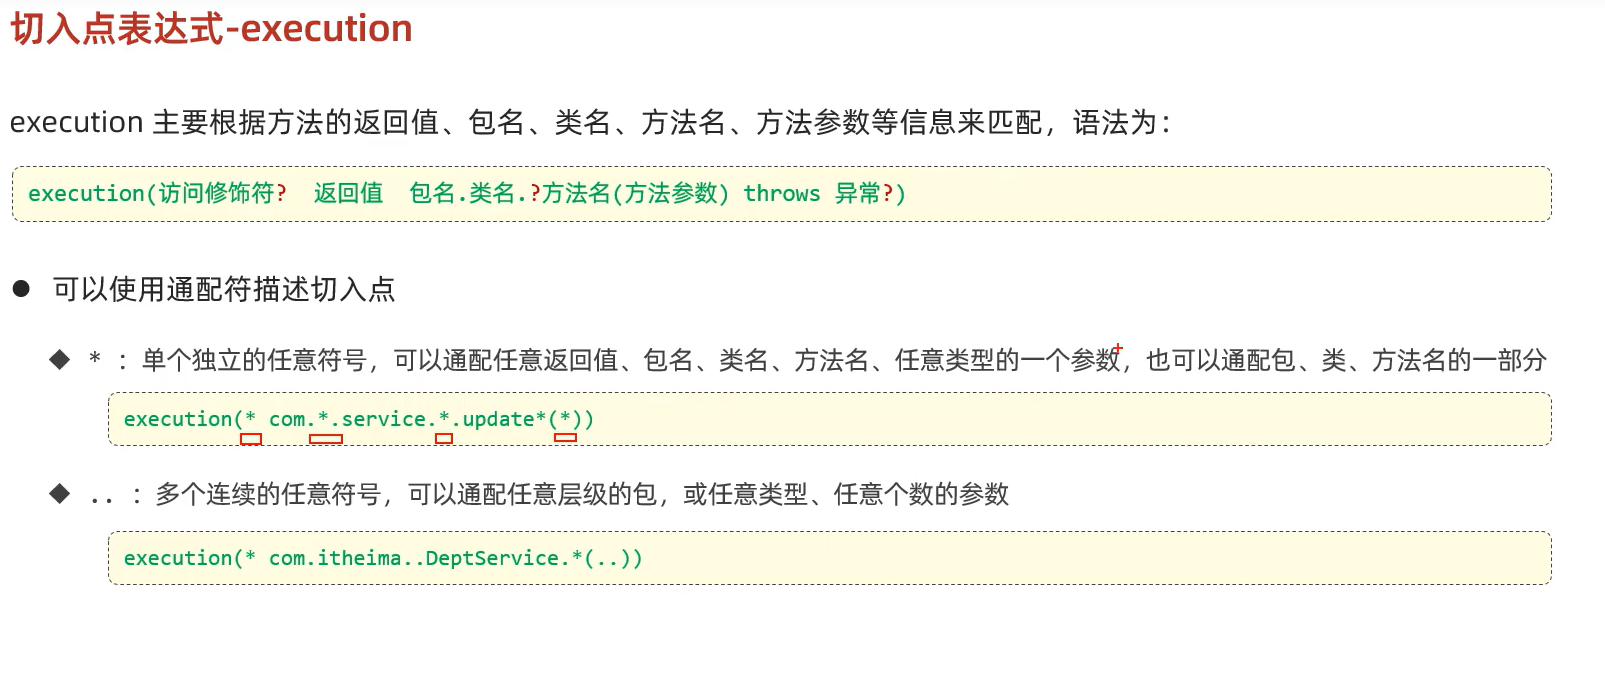
语法
根据注解切入点表达式(使用@annotation)


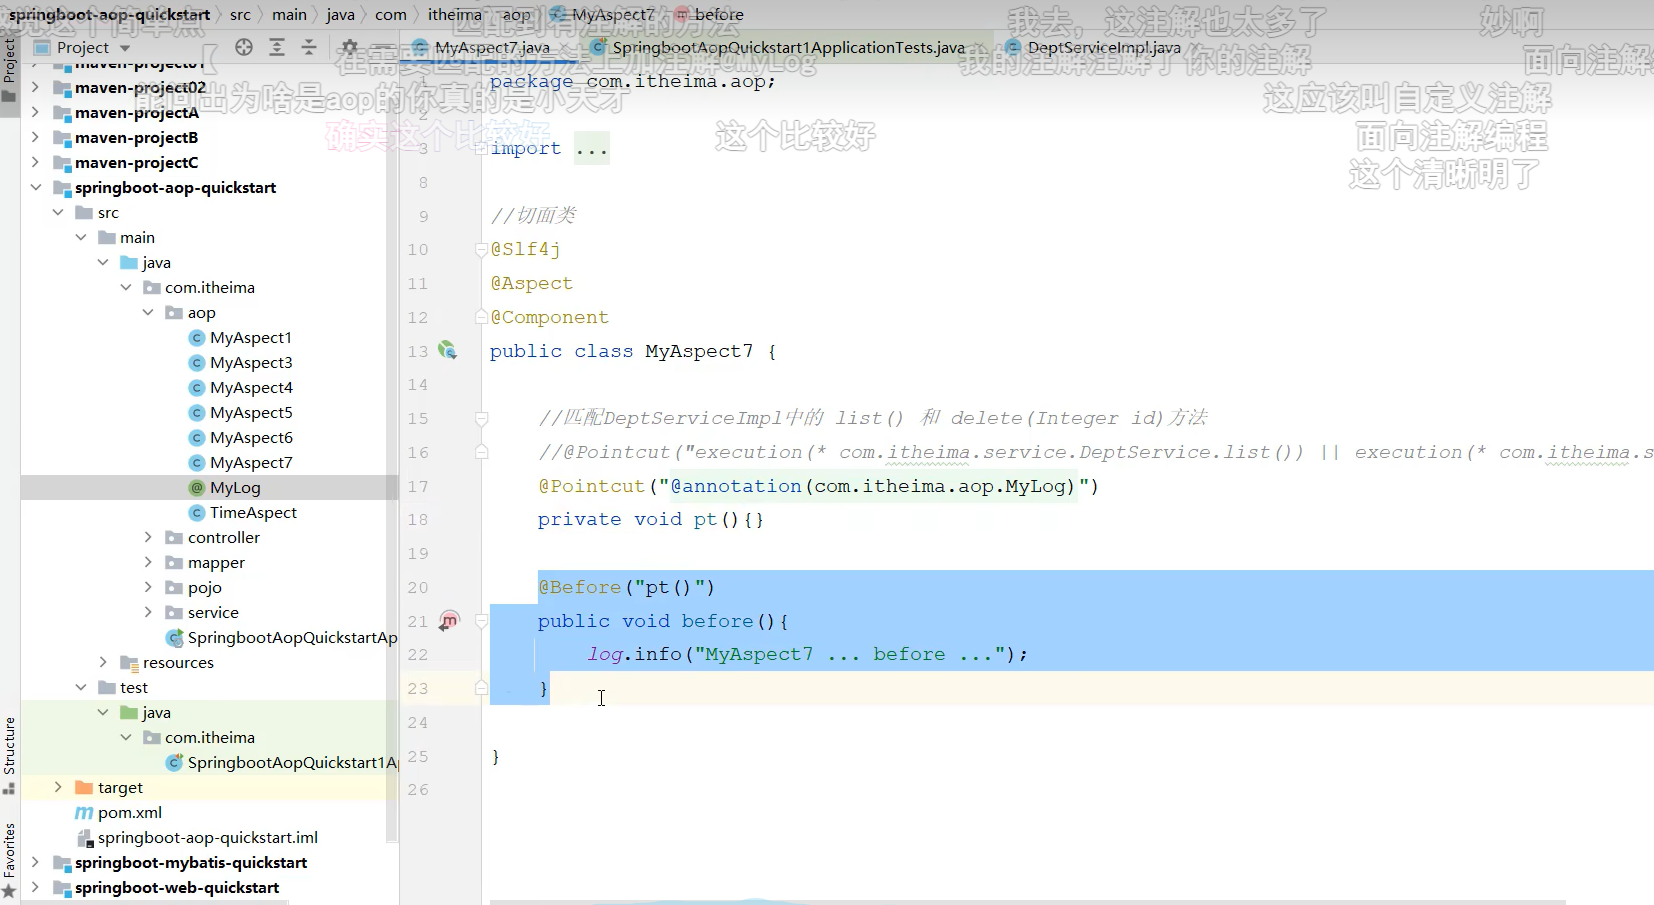
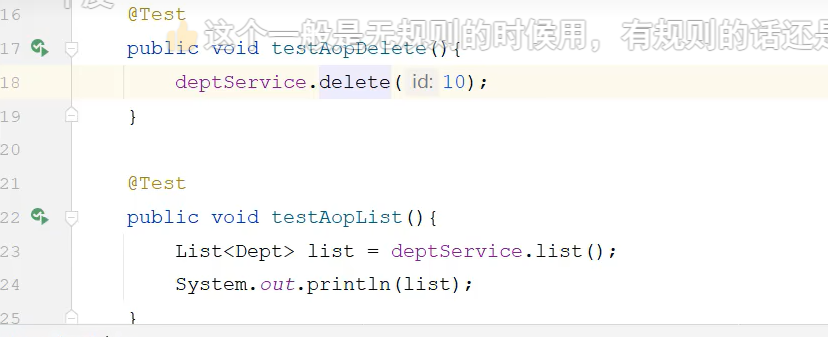
Test运行方法

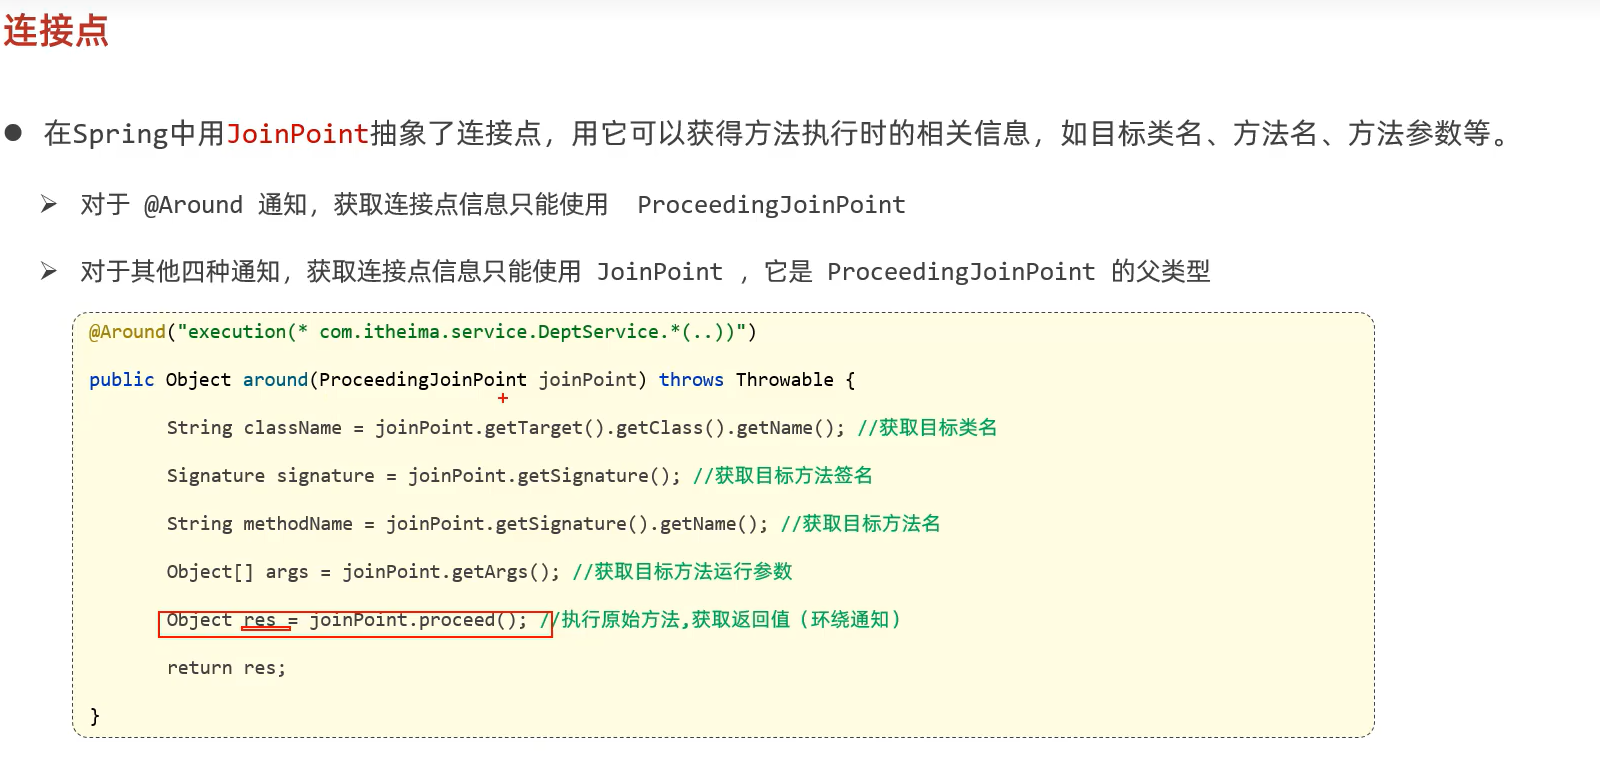
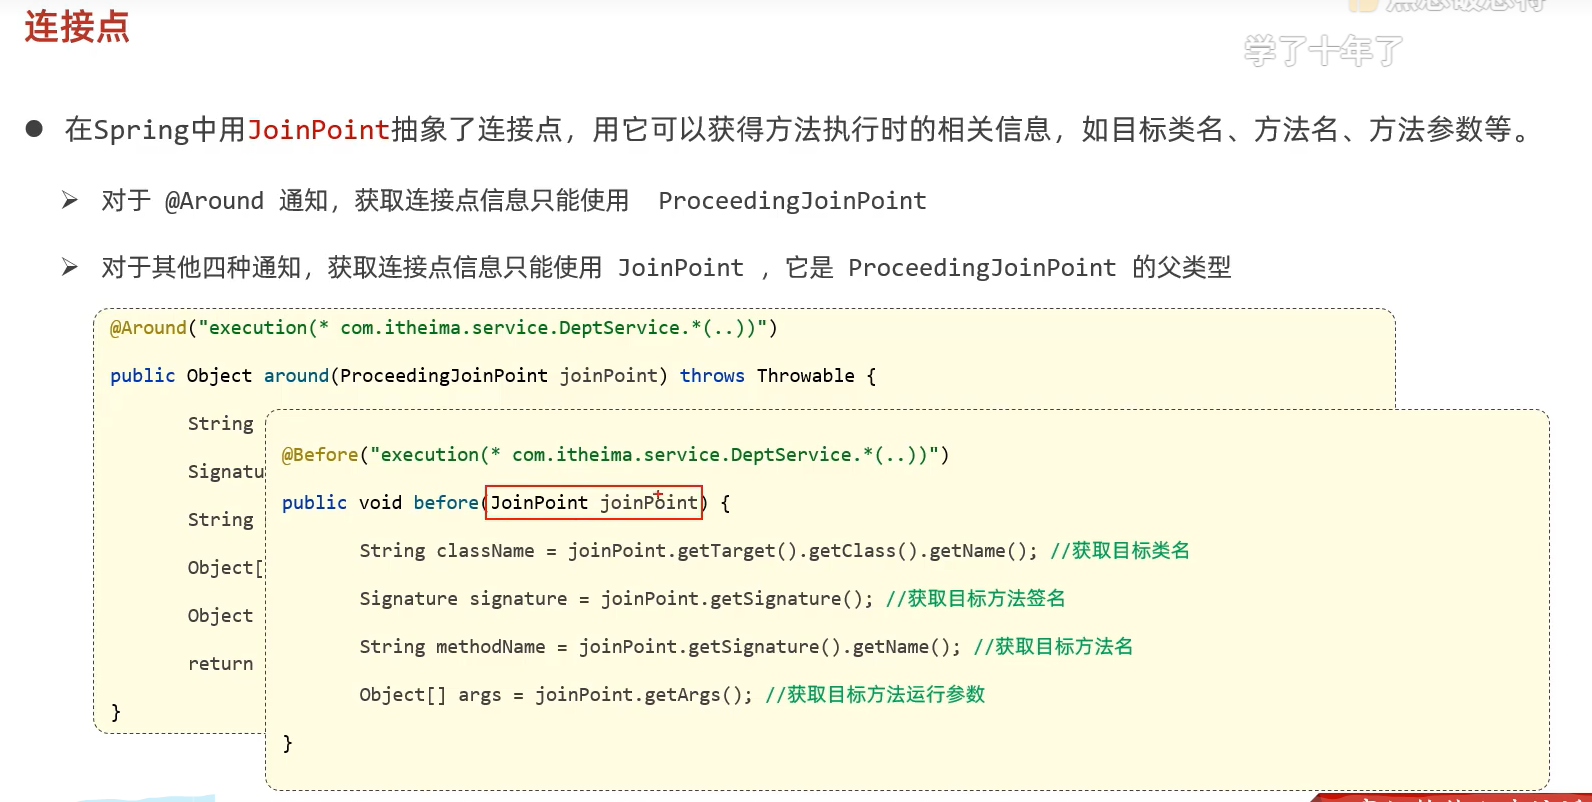
连接点
案例
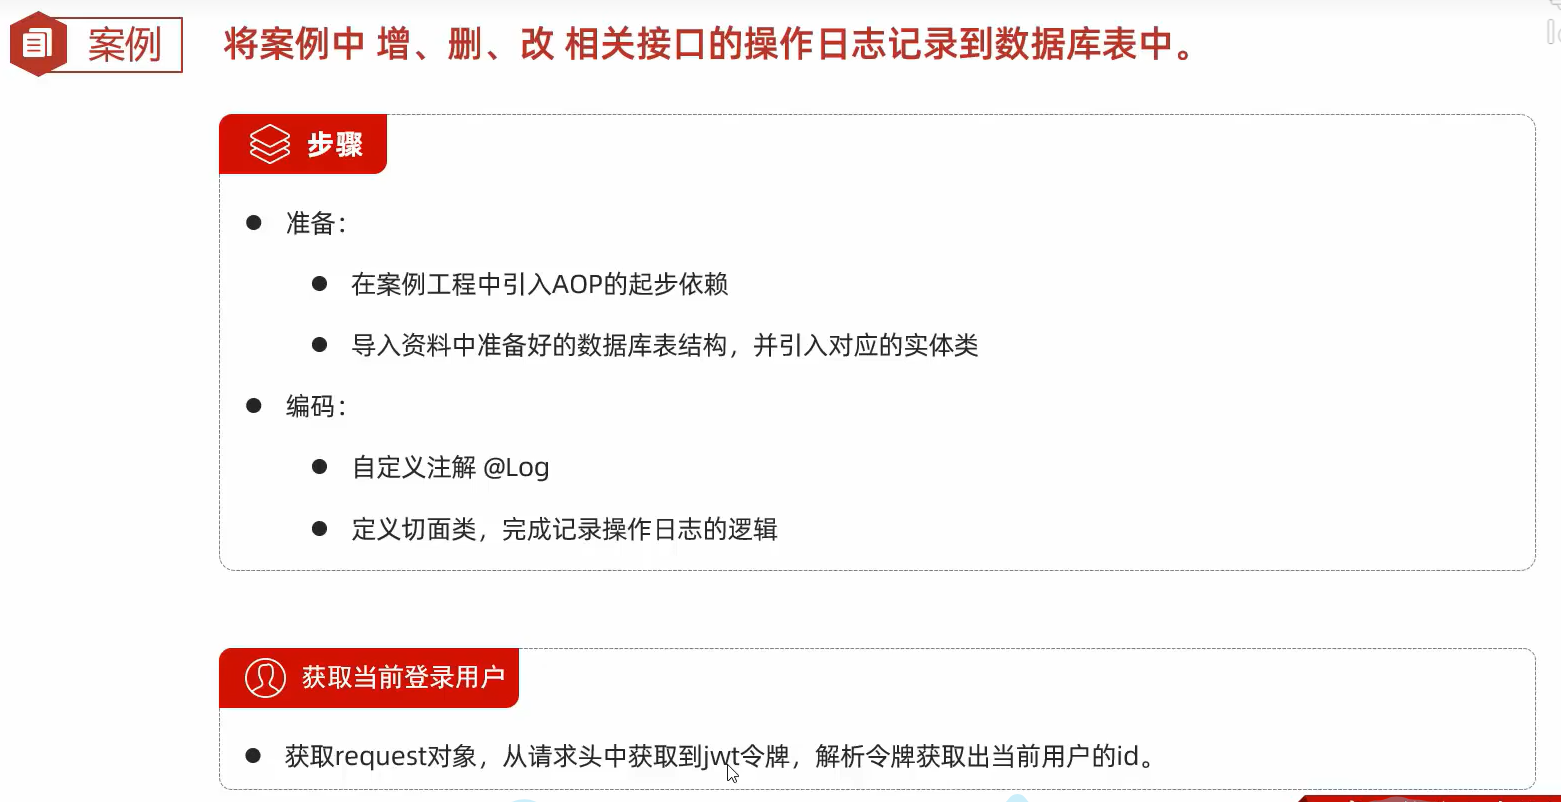
@Slf4j
@Component
@Aspect
public class LogAspect {

    @Autowired
    HttpServletRequest request;

    @Autowired
    OperateLogMapper operateLogMapper;

    @Around("@annotation(com.example.anno.Log)")
    public Object recordLod(ProceedingJoinPoint joinPoint) throws Throwable {

        //获取id
        String jwt = request.getHeader("token");
        Claims claims = JwtUtils.*parseJWT*(jwt);
        Integer operateUser = (Integer) claims.get("id");

        //操作时间
        LocalDateTime operateTime = LocalDateTime.*now*();

        //操作类名
        String className = joinPoint.getTarget().getClass().getName();

        //操作方法名
        String methodName = joinPoint.getSignature().getName();

        //操作方法参数
        Object[] args = joinPoint.getArgs();
        String methodParams = Arrays.*toString*(args);

        long begin = System.*currentTimeMillis*();

        //使用原始目标方法运行
        Object result  = joinPoint.proceed();

        long end = System.*currentTimeMillis*();

        //方法返回值
        String returnValue = JSONObject.*toJSONString*(result);

        //方法耗时
        Long costTime = end -begin;

        //记录操作日志
        OperateLog operateLog = new OperateLog(null,operateUser,operateTime,className,methodName,methodParams,returnValue,costTime);
        operateLogMapper.insert(operateLog);

        *log*.info("AOP操作日志:{}",operateLog);

        return result;
    }

}
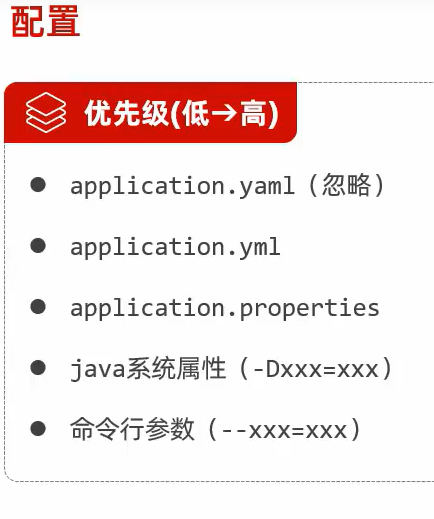
springboot配置文件
优先级
其他配置

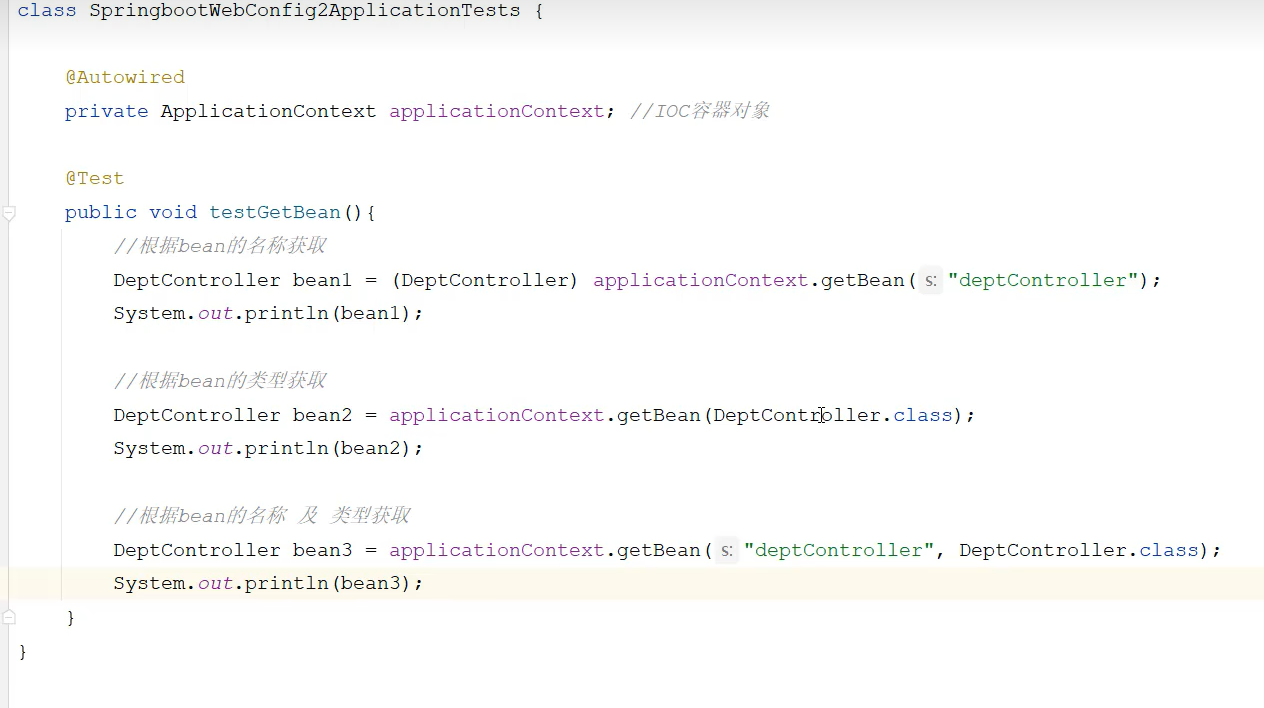
Bean管理
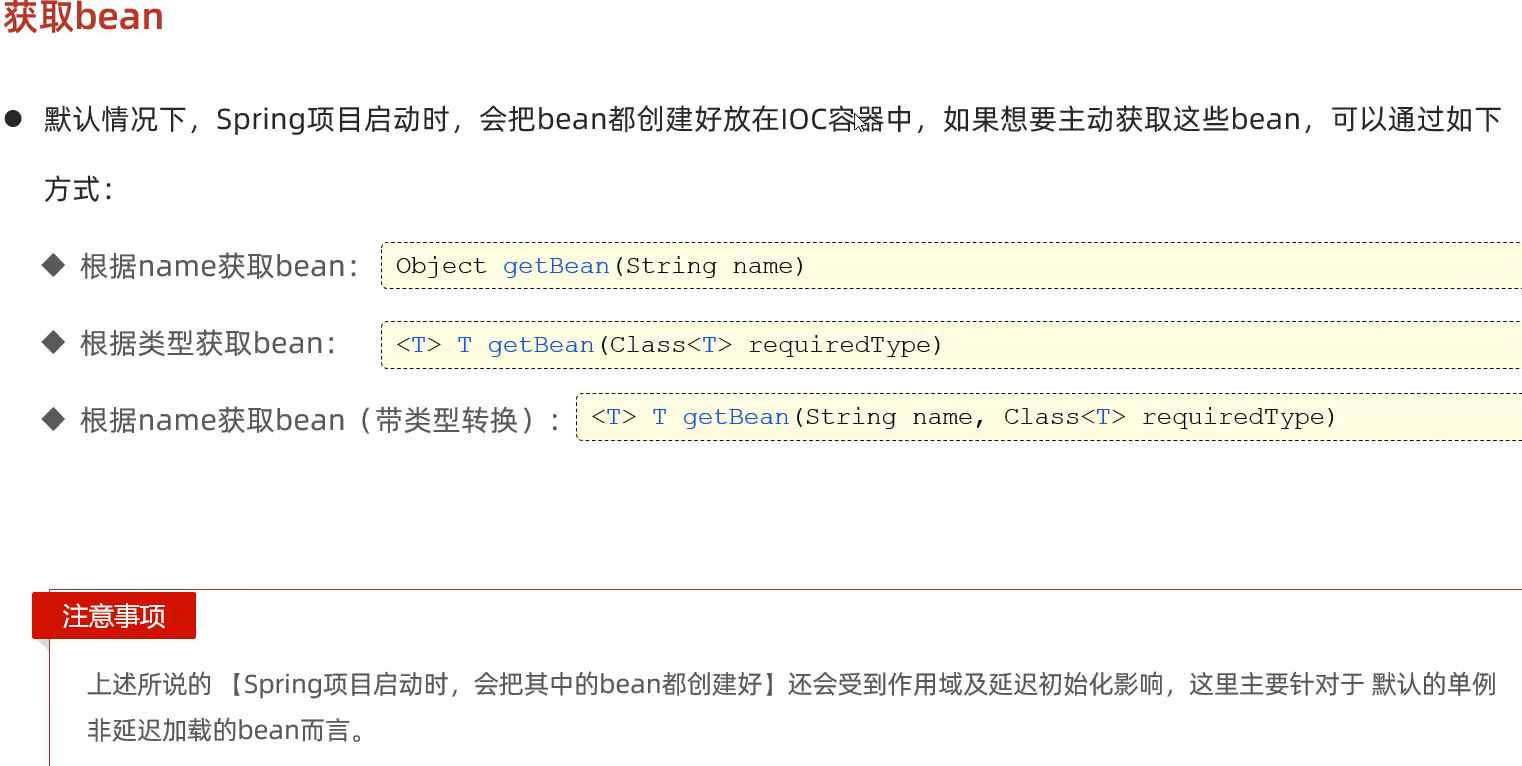
获取bean对象
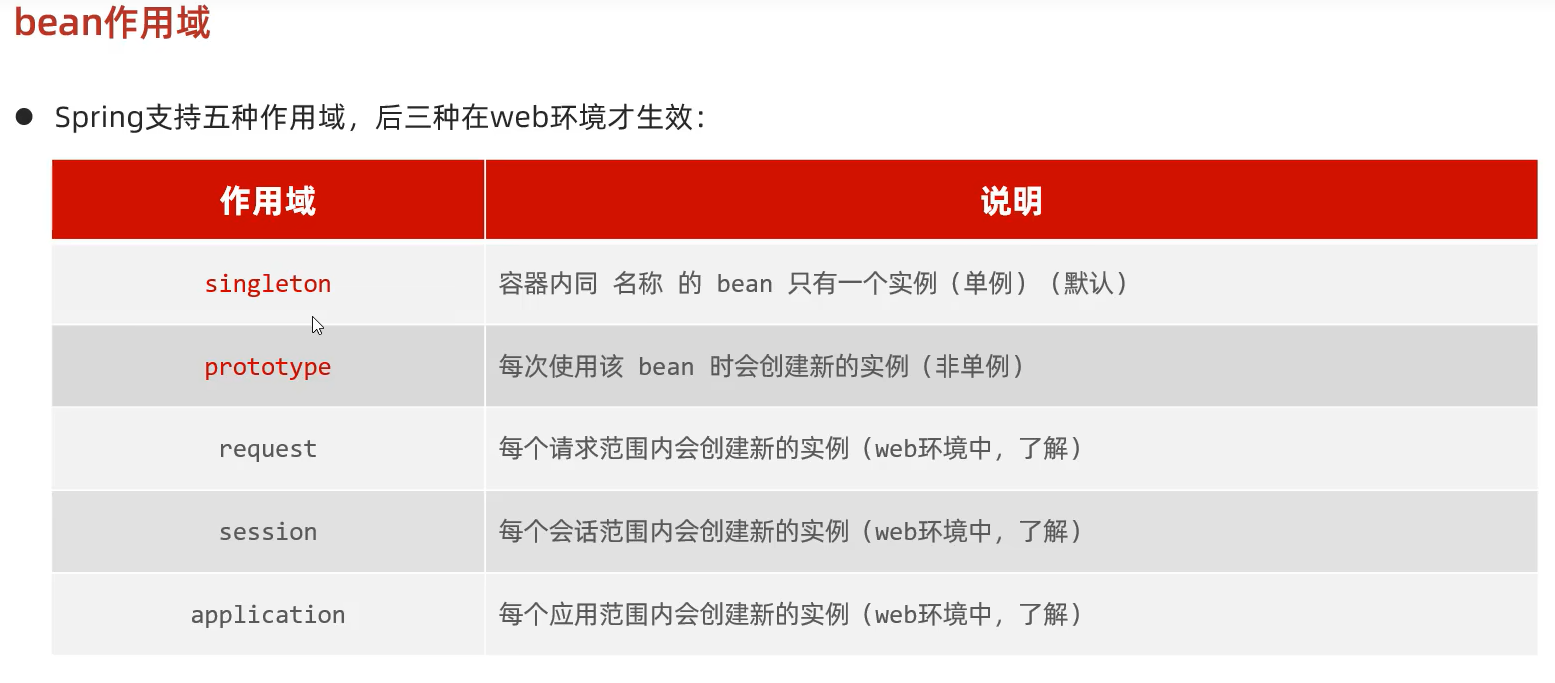
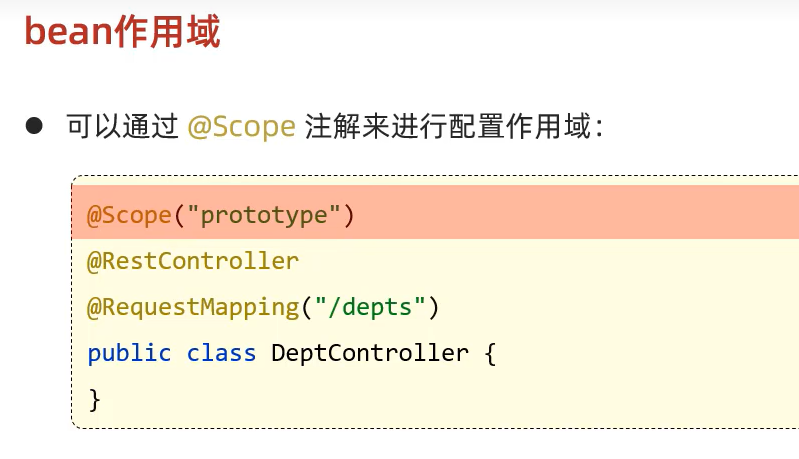
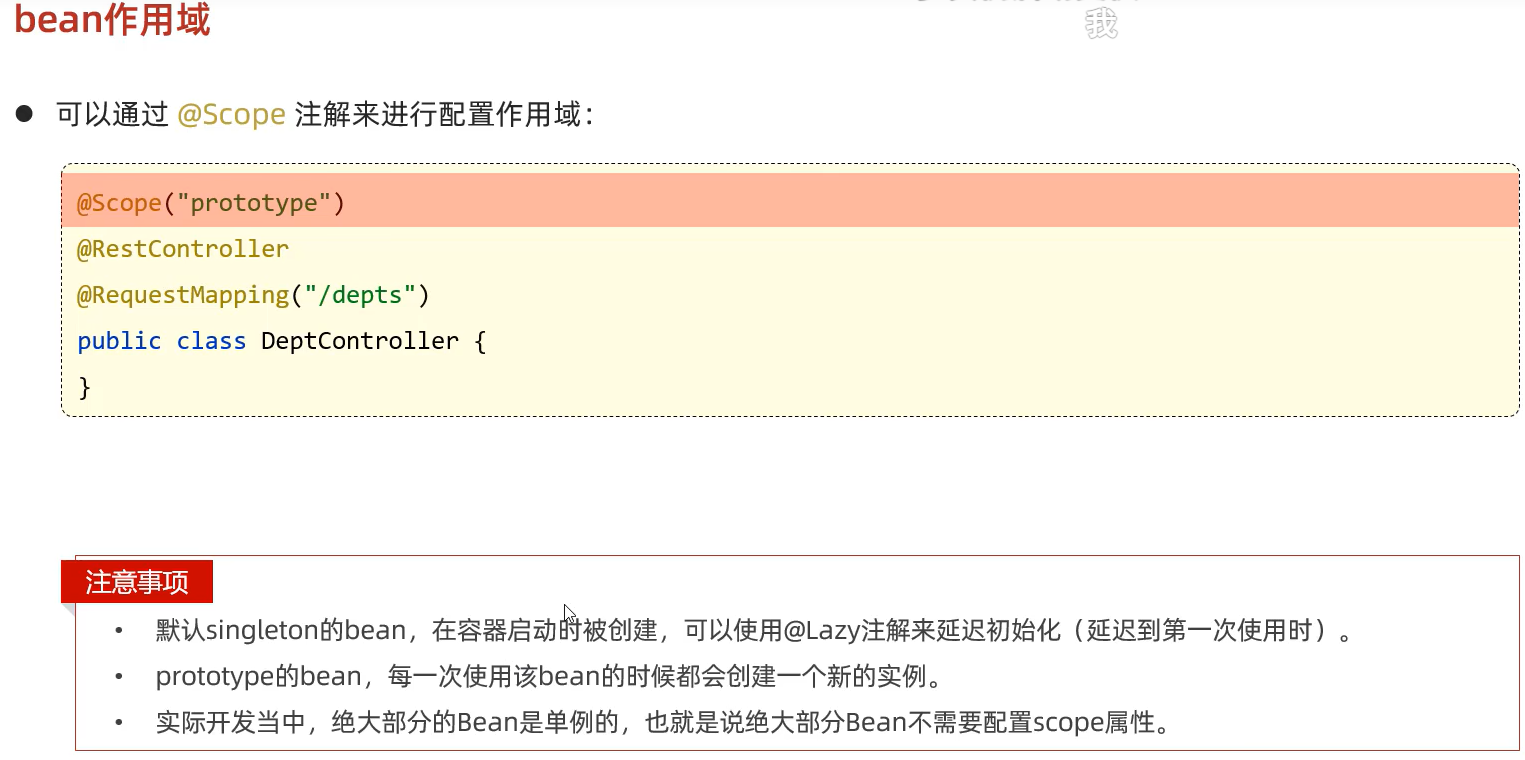
bean的作用域
@Lazy
延迟初始化:容器启动时初始化(构造函数)
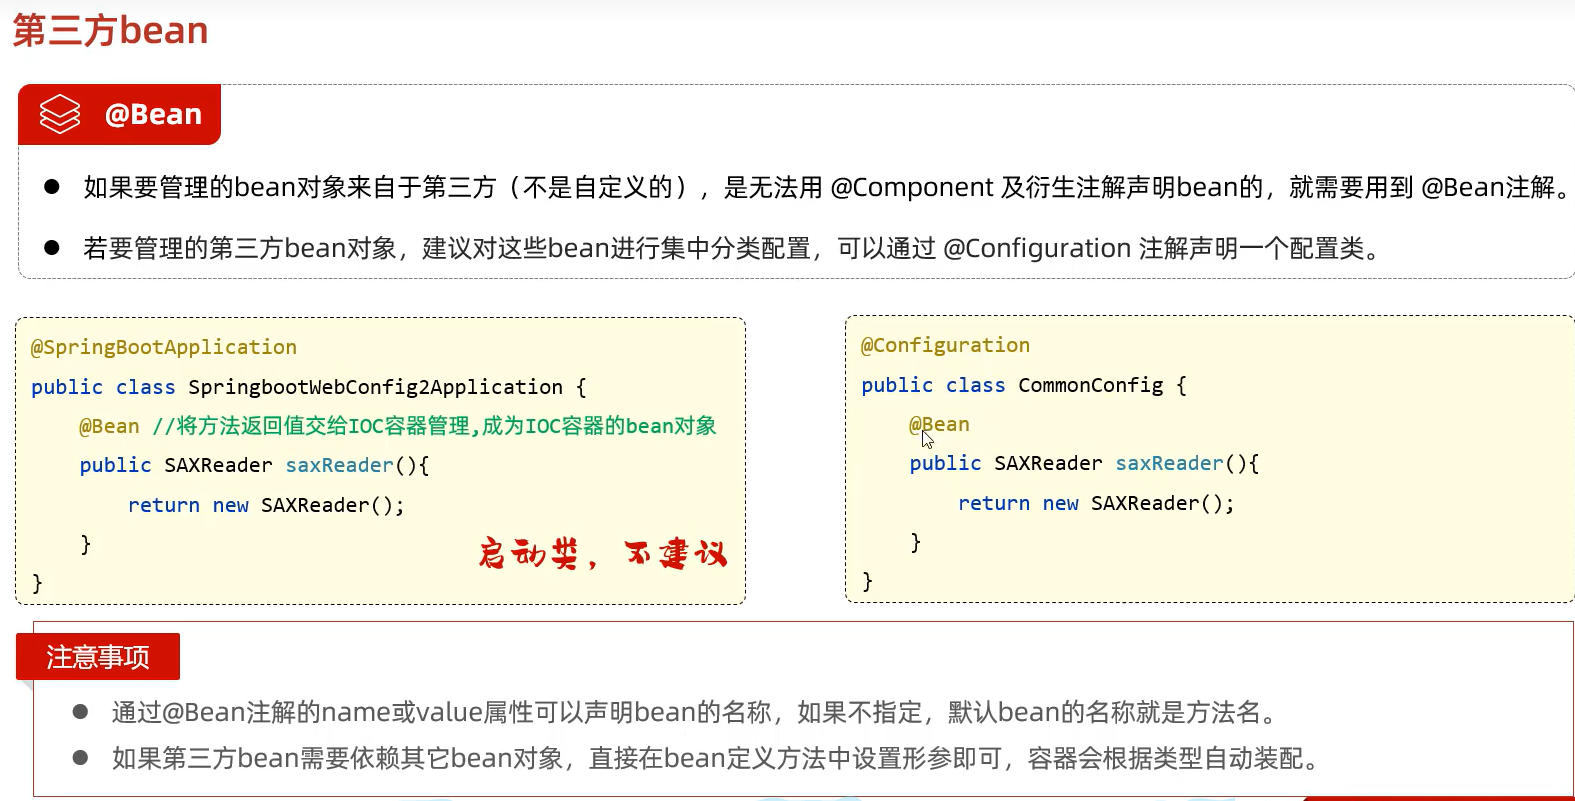
第三方bean的配置
@AliasFor(“”)注解
别名
Springboot原理
起步依赖

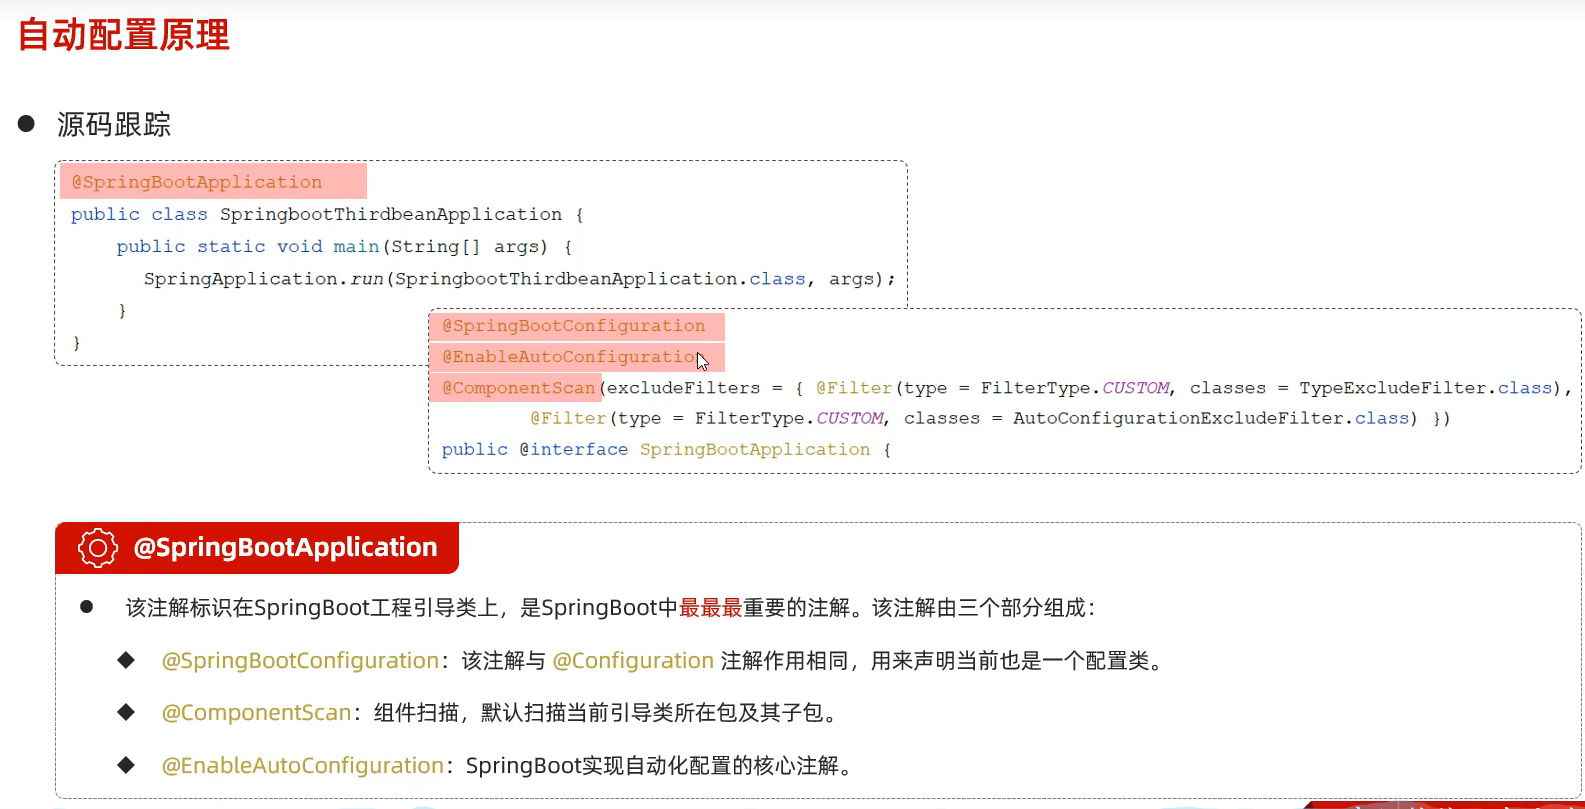
自动配置(最核心)
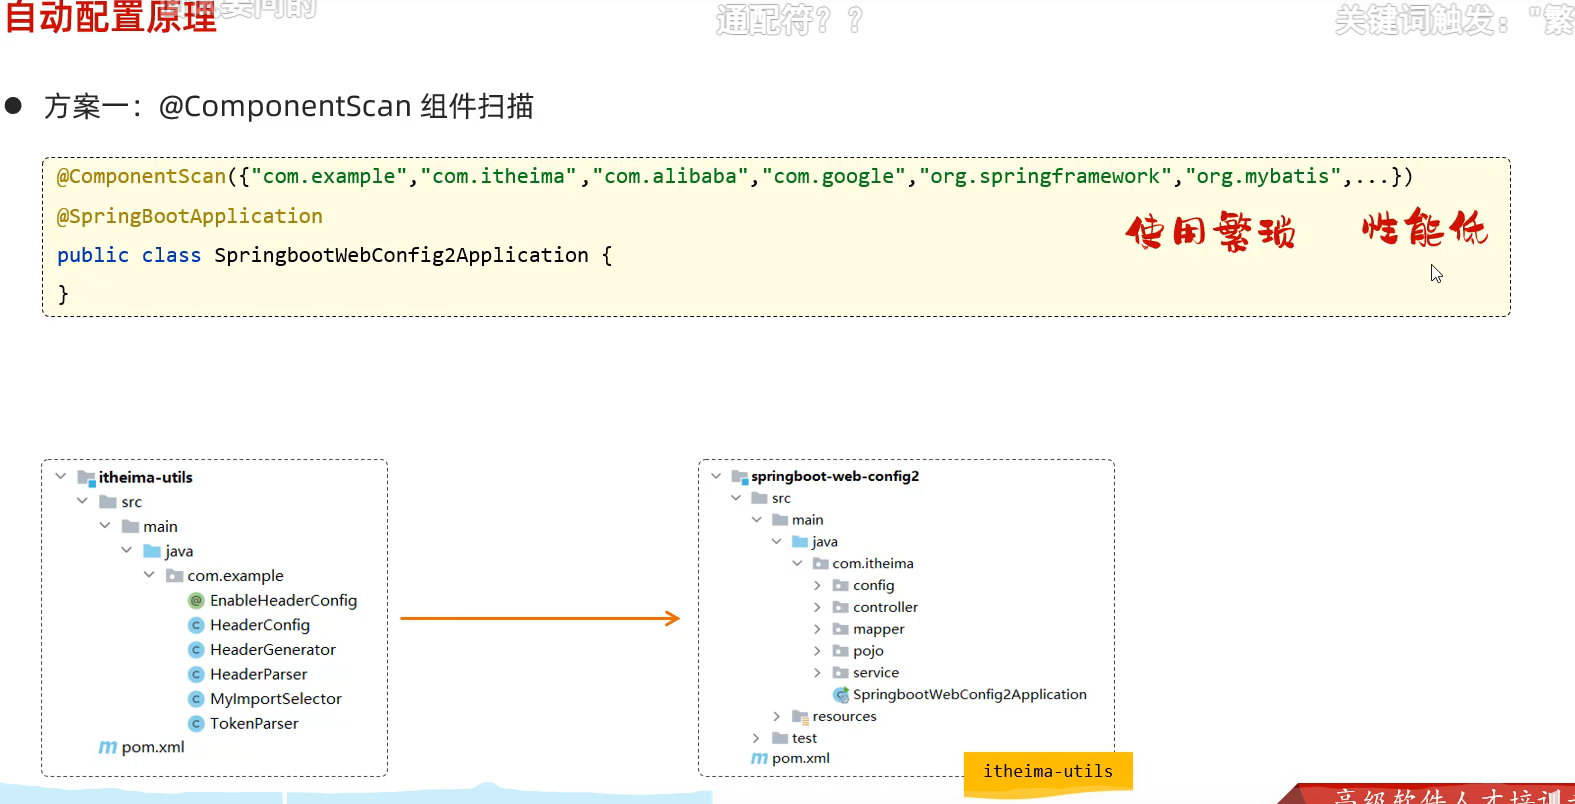
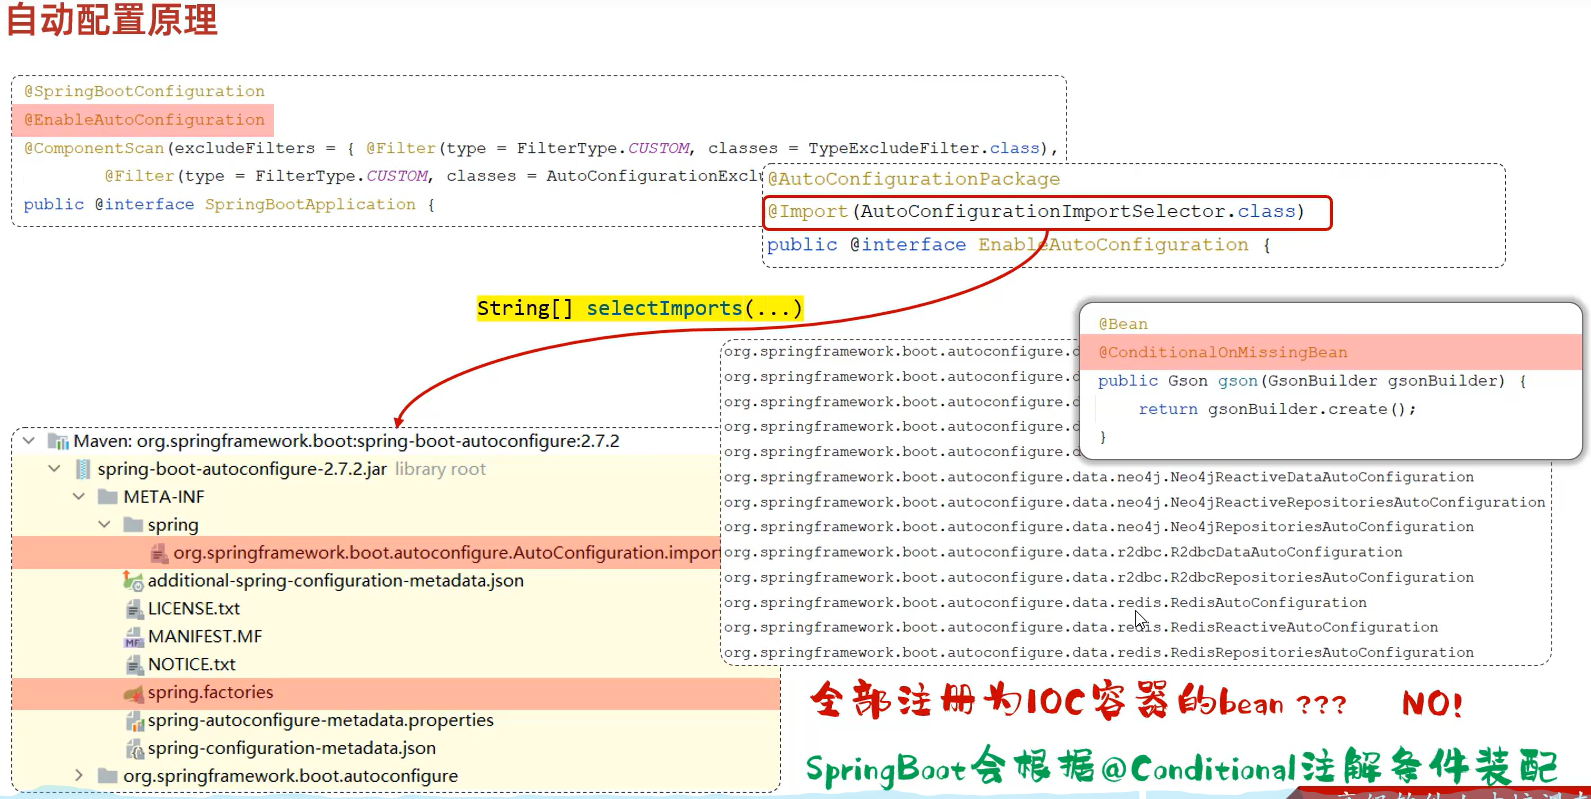
自动配置得原理(高频)
@ComponentScan默认只扫描当前项目包
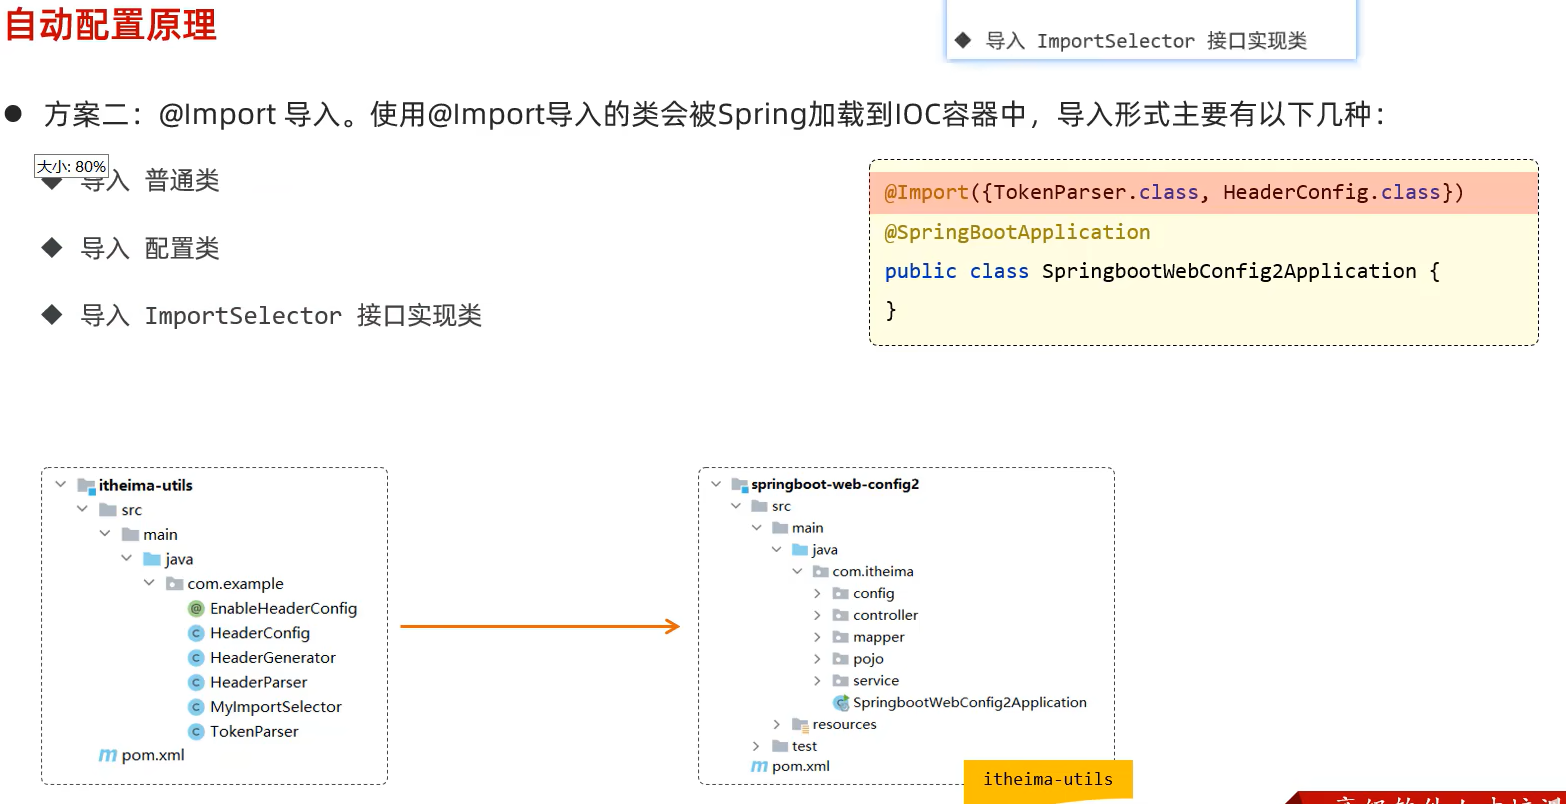
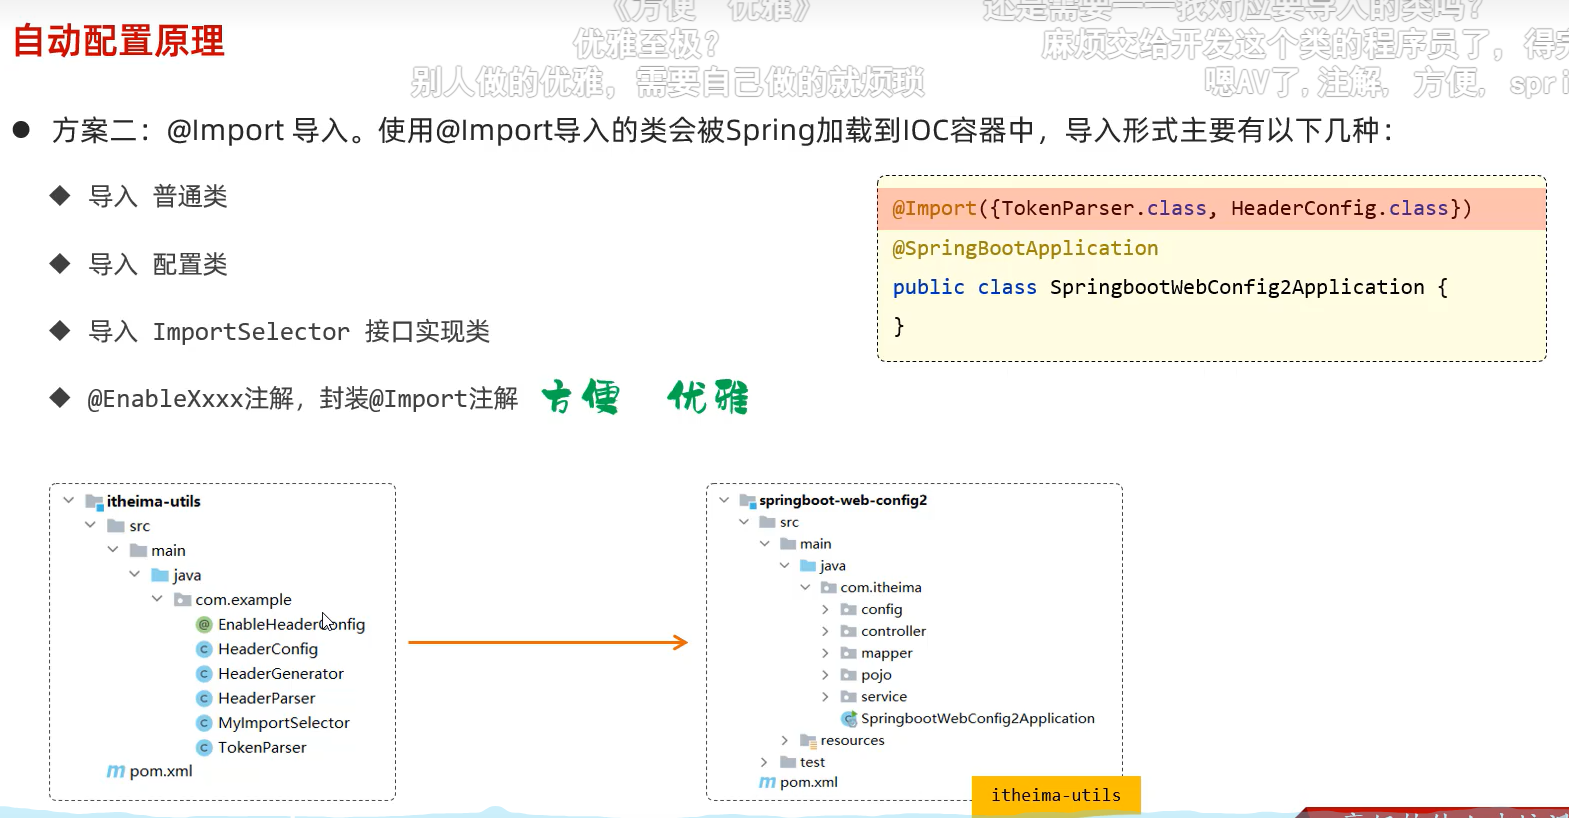
方案
源码跟踪

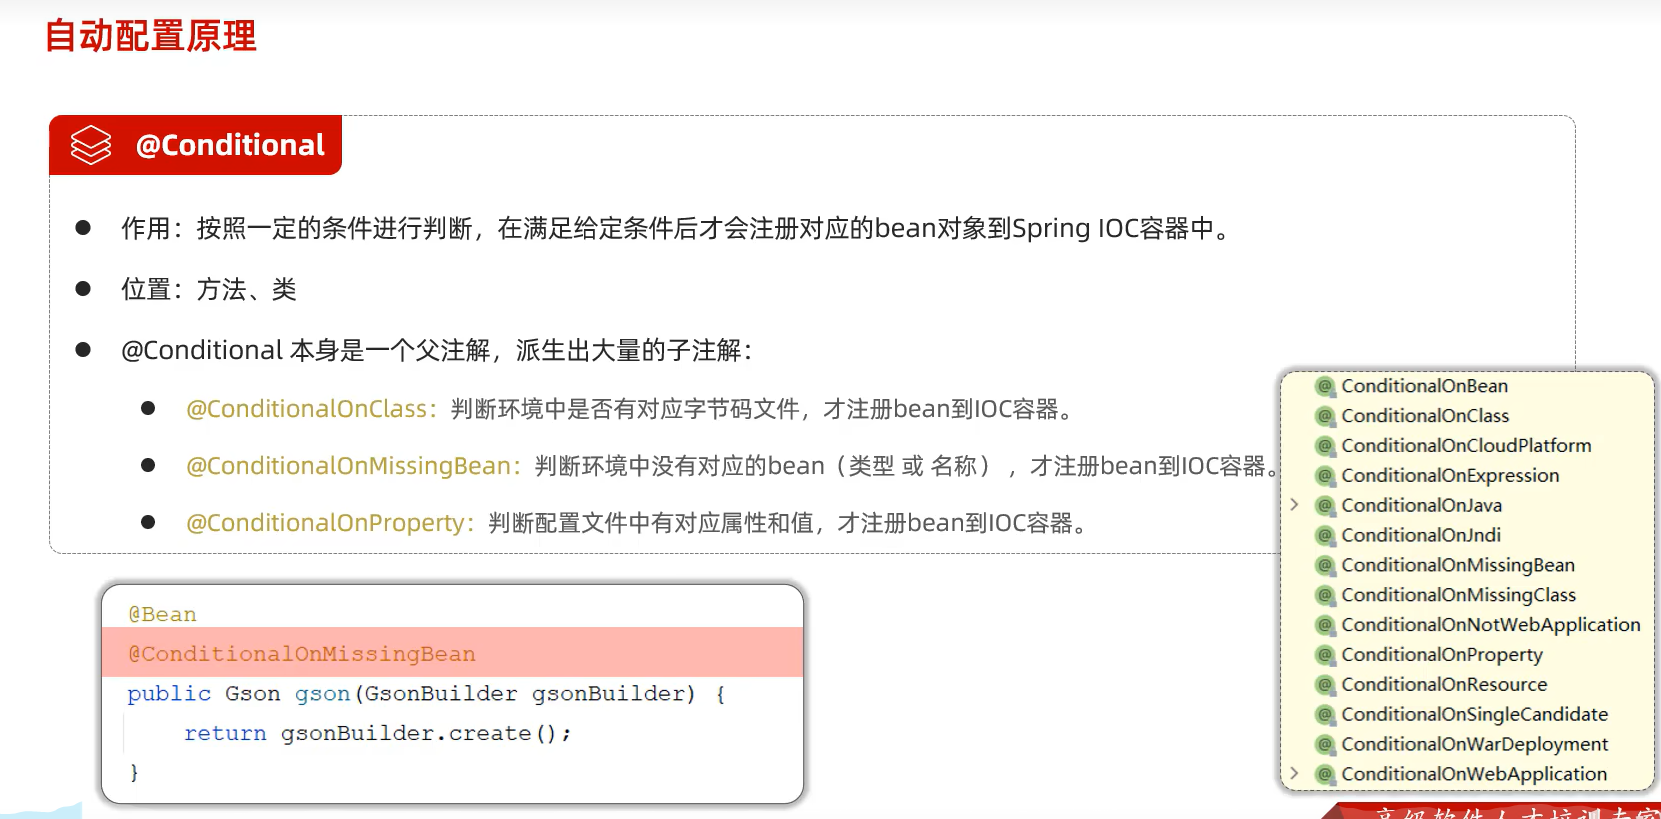
@ConditionalOnMissingBean条件注解
总结
总结
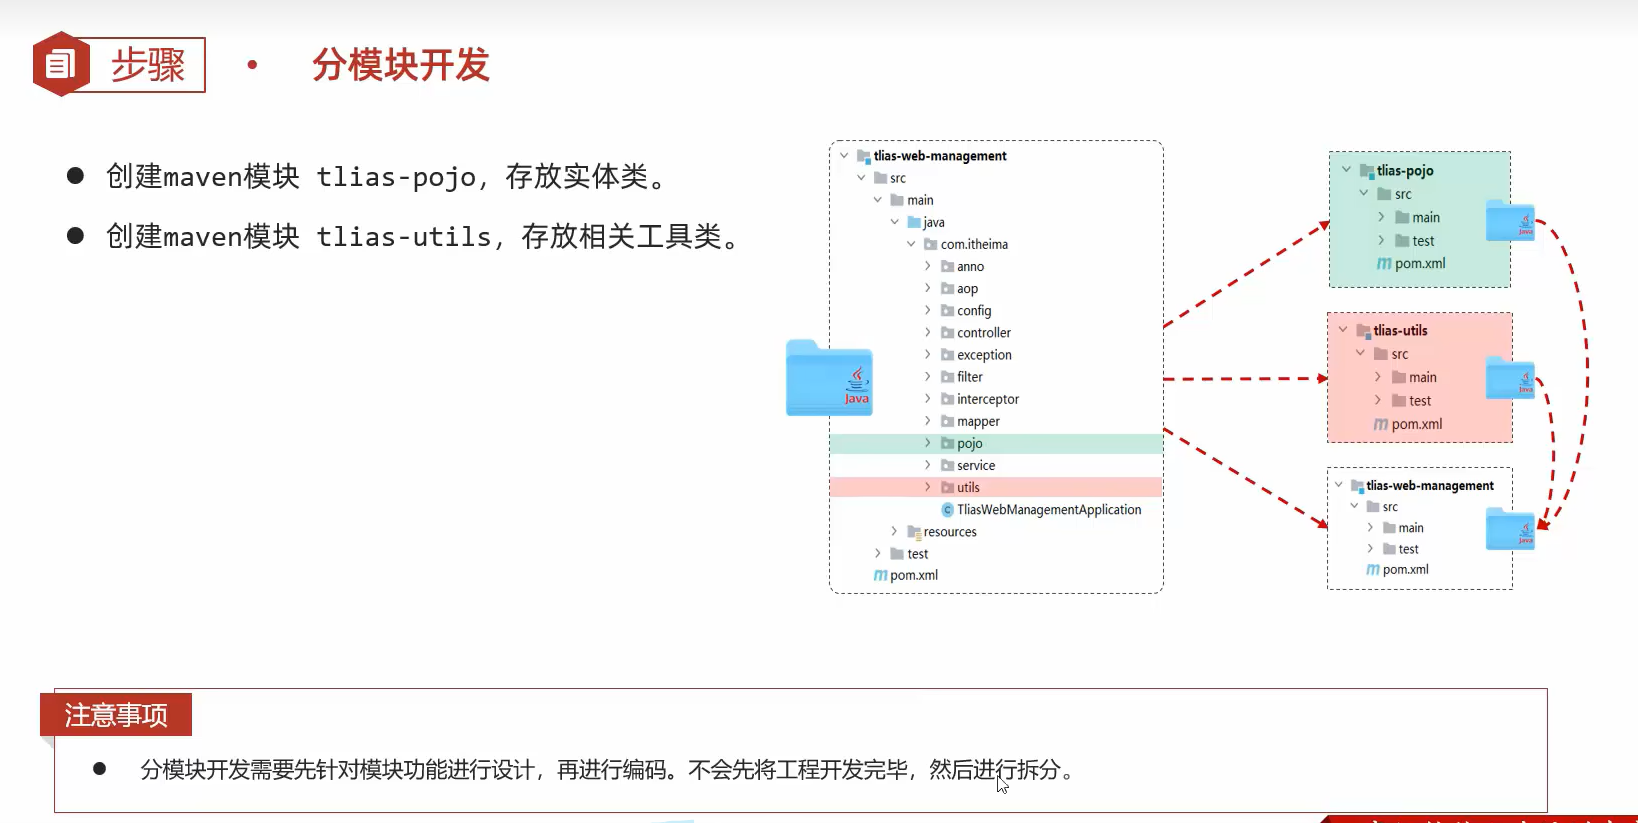
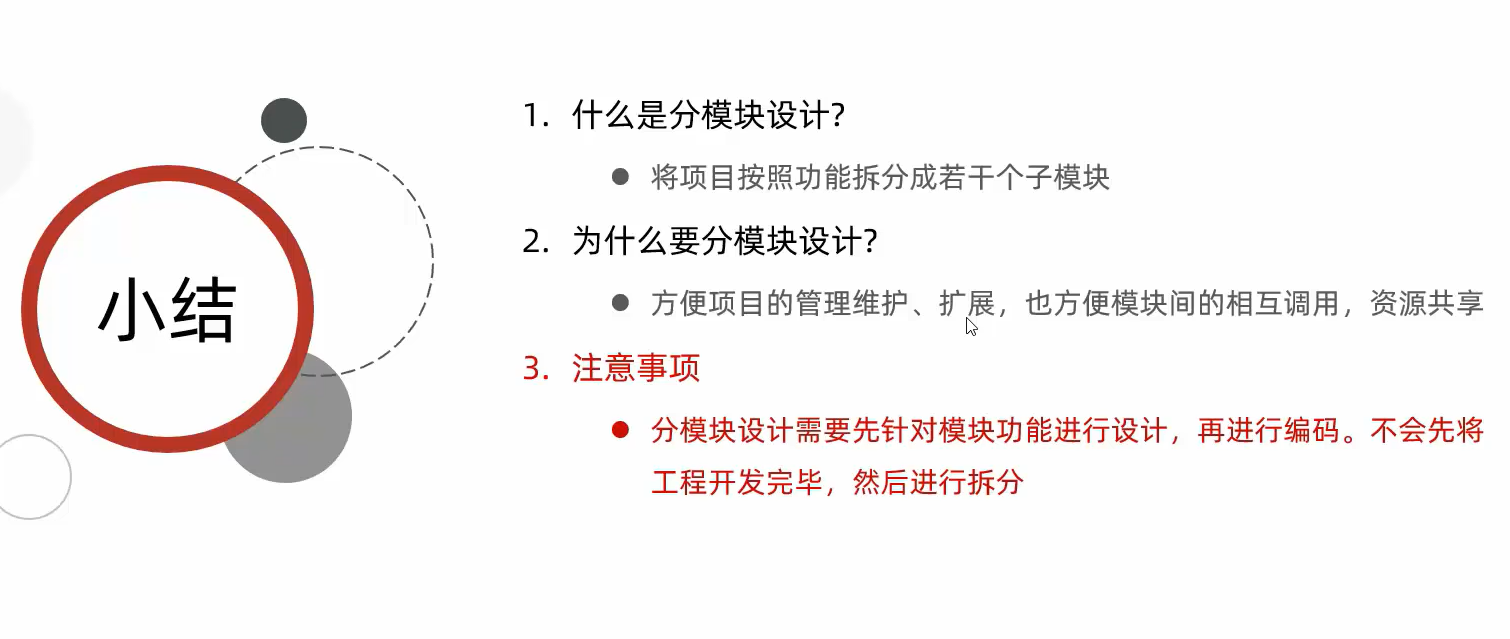
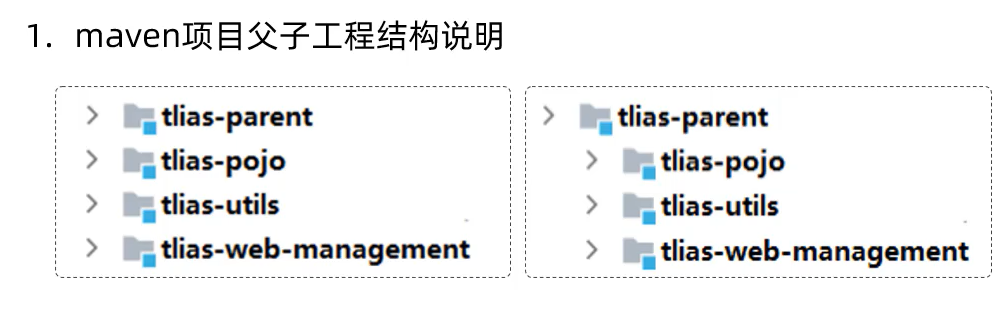
Maven高级
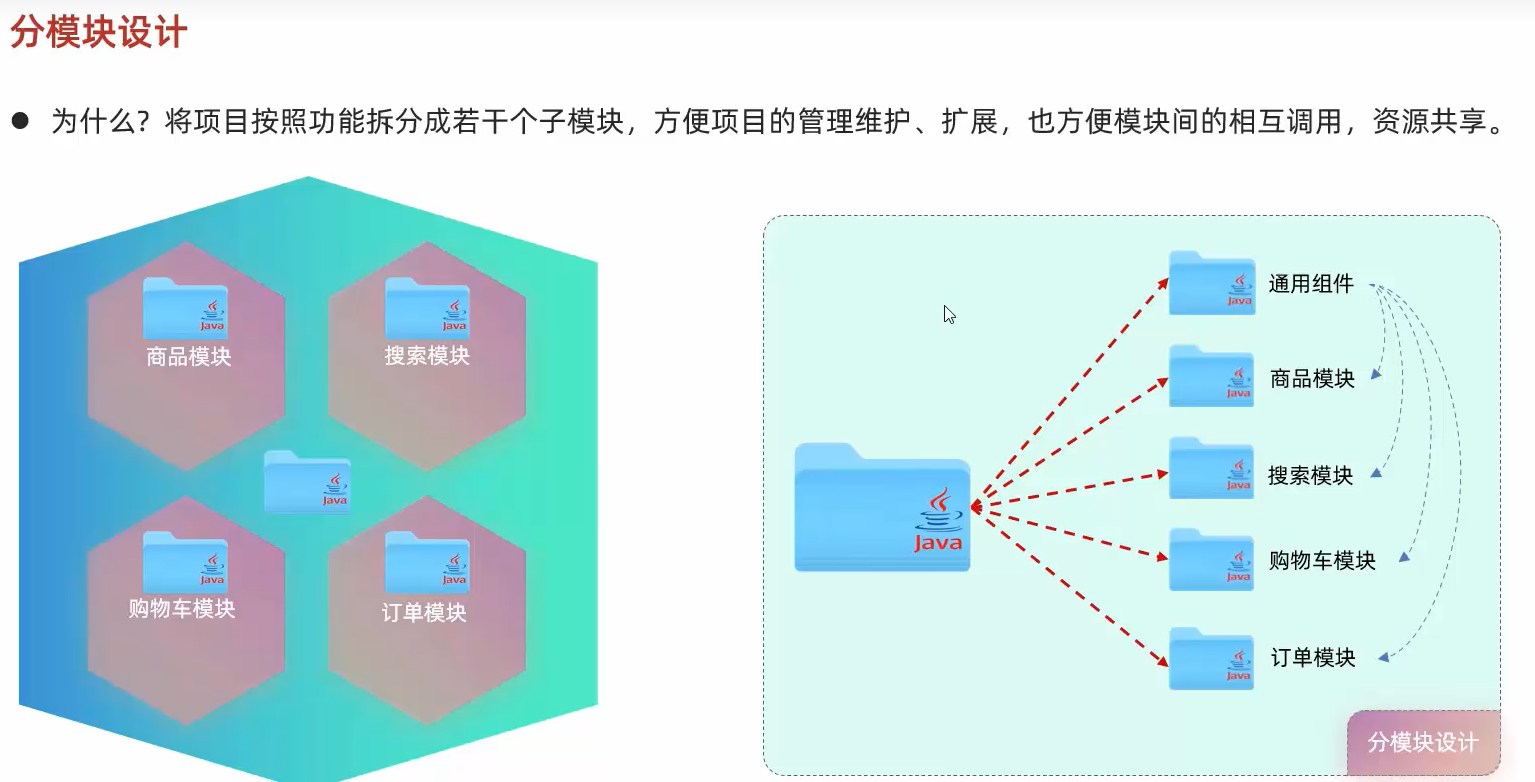
分模块
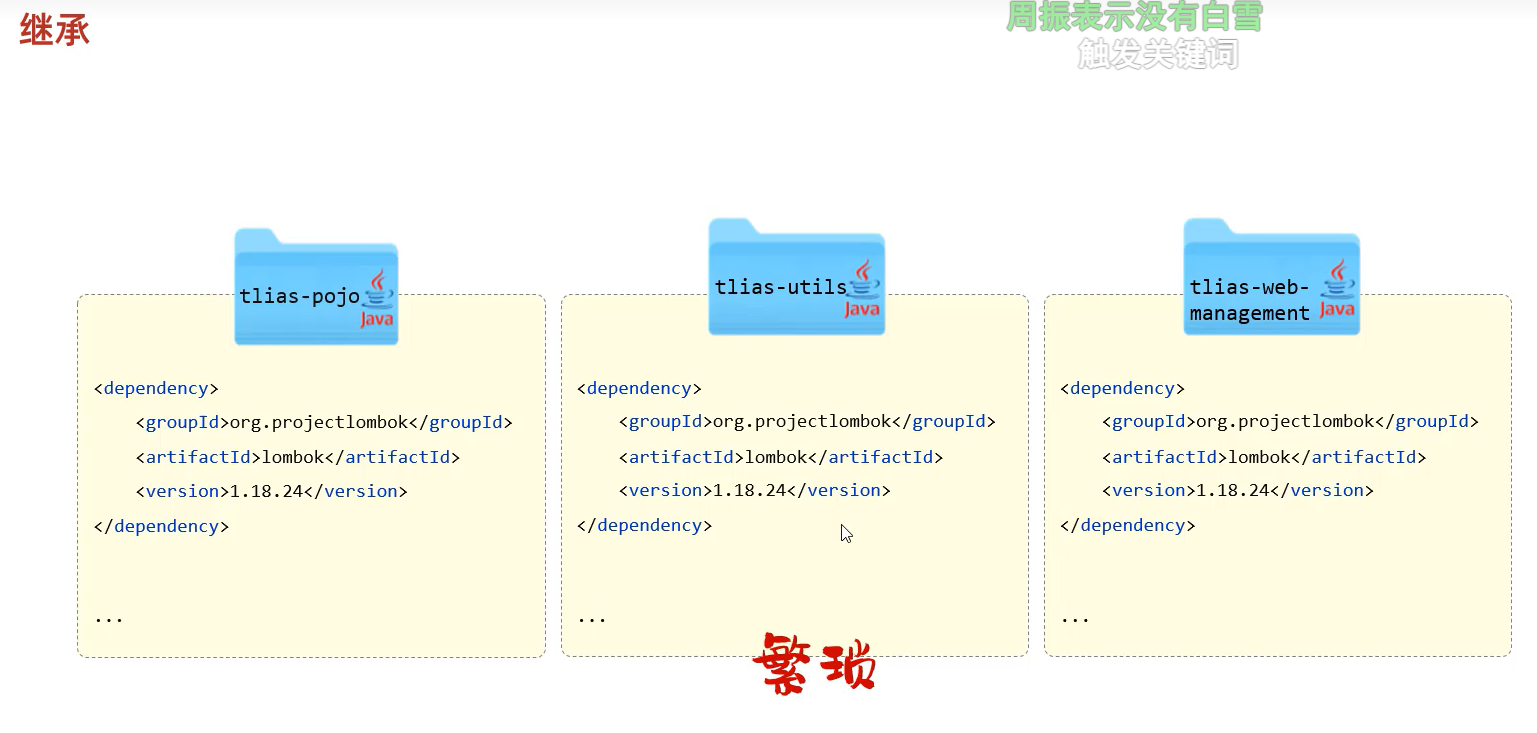
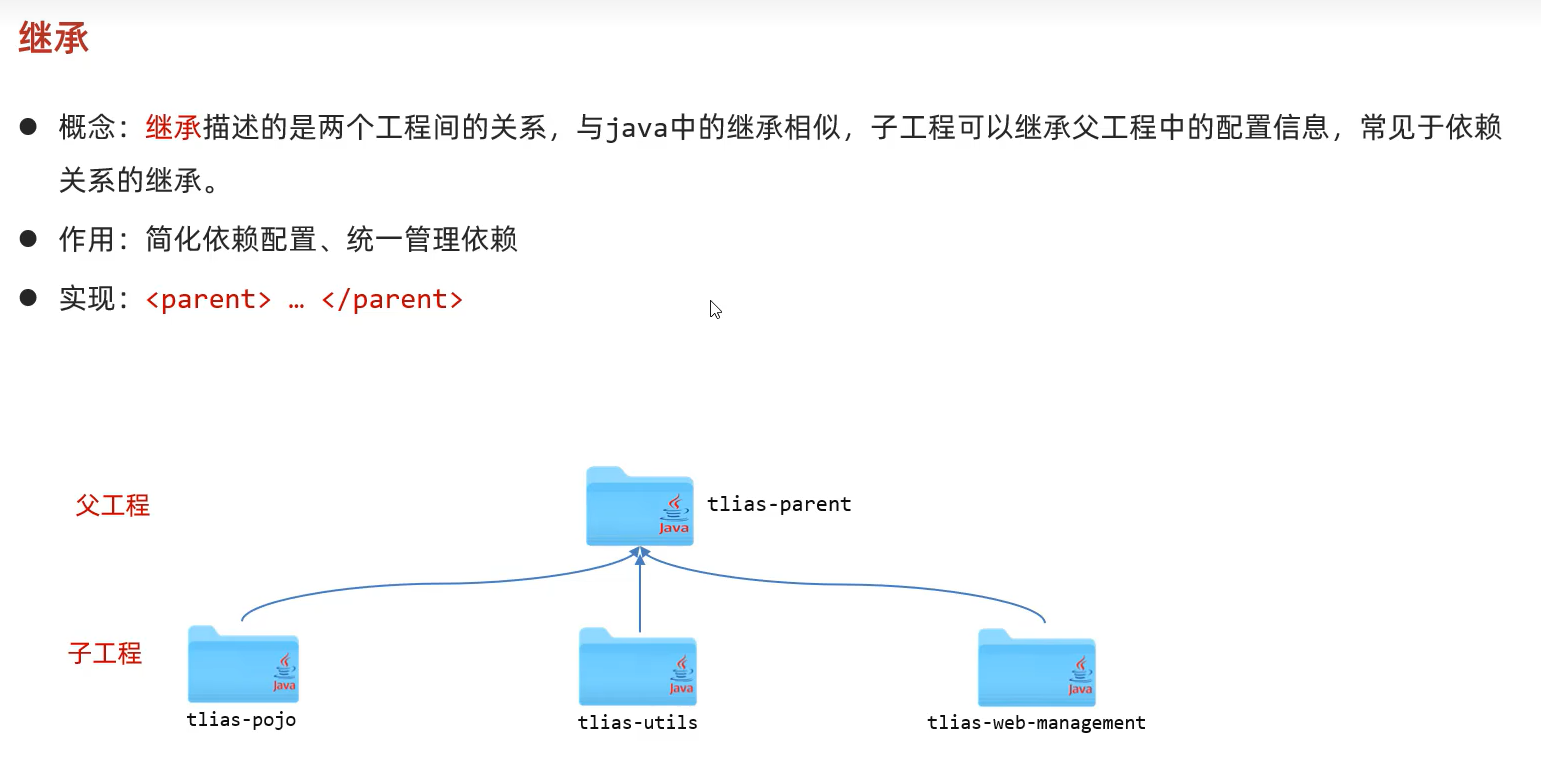
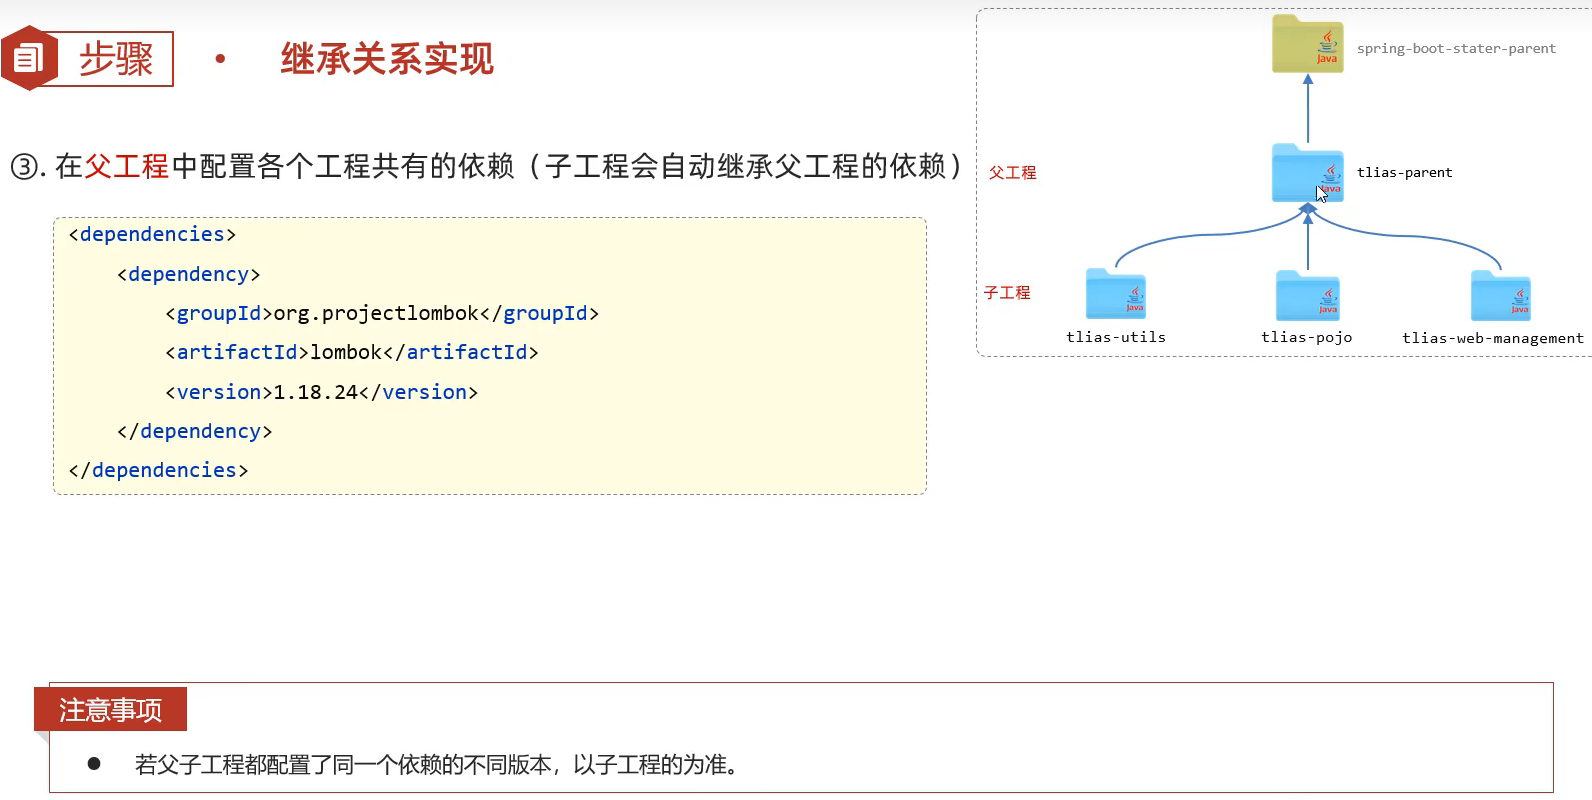
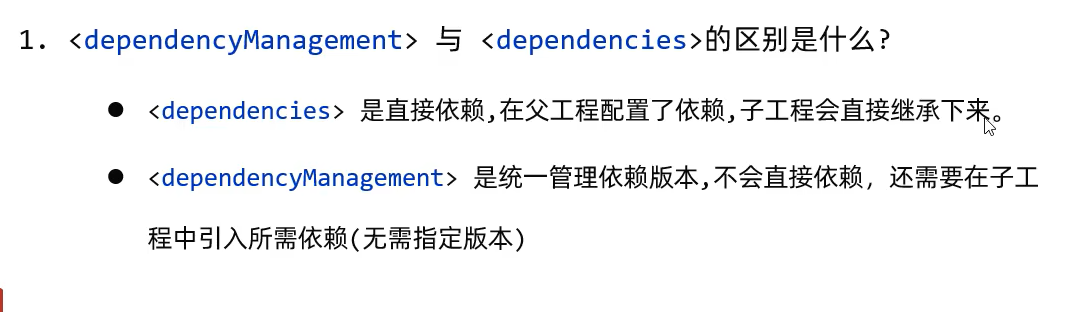
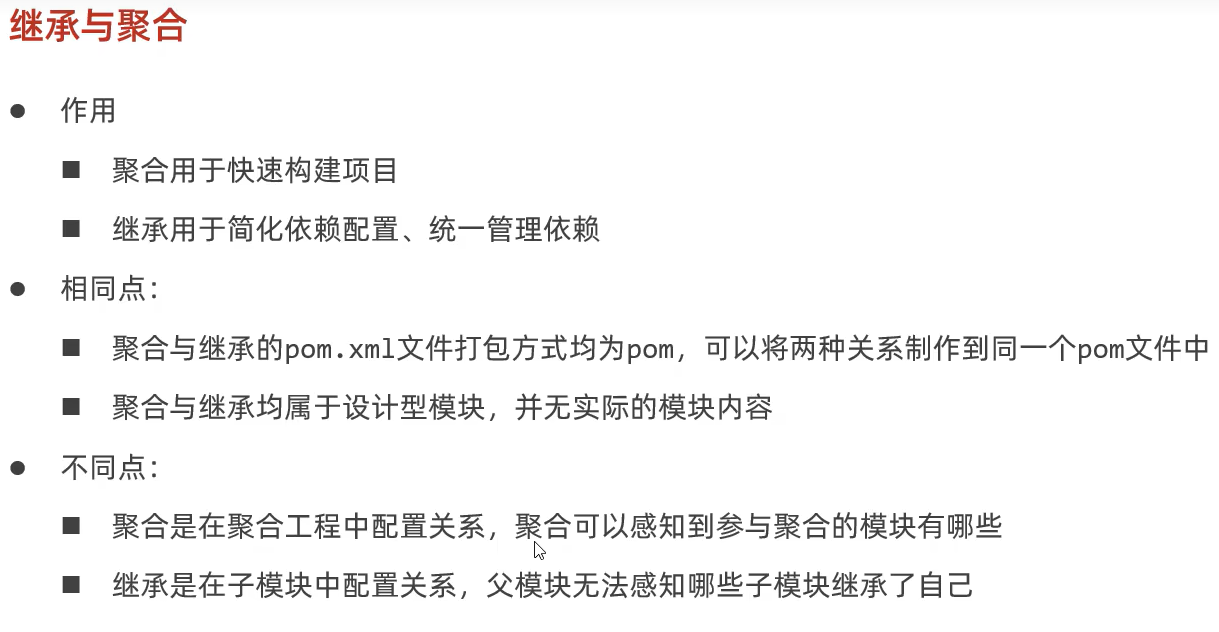
继承
三种打包方式

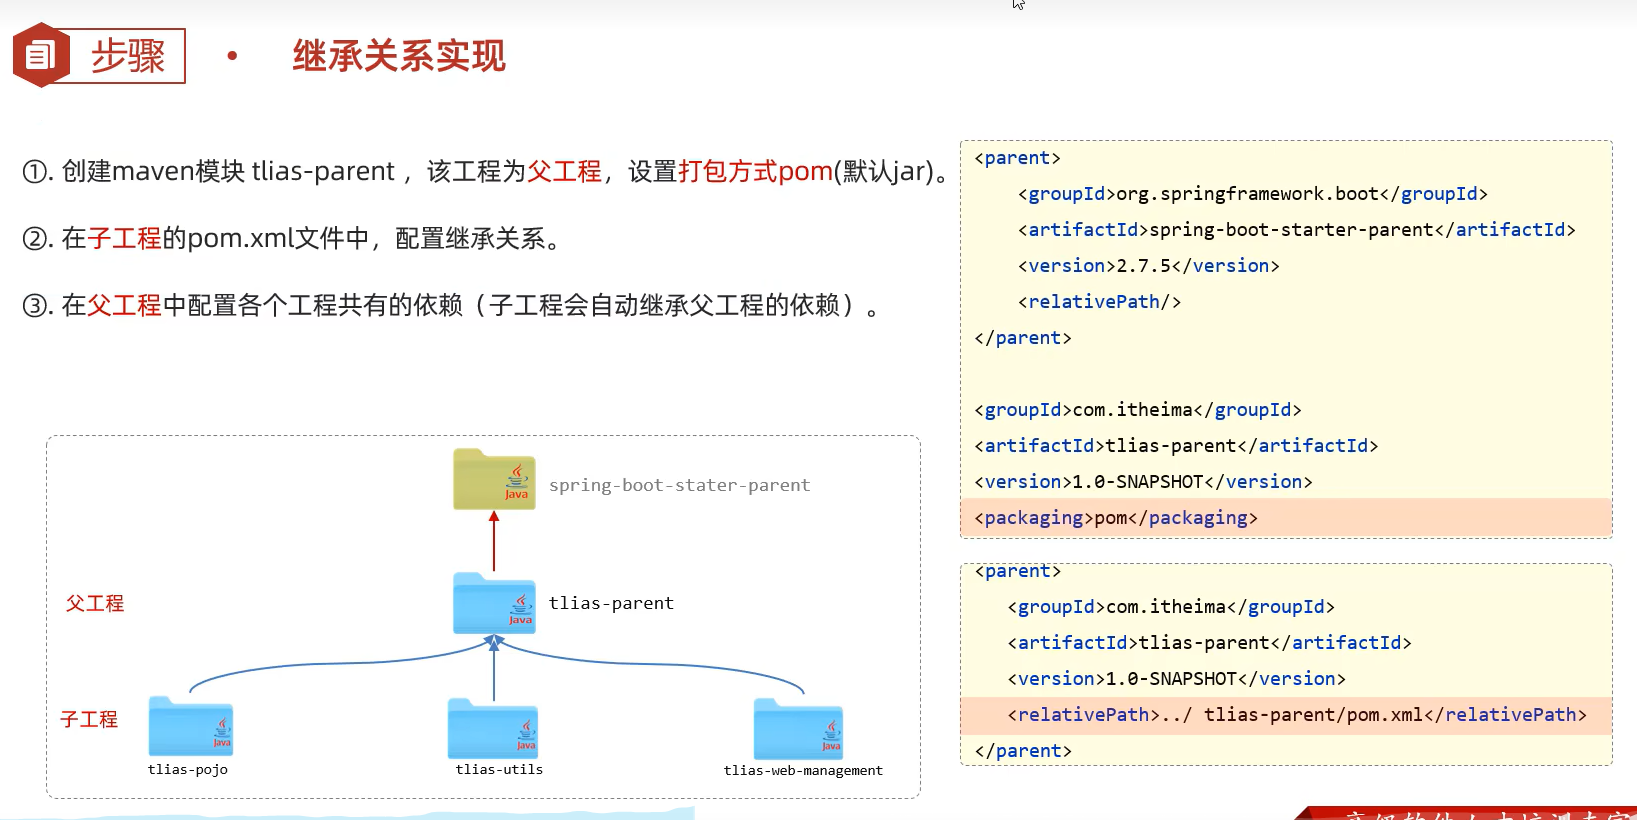

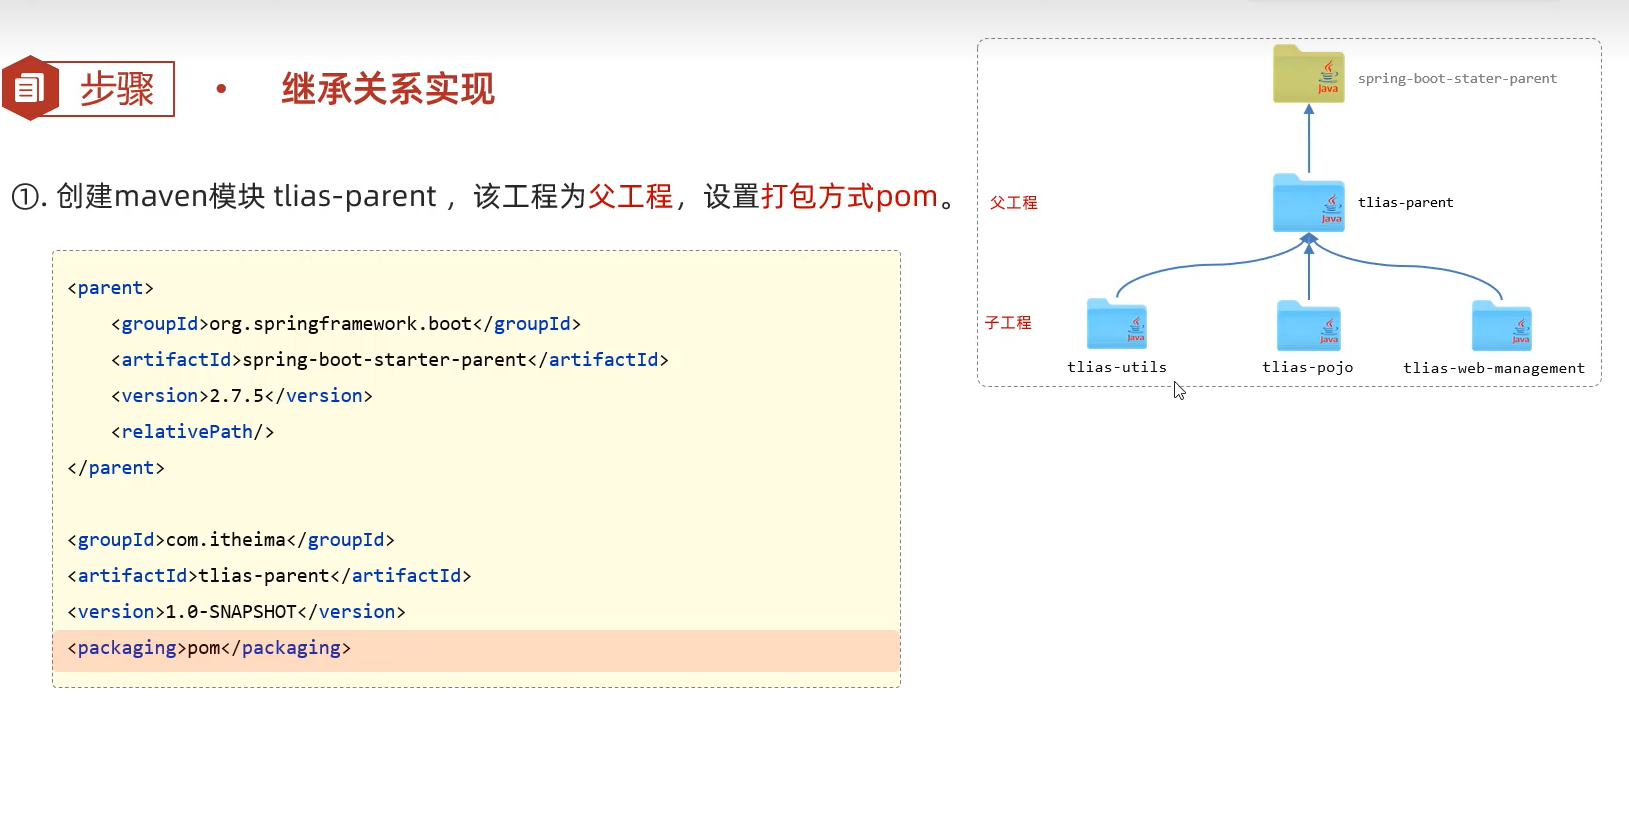
POM步骤
1.
2.
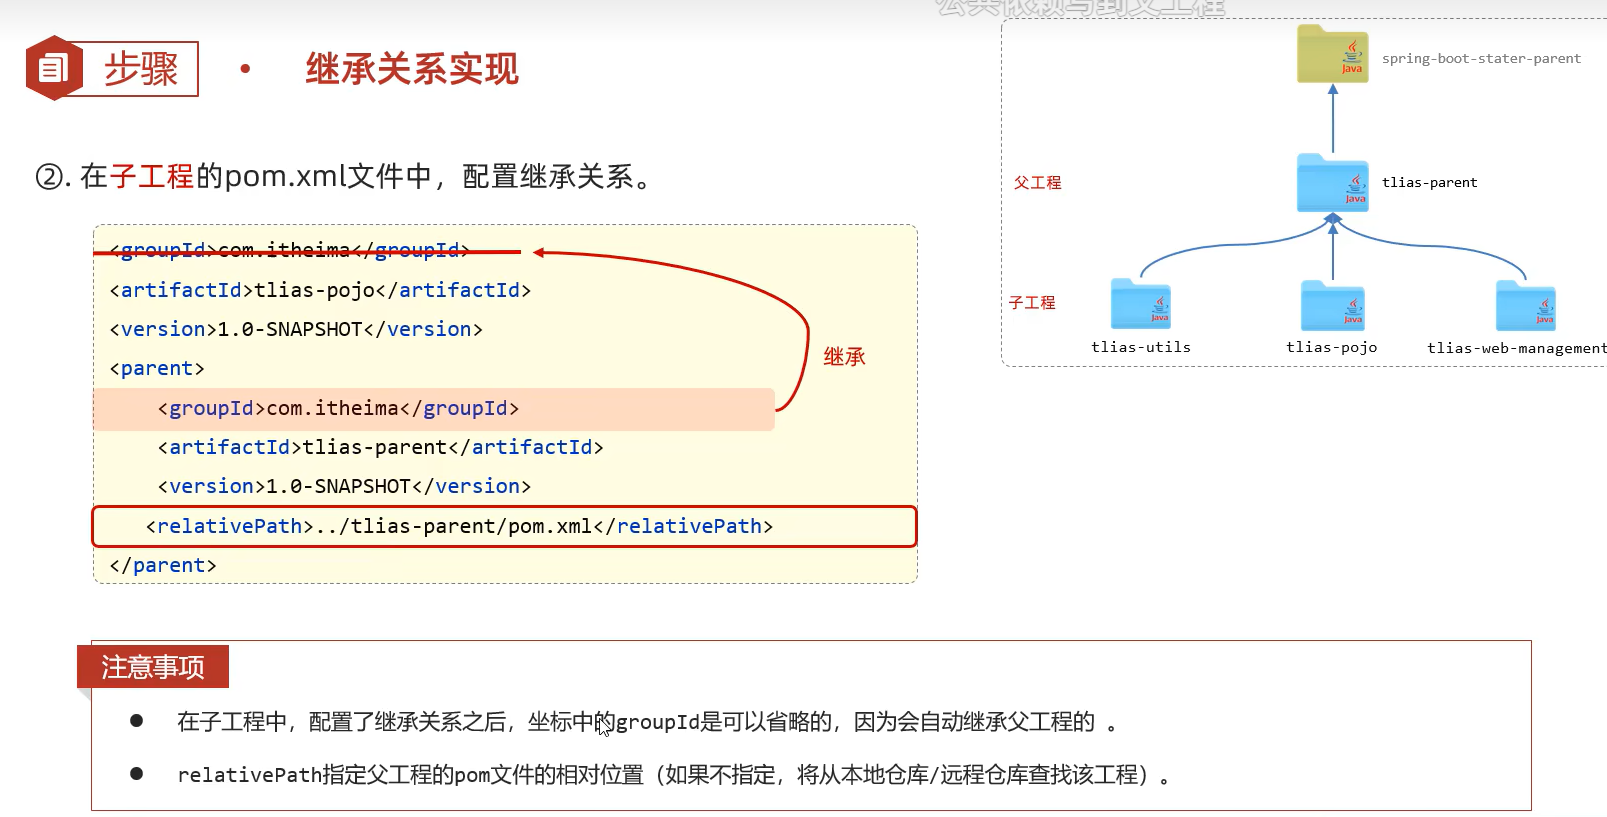
3.
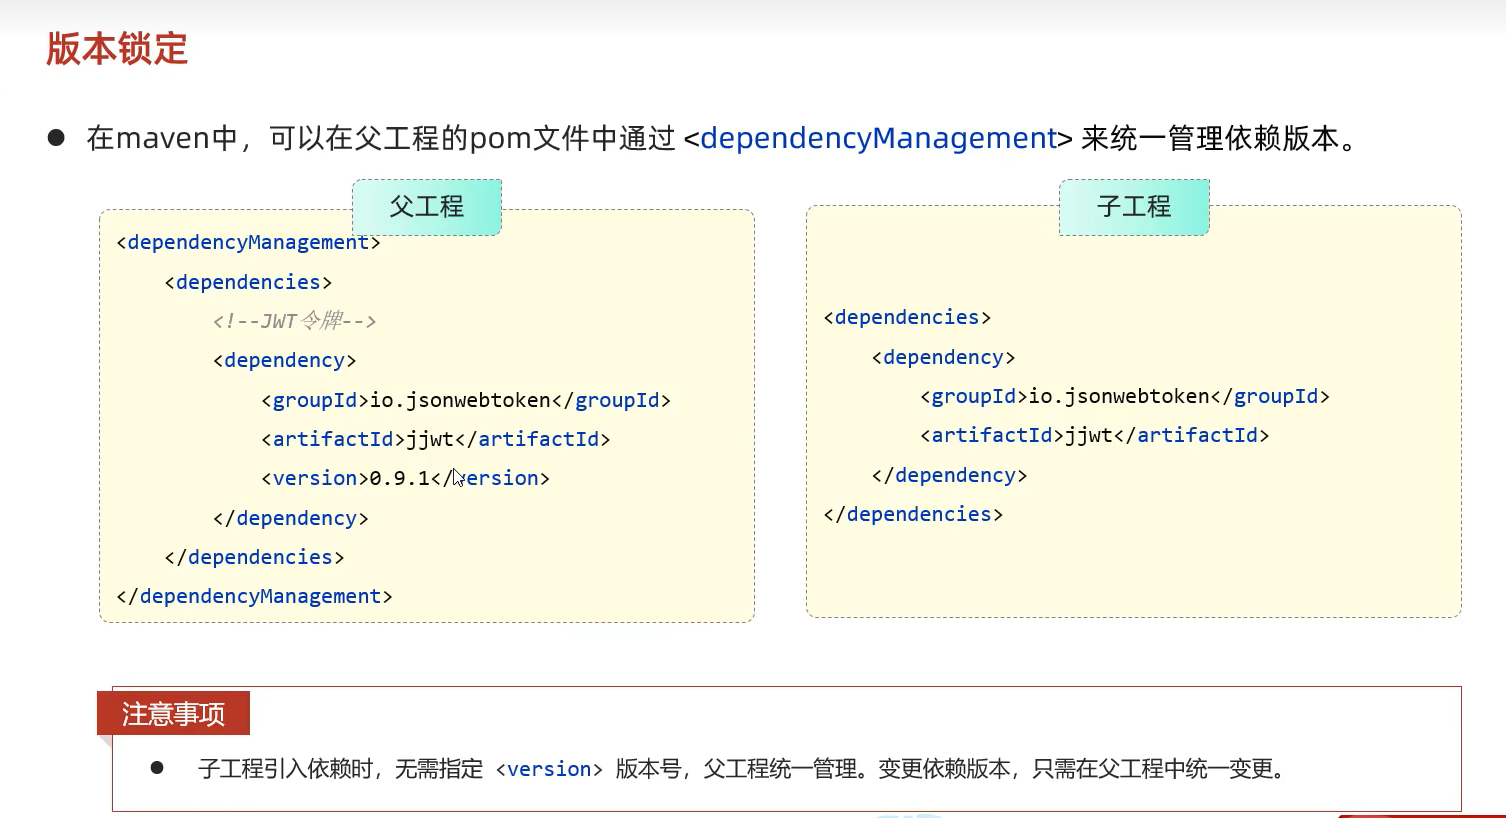
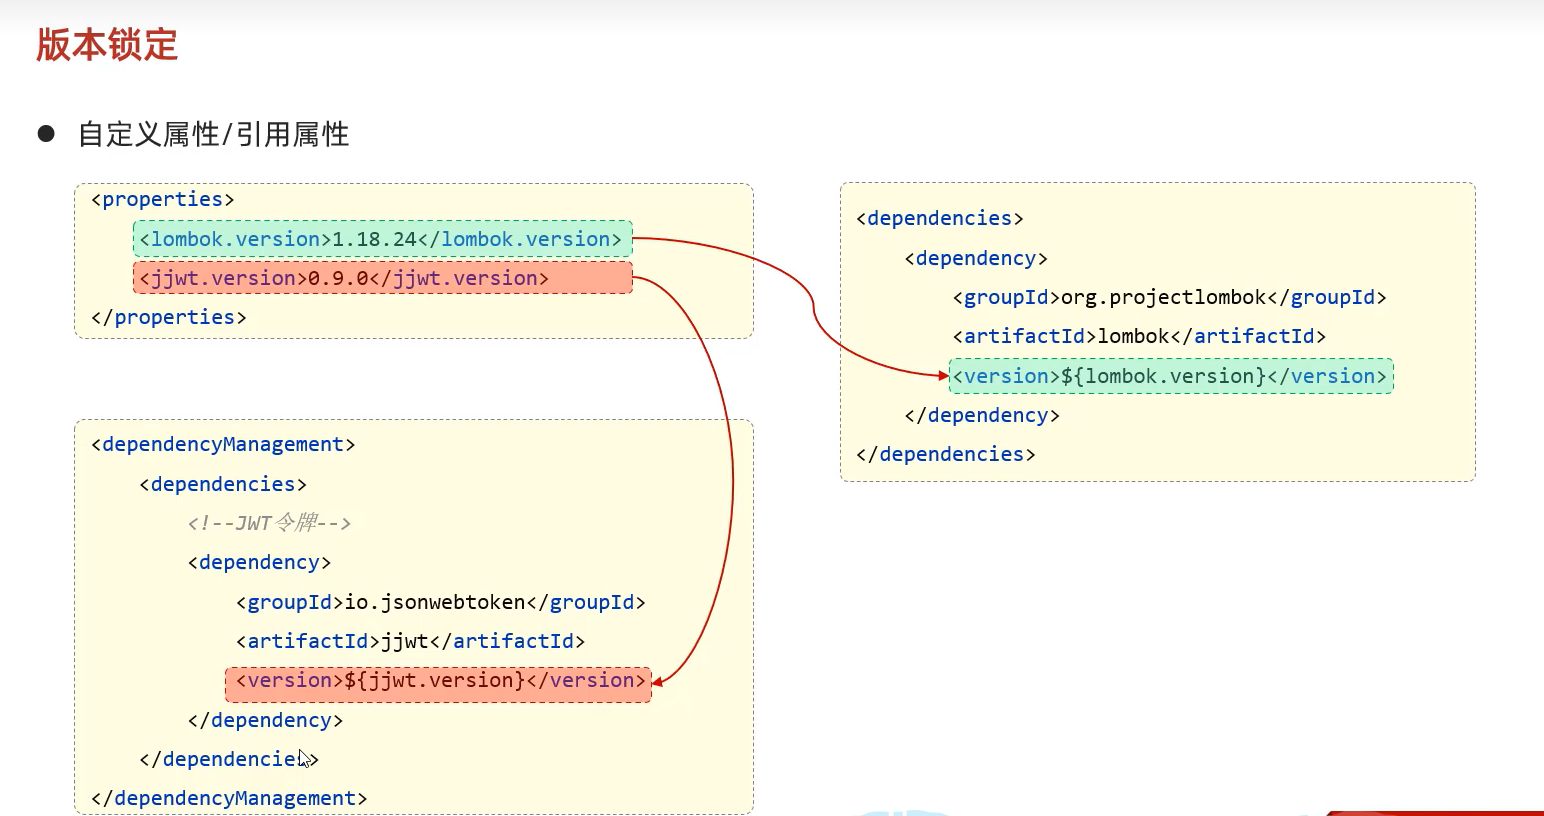
版本锁定
自定义属性
聚合
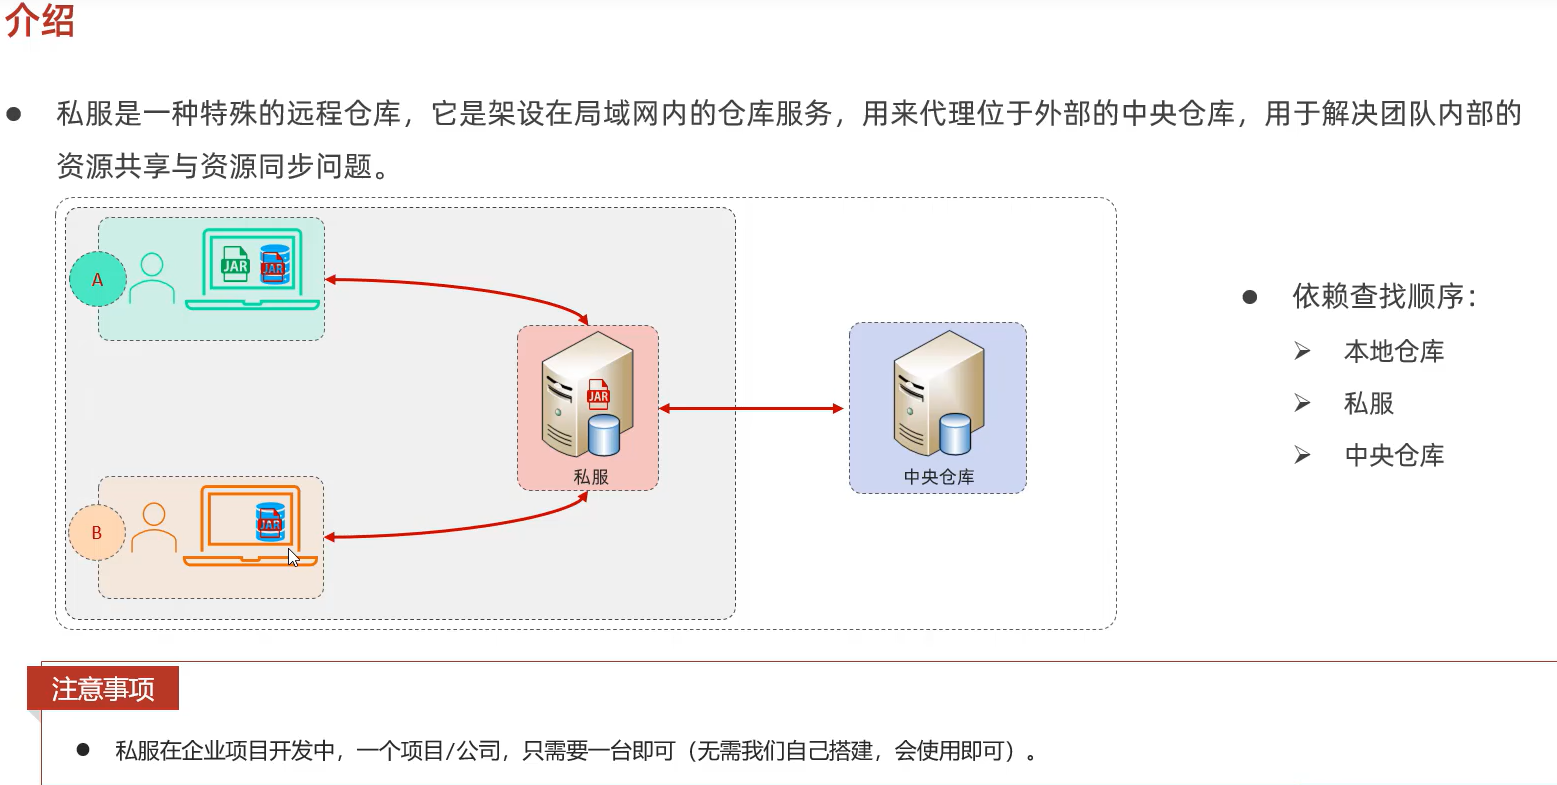
Maven私服
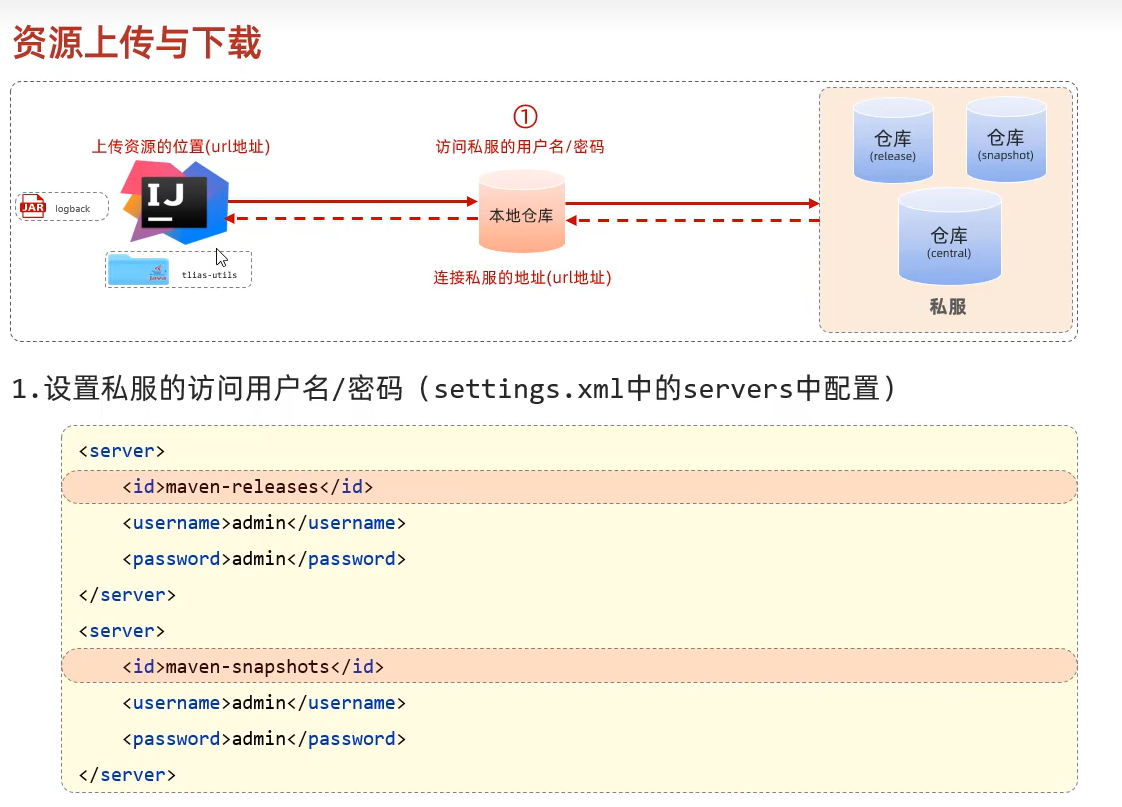
资源上传下载

步骤1
步骤2
步骤3
私服配置说明
访问私服:http://192.168.150.101:8081
访问密码:admin/admin
使用私服,需要在maven的settings.xml配置文件中,做如下配置:
-
需要在 servers 标签中,配置访问私服的个人凭证(访问的用户名和密码)
<server> <id>maven-releases</id> <username>admin</username> <password>admin</password> </server> <server> <id>maven-snapshots</id> <username>admin</username> <password>admin</password> </server> -
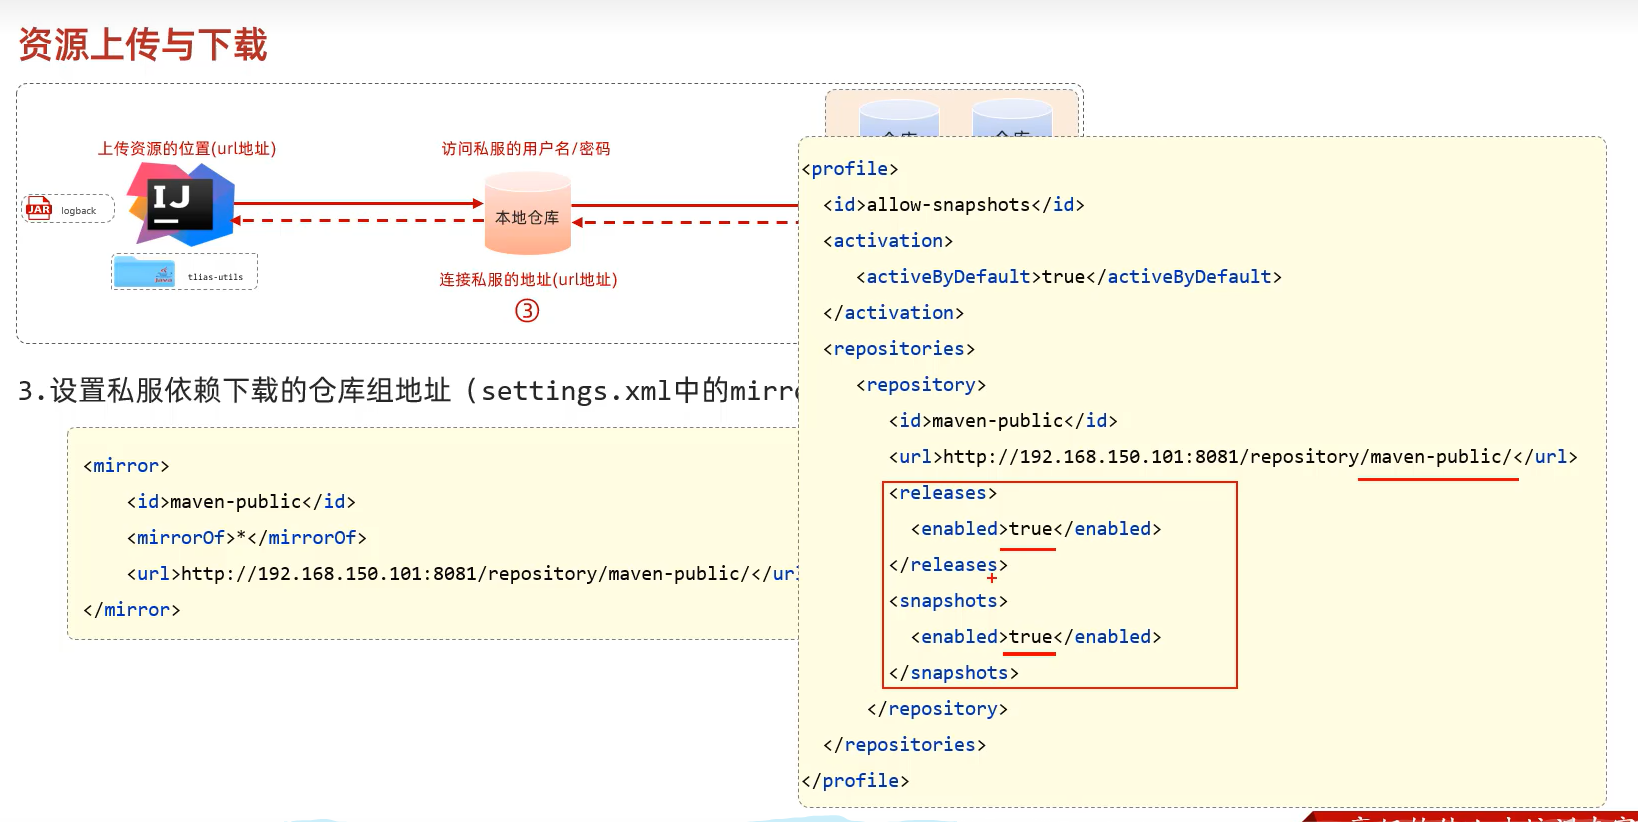
在 mirrors 中只配置我们自己私服的连接地址(如果之前配置过阿里云,需要直接替换掉)
<mirror> <id>maven-public</id> <mirrorOf>*</mirrorOf> <url>http://192.168.150.101:8081/repository/maven-public/</url> </mirror> -
需要在 profiles 中,增加如下配置,来指定snapshot快照版本的依赖,依然允许使用
<profile> <id>allow-snapshots</id> <activation> <activeByDefault>true</activeByDefault> </activation> <repositories> <repository> <id>maven-public</id> <url>http://192.168.150.101:8081/repository/maven-public/</url> <releases> <enabled>true</enabled> </releases> <snapshots> <enabled>true</enabled> </snapshots> </repository> </repositories> </profile> -
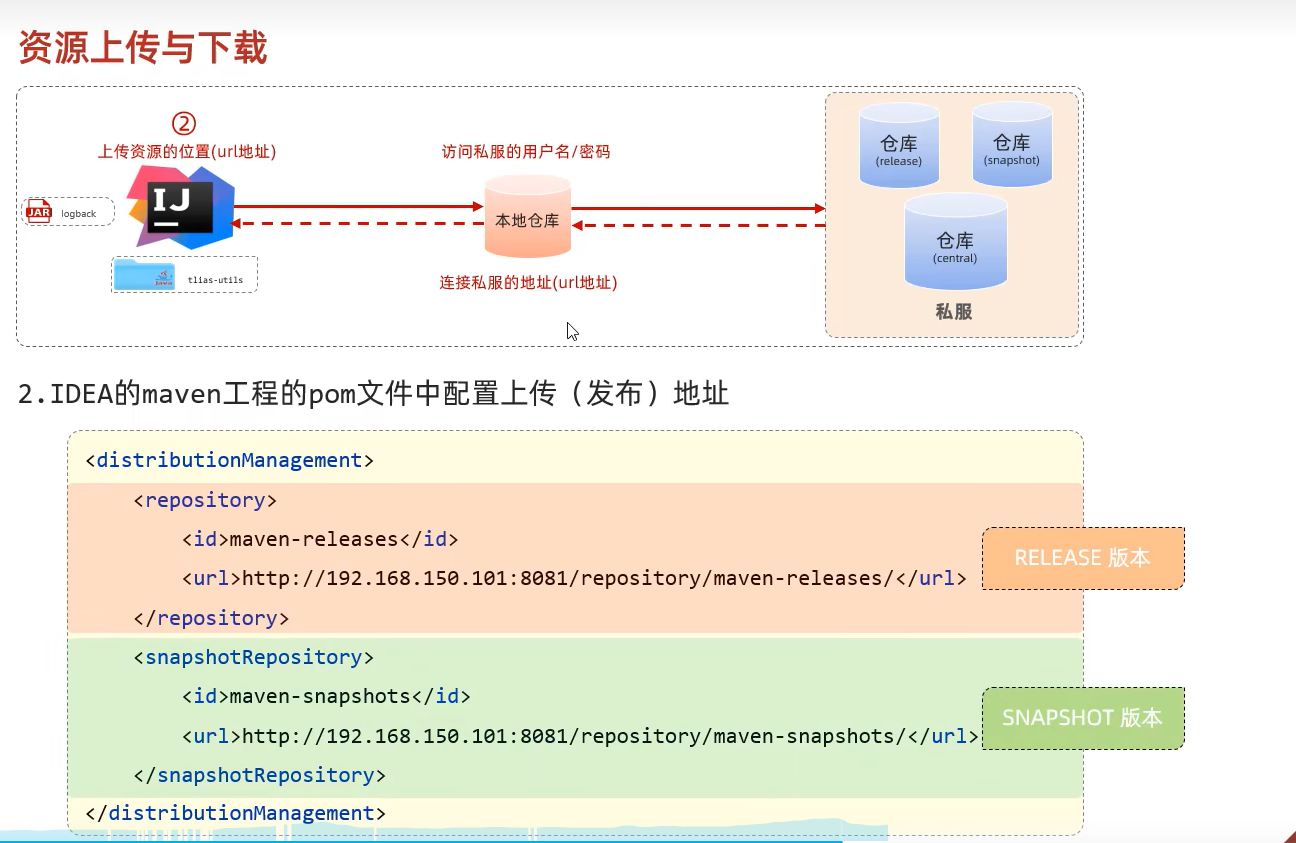
如果需要上传自己的项目到私服上,需要在项目的pom.xml文件中,增加如下配置,来配置项目发布的地址(也就是私服的地址)
<distributionManagement> <!-- release版本的发布地址 --> <repository> <id>maven-releases</id> <url>http://192.168.150.101:8081/repository/maven-releases/</url> </repository> <!-- snapshot版本的发布地址 --> <snapshotRepository> <id>maven-snapshots</id> <url>http://192.168.150.101:8081/repository/maven-snapshots/</url> </snapshotRepository> </distributionManagement> -
发布项目,直接运行 deploy 生命周期即可 (发布时,建议跳过单元测试)
启动本地私服
-
解压: apache-maven-nexus.zip
-
进入目录: apache-maven-nexus\nexus-3.39.0-01\bin
-
启动服务:双击 start.bat
-
访问服务:localhost:8081
-
私服配置说明:将上述配置私服信息的 192.168.150.101 改为 localhost


 86
86

 被折叠的 条评论
为什么被折叠?
被折叠的 条评论
为什么被折叠?
 到【灌水乐园】发言


