【WPF 实例】基于WPF实现3D画廊动画效果的示例代码

这篇文章主要为大家详细介绍了如何基于WPF实现简单的3D画廊动画效果,文中的示例代码讲解详细,感兴趣的小伙伴可以跟随小编一起学习一下

接下来想做一个图廊,所以并没有必要用立方体,只需做一些“墙壁”就行了。

而在一个平面上建起另一个矩形的平面,实则非常容易,只需输入墙角的两点和高度就可以了,这对于写过正方体的人来说绝对是简单得很,无非是把四个点劈成两个三角形

1

2

3

4

5

6

7

8

9

10

11

private MeshGeometry3D MakeSurface(Point3D p0, Point3D p1, Point3D p2, Point3D p3)

{

    MeshGeometry3D mesh = new MeshGeometry3D();

    Point3D[] pts ={p0, p1, p2, p3};

    foreach (var pt in pts)

        mesh.Positions.Add(pt);

    foreach (var i in new int[6] { 0, 1, 2, 2, 3, 0 })

        mesh.TriangleIndices.Add(i);

    return mesh;

}

接下来可以像之前做正方体时那样,先做一个平的地面,然后在地面上放置一些正方体。

由于地面上的正方形要求垂直于地面,所以重载一下

1

2

3

4

5

6

7

8

private MeshGeometry3D MakeSurface(Point p0, Point p1, double high)

{

    return MakeSurface(

        new Point3D(p0.X, 0, p0.Y),

        new Point3D(p1.X, 0, p1.Y),

        new Point3D(p1.X, high, p1.Y),

        new Point3D(p0.X, high, p0.Y));

}

然后生成模型

代码为

1

2

3

4

5

6

7

8

9

10

11

12

13

14

15

16

17

18

19

20

21

22

23

24

25

26

27

28

29

30

31

32
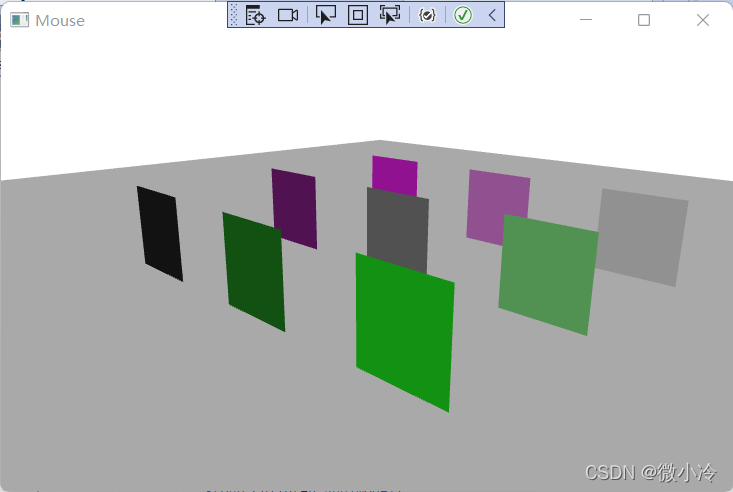
private void DefineModel(Model3DGroup group)

{

    // Make the ground.

    const double wid = 10;

    MeshGeometry3D groundMesh = MakeSurface(

        new Point3D(-wid, 0, -wid),

        new Point3D(-wid, 0, +wid),

        new Point3D(+wid, 0, +wid),

        new Point3D(+wid, 0, -wid));

    DiffuseMaterial groundMaterial = new DiffuseMaterial(Brushes.DarkGray);

    GeometryModel3D groundModel = new GeometryModel3D(groundMesh, groundMaterial);

    group.Children.Add(groundModel);

    MaterialGroup gpMaterial;

    for (int x = -2; x <= 2; x += 2)

    {

        for (int y = -2; y <= 2; y += 2)

        {

            MeshGeometry3D mesh = MakeSurface(new Point(x, y), new Point(x, y + 1), 1);

            byte r = (byte)(128 + x * 50);

            byte g = (byte)(128 + y * 50);

            byte b = (byte)(128 + x * 50);

            Color color = Color.FromArgb(255, r, g, b);

            DiffuseMaterial material = new DiffuseMaterial(

                new SolidColorBrush(color));

            GeometryModel3D model = new GeometryModel3D(mesh, material);

            group.Children.Add(model);

        }

    }

}

接下来就是挂载贴图,结果大致如下

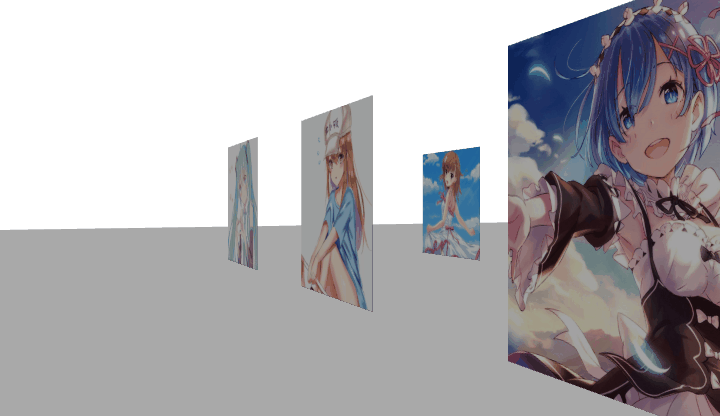
其方法也很简单,就是把material变成想要的图片,故而先把图像放在一个字符串数组里

1

2

3

4

5

static readonly string[] imgs = new string[9]

{

    "2d1.png","2d2.png","2d3.png","2d4.png","2d5.png",

    "2d6.png","2d7.png","2d8.png","2d9.png"

};

接下来需要注意一点,图像本身需要一个坐标系,故而要把墙壁的代码改为

1

2

3

4

5

6

7

8

9

10

11

12

13

14

15

private MeshGeometry3D MakeSurface(Point p0, Point p1, double high, string uri = null)

{

    var mesh = MakeSurface(

        new Point3D(p0.X, 0, p0.Y), new Point3D(p1.X, 0, p1.Y),

        new Point3D(p1.X, high, p1.Y), new Point3D(p0.X, high, p0.Y));

    //这四个点代表图像上的坐标和图形中点的对应关系

    Point[] textureCoods = new Point[4]

    {

        new Point(0, 1),new Point(1, 1),

        new Point(1, 0),new Point(0, 0),

    };

    foreach (var pt  in textureCoods)

        mesh.TextureCoordinates.Add(pt);

    return mesh;

}

然后在生成正方形时,用图像取代颜色

1

2

3

4

5

6

7

8

ImageBrush imgBrush = new ImageBrush();

imgBrush.ImageSource = new BitmapImage(new Uri(

    $"imgs//{imgs[k++]}", UriKind.Relative));

MeshGeometry3D mesh = MakeSurface(new Point(x, y), new Point(x, y + 1), 1);

GeometryModel3D model = new GeometryModel3D(mesh, new DiffuseMaterial(imgBrush));

group.Children.Add(model);

  • 0
    点赞
  • 0
    收藏
    觉得还不错? 一键收藏
  • 0
    评论
评论
添加红包

请填写红包祝福语或标题

红包个数最小为10个

红包金额最低5元

当前余额3.43前往充值 >
需支付:10.00
成就一亿技术人!
领取后你会自动成为博主和红包主的粉丝 规则
hope_wisdom
发出的红包
实付
使用余额支付
点击重新获取
扫码支付
钱包余额 0

抵扣说明:

1.余额是钱包充值的虚拟货币,按照1:1的比例进行支付金额的抵扣。
2.余额无法直接购买下载,可以购买VIP、付费专栏及课程。

余额充值