


基本功能
1. 自定义标题栏。(标题栏不做任何功能)
2. 有左右发送按钮。(这个只能自己和自己聊天哦,所以有左右发送按钮)
(1)点击左边按钮发送按钮,在ListView的左侧显示。
(2)点击右边按钮发送按钮,在ListView的右侧显示。
3.有表情发送按钮。
(1)当点击表情发送按钮时, 弹出表情框,点击想要发送的表情将其添加输入框中。
(2)当在此点击表情按钮时,表情框收回。
(3)当表情框处在显示状态时, 点击输入框时,表情框收回。
聊天界面的制作(二)——发送消息后ListView左右布局显示
聊天界面的制作(三)——表情列表发送功能
源码下载链接
标题栏制作
1. 定义标题的title_bar.xml布局文件,一般情况下用Linearlayout来写。
<LinearLayout xmlns:android="http://schemas.android.com/apk/res/android"
    android:layout_width="match_parent"
    android:layout_height="50dp"
    android:background="@color/light_blue"
    android:gravity="center"
    android:orientation="horizontal">

    <ImageButton
        android:id="@+id/imagebutton_back"
        android:layout_width="wrap_content"
        android:layout_height="wrap_content"
        android:layout_marginLeft="5dp"
        android:background="@drawable/imagebtn_back" />

    <TextView
        android:id="@+id/textview_title"
        android:layout_width="wrap_content"
        android:layout_height="wrap_content"
        android:layout_margin="10dp"
        android:layout_weight="1"
        android:gravity="center"
        android:text="Chatting"
        android:textColor="@color/white"
        android:textSize="@dimen/title_bar_tilte"
        android:textStyle="bold" />

    <ImageButton
        android:layout_width="wrap_content"
        android:layout_height="wrap_content"
        android:layout_marginRight="10dp"
        android:background="@drawable/title_phone_background" />

    <ImageButton
        android:layout_width="wrap_content"
        android:layout_height="wrap_content"
        android:layout_marginRight="5dp"
        android:background="@mipmap/kmy" />

</LinearLayout>
2. 在整体布局activity_main.xml中通过功能引入title_bar.xml布局实现。
<include
        android:id="@+id/title_bar"
        layout="@layout/title_bar"
        android:layout_width="fill_parent"
        android:layout_height="wrap_content" />
整体布局构建
- 定义聊天界面的整体布局。
(注意: 颜色值存储在colors中,color的颜色定义名称尽量用颜色只来命名。大小值存储在dimens中,值的名称可以用器件的名称来命名。)
在布局中用到了几个知识点:
- 背景渐变色的设置。参考博文: Android UI设计小知识——渐变色背景的制作
- 按钮背景的设置。 参考博文:Android UI设计小知识——按钮背景的制作
- 去除应用自带的标题栏。参考博文:Activity的操作—去标题和横竖屏
<LinearLayout xmlns:android="http://schemas.android.com/apk/res/android"
    xmlns:tools="http://schemas.android.com/tools"
    android:layout_width="match_parent"
    android:layout_height="match_parent"
    android:orientation="vertical"
    tools:context=".MainActivity">

    <include
        android:id="@+id/title_bar"
        layout="@layout/title_bar"
        android:layout_width="fill_parent"
        android:layout_height="wrap_content" />

    <ListView
        android:id="@+id/listview"
        android:layout_width="match_parent"
        android:layout_height="wrap_content"
        android:layout_weight="1"
        android:background="@drawable/chatting_background"
        android:listSelector="@android:color/transparent"></ListView>

    <LinearLayout
        android:id="@+id/linearlayout"
        android:layout_width="match_parent"
        android:layout_height="wrap_content"
        android:background="@color/grey"
        android:gravity="bottom"
        android:orientation="horizontal">

        <ImageButton
            android:id="@+id/imagebutton_expression"
            android:layout_width="40dp"
            android:layout_height="40dp"
            android:layout_margin="10dp"
            android:focusable="true"
            android:background="@drawable/imagebutton_expression" />

        <Button
            android:id="@+id/button_left"
            android:layout_width="wrap_content"
            android:layout_height="40dp"
            android:layout_margin="5dp"
            android:background="@drawable/button_send_background"
            android:padding="5dp"
            android:text="发送"
            android:textColor="@color/white" />

        <EditText
            android:id="@+id/edittext_input"
            android:layout_width="wrap_content"
            android:layout_height="wrap_content"
            android:layout_margin="5dp"
            android:layout_weight="1"
            android:background="@drawable/edittext_background"
            android:padding="7dp"
            android:layout_gravity="center"/>

        <Button
            android:id="@+id/button_right"
            android:layout_width="wrap_content"
            android:layout_height="40dp"
            android:layout_margin="5dp"
            android:background="@drawable/button_send_background"
            android:padding="5dp"
            android:text="发送"
            android:textColor="@color/white" />
    </LinearLayout>
    <GridView
        android:id="@+id/gridview"
        android:layout_width="match_parent"
        android:layout_height="wrap_content"
        android:numColumns="7"
        android:visibility="gone"
        android:background="@color/grey">

    </GridView>

</LinearLayout>
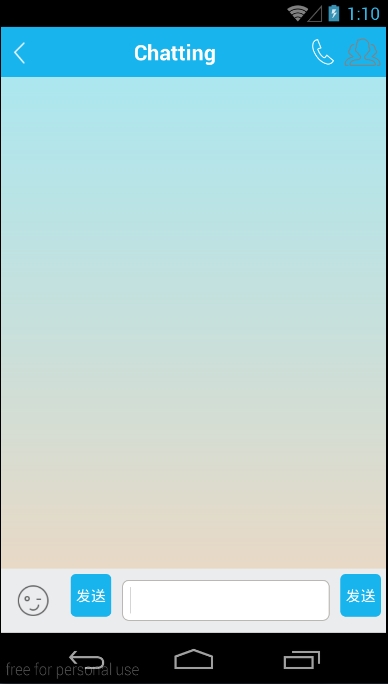
这样基本布局就完成了……
聊天界面左右按钮发送功能以及发送图片功能的完成请看接下来的文章。


 1万+
1万+


 被折叠的 条评论
为什么被折叠?
被折叠的 条评论
为什么被折叠?
 到【灌水乐园】发言


