


Finally, the big moment has come. Reading the information displayed by the crash utility, understanding what those curious lines mean and hacking your way through the problem to the other side.
We have learned how to configure our systems for kernel crash dumping, using LKCD and Kdump, both locally and across the network. We have learned how to setup the crash dumping mechanism on both CentOS and openSUSE, and we reviewed the subtle differences between the two operating systems. Next, we mastered the basic usage of the crash utility, using it to open the dumped memory core and process the information contained therein. But we did not yet learn to interpret the output.

Pre-Introduction
Today, we will focus on just that. Read the vmcore analysis, understand what the entries mean, perform basic investigation of the problem, examine the source code, and derive an efficient methodology for handling kernel crash problems in the future.
So if you're in a mood for some super-serious hackology, please follow me.
Table of Contents
- Necessary reading
- Analyzing the crash report - First steps
- Getting warmer
- Getting hot
- Super geeky stuff
- Next steps
- Official documentation
- References
- Conclusion
- Download
Necessary reading
You MUST read the other articles in other to fully understand how crash works. You can find the detailed list of references below. Without mastering the basic concepts, including Kdump and crash functionality, you will not be able to follow this tutorial efficiently.
Analyzing the crash report - First steps
Once you launch crash, you will get the initial report information printed to the console. This is where the analysis of the crash begins.

crash 4.0-8.9.1.el5.centos
Copyright (C) 2002, 2003, 2004, 2005, 2006, 2007, 2008, 2009 Red Hat, Inc.
Copyright (C) 2004, 2005, 2006 IBM Corporation
Copyright (C) 1999-2006 Hewlett-Packard Co
Copyright (C) 2005, 2006 Fujitsu Limited
Copyright (C) 2006, 2007 VA Linux Systems Japan K.K.
Copyright (C) 2005 NEC Corporation
Copyright (C) 1999, 2002, 2007 Silicon Graphics, Inc.
Copyright (C) 1999, 2000, 2001, 2002 Mission Critical Linux, Inc.
This program is free software, covered by the GNU General Public License, and you are welcome to change it and/or distribute copies of it under certain conditions. Enter "help copying" to see the conditions. This program has absolutely no warranty. Enter "help warranty" for details.
NOTE: stdin: not a tty
GNU gdb 6.1
Copyright 2004 Free Software Foundation, Inc.
GDB is free software, covered by the GNU General Public License, and you are welcome to change it and/or distribute copies of it under certain conditions.
Type "show copying" to see the conditions.
There is absolutely no warranty for GDB. Type "show warranty" for details. This GDB was configured as "x86_64-unknown-linux-gnu"...
bt: cannot transition from exception stack to current process stack:
exception stack pointer: ffff810107132f20
process stack pointer: ffff81010712bef0
current_stack_base: ffff8101b509c000
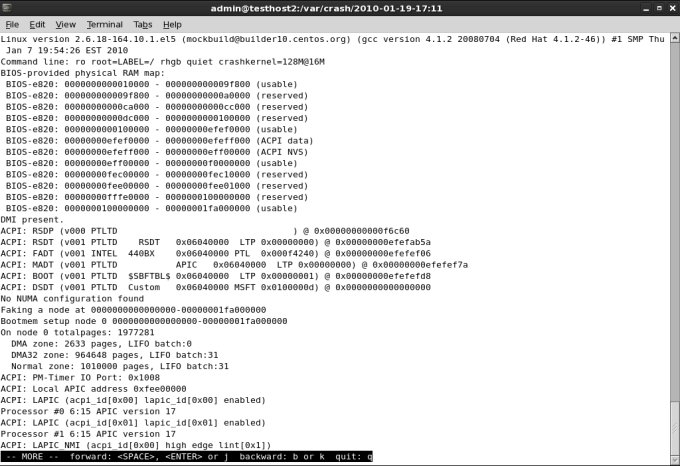
KERNEL: /usr/lib/debug/lib/modules/2.6.18-164.10.1.el5.centos.plus/vmlinux
DUMPFILE: vmcore
CPUS: 2
DATE: Tue Jan 19 20:21:19 2010
UPTIME: 00:00:00
LOAD AVERAGE: 0.00, 0.04, 0.07
TASKS: 134
NODENAME: testhost2@localdomain
RELEASE: 2.6.18-164.10.1.el5
VERSION: #1 SMP Thu Jan 7 19:54:26 EST 2010
MACHINE: x86_64 (3000 Mhz)
MEMORY: 7.5 GB
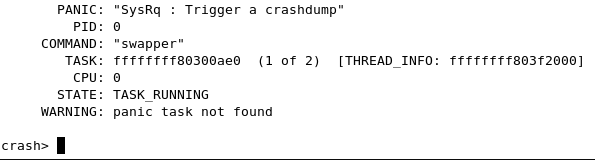
PANIC: "SysRq : Trigger a crashdump"
PID: 0
COMMAND: "swapper"
TASK: ffffffff80300ae0 (1 of 2) [THREAD_INFO: ffffffff803f2000]
CPU: 0
STATE: TASK_RUNNING (ACTIVE)
Let's walk through the report. The first thing you see is some kind of an error:
bt: cannot transition from exception stack to current process stack:
exception stack pointer: ffff810107132f20
process stack pointer: ffff81010712bef0
current_stack_base: ffff8101b509c000
The technical explanation for this error is a little tricky. Quoted from the crash utility mailing list thread about changes in the crash utility 4.0-8.11 release, we learn the following information:
If a kdump NMI issued to a non-crashing x86_64 cpu was received while
running in schedule(), after having set the next task as "current" in
the cpu's runqueue, but prior to changing the kernel stack to that of
the next task, then a backtrace would fail to make the transition
from the NMI exception stack back to the process stack, with the
error message "bt: cannot transition from exception stack to current
process stack". This patch will report inconsistencies found between
a task marked as the current task in a cpu's runqueue, and the task
found in the per-cpu x8664_pda "pcurrent" field (2.6.29 and earlier)
or the per-cpu "current_task" variable (2.6.30 and later). If it can
be safely determined that the runqueue setting (used by default) is
premature, then the crash utility's internal per-cpu active task will
be changed to be the task indicated by the appropriate architecture
specific value.
What does this mean? It's a warning that you should heed when analyzing the crash report. It will help us determine which task structure we need to look at to troubleshoot the crash reason. For now, ignore this error. It's not important to understanding what the crash report contains. You may or may not see it.
Now, let's examine the code below this error.
KERNEL: specifies the kernel running at the time of the crash.
DUMPFILE: is the name of the dumped memory core.
CPUS: is the number of CPUs on your machine.
DATE: specifies the time of the crash.
TASKS: indicates the number of tasks in the memory at the time of the crash. Task is a set of program instructions loaded into memory.
NODENAME: is the name of the crashed host.
RELEASE: and VERSION: specify the kernel release and version.
MACHINE: specifies the architecture of the CPU.
MEMORY: is the size of the physical memory on the crashed machine.
And now come the interesting bits:
PANIC: specifies what kind of crash occurred on the machine. There are several types that you can see.
SysRq (System Request) refers to Magic Keys, which allow you to send instructions directly to the kernel. They can be invoked using a keyboard sequence or by echoing letter commands to /proc/sysrq-trigger, provided the functionality is enabled. We have discussed this in the Kdump tutorial.
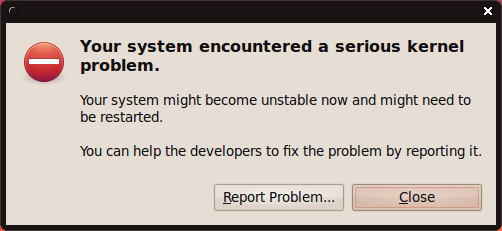
Oops is a deviation from the expected, correct behavior of the kernel. Usually, the oops results in the offending process being killed. The system may or may not resume its normal behavior. Most likely, the system will enter an unpredictable, unstable state, which could lead to kernel panic if some of the buggy, killed resources are requested later on.
For example, in my Ubuntu Karmic and Fedora Constantine reviews, we've seen evidence of kernel crashes. However, the system continued working. These crashes were in fact oopses.
Ubuntu crash:
Fedora crash:

We will discuss the Fedora case later on.
Panic is a state where the system has encountered a fatal error and cannot recover. Panic can be caused by trying to access non-permitted addresses, forced loading or unloading of kernel modules, or hardware problems.
In our first, most benign example, the PANIC: string refers to the use of Magic Keys. We deliberately triggered a crash.
PANIC: "SysRq : Trigger a crashdump"
PID: is the process ID of the ... process that caused the crash.
COMMAND: is the name of the process, in this case swapper.
COMMAND: "swapper"
swapper, or PID 0 is the scheduler. It's the process that delegates the CPU time between runnable processes and if there are no other processes in the runqueue, it takes control. You may want to refer to swapper as the idle task, so to speak.
There's one swapper per CPU, which you will soon see when we start exploring the crash in greater depth. But this is not really important. We will encounter many processes with different names.
TASK: is the address in memory for the offending process. We will use this information later on. There's a difference in the memory addressing for 32-bit and 64-bit architectures.
CPU: is the number of the CPU (relevant if more than one) where the offending process was running at the time of the crash. CPU refers to CPU cores and not just physical CPUs. If you're running your Linux with hyperthreading enabled, then you will also be counting separate threads as CPUs. This is important to remember, because recurring crashes on just one specific CPU might indicate a CPU problem.
If you're running your processes with affinity set to certain CPUs (taskset), then you might have more difficulty pinpointing CPU-related problems when analyzing the crash reports.
You can examine the number of your CPUs by running cat /proc/cpuinfo.
STATE: indicates the process state at the time of the crash. TASK_RUNNING refers to runnable processes, i.e. processes that can continue their execution. Again, we will talk more about this later on.
Getting warmer
We've seen one benign example so far. Just an introduction. We will take a look at several more examples, including real cases. For now, we know little about the crash, except that the process that caused it.
We will now examine several more examples and try to understand what we see there.
Fedora example
Let's go back to Fedora case. Take a look at the screenshot below. While the information is arranged somewhat differently than what we've seen earlier, essentially, it's the same thing.
But there's a new piece of information:
Pid: 0, comm: swapper Not tainted.
Let's focus on the Not tainted string for a moment. What does it mean? This means that the kernel is not running any module that has been forcefully loaded. In other words, we are probably facing a code bug somewhere rather than a violation of the kernel.
You can examine your running kernel by executing:
cat /proc/sys/kernel/tainted
So far, we've learned another bit of information. We will talk about this later on.
Another example, from the White Paper
Take a look at this:
MEMORY: 128MB
PANIC: "Oops: 0002" (check log for details)
PID: 1696
COMMAND: "insmod"
What do we have here? A new piece of information. Oops: 0002. What does this mean?
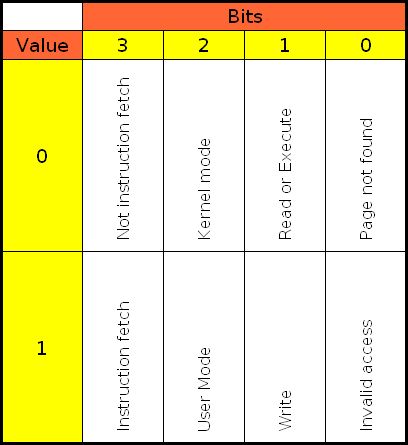
Kernel Page Error
The four digits are a decimal code of the Kernel Page Error. Reading O'Reilly's Understanding Linux Kernel, Chapter 9: Process Address Space, Page Fault Exception Handler, pages 376-382, we learn the following information:
- If the first bit is clear (0), the exception was caused by an access to a page that is not present; if the bit is set (1), this means invalid access right.
- If the second bit is clear (0), the exception was caused by read or execute access; if set (1), the exception was caused by a write access.
- If the third bit is clear (0), the exception was caused while the processor was in Kernel mode; otherwise, it occurred in User mode.
- The fourth bit tells us whether the fault was an Instruction Fetch. This is only valid for 64-bit architecture. Since our machine is 64-bit, the bit has meaning here.
This is quite interesting. Seemingly incomprehensible information starts to feel very logical indeed. Oh, you may also see the Kernel Page Errors in the following format, as a table:

Sometimes, invalid access is also referred to as Protection fault:

Therefore, to understand what happened, we need to translate the decimal code into binary and then examine the four bits, from right to left.
You can find this information under arch/arch/mm/fault.c in the kernel source tree:
/* Page fault error code bits */
#define PF_PROT (1<<0) /* or no page found */
#define PF_WRITE (1<<1)
#define PF_USER (1<<2)
#define PF_RSVD (1<<3)
#define PF_INSTR (1<<4)
In our case, decimal 2 is binary 10. Looking from right to left, bit 1 is zero, bit 2 is lit, bit 3 and 4 are zero. Notice the binary count, starting from zero.
In other words:
0002 (dec) --> 0010 (binary) --> Not instruction fetch|Kernel mode|Write|Invalid access
Therefore, we have a page not found during a write operation in Kernel mode; the fault was not an Instruction Fetch. Of course, it's a little more complicated than that, but still we're getting a very good idea of what's going on. Well, it's starting to get interesting, isn't it?
Looking at the offending process, insmod, this tells us quite a bit. We tried to load a kernel module. It tried to write to a page it could not find, meaning protection fault, which caused our system to crash. This might be a badly written piece of code.
Status check
OK, so far, we've seen quite a bit of useful information. We learned about the basic identifier fields in the crash report. We learned about the different types of Panics. We learned about identifying the offending process, deciding whether the kernel is tainted and what kind of problem occurred at the time of the crash.
But we have just started our analysis. Let's take this to a new level.
Getting hot
Backtrace
In the first article on crash, we learned about some basic commands. It's time to put them to good use. The first command we want is bt - backtrace. We want to see the execution history of the offending process, i.e. backtrace.

PID: 0 TASK: ffffffff80300ae0 CPU: 0 COMMAND: "swapper"
#0 [ffffffff80440f20] crash_nmi_callback at ffffffff8007a68e
#1 [ffffffff80440f40] do_nmi at ffffffff8006585a *
#2 [ffffffff80440f50] nmi at ffffffff80064ebf *
[exception RIP: default_idle+61]
RIP: ffffffff8006b301 RSP: ffffffff803f3f90 RFLAGS: 00000246
RAX: 0000000000000000 RBX: ffffffff8006b2d8 RCX: 0000000000000000
RDX: 0000000000000000 RSI: 0000000000000001 RDI: ffffffff80302698
RBP: 0000000000090000 R8: ffffffff803f2000 R9: 000000000000003e
R10: ffff810107154038 R11: 0000000000000246 R12: 0000000000000000
R13: 0000000000000000 R14: 0000000000000000 R15: 0000000000000000
ORIG_RAX: ffffffffffffffff CS: 0010 SS: 0018
--- <exception stack> ---
#3 [ffffffff803f3f90] default_idle at ffffffff8006b301 *
#4 [ffffffff803f3f90] cpu_idle at ffffffff8004943c
We have lots of data here, let's start digesting it slowly.
Call trace
The sequence of numbered lines, starting with the hash sign (#) is the call trace. It's a list of kernel functions executed just prior to the crash. This gives us a good indication of what happened before the system went down.
#0 [ffffffff80440f20] crash_nmi_callback at ffffffff8007a68e
#1 [ffffffff80440f40] do_nmi at ffffffff8006585a *
#2 [ffffffff80440f50] nmi at ffffffff80064ebf *
[exception RIP: default_idle+61]
RIP: ffffffff8006b301 RSP: ffffffff803f3f90 RFLAGS: 00000246
RAX: 0000000000000000 RBX: ffffffff8006b2d8 RCX: 0000000000000000
RDX: 0000000000000000 RSI: 0000000000000001 RDI: ffffffff80302698
RBP: 0000000000090000 R8: ffffffff803f2000 R9: 000000000000003e
R10: ffff810107154038 R11: 0000000000000246 R12: 0000000000000000
R13: 0000000000000000 R14: 0000000000000000 R15: 0000000000000000
ORIG_RAX: ffffffffffffffff CS: 0010 SS: 0018
--- <exception stack> ---
#3 [ffffffff803f3f90] default_idle at ffffffff8006b301 *
#4 [ffffffff803f3f90] cpu_idle at ffffffff8004943c
We will discuss this more later on.
Instruction pointer
The first really interesting line is this one:
[exception RIP: default_idle+61]
We have exception RIP: default_idle+61. What does this mean?
First, let's discuss RIP. RIP is the instruction pointer. It points to a memory address, indicating the progress of program execution in memory. In our case, you can see the exact address in the line just below the bracketed exception line:
[exception RIP: default_idle+61]
RIP: ffffffff8006b301 RSP: ffffffff803f3f90 ...
For now, the address itself is not important.
Note: On 32-bit architecture, the instruction pointer is called EIP.
The second part of information is far more useful to us. default_idle is the name of the kernel function in which the RIP lies. +61 is the offset, in decimal format, inside the said function where the exception occurred.
This is the really important bit that we will use later in our analysis.
Code Segment (CS) register
The code between the bracketed string down to --- <exception stack> --- is the dumping of registers. Most are not useful to us, except the CS (Code Segment) register.
CS: 0010
Again, we encounter a four-digit combination. In order to explain this concept, I need to deviate a little and talk about Privilege levels.
Privilege levels
Privilege level is the concept of protecting resources on a CPU. Different execution threads can have different privilege levels, which grant access to system resources, like memory regions, I/O ports, etc. There are four levels, ranging from 0 to 3. Level 0 is the most privileged, known as Kernel mode. Level 3 is the least privileged, known as User mode.
Most modern operating systems, including Linux, ignore the intermediate two levels, using only 0 and 3. The levels are also known as Rings. A notable exception of the use of levels was IBM OS/2 system.
Current Privilege Level (CPL)
Code Segment (CS) register is the one that points to a segment where program instructions are set. The two least significant bits of this register specify the Current Privilege Level (CPL) of the CPU. Two bits, meaning numbers between 0 and 3.
Descriptor Privilege Level (DPL) & Requested Privilege Level (RPL)
Descriptor Privilege Level (DPL) is the highest level of privilege that can access the resource and is defined. This value is defined in the Segment Descriptor. Requested Privilege Level (RPL) is defined in the Segment Selector, the last two bits. Mathematically, CPL is not allowed to exceed MAX(RPL,DPL), and if it does, this will cause a general protection fault.
Now, why is all this important, you ask?
Well, for instance, if you encounter a case where system crashed while the CPL was 3, then this could indicate faulty hardware, because the system should not crash because of a problem in the User mode. Alternatively, there might be a problem with a buggy system call. Just some rough examples.
For more information, please consider referring to O'Reilly's Understanding Linux Kernel, Chapter 2: Memory Addressing, Page 36-39. You will find useful information about Segment Selectors, Segment Descriptors, Table Index, Global and Local Descriptor Tables, and of course, the Current Privilege Level (CPL).
Back to our crash log:
CS: 0010
As we know, the two least significant bits specify the CPL. Two bits means four levels, however, levels 1 and 2 are ignored. This leaves us with 0 and 3, the Kernel mode and User mode, respectively. Translated into binary format, we have 00 and 11.
The format used to present the descriptor data can be confusing, but it's very simple. If the right-most figure is even, then we're in the Kernel mode; if the last figure is odd, then we're in the User mode. Hence, we see that CPL is 0, the offending task leading to the crash was running in the Kernel mode. This is important to know. It may help us understand the nature of our problem.
Just for reference, here's an example where the crash occurred in User mode, collected on a SUSE machine:

But that's just geeky talk. Back to our example, we have learned many useful, important details. We know the exact memory address where the instruction pointer was at the time of the crash. We know the privilege level.
More importantly, we know the name of the kernel function and the offset where the RIP was pointing at the time of the crash. For all practical purposes, we just need to find the source file and examine the code. Of course, this may not be always possible, for various reasons, but we will do that, nevertheless, as an exercise.
So, we know that crash_nmi_callback() function was called by do_nmi(), do_nmi() was called by nmi(), nmi() was called by default_idle(), which caused the crash. We can examine these functions and try to understand more deeply what they do. We will do that soon. Now, let's revisit our Fedora example one more time.
Fedora example, again
Now that we understand what's wrong, we can take a look at the Fedora example again and try to understand the problem. We have a crash in a non-tainted kernel, caused by the swapper process. The crash report points to native_apic_write_dummy function.

Then, there's also a very long call trace. Quite a bit of useful information that should help us solve the problem. We will see how we can use the crash reports to help developers fix bugs and produce better, more stable software.
Now, let's focus some more on crash and the basic commands.
backtrace for all tasks
By default, crash will display backtrace for the active task. But you may also want to see the backtrace of all tasks. In this case, you will want to run foreach.
foreach bt
Dump system message buffer
log - dump system message buffer
This command dumps the kernel log_buf contents in chronological order.
The kernel log bugger (log_buf) might contains useful clues preceding the crash, which might help us pinpoint the problem more easily and understand why our system went down.
The log command may not be really useful if you have intermittent hardware problems or purely software bugs, but it is definitely worth the try. Here's our crash log, the last few lines:
ide: failed opcode was: 0xec
mtrr: type mismatch for f8000000,400000 old: uncachable new: write-combining
ISO 9660 Extensions: Microsoft Joliet Level 3
ISO 9660 Extensions: RRIP_1991A
SysRq : Trigger a crashdump
And there's the SysRq message. Useful to know. In real cases, there might be something far more interesting.
Display process status information
ps - display process status information
This command displays process status for selected, or all, processes in the system. If no arguments are entered, the process data is displayed for all processes.
Take a look at the example below. We have two swapper processes! As I told you earlier, each CPU has its own scheduler. The active task is marked with >.


In this case, the pointer in the ps output marks the "wrong" process:

Using backtrace for all processes (with foreach) and running the ps command, you should be able to locate the offending process and examine its task.
Other useful information you may need: Bracketed items are kernel threads; for example, init and udevd are not. Then, there's memory usage information, VSZ and RSS, process state, and more.
Super geeky stuff
Note: This section is impossibly hard. Too hard for most people. Very few people are skilled enough to dabble in kernel code and really know what's going on in there. Trying to be brave and tackle the possible bugs hidden in crash cores is a noble attempt, but you should not take this lightly. I have to admit that although I can peruse crash reports and accompanying sources, I still have a huge deal to learn about the little things and bits. Don't expect any miracles. There's no silver-bullet solution to crash analysis!
Now ...
Time to get ultra-serious. Let's say you may even want to analyze the C code for the offending function. Needless to say, you should have the C sources available and be able to read them. This is not something everyone should do, but it's an interesting mental exercise.
Source code
All right, you want examine the code. First, you will have to obtain the sources.
Some distributions make the sources readily available. For example, in openSUSE, you just have to download the kernel-source package. With CentOS, it is a little more difficult, but doable. You can also visit the Linux Kernel Archive and download the kernel matching your own, although some sources may be different from the ones used on your system, since some vendors make their own custom changes.
Once you have the sources, it's time to examine them.
Example, on openSUSE:

cscope
You could browse the sources using the standard tools like find and grep, but this can be rather tedious. Instead, why not let the system do all the hard work for you. A very neat utility for browsing C code is called cscope. The tool runs from the command line and uses a vi-like interface. By default, it will search for sources in the current directory, but you can configure it any which way.
cscope is available in the repositories:

Now, in the directory containing sources (by default, /usr/src/linux), run cscope:
cscope -R
This will recursively search all sub-directories, index the sources and display the main interface. There are other uses as well; try the man page or --help flag.

Now, it's time to put the tool to good use and search for desired functions. We will begin with Find this C symbol. Use the cursor keys to get down to this line, then type the desired function name and press Enter. The results will be displayed:

Depending on what happened, you may get many results or none. It is quite possible that there is no source code containing the function seen in the crash report. If there are too many results, then you might want to search for the next function in the call trace by using the Find functions called by this function option. Use Tab to jump between the input and output section. If you have official vendor support, this is a good moment to turn the command over and let them drive.
If you stick with the investigation, looking for other functions listed in the call trace can help you narrow down the C file you require. But there's no guarantee and this can be a long, tedious process.
Furthermore, any time you need help, just press ? and you will get a basic usage guide:
In the kernel source directory, you can also create the cscope indexes, for faster searches in the future, by running make cscope.


Disassemble the object
Assuming you have found the source, it's time to disassemble the object compiled from this source.
First, if you're running a debug kernel, then all the objects have been compiled with the debug symbols. You're lucky. You just need to dump the object and burrow into the intermixed assembly-C code. If not, you will have to recompile the source with debug symbols and then reverse-engineer it.
This is not a simple or a trivial task. First, if you use a compiler that is different than the one used to compile the original, your object will be different from the one in the crash report, rendering your efforts difficult if not impossible.
Trivial example
I call this example trivial because it has nothing to do with the kernel. It merely demonstrates how to compile objects and then disassemble them.
Any source will do. In our case, we'll use MPlayer, a popular open-source media player as our scapegoat. Download the MPlayer source code, run ./configure, make. After the objects are created, delete one of them, then recompile it.
Run make <object name>, for instance:
make xvid_vbr.o

Please note that make has no meaning without a Makefile, which specifies what needs to be done. But we have a Makefile. It was created after we ran ./configure. Otherwise, all this would not really work. Makefile is very important. We will see a less trivial example soon.
If you do not remove the existing object, then you probably won't be able to make it. Make compares timestamps on sources and the object, so unless you change the sources, the recompile of the object will fail.

Now, here's another simple example, and note the difference in the size of the created object, once with the debug symbols and once without:

If you don't have a Makefile, you can invoke gcc manually using all sorts of flags. You will need kernel headers that match the architecture and the kernel version that was used to create the kernel where the crash occurred, otherwise your freshly compiled objects will be completely different from the ones you may wish to analyze, including functions and offsets.
objdump
A utility you want to use for disassembly is objdump. You will probably want to use the utility with -S flag, which means display source code intermixed with assembly instructions. You may also want -s flag, which will display contents of all sections, including empty ones. -S implies -d, which displays the assembler mnemonics for the machine instructions from objfile; this option only disassembles those sections which are expected to contain instructions. Alternatively, use -D for all sections.
Thus, the most inclusive objdump would be:
objdump -D -S <compiled object with debug symbols> > <output file>
It will look something like this:

And an even better example, the memhog dump:

Moving on to kernel sources
Warming up. Once you're confident practicing with trivial code, time to move to kernel. Make sure you do not just delete any important file. For the sake of exercise, move or rename any existing kernel objects you may find lurking about.
Then, recompile them. You will require the .config file used to compile the kernel. It should be included with the sources. Alternatively, you can dump it from /proc/config.gz.
zcat /proc/config.gz > .config
On RedHat machines, you will find the configuration files also under /boot. Make sure you use the one that matches the crashed kernel and copy it over into the source directory. If needed, edit some of the options, like CONFIG_DEBUG_INFO. More about that later.
Without the .config file, you won't be able to compile kernel sources:

You may also encounter an error where the Makefile is supposedly missing, but it's there. In this case, you may be facing a relatively simply problem, with the wrong $ARCH environment variable set. For example, i585 versus i686 and x86-64 versus x86_64.
Pay attention to the error and compare the architecture to the $ARCH variable. In the worst case, you may need to export it correctly. For example:
export ARCH=x86_64
As a long term solution, you could also create symbolic links under /usr/src/linux from the would-be bad architecture to the right one. This is not strictly related to the analysis of kernel crashes, but if and when you compile kernel sources, you may encounter this issue.
Now, regarding the CONFIG_DEBUG_INFO variable. It should be set to 1 in your .config file. If you recall the Kdump tutorial, this was a prerequisite we asked for, in order to be able to successfully troubleshoot kernel crashes. This tells the compiler to create objects with debug symbols.
Alternatively, export the variable in the shell, as CONFIG_DEBUG_INFO=1.
export CONFIG_DEBUG_INFO=1
Then, take a look at the Makefile. You should see that if this variable is set, the object will be compiled with debug symbols (-g). This is what we need. After that, once again, we will use objdump.

Now, Makefile might really be missing. In this case, you will get a whole bunch of errors related to the compilation process.

But with the Makefile in place, it should all work smoothly.
And then, there's the object up to date example again. If you do not remove an existing one, you won't be able to compile a new one, especially if you need debug symbols for later disassembly.

Finally, the disassembled object:

What do we do now?
Well, you look for the function listed in the exception RIP and mark the starting address. Then add the offset to this number, translated to hexadecimal format. Then, go to the line specified. All that is left is to try to understand what really happened. You'll have an assembly instruction listed and possibly some C code, telling us what might have gone wrong.
It's not easy. In fact, it's very difficult. But it's exciting and you may yet succeed, finding bugs in the operating system. What's more fun than that?
Above, we learned about the compilation and disassembly procedures, without really doing anything specific. Now that we know how to go about compiling kernel objects and dissecting them into little bits, let's do some real work.
Intermediate example
We will now try something more serious. Grab a proof-of-concept code that crashes the kernel, compile it, examine the crash report, then look for the right sources, do the whole process we mentioned above, and try to read the alien intermixed assembly and C code.
Of course, we will be cheating, cause we will know what we're looking for, but still, it's a good exercise.
The most basic non-trivial example is to create a kernel module that causes panic. Before we panic our kernel, let's do a brief overview of the kernel module programming basics.
Create problematic kernel module
This exercise forces us to deviate from the crash analysis flow and take a brief look at the C programming language from the kernel perspective. We want to crash our kernel, so we need kernel code. While we're going to use C, it's a little different from everyday stuff. Kernel has its own rules.
We will have a sampling of kernel module programing. We'll write our own module and Makefile, compile the module and then insert it into the kernel. Since our module is going to be written badly, it will crash the kernel. Then, we will analyze the crash report. Using the information obtained in the report, we will try to figure out what's wrong with our sources.
Step 1: Kernel module
We first need to write some C code. Let's begin with hello.c.
Without getting too technical, here's the most basic of modules, with the init and cleanup functions. The module does not nothing special except print messages to the kernel logging facility.

* hello.c - The simplest kernel module.
*/
#include <linux/module.h> /* Needed by all modules */
#include <linux/kernel.h> /* Needed for KERN_INFO */
int init_module(void)
{
printk(KERN_INFO "Hello world.\n");
/*
* A non 0 return means init_module failed; module can't be loaded.
*/
return 0;
}
void cleanup_module(void)
{
printk(KERN_INFO "Goodbye world.\n");
}
We need to compile this module, so we need a Makefile:

obj-m += hello.o
all:
make -C /lib/modules/$(shell uname -r)/build M=$(PWD) modules
clean:
make -C /lib/modules/$(shell uname -r)/build M=$(PWD) clean
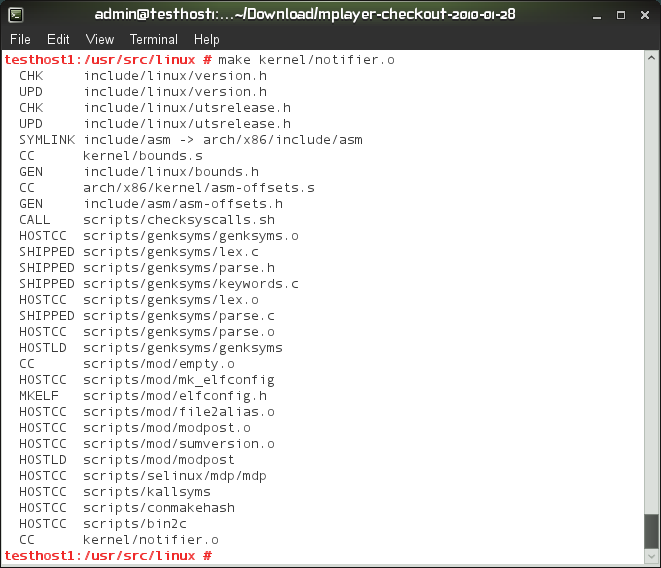
Now, we need to make the module. In the directory containing your hello.c program and the Makefile, just run make. You will see something like this:

Our module has been compiled. Let's insert it into the kernel. This is done using the insmod command. However, a second before we do that, we can examine our module and see what it does. Maybe the module advertises certain bits of information that we might find of value. Use the modinfo command for that.
/sbin/modinfo hello.ko

In this case, nothing special. Now, insert it:
/sbin/insmod hello.ko
If the module loads properly into the kernel, you will be able to see it with the lsmod command:
/sbin/lsmod | grep hello

Notice that the use count for our module is 0. This means that we can unload it from the kernel without causing a problem. Normally, kernel modules are used for various purposes, like communicating with system devices.
Finally, to remove the module, use the rmmod command:
/sbin/rmmod hello
If you take at a look at /var/log/messages, you will notice the Hello and Goodbye messages, belonging to the init_module and cleanup_module functions:

That was our most trivial example. No crash yet. But we have a mechanism of inserting code into the kernel. If the code is bad, we will have an oops or a panic.
Step 2: Kernel panic
We'll now create a new C program that uses the panic system call on initialization. Not very useful, but good enough for demonstrating the power of crash analysis.
Here's the code, we call it kill-kernel.c./*
* kill-kernel.c - The simplest kernel module to crash kernel.
*/
#include <linux/module.h> /* Needed by all modules */
#include <linux/kernel.h> /* Needed for KERN_INFO */
int init_module(void)
{
printk(KERN_INFO "Hello world. Now we crash.\n");
panic("Down we go, panic called!");
return 0;
}
void cleanup_module(void)
{
printk(KERN_INFO "Goodbye world.\n");
}
When inserted, this module will write a message to /var/log/messages and then panic. Indeed, this is what happens. Once you execute the insmod command, the machine will freeze, reboot, dump the kernel memory and then reboot back into the production kernel.
Step 3: Analysis
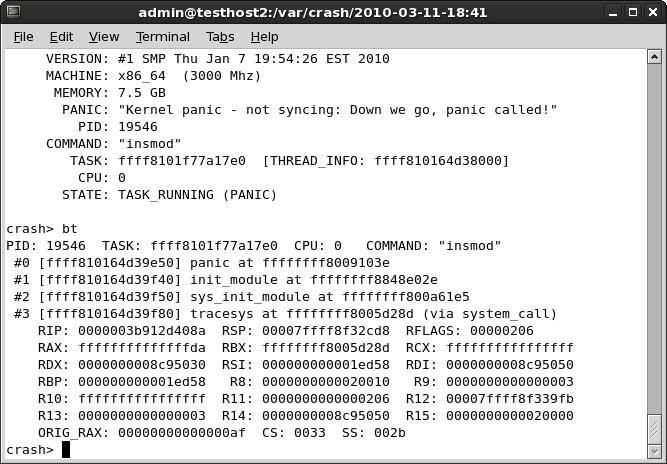
Let's take a look at the vmcore.

And the backtrace:
What do we have here?
First, the interesting bit, the PANIC string:
"Kernel panic - not syncing: Down we go, panic called!"
That bit looks familiar. Indeed, this is our own message we used on panic. Very informative, as we know what happened. We might use something like this if we encountered an error in the code, to let know the user what the problem is.
Another interesting piece is the dumping of the CS register - CS: 0033. Seemingly, we crashed the kernel in user mode. As I've mentioned before, this can happen if you have hardware problems or if there's a problem with a system call. In our case, it's the latter.
Well, that was easy - and self-explanatory. So, let's try a more difficult example.
For more information about writing kernel modules, including benevolent purposes, please consult the Linux Kernel Module Programming Guide.
Difficult example
Now another, a more difficult example. We panicked our kernel with ... panic. Now, let's try some coding malpractice and create a NULL pointer testcase.
We've seen earlier how to create a kernel module. Now, let's spice up our code. We will now create a classic NULL pointer example, the most typical problem with programs. NULL pointers can lead to all kinds of unexpected behavior, including kernel crashes.
Our program, called null-pointer.c, now looks like this:
/*
* null-pointer.c - A not so simple kernel module to crash kernel.
*/
#include <linux/module.h> /* Needed by all modules */
#include <linux/kernel.h> /* Needed for KERN_INFO */
char *p=NULL;
int init_module(void)
{
printk(KERN_INFO "We is gonna KABOOM now!\n");
*p = 1;
return 0;
}
void cleanup_module(void)
{
printk(KERN_INFO "Goodbye world.\n");
}
We declare a NULL pointer and then dereference it. Not a healthy practice. I guess programmers can explain this more eloquently than I, but you can't have something pointing to nothing get a valid address of a sudden. In kernel, this leads to panic.
Indeed, after making this module and trying to insert it, we get panic. Now, the sweet part.
Step 1: Analysis
Looking at the crash report, we see a goldmine of information:

Let's digest the stuff:
PANIC: "Oops: 0002 [1] SMP " (check log for details)
We have an Oops on CPU 1. 0002 translates to 0010 in binary, meaning no page was found during a write operation in kernel mode. Exactly what we're trying to achieve. We're also referred to the log. More about that soon.
WARNING: panic task not found
There was no task, because we were just trying to load the module, so it died before it could run. In this case, we will need to refer to the log for details. This is done by running log in the crash utility, just as we've learned.
The log provides us with what we need:
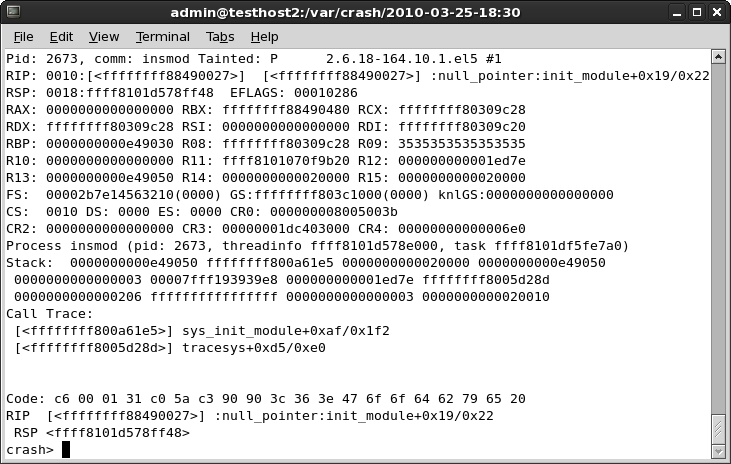
The RIP says null_pointer:init_module+0x19/0x22. We're making progress here. We know there was a problem with NULL pointer in the init_module function. Time to disassemble the object and see what went wrong.
There's more useful information, including the fact the kernel was Tainted by our module, the dumping of the CS register and more. We'll use this later. First, let's objdump our module.
objdump -d -S null-pointer.ko > /tmp/whatever
Looking at the file, we see the Rain Man code:

The first part, the cleanup is not really interesting. We want the init_module. The problematic line is even marked for us with a comment: # 27 <init_module+0x19>.
27: c6 0001 movb $0x1,(%rax)
What do we have here?
We're trying to load (assembly movb) value 1 ($0x1) into the RAX register (%rax). Now, why does it cause such a fuss? Let's go back to our log and see the memory address of the RAX register:
RAX register is: 0000000000000000. In other words, zero. We're trying to write to memory address 0. This causes the page fault, resulting in kernel panic. Problem solved!
Of course, in real life, nothing is going to be THAT easy, but it's a start. In real life, you will face tons of difficulties, including missing sources, wrong versions of GCC and all kinds of problems that will make crash analysis very, very difficult. Remember that!
For more information, please take a look at the case study shown in the crash White Paper. Again, it's easier when you know what you're looking for. Any example you encounter online will be several orders of magnitude simpler than your real crashes, but it is really difficult demonstrating an all-inclusive, abstract case. Still, I hope my two examples are thorough enough to get you started.
Alternative solution (debug kernel)
If you have time and space, you may want to download and install a debug kernel for your kernel release. Not for everyday use, of course, but it could come handy when you're analyzing kernel crashes. While it is big and bloated, it may offer additional, useful information that can't be derived from standard kernels. Plus, the objects with debug symbols might be there, so you won't need to recompile them, just dump them and examine the code.


Next steps
So the big question is, what do crash reports tell us? Well, using the available information, we can try to understand what is happening on our troubled systems.
First and foremost, we can compare different crashes and try to understand if there's any common element. Then, we can try to look for correlations between separate events, environment changes and system changes, trying to isolate possible culprits to our crashes.
Combined with submitting crash reports to vendors and developers, plus the ample use of Google and additional resources, like mailing lists and forums, we might be able to narrow down our search and greatly simply the resolution of problems.
Kernel crash bug reporting
When your kernel crashes, you may want to take the initiative and submit the report to the vendor, so that they may examine it and possibly fix a bug. This is a very important thing. You will not only be helping yourself but possibly everyone using Linux anywhere. What more, kernel crashes are valuable. If there's a bug somewhere, the developers will find it and fix it.
kerneloops.org
![]()
Kerneloops.org is a website dedicated to collecting and listing kernel crashes across the various kernel releases and crash reasons, allowing kernel developers to work on identifying most critical bugs and solving them, as well as providing system administrators, engineers and enthusiasts with a rich database of crucial information.
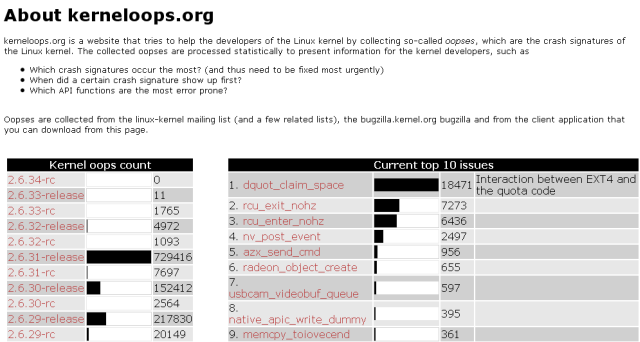
Remember the Fedora 12 kernel crash report? We had that native_apic_write_dummy? Well, let's see what kerneloops.org has to say about it.

As you can see, quite a lot. Not only do you have all sorts of useful statistics, you can actually click on the exception link and go directly to source, to the problematic bit of code and see what gives. This is truly priceless information!

As we mentioned earlier, some modern Linux distributions have an automated mechanism for kernel crash submission, both anonymously and using a Bugzilla account.
For example, Fedora 12 uses the Automatic Bug Reporting Tool (ABRT), which collects crash data, runs a report and then sends it for analysis with the developers. For more details, you may want to read the Wiki. Beforehand, Fedora 11 used kerneloops utility, which sent reports to, yes, you guessed it right, kerneloops.org.
Some screenshots ... Here's an example of live submission in Fedora 11:

And more recently in Fedora 12:
And here's Debian:

Hopefully, all these submissions help make next releases of Linux kernel and the specific distributions smarter, faster, safer, and more stable.
Google for information
Sounds trivial, but it is not. If you're having a kernel crash, there's a fair chance someone else saw it too. While environments differ from one another, there still might be some commonality for them all. Then again, there might not. A site with 10 database machines and local logins will probably experience different kinds of problems than a 10,000-machine site with heavy use of autofs and NFS. Similarly, companies working with this or that hardware vendor are more likely to undergo platform-specific issues that can't easily be find elsewhere.
The simplest way to search for data is to paste the exception RIP into the search box and look for mailing list threads and forum posts discussing same or similar items.
Once again, using the Fedora case an an example:

Crash analysis results
And after you have exhausted all the available channels, it's time to go through the information and data collected and try to reach a decision/resolution about the problem at hand.
We started with the situation where our kernel is experiencing instability and is crashing. To solve the problem, we setup a robust infrastructure that includes a mechanism for kernel crash collection and tools for the analysis of dumped memory cores. We now understand what the seemingly cryptic reports mean.
The combination of all the lessons learned during our long journey allows us to reach a decision what should be done next. How do we treat our crashing machines? Are they in for a hardware inspection, reinstallation, something else? Maybe there's a bug in the kernel internals? Whatever the reason, we have the tools to handle the problems quickly and efficiently.
Finally, some last-minute tips, very generic, very generalized, about what to do next:Single crash
A single crash may seem as too little information to work with. Don't be discouraged. If you can, analyze the core yourself or send the core to your vendor support. There's a fair chance you will find something wrong, either with software at hand, the kernel or the hardware underneath.
Hardware inspection
Speaking of hardware, kernel crashes can be caused by faulty hardware. Such crashes usually seem sporadic and random in reason. If you encounter a host that is experiencing many crashes, all of which have different panic tasks, you may want to considering scheduling some downtime and running a hardware check on the host, including memtest, CPU stress, disk checks, and more. Beyond the scope of this article, I'm afraid.
The exact definition of what is considered many crashes, how critical the machine is, how much downtime you can afford, and what you intend to do with the situation at hand is individual and will vary from one admin to another.
Reinstallation & software changes
Did the software setup change in any way that correlates with the kernel crashes? If so, do you know what the change is? Can you reproduce the change and the subsequent crashes on other hosts? Sometimes, it can be very simple; sometimes, you may not be able to easily separate software from the kernel or the underlying hardware.
If you can, try to isolate the changes and see how the system responds with or without them. If there's a software bug, then you might be just lucky enough and have to deal with a reproducible error. Kernel crashes due to a certain bug in software should look pretty much the same. But there's no guarantee you'll have it that easy.
Now, if your system is a generic machine that does not keep any critical data on local disks, you may want to consider wiping the slate clean - start over, with a fresh installation that you know is stable. It's worth a try.
Submit to developer/vendor
Regardless of what you discovered or you think the problem is, you should send the kernel crash report to the relevant developer and/or vendor. Even if you're absolutely sure you know what the problem is and you've found the cure, you should still leave the official fix in the hands of people who do this kind of work for a living.
I have emphasized this several times throughout the article, because I truly believe this is important, valuable and effective. You can easily contribute to the quality of Linux kernel code by submitting a few short text reports. It's as simple and powerful as that.
And that would be all for now, I think. I'm spent. I still owe you some information, but I can't possibly include everything in a single article. We will revisit some of the stuff when we discuss gdb.
Official documentation
Here's a selection of highly useful articles and tutorials:
White Paper: Red Hat Crash Utility (must read)
RedHat Knowledge Base: How do I configure kexec/kdump on RedHat 5?
Crashdump Debugging - openSUSE
Linux Kernel Module Programming Guide
References
Furthermore, please refer to the following detailed step-by-step tutorials and articles for more information:
Collecting and analyzing Linux kernel crashes - crash
Collecting and analyzing Linux kernel crashes - Kdump
How to enable Debug repository in CentOS Linux
CentOS 5.3 - Serious Linux for serious people
Conclusion
Wow, that was supremely long. But I hope it's worth it. While there's some data still missing, I believe my article provides a handsome 80-90% of information you will ever need when working with kernel crashes. Unless you're a kernel developer, but then, you definitely don't need me.
We worked carefully and slowly through the kernel crash analysis series. In this last part, we have finally taken a deep, personal look at the crash internals and now have the right tools and the knowledge to understand what's bothering our kernel. Using this new wealth of information, we can work on making our systems better, smarter and more stable.
That would be all, I guess, one of my longer articles. But it was worth it. I do not think there's a similar compilation online. Use it wisely and make your kernel proud.
Cheers.
Download
This tutorial is a part of my Linux Kernel Crash Book. The book is available for free download, in PDF format. Please check the book article for more details.


 2426
2426


 被折叠的 条评论
为什么被折叠?
被折叠的 条评论
为什么被折叠?
 到【灌水乐园】发言


