


本文是对在window环境下如何搭建zookeeper集群和kafka集群的研究,如果你正在查找相关此类资料,希望本文能对你有所帮助。
网上很多资料关于”kafka集群”几乎都是一个模样,写得东西很类似,而且很多细节没有注明,需要在不断的测试过程中推敲才能得到理想的结果。本篇文章力求能尽量说明每一个细节每一个步骤,达到只要认真看过本文者都能自己搭建一个基于window的kafka集群环境,当然这里仅代表学习心得,不具备任何商业用途的说明。
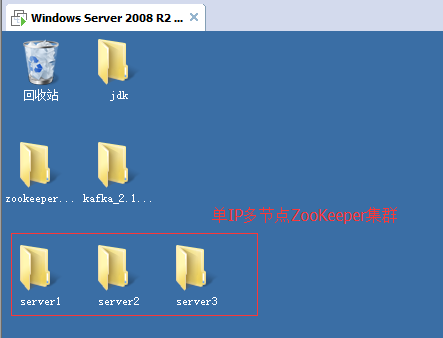
话不多说,实践才是硬道理。在进行搭建之前需要说明几点,为了能更好的了解本文的相关内容,推荐您先认真查阅kafka入门这篇文章,这能作为基础能让你更顺利看懂本篇文章。为了演示集群的效果,这里准备了一台虚拟机(window server 2008),在虚拟机中搭建了单IP多节点的zookeeper集群(多IP节点的也是同理的),并且在本机(win 10)和虚拟机中都安装了kafka。简言之需要准备的东西如下:
- 三台zookeeper服务器,都安装在同一台虚拟机中。
- 本机win10,和虚拟机分别安装一台kafka服务器。
一:虚拟机和本机网络环境
- 将虚拟机的网络模式调整为桥接模式,将虚拟机的防火墙功能关闭;
- 将主机的防火墙也关闭。
- 互相ping,测试是否能正常连接.
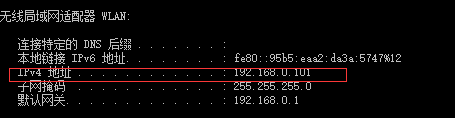
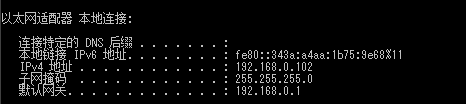
1)查看主机或者虚拟机中的ip:
在cmd中输入ipconfig,找到IP4地址。这就是机子的ip地址。
主机win10:
虚拟机winserver2008:
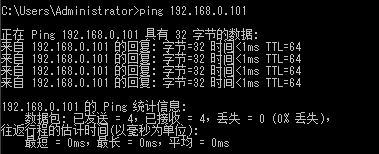
2)使用ping ip地址 测试网络是否连接
在两台机子的cmd中相互输入ping一下对方的ip:
主机win10:
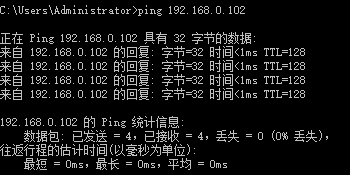
winserver2008:
二 虚拟机中搭建zookeeper集群
相对来说,zookeeper集群的搭建是很容易的,只需要注意一下配置文件。
首先准备三份zookeeper程序,这里命名为server1,server2,server3.三台zookeeper服务器不同点在于它们各自的配置文件:
server1的zoo.cfg文件:
    # The number of milliseconds of each tick
    tickTime=2000
    # The number of ticks that the initial
    # synchronization phase can take
    initLimit=10
    # The number of ticks that can pass between
    # sending a request and getting an acknowledgement
    syncLimit=5
    # the directory where the snapshot is stored.
    # do not use /tmp for storage, /tmp here is just
    # example sakes.
    #dataDir=/tmp/zookeeper
    dataDir=C:\\Users\\Administrator\\Desktop\\server1\\zookeeper-3.4.8\\zkdata
    dataLogDir=C:\\Users\\Administrator\\Desktop\\server1\\zookeeper-3.4.8\\zkdatalog
    # the port at which the clients will connect
    clientPort=3181
    # the maximum number of client connections.
    # increase this if you need to handle more clients
    #maxClientCnxns=60
    #
    # Be sure to read the maintenance section of the
    # administrator guide before turning on autopurge.
    #
    # http://zookeeper.apache.org/doc/current/zookeeperAdmin.html#sc_maintenance
    #
    # The number of snapshots to retain in dataDir
    #autopurge.snapRetainCount=3
    # Purge task interval in hours
    # Set to "0" to disable auto purge feature
    #autopurge.purgeInterval=1
    server.1=192.168.0.102:4181:5181
    server.2=192.168.0.102:4182:5182
    server.3=192.168.0.102:4183:5183
server2的zoo.cfg文件:
    # The number of milliseconds of each tick
    tickTime=2000
    # The number of ticks that the initial
    # synchronization phase can take
    initLimit=10
    # The number of ticks that can pass between
    # sending a request and getting an acknowledgement
    syncLimit=5
    # the directory where the snapshot is stored.
    # do not use /tmp for storage, /tmp here is just
    # example sakes.
    #dataDir=/tmp/zookeeper
    dataDir=C:\\Users\\Administrator\\Desktop\\server2\\zookeeper-3.4.8\\zkdata
    dataLogDir=C:\\Users\\Administrator\\Desktop\\server2\\zookeeper-3.4.8\\zkdatalog
    # the port at which the clients will connect
    clientPort=3182
    # the maximum number of client connections.
    # increase this if you need to handle more clients
    #maxClientCnxns=60
    #
    # Be sure to read the maintenance section of the
    # administrator guide before turning on autopurge.
    #
    # http://zookeeper.apache.org/doc/current/zookeeperAdmin.html#sc_maintenance
    #
    # The number of snapshots to retain in dataDir
    #autopurge.snapRetainCount=3
    # Purge task interval in hours
    # Set to "0" to disable auto purge feature
    #autopurge.purgeInterval=1
    server.1=192.168.0.102:4181:5181
    server.2=192.168.0.102:4182:5182
    server.3=192.168.0.102:4183:5183
server3的zoo.cfg文件:
# The number of milliseconds of each tick
tickTime=2000
# The number of ticks that the initial
# synchronization phase can take
initLimit=10
# The number of ticks that can pass between
# sending a request and getting an acknowledgement
syncLimit=5
# the directory where the snapshot is stored.
# do not use /tmp for storage, /tmp here is just
# example sakes.
#dataDir=/tmp/zookeeper
dataDir=C:\\Users\\Administrator\\Desktop\\server3\\zookeeper-3.4.8\\zkdata
dataLogDir=C:\\Users\\Administrator\\Desktop\\server3\\zookeeper-3.4.8\\zkdatalog
# the port at which the clients will connect
clientPort=3183
# the maximum number of client connections.
# increase this if you need to handle more clients
#maxClientCnxns=60
#
# Be sure to read the maintenance section of the
# administrator guide before turning on autopurge.
#
# http://zookeeper.apache.org/doc/current/zookeeperAdmin.html#sc_maintenance
#
# The number of snapshots to retain in dataDir
#autopurge.snapRetainCount=3
# Purge task interval in hours
# Set to "0" to disable auto purge feature
#autopurge.purgeInterval=1
server.1=192.168.18.97:4181:5181
server.2=192.168.18.97:4182:5182
server.3=192.168.18.97:4183:5183
注意:每一个server下的zoo.cfg内容中主要关注几个点,dataDir是zookeeper存放数据的地方,自己手动新建一个位置,比如这里是zkdata,将路径赋值给dataDir即可。同理dataLogDir。对于clientPort是客户端端口,在单IP多节点的这种方式每个clientPort不能一样。在最后server.1,server.2,server.3这是指定zookeeper服务器,第一个端口比如4181是指各个zookeeper之间的通信端口,5181是各个zookeeper的选举leader端口。还有最重要的一点是这个server.1还要在zkdata文件夹下新建一个没有后缀名的myid文件,里面填写1.同理,server.2是在zkdata文件夹下新建一个myid,里面填写2.以此类推,比如server.3的话,请看下图:

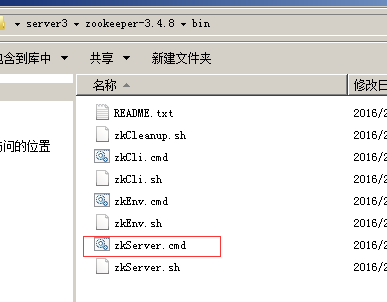
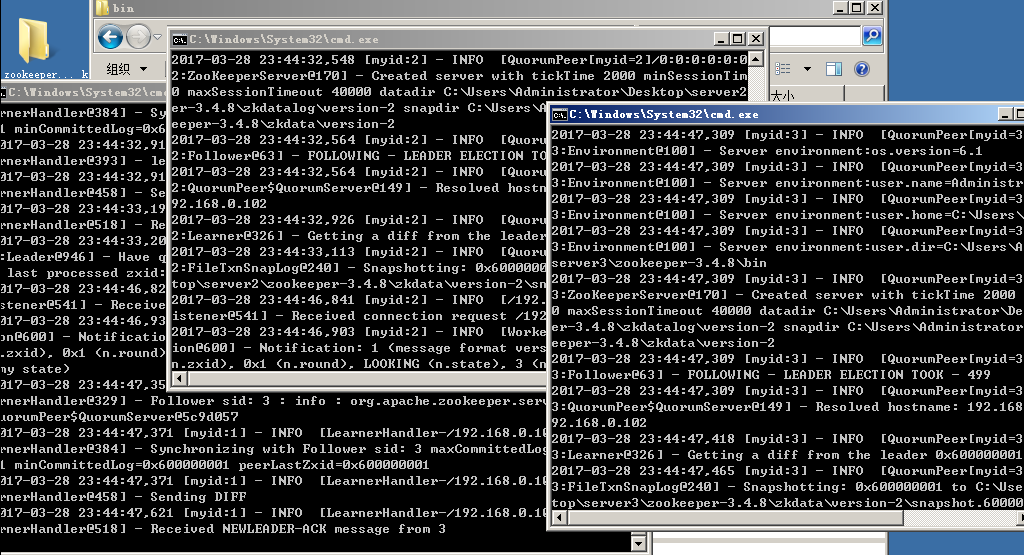
启动zookeeper集群:一个一个启动每一个zookeeper服务器:
先后进入每一个zookeeper服务器的bin目录下执行zkserver.cmd,在先启动的zookeeper会打印其他zookeeper服务器未启动的错误信息,直至到最后一个启动的时候就没有异常信息了。
启动:
三 kafka集群
1.配置server.properties文件:
因为模板里面内容挺多的,我就贴一个出来作为演示说明:
    # Licensed to the Apache Software Foundation (ASF) under one or more
    # contributor license agreements.  See the NOTICE file distributed with
    # this work for additional information regarding copyright ownership.
    # The ASF licenses this file to You under the Apache License, Version 2.0
    # (the "License"); you may not use this file except in compliance with
    # the License.  You may obtain a copy of the License at
    #
    #    http://www.apache.org/licenses/LICENSE-2.0
    #
    # Unless required by applicable law or agreed to in writing, software
    # distributed under the License is distributed on an "AS IS" BASIS,
    # WITHOUT WARRANTIES OR CONDITIONS OF ANY KIND, either express or implied.
    # See the License for the specific language governing permissions and
    # limitations under the License.
    # see kafka.server.KafkaConfig for additional details and defaults

    ############################# Server Basics #############################

    # The id of the broker. This must be set to a unique integer for each broker.
    broker.id=1
    broker.list=192.168.0.101:9093,192.168.0.102:9092
    ############################# Socket Server Settings #############################

    # The port the socket server listens on
    port=9093

    # Hostname the broker will bind to. If not set, the server will bind to all interfaces
    #host.name=localhost

    # Hostname the broker will advertise to producers and consumers. If not set, it uses the
    # value for "host.name" if configured.  Otherwise, it will use the value returned from
    # java.net.InetAddress.getCanonicalHostName().
    #advertised.host.name=<hostname routable by clients>

    # The port to publish to ZooKeeper for clients to use. If this is not set,
    # it will publish the same port that the broker binds to.
    #advertised.port=<port accessible by clients>

    # The number of threads handling network requests
    num.network.threads=3

    # The number of threads doing disk I/O
    num.io.threads=8

    # The send buffer (SO_SNDBUF) used by the socket server
    socket.send.buffer.bytes=102400

    # The receive buffer (SO_RCVBUF) used by the socket server
    socket.receive.buffer.bytes=102400

    # The maximum size of a request that the socket server will accept (protection against OOM)
    socket.request.max.bytes=104857600


    ############################# Log Basics #############################

    # A comma seperated list of directories under which to store log files
    #log.dirs=/tmp/kafka-logs
    log.dirs=G:\Tools\JAVA\Kafka\kafka_2.11-0.8.2.2\kafka_2.11-0.8.2.2\kafka-logs

    # The default number of log partitions per topic. More partitions allow greater
    # parallelism for consumption, but this will also result in more files across
    # the brokers.
    num.partitions=3

    # The number of threads per data directory to be used for log recovery at startup and flushing at shutdown.
    # This value is recommended to be increased for installations with data dirs located in RAID array.
    num.recovery.threads.per.data.dir=1

    ############################# Log Flush Policy #############################

    # Messages are immediately written to the filesystem but by default we only fsync() to sync
    # the OS cache lazily. The following configurations control the flush of data to disk.
    # There are a few important trade-offs here:
    #    1. Durability: Unflushed data may be lost if you are not using replication.
    #    2. Latency: Very large flush intervals may lead to latency spikes when the flush does occur as there will be a lot of data to flush.
    #    3. Throughput: The flush is generally the most expensive operation, and a small flush interval may lead to exceessive seeks.
    # The settings below allow one to configure the flush policy to flush data after a period of time or
    # every N messages (or both). This can be done globally and overridden on a per-topic basis.

    # The number of messages to accept before forcing a flush of data to disk
    #log.flush.interval.messages=10000

    # The maximum amount of time a message can sit in a log before we force a flush
    #log.flush.interval.ms=1000

    ############################# Log Retention Policy #############################

    # The following configurations control the disposal of log segments. The policy can
    # be set to delete segments after a period of time, or after a given size has accumulated.
    # A segment will be deleted whenever *either* of these criteria are met. Deletion always happens
    # from the end of the log.

    # The minimum age of a log file to be eligible for deletion
    log.retention.hours=168

    # A size-based retention policy for logs. Segments are pruned from the log as long as the remaining
    # segments don't drop below log.retention.bytes.
    #log.retention.bytes=1073741824

    # The maximum size of a log segment file. When this size is reached a new log segment will be created.
    log.segment.bytes=1073741824

    # The interval at which log segments are checked to see if they can be deleted according
    # to the retention policies
    log.retention.check.interval.ms=300000

    # By default the log cleaner is disabled and the log retention policy will default to just delete segments after their retention expires.
    # If log.cleaner.enable=true is set the cleaner will be enabled and individual logs can then be marked for log compaction.
    log.cleaner.enable=false

    ############################# Zookeeper #############################

    # Zookeeper connection string (see zookeeper docs for details).
    # This is a comma separated host:port pairs, each corresponding to a zk
    # server. e.g. "127.0.0.1:3000,127.0.0.1:3001,127.0.0.1:3002".
    # You can also append an optional chroot string to the urls to specify the
    # root directory for all kafka znodes.
    zookeeper.connect=192.168.0.102:3181,192.168.0.102:3182,192.168.0.102:3183

    # Timeout in ms for connecting to zookeeper
    zookeeper.connection.timeout.ms=6000
需要修改的几个地方:
broker.id=1
broker.list=192.168.0.101:9093,192.168.0.102:9092

port=9093

log.dirs=G:\Tools\JAVA\Kafka\kafka_2.11-0.8.2.2\kafka_2.11-0.8.2.2\kafka-logs

zookeeper.connect=192.168.0.102:3181,192.168.0.102:3182,192.168.0.102:3183
每一个kafka服务器都需要有一个唯一的broker.id,这个broker.list是kafka集群的地址。
2.启动kafka集群,创建topics
主机win10启动kafka:
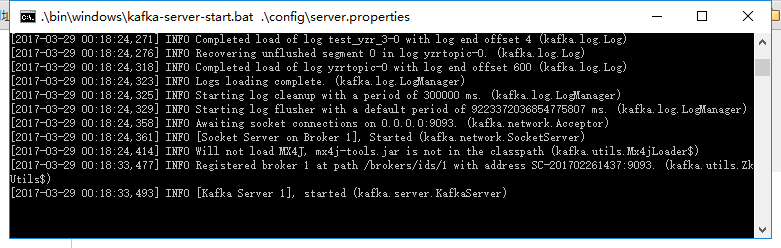
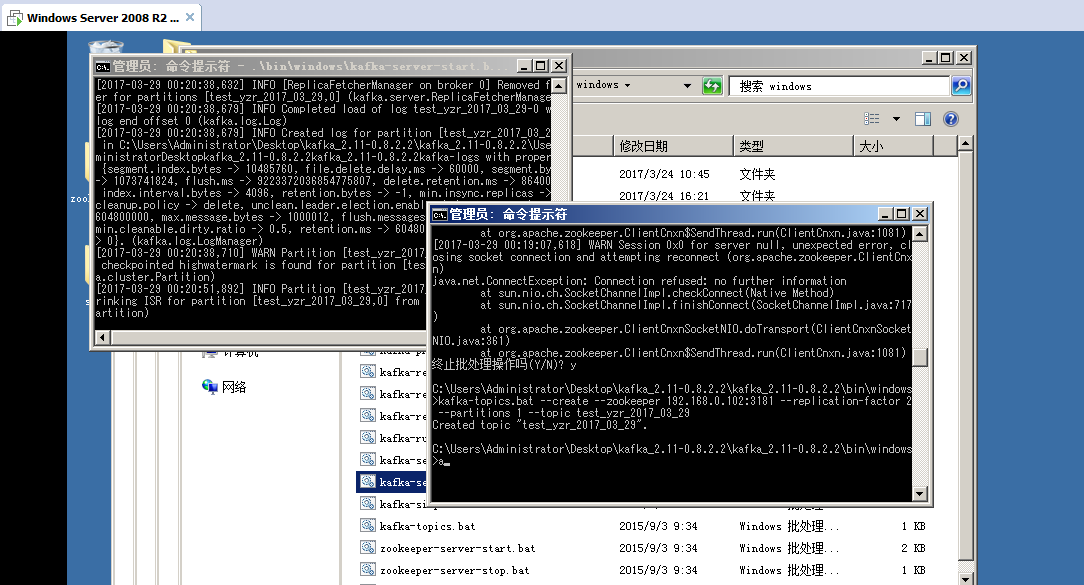
虚拟机启动kafka并且创建一个带2个备份的topic(test_yzr_2017_03_29)
四 测试集群
1.消息提供者和消费者之间的消息流通测试
比如在虚拟机上创建一个消息提供者:
kafka-console-producer.bat --broker-list 192.168.0.102:9092,192.168.0.101:9093 --topic test_yzr_2017_03_29在虚拟机和win10主机上都创建一个消息消费者:
kafka-console-consumer.bat --zookeeper 192.168.0.102:3181 --topic test_yzr_2017_03_29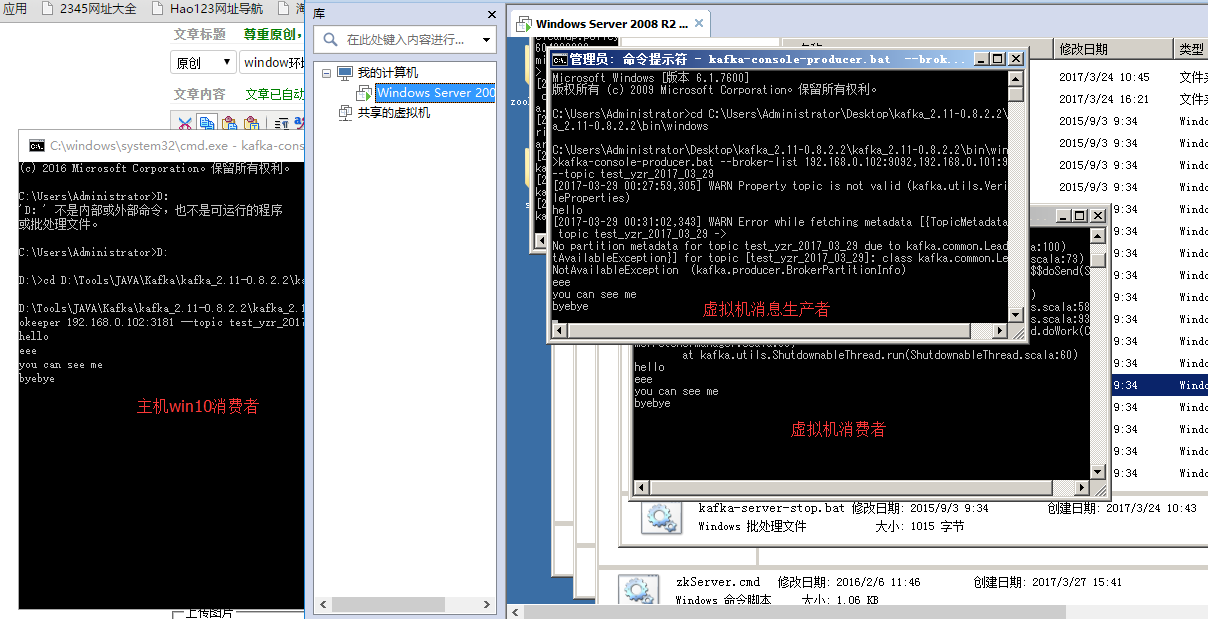
2.集群的容错性:
首先查看topic的信息
kafka-topics.bat --list --zookeeper 192.168.0.102:3181或是改成(kafka-topics.bat --list --zookeeper 192.168.0.102:3182 和kafka-topics.bat --list --zookeeper 192.168.0.102:3183都是可以的,因为zookeeper集群共享数据)
查看指定的topic的详细信息:
kafka-topics.bat --describe --zookeeper --192.168.0.102:3181 --topic test_yzr_2017_03_29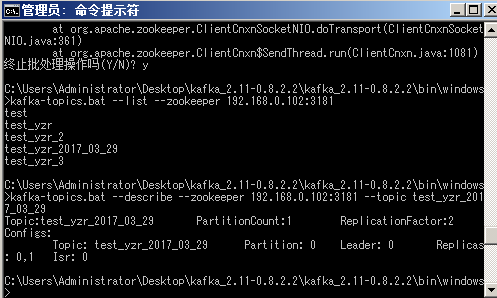
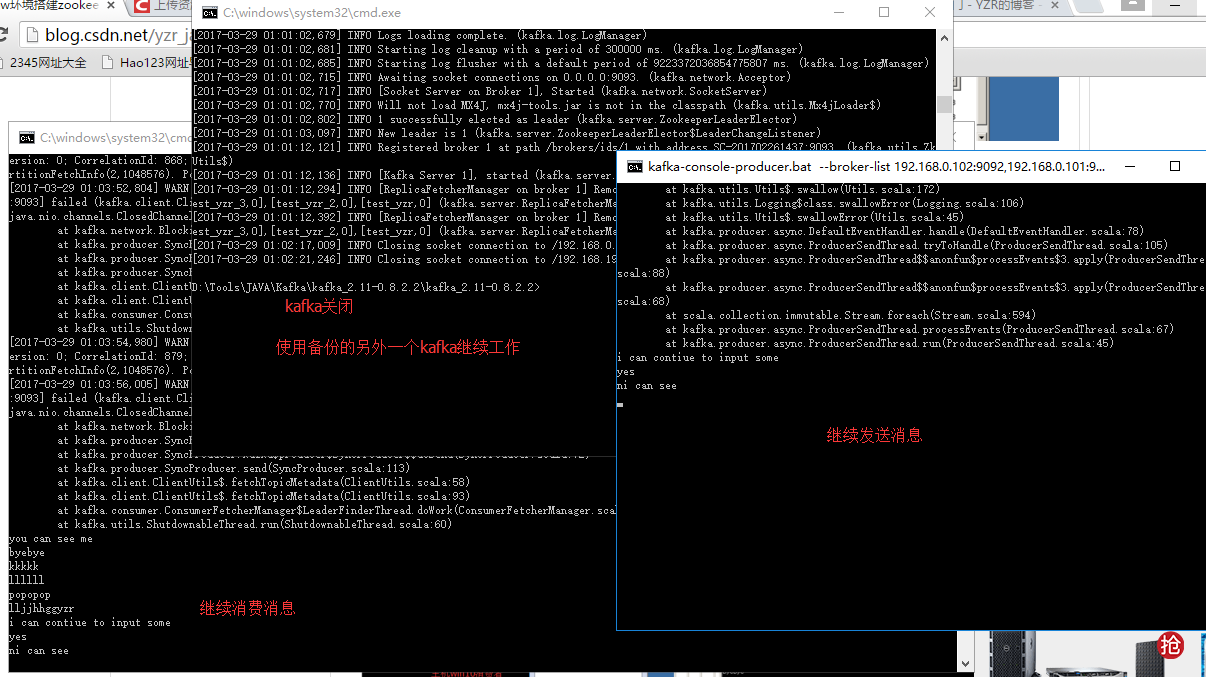
可以看到此时选举的leader是0,即就是虚拟机中的kafka服务器,现在把虚拟机的kafka服务器给干掉。
此时leader为变为1,消费者能继续消费。


 3186
3186

 被折叠的 条评论
为什么被折叠?
被折叠的 条评论
为什么被折叠?
 到【灌水乐园】发言


