


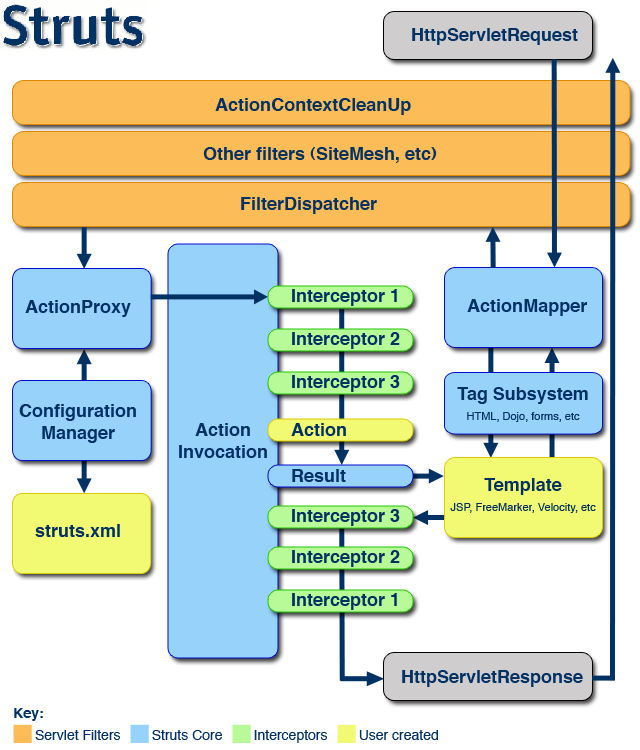
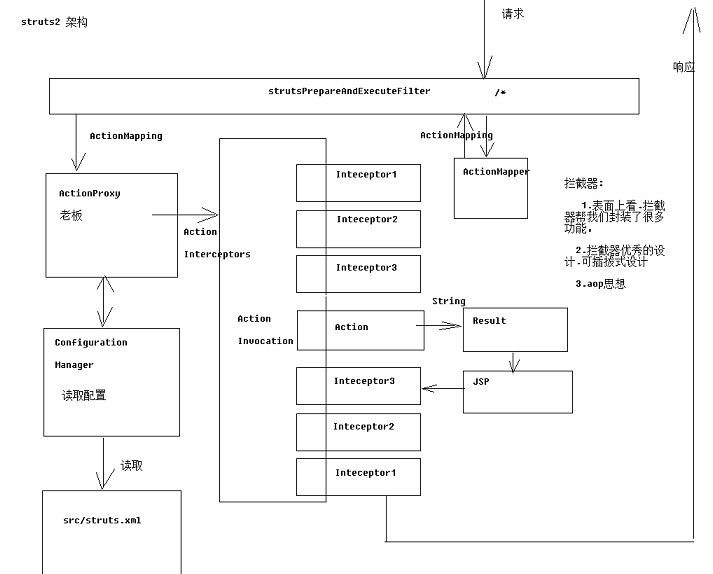
一、流程图
二、源码基本流程
我们可以使用调试的方式来操作。
2.1 StrutsPrepareAndExecuteFilter的doFilter
首先我们的请求会到达 StrutsPrepareAndExecuteFilter 的 doFilter
如下:
public class StrutsPrepareAndExecuteFilter implements StrutsStatics, Filter {
    .........
    public void doFilter(ServletRequest req, ServletResponse res, FilterChain chain) throws IOException, ServletException {

        HttpServletRequest request = (HttpServletRequest) req;
        HttpServletResponse response = (HttpServletResponse) res;

        try {
            String uri = RequestUtils.getUri(request);
            //判断是否使用struts2来处理请求,如果不是,那么放行
            if (excludedPatterns != null && prepare.isUrlExcluded(request, excludedPatterns)) {
                LOG.trace("Request {} is excluded from handling by Struts, passing request to other filters", uri);
                //放行
                chain.doFilter(request, response);
            } else {
                LOG.trace("Checking if {} is a static resource", uri);
                boolean handled = execute.executeStaticResourceRequest(request, response);
                if (!handled) {
                    LOG.trace("Assuming uri {} as a normal action", uri);
                    prepare.setEncodingAndLocale(request, response);
                    //创建ActionContext
                    prepare.createActionContext(request, response);
                    prepare.assignDispatcherToThread();
                    //包装请求
                    request = prepare.wrapRequest(request);
                    //获取到 ActionMapping
                    ActionMapping mapping = prepare.findActionMapping(request, response, true);
                    if (mapping == null) {
                        LOG.trace("Cannot find mapping for {}, passing to other filters", uri);
                        //放行
                        chain.doFilter(request, response);
                    } else {
                        LOG.trace("Found mapping {} for {}", mapping, uri);
                        //执行
                        execute.executeAction(request, response, mapping);
                    }
                }
            }
        } finally {
            prepare.cleanupRequest(request);
        }
    }
   .........
}
这里面会判断需不需要struts2来处理,如果不需要,那么放行,如果需要那么接着处理。
来到22行,创建 ActionContext。这个方法是PrepareOperations的createActionContext方法。
2.2 PrepareOperations的createActionContext
来到PrepareOperations的createActionContext方法中,如下:
/**
 * Contains preparation operations for a request before execution
 */
public class PrepareOperations {

    .......................
    /**
     * Creates the action context and initializes the thread local
     *
     * @param request servlet request
     * @param response servlet response
     *
     * @return the action context
     */
    public ActionContext createActionContext(HttpServletRequest request, HttpServletResponse response) {
        ActionContext ctx;
        Integer counter = 1;
        Integer oldCounter = (Integer) request.getAttribute(CLEANUP_RECURSION_COUNTER);
        if (oldCounter != null) {
            counter = oldCounter + 1;
        }

        ActionContext oldContext = ActionContext.getContext();
        if (oldContext != null) {
            // detected existing context, so we are probably in a forward
            ctx = new ActionContext(new HashMap<>(oldContext.getContextMap()));
        } else {
            //创建一个值栈
            ValueStack stack = dispatcher.getContainer().getInstance(ValueStackFactory.class).createValueStack();
            //把我们的请求和响应相关的域和数据添加到 值栈 的context中
            stack.getContext().putAll(dispatcher.createContextMap(request, response, null));
            //创建 ActionContext,其实就是 值栈的 context
            ctx = new ActionContext(stack.getContext());
        }
        request.setAttribute(CLEANUP_RECURSION_COUNTER, counter);
        ActionContext.setContext(ctx);
        return ctx;
    }

   .......................
}
29行 创建了值栈
31行 把请求相关的域以及数据添加到了值栈的context中
33行 创建ActionContext,传入的是 上面创建的值栈的context,也就是说其实 ActionContext就是值栈的contex
现在我们去看一下 31行 中的 createContextMap 方法,取到 Dispatcher 中查看 createContextMap() 方法
2.3 Dispatcher的createContextMap() 方法
createContextMap()方法其实就创建我们能够查询的 map 集合,里面它把 parameters,sessionMap,applicationMap,request,response,servletContext等数据添加到了map集合中。
/**
 * A utility class the actual dispatcher delegates most of its tasks to. Each instance
 * of the primary dispatcher holds an instance of this dispatcher to be shared for
 * all requests.
 *
 * @see InitOperations
 */
public class Dispatcher {

     ....................................

    /**
     * Create a context map containing all the wrapped request objects
     * 创建一个context map 包装所有的请求对象
     * @param request The servlet request
     * @param response The servlet response
     * @param mapping The action mapping
     * @return A map of context objects
     *
     * @since 2.3.17
     */
    public Map<String,Object> createContextMap(HttpServletRequest request, HttpServletResponse response,
            ActionMapping mapping) {
        //---------------------下面对数据的包装处理------------------------
        // request map wrapping the http request objects
        Map requestMap = new RequestMap(request);

        // parameters map wrapping the http parameters.  ActionMapping parameters are now handled and applied separately
        HttpParameters params = HttpParameters.create(request.getParameterMap()).build();

        // session map wrapping the http session
        Map session = new SessionMap(request);

        // application map wrapping the ServletContext
        Map application = new ApplicationMap(servletContext);
        //创建 包装了全部数据的 map集合
        Map<String,Object> extraContext = createContextMap(requestMap, params, session, application, request, response);

        if (mapping != null) {
            extraContext.put(ServletActionContext.ACTION_MAPPING, mapping);
        }
        return extraContext;
    }

    /**
     * Merge all application and servlet attributes into a single <tt>HashMap</tt> to represent the entire
     * <tt>Action</tt> context.
     *
     * @param requestMap     a Map of all request attributes.
     * @param parameters     an Object of all request parameters.
     * @param sessionMap     a Map of all session attributes.
     * @param applicationMap a Map of all servlet context attributes.
     * @param request        the HttpServletRequest object.
     * @param response       the HttpServletResponse object.
     * @return a HashMap representing the <tt>Action</tt> context.
     *
     * @since 2.3.17
     */
    public HashMap<String,Object> createContextMap(Map requestMap,
                                    HttpParameters parameters,
                                    Map sessionMap,
                                    Map applicationMap,
                                    HttpServletRequest request,
                                    HttpServletResponse response) {
        HashMap<String, Object> extraContext = new HashMap<>();
        //Map结合中添加 parameters,sessionMap,applicationMap,request,response,servletContext
        //等对象,后面的访问提供数据
        extraContext.put(ActionContext.PARAMETERS, parameters);
        extraContext.put(ActionContext.SESSION, sessionMap);
        extraContext.put(ActionContext.APPLICATION, applicationMap);

        extraContext.put(ActionContext.LOCALE, getLocale(request));

        extraContext.put(StrutsStatics.HTTP_REQUEST, request);
        extraContext.put(StrutsStatics.HTTP_RESPONSE, response);
        extraContext.put(StrutsStatics.SERVLET_CONTEXT, servletContext);

        //添加数据到 request/session/application 域到map中,后面可以通过 键来获取
        // helpers to get access to request/session/application scope
        extraContext.put("request", requestMap);
        extraContext.put("session", sessionMap);
        extraContext.put("application", applicationMap);
        extraContext.put("parameters", parameters);

        AttributeMap attrMap = new AttributeMap(extraContext);
        extraContext.put("attr", attrMap);

        return extraContext;
    }
    ......................
}
看完上面的代码以后,回到 StrutsPrepareAndExecuteFilter 中的 25行
request = prepare.wrapRequest(request);这里面它放回的包装对象其实是 StrutsRequestWrapper 的对象。struts就是通过这个
来取值的,那么我们去看一下 StrutsRequestWrapper的getAttribute()方法 。
2.4 StrutsRequestWrapper的getAttribute()方法
public class StrutsRequestWrapper extends HttpServletRequestWrapper {
    ...............................
    /**
     * Gets the object, looking in the value stack if not found
     * 返回对象,如果查找不到会从值栈中查找
     * @param key The attribute key
     */
    public Object getAttribute(String key) {
        if (key == null) {
            throw new NullPointerException("You must specify a key value");
        }

        if (disableRequestAttributeValueStackLookup || key.startsWith("javax.servlet")) {
            // don't bother with the standard javax.servlet attributes, we can short-circuit this
            // see WW-953 and the forums post linked in that issue for more info
            return super.getAttribute(key);
        }

        //获取ActionContext,由上面我们可以知道 ,这其实就是 值栈的context
        ActionContext ctx = ActionContext.getContext();
        //调用父类的getAttribute()方法来获取对象
        Object attribute = super.getAttribute(key);

        if (ctx != null && attribute == null) {
            boolean alreadyIn = isTrue((Boolean) ctx.get(REQUEST_WRAPPER_GET_ATTRIBUTE));

            // note: we don't let # come through or else a request for
            // #attr.foo or #request.foo could cause an endless loop
            if (!alreadyIn && !key.contains("#")) {
                try {
                    // If not found, then try the ValueStack
                    ctx.put(REQUEST_WRAPPER_GET_ATTRIBUTE, Boolean.TRUE);
                    //获取值栈
                    ValueStack stack = ctx.getValueStack();
                    if (stack != null) {
                        //去值栈中查找值,值栈有Root和context(ActionContext)两部分组成
                        //也就是说它会去root中查找,找不到会去 context中找
                        //context中包含了 parameters,sessionMap,applicationMap,request,response,servletContext等的数据
                        //也就说如果root中找不到,它会去这些数据中查找
                        attribute = stack.findValue(key);
                    }
                } finally {
                    ctx.put(REQUEST_WRAPPER_GET_ATTRIBUTE, Boolean.FALSE);
                }
            }
        }
        return attribute;
    }
}
22行 我们可以看到,它会通过父类(ServletRequestWrapper)的 getAttribute()查找对象。
如果找到了,那么放回,如果找不到继续查找。
34行 获取到值栈
40行 从值栈中会查找对象。值栈是OGNL和struts2的结合,值栈有Root和context(ActionContext)两部分组成,
也就是说它会去root中查找,找不到会去 context中找,
context中包含了 parameters,sessionMap,applicationMap,request,response,servletContext等的数据,
也就说如果root中找不到,它会去这些数据中查找。
所以说,request.getAttribute()会去查找以下地方
原生request域
查找ValueStack的栈Root部分(其实就是请求的Action)
查找ValueStack的Context部分(其实就是ActionContext)
2.5 Dispatcher的serviceAction()方法
回到 StrutsPrepareAndExecuteFilter 中的 27行 获取到 ActionMapping,如果ActionMapping为空,那么说明不是struts2
处理的,那么放行。否则来到 35行
execute.executeAction(request, response, mapping);execute是ExecuteOperations的对象,所以来到 ExecuteOperations的execute()中查看
public class ExecuteOperations {

    private Dispatcher dispatcher;
    .............................
    public void executeAction(HttpServletRequest request, HttpServletResponse response, ActionMapping mapping) throws ServletException {
        dispatcher.serviceAction(request, response, mapping);
    }
}
可以看到 它里面有调用了 Dispatcher 的serviceAction 方法,如下:
public class Dispatcher {
    .........................
    public void serviceAction(HttpServletRequest request, HttpServletResponse response, ActionMapping mapping)
            throws ServletException {

        Map<String, Object> extraContext = createContextMap(request, response, mapping);

        // If there was a previous value stack, then create a new copy and pass it in to be used by the new Action
        //获取值栈
        ValueStack stack = (ValueStack) request.getAttribute(ServletActionContext.STRUTS_VALUESTACK_KEY);
        boolean nullStack = stack == null;
        if (nullStack) {
            ActionContext ctx = ActionContext.getContext();
            if (ctx != null) {
                stack = ctx.getValueStack();
            }
        }
        if (stack != null) {
            extraContext.put(ActionContext.VALUE_STACK, valueStackFactory.createValueStack(stack));
        }

        String timerKey = "Handling request from Dispatcher";
        try {
            UtilTimerStack.push(timerKey);
            //获取命名空间
            String namespace = mapping.getNamespace();
            //获取action的名字
            String name = mapping.getName();
            String method = mapping.getMethod();
            //创建Action的代理对象
            ActionProxy proxy = getContainer().getInstance(ActionProxyFactory.class).createActionProxy(
                    namespace, name, method, extraContext, true, false);

            request.setAttribute(ServletActionContext.STRUTS_VALUESTACK_KEY, proxy.getInvocation().getStack());

            // if the ActionMapping says to go straight to a result, do it!
            if (mapping.getResult() != null) {
                Result result = mapping.getResult();
                result.execute(proxy.getInvocation());
            } else {
                //执行
                proxy.execute();
            }

            // If there was a previous value stack then set it back onto the request
            if (!nullStack) {
                request.setAttribute(ServletActionContext.STRUTS_VALUESTACK_KEY, stack);
            }
        } catch (ConfigurationException e) {
            logConfigurationException(request, e);
            sendError(request, response, HttpServletResponse.SC_NOT_FOUND, e);
        } catch (Exception e) {
            e.printStackTrace();
            if (handleException || devMode) {
                sendError(request, response, HttpServletResponse.SC_INTERNAL_SERVER_ERROR, e);
            } else {
                throw new ServletException(e);
            }
        } finally {
            UtilTimerStack.pop(timerKey);
        }
    }

   .........................

}
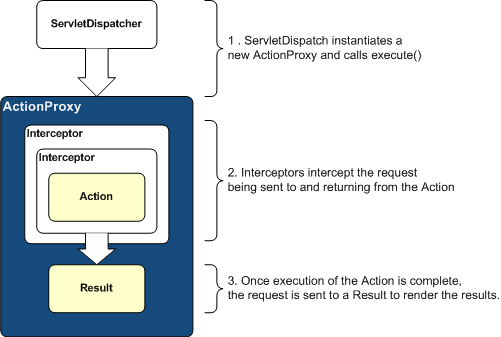
这里其实最主要的就是通过传递过来得 对象,创建 action的代理 ActionProxy,然后调用 ActionProxy的execute()方法
2.6 ActionProxy的execute()方法
现在来到了 ActionProxy的execute()方法
public class StrutsActionProxy extends DefaultActionProxy {
    ............
    public String execute() throws Exception {
        ActionContext previous = ActionContext.getContext();
        ActionContext.setContext(invocation.getInvocationContext());
        try {
// This is for the new API:
//            return RequestContextImpl.callInContext(invocation, new Callable<String>() {
//                public String call() throws Exception {
//                    return invocation.invoke();
//                }
//            });
            //invocation是DefaultActionProxy的实例
            return invocation.invoke();
        } finally {
            if (cleanupContext)
                ActionContext.setContext(previous);
        }
    }
    ...............
}
最主要的是第14行,这里面invocation是DefaultActionProxy的实例,也就说其实调用的就是 DefaultActionProxy的invocation方法
2.7 DefaultActionProxy的invocation方法 和 ActionInvocation的invoke() 方法
DefaultActionInvocation的invoke()方法
public class DefaultActionInvocation implements ActionInvocation {
    ...................................
    /**
     * @throws ConfigurationException If no result can be found with the returned code
     */
    public String invoke() throws Exception {
        String profileKey = "invoke: ";
        try {
            UtilTimerStack.push(profileKey);

            if (executed) {
                throw new IllegalStateException("Action has already executed");
            }
            //判断是否有拦截器
            if (interceptors.hasNext()) {
                final InterceptorMapping interceptorMapping = interceptors.next();
                String interceptorMsg = "interceptorMapping: " + interceptorMapping.getName();
                UtilTimerStack.push(interceptorMsg);
                try {
                    Interceptor interceptor = interceptorMapping.getInterceptor();
                    if (interceptor instanceof WithLazyParams) {
                        interceptor = lazyParamInjector.injectParams(interceptor, interceptorMapping.getParams(), invocationContext);
                    }
                    //调用拦截器的 intercept 方法,并且把 DefaultActionInvocation的当前实例传入进去
                    resultCode = interceptor.intercept(DefaultActionInvocation.this);
                } finally {
                    UtilTimerStack.pop(interceptorMsg);
                }
            } else {
                resultCode = invokeActionOnly();
            }

            // this is needed because the result will be executed, then control will return to the Interceptor, which will
            // return above and flow through again
            if (!executed) {
                if (preResultListeners != null) {
                    LOG.trace("Executing PreResultListeners for result [{}]", result);

                    for (Object preResultListener : preResultListeners) {
                        PreResultListener listener = (PreResultListener) preResultListener;

                        String _profileKey = "preResultListener: ";
                        try {
                            UtilTimerStack.push(_profileKey);
                            listener.beforeResult(this, resultCode);
                        }
                        finally {
                            UtilTimerStack.pop(_profileKey);
                        }
                    }
                }

                // now execute the result, if we're supposed to
                if (proxy.getExecuteResult()) {
                    //结果处理
                    executeResult();
                }

                executed = true;
            }

            return resultCode;
        }
        finally {
            UtilTimerStack.pop(profileKey);
        }
    }

    public String invokeActionOnly() throws Exception {
        return invokeAction(getAction(), proxy.getConfig());
    }

   ...................................
}
这里我主要关注 25行,调用拦截器的 intercept 方法,并且把 DefaultActionInvocation的当前实例传入进去。
这里的拦截器就是的顺序就是默认配置的中。见后面。第一个调用的拦截器是ExceptionMappingInterceptor,如下
public class ExceptionMappingInterceptor extends AbstractInterceptor {
    ........
    @Override
    public String intercept(ActionInvocation invocation) throws Exception {
        String result;

        try {
            //放行
            result = invocation.invoke();
        } catch (Exception e) {
           ........
        }

        return result;
    }

    ........
}
这里面 又调用 invocation的invoke()方法,其实就是传递进来的 DefaultActionInvocation的实例。这样就回到DefaultActionInvocation的invoke()方法
中,获取下一个拦截器,然后重复上面的步骤。知道拦截器调用完了。调用完了,就会去执行上面代码中的 30行 resultCode = invokeActionOnly();,
这样就来到了 请求的 Action中,Action处理完毕以后,56行 调用executeResult();来处理结果,这样流程就完了。
2.8 interceptor-stack—defaultStack
<interceptor-stack name="defaultStack">
    <interceptor-ref name="exception"/>
    <interceptor-ref name="alias"/>
    <interceptor-ref name="servletConfig"/>
    <interceptor-ref name="i18n"/>
    <interceptor-ref name="prepare"/>
    <interceptor-ref name="chain"/>
    <interceptor-ref name="scopedModelDriven"/>
    <interceptor-ref name="modelDriven"/>
    <interceptor-ref name="fileUpload"/>
    <interceptor-ref name="checkbox"/>
    <interceptor-ref name="datetime"/>
    <interceptor-ref name="multiselect"/>
    <interceptor-ref name="staticParams"/>
    <interceptor-ref name="actionMappingParams"/>
    <interceptor-ref name="params"/>
    <interceptor-ref name="conversionError"/>
    <interceptor-ref name="validation">
        <param name="excludeMethods">input,back,cancel,browse</param>
    </interceptor-ref>
    <interceptor-ref name="workflow">
        <param name="excludeMethods">input,back,cancel,browse</param>
    </interceptor-ref>
    <interceptor-ref name="debugging"/>
</interceptor-stack>


 5785
5785


 被折叠的 条评论
为什么被折叠?
被折叠的 条评论
为什么被折叠?
 到【灌水乐园】发言


