


从本章开始,将为读者介绍MVC4中的helper使用方法
从sample开始
准备controller和Action
   public class TestController : Controller
    {
        public ActionResult Index()
        {
           ViewBag.Fruits = new[] { "Apple", "Orange","Pear" };
           ViewBag.Cities = new[] { "New York", "London","Paris" };
            string message = "This is an HTML element: <input>";
            return View("List",(object)message);

        }
}代码说明:准备了一个TestController,包含了一个Index Action(默认Action),Action中存了一些stringArray在ViewBag,返回了一个字符串(包含了htmltag)。
准备View
<html>
<head>
<meta name="viewport" content="width=device-width" />
<title>Index</title>
</head>
<body>
<div>
Here are the fruits:
@foreach (string str in (string[])ViewBag.Fruits) {
<b>@str </b>
}
</div>
<div>
Here are the cities:
@foreach (string str in (string[])ViewBag.Cities) {
<b>@str </b>
}
</div>
<div>
Here is the message:
<p>@Model</p>
</div>
</body>
</html>代码说明:把Viewbag中的两个string Array打印出来,并打印出传来的message。
测试:
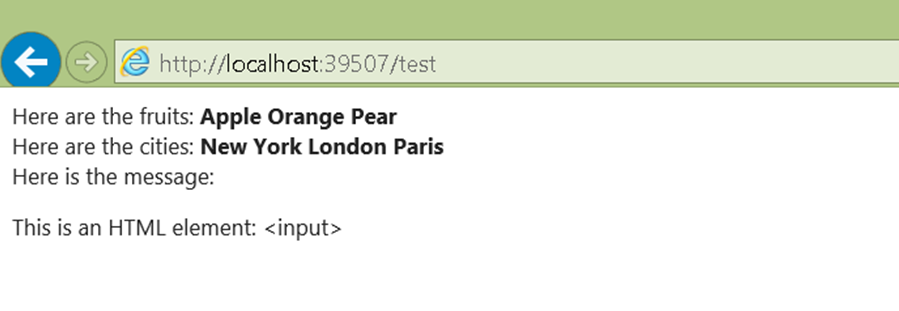
可以看到,View打印出了string array,并且htmltag被识别为了string。
下一步,创建一个inline的helper
现在希望对打印字符串数组的View中的代码做一下封装,这样可以很好的控制打印的这部分实现。
于是给出实现:
@helper  ListArrayItems(string[] items) {
foreach(string str in items) {
<b>@str </b>
}
}在打印时候,就像调用C#函数那样调用就可以了,传入ViewBag中的Array:
<div>
Here are the fruits:
@ListArrayItems(ViewBag.Fruits)
</div>
<div>
Here are the cities:
@ListArrayItems(ViewBag.Cities)
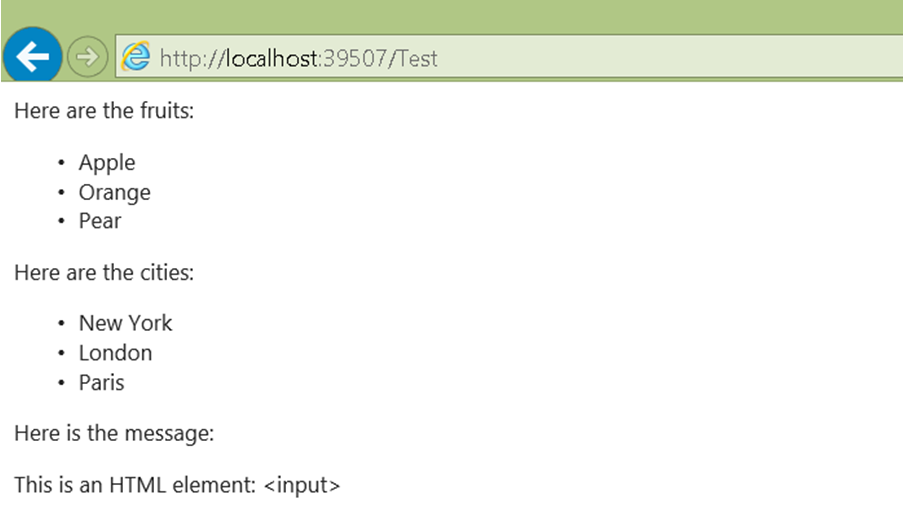
</div>使用helper的好处显而易见,其实就是封装带来的好处,我们可以集中对行为进行控制,例如希望显示为列表,只需要给helper改为:
@helper  ListArrayItems(string[] items) {
<ul>
@foreach(string str in items) {
<li>@str</li>
}
</ul>
}
测试:
实现ExternalHelper method
不想把代码coding在View里,希望写在C#里来管理,那么可以考虑实现一个External版本的:
第一步,实现一个customizehelper
    Public  static class MyHelpers
        {
            public static MvcHtmlString ListArrayItems(this HtmlHelper html, string[] list)
            {
                var  tag =new TagBuilder("ul");
                foreach(var str in list)
                {
                   var itemTag = new TagBuilder("li");
                   itemTag.SetInnerText(str);
                   tag.InnerHtml += itemTag.ToString();
                }
                return  new MvcHtmlString(tag.ToString());
            }
} 可以看到,实际上是对HtmlHelper的扩展,接收一个string array参数,打印为<ul></li>列表,使用的是TagBuilder,返回值是MvcHtmlString。
1.在View中comment掉以前的inline版本,应用external版本的实现:
    @*@helper ListArrayItems(string[] items) {
    <ul>
    @foreach(string str in items) {
    <li>@str</li>
    }
    </ul>
    } *@
    @using MVCHelperStudy.CustomizeHelper
2.调用
<div>
Here are the fruits:
@Html.ListArrayItems((string[])ViewBag.Fruits)
</div>
<div>
Here are the cities:
@Html.ListArrayItems((string[])ViewBag.Cities)
</div>HtmlHelper中常用的property:
| 属性 | 说明 |
|---|---|
| RouteCollection | Application定义的路由 |
| ViewBag | 从调用的Controller/Action传进来的ViewBag |
| ViewContext | 包含了请求信息,Controller,View等等 |
ViewContext中常用的property
| 属性 | 说明 |
|---|---|
| Controller | 当前请求调用的Controller |
| HelperContext | 包含了当前请求的详细信息(Request,Reponse等等) |
| IsChildAction | 调用是否来自ChildAction |
| RouteData | 当前请求的路由信息 |
| View | 调用当前helper的view |
TagBuilder的常用函数,property
| 属性 | 说明 |
|---|---|
| InnerHtml | 设置控件内部html |
| SetInnerText(string) | 设置控件包含的text |
| AddCssClass(string) | 设置控件的css class |
| MergeAttribute(string,string,bool) | 设置attribute,指定是否覆盖旧值 |
Partial View , Child Action , Helper Method
前面章节讲过了PartialView,ChildAction,这次也演示了Helper的用法,那么什么时候用哪个?
一般的,Helper会对Html的封装多一些,如果希望封装部分html的展示方法,可以考虑helper,一般会使用inline形式的,因为个人认为mvc后端写external版本的helper比较蹩脚。
如果对于场景:来了一个请求,找到了action,action希望停留在当前view,完成一个局部刷新(ajaxcall),那么可考虑partialview最合适了,这种场景,只涉及到action接到请求,来选择view。
如果再复杂一些,view中一定要callaction,操作一下model,反过来render一个view,那么就考虑采用childaction。不过一般情况下,接收请求返回partialview足以cover大部分需要应用ajax的场景,如果不够,对于比较特殊的页面,例如需要SPA(singlepage application ) , 那么js template + JsonResult也是个不错的方案。
字符串Encoding
对于上例,Action中返回的字符串中包含了”<input>”,如果希望mvc自动识别为一个输入框,如何做?
准备一个helper
    public static  MvcHtmlString DisplayMessage(this HtmlHelper html, string msg)
    {
        string result =String.Format("This is the message: <p>{0}</p>", msg);
        return new  MvcHtmlString(result);
} 与直接显示出model(字符串类型)不同,我们包了一层,构造一个MvcHtmlString对象丢给mvcframework,这样它就会识别为一个html输出到浏览器。
改一下view
把刚才的View代码删了,添加以下代码:
@model string
@using MVCHelperStudy.CustomizeHelper

<html>
<head>
<meta name="viewport" content="width=device-width"/>
<title>Index</title>
</head>
<body>
    <p>This is the contentfrom the view:</p>
<div style="border: thin solid black; padding: 10px">
Here is the message:
<p>@Model</p>
</div>
<p>This is the content from the helper method:</p>
<div style="border: thin solid black; padding: 10px">
@Html.DisplayMessage(Model)
</div>代码说明:我们打印了两个字符串,一个是直接取@Model的,一个是调用了新的helper(Wrap为MvcHtmlString对象)
测试
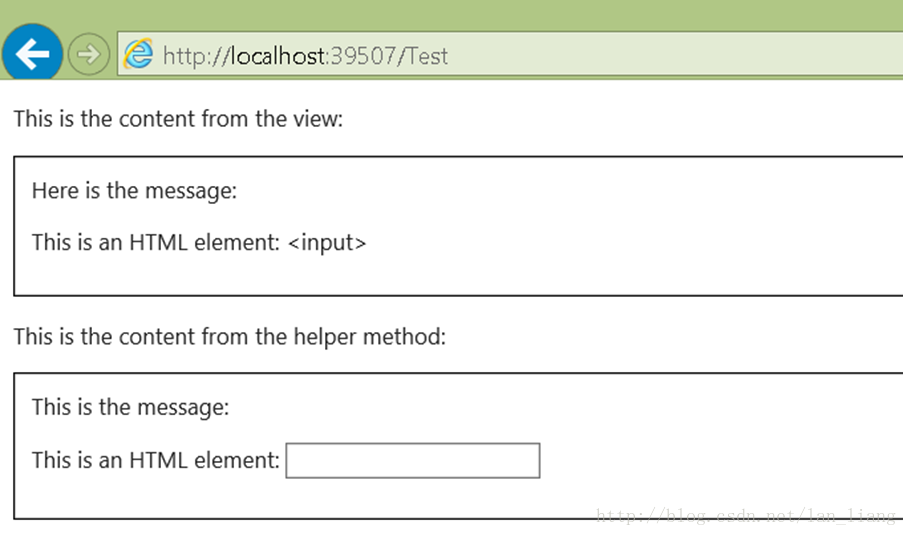
可以看到我们的html字符串被mvcframework识别为了控件render在浏览器上
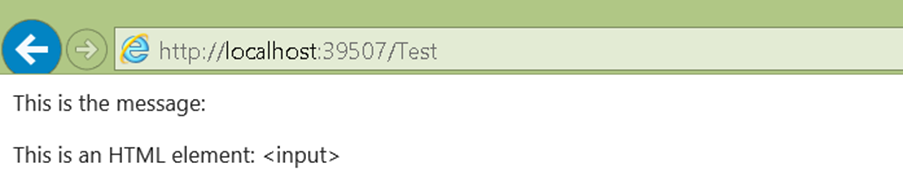
现在改一下,如果我们的目的就是希望mvcframework把我的html字符串识别为字符串,那么helper怎么写,简单的返回字符串就好了:
public static string DisplayMessage(this HtmlHelper html, string msg) {
return String.Format("This is the message:<p>{0}</p>", msg);
}
第二种方法
使用Html.Encode,依然返回MvcHtmlString:
    public  static MvcHtmlString DisplayEncodeMessage(this HtmlHelper html, string msg)
    {
    String  encodedMessage = html.Encode(msg);
    string result = String.Format("This is the message: <p>{0}</p>", encodedMessage);
    return new  MvcHtmlString(result);
} View调用一下:
Remove掉所有代码添加这行, @Html.DisplayEncodeMessage(@Model)
测试:
使用自带的helper来构造一个表单
Mvc framework给我们提供了很多自带的生成html的方法,让我们可以生成表单。
从一个例子开始,在Model文件夹添加Person类
    public class Person
    {
        public int PersonId { get;set; }
        public string FirstName {get; set; }
        public string LastName {get; set; }
        public DateTime BirthDate {get; set; }
        public Address HomeAddress{ get; set; }
        public bool IsApproved {get; set; }
        public Role Role { get;set; }
    }
    public class Address
    {
        public string Line1 { get;set; }
        public string Line2 { get;set; }
        public string City { get;set; }
        public string PostalCode {get; set; }
        public string Country {get; set; }
    }
    public enum Role
    {
        Admin,
        User,
        Guest
     }
准备一个Controller代码
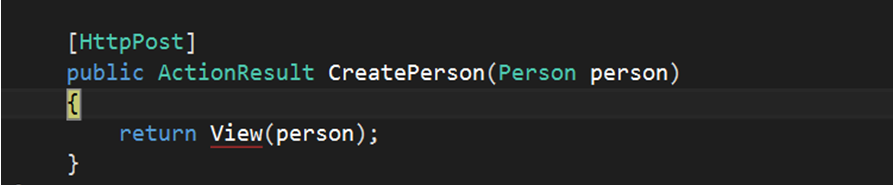
    public class PersonController : Controller
    {
        public ActionResult CreatePerson()
        {
           return  View(new Person());
        }

       [HttpPost]
        public ActionResult  CreatePerson(Person person)
        {
           return  View(person);
        }
    }
代码说明:
准备两个action,一个是不带数据的,主要针对第一次来到这个页面的情况;一个是接收数据的,针对提交表单的情况,并使用了httppost对请求访问进行限制。
View的实现
<html>
<head></head>
<body>
@model MVCHelperStudy.Models.Person @{ ViewBag.Title = "CreatePerson"; }
<h2>CreatePerson</h2>
<form action="/Person/CreatePerson" method="post">
<div class="dataElem">
<label>PersonId</label>
<input name="personId" value="@Model.PersonId" />
</div>
<div class="dataElem">
<label>First Name</label>
<input name="FirstName" value="@Model.FirstName" />
</div>
<div class="dataElem">
<label>Last Name</label>
<input name="lastName" value="@Model.LastName" />
</div>
<input type="submit" value="Submit" />
</form>
</body>
</html>代码说明:
在不使用任何html helper 函数的情况下,手动coding一个form,表单指向Person/CreatePerson,method为post。
测试
1.第一次访问这个页面,可以看到View拿到了一个空的Person对象
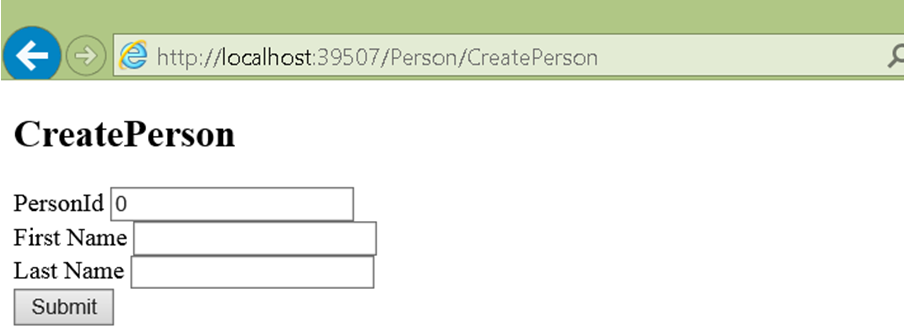
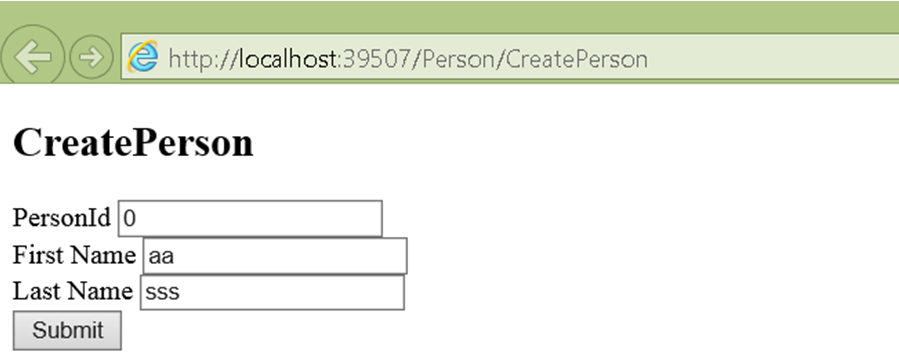
2.Fill这个form:

3.提交表单
在Action设置了断点,为了说明请求成功被路由到了post版本的CreatePersonAction中。
注意,我们手动为每一个input设置了name属性,这个很重要,因为mvcFramework在提交表单时会拿input的name属性和model进行匹配并赋值,如果把name拿掉会怎样?提交表单时这个input的值就没法带到action了。例如拿掉lastName的name属性:
<input value="@Model.LastName"/> 然后按照刚才的流程提交表单,
在调试状态下查看LastName的值:
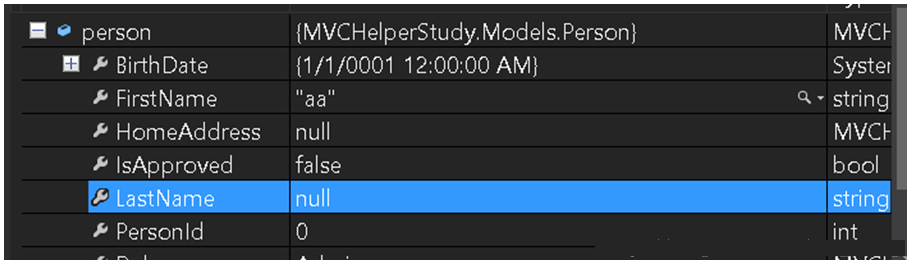
可以看到,FirstName和Id的数值都被带过来了,但是LastName由于name属性没有设置导致mvcframework没有办法匹配,因此数据没有被正确赋值导致binding失败,关于modelbinding,后面章节会讲到。
使用Html.BeginForm, Html.EndForm 生成表单控件
顾名思义,这个函数就是生成<form> tag的,下面的列表是几种重载和说明:
| 函数 | 说明 |
|---|---|
| BeginForm() | 指向当前的controller和当前view对应的action, http method :Get |
| BeginForm(action,controller) | 指定一个controller/action和http method : Get |
| BeginForm(action,controller,method) | 指定controller/action和Http method |
| BeginForm(action,controller,method,attributes) | 指定controller/action 和http method ,并设置form的一些属性(例如 class) |
| BeginForm(action,controller,routeValues,method,attributes) | 指定controller/action,设置method,传route的匿名对象,并可以设置form attribute |
我们可以看到,从第一个到最后一个重载,我们可以自定义的事情越来越多,现在以一个最复杂的最后一个为例,看看生成的form是怎样的,这样我们可以考虑不同场景来决定是否使用这个方法:
@using (Html.BeginForm("CreatePerson", "Person",
new { id = "MyIdValue" }, FormMethod.Post,
new { @class = "personClass",data_formType="person"})) {
////html
}
生成的form
<form action="/Person/CreatePerson/MyIdValue" class="personClass" data-formType="person"
method="post">
生成form时,specify一个路由
如果有需要,告诉mvcframework在生成表单时,按照指定的路由配置来生成,也是可以做到的:
对于路由配置:
routes.MapRoute(
name: "FormRoute",
url: "app/forms/{controller}/{action}"
);
编写View代码
@using(Html.BeginRouteForm("FormRoute", new {},FormMethod.Post,
new { @class = "personClass",data_formType="person"})) {
//html
}
生成的表单html(Form部分)
<form action="/app/forms/Person/CreatePerson" class="personClass" data-formType="person" method="post"><div class="dataElem"> 这样就完成了手动根据路由来生成form的实现。
使用html helper
常用的用于html helper生成控件
| Html标签 | htmlhelper方法 | 生成结果 |
|---|---|---|
| CheckBox | Html.CheckBox(“name”,false) | <input id="myCheckbox" name="myCheckbox" type="checkbox" value="true" /> |
<input name="myCheckbox" type="hidden" value="false" /> | ||
| Hidden Field | Html.Hidden("myHidden", "val") | <input id="myHidden" name="myHidden" type="hidden" value="val" /> |
| Radio Button | Html.RadioButton("myRadiobutton", "val", true) | <input checked="checked" id="myRadiobutton" name="myRadiobutton" type="radio" value="val" /> |
| Password | Html.Password("myPassword", "val") | <input id="myPassword" name="myPassword" type="password" value="val" /> |
| Text Area | Html.TextArea("myTextarea", "val", 5, 20, null) | <textarea cols="20" id="myTextarea" name="myTextarea" rows="5">val</textarea> |
| Text box | Html.TextBox("myTextbox", "val") | <input id="myTextbox" name="myTextbox" type="text" value="val" /> |
使用html helper重构刚才的View
<html>
    <head>
        <title></title>
    </head>
    <body>
        @using(Html.BeginRouteForm("FormRoute",new {}, FormMethod.Post, new { @class ="personClass", data_formType="person"})) {
        <div class="dataElem">
            <label>PersonId</label> @Html.TextBox("personId",@Model.PersonId)
        </div>
        <div class="dataElem">
            <label>FirstName</label> @Html.TextBox("firstName",@Model.FirstName)
        </div>
        <div class="dataElem">
            <label>LastName</label> @Html.TextBox("lastName",@Model.LastName)
        </div>
        <form>
            <input type="submit" value="Submit"> }
        </form>
    </body>
</html>
运行,查看浏览器生成的html:
    <form action="/app/forms/Person/CreatePerson" class="personClass" data-formType="person" method="post"><div class="dataElem">
    <label>PersonId</label>
    <input data-val="true" data-val-number="The field PersonId must be anumber." data-val-required="The PersonId field is required." id="personId" name="personId" type="text"value="0" />
    </div>
    <div class="dataElem">
    <label>FirstName</label>
    <input id="firstName" name="firstName" type="text"value="" />
    </div>
    <div class="dataElem">
    <label>LastName</label>
    <input id="lastName"  name="lastName"  type="text" value="" />
    </div>
    <input type="submit"  value="Submit" />
    </form>
结果:
1.form标签按照我们希望的方式生成了(根据路由配置生成)
2.htmlhelper生成了input,每个都有name,名称为我们传入的那个名字。
关于Html.TextBox(“”),mvcframework会分别从ViewData, ViewBag,和@Model.DataValue中查找指定的property名称,找到第一个就直接返回,完成匹配。
强类型的form表单
如果使用Html.TextBox(“name”)传字符串不太满意,希望传一个Member表达式,可以使用Html.TextBoxFor来达到目的:
支持强类型生成html控件的常用方法
| Html标签 | htmlhelper方法 | 生成结果 |
|---|---|---|
| CheckBox | Html.CheckBoxFor(x => x.IsApproved) | <input id="IsApproved" name="IsApproved" type="checkbox" value="true" /> |
<input name="IsApproved" type="hidden" value="false" /> | ||
| HiddenField | Html.HiddenFor(x => x.FirstName) | <input id="FirstName" name="FirstName" type="hidden" value="" /> |
| RadioButton | Html.RadioButtonFor(x => x.IsApproved, "val") | <input id="IsApproved" name="IsApproved" type="radio" value="val" /> |
| Password | Html.PasswordFor(x => x.Password) | <input id="Password" name="Password" type="password" /> |
| Text Area | Html.TextAreaFor(x => x.Bio, 5, 20, new{}) | <textarea cols="20" id="Bio" name="Bio" rows="5">Bio value</textarea> |
| Text Box | Html.TextBoxFor(x => x.FirstName) | <input id="FirstName" name="FirstName" type="text" value="" /> |
几乎和字符串版本的类似,区别就是签名多了一个For,接收的参数为一个MemberExpression。
使用强类型的版本重构我们的View:
    @using(Html.BeginRouteForm("FormRoute",new {}, FormMethod.Post,
    new { @class = "personClass",data_formType="person"})) {
    <div class="dataElem">
    <label>PersonId</label>
    @Html.TextBoxFor(m => m.PersonId)
    </div>
    <div class="dataElem">
    <label>First Name</label>
    @Html.TextBoxFor(m => m.FirstName)
    </div>
    <div class="dataElem">
    <label>Last Name</label>
    @Html.TextBoxFor(m => m.LastName)
    </div>
    <input  type="submit"value="Submit" />
    }
验证一下浏览器生成的html是我们希望的:
    <form action="/app/forms/Person/CreatePerson" class="personClass" data-formType="person" method="post"><div class="dataElem">
    <label>PersonId</label>
    <input  data-val="true" data-val-number="The field PersonId must be a number." data-val-required="The PersonId field is required." id="PersonId" name="PersonId" type="text" value="0" />

    <div class="dataElem">
    <label>First Name</label>
    <input id="FirstName" name="FirstName" type="text" value="" />
    </div>
    <div class="dataElem">
    <label>Last Name</label>
    <input id="LastName" name="LastName" type="text" value="" />
    </div>
    <input type="submit" value="Submit" />
    </form>
可以看到,mvcframework为我们生成了希望的html。
DropDownList
前面的例子没有提到Dropdown,是希望以其为特例演示一下强类型的显示。
1. 先看一下html自带的关于drop-down生成的方法
| Html标签 | htmlhelper方法 | 生成结果 |
|---|---|---|
| CheckBox | Html.DropDownList("myList", new SelectList(new [] {"A", "B"}), "Choose") | <select id="myList" name="myList"><option value="">Choose</option><option>A</option><option>B</option></select> |
Html.DropDownListFor(x => x.Gender, new SelectList(new [] {"M", "F"})) | <select id="Gender" name="Gender"><option>M</option><option>F</option></select> | |
Html.ListBox("myList", new MultiSelectList(new [] {"A", "B"})) | <select id="myList" multiple="multiple" name="myList"><option>A</option><option>B</option></select> | |
Html.ListBoxFor(x => x.Vals, new MultiSelectList(new [] {"A", "B"})) | <select id="Vals" multiple="multiple" name="Vals"><option>A</option><option>B</option></select> |
可以看到,mvc framework提供了不同的重载,我们可以生成multiselect和select。
生成带有role的表单,修改View代码:
@using(Html.BeginRouteForm("FormRoute", new {},FormMethod.Post,
new {@class = "personClass", data_formType="person"})) {
<div class="dataElem">
<label>PersonId</label>
@Html.TextBoxFor(m=> m.PersonId)
</div>
<div class="dataElem">
<label>FirstName</label>
@Html.TextBoxFor(m=> m.FirstName)
</div>
<div class="dataElem">
<label>LastName</label>
@Html.TextBoxFor(m=> m.LastName)
</div>
<div class="dataElem">
<label>Role</label>
@Html.DropDownListFor(m=> m.Role,
new SelectList(Enum.GetNames(typeof(MVCHelperStudy.Models.Role))))
</div>
<input  type="submit"value="Submit" />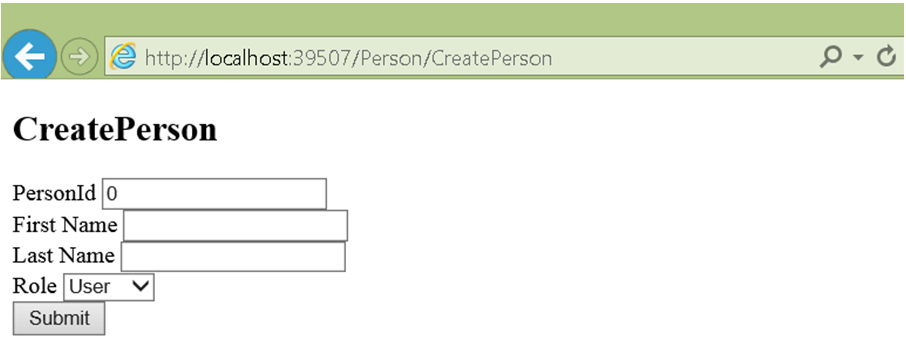
} 这次我们添加了Role,我们使用了Enum的静态方法获得指定Enum类型中的所有值。传递给mvcframework的是Member Expression和string array。
测试:
浏览器生成的select标签
    <div class="dataElem">
    <label>Role</label>
    <select  data-val="true"  data-val-required="The Role field isrequired."  id="Role" name="Role">
    <option selected="selected">Admin</option>
    <option>User</option>
    <option>Guest</option>
    </select>
</div> 


 109
109


 被折叠的 条评论
为什么被折叠?
被折叠的 条评论
为什么被折叠?
 到【灌水乐园】发言


