


flairNLP
Flair is:
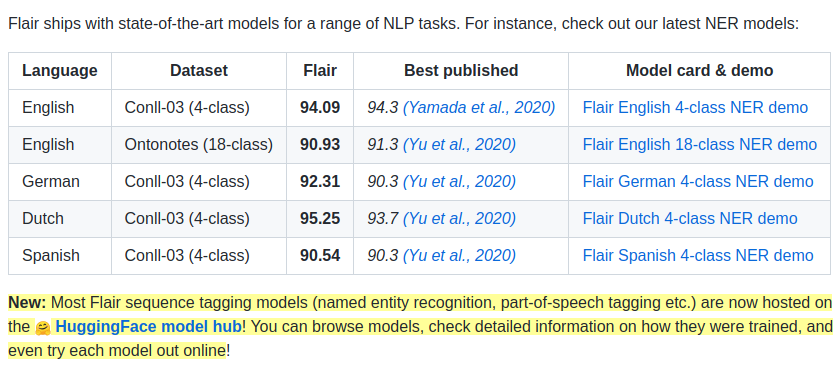
- A powerful NLP library. Flair allows you to apply our state-of-the-art natural language processing (NLP) models to your text, such as named entity recognition (NER), part-of-speech tagging (PoS), special support for biomedical data, sense disambiguation and classification, with support for a rapidly growing number of languages.
- A text embedding library. Flair has simple interfaces that allow you to use and combine different word and document embeddings, including our proposed Flair embeddings, BERT embeddings and ELMo embeddings.
- A PyTorch NLP framework. Our framework builds directly on PyTorch, making it easy to train your own models and experiment with new approaches using Flair embeddings and classes.
from flair.data import Sentence
from flair.models import SequenceTagger

# make a sentence
sentence = Sentence('I love Berlin .')
print(sentence)

# load the NER tagger
tagger = SequenceTagger.load('ner')

# run NER over sentence
tagger.predict(sentence)

print(sentence)
print('The following NER tags are found:')

# iterate over entities and print
for entity in sentence.get_spans('ner'):
    print(entity)

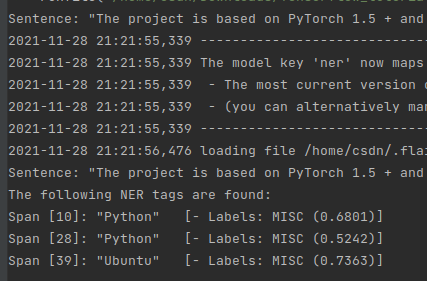
把 sentence 换成 “The project is based on PyTorch 1.5+ and Python 3.6+, because method signatures and type hints are beautiful. If you do not have Python 3.6, install it first. Here is how for Ubuntu 16.04. Then, in your favorite virtual environment, simply do:”
发现识别效果并不好,比如 Pytorch 没有被识别出来
而且预测的实体类别也不对
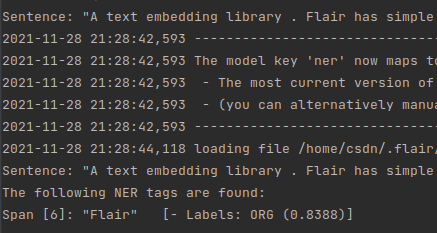
把 sentence 换成 “A text embedding library. Flair has simple interfaces that allow you to use and combine different word and document embeddings, including our proposed Flair embeddings, BERT embeddings and ELMo embeddings”
发现只识别出 Flair,比如 BERT、ELMo 并没有被识别出来
而且预测的实体类别也不对
There are two types of objects that are central to this library, namely the Sentence and Token objects. A Sentence holds a textual sentence and is essentially a list of Token
# The sentence objects holds a sentence that we may want to embed or tag
from flair.data import Sentence
# Make a sentence object by passing a string
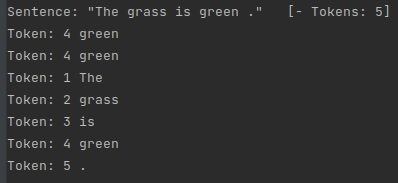
sentence = Sentence('The grass is green.')
# Print the object to see what's in there
print(sentence)
# using the token id
print(sentence.get_token(4))
# using the index itself
print(sentence[3])
for token in sentence:
print(token)
获取 sentence 的 token
When you create a Sentence as above, the text is automatically tokenized using the lightweight segtok library.
You can write your own tokenization routine. Check the code of flair.data.Tokenizer and its implementations (e.g. flair.tokenization.SegtokTokenizer or flair.tokenization.SpacyTokenizer) to get an idea of how to add your own tokenization method.
In Flair, any data point can be labeled. For instance, you can label a word or label a sentence:
给 token 添加标签
A Token has fields for linguistic annotation, such as lemmas, part-of-speech tags or named entity tags. You can add a tag by specifying the tag type and the tag value. In this example, we’re adding an NER tag of type ‘color’ to the word ‘green’. This means that we’ve tagged this word as an entity of type color.
# add a tag to a word in the sentence
sentence[3].add_tag('ner', 'color')

# print the sentence with all tags of this type
print(sentence.to_tagged_string())

输出: The grass is green <color> .
Each tag is of class Label which next to the value has a score indicating confidence. Print like this:
# get token 3 in the sentence
token = sentence[3]

# get the 'ner' tag of the token
tag = token.get_tag('ner')

# print token
print(f'"{token}" is tagged as "{tag.value}" with confidence score "{tag.score}"')
输出: “Token: 4 green” is tagged as “color” with confidence score “1.0”
Our color tag has a score of 1.0 since we manually added it. If a tag is predicted by our sequence labeler, the score value will indicate classifier confidence.
给句子添加标签
You can also add a Label to a whole Sentence. For instance, the example below shows how we add the label ‘sports’ to a sentence, thereby labeling it as belonging to the sports “topic”.
from flair.data import Sentence

sentence = Sentence('France is the current world cup winner.')

# add a label to a sentence
sentence.add_label('topic', 'sports')

print(sentence)
输出: Sentence: “France is the current world cup winner .” [− Tokens: 8 − Sentence-Labels: {‘topic’: [sports (1.0)]}]
Indicating that this sentence belongs to the topic ‘sports’ with confidence 1.0.
Any data point can be labeled multiple times. A sentence for instance might belong to two topics. In this case, add two labels with the same label name:
You might want to add different layers of annotation for the same sentence. Next to topic you might also want to predict the “language” of a sentence. In this case, add a label with a different label name:
from flair.data import Sentence
sentence = Sentence('France is the current world cup winner.')
# this sentence has multiple "topic" labels
sentence.add_label('topic', 'sports')
sentence.add_label('topic', 'soccer')
# this sentence has a "language" label
sentence.add_label('language', 'English')
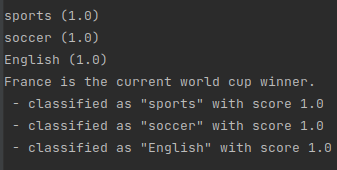
print(sentence)
输出: Sentence: “France is the current world cup winner .” [− Tokens: 8 − Sentence-Labels: {‘topic’: [sports (1.0), soccer (1.0)], ‘language’: [English (1.0)]}]
Indicating that this sentence has two “topic” labels and one “language” label.
Remember that each label is a Label object, so you can also access the label’s value and score fields directly:
print(sentence.to_plain_string())
for label in sentence.labels:
    print(f' - classified as "{label.value}" with score {label.score}')
If you are interested only in the labels of one layer of annotation, you can access them like this:
for label in sentence.get_labels('topic'):
    print(label)
训练 POS 模型
This part of the tutorial shows how you can train your own sequence labelling and text classification models using state-of-the-art word embeddings
训练一个 POS tagging model
Here is example code for a small part-of-speech tagger model trained over UD_ENGLISH (English universal dependency treebank) data, using simple GloVe embeddings. In this example, we downsample the data to 10% of the original data to make it run faster, but normally you should train over the full dataset:
from flair.datasets import UD_ENGLISH
from flair.embeddings import WordEmbeddings, StackedEmbeddings
from flair.models import SequenceTagger
from flair.trainers import ModelTrainer
# 1. get the corpus
corpus = UD_ENGLISH().downsample(0.1)
print(corpus)
# 2. what label do we want to predict?
label_type = 'upos'
# 3. make the label dictionary from the corpus
label_dict = corpus.make_label_dictionary(label_type=label_type)
print(label_dict)
# 4. initialize embeddings
embedding_types = [
WordEmbeddings('glove'),
# comment in this line to use character embeddings
# CharacterEmbeddings(),
# comment in these lines to use flair embeddings
# FlairEmbeddings('news-forward'),
# FlairEmbeddings('news-backward'),
]
embeddings = StackedEmbeddings(embeddings=embedding_types)
# 5. initialize sequence tagger
tagger = SequenceTagger(hidden_size=256,
embeddings=embeddings,
tag_dictionary=label_dict,
tag_type=label_type,
use_crf=True)
# 6. initialize trainer
trainer = ModelTrainer(tagger, corpus)
# 7. start training
trainer.train('resources/taggers/example-upos',
learning_rate=0.1,
mini_batch_size=32,
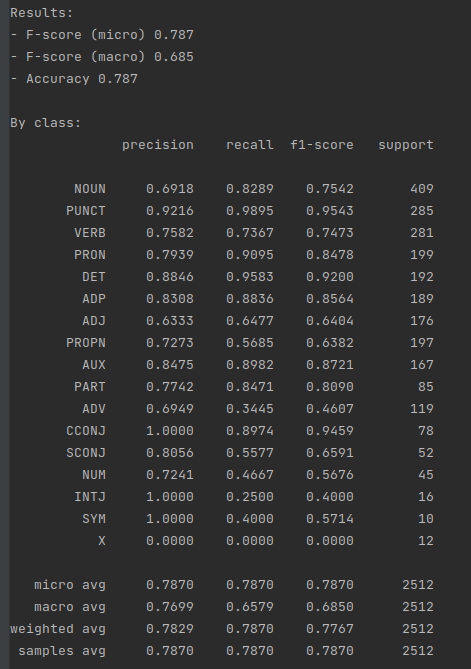
max_epochs=10)
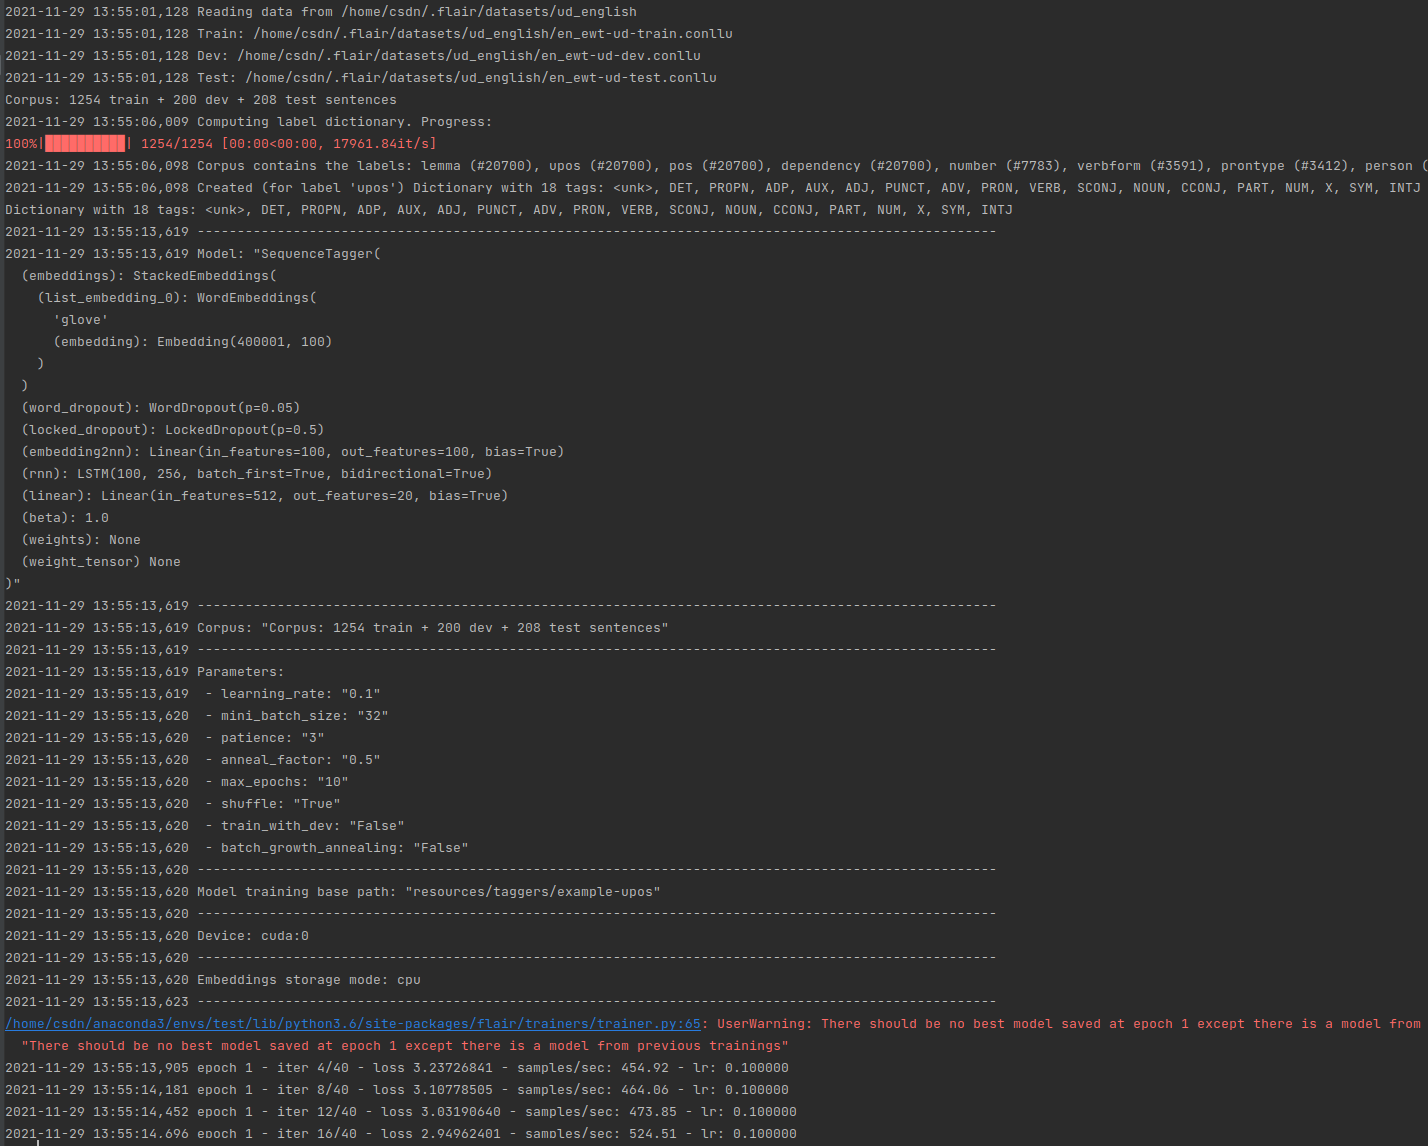
最终的结果展示:
from flair.data import Sentence
# load the model you trained
model = SequenceTagger.load('resources/taggers/example-pos/final-model.pt')

# create example sentence
sentence = Sentence('I love Berlin')

# predict tags and print
model.predict(sentence)

print(sentence.to_tagged_string())
输出: 2021-11-29 14:03:17,653 loading file resources/taggers/example-pos/final-model.pt
I <PRON> love <VERB> Berlin <PROPN>
Alternatively, try using a stacked embedding with FlairEmbeddings and GloVe, over the full data, for 150 epochs. This will give you the state-of-the-art accuracy reported in Akbik et al. (2018)
Once the model is trained you can use it to predict tags for new sentences. Just call the predict method of the model.
训练 NER model
To train a sequence labeling model for NER, just minor modifications to the above script are necessary. Load an NER corpus like CONLL_03 (requires manual download of data - or use a different NER corpus), change the label_type to ‘ner’ and use a StackedEmbedding consisting of GloVe and Flair:
from flair.datasets import CONLL_03_DUTCH
from flair.embeddings import WordEmbeddings, FlairEmbeddings, StackedEmbeddings
from flair.models import SequenceTagger
from flair.trainers import ModelTrainer

# 1. get the corpus
corpus = CONLL_03_DUTCH()
print(corpus)

# 2. what label do we want to predict?
label_type = 'ner'

# 3. make the label dictionary from the corpus
label_dict = corpus.make_label_dictionary(label_type=label_type)
print(label_dict)

# 4. initialize embedding stack with Flair and GloVe
embedding_types = [
    WordEmbeddings('glove'),
    FlairEmbeddings('news-forward'),
    FlairEmbeddings('news-backward'),
]

embeddings = StackedEmbeddings(embeddings=embedding_types)

# 5. initialize sequence tagger
tagger = SequenceTagger(hidden_size=256,
                        embeddings=embeddings,
                        tag_dictionary=label_dict,
                        tag_type=label_type,
                        use_crf=True)

# 6. initialize trainer
trainer = ModelTrainer(tagger, corpus)

# 7. start training
trainer.train('resources/taggers/sota-ner-flair',
              learning_rate=0.1,
              mini_batch_size=32,
              max_epochs=150)

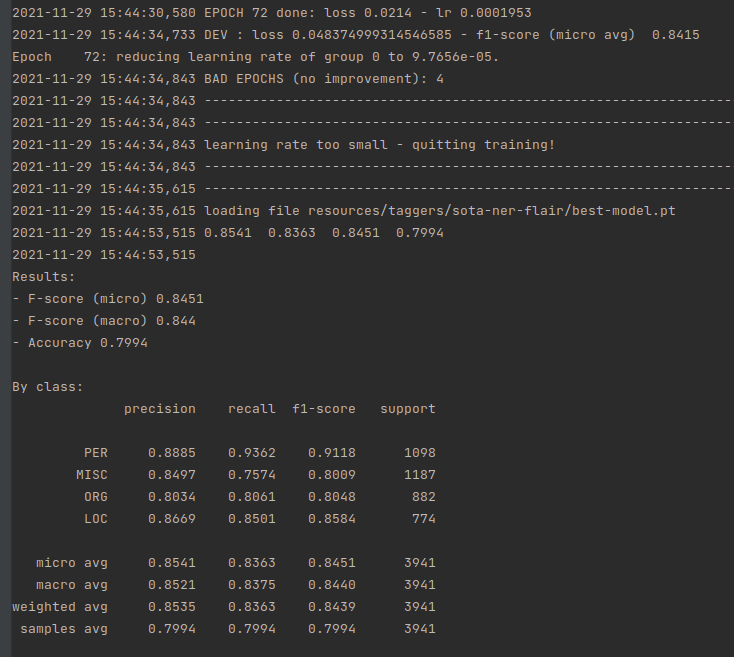
This will give you state-of-the-art numbers similar to the ones reported in Akbik et al. (2018).
You can get even better numbers if you use transformers as embeddings, fine-tune them and use full document context (see our FLERT paper for details). It’s state-of-the-art but much slower than the above model.
Change the script to use transformer embeddings and change the training routine to fine-tune with AdamW optimizer and a tiny learning rate instead of SGD:
from flair.datasets import CONLL_03_DUTCH
from flair.embeddings import TransformerWordEmbeddings
from flair.models import SequenceTagger
from flair.trainers import ModelTrainer

# 1. get the corpus
corpus = CONLL_03_DUTCH().downsample(0.1)
print(corpus)

# 2. what label do we want to predict?
label_type = 'ner'

# 3. make the label dictionary from the corpus
label_dict = corpus.make_label_dictionary(label_type=label_type)
print(label_dict)

# 4. initialize fine-tuneable transformer embeddings WITH document context
embeddings = TransformerWordEmbeddings(model='xlm-roberta-base',
                                       layers="-1",
                                       subtoken_pooling="first",
                                       fine_tune=True,
                                       use_context=True,
                                       )

# 5. initialize bare-bones sequence tagger (no CRF, no RNN, no reprojection)
tagger = SequenceTagger(hidden_size=256,
                        embeddings=embeddings,
                        tag_dictionary=label_dict,
                        tag_type='ner',
                        use_crf=False,
                        use_rnn=False,
                        reproject_embeddings=False,
                        )

# 6. initialize trainer
trainer = ModelTrainer(tagger, corpus)

# 7. run fine-tuning
trainer.fine_tune('resources/taggers/sota-ner-flert',
                  learning_rate=5.0e-6,
                  mini_batch_size=1,
                  mini_batch_chunk_size=1,  # remove this parameter to speed up computation if you have a big GPU
                  max_epochs=5
                  )

from flair.data import Sentence
# load the model you trained
model = SequenceTagger.load('resources/taggers/sota-ner-flert/final-model.pt')

# create example sentence
sentence = Sentence('I love Berlin')

# predict tags and print
model.predict(sentence)

print(sentence.to_tagged_string())
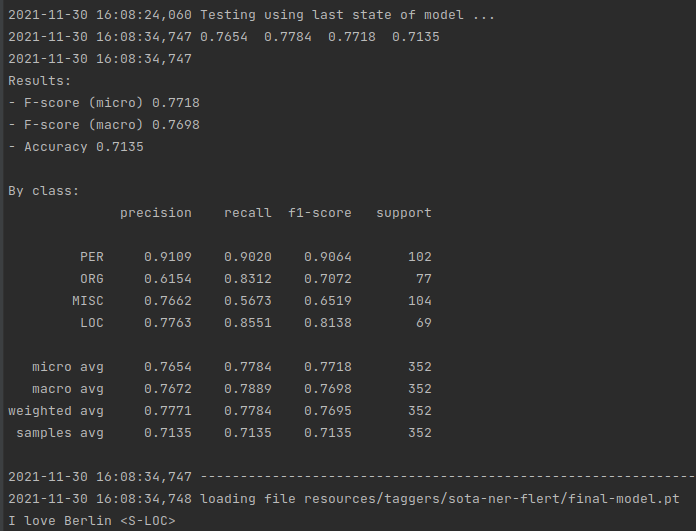
This will give you state-of-the-art numbers similar to the ones reported in Schweter and Akbik (2021)
Training other types of models is very similar to the scripts for training sequence labelers above. For text classification, use an appropriate corpus and use document-level embeddings instead of word-level embeddings (see tutorials on both for difference).
(If you don’t have a big GPU to fine-tune transformers, try DocumentPoolEmbeddings or DocumentRNNEmbeddings instead; sometimes they work just as well!)
from flair.data import Corpus
from flair.datasets import TREC_6
from flair.embeddings import TransformerDocumentEmbeddings
from flair.models import TextClassifier
from flair.trainers import ModelTrainer
from flair.data import Sentence

# 1. get the corpus
corpus: Corpus = TREC_6()

# 2. what label do we want to predict?
label_type = 'question_class'

# 3. create the label dictionary
label_dict = corpus.make_label_dictionary(label_type=label_type)

# 4. initialize transformer document embeddings (many models are available)
document_embeddings = TransformerDocumentEmbeddings('distilbert-base-uncased', fine_tune=True)

# 5. create the text classifier
classifier = TextClassifier(document_embeddings, label_dictionary=label_dict, label_type=label_type)

# 6. initialize trainer
trainer = ModelTrainer(classifier, corpus)

# 7. run training with fine-tuning
trainer.fine_tune('resources/taggers/question-classification-with-transformer',
                  learning_rate=5.0e-5,
                  mini_batch_size=1,
                  mini_batch_chunk_size=1,  # remove this parameter to speed up computation if you have a big GPU
                  max_epochs=5,
                  )

classifier = TextClassifier.load('resources/taggers/question-classification-with-transformer/final-model.pt')

# create example sentence
sentence = Sentence('Who built the Eiffel Tower ?')

# predict class and print
classifier.predict(sentence)

print(sentence.labels)

Now, let us train a single model that can PoS tag text in both English and German. To do this, we load both the English and German UD corpora and create a MultiCorpus object. We also use the new multilingual Flair embeddings for this task.
from flair.data import MultiCorpus
from flair.datasets import UD_ENGLISH, UD_GERMAN
from flair.embeddings import FlairEmbeddings, StackedEmbeddings
from flair.models import SequenceTagger
from flair.trainers import ModelTrainer

# 1. get the corpora - English and German UD
corpus = MultiCorpus([UD_ENGLISH(), UD_GERMAN()]).downsample(0.1)

# 2. what label do we want to predict?
label_type = 'upos'

# 3. make the label dictionary from the corpus
label_dict = corpus.make_label_dictionary(label_type=label_type)
print(label_dict)

# 4. initialize embeddings
embedding_types = [

    # we use multilingual Flair embeddings in this task
    FlairEmbeddings('multi-forward'),
    FlairEmbeddings('multi-backward'),
]

embeddings = StackedEmbeddings(embeddings=embedding_types)

# 5. initialize sequence tagger
tagger = SequenceTagger(hidden_size=256,
                        embeddings=embeddings,
                        tag_dictionary=label_dict,
                        tag_type=label_type,
                        use_crf=True)

# 6. initialize trainer
trainer = ModelTrainer(tagger, corpus)

# 7. start training
trainer.train('resources/taggers/example-universal-pos',
              learning_rate=0.1,
              mini_batch_size=32,
              max_epochs=10,
              )

from flair.data import Sentence
# load the model you trained
model = SequenceTagger.load('resources/taggers/example-universal-pos/final-model.pt')

# create example sentence
sentence = Sentence('I love Berlin')

# predict tags and print
model.predict(sentence)

print(sentence.to_tagged_string())
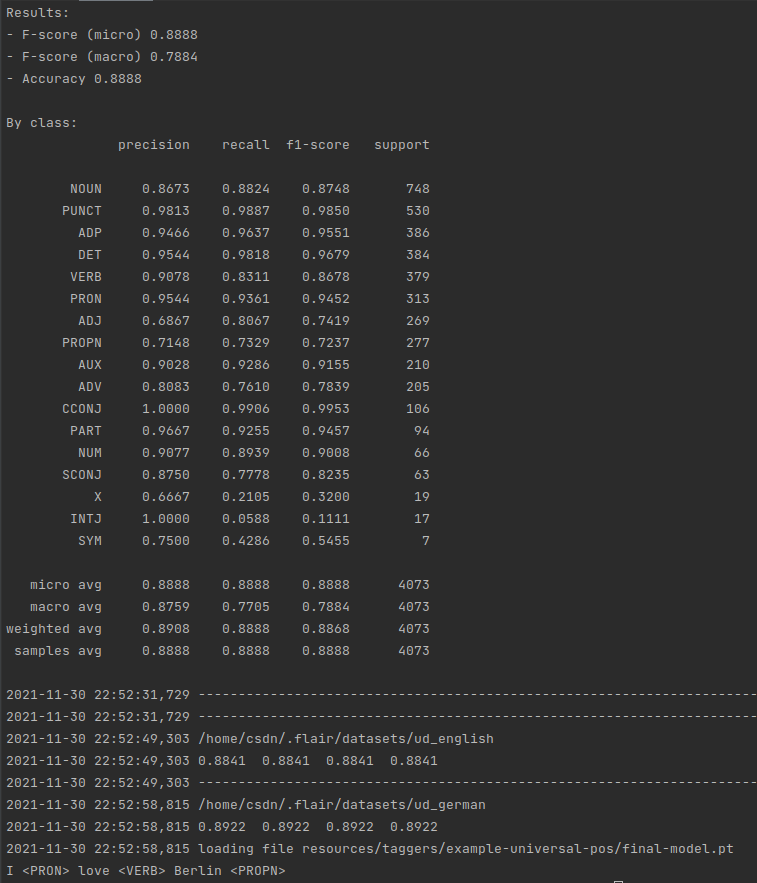
This gives you a multilingual model. Try experimenting with more languages
If you want to stop the training at some point and resume it at a later point, you should train with the parameter checkpoint set to True. This will save the model plus training parameters after every epoch. Thus, you can load the model plus trainer at any later point and continue the training exactly there where you have left
The example code below shows how to train, stop, and continue training of a SequenceTagger. The same can be done for TextClassifier
from flair.data import Corpus
from flair.datasets import UD_ENGLISH
from flair.embeddings import WordEmbeddings
from flair.models import SequenceTagger
from flair.trainers import ModelTrainer

# 1. get the corpus
corpus: Corpus = UD_ENGLISH().downsample(0.1)

# 2. what label do we want to predict?
label_type = 'upos'

# 3. make the label dictionary from the corpus
label_dict = corpus.make_label_dictionary(label_type=label_type)

# 4. initialize sequence tagger
tagger: SequenceTagger = SequenceTagger(hidden_size=128,
                                        embeddings=WordEmbeddings('glove'),
                                        tag_dictionary=label_dict,
                                        tag_type=label_type)

# 5. initialize trainer
trainer: ModelTrainer = ModelTrainer(tagger, corpus)

# 6. train for 10 epochs with checkpoint=True
path = 'resources/taggers/example-pos'
trainer.train(path,
              learning_rate=0.1,
              mini_batch_size=32,
              max_epochs=10,
              checkpoint=True,
              )

# 7. continue training at later point. Load previously trained model checkpoint, then resume
trained_model = SequenceTagger.load(path + '/checkpoint.pt')

# resume training best model, but this time until epoch 25
trainer.resume(trained_model,
               base_path=path + '-resume',
               max_epochs=25,
               )
Many embeddings in Flair are somewhat costly to produce in terms of runtime and may have large vectors. Examples of this are Flair- and Transformer-based embeddings. Depending on your setup, you can set options to optimize training time.
The most important is mini_batch_size: Set this to higher values if your GPU can handle it to get good speed-ups. However, if your data set is very small don’t set it too high, otherwise there won’t be enough learning steps per epoch.
A similar parameter is mini_batch_chunk_size: This parameter causes mini-batches to be further split into chunks, causing slow-downs but better GPU-memory effectiveness. Standard is to set this to None (just don’t set it) - only set this if your GPU cannot handle the desired mini-batch size. Remember that this is the opposite of mini_batch_size so this will slow down computation.
Another main parameter you need to set is the embeddings_storage_mode in the train() method of the ModelTrainer. It can have one of three values:
- ‘none’: If you set embeddings_storage_mode=‘none’, embeddings do not get stored in memory. Instead they are generated on-the-fly in each training mini-batch (during training). The main advantage is that this keeps your memory requirements low. Always set this if fine-tuning transformers.
- ‘cpu’: If you set embeddings_storage_mode=‘cpu’, embeddings will get stored in regular memory.
during training: this in many cases speeds things up significantly since embeddings only need to be computed in the first epoch, after which they are just retrieved from memory. A disadvantage is that this increases memory requirements. Depending on the size of your dataset and your memory setup, this option may not be possible.
during inference: this slow down your inference when used with a GPU as embeddings need to be moved from GPU memory to regular memory. The only reason to use this option during inference would be to not only use the predictions but also the embeddings after prediction. - ‘gpu’: If you set embeddings_storage_mode=‘gpu’, embeddings will get stored in CUDA memory. This will often be the fastest one since this eliminates the need to shuffle tensors from CPU to CUDA over and over again. Of course, CUDA memory is often limited so large datasets will not fit into CUDA memory. However, if the dataset fits into CUDA memory, this option is the fastest one.
If you don’t have training data (or only very little), our TARS approach might be best for you. Check out the TARS tutorial on few-shot and zero-shot classification).
Alternatively, you can look into training your own embeddings.
加载训练数据
This part of the tutorial shows how you can load a corpus for training a model
The Corpus represents a dataset that you use to train a model. It consists of a list of train sentences, a list of dev sentences, and a list of test sentences, which correspond to the training, validation and testing split during model training.
The following example snippet instantiates the Universal Dependency Treebank for English as a corpus object:
import flair.datasets
corpus = flair.datasets.UD_ENGLISH()

# print the number of Sentences in the train split
print(len(corpus.train))

# print the number of Sentences in the test split
print(len(corpus.test))

# print the number of Sentences in the dev split
print(len(corpus.dev))

# print the first Sentence in the test split
print(corpus.test[0])

# print the first Sentence in the test split
print(corpus.test[0].to_tagged_string('pos'))
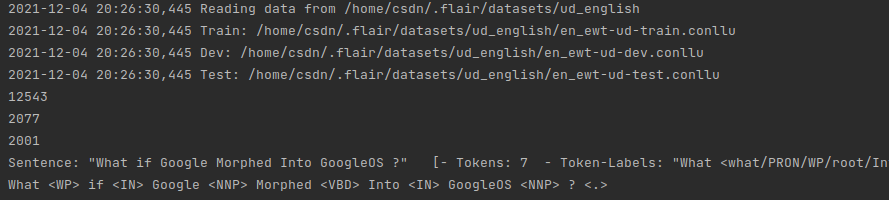
So the corpus is tagged and ready for training.
A Corpus contains a bunch of useful helper functions. For instance, you can downsample the data by calling downsample() and passing a ratio. So, if you normally get a corpus like this:
import flair.datasets
corpus = flair.datasets.UD_ENGLISH()
import flair.datasets
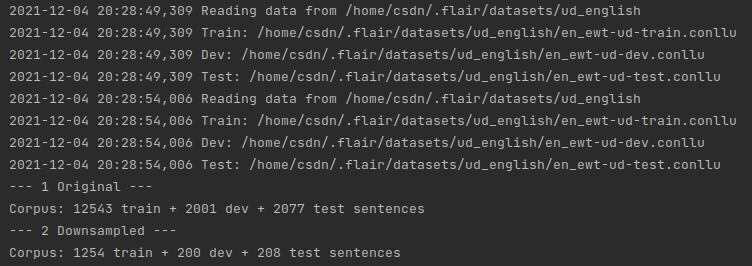
downsampled_corpus = flair.datasets.UD_ENGLISH().downsample(0.1)
print("--- 1 Original ---")
print(corpus)
print("--- 2 Downsampled ---")
print(downsampled_corpus)
For many learning tasks you need to create a “dictionary” that contains all the labels you want to predict. You can generate this dictionary directly out of the Corpus by calling the method make_label_dictionary and passing the desired label_type
For instance, the UD_ENGLISH corpus instantiated above has multiple layers of annotation like regular POS tags (‘pos’), universal POS tags (‘upos’), morphological tags (‘tense’, ‘number’…) and so on. Create label dictionaries for universal POS tags by passing label_type=‘upos’ like this:
# create label dictionary for a Universal Part-of-Speech tagging task
upos_dictionary = corpus.make_label_dictionary(label_type='upos')

# print dictionary
print(upos_dictionary)

If you want to train multiple tasks at once, you can use the MultiCorpus object. To initiate the MultiCorpus you first need to create any number of Corpus objects. Afterwards, you can pass a list of Corpus to the MultiCorpus object. For instance, the following snippet loads a combination corpus consisting of the English, German and Dutch Universal Dependency Treebanks.
english_corpus = flair.datasets.UD_ENGLISH()
german_corpus = flair.datasets.UD_GERMAN()
dutch_corpus = flair.datasets.UD_DUTCH()

# make a multi corpus consisting of three UDs
from flair.data import MultiCorpus
multi_corpus = MultiCorpus([english_corpus, german_corpus, dutch_corpus])
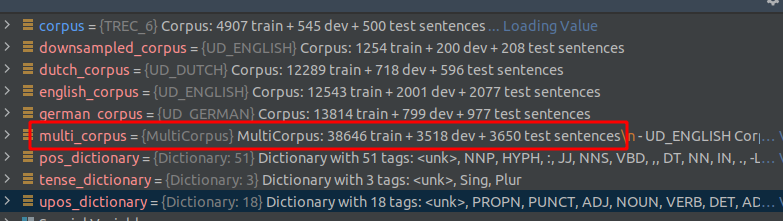
The MultiCorpus inherits from Corpus, so you can use it like any other corpus to train your models
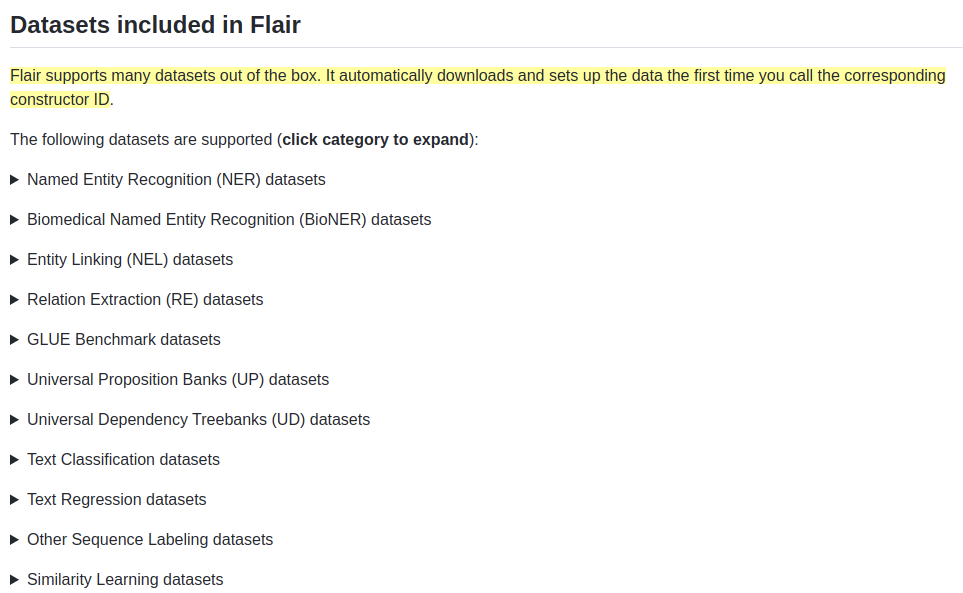
Reading Your Own Sequence Labeling Dataset
In cases you want to train over a sequence labeling dataset that is not in the above list, you can load them with the ColumnCorpus object. Most sequence labeling datasets in NLP use some sort of column format in which each line is a word and each column is one level of linguistic annotation
George N B-PER
Washington N I-PER
went V O
to P O
Washington N B-LOC

Sam N B-PER
Houston N I-PER
stayed V O
home N O
The first column is the word itself, the second coarse PoS tags, and the third BIO-annotated NER tags. Empty line separates sentences. To read such a dataset, define the column structure as a dictionary and instantiate a ColumnCorpus
from flair.data import Corpus
from flair.datasets import ColumnCorpus

# define columns
columns = {0: 'text', 1: 'pos', 2: 'ner'}

# this is the folder in which train, test and dev files reside
data_folder = './corpus_dataset'

# init a corpus using column format, data folder and the names of the train, dev and test files
corpus: Corpus = ColumnCorpus(data_folder, columns,
                              train_file='train.txt',
                              test_file='test.txt',
                              dev_file='dev.txt')
This gives you a Corpus object that contains the train, dev and test splits, each has a list of Sentence. So, to check how many sentences there are in the training split, do
len(corpus.train)
You can also access a sentence and check out annotations. Lets assume that the training split is read from the example above, then executing these commands
print(corpus.train[0].to_tagged_string('ner'))
print(corpus.train[1].to_tagged_string('pos'))

George <B-PER> Washington <I-PER> went to Washington <B-LOC>
Sam <N> Houston <N> stayed <V> home <N>
Reading a Text Classification Dataset
If you want to use your own text classification dataset, there are currently two methods to go about this: load specified text and labels from a simple CSV file or format your data to the FastText format.
Many text classification datasets are distributed as simple CSV files in which each row corresponds to a data point and columns correspond to text, labels, and other metadata. You can load a CSV format classification dataset using CSVClassificationCorpus by passing in a column format (like in ColumnCorpus above). This column format indicates which column(s) in the CSV holds the text and which field(s) the label(s). By default, Python’s CSV library assumes that your files are in Excel CSV format, but you can specify additional parameters if you use custom delimiters or quote characters
Load from simple CSV file
from flair.data import Corpus
from flair.datasets import CSVClassificationCorpus

# this is the folder in which train, test and dev files reside
data_folder = '/path/to/data'

# column format indicating which columns hold the text and label(s)
column_name_map = {4: "text", 1: "label_topic", 2: "label_subtopic"}

# load corpus containing training, test and dev data and if CSV has a header, you can skip it
corpus: Corpus = CSVClassificationCorpus(data_folder,
                                         column_name_map,
                                         skip_header=True,
                                         delimiter='\t',    # tab-separated files
)
FastText Format
If using CSVClassificationCorpus is not practical, you may format your data to the FastText format, in which each line in the file represents a text document. A document can have one or multiple labels that are defined at the beginning of the line starting with the prefix label. This looks like this
__label__<label_1> <text>
__label__<label_1> __label__<label_2> <text>
As previously mentioned, to create a Corpus for a text classification task, you need to have three files (train, dev, and test) in the above format located in one folder. This data folder structure could, for example, look like this for the IMDB task:
/resources/tasks/imdb/train.txt
/resources/tasks/imdb/dev.txt
/resources/tasks/imdb/test.txt
Now create a ClassificationCorpus by pointing to this folder (/resources/tasks/imdb). Thereby, each line in a file is converted to a Sentence object annotated with the labels.
Attention: A text in a line can have multiple sentences. Thus, a Sentence object can actually consist of multiple sentences
from flair.data import Corpus
from flair.datasets import ClassificationCorpus

# this is the folder in which train, test and dev files reside
data_folder = './csv_dataset'

# load corpus containing training, test and dev data
corpus: Corpus = ClassificationCorpus(data_folder,
                                      test_file='test.txt',
                                      dev_file='dev.txt',
                                      train_file='train.txt',
                                      label_type='topic',
                                      )

print(corpus.train[0])
print(corpus.train[1])
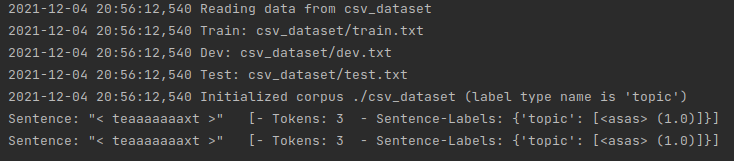
Since the FastText format does not have columns, you must manually define a name for the annotations. In this example we chose label_type=‘topic’ to denote that we are loading a corpus with topic labels.


 758
758


 被折叠的 条评论
为什么被折叠?
被折叠的 条评论
为什么被折叠?
 到【灌水乐园】发言


