


说明:请耐心看完。。。
Spring中执行单元测试,最麻烦的就是解决Bean的定义以及注入的问题。最开始使用Spring的上下文初始化进行测试,开头是这样的:
@RunWith(SpringJUnit4ClassRunner.class)
@ContextConfiguration("/config/Spring-db1.xml")
或者
@RunWith(SpringRunner.class) // spring框架
@TestPropertySource(locations = "classpath:application-unittest-other.properties") // 配置文件
@ContextConfiguration(
    classes = TestServiceImplTest.MyConfiguration.class   // 配置bean
)
@TestConfiguration
@ActiveProfiles("unittest") // 激活对应配置文件
@DirtiesContext(classMode = DirtiesContext.ClassMode.BEFORE_EACH_TEST_METHOD)
public class TestServiceImplTest {

@Autowired
TestApi testApi;  // mock

// === 增加测试代码


public static class MyTestConfiguration {

        @Bean
        public ThreadPoolTaskExecutor threadPoolTaskExecutor() {
            return new ThreadPoolTaskExecutor();
        }


        @Bean
        public TestApi testApi() {
            return mock(TestApi.class);
        }

    }
}
h2数据库配置
spring.application.name=test-app
spring.datasource.druid.url=jdbc:h2:mem:;MODE=MySQL;DB_CLOSE_ON_EXIT=TRUE;
spring.datasource.druid.username=root
spring.datasource.druid.password=123456
spring.datasource.druid.driver-class-name=org.h2.Driver
spring.datasource.druid.filters=stat
spring.datasource.druid.maxActive=20
spring.datasource.druid.initialSize=1
spring.datasource.schema=classpath:db/schema.sql // 建表语句 eg: create TABLE IF NOT EXISTS 开头
spring.datasource.data=classpath:db/data.sql //测试初始化数据 INSERT INTO table VALUES
spring.datasource.generate-unique-name=true
spring.cloud.enable=false
spring.cloud.discovery.enable=false
或者
<bean id="dataSource" class="org.apache.tomcat.jdbc.pool.DataSource"
        destroy-method="close">
        <property name="poolProperties">
            <bean class="org.apache.tomcat.jdbc.pool.PoolProperties">
                <property name="url" value="jdbc:h2:mem:testdb;DB_CLOSE_ON_EXIT=FALSE;DB_CLOSE_DELAY=1;MODE=MySQL"/>
                <property name="driverClassName" value="org.h2.Driver" />
                <property name="username" value="" />
                <property name="password" value=""/>
                <property name="validationQuery" value="SELECT 1"/>
                <property name="maxActive" value="8" />
                <property name="minIdle" value="1"/>
                <property name="maxIdle" value="4" />
                <property name="maxWait" value="10000"/>
                <property name="initialSize" value="1"/>
            </bean>
        </property>
    </bean>
注意:MODE=MySQL,这是让h2模拟mysql库,如果你使用其他类型的库,一般也会有对应的Mode,主流数据库都支持。注意mem项,意思是内存数据库,这样配置根本不会生成数据库文件的,特别适合单元测试(依赖外部环境就不是标准单元测试了)。至于数据源类型,按自己的工程的配置就好,只要使用h2的url和driver就行,这里用的是tomcat数据源。
说明:
依赖spring框架,不需要注入bean,贴近实际业务,能够对数据库操作;启动相对较慢,对业务依赖比较深,单元测试比较笨重,启动也相对较慢。
运行的时候又需要对整个Spring的上下文进行初始化,跑一个单元测试需要0.1秒,跑初始化流程就需要1分钟。不过当时单元测试并不是团队高优先级的任务,后来也就没有再研究。
JUnit+mockito+powermock进行可行的单元测试
三个软件的定位
- JUnit 作为优秀的测试框架,在Spring单元测试占有相当大的市场份额
- Mockito 管理Spring的Mock对象管理,以及依赖注入等
- PowerMock Mockito不能对构造函数、静态函数以及私有函数进行Stunning,PowerMock是Mockito基础上的增强,填补了后者这方面的空白
从一个例子开始:签到
凡事从简单的开始,我选择了系统中最复杂模块之一————“签到”的最简单部分进行单元测试。以下是需要进行测试的代码:
@Override
@Transactional
public SigninResult signV3(String staffId, SigninType signType, String wifiName, String wifiMac, Double longitude,
                           Double latitude, Double radius, String locationName, String mobileId, Date signDate, String companyId, boolean isSigninOnlyOnce) {
    this.checkOutSign(signType, companyId, staffId, signDate);//校验是否有相同类型的外出签到在申请中或已经审批通过了
    return actualSignV3(staffId, signType, wifiName, wifiMac, longitude, latitude, radius, locationName, mobileId, signDate, companyId, new Date(), isSigninOnlyOnce, false);
}
大家可以忽略乱七八糟的参数,只关注函数的两步:
- 校验和外出签到关联的条件:checkOutSign
- 实际执行签到的逻辑:actualSignV3 另外需要注意的是:
- checkOutSign是私有函数,如果其中不符合签到条件的话会抛出异常
- actualSignV3是共有函数,在某些版本的接口中可以被其他模块直接调用 由于我们要演示对私有函数的测试,所以
checkOutSign内的大致流程为: - 获取一个外出签到记录,
signinOutRecordDao.findByCompanyIdAndStaffIdAndSignTypeAndSignDateAndApplicationStatusIn(xxx, xxx)。(JPA实现,函数名比较长,勿喷) - 校验外出签到,如果有异常的时候,抛出
IrenshiException
单元测试代码
先从代码开始,然后一步步讲解
package cn.irenshi.biz.attendance.service;

import cn.irenshi.biz.attendance.dao.mysql.SigninOutRecordDao;
import cn.irenshi.biz.attendance.service.impl.SignServiceImpl;
import cn.irenshi.meta.dto.attendance.mysql.SigninOutRecord;
import cn.irenshi.meta.entity.attendance.SigninResult;
import cn.irenshi.meta.exception.IrenshiException;
import cn.irenshi.meta.type.ApplicationStatus;
import cn.irenshi.meta.type.SigninType;
import com.google.common.collect.Lists;
import org.junit.Test;
import org.junit.runner.RunWith;
import org.mockito.InjectMocks;
import org.mockito.Mock;
import org.powermock.core.classloader.annotations.PrepareOnlyThisForTest;
import org.powermock.modules.junit4.PowerMockRunner;
import org.powermock.reflect.Whitebox;

import java.util.Date;

import static org.junit.Assert.assertTrue;
import static org.mockito.Matchers.any;
import static org.mockito.Matchers.eq;
import static org.mockito.Mockito.doReturn;
import static org.mockito.Mockito.*;
import static org.powermock.api.mockito.PowerMockito.doNothing;
import static org.powermock.api.mockito.PowerMockito.spy;
import static org.powermock.api.mockito.PowerMockito.*;

// 1. 使用名称为PowerMockRunner的JUnit模块执行单元测试
@RunWith(PowerMockRunner.class)
public class SignServiceTest {
    // 2. 使用Mockito的@InjectMocks注解将待测试的实现类注入
    @InjectMocks
    private SignServiceImpl signService;
    // 3. 将生成MockDao,并注入到@InjectMocks指定的类中
    @Mock
    private SigninOutRecordDao signinOutRecordDao;

    @Test
    // 4. 对于final类,有private函数及static函数的类等,必须使用此注解,之后才能着Stubbing
    @PrepareOnlyThisForTest(SignServiceImpl.class)
    public void testSignV3() throws Exception {
        String staffId = "mockStaffId";
        SigninType signType = SigninType.SIGNIN_AFTERNOON;
        String wifiName = "mockWifiName";
        String wifiMac = "mockWifiMac";
        Double longitude = 0.0;
        Double latitude = 0.0;
        Double radius = 0.0;
        String locationName = "mockLocationName";
        String mobileId = "mockMobileId";
        Date signDate = new Date();
        String companyId = "mockCompanyId";
        boolean isSigninOnlyOnce = true;

        // 5. 对实体类进行Stubbing,从spy()开始
        SignServiceImpl spy = spy(signService);

        SigninResult signinResult = new SigninResult();

        // 6. 对私有函数进行Stubbing
        doNothing().when(spy, "checkOutSign", signType, companyId, staffId, signDate);
        // 7. 对共有和函数进行Stubbing
        // 8. 因为actualSignV3含有不确定的变量,所以必须使用Matchers进行参数处理
        doReturn(signinResult).when(spy).actualSignV3(eq(staffId), eq(signType), eq(wifiName), eq(wifiMac),
                eq(longitude), eq(latitude), eq(radius), eq(locationName), eq(mobileId), eq(signDate), eq(companyId),
                any(), eq(isSigninOnlyOnce), eq(false));

        // 9. 执行即将进行测试的代码
        SigninResult result = spy.signV3(staffId, signType, wifiName, wifiMac, longitude, latitude, radius, locationName, mobileId,
                signDate, companyId, isSigninOnlyOnce);

        // 10. 检查该私有函数是否以给定的参数被调用了1次
        verifyPrivate(spy, times(1)).invoke("checkOutSign", signType, companyId, staffId, signDate);
        // 11. 检查该共有函数是否以给定的参数被调用了1次
        // 12. 同样由于含有不确定变量,校验的时候也需要使用Matchers对参数进行处理
        verify(spy, times(1)).actualSignV3(eq(staffId), eq(signType), eq(wifiName), eq(wifiMac),
                eq(longitude), eq(latitude), eq(radius), eq(locationName), eq(mobileId), eq(signDate), eq(companyId),
                any(), eq(isSigninOnlyOnce), eq(false));
        // 13. 校验函数的返回值是否正确
        assertTrue(signinResult == result);
    }

    @Test
    public void testCheckOutSign1() throws Exception {
        String staffId = "mockStaffId";
        SigninType signType = SigninType.SIGNIN_AFTERNOON;
        Date signDate = new Date();
        String companyId = "mockCompanyId";

        SigninOutRecord record1 = new SigninOutRecord();
        SigninOutRecord record2 = new SigninOutRecord();
        SigninOutRecord record3 = new SigninOutRecord();
        SigninOutRecord record4 = new SigninOutRecord();
        SigninOutRecord record5 = new SigninOutRecord();
        record1.setApplicationStatus(ApplicationStatus.CANCEL_APPROVED);
        record2.setApplicationStatus(ApplicationStatus.CANCEL_PROCESSING);
        record3.setApplicationStatus(ApplicationStatus.DELETE);
        record4.setApplicationStatus(ApplicationStatus.DENIED);
        record5.setApplicationStatus(ApplicationStatus.PROCESSING);
        // 14. 对Mock的接口进行处理,定义接口的返回值
        doReturn(Lists.newArrayList(record1, record2, record3, record4)).when(signinOutRecordDao)
                .findByCompanyIdAndStaffIdAndSignTypeAndSignDateAndApplicationStatusIn(companyId, staffId,
                        signType, signDate, Lists.newArrayList(ApplicationStatus.APPROVED,
                                ApplicationStatus.WAITING_HR_APPROVAL, ApplicationStatus.PROCESSING));

        // 15. 执行私有函数进行测试
        Whitebox.invokeMethod(signService, "checkOutSign", signType, companyId, staffId, signDate);

        // 16. 校验Mock的对象的函数是否被调用了1次
        verify(signinOutRecordDao, times(1)).findByCompanyIdAndStaffIdAndSignTypeAndSignDateAndApplicationStatusIn(companyId, staffId,
                signType, signDate, Lists.newArrayList(ApplicationStatus.APPROVED,
                        ApplicationStatus.WAITING_HR_APPROVAL, ApplicationStatus.PROCESSING));
    }

    // 17. 该函数预计会产生Exception
    @Test(expected = IrenshiException.class)
    public void testCheckOutSign2() throws Exception {
        String staffId = "mockStaffId";
        SigninType signType = SigninType.SIGNIN_AFTERNOON;
        Date signDate = new Date();
        String companyId = "mockCompanyId";

        SigninOutRecord record = new SigninOutRecord();
        record.setApplicationStatus(ApplicationStatus.APPROVED);
        doReturn(Lists.newArrayList(record)).when(signinOutRecordDao)
                .findByCompanyIdAndStaffIdAndSignTypeAndSignDateAndApplicationStatusIn(companyId, staffId,
                        signType, signDate, Lists.newArrayList(ApplicationStatus.APPROVED,
                                ApplicationStatus.WAITING_HR_APPROVAL, ApplicationStatus.PROCESSING));

        Whitebox.invokeMethod(signService, "checkOutSign", signType, companyId, staffId, signDate);

        verify(signinOutRecordDao, times(1)).findByCompanyIdAndStaffIdAndSignTypeAndSignDateAndApplicationStatusIn(companyId, staffId,
                signType, signDate, Lists.newArrayList(ApplicationStatus.APPROVED,
                        ApplicationStatus.WAITING_HR_APPROVAL, ApplicationStatus.PROCESSING));
    }
}
代码详细分析
使用JUnit测试框架启动
@RunWith(PowerMockRunner.class)
@RunWith是JUnit的注解,可以指定测试用的Runner。如:使用Spring上下文做测试的代码为@RunWith(SpringJUnit4ClassRunner.class) ,使用纯Mockito的代码为@RunWith(MockitoJUnitRunner.class)
注入待测试的类
@InjectMocks
private SignServiceImpl signService;
@InjectMocks是原生Mockito的注解,负责将待测试的类注入到单元测试中。这里需要注意:
- 此处的对象(SignServiceImpl)必须是实体对象,不能是接口或者抽象类。因为
InjectMocks需要实例化该对象 - 对象中所有的依赖注入都会以一个简单粗暴的方式解决,默认将所有的
@Autowired对象注入成null所以,只要增加这个注解就可以快速生成一个对象,比Spring的Bean管理简单很多。
Mock一个Bean
大部分情况下,我们还是要Mock一些Bean,来辅助完成单元测试的。
@Mock
private SigninOutRecordDao signinOutRecordDao;
@Mock也是原生Mockito的注解,增加该Mock之后,SignServiceImpl所有依赖SigninOutRecordDao的地方,都会被注入成该对象。我们可以对Mock的对象进行各种操作,修改函数调用行为(称作Stub,有人叫“打桩”)等。
测试类包含私有函数的调用时
@Test
@PrepareOnlyThisForTest(SignServiceImpl.class)
public void testSignV3() throws Exception
@Test注解不用说,就是生成一个测试用例。@PrepareOnlyThisForTest需要特别注意。因为我们在测试SignServiceImpl的过程中,需要对SignServiceImpl的私有函数checkOutSign进行Stubbing,修改其行为,所以必须使用@PrepareOnlyThisForTest(SignServiceImpl.class)为Stubbing做好准备。
为测试实体Stubbing
测试的时候,我们需要用到实体类,但又不想使用实体类的所有实现函数。所以我们需要针对特定的某些函数进行Stubbing。
SignServiceImpl spy = spy(signService);
对Mock的接口(如:SigninOutRecordDao signinOutRecordDao)来说,直接对其中的函数进行Stub即可。但如果要对测试实体进行Stubbing,则需要先对其进行spy。然后即可开展后边的Stubbing操作。
对函数进行Stubbing
先从对Mock对象进行的Stubbing开始。
doReturn(Lists.newArrayList(record1, record2, record3, record4)).when(signinOutRecordDao)
                .findByCompanyIdAndStaffIdAndSignTypeAndSignDateAndApplicationStatusIn(companyId, staffId,
                        signType, signDate, Lists.newArrayList(ApplicationStatus.APPROVED,
                                ApplicationStatus.WAITING_HR_APPROVAL, ApplicationStatus.PROCESSING));
这个函数对signinOutRecordDao进行Stubbing。根据字面意思可以理解:
This function will be stubbed as: **return** the given **List** when **signinOutRecordDao**
is called by **findByCompanyIdAndStaffIdAndSignTypeAndSignDateAndApplicationStatusIn**
with these **parameters**
都比较容易理解。
对私有函数进行Stubbing
对私有函数进行Stubbing和公共函数类似:
doNothing().when(spy, "checkOutSign", signType, companyId, staffId, signDate);
在这里,Stubbing对象是实体spy的checkOutSign函数,参数为signType, companyId, staffId, signDate。
当被Stub的函数不是确定输入参数时
actualSignV3这个函数在调用的时候,用了一个很Anti-Pattern的一个设计,signTime这个参数用的是new Date()。暂且先不讨论代码的质量,先看看下边的Stub代码:
doReturn(signinResult).when(spy).actualSignV3(eq(staffId), eq(signType), eq(wifiName), eq(wifiMac),
                eq(longitude), eq(latitude), eq(radius), eq(locationName), eq(mobileId), eq(signDate), eq(companyId),
                any(), eq(isSigninOnlyOnce), eq(false));
any()函数意思是,当actualSignV3函数调用的时候,无论signTime这个参数是什么值,这个Stubbing均生效。需要注意的是,一旦函数参数里边有任何一个any或类似的Matcher函数(如anyInt,anyString等)时,其他所有参数也必须以同样的形式出现。 上边代码中可以看到所有参数都使用了eq()进行封装。
另一种Stubbing方法(不推荐)
when(spy.actualSignV3(eq(staffId), eq(signType), eq(wifiName), eq(wifiMac),
        eq(longitude), eq(latitude), eq(radius), eq(locationName), eq(mobileId), eq(signDate), eq(companyId),
        any(), eq(isSigninOnlyOnce), eq(false))).thenReturn(signinResult);
这种Stubbing比较符合汉语的语法:当xxx的时候,怎么怎么样。但是这样Stub有一个不好的地方,Stub的时候会首先执行actualSignV3的原版函数,然后再进行替换。可向而知,由于很多Bean都没有定义,直接抛NullPointerException。
执行测试代码
执行测试代码的方法和普通调用一样:
SigninResult result = spy.signV3(staffId, signType, wifiName, wifiMac, longitude, latitude, radius, locationName, mobileId,
        signDate, companyId, isSigninOnlyOnce);
但这里仍有需要注意的地方:当调用的时候,只能使用被spy的对象spy,而不能使用原对象signService。因为只有spy被Stubbed了,而signService仍然保持不变。
校验函数调用情况
校验checkOutSign函数是否以给定的参数signType, companyId, staffId, signDate被调用了一次。
verifyPrivate(spy, times(1)).invoke("checkOutSign", signType, companyId, staffId, signDate);
校验具有不确定参数的函数时
和Stubbing的时候一样,校验时如果有任意一个参数使用了Matcher形式,则其他所有函数都必须使用Matcher。
verify(spy, times(1)).actualSignV3(eq(staffId), eq(signType), eq(wifiName), eq(wifiMac),
        eq(longitude), eq(latitude), eq(radius), eq(locationName), eq(mobileId), eq(signDate), eq(companyId),
        any(), eq(isSigninOnlyOnce), eq(false));
校验输出结果
这个没什么好说的
assertTrue(signinResult == result);
对私有函数进行测试
私有函数测试的难点在于我们没有办法调用私有函数,但是PowerMock帮我们解决了这个问题。
Whitebox.invokeMethod(signService, "checkOutSign", signType, companyId, staffId, signDate);
PowerMock使用Writebox,通过反射的方式调用checkOutSign这个函数。
正确运行会抛出异常
这个也没什么好说的,JUnit4原生的处理方式。
@Test(expected = IrenshiException.class)
最后
一个框架+一个Mock+一个Mock增强,基本可以满足大部分单元测试的需求了,在配合使用Jenkins等CI工具,单元测试是要飞起来的节奏
补充:
Mock 测试
Mock 测试就是在测试过程中,对于某些不容易构造(如 HttpServletRequest 必须在Servlet 容器中才能构造出来)或者不容易获取比较复杂的对象(如 JDBC 中的ResultSet 对象),用一个虚拟的对象(Mock 对象)来创建以便测试的测试方法。
Mock 最大的功能是帮你把单元测试的耦合分解开,如果你的代码对另一个类或者接口有依赖,它能够帮你模拟这些依赖,并帮你验证所调用的依赖的行为。
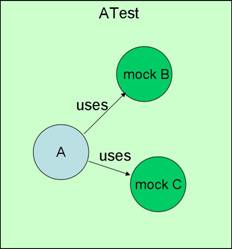
比如一段代码有这样的依赖:
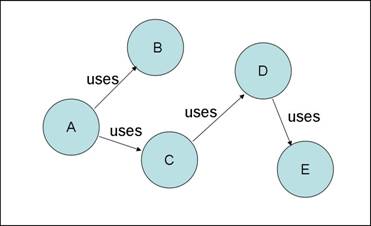
当我们需要测试A类的时候,如果没有 Mock,则我们需要把整个依赖树都构建出来,而使用 Mock 的话就可以将结构分解开,像下面这样:
Mock 对象使用范畴
真实对象具有不可确定的行为,产生不可预测的效果,(如:股票行情,天气预报) 真实对象很难被创建的 真实对象的某些行为很难被触发 真实对象实际上还不存在的(和其他开发小组或者和新的硬件打交道)等等
使用 Mock 对象测试的关键步骤
使用一个接口来描述这个对象 在产品代码中实现这个接口 在测试代码中实现这个接口 在被测试代码中只是通过接口来引用对象,所以它不知道这个引用的对象是真实对象,还是 Mock 对象。
Java Mock 测试
目前,在 Java 阵营中主要的 Mock 测试工具有 Mockito,JMock,EasyMock 等。
关于这些框架的比较,不是本文的重点。本文着重介绍 Mockito 的使用。
Mockito 的特性
Mockito 是美味的 Java 单元测试 Mock 框架,开源。
大多 Java Mock 库如 EasyMock 或 JMock 都是 expect-run-verify (期望-运行-验证)方式,而 Mockito 则使用更简单,更直观的方法:在执行后的互动中提问。使用 Mockito,你可以验证任何你想要的。而那些使用 expect-run-verify 方式的库,你常常被迫查看无关的交互。
非 expect-run-verify 方式 也意味着,Mockito 无需准备昂贵的前期启动。他们的目标是透明的,让开发人员专注于测试选定的行为。
Mockito 拥有的非常少的 API,所有开始使用 Mockito,几乎没有时间成本。因为只有一种创造 mock 的方式。只要记住,在执行前 stub,而后在交互中验证。你很快就会发现这样 TDD java 代码是多么自然。
类似 EasyMock 的语法来的,所以你可以放心地重构。Mockito 并不需要“expectation(期望)”的概念。只有 stub 和验证。
Mockito 实现了 Gerard Meszaros 所谓的 Test Spy.
其他的一些特点:
- 可以 mock 具体类而不单止是接口
- 一点注解语法糖 -
@Mock - 干净的验证错误是 – 点击堆栈跟踪,看看在测试中的失败验证;点击异常的原因来导航到代码中的实际互动。堆栈跟踪总是干干净净。
- 允许灵活有序的验证(例如:你任意有序
verify,而不是每一个单独的交互) - 支持“详细的用户号码的时间”以及“至少一次”验证
- 灵活的验证或使用参数匹配器的 stub (
anyObject(),anyString()或refEq()用于基于反射的相等匹配) - 允许创建自定义的参数匹配器或者使用现有的 hamcrest 匹配器
Mockito 入门
声明 mockito 依赖
Gradle 用户可以使用:
| 1 2 |
|
Maven 用户可以使用:http://search.maven.org/#search%7Cga%7C1%7Cg%3A%22org.mockito%22%2C%20a%3A%22mockito-core%22
Mockito 自动发布到 http://jcenter.bintray.com/org/mockito/mockito-core/ 并同步到 Maven Central Repository
示例
1.验证行为
| 1 2 3 4 5 6 7 8 9 10 11 12 13 |
|
一旦创建 mock 将会记得所有的交互。你可以选择验证你感兴趣的任何交互
2.stubbing
| 1 2 3 4 5 6 7 8 9 10 11 12 13 14 15 16 17 18 19 20 |
|
- 默认情况下,所有方法都会返回值,一个 mock 将返回要么 null,一个原始/基本类型的包装值或适当的空集。例如,对于一个 int/Integer 就是 0,而对于 boolean/Boolean 就是 false。
- Stubbing 可以被覆盖。
- 一旦 stub,该方法将始终返回一个 stub 的值,无论它有多少次被调用。
- 最后的 stubbing 是很重要的 – 当你使用相同的参数 stub 多次同样的方法。换句话说:stubbing 的顺序是重要的,但它唯一有意义的却很少,例如当 stubbing 完全相同的方法调用,或者有时当参数匹配器的使用,等等。
3.参数匹配器
Mockito 验证参数值使用 Java 方式:通过使用 equals() 方法。有时,当需要额外的灵活性,可以使用参数匹配器:
| 1 2 3 4 5 6 7 8 9 10 11 |
|
参数匹配器允许灵活的验证或 stubbing。点击这里查看更多内置的匹配器和自定义的参数匹配器/ hamcrest匹配器的例子。
自定义参数的匹配信息,请查看 Javadoc 中 ArgumentMatcher 类。
如果你正在使用参数的匹配,所有的参数都由匹配器来提供。
下面的示例演示验证,但同样适用于 stubbing:
| 1 2 3 4 5 |
|
4.调用额外的调用数字/at least x / never
| 1 2 3 4 5 6 7 8 9 10 11 12 13 14 15 16 17 18 19 20 21 22 23 24 25 |
|
times(1) 是默认的,因此,使用的 times(1) 可以显示的省略。
5.Stubbing void 方法处理异常
| 1 2 3 4 |
|
6.有序的验证
| 1 2 3 4 5 6 7 8 9 10 11 12 13 14 15 16 17 18 19 20 21 22 23 24 25 26 27 28 29 30 |
|
有序验证是为了灵活 – 你不必一个接一个验证所有的交互。
此外,您还可以通过创建 InOrder 对象传递只与有序验证相关的 mock 。
7. 确保 mock 上不会发生交互
| 1 2 3 4 5 6 7 8 9 10 11 |
|
8.寻找多余的调用
| 1 2 3 4 5 6 7 8 |
|
注意:不建议 verifyNoMoreInteractions() 在每个测试方法中使用。 verifyNoMoreInteractions() 是从交互测试工具包一个方便的断言。只有与它的相关时才使用它。滥用它导致难以维护。
9. 标准创建 mock 方式 – 使用 @Mock 注解
- 最小化可重用 mock 创建代码
- 使测试类更加可读性
- 使验证错误更加易读,因为字段名称用于唯一识别 mockpublic class ArticleManagerTest {
1
2
3
4
5
@MockprivateArticleCalculator calculator;@MockprivateArticleDatabase database;@MockprivateUserProvider userProvider;privateArticleManager manager;
在基础类或者测试 runner 里面,使用如下:
| 1 |
|
可以使用内建 runner: MockitoJUnitRunner 或者 rule: MockitoRule
更多详见 MockitoAnnotations
10. Stubbing 连续调用(迭代器式的 stubbing)
| 1 2 3 4 5 6 7 8 9 10 11 12 |
|
下面是一个精简版本:
| 1 2 |
|
11. 回调 Stubbing
允许使用泛型 Answer 接口。
然而,这是不包括在最初的 Mockito 另一个有争议的功能。我们建议您只需用thenReturn() 或 thenThrow() 来 stubbing ,这在测试/测试驱动中应用简洁与简单的代码足够了。但是,如果你有一个需要 stub 到泛型 Answer 接口,这里是一个例子:
| 1 2 3 4 5 6 7 8 9 10 |
|
12. doReturn()|doThrow()| doAnswer()|doNothing()|doCallRealMethod() 家族方法
Stubbing void 方法,需要不同的 when(Object) ,因为编译器不喜欢括号内无效的方法…
在 用于 Stubbing void 方法中,doThrow(Throwable…) 取代 stubVoid(Object)。主要原因是提高可读性和与 doAnswer() 保持一致性。
当你想用 stub void 方法 使用 doThrow():
| 1 2 3 4 |
|
在调用 when() 的相应地方可以使用 oThrow(), doAnswer(), doNothing(), doReturn() 和 doCallRealMethod(),当:
- stub void 方法
- stub 方法在 spy 对象(见下面)
- 可以不止一次的 stub 相同的方法,在测试的中期来改变 mock 的行为
但你更加倾向于使用这些方法来代替 when(),在所有的 stubbing 调用。可以阅读更多关于这些方法的描述:
PowerMock 在单元测试中的应用
@Mock与@InjectMocks区别:
- @Mock:创建一个Mock。
- @InjectMocks:创建一个实例,其余用@Mock(或@Spy)注解创建的mock将被注入到用该实例中。
@Autowird 等方式完成自动注入。在单元测试中,没有启动 spring 框架,此时就需要通过 @ InjectMocks完成依赖注入。 @InjectMocks会将带有@Spy 和@Mock 注解的对象尝试注入到被 测试的目标类中。
注意:必须使用@RunWith(MockitoJUnitRunner.class) 或 Mockito.initMocks(this)进行mocks的初始化和注入。
@Mock:可以是interface、class, 只是只运行是不进入具体的类中
@InjectMocks:只能只对class,在JUNIT运行时,可以进入具体的方法中,只是mock的方法,直接返回mock的值。
@RunWith(MockitoJUnitRunner.class)
public class Test {

    @InjectMocks
    private SomeHandler someHandler;

    @Mock
    private OneDependency oneDependency; // 此mock将被注入到someHandler

    // ...
}
模拟 Static 方法
在任何需要用到 PowerMock 的类开始之前,首先我们要做如下声明:
@RunWith(PowerMockRunner.class)
然后,还需要用注释的形式将需要测试的静态方法提供给 PowerMock:
@PrepareForTest( { YourClassWithEgStaticMethod.class })
然后就可以开始写测试代码:
首先,需要有一个含有 static 方法的代码 , 如清单 4:
清单 4
| 1 2 3 4 5 6 7 8 9 10 |
|
然后,在被测代码中,引用了以上方法 , 如清单 5 所示:
清单 5
| 1 2 3 4 5 6 7 8 9 |
|
为了达到单元测试的目的,需要让静态方法 generateNewId()返回各种值来达到对被测试方法 methodToTest()的覆盖测试,实现方式如清单 6 所示:
清单 6
| 1 2 3 4 5 6 7 8 9 10 11 12 13 14 15 16 17 18 19 20 21 |
|
如清单 6 中所展示,在测试代码中,可以使用 When().thenReturn() 语句来指定被引用的静态方法返回任意需要的值,达到覆盖测试的效果。
模拟构造函数
有时候,能模拟构造函数,从而使被测代码中 new 操作返回的对象可以被随意定制,会很大程度的提高单元测试的效率,考虑如清单 7 的代码:
清单 7
| 1 2 3 4 5 6 7 8 9 10 11 12 |
|
为了充分测试 create()函数,我们需要被 new 出来的 File 对象返回文件存在和不存在两种结果。在 PowerMock 出现之前,实现这个单元测试的方式通常都会需要在实际的文件系统中去创建对应的路径以及文件。然而,在 PowerMock 的帮助下,本函数的测试可以和实际的文件系统彻底独立开来:使用 PowerMock 来模拟 File 类的构造函数,使其返回指定的模拟 File 对象而不是实际的 File 对象,然后只需要通过修改指定的模拟 File 对象的实现,即可实现对被测试代码的覆盖测试,参考如清单 8 的代码:
清单 8
| 1 2 3 4 5 6 7 8 9 10 11 12 13 14 15 16 17 18 19 20 21 22 |
|
使用 whenNew().withArguments().thenReturn() 语句即可实现对具体类的构造函数的模拟操作。然后对于之前创建的模拟对象 directoryMock使用 When().thenReturn() 语句,即可实现需要的所有功能,从而实现对被测对象的覆盖测试。在本测试中,因为实际的模拟操作是在类 DirectoryStructureTest 中实现,所以需要指定的 @PrepareForTest 对象是 DirectoryStructureTest.class。
模拟私有以及 Final 方法
为了实现对类的私有方法或者是 Final 方法的模拟操作,需要 PowerMock 提供的另外一项技术:局部模拟。
在之前的介绍的模拟操作中,我们总是去模拟一整个类或者对象,然后使用 When().thenReturn()语句去指定其中值得关心的部分函数的返回值,从而达到搭建各种测试环境的目标。对于没有使用 When().thenReturn()方法指定的函数,系统会返回各种类型的默认值(具体值可参考官方文档)。
局部模拟则提供了另外一种方式,在使用局部模拟时,被创建出来的模拟对象依然是原系统对象,虽然可以使用方法 When().thenReturn()来指定某些具体方法的返回值,但是没有被用此函数修改过的函数依然按照系统原始类的方式来执行。
这种局部模拟的方式的强大之处在于,除开一般方法可以使用之外,Final 方法和私有方法一样可以使用。
参考如清单 9 所示的被测代码:
清单 9
| 1 2 3 4 5 6 7 8 9 |
|
为了保持单元测试的纯洁性,在测试方法 methodToTest()时,我们不希望受到私有函数 methodToMock()实现的干扰,为了达到这个目的,我们使用刚提到的局部模拟方法来实现 , 实现方式如清单 10:
清单 10
| 1 2 3 4 5 6 7 8 9 10 11 12 13 14 15 16 17 18 19 20 21 22 |
|
可以发现,为了实现局部模拟操作,用来创建模拟对象的函数从 mock() 变成了 spy(),操作对象也从类本身变成了一个具体的对象。同时,When() 函数也使用了不同的版本:在模拟私有方法或者是 Final 方法时,When() 函数需要依次指定模拟对象、被指定的函数名字以及针对该函数的输入参数列表。
常见使用技巧:
静态类mock
@RunWith(PowerMockRunner.class)
// mock静态类AreaInfoConfig必需添加,在此全局有效
@PrepareForTest({CommonConfig.class, AreaInfoConfig.class})
@PowerMockIgnore("javax.management.*")
mock使用:
mockStatic(AreaInfoConfig.class); // mock it when(AreaInfoConfig.getAreaCodeMap()).thenReturn(AreaInfoMockData.areaCodeMap);完整使用示例
// Base code
package com.javacodegeeks.powermock.staticmethod;

import java.sql.Connection;
import java.sql.DriverManager;
import java.sql.PreparedStatement;
import java.sql.ResultSet;
import java.sql.SQLException;

public class DatabaseReader {

    public static final String CONNECTION = "jdbc:mysql://localhost/testdb";

    public static String getById(int id) throws SQLException {
        String query = "SELECT * FROM Foo WHERE Id = ?";
        Connection connection = DriverManager.getConnection(CONNECTION);
        PreparedStatement preparedStatement = connection.prepareStatement(query);
        preparedStatement.setInt(1, id);
        ResultSet resultSet = preparedStatement.executeQuery();

        resultSet.next();

        String result = resultSet.getString(0);

        resultSet.close();
        preparedStatement.close();
        connection.close();

        return result;
    }
}
// We won’t need a real database (remember that we are mocking).
Mocking the method
// this is how we would mock our getById static method, using PowerMock

package com.javacodegeeks.powermock.staticmethod;

import static org.junit.Assert.assertEquals;
import static org.junit.Assert.fail;
import static org.mockito.Mockito.when;
import static org.powermock.api.mockito.PowerMockito.mockStatic;
import static org.powermock.api.mockito.PowerMockito.verifyStatic;

import java.sql.SQLException;

import org.junit.Test;
import org.junit.runner.RunWith;
import org.powermock.core.classloader.annotations.PrepareForTest;
import org.powermock.modules.junit4.PowerMockRunner;

@RunWith(PowerMockRunner.class)
@PrepareForTest(DatabaseReader.class)
public class DatabaseReaderTest {

    @Test
    public void testGetById() {
        int inputId = 1;
        String returnValue = "JavaCodeGeeks";

        mockStatic(DatabaseReader.class);

        try {
            when(DatabaseReader.getById(inputId))
                .thenReturn(returnValue);

            String actual = DatabaseReader.getById(inputId);

            verifyStatic();
            assertEquals(returnValue, actual);
        } catch (SQLException e) {
            fail("No exception should be thrown.");
        }
    }

}
此方法mock的静态类,指定方法是行为有效
我们指定的,而不是创建一个模拟实例,并添加行为的函数,一个类的静态函数将被mock,。这是通过mockStatic()方法和@PrepareForTest注释完成的,然后,行为被定义为始终使用when(),但静态地访问该方法。请注意,我们还需要使用@RunWith(PowerMockRunner.class)注释运行测试用例,并且我们还可以使用调用静态方法调用verifyStatic()。
@Test
public void testGetById() {
    int inputId = 1;
    String returnValue = "JavaCodeGeeks";

    DatabaseReader databaseReaderMock = Mockito.mock(DatabaseReader.class);
    try {
        when(databaseReaderMock.getById(inputId))
            .thenReturn(returnValue);

        String actual = DatabaseReader.getById(inputId);

        assertEquals(returnValue, actual);
    } catch (SQLException e) {
        fail("No exception should be thrown.");
    }
}无需PowerMock或任何其他特殊的模拟技术。但是将静态方法作为对象方法测试没有任何意义,因为它应该被称为类方法,因此测试不会反映真实情况。
模拟数据库连接
我们可以进一步模拟getById()方法内部发生的事情,只是在其中添加预定义的行为。为此,我们必须模拟数据库连接,使用DriverManager.getConnection()方法完成。有了Mockito,我们无法以这种方式模仿方法。但是,正如我们在PowerMock中看到的那样,我们可以像任何其他方法一样模拟它。
@Test
public void testGetByIdMockDatabase() {
    String query = "SELECT * FROM Foo WHERE Id = ?";
    int inputId = 1;
    String returnValue = "JavaCodeGeeks";

    Connection connectionMock = Mockito.mock(Connection.class);
    PreparedStatement preparedStatementMock = Mockito.mock(PreparedStatement.class);
    ResultSet resultSetMock = Mockito.mock(ResultSet.class);

    mockStatic(DriverManager.class);
    try {
        when(DriverManager.getConnection(DatabaseReader.CONNECTION))
            .thenReturn(connectionMock);

        when(connectionMock.prepareStatement(query))
            .thenReturn(preparedStatementMock);

        when(preparedStatementMock.executeQuery())
            .thenReturn(resultSetMock);

        when(resultSetMock.next())
            .thenReturn(true);

        when(resultSetMock.getString(0))
            .thenReturn(returnValue);

        String actual = DatabaseReader.getById(inputId);

        verify(connectionMock).prepareStatement(query);
        verify(preparedStatementMock).executeQuery();
        verify(resultSetMock).next();
        verify(resultSetMock).getString(0);
        verifyStatic();

        assertEquals(returnValue, actual);
    } catch (SQLException e) {
        fail("No exception should be thrown.");
    }
}
使用反射工具类ReflectionTestUtils
Mockito Spring @value
pring采用@value标签
@Value("${default.url}")
private String defaultUrl;
Test方法
@Mock
ManageService manageService;

public void testDoJob(){
    ReflectionTestUtils.setField(manageService, "defaultUrl", "url123");
}参考:How do I mock an autowired @Value field in Spring with Mockito?
springtest有2个Utils类,可以帮助我们拿到MyService代理中的具体实现类:
org.springframework.test.util.AopTestUtils;
org.springframework.test.util.ReflectionTestUtils;
基本情况是:
MyService是个接口,其实现类MyServiceImpl是@Transactional注解的Bean(这样注入的MyService实例实际上就是代理了)
MyServiceImpl注了一个Bean:InnerBean,innerBean是自己工程中实现或其他服务都无所谓
测试中想使用mock替换这个InnerBean。
MyServiceImpl impl = org.springframework.test.util.AopTestUtils.getTargetObject(MyServiceBean实例); 这样就可以拿到具体实现类了,再加一句
impl.innerBean = mockInnerBean;就可以用自己打桩过的mock替换注入的innerBean实例了。如果多于一个测试方法,别忘了finally时候替换回来啊。
impl.innerBean 这里,我一般的注入bean都是是用package级别的,这样便于测试,不必特别的依赖其他技术就可以替换实现。如果是private的,那么用ReflectionTestUtils吧,具体不用说了,简单易用。
 @InjectMocks
 AreaInfoServiceImpl areaInfoService; // 被测试类
AreaInfoConverter areaInfoConverter = new AreaInfoConverterImpl(); // 新建工具类
ReflectionTestUtils.setField(areaInfoService, "areaInfoConverter", areaInfoConverter); //注入
powermock与springtest配合使用的问题
spring标准的Runner是SpringJUnit4ClassRunner,如果用这个Runner,那么powermock的@PrepairForTest就没法使用了(也就是静态mock,私有方法mock的关键),因此如果想使用静态和私有方法mock就必须使用用Powemock的Runner,但是又如何启动spring context呢? 经过一些查找,终于解决了这个问题,方法就是用powermock的代理, 在测试类上加上这样的注解:
@PowerMockIgnore({"java.lang.management.*","javax.management.*","javax.xml.*","org.xml.sax.*","org.apache.xerces.*","org.w3c.*"})
@RunWith(PowerMockRunner.class)
@PowerMockRunnerDelegate(SpringJUnit4ClassRunner.class)
@ContextConfiguration(locations = "classpath:META-INF/spring/test-spring.xml")
特别说明:
Runner使用PowerMockRuner(就是RunWith注解的值);使用powermock提供的代理来使用SpringJUnit4ClassRunner;@PowerMockIgnore的作用是忽略一些powermock使用的classloader无法处理的类,不使用的话,启动用例就会报错。
classpath:META-INF/spring/test-spring.xml 是单元测试专门的spring配置文件,和域代码使用的配置有些不同。这个文件我放在/test/resources/spring/目录下。
说到powermock的配置,我一般在测试类中再加上继承spring的测试类:
extends AbstractTransactionalJUnit4SpringContextTests ,这样就基本可以了。
3.注入外部的服务:
开始我想了个很笨的方法:在test/文件夹下给外部服务的接口都提供一个空的实现类(implements 接口,然后用eclpse生成默认的方法实现)。这样基本上就可以启动了。但是实际使用中,由于外部服务接口也在不断修改中,会出现不同环境的接口类不一至的情况。比如uat环境的jar包多了或一个方法(虽然我们的程序没有直接使用),如此一来,我自己搞的空实现类就会报编译错误了。
后来想到了一个方法,在/test的代码中增加一个普通的@Conponent注解的类,类里面使用@Bean注解标明所有外部类的生成方法
@Component
public class MockedOuterBeanFactory {
    @Bean
    public OuterService outerSerive(){
        return Mocktio.mock(OuterService.class);
    }
}
然后在测试类中注入这个MockedOuterBeanFactory,这样测试环境的spring就可以完整的启动了。外部的服务在启动后都是Mocktio生成的代理类,所有方法都会返回默认值。
在实际测试中如何打桩呢?
如果我测试一个自己写的服务(如MyService),MyService又注入了OuterService(外部服务),那么利用spring Bean注入的单例这个特性就可以完成。在MyService的测试类中(MyServiceTest.java),同样也注入OuterService,在执行MyService的方法之前对OuterService进行打桩。那么由于bean是单例的,MyServiceTest中注入的OuterService实例就是MyService注入的实例。这样就轻松完成了打桩的工作。如果有特殊原因,main中配置的bean不是单例的,那么可以的话,在test-spring.xml中把它配置为单例的就可以。
springboot+mockito 异常解决方案
系统启动的异常日志如下
javax.net.ssl.*
具体出问题的地方是在
org.apache.http.ssl.SSLContexts

  public static SSLContext createDefault() throws SSLInitializationException {
        try {
            final SSLContext sslcontext = SSLContext.getInstance(SSLContextBuilder.TLS);
            sslcontext.init(null, null, null);
            return sslcontext;
        } catch (final NoSuchAlgorithmException ex) {
            throw new SSLInitializationException(ex.getMessage(), ex);
        } catch (final KeyManagementException ex) {
            throw new SSLInitializationException(ex.getMessage(), ex);
        }
    }
解决方案
@RunWith(PowerMockRunner.class)
@PowerMockRunnerDelegate(SpringJUnit4ClassRunner.class)
// 代码之下加上如下配置
@PowerMockIgnore("javax.net.ssl.*")
javax.management.*
// 解决方案 加上如下配置
@PowerMockIgnore("javax.management.*")
基于spring与mockito单元测试Mock对象注入
单元测试目前已经成为项目中保证代码质量的一种必要方法,对于一些不易构造或者不易获取的对象通过mock的方式进行测试是一种很有效的处理办法。在基于spring的mock测试中,mock对象获取和使用的便利性可以提升单元测试代码的质量。
3.实现原理
Mock对象的注入使用注解和反射,对象注入依赖spring框架支持junit4提供的TestExcutionListeners监听器对象,在监听器中将mock对象注入到单元测试类中。
4.新建对象方式代码
|
5.监听器方式代码
5.1 实现监听器
继承DependencyInjectionTestExecutionListener类,
实现injectDependencies(TestContexttestContext)方法
|
5.2 利用反射注入mock对象
|
|
5.3 测试类配置
使用@TestExecutionListeners注解,引入监听器,需要mock的对象加上@Mock注解。
|
6.总结
监听器的方式解放了代码中硬编码注入mock对象,使得代码简洁干净。
参考


 712
712


 被折叠的 条评论
为什么被折叠?
被折叠的 条评论
为什么被折叠?
 到【灌水乐园】发言


