


引子
在上一篇博文 Elasticsearch入门(五):Elasticsearch基础概念与基本操作 中,我讲了一些Elasticsearch的基础知识,以及一些基础操作。本来想接下来讲Elasticsearch的高级查询和复合查询,但是一想,前面的知识还不是很巩固,就先讲一讲SpringBoot如何整合Elasricsearch,同时复习一下前面的基本操作,并在项目中使用代码实现这些操作。
在文末的附件中,我给出了完整项目代码,需要的朋友可以自己去下载。
项目环境
SpringBoot版本:2.1.4.RELEASE Elasticsearch版本:7.0.0 Elasticsearch Client Jar包版本:7.0.0
注意事项:
- 1、由于spring-data-elasticsearch目前对Elasticsearch7.x版本支持的还不够好,所以本文中我们并未使用spring-data-elasticsearch;后期我会补上。
- 2、客户端(Client) Jar包的版本尽量不要大于Elasticsearch本体的版本,否则可能出现客户端中使用的某些API在Elasticsearch中不支持。
搭建步骤
1、构建项目,pom.xml文件中添加下面的依赖:
<properties>
    <elasticsearch.version>7.0.0</elasticsearch.version>
</properties>

<dependencies>
    <dependency>
        <groupId>org.elasticsearch.client</groupId>
        <artifactId>elasticsearch-rest-high-level-client</artifactId>
        <version>${elasticsearch.version}</version>
    </dependency>
</dependencies>
其他的SpringBoot依赖、lambok依赖等这里就不列出了。
需要注意的是,在SpringBoot 2.1.4.RELEASE版本中,在parent pom中,指定了es的版本为:
<elasticsearch.version>6.4.3</elasticsearch.version>所以我们在加入ES依赖的时候,需要手动将版本指定到7.0.0去。
2、添加配置,指定客户端(Client)。
需要说明的是,通过查阅资料,我整理除了下面三种Clien,这里做个简单介绍:
TransportClient:TransportClient使用Transport模块连接远端的集群。它不加入集群,而是简单地获取一个或多个初始传输地址,并在每个操作中以循环方式与它们通信。需要注意的是,TransportClient在ES 7.0.0版本中已经被标注为deprecated,并且打算在ES 8.0中移除。同时,官方推荐使用 Java High Level REST Client。- Java Low Level REST Client:ES官方的低级客户端。它通过HTTP与ES集群通信。
- Java High Level REST Client:ES官方的高级客户端。基于上面的低级客户端,也是通过HTTP与ES集群进行通信。它提供了更多的接口。
下面,我们就配置一个Java High Level REST Client:
①:application.properties添加配置:
elasticsearch.host=localhost    # ES所在主机的地址
elasticsearch.port=9200         # 因为是REST Client,通过HTTP与ES进行交互,所以这里填 9200 (http.port的值)
②:添加RestHighLevelClient的配置:
@Data
@Configuration
@ConfigurationProperties(prefix = "elasticsearch")
public class EsConfig {
    private String host;
    private Integer port;

    @Bean(destroyMethod = "close")
    public RestHighLevelClient client() {
        return new RestHighLevelClient(RestClient.builder(
                new HttpHost(host, port, "http")
        ));
    }
}
③:启动类上加上@EnableConfigurationProperties注解:
@EnableConfigurationProperties({EsConfig.class})至此,我们的项目框架就搭建完毕了。直接运行,我们可以看到项目已经跑起来了:

开发实战
项目框架搭建完毕后,我们来尝试着执行一些简单的增删改查操作。这个地方,我是跟着官方文档走的流程。
首先,我们构建一个BookService,并且注入RestHighLevelClient:
import org.elasticsearch.client.RestHighLevelClient;
import org.springframework.stereotype.Service;
import javax.annotation.Resource;

@Service
public class BookService {
    @Resource
    private RestHighLevelClient client;

    // 下面的方法都是写在这个Service中的
}
准备工作完毕了,下面我们开始跟着官方文档进行实战:
Index API
Index API允许用户将一个类型化的JSON文档索引(插入)到一个特定的索引中,并使其可搜索。
直接上代码:BookVO的代码见附件。
public String addBook(BookVO vo) {
    try {
        XContentBuilder content = XContentFactory.jsonBuilder().startObject()
                .field("type", vo.getType())
                .field("word_count", vo.getWordCount())
                .field("author", vo.getAuthor())
                .field("title", vo.getTitle())
                .timeField("publish_date", vo.getPublishDate())
                .endObject();
        IndexRequest request = new IndexRequest("book").source(content);
        IndexResponse response = client.index(request, RequestOptions.DEFAULT);
        return response.toString();
    } catch (IOException e) {
        e.printStackTrace();
    }
    return null;
}
执行结果:
IndexResponse[index=book,type=_doc,id=PkMju2oBd2QFj63oa1sE,version=1,result=created,seqNo=3,primaryTerm=1,shards={"total":2,"successful":2,"failed":0}]我们可以看到,IndexResponse中包含了一些我们刚刚创建的文档的信息,并且该文档的id 为 【PkMju2oBd2QFj63oa1sE】。
这里,解释一下,在代码中,我们首先构建出了一个IndexRequest对象,然后为该对象设置了source参数,随后使用我们上面注入的RestHighLevelClient对象调用 index() 方法,这样就拿到了对应的Response对象。值得一提的是,设置 source 的方式有很多种:
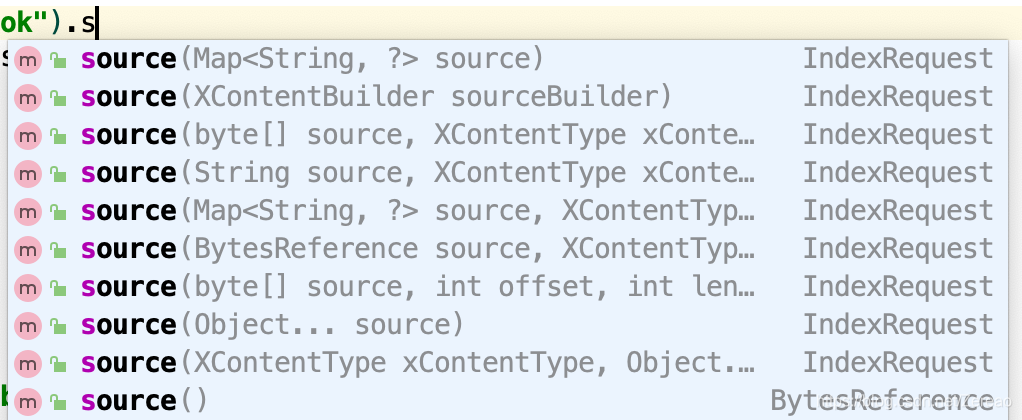
而我们在实际开发中,可以根据需求选择不同的方式。通过XContentBuilder构建是一种推荐的方式。
此外,client.index()方法的第二个参数,我们可以自定义一些请求配置项,比如,我们可以在这里指定一个节点选择器(NodeSelector)来控制哪个节点接收请求。这里,我们直接使用了默认配置 RequestOptions.DEFAULT。
Get API
Get API允许根据 id 从索引中获取一个类型化的JSON文档。
public String findBookById(String id) {
    GetRequest request = new GetRequest("book", id);
    try {
        GetResponse response = client.get(request, RequestOptions.DEFAULT);
        // 通过 response.getSource()方法我们可以拿到该文档的字段信息
        Map<String, Object> resultMap = response.getSource();
        return resultMap.toString();
    } catch (IOException e) {
        e.printStackTrace();
    }
    return null;
}
通过上面刚刚新添加的文档的ID进行查询,得到结果:
{word_count=90000, author=小伦, type=IT, title=跟Z开始学ES, publish_date=2019-05-15 16:56:20}Update API
update API允许通过使用脚本或传递部分文档来更新现有文档。
public String update(BookVO vo) {
    try {
        UpdateRequest request = new UpdateRequest("book", vo.getId());
        XContentBuilder content = XContentFactory.jsonBuilder().startObject()
                .field("type", vo.getType())
                .field("word_count", vo.getWordCount())
                .field("author", vo.getAuthor())
                .field("title", vo.getTitle())
                .timeField("publish_date", vo.getPublishDate())
                .endObject();
        request.doc(content);
        UpdateResponse response = client.update(request, RequestOptions.DEFAULT);
        return response.toString();
    } catch (IOException e) {
        e.printStackTrace();
    }
    return null;
}
我们还是根据之前添加的文档的ID进行更新,执行结果:
UpdateResponse[index=book,type=_doc,id=PkMju2oBd2QFj63oa1sE,version=2,seqNo=4,primaryTerm=1,result=updated,shards=ShardInfo{total=2, successful=2, failures=[]}]Delete API
Delete API就是根据ID删除相关的文档了。
public String delete(String id) {
    try {
        DeleteRequest request = new DeleteRequest("book").id(id);
        DeleteResponse response = client.delete(request, RequestOptions.DEFAULT);
        return response.toString();
    } catch (IOException e) {
        e.printStackTrace();
    }
    return null;
}
我们删除掉最开始创建的那个文档,执行结果:
DeleteResponse[index=book,type=_doc,id=PkMju2oBd2QFj63oa1sE,version=3,result=deleted,shards=ShardInfo{total=2, successful=2, failures=[]}]Search API
Search API用于与搜索文档、聚合、建议(suggestions)相关的任何操作,并且还提供了在结果文档上请求高亮显示的方法。
public String boolQuery(BoolQueryVO vo) {
    BoolQueryBuilder boolQuery = QueryBuilders.boolQuery();
    if (!StringUtils.isEmpty(vo.getAuthor())) {
        boolQuery.must(QueryBuilders.matchQuery("author", vo.getAuthor()));
    }
    if (!StringUtils.isEmpty(vo.getTitle())) {
        boolQuery.must(QueryBuilders.matchQuery("title", vo.getTitle()));
    }
    if (vo.getGtWordCount() != null && vo.getLtWordCount() != null) {
        RangeQueryBuilder rangeQuery = QueryBuilders.rangeQuery("word_count")
                .from(vo.getGtWordCount()).to(vo.getLtWordCount());
        boolQuery.filter(rangeQuery);
    }
    SearchSourceBuilder searchSourceBuilder = new SearchSourceBuilder().query(boolQuery);
    SearchRequest searchRequest = new SearchRequest().source(searchSourceBuilder);
    try {
        SearchResponse response = client.search(searchRequest, RequestOptions.DEFAULT);
        return response.toString();
    } catch (IOException e) {
        e.printStackTrace();
    }
    return "";
}
运行结果这里不贴了,读者朋友们可以自己造数据,尝试着理解这个查询。
总结
至此,我们SpringBoot项目整合Elasticsearch就整合完毕了。不是太难,总体来说,最大的收获就是——遇到问题,首先去看官方文档!
最后,作者也是在一边学习,一边记录,有的地方如果没有描述清楚或者讲述错误,欢迎大家指出,一起进步!
附件信息
注意,本文中我用于测试发送请求的HTTP文件位于 【src/test/java/com/zereao/es/http 目录下】, book.http文件。不知道http文件怎么用的,请参考:Elasticsearch入门(五):Elasticsearch基础概念与基本操作
文中的源代码:点我下载
GitHub:点击访问我的GitHub
参考文章
1、 https://www.elastic.co/guide/en/elasticsearch/client/java-rest/current/java-rest-high.html
2、https://www.elastic.co/guide/en/elasticsearch/client/java-api/current/java-docs.html
3、https://www.cnblogs.com/ginb/p/8716485.html
5、https://github.com/spring-projects/spring-data-elasticsearch


 256
256


 被折叠的 条评论
为什么被折叠?
被折叠的 条评论
为什么被折叠?
 到【灌水乐园】发言


