


文章来源:http://www.cocoachina.com/industry/20140705/9039.html
两个动画效果来了解一下CALayer的两个重要的subClass:CAGradientLayer和CAShapeLayer。微视录制视频的时候那个进度效果和Spark相机类似,但是个人还是比较喜欢Spark相机的录制的效果。
CAShapeLayer 项目源码:https://github.com/subjc/SparkRecordingCircle
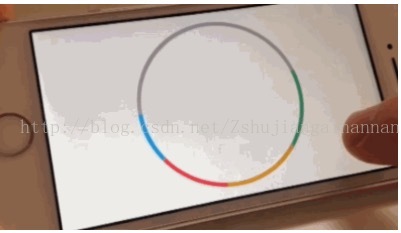
我们做一个和Spark相机一样的圆形进度,每一段有一种颜色,标识不同时间段录的视频。
首先,我们创建一个UIView的子类叫RecordingCircleOverlayView这样看起来比较有意义,然后我们看到圆形进度条有一个底色是灰色的圆形轨迹,所以我们创建一个CAShapeLayer,然后提供一个CGPathRef给它的path属性,我们使用UIBezierPath这个类的bezierPathWithArcCenter:radius:startAngle:endAngle:clockwise:这个方法给CAShapeLayer提供path。
图中我们可以看到有彩色一些片段,我们使用另外一个CAShapeLayer和同样的CGPathRef作为背景层,由于是同样的Path,所以我们给UIBezierPath创建一个属性,这样不用每次都重复创建。
CGPoint arcCenter = CGPointMake(CGRectGetMidY(self.bounds), CGRectGetMidX(self.bounds));
CGFloat radius = CGRectGetMidX(self.bounds) - insets.top - insets.bottom;

self.circlePath = [UIBezierPath bezierPathWithArcCenter:arcCenter
radius:radius
startAngle:M_PI
endAngle:-M_PI
clockwise:NO];
开始角度M_PI和结束角度-M_PI和Spark相机是一样的逆时针方向,然后我们再创建一个背景层
CAShapeLayer *backgroundLayer = [CAShapeLayerlayer];
backgroundLayer.path = self.circlePath.CGPath;
backgroundLayer.strokeColor = [[UIColor lightGrayColor] CGColor];
backgroundLayer.fillColor = [[UIColorclearColor] CGColor];
backgroundLayer.lineWidth = self.strokeWidth;
然后我们把backgroundLayer添加为RecordingCircleOverlayView的subLayer
[self.layer addSublayer:backgroundLayer]; 如果我们build运行成功的话应该是这样的。

现在我们需要一个方法来实现开始和停止进度,如果我们回头去看Spark Camera,我们需要按下手指才会开始松开结束,首先UITapGestureRecognizer和UIControlEventTouchUpInside没有方法检测按下和松开,但是我们可以用UIControlEventTouchDown,但是我们在Reveal里面并没有看到它是这么做的,所以最后决定使用复写UIResponder的touchesBegan:WithEvent: and touchesEnded:WithEvent:方法来实现。

有个这个方法后,我们可以控制CAShapeLayer的strokeEnd的属性大小来实现动画效果,首页我们先设置它的值为0然后把这个layer添加作为子类。
CAShapeLayer *progressLayer = [CAShapeLayerlayer];
progressLayer.path = self.circlePath.CGPath;
progressLayer.strokeColor = [[selfrandomColor] CGColor];
progressLayer.fillColor = [[UIColorclearColor] CGColor];
progressLayer.lineWidth = self.strokeWidth;
progressLayer.strokeEnd = 0.f;
然后我们发现有多个CAShapeLayer分别代表不同的段,而且每个CAShapeLayer都有自己的strokeEnd,所以我们创建一个数组,把每一个CAShapeLayer添加到数组里。
[self.progressLayers addObject:progressLayer]; 继而我们又需要一个属性代表当前的正在增加可以动画的片段,所以我们添加一个属性来记录当前的进度的layer。
self.currentProgressLayer = progressLayer; 所以最后方法看起来是这样的。
- (void)addNewLayer
{
    CAShapeLayer *progressLayer = [CAShapeLayer layer];
    progressLayer.path = self.circlePath.CGPath;
    progressLayer.strokeColor = [[self randomColor] CGColor];
    progressLayer.fillColor = [[UIColor clearColor] CGColor];
    progressLayer.lineWidth = self.strokeWidth;
    progressLayer.strokeEnd = 0.f;

    [self.layer addSublayer:progressLayer];
    [self.progressLayers addObject:progressLayer];

    self.currentProgressLayer = progressLayer;
}
为了让它可以有动画,我们有两个重点,其一我们可以使用rotation transform属性,但是我们使用CAShapeLayer的strokeStart和strokeEnd结合起来实现动画,其二停止动画后我们可以使用截图当前的状态同时移除动画,这样就可以保留每个状态的颜色。为了实现这些,我们使用CABasicAnimation和CAlayer的属性presentationLayer,直接上代码。
- (void)updateAnimations
{
    CGFloat duration = self.duration * (1.f - [[self.progressLayers firstObject] strokeEnd]);
    CGFloat strokeEndFinal = 1.f;

    for (CAShapeLayer *progressLayer in self.progressLayers)
    {
        CABasicAnimation *strokeEndAnimation = nil;
        strokeEndAnimation = [CABasicAnimation animationWithKeyPath:@"strokeEnd"];
        strokeEndAnimation.duration = duration;
        strokeEndAnimation.fromValue = @(progressLayer.strokeEnd);
        strokeEndAnimation.toValue = @(strokeEndFinal);
        strokeEndAnimation.autoreverses = NO;
        strokeEndAnimation.repeatCount = 0.f;
        strokeEndAnimation.fillMode = kCAFillModeForwards;
        strokeEndAnimation.removedOnCompletion = NO;
        strokeEndAnimation.delegate = self;
        [progressLayer addAnimation:strokeEndAnimation forKey:@"strokeEndAnimation"];

        strokeEndFinal -= (progressLayer.strokeEnd - progressLayer.strokeStart);

        if (progressLayer != self.currentProgressLayer)
        {
            CABasicAnimation *strokeStartAnimation = nil;
            strokeStartAnimation = [CABasicAnimation animationWithKeyPath:@"strokeStart"];
            strokeStartAnimation.duration = duration;
            strokeStartAnimation.fromValue = @(progressLayer.strokeStart);
            strokeStartAnimation.toValue = @(strokeEndFinal);
            strokeStartAnimation.autoreverses = NO;
            strokeStartAnimation.repeatCount = 0.f;
            strokeStartAnimation.fillMode = kCAFillModeForwards;
            strokeStartAnimation.removedOnCompletion = NO;
            [progressLayer addAnimation:strokeStartAnimation forKey:@"strokeStartAnimation"];
        }
    }
    CABasicAnimation *backgroundLayerAnimation = [CABasicAnimation animationWithKeyPath:@"strokeStart"];
    backgroundLayerAnimation.duration = duration;
    backgroundLayerAnimation.fromValue = @(self.backgroundLayer.strokeStart);
    backgroundLayerAnimation.toValue = @(1.f);
    backgroundLayerAnimation.autoreverses = NO;
    backgroundLayerAnimation.repeatCount = 0.f;
    backgroundLayerAnimation.fillMode = kCAFillModeForwards;
    backgroundLayerAnimation.removedOnCompletion = NO;
    backgroundLayerAnimation.delegate = self;
    [self.backgroundLayer addAnimation:backgroundLayerAnimation forKey:@"strokeStartAnimation"];
}
上面代码中我们看到我们遍历了所有的CAShapeLayer,给每个strokeEnd添加了CABasicAnimation动画,然后给不是当前的layer的strokeStart属性添加了一个动画。再来看看duration,假设一圈代表45秒钟,这个意味着每次停止之后又开始的话duration肯定是减少的,所以用duration代表一圈剩余的可以录制的时间,再看strekeEndFinal,假设有很多段,肯定不是每个段的strkeEnd都是1所以这个是用来标识每段可以达到的最终距离一圈为(0-1)。最后我们需要更新background layer除去有彩色段剩余的地方。
你可能注意到上面的代码里面并没有移除动画,所以对于显示每一个CAShapeLayer我们设置都是通过layers的presentationLayer设置strokeStart和strokeEnd,然后移除CAShapeLayer上的所有动画。
presentationLayer在文档中是这么说的:
“While an animation is in progress, you can retrieve this object and use it to get the current values for those animations.”
所以把上面所说的结合起来,代码应该是这样的。
- (void)removeAnimations
{
    for (CAShapeLayer *progressLayer in self.progressLayers)
    {
        progressLayer.strokeStart = [progressLayer.presentationLayer strokeStart];
        progressLayer.strokeEnd = [progressLayer.presentationLayer strokeEnd];
        [progressLayer removeAllAnimations];
    }
    self.backgroundLayer.strokeStart = [self.backgroundLayer.presentationLayer strokeStart];
    [self.backgroundLayer removeAllAnimations];
}
最后,还有一个问题是我们需要确保我们完成了动画以后手指按下不要保持添加layer和更新动画这些操作,所以我们可以设置一个代理方法像这样,就大功告成了。
- (void)animationDidStop:(CAAnimation *)anim finished:(BOOL)flag
{
    if (self.hasFinishedAnimating == NO && flag)
    {
        [self removeAnimations];
        self.finishedAnimating = flag;
    }
}
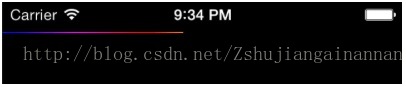
CAGradientLayer
首页我们创建一个UIView的子类,然后我们使用CAGradientLayer作为默认的CALayer。
+ (Class)layerClass {
    return [CAGradientLayer class];
}
CAGradientLayer是CALayer的一个子类,添加了一些额外的属性,我们将是使用colors,startPoint,endPoint这些来创建一个有梯度的动画.
现在有几个方法来实现这种彩色的效果,一种是我现在将要使用的创建一个包含UIColor的数组,有不同的色调的值,在你的initWithFrame方法里添加一下代码:
// Use a horizontal gradient
CAGradientLayer *layer = (id)[self layer];
[layer setStartPoint:CGPointMake(0.0, 0.5)];
[layer setEndPoint:CGPointMake(1.0, 0.5)];

// Create colors using hues in +5 increments
NSMutableArray *colors = [NSMutableArray array];
for (NSInteger hue = 0; hue <= 360; hue += 5) {

    UIColor *color;
    color = [UIColor colorWithHue:1.0 * hue / 360.0
                       saturation:1.0
                       brightness:1.0
                            alpha:1.0];
    [colors addObject:(id)[color CGColor]];
}
[layer setColors:[NSArray arrayWithArray:colors]];
现在运行你可以看见一个水平光谱图,下一步创建移动的效果,我们可以遍历这个颜色的数组使用layer animation,一个动画结束的时候会前面的颜色方法最后重复这个进度,方法是这样:
- (void)performAnimation {
    // Move the last color in the array to the front
    // shifting all the other colors.
    CAGradientLayer *layer = (id)[self layer];
    NSMutableArray *mutable = [[layer colors] mutableCopy];
    id lastColor = [[mutable lastObject] retain];
    [mutable removeLastObject];
    [mutable insertObject:lastColor atIndex:0];
    [lastColor release];
    NSArray *shiftedColors = [NSArray arrayWithArray:mutable];
    [mutable release];

    // Update the colors on the model layer
    [layer setColors:shiftedColors];

    // Create an animation to slowly move the gradient left to rig<pre name="code" class="objc">创建一个宽度为0的mask覆盖整个View,mask的颜色不重要,当我们progress属性更新的时候我们会增加它的宽度,所以复写setProgress:方法像下面这样:
ht. CABasicAnimation *animation; animation = [CABasicAnimation animationWithKeyPath:@"colors"]; [animation setToValue:shiftedColors]; [animation setDuration:0.08]; [animation setRemovedOnCompletion:YES]; [animation setFillMode:kCAFillModeForwards]; [animation setDelegate:self]; [layer addAnimation:animation forKey:@"animateGradient"]; } - (void)animationDidStop:(CAAnimation *)animation finished:(BOOL)flag { [self performAnimation]; }
为了增加一个标识进度的进行,我们可以使用mask属性来屏蔽一部分,在头文件中添加两个属性:
@property (nonatomic, readonly) CALayer *maskLayer;
@property (nonatomic, assign) CGFloat progress;
然后在initWithFrame:里面添加:
maskLayer = [CALayer layer];
[maskLayer setFrame:CGRectMake(0, 0, 0, frame.size.height)];
[maskLayer setBackgroundColor:[[UIColor blackColor] CGColor]];
[layer setMask:maskLayer];
创建一个宽度为0的mask覆盖整个View,mask的颜色不重要,当我们progress属性更新的时候我们会增加它的宽度,所以复写setProgress:方法像下面这样:
- (void)setProgress:(CGFloat)value {
    if (progress != value) {
        // Progress values go from 0.0 to 1.0
        progress = MIN(1.0, fabs(value));
        [self setNeedsLayout];
    }
}

- (void)layoutSubviews {
    // Resize our mask layer based on the current progress
    CGRect maskRect = [maskLayer frame];
    maskRect.size.width = CGRectGetWidth([self bounds]) * progress;
    [maskLayer setFrame:maskRect];
}
现在当我们设置progress值的时候我们要确保它在0到1之间,然后下一步在layoutSubviews里面我们重新定义mask的值。


 5万+
5万+


 被折叠的 条评论
为什么被折叠?
被折叠的 条评论
为什么被折叠?
 到【灌水乐园】发言


