


一、今日任务
今天的主要任务是两个:
1.完成登录页面的美化;
2.实现数据库的安装和可视化;
3.学习JSP知识
二、完成登录页面的美化
其实首先是页面框架,然后才是考虑展示效果。
login.jsp的页面代码如下:
<%@ page contentType="text/html;charset=GBK" errorPage="error.jsp" language="java" %>
<!DOCTYPE html PUBLIC "-//W3C//DTD XHTML 1.0 Transitional//EN"
"http://www.w3.org/TR/xhtml1/DTD/xhtml-transitional.dtd">
<html xmlns="http://www.w3.org/1999/xhtml">
<head>
<meta name=keywords content=小游戏,little game,心理游戏,心理提升>
<meta name=description
content=这是心理学爱好者自编的网页,目前还在编写阶段,欢迎试用>
<meta http-equiv="X-UA-Compatible" content="ie=edge">
<meta name="viewport" content="width=device-width, initial-scale=1.0">
<title>登录页面</title>
<link rel="icon" href="./img/label.png" >
<link rel="stylesheet" href="./styles/sui.css">
</head>
<body>
<div class="sui-full-size sui-flex sui-flex-column">
<div class="sui-full-width scroll-y">
<section class="letter" >
<div style="padding-bottom: 1rem;" align="center">
<img align="center" style="height: 2rem;" src="./img/first.png" alt="心理提升">
</div>
</section>
<form align="center" id="login" method="post" action="./jsp/temp.jsp">
<table align="center">
<tr>
<td>用户名:</td>
<td><input type="text" name="username"></td>
</tr>
<tr>
<td>密   码:</td>
<td><input type="password" name="password"></td>
</tr>
<tr align="center">
<td colspan="2"><input type="submit" value="登录">            <input type="submit" value="注册"></td>
</tr>
</table>
</form>
</div>
</div>
</body>
</html>接下来是css表现代码。
/**
 * size with percent
 */
.sui-full-size {
  height: 100%;
  width: 100%;
}
/**
 * flex layout style
 */
.sui-flex {
  /* ios 6- or safari 3.1-6 */
  display: -webkit-box;
  /* firefox 19- (buggy but mostly works) */
  display: -moz-box;
  /* ie 10+ */
  display: -ms-flexbox;
  /* chrome */
  display: -webkit-flex;
  /* standard */
  display: flex;
}
.sui-flex-column {
  /* flex 09 */
  -webkit-box-orient: vertical;
  /* flex 12 */
  -webkit-flex-direction: column;
  -moz-flex-direction: column;
  -ms-flex-direction: column;
  -o-flex-direction: column;
  flex-direction: column;
}
.sui-full-width {
  width: 100%;
}
.scroll-y {
  -webkit-overflow-scrolling: touch;
  overflow-y: scroll;
}
.letter {
  padding: 1rem 5% 1rem 5%;
  border-bottom: 1px dotted #d3dfef;
  background: -webkit-linear-gradient(top, #f6f9fc, #ffffff);
  background: -moz-linear-gradient(top, #f6f9fc, #ffffff);
  background: -o-linear-gradient(top, #f6f9fc, #ffffff);
  background: linear-gradient(top, #f6f9fc, #ffffff);
}
jsp页面展示效果如下:
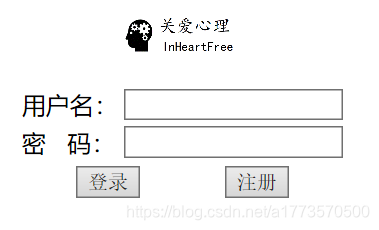
页面展示今天就到这里,下面考虑进行数据库的连接。
三、完成数据库登录和连接
四、今日学习内容
1.Servlet类简介
- Servlet作为控制器使用
- Servlet的方法,继承HttpServlet
- doGet()
- doPost()
- doPut()
- doDelete()
- service():大部分时候重写这个就可以了
- init(ServletConfig config):如果重写了init需在第一行调用super.init(config)
- destroy()
2.Servlet的生命周期
- Web容器创建Servlet
- 客户第一次请求
- load-on-startup
- init()初始化
- 运行(用户访问)
- 销毁
3.一般Servlet的配置
两种配置方法:
①在Servlet中使用@WebServlet配置
- 无需在Servlet中配置<Servlet/>和<Servlet-mapping/>
- 根节点中的属性metadata-complete不需要为true
②web.xml配置
- 需要配置Servlet和<Servlet/>和<Servlet-mapping/>
方法①示例代码:
servlet代码
package lee;
import Dao.FirstDao;
import java.io.IOException;
import java.text.SimpleDateFormat;
import java.util.Date;
import javax.servlet.http.HttpServlet;
import javax.servlet.annotation.*;
import javax.servlet.http.HttpServletRequest;
import javax.servlet.http.HttpServletResponse;
@WebServlet(name="firstServlet" ,urlPatterns={"/firstServlet"})
public class FirstServlet extends HttpServlet
{
 public void service(HttpServletRequest request,
      HttpServletResponse response)
 {
String ip=request.getRemoteAddr();
  SimpleDateFormat df = new SimpleDateFormat("yyyy-MM-dd HH:mm:ss");//设置日期格式
  String time=df.format(new Date());
  new FirstDao().setHistory(ip,time);
  try {
   response.sendRedirect(request.getContextPath()+"/jsp/temp.jsp");
  } catch (IOException e) {
   // TODO Auto-generated catch block
   e.printStackTrace();
  }
 }
}
登录页面代码:
<%@ page contentType="text/html;charset=GBK" errorPage="error.jsp" language="java" %>
<!DOCTYPE html PUBLIC "-//W3C//DTD XHTML 1.0 Transitional//EN"
"http://www.w3.org/TR/xhtml1/DTD/xhtml-transitional.dtd">
<html xmlns="http://www.w3.org/1999/xhtml">
<head>
<meta name=keywords content=小游戏,little game,心理游戏,心理提升>
<meta name=description
content=这是心理学爱好者自编的网页,目前还在编写阶段,欢迎试用>
<meta http-equiv="X-UA-Compatible" content="ie=edge">
<meta name="viewport" content="width=device-width, initial-scale=1.0">
<title>登录页面</title>
<link rel="icon" href="./img/label.png" >
<link rel="stylesheet" href="./styles/sui.css">
</head>
<body>
<div class="sui-full-size sui-flex sui-flex-column">
<div class="sui-full-width scroll-y">
<section class="letter" >
<div style="padding-bottom: 1rem;" align="center">
<img align="center" style="height: 2.5rem;" src="./img/first.png" alt="心理提升">
</div>
</section>
<form align="center" id="login" method="post" action="/webDemo_sit/firstServlet">
<table align="center">
<tr>
<td>用户名:</td>
<td><input type="text" name="username"></td>
</tr>
<tr>
<td>密   码:</td>
<td><input type="password" name="password"></td>
</tr>
<tr align="center">
<td colspan="2"><input type="submit" value="注册">            <input type="submit" value="登录"></td>
</tr>
</table>
</form>
</div>
</div>
</body>
</html>后台数据库录入数据代码:
package Dao;
import java.sql.*;
 public class FirstDao {
  static final String JDBC_DRIVER = "com.mysql.cj.jdbc.Driver";
  static final String DB_URL = "jdbc:mysql://localhost:3306/webdemo?serverTimezone=GMT";
  static final String USER = "*****";
  static final String PASS = "********";
  public void setHistory(String ip,String time)
  {
  Connection conn = null;
        Statement stmt = null;
  PreparedStatement pst =null;
        try{
          Class.forName(JDBC_DRIVER);

             // 打开链接
             conn = DriverManager.getConnection(DB_URL,USER,PASS);
             // 执行查询
             stmt = conn.createStatement();
             String sql = "INSERT  INTO  history_inf  VALUES (?,?)";
    pst = conn.prepareStatement(sql);
    pst.setString(1,ip);
    pst.setString(2,time);
    pst.executeUpdate();
        }catch(SQLException se){
            // 处理 JDBC 错误
            se.printStackTrace();
        }catch(Exception e){
            // 处理 Class.forName 错误
            e.printStackTrace();
        }finally{
            // 关闭资源
            try{
                if(stmt!=null) stmt.close();
            }catch(SQLException se2){
            }// 什么都不做
            try{
                if(conn!=null) conn.close();
            }catch(SQLException se){
                se.printStackTrace();
            }
         }
        }
}
使用ant生成class字节代码:
1.需要编写build.xml文件,之前已经写过,也可到之前的day01帖子里查看;
2.但是发现编译没有办法通过,然后到classpath里面配置了环境变量,把servlet-api.jar和jsp-api.jar放到路径下面。
CLASSPATH:
.;%JAVA_HOME%\lib;D:\programSoftware\apache-tomcat-7.0.100\lib\servlet-api.jar;D:\programSoftware\apache-tomcat-7.0.100\lib\jsp-api.jar

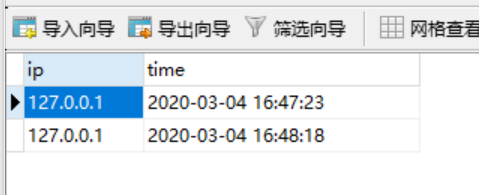
3.重启应用下面的服务器,运行,到数据库里查看登录情况。
方法②示例代码:
 <servlet>
  <servlet-name>firstServlet</servlet-name>
  <servlet-class>lee.FirstServlet</servlet-class>
 </servlet>
 <servlet-mapping>
  <servlet-name>firstServlet</servlet-name>
  <url-pattern>/aa</url-pattern>
 </servlet-mapping>
4.load-on-startup Servlet设置
两种配置方法:
①在Servlet中使用@WebServlet配置
- 指定load-on-startup
- @WebServlet(loadOnSstartup=1)
②web.xml配置
- 需要配置Servlet中<Servlet/>的子标签<load-on-startup/>
<servlet>
   <servlet-name>........</servlet-name>
   <servlet-class>.......</servlet-class>
   <load-on-startup>...</load-on-startup>
</servlet>
三、今日学习总结
1.数据库登录和连接
2.一般Servlet的配置
3.load-on-startup Servlet设置
四、明日计划
1.把应用部署到虚拟云主机上(其实是复习,看一下是不是哪些步骤被忘了);
2.继续学习Servlet相关知识。


 2628
2628


 被折叠的 条评论
为什么被折叠?
被折叠的 条评论
为什么被折叠?
 到【灌水乐园】发言


