转自http://my.oschina.net/amigos/blog/59261
实现RadioButton由两部分组成,也就是RadioButton和RadioGroup配合使用.RadioGroup是单选组合框,可以容纳多个RadioButton的容器.在没有RadioGroup的情况下,RadioButton可以全部都选中;当多个RadioButton被RadioGroup包含的情况下,RadioButton只可以选择一个。并用setOnCheckedChangeListener来对单选按钮进行监听
03 | RadioGroup.getCheckedRadioButtonId ();--获取选中按钮的id |
05 | RadioGroup.clearCheck (); |
07 | RadioGroup.check (int id); |
09 | setOnCheckedChangeListener (RadioGroup.OnCheckedChangeListener listener); |
11 | addView (View child, int index, ViewGroup.LayoutParams params); |
15 | RadioButton.getText(); |
RadioButton和RadioGroup的关系:
1、RadioButton表示单个圆形单选框,而RadioGroup是可以容纳多个RadioButton的容器
2、每个RadioGroup中的RadioButton同时只能有一个被选中
3、不同的RadioGroup中的RadioButton互不相干,即如果组A中有一个选中了,组B中依然可以有一个被选中
4、大部分场合下,一个RadioGroup中至少有2个RadioButton
5、大部分场合下,一个RadioGroup中的RadioButton默认会有一个被选中,并建议您将它放在RadioGroup中的起始位置
看案例:
1.定义布局文件:
01 | <?xml version="1.0" encoding="utf-8"?> |
02 | <ScrollView xmlns:android="http://schemas.android.com/apk/res/android" |
03 | android:layout_width="match_parent" |
04 | android:layout_height="match_parent" > |
06 | android:orientation="vertical" |
07 | android:layout_width="match_parent" |
08 | android:layout_height="wrap_content" |
09 | android:layout_marginRight="5dp" > |
12 | android:id="@+id/radiogroup_info_id" |
13 | android:layout_width="228px" |
14 | android:layout_height="wrap_content" |
15 | android:text="我选择的是...?" |
16 | android:textSize="30sp" |
20 | android:id="@+id/radioGroup_sex_id" |
21 | android:layout_width="match_parent" |
22 | android:layout_height="match_parent" |
25 | android:id="@+id/boy_id" |
26 | android:layout_width="match_parent" |
27 | android:layout_height="match_parent" |
31 | android:id="@+id/girl_id" |
32 | android:layout_width="match_parent" |
33 | android:layout_height="match_parent" |
39 | android:id="@+id/radio_clear" |
40 | android:layout_width="match_parent" |
41 | android:layout_height="match_parent" |
46 | android:id="@+id/radio_add_child" |
47 | android:layout_width="match_parent" |
48 | android:layout_height="match_parent" |
2.java代码文件
01 | package com.dream.app.start.first.radiobutton; |
03 | import com.dream.app.start.R; |
04 | import com.dream.app.start.R.id; |
05 | import com.dream.app.start.R.layout; |
06 | import com.dream.app.start.three.utils.PublicClass; |
08 | import android.app.Activity; |
09 | import android.os.Bundle; |
10 | import android.view.View; |
11 | import android.view.View.OnClickListener; |
12 | import android.view.ViewGroup.LayoutParams; |
13 | import android.widget.Button; |
14 | import android.widget.RadioButton; |
15 | import android.widget.RadioGroup; |
16 | import android.widget.RadioGroup.OnCheckedChangeListener; |
17 | import android.widget.TextView; |
18 | import android.widget.ToggleButton; |
20 | public class RadioButtonDemo extends PublicClass { |
21 | private TextView textView=null; |
22 | private RadioGroup radioGroup=null; |
23 | private RadioButton radioButton_boy,radioButton_girl; |
24 | private Button radio_clear,child; |
29 | protected void onCreate(Bundle savedInstanceState) { |
31 | super.onCreate(savedInstanceState); |
33 | setContentView(R.layout.layout_frist_radiobuton); |
35 | textView = (TextView)findViewById(R.id.radiogroup_info_id); |
38 | radioGroup=(RadioGroup)findViewById(R.id.radioGroup_sex_id); |
39 | radioButton_boy=(RadioButton)findViewById(R.id.boy_id); |
40 | radioButton_girl=(RadioButton)findViewById(R.id.girl_id); |
41 | child=(Button)findViewById(R.id.radio_add_child); |
43 | radioGroup.setOnCheckedChangeListener(listen); |
44 | radio_clear=(Button)findViewById(R.id.radio_clear); |
45 | radio_clear.setOnClickListener(onClick); |
46 | child.setOnClickListener(onClick); |
49 | private OnCheckedChangeListener listen=new OnCheckedChangeListener() { |
52 | public void onCheckedChanged(RadioGroup group, int checkedId) { |
53 | int id= group.getCheckedRadioButtonId(); |
54 | switch (group.getCheckedRadioButtonId()) { |
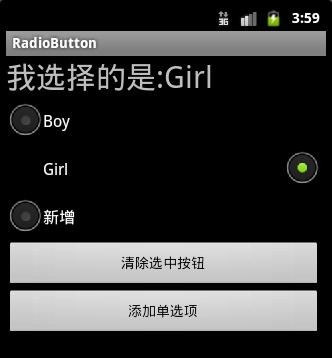
56 | textView.setText("我选择的是:"+radioButton_girl.getText()); |
59 | textView.setText("我选择的是:"+radioButton_boy.getText()); |
62 | textView.setText("我选择的是:新增"); |
68 | private OnClickListener onClick=new OnClickListener() { |
71 | public void onClick(View v) { |
72 | radio_clear=(Button)v; |
73 | switch (radio_clear.getId()) { |
74 | case R.id.radio_clear: |
77 | textView.setText("我选择的是...?"); |
79 | case R.id.radio_add_child: |
81 | RadioButton newRadio =new RadioButton(getApplicationContext()); |
82 | newRadio.setText("新增"); |
83 | radioGroup.addView(newRadio, radioGroup.getChildCount()); |
运行效果:


3.

4:可以通过设置如下属性可以使单选按钮在显示文本的右边
android:button="@null"
android:drawableRight="@android:drawable/btn_radio"
效果:
RadioButton和CheckBox的区别:
1、单个RadioButton在选中后,通过点击无法变为未选中
单个CheckBox在选中后,通过点击可以变为未选中
2、一组RadioButton,只能同时选中一个
一组CheckBox,能同时选中多个
3、RadioButton在大部分UI框架中默认都以圆形表示
CheckBox在大部分UI框架中默认都以矩形表示
==================================================
☆定制RadioButton样式
RadioButton长成什么样子是由其Background、Button等属性决定的,Android系统
使用style定义了默认的属性,在android源码
android/frameworks/base/core/res/res/values/styles.xml中可以看到默认的定义:
1 | <style name="Widget.CompoundButton.RadioButton"> |
2 | <item name="android:background">@android:drawable/btn_radio_label_background</item> |
3 | <item name="android:button">@android:drawable/btn_radio</item> |
即其背景图是btn_radio_label_background,其button的样子是btn_radio
btn_radio_label_background是什么?
其路径是android/frameworks/base/core/res/res/drawable-mdpi/btn_radio_label_background.9.png
可以看到是一个NinePatch图片,用来做背景,可以拉伸填充。
btn_radio是什么?
其路径是android/frameworks/base/core/res/res/drawable/btn_radio.xml
是个xml定义的drawable,打开看其内容:
01 | <selector xmlns:android="http://schemas.android.com/apk/res/android"> |
02 | <item android:state_checked="true" android:state_window_focused="false" |
03 | android:drawable="@drawable/btn_radio_on" /> |
04 | <item android:state_checked="false" android:state_window_focused="false" |
05 | android:drawable="@drawable/btn_radio_off" /> |
07 | <item android:state_checked="true" android:state_pressed="true" |
08 | android:drawable="@drawable/btn_radio_on_pressed" /> |
09 | <item android:state_checked="false" android:state_pressed="true" |
10 | android:drawable="@drawable/btn_radio_off_pressed" /> |
12 | <item android:state_checked="true" android:state_focused="true" |
13 | android:drawable="@drawable/btn_radio_on_selected" /> |
14 | <item android:state_checked="false" android:state_focused="true" |
15 | android:drawable="@drawable/btn_radio_off_selected" /> |
17 | <item android:state_checked="false" android:drawable="@drawable/btn_radio_off" /> |
18 | <item android:state_checked="true" android:drawable="@drawable/btn_radio_on" /> |
<item android:state_checked="true" android:state_pressed="true"
android:drawable="@drawable/btn_radio_on_pressed" />
意思即为当radiobutton被选中时,并且被按下时,其Button应该长成btn_radio_on_pressed这个样子。

文件是android/frameworks/base/core/res/res/drawable-mdpi/btn_radio_on_pressed.png
drawable的item中可以有以下属性:
1 | android:drawable="@[package:]drawable/drawable_resource" |
2 | android:state_pressed=["true" | "false"] |
3 | android:state_focused=["true" | "false"] |
4 | android:state_selected=["true" | "false"] |
5 | android:state_active=["true" | "false"] |
6 | android:state_checkable=["true" | "false"] |
7 | android:state_checked=["true" | "false"] |
8 | android:state_enabled=["true" | "false"] |
9 | android:state_window_focused=["true" | "false"] |
当按钮的状态和某个item匹配后,就会使用此item定义的drawable作为按钮图片。
从上面分析我们如果要修改RadioButton的外观,
自定义有三种方式:
1.方式一:
01 | <?xml version="1.0" encoding="utf-8"?> |
02 | <selector xmlns:android="http://schemas.android.com/apk/res/android"> |
05 | android:state_checked="false" |
06 | android:drawable="@drawable/tabswitcher_long" /> |
09 | android:state_checked="true" |
10 | android:drawable="@drawable/tabswitcher_short" /> |
在布局文件中使用
7 | android:background="@drawable/radio" |
android:button="@null"
去除RadioButton前面的圆点
2.方式二:在JAVA代码中定义
2 | public boolean onTouchEvent(MotionEvent event) { |
3 | if(event.getActionMasked() == MotionEvent.ACTION_DOWN){ |
4 | this.setBackgroundResource(com.wxg.tab.R.drawable.main_bg); |
5 | }else if(event.getActionMasked()== MotionEvent.ACTION_DOWN) { |
6 | this.setBackgroundResource(com.wxg.tab.R.drawable.hui); |
8 | return super.onTouchEvent(event); |
去除RadioButton前面的圆点adioButton.setButtonDrawable(android.R.color.transparent);
3. 方式三
使用XML文件定义,在JAVA代码中使用 radioButton.setBackgroundResource(R.drawable.radio);调用
==============================================================
设置RadioButton在文字的右边
2 | android:id="@+id/button2" |
3 | android:layout_width="fill_parent" |
4 | android:layout_height="50dip" |
6 | android:drawableRight="@android:drawable/btn_radio" //在右边 |
7 | android:paddingLeft="30dip" |
8 | android:text="Android高手" |
9 | android:textSize="20dip" /> </b> |
================================================================
自定义 radiobutton 文字颜色随选中状态而改变
主要是写一个 color selector
在res/建一个文件夹取名color
res/color/color_radiobutton.xml
1 | <?xml version="1.0" encoding="utf-8"?> |
2 | <selector xmlns:android="http://schemas.android.com/apk/res/android"> |
4 | <item android:state_checked="true" |
5 | android:color="@color/color_text_selected"/> |
7 | <item android:color="@color/color_text_normal"/> |
布局文件定义控件:
02 | android:id="@+id/radiobutton_1" |
03 | android:layout_width="wrap_content" |
04 | android:layout_height="wrap_content" |
05 | android:background="@drawable/selector_radio" |
06 | android:button="@null" |
07 | android:checked="true" |
08 | android:gravity="center" |
11 | android:textColor="@color/color_radiobutton" |
12 | android:textSize="@dimen/font_size" |
13 | android:textStyle="bold" /> |
============================================================
RadioButton上显示图片和文字
使用XML文件很简单就可以实现,但是有时必须要使用java code 的方式动态实现,这就有些复杂了,这需要继承RadioButton并覆盖其中的onDraw方法。
在代码中的image是Bitmap对象。
03 | protected void onDraw(Canvas canvas) { |
09 | Paint pt = new Paint(); |
11 | pt.setARGB(255,66,66,66); |
15 | pt.setAntiAlias(true); |
19 | int imageX=(int)(this.getWidth()-image.getWidth())/2; |
21 | canvas.drawBitmap(image,imageX,5,pt); |
23 | pt.setARGB(255,255,255,255); |
27 | int strX=(int)(this.getWidth()-name.getBytes().length*5.5)/2; |
29 | canvas.drawText(name,strX,(image.getHeight()+15),pt); |


 400
400


 被折叠的 条评论
为什么被折叠?
被折叠的 条评论
为什么被折叠?
 到【灌水乐园】发言


