


1. 前言
关于SSL的理论知识就不细说了,也了解得不是很深入。
这里主要是记录一下 SSL 证书的生成以及证书配置后发现chrome浏览器访问网站会提示网站不安全的问题。
大致流程如下,如果有两个域名,应该只需要生成自签名证书就可以了。
但是我只有一个域名,所以只能用其他的方式解决。openssl 的安装过程比较简单,不详细记录

2. 生成证书
证书的生成过程主要参考了:https://blog.51cto.com/1inux/1638154
第一步 生成私钥文件
命令:sudo openssl genrsa -out /etc/pki/CA/private/cakey.pem 2048
[centos@ip ssl]$ sudo openssl genrsa -out /etc/pki/CA/private/cakey.pem 2048
Generating RSA private key, 2048 bit long modulus
...........+++
......................+++
e is 65537 (0x10001)
** 检查:
sudo vim /etc/pki/CA/private/cakey.pem
第二步 生成自签证书
命令:sudo openssl req -new -x509 -key /etc/pki/CA/private/cakey.pem -out /etc/pki/CA/cacert.pem -days 365
[centos@ip ssl]$ sudo openssl req -new -x509 -key /etc/pki/CA/private/cakey.pem -out /etc/pki/CA/cacert.pem -days 365
You are about to be asked to enter information that will be incorporated
into your certificate request.
What you are about to enter is what is called a Distinguished Name or a DN.
There are quite a few fields but you can leave some blank
For some fields there will be a default value,
If you enter '.', the field will be left blank.
-----
Country Name (2 letter code) [XX]:CN
State or Province Name (full name) []:Guangdong
Locality Name (eg, city) [Default City]:Shenzhen
Organization Name (eg, company) [Default Company Ltd]:Walle
Organizational Unit Name (eg, section) []:Test
Common Name (eg, your name or your server's hostname) []:certmall.trustauth.cn
Email Address []:root@amwalle.com
-key 私钥文件(指明从哪个私钥文件中提取公钥创建证书签署请求)
-out 指定证书文件存放在位置
-new 生成新的证书签署请求;
-days n 证书有效时长,单位为“天”;
-x509 生成自签证书
** 参数中带-x509表示直接生成自签证书,不带则表示生成证书签署请求
第三步 生成私钥
命令:sudo openssl genrsa -out certificate.key 2048
[centos@ip ssl]$ sudo openssl genrsa -out certificate.key 2048
Generating RSA private key, 2048 bit long modulus
............................................+++
..............................................................+++
e is 65537 (0x10001)
第四步 生成请求签署文件:
命令:sudo openssl req -new -key certificate.key -out certificate.csr
[centos@ip ssl]$ sudo openssl req -new -key certificate.key -out certificate.csr
You are about to be asked to enter information that will be incorporated
into your certificate request.
What you are about to enter is what is called a Distinguished Name or a DN.
There are quite a few fields but you can leave some blank
For some fields there will be a default value,
If you enter '.', the field will be left blank.
-----
Country Name (2 letter code) [XX]:CN
State or Province Name (full name) []:Guangdong
Locality Name (eg, city) [Default City]:Shenzhen
Organization Name (eg, company) [Default Company Ltd]:Walle
Organizational Unit Name (eg, section) []:Test
Common Name (eg, your name or your server's hostname) []:www.amwalle.com // 你要访问的域名
Email Address []:root@amwalle.com
Please enter the following 'extra' attributes
to be sent with your certificate request
A challenge password []:  // 密码
An optional company name []:Ops
** 这里的 hostname 就是部署的工程所在的域名地址,字段与生成自签证书时填写一致即可
第五步 签署证书
做签署证书之前,要先执行以下两个命令(签署证书的时候会用到,否则会报错):
sudo touch /etc/pki/CA/index.txt
echo 01 | sudo tee /etc/pki/CA/serial
签署证书命令:sudo openssl ca -in certificate.csr -out certificate.crt -days 365
[centos@ip ssl]$ sudo openssl ca -in certificate.csr -out certificate.crt -days 365
Using configuration from /etc/pki/tls/openssl.cnf
Check that the request matches the signature
Signature ok
Certificate Details:
        Serial Number: 2 (0x2)
        Validity
            Not Before: Jun  2 13:26:26 2019 GMT
            Not After : Jun  1 13:26:26 2020 GMT
        Subject:
            countryName               = CN
            stateOrProvinceName       = Guangdong
            organizationName          = Walle
            organizationalUnitName    = Test
            commonName                = www.amwalle.com
            emailAddress              = root@amwalle.com
        X509v3 extensions:
            X509v3 Basic Constraints:
                CA:FALSE
            Netscape Comment:
                OpenSSL Generated Certificate
            X509v3 Subject Key Identifier:
                61:EA:60:4D:0C:80:C4:03:89:AF:B6:DB:AE:40:E8:AC:4C:2D:29:64
            X509v3 Authority Key Identifier:
                keyid:6F:DE:B1:A8:8B:88:F3:BE:BE:82:CB:E4:2C:85:A1:F0:25:53:50:96

Certificate is to be certified until Jun  1 13:26:26 2020 GMT (365 days)
Sign the certificate? [y/n]:y


1 out of 1 certificate requests certified, commit? [y/n]y
Write out database with 1 new entries
Data Base Updated
**
-in 证书请求签署文件
-out 签发后的证书文件
-days 证书有效天数
到这一步,我们得到了下面三个文件:
certificate.crt certificate.csr certificate.key
如果这时直接用certificate.crt 和 certificate.key 配置 nginx,chrome会提示网站不安全
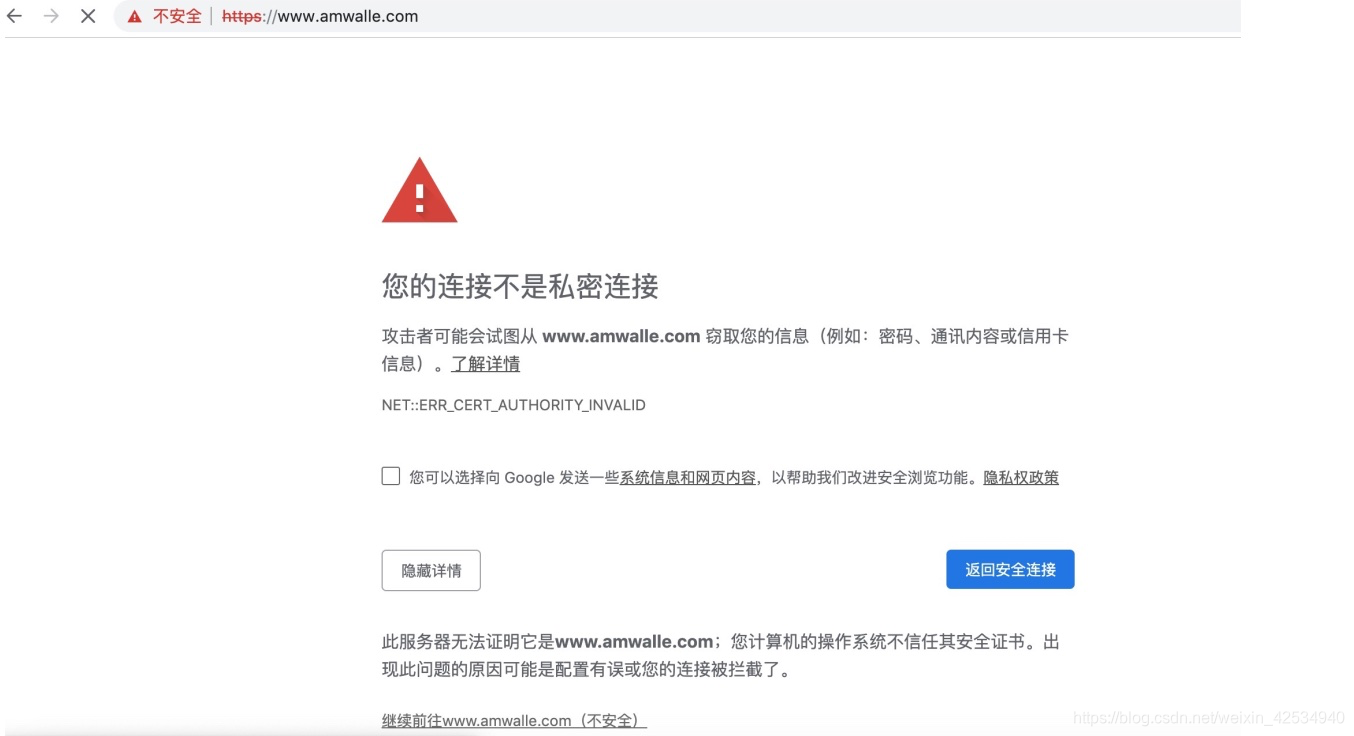
点击“不安全”,会提示“证书不受信任”:
这时,可以去免费的证书申请网站上申请证书来解决这个问题
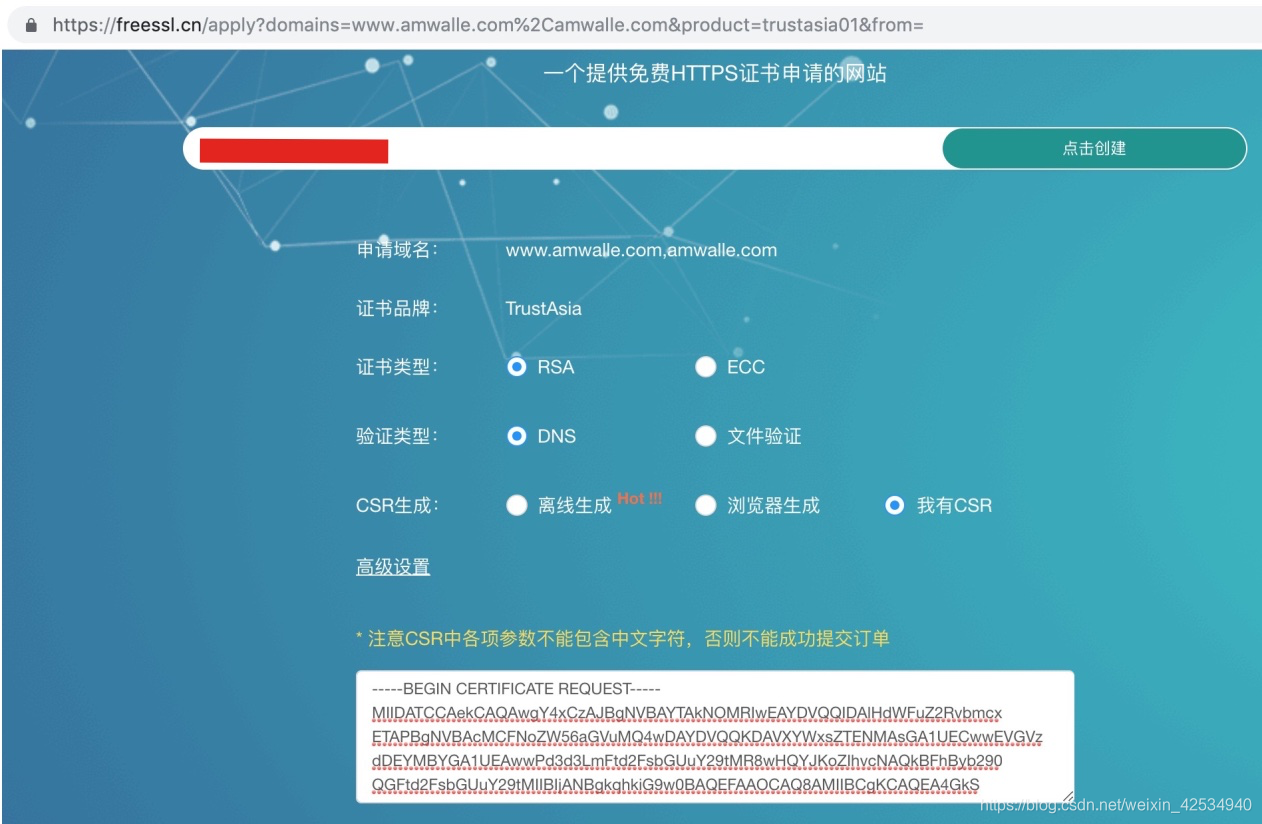
3. 证书网站生成新证书
免费 HTTPS 证书申请网站:
* https://freessl.cn/? (有效期更长)
* https://certmall.trustauth.cn/Free/index.html
以第一个为例。
第一步 通过 CSR 进行创建
从上一节生成的 certificate.csr,读取其内容并粘贴到下面的文本框:
命令:sudo vim certificate.csr
第二步 DNS验证
这里要去你的域名提供商处,配置DNS规则,来证明你对该域名拥有所有权。
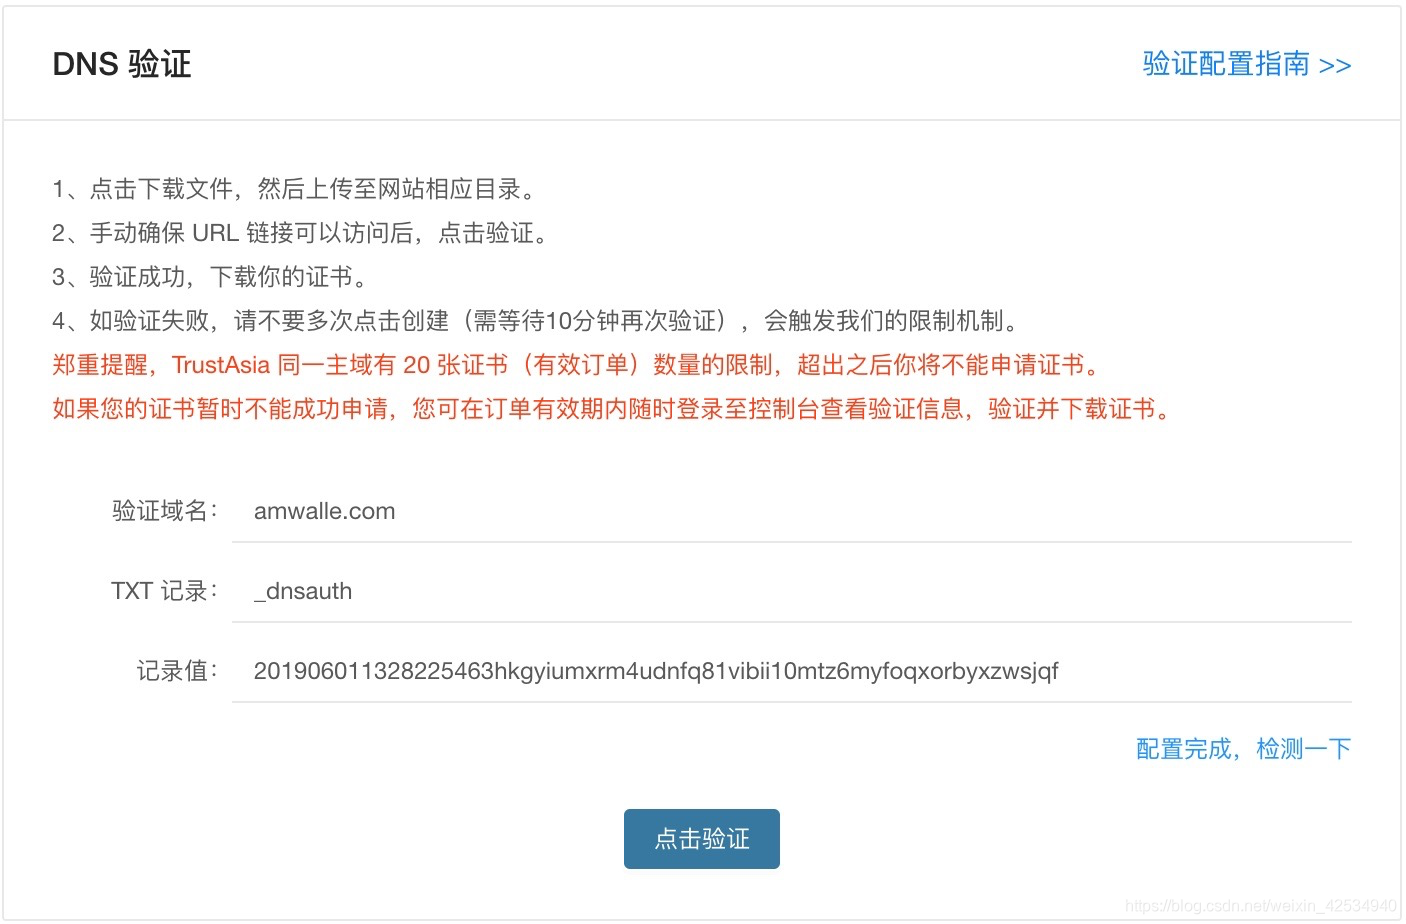
根据上面的信息,新增(或者修改已经存在的相同规则)如下:
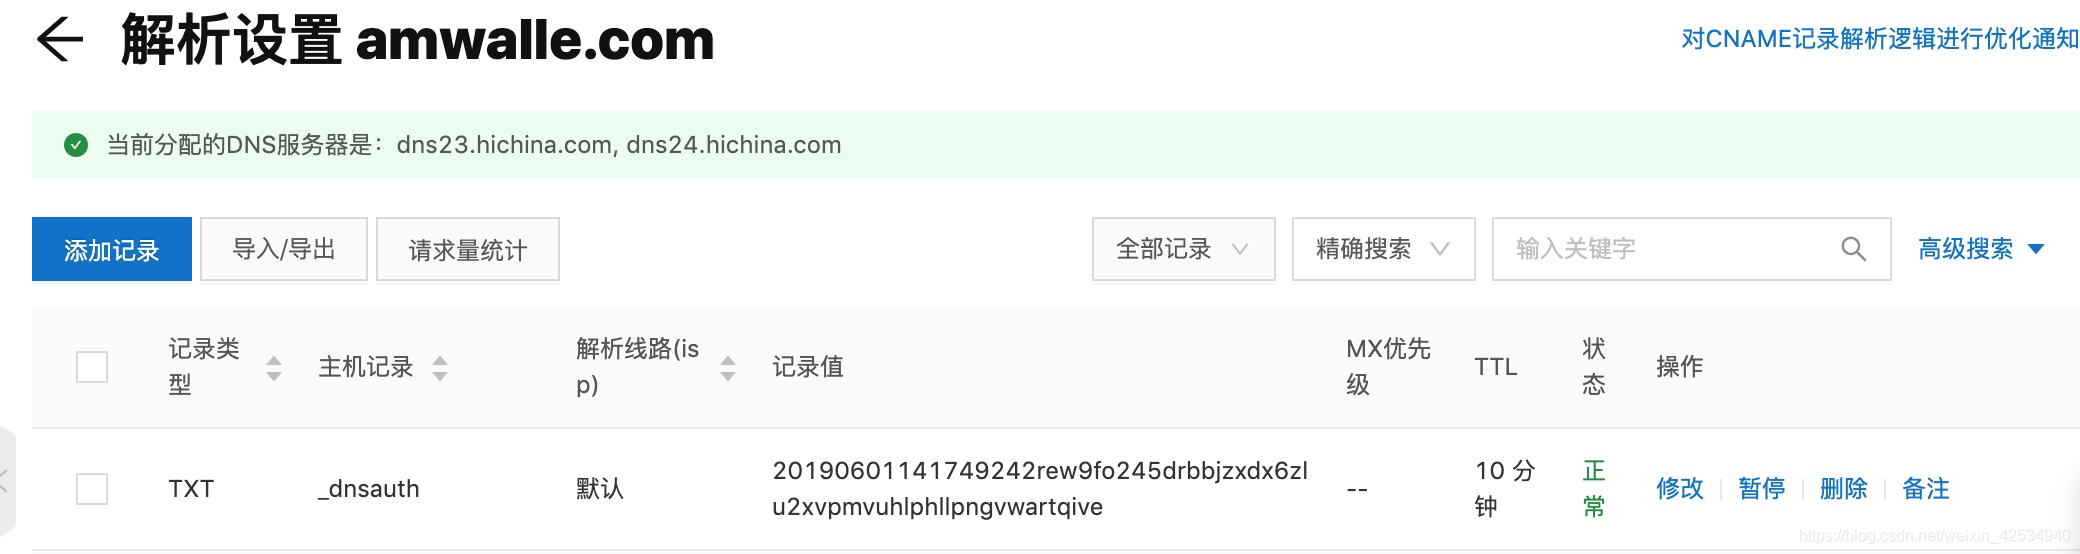
** 这里是阿里云里面配置DNS的一个示例
配置完成之后,点击第一张图片里面的“配置完成,检测一下”:
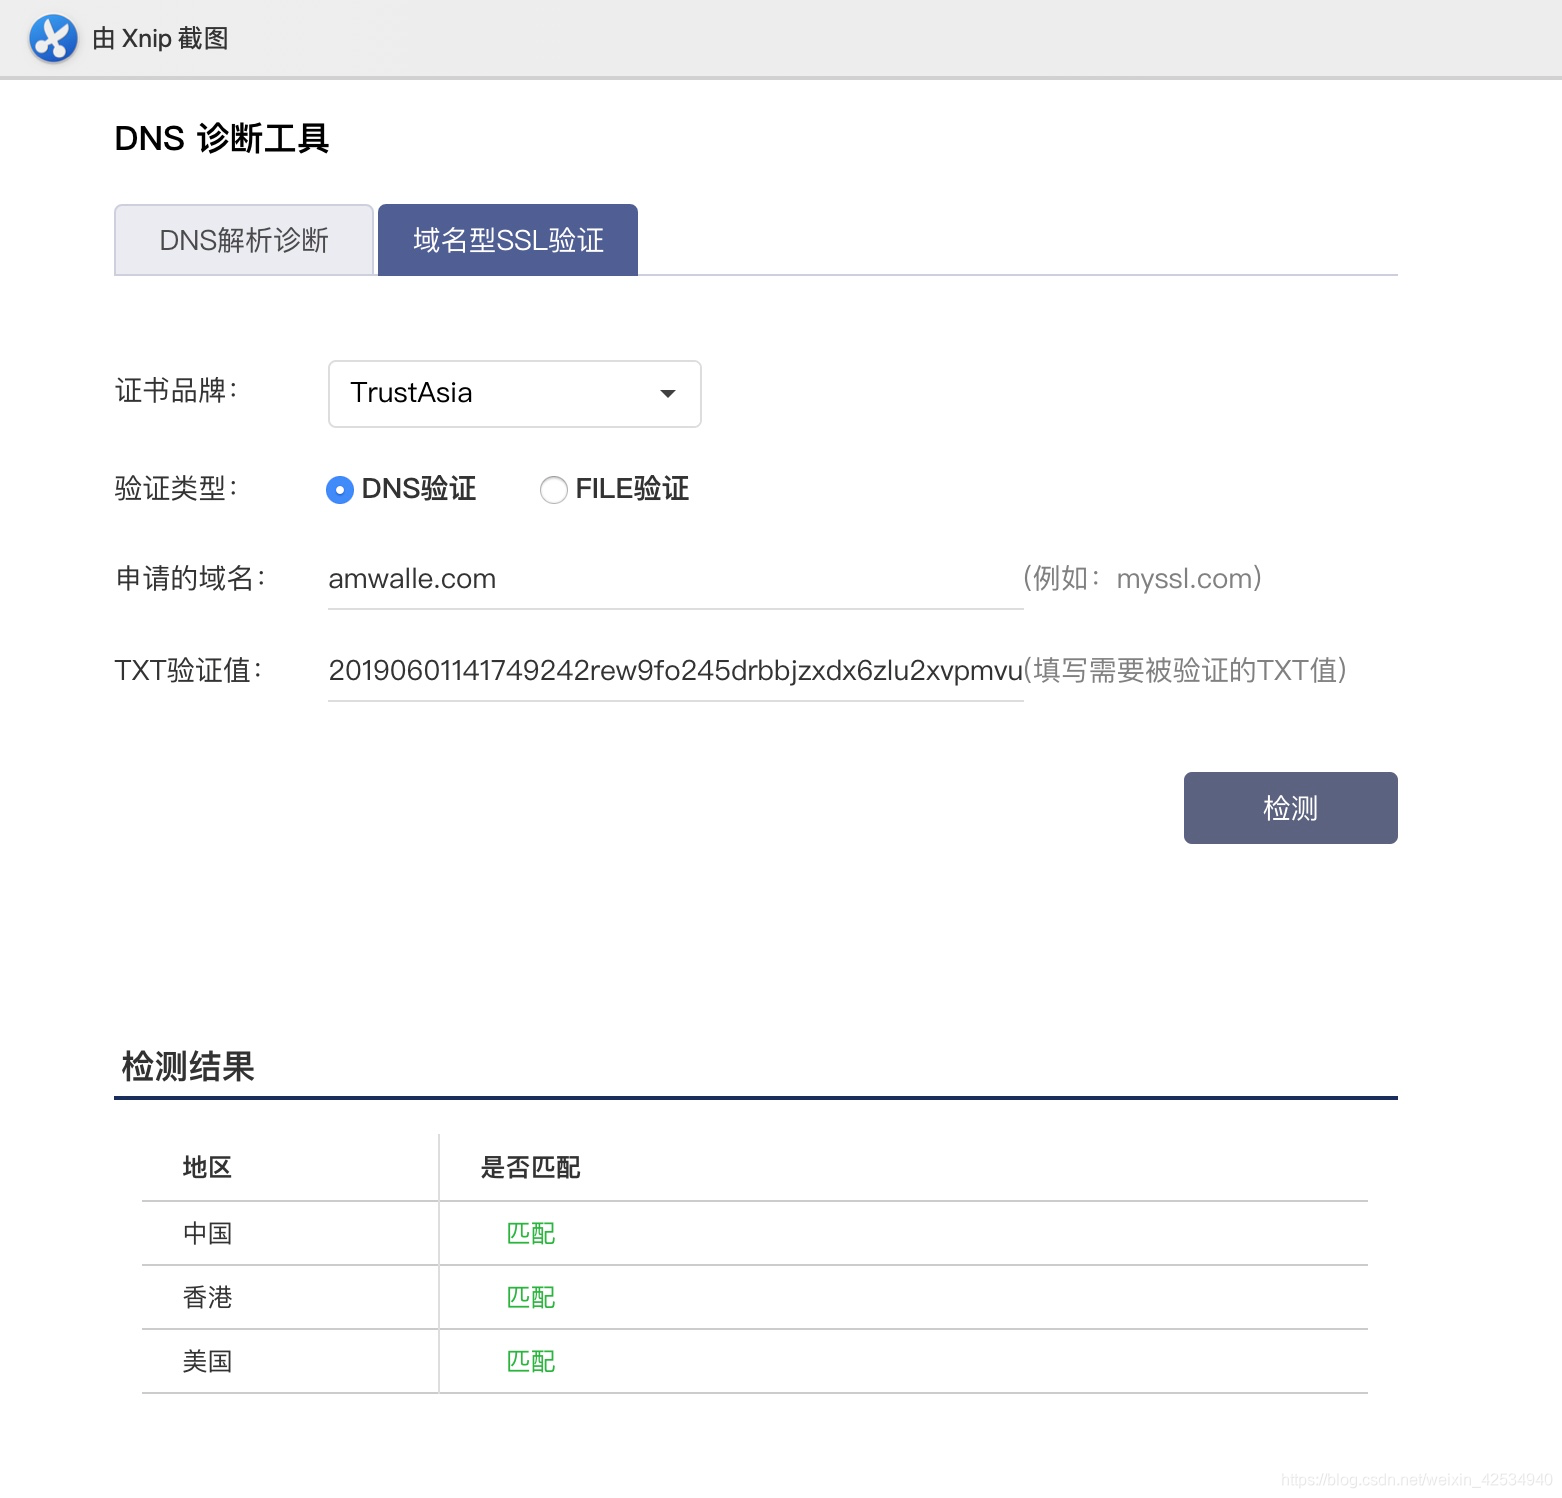
** 如果检测结果为 匹配,则可以再点击第一张图片里面的“点击验证”
第三步 下载证书
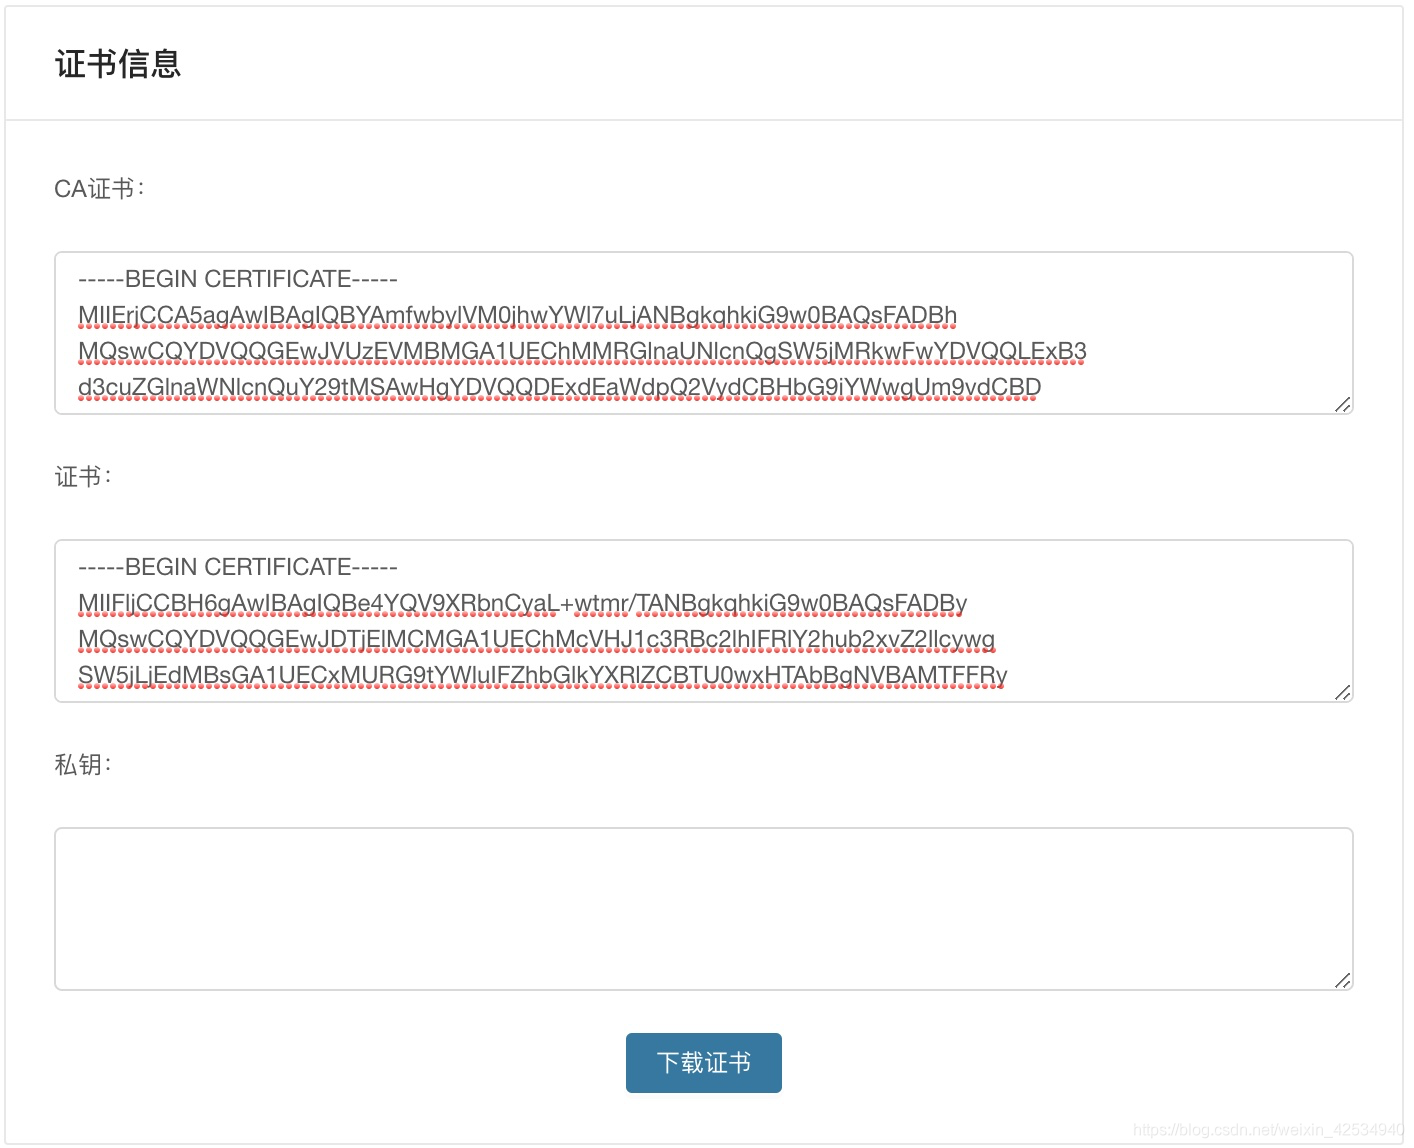
第四步 上传新证书
证书下载之后解压,得到 full_chain.pem
** https://certmall.trustauth.cn/Free/index.html 用这个生成得到的是 certificate.crt
将 full_chain.pem 上传至自己的服务器(也可以在服务器上新建一个相同的文件,然后把内容复制上去)
4. 配置 nginx
第一步 配置 nginx.conf
首先进入 nginx 配置目录,执行:sudo vim nginx.conf
在 http 中新增配置如下:
server {
        listen  443 ssl;
        server_name  www.amwalle.com;

        ssl_certificate      full_chain.pem;
        ssl_certificate_key  certificate.key;
        ssl_session_cache    shared:SSL:1m;
        ssl_session_timeout  5m;
        ssl_ciphers  HIGH:!aNULL:!MD5;
        ssl_prefer_server_ciphers  on;

        location /index {
                proxy_pass  http://127.0.0.1:7001/index;
            }

        location /test {
                proxy_pass  http://127.0.0.1:7001/test;
            }
        }
** 其中,full_chain.pem 是上一节生成的,certificate.key 是第二节生成的
** 如果是用 https://certmall.trustauth.cn/Free/index.html 生成,那么配置如下:
 server {
        listen  443 ssl;
        server_name  www.amwalle.com;

        ssl_certificate      certificate.crt;
        ssl_certificate_key  certificate.key;
        ssl_session_cache    shared:SSL:1m;
        ssl_session_timeout  5m;
        ssl_ciphers  HIGH:!aNULL:!MD5;
        ssl_prefer_server_ciphers  on;

        location /index {
                proxy_pass  http://127.0.0.1:7001/index;
            }

        location /test {
                proxy_pass  http://127.0.0.1:7001/test;
            }
        }
第二步 检查配置
进入 nginx 所在目录,执行:sudo ./nginx -t
[centos@ip sbin]$ sudo ./nginx -t
nginx: the configuration file /opt/openresty/nginx/conf/nginx.conf syntax is ok
nginx: configuration file /opt/openresty/nginx/conf/nginx.conf test is successful
第三步 重新加载 nginx
在 nginx 目录下,执行:sudo ./nginx -s reload
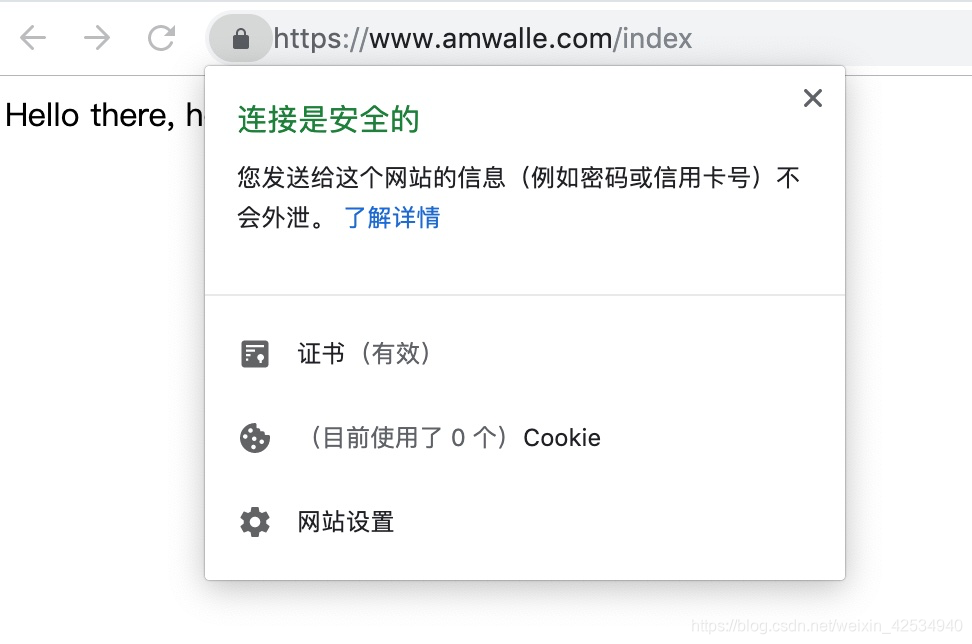
5. 访问 HTTPS 地址
检查访问是否正常:
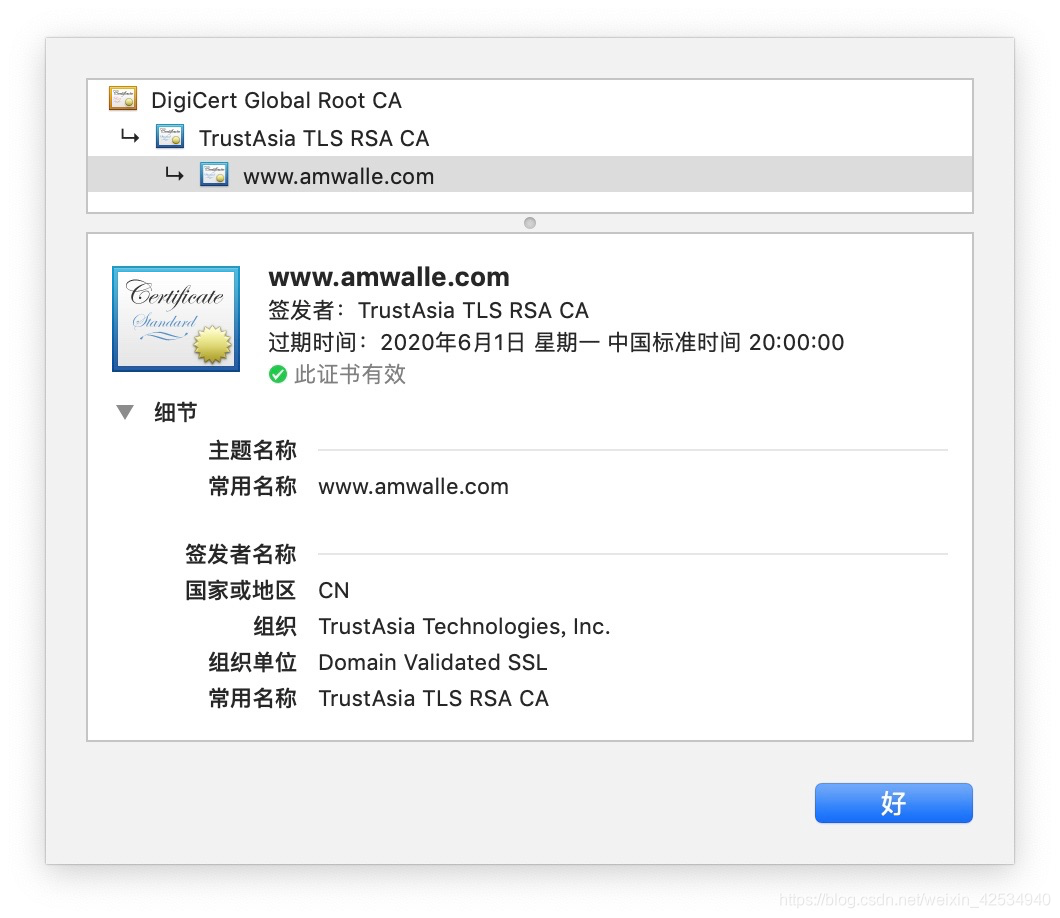
查看证书:
6. 一些可能问题处理
** 对于下面的问题,执行该命令解决:sudo touch /etc/pki/CA/index.txt
[centos@ip ssl]$ sudo openssl ca -in certificate.csr -out certificate.crt -days 365
Using configuration from /etc/pki/tls/openssl.cnf
/etc/pki/CA/index.txt: No such file or directory
unable to open '/etc/pki/CA/index.txt'
139981965662096:error:02001002:system library:fopen:No such file or directory:bss_file.c:402:fopen('/etc/pki/CA/index.txt','r')
139981965662096:error:20074002:BIO routines:FILE_CTRL:system lib:bss_file.c:404:
** 对于下面的问题,执行该命令解决:echo 01 | sudo tee /etc/pki/CA/serial
[centos@ip ssl]$ sudo openssl ca -in certificate.csr -out certificate.crt -days 365
Using configuration from /etc/pki/tls/openssl.cnf
/etc/pki/CA/serial: No such file or directory
error while loading serial number
139630067787664:error:02001002:system library:fopen:No such file or directory:bss_file.c:402:fopen('/etc/pki/CA/serial','r')
139630067787664:error:20074002:BIO routines:FILE_CTRL:system lib:bss_file.c:404:
** 如果在多次生成证书的过程中报下面的错误,可以通过先删除,再重新创建 index.txt 文件来解决
TXT_DB error
** 如果在 nginx 测试的过程中报如下错误,可能是由于复制的证书文件不对,检查一下正是是否复制完整
failed (SSL: error:0906D06C:PEM routines:PEM_read_bio:no start line:Expecting: TRUSTED CERTIFICATE)
** 如果出现响应时间过长,可能是由于防火墙或者安全组设置问题,检查一下防火墙配置

————————————————
版权声明:本文为CSDN博主「weixin_42534940」的原创文章,遵循CC 4.0 BY-SA版权协议,转载请附上原文出处链接及本声明。
原文链接:https://blog.csdn.net/weixin_42534940/article/details/90745452


 1万+
1万+

 被折叠的 条评论
为什么被折叠?
被折叠的 条评论
为什么被折叠?
 到【灌水乐园】发言


