


Android热补丁动态修复技术(一):从Dex分包原理到热补丁
一、参考
博文:安卓App热补丁动态修复技术介绍——by QQ空间终端开发团队
博文:Android dex分包方案——by 猫的午后
开源项目:https://github.com/jasonross/Nuwa
开源项目:https://github.com/dodola/HotFix
感谢以上几位大神分享的技术知识!
关于热补丁技术,以上文章已经做了很详细的描述。但是细节上的东西都一带而过,这里会做出更为详细的说明,更适合初学者学习这门技术。
二、Dex分包方案的由来
2.1 Dalvik限制
众所周知,当apk解压后里面是只有一个classes.dex文件的,而这个dex文件里面就包含了我们项目的所有.class文件。
但是当一个app功能越来越复杂,可能会出现两个问题:
- 编译失败,因为一个dvm中存储方法id用的是short类型,导致dex中方法不能超过65536个
- 你的apk在android 2.3之前的机器无法安装,因为dex文件过大(用来执行dexopt的内存只分配了5M)
2.2 解决方案
针对上述两个问题,有人研究出了dex分包方案。
原理就是将编译好的class文件拆分打包成两个dex,绕过dex方法数量的限制以及安装时的检查,在运行时再动态加载第二个dex文件中。
除了第一个dex文件(即正常apk包唯一包含的Dex文件),其它dex文件都以资源的方式放在安装包中,并在Application的onCreate回调中被注入到系统的ClassLoader。因此,对于那些在注入之前已经引用到的类(以及它们所在的jar),必须放入第一个Dex文件中。
三、Dex分包的原理——ClassLoader
接下来我们就来看看,如何将第二个dex文件注入到系统中。
3.1 ClassLoader体系
我们都知道,java执行程序的时候是需要先将字节码加载到jvm之后才会被执行的,而这个过程就是使用到了ClassLoader类加载器。Android也是如此
以下是DVM的ClassLoader体系
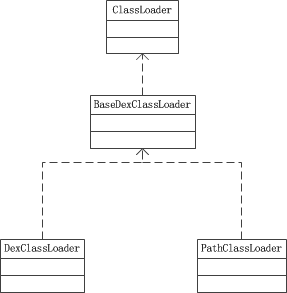
查看官方文档可以知道以下两点:
1.Android系统是通过PathClassLoader加载系统类和已安装的应用的。
Android uses this class for its system class loader and for its application class loader(s).
2.而DexClassPath则可以从一个jar包或者未安装的apk中加载dex
A class loader that loads classes from .jar and .apk files containing a classes.dex entry. This can be used to execute code not installed as part of an application.
从这里就可以看出,动态加载dex的时候我们应该使用DexClassLoader
3.2 ClassLoader源码分析
源码可以到这个网站查阅:http://androidxref.com/
DexClassLoader和PathClassLoader都只重写了BaseDexClassLoader的构造而已,而具体的加载逻辑则在BaseDexClassLoader中。
这部分源码都很简单,请务必看懂
BaseDexClassLoader部分源码:
- 1
- 2
- 3
- 4
- 5
- 6
- 7
- 8
- 9
- 10
- 11
- 12
- 13
- 14
- 15
- 16
- 17
- 18
- 19
- 20
- 21
- 22
- 23
- 24
- 25
- 26
- 27
- 28
- 29
- 30
- 31
- 32
- 33
- 34
- 35
- 36
- 1
- 2
- 3
- 4
- 5
- 6
- 7
- 8
- 9
- 10
- 11
- 12
- 13
- 14
- 15
- 16
- 17
- 18
- 19
- 20
- 21
- 22
- 23
- 24
- 25
- 26
- 27
- 28
- 29
- 30
- 31
- 32
- 33
- 34
- 35
- 36
从源码得知,当我们需要加载一个class时,实际是从pathList中去找的,而pathList则是DexPathList的一个实体。
DexPathList部分源码:
- 1
- 2
- 3
- 4
- 5
- 6
- 7
- 8
- 9
- 10
- 11
- 12
- 13
- 14
- 15
- 16
- 17
- 18
- 19
- 20
- 21
- 22
- 23
- 24
- 25
- 26
- 27
- 28
- 29
- 30
- 31
- 32
- 33
- 34
- 35
- 36
- 37
- 38
- 39
- 40
- 41
- 42
- 43
- 44
- 45
- 1
- 2
- 3
- 4
- 5
- 6
- 7
- 8
- 9
- 10
- 11
- 12
- 13
- 14
- 15
- 16
- 17
- 18
- 19
- 20
- 21
- 22
- 23
- 24
- 25
- 26
- 27
- 28
- 29
- 30
- 31
- 32
- 33
- 34
- 35
- 36
- 37
- 38
- 39
- 40
- 41
- 42
- 43
- 44
- 45
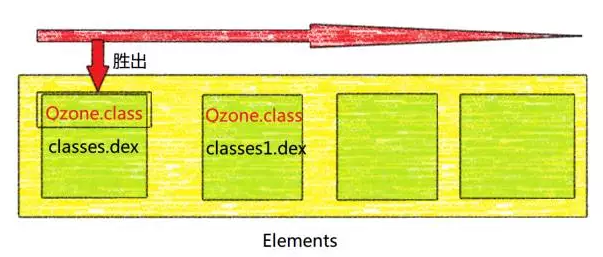
从这段源码可以看出,dexElements是用来保存dex的数组,而每个dex文件其实就是DexFile对象。遍历dexElements,然后通过DexFile去加载class文件,加载成功就返回,否则返回null
通常情况下,dexElements数组中只会有一个元素,就是apk安装包中的classes.dex
而我们则可以通过反射,强行的将一个外部的dex文件添加到此dexElements中,这就是dex的分包原理了。
这也是热补丁修复技术的原理。
四、热补丁修复技术的原理
上面的源码,我们注意到一点,如果两个dex中存在相同的class文件会怎样?
先从第一个dex中找,找到了直接返回,遍历结束。而第二个dex中的class永远不会被加载进来。
简而言之,两个dex中存在相同class的情况下,dex1的class会覆盖dex2的class。
盗一下QQ空间的图,如图:classes1.dex中的Qzone.class并不会被加载
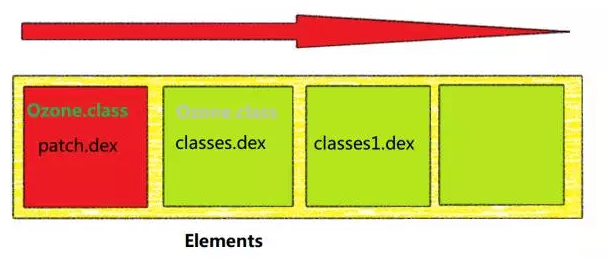
而热补丁技术则利用了这一特性,当一个app出现bug的时候,我们就可以将出现那个bug的类修复后,重新编译打包成dex,插入到dexElements的前面,那么出现bug的类就会被覆盖,app正常运行,这就是热修复的原理了。
五、本章结束
这章为大家介绍了热补丁技术的原理,但是大家可能并不会实际操作。
1. 怎么通过反射将dex插入到elements
2. 怎么讲修复后的类打包成dex
这将是下一篇博客的内容,感谢阅读。
---------------------------------------------------------------------------------------------------------
上一篇博客中,我们通过介绍dex分包原理引出了Android的热补丁技术,而现在我们将解决两个问题。
1. 怎么将修复后的Bug类打包成dex
2. 怎么将外部的dex插入到ClassLoader中
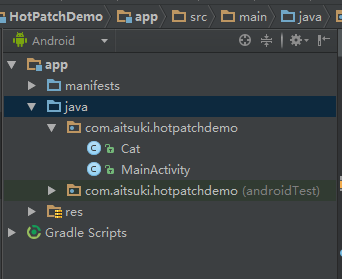
二、建立测试Demo
2.1 目录结构
2.2 源码
activity_main.xml
- 1
- 2
- 3
- 4
- 5
- 6
- 7
- 8
- 9
- 10
- 11
- 12
- 13
- 14
- 15
- 16
- 17
- 1
- 2
- 3
- 4
- 5
- 6
- 7
- 8
- 9
- 10
- 11
- 12
- 13
- 14
- 15
- 16
- 17
MainActivity.class
- 1
- 2
- 3
- 4
- 5
- 6
- 7
- 8
- 9
- 10
- 11
- 12
- 13
- 14
- 15
- 16
- 17
- 18
- 19
- 20
- 21
- 22
- 1
- 2
- 3
- 4
- 5
- 6
- 7
- 8
- 9
- 10
- 11
- 12
- 13
- 14
- 15
- 16
- 17
- 18
- 19
- 20
- 21
- 22
Cat.class
- 1
- 2
- 3
- 4
- 5
- 6
- 7
- 8
- 9
- 10
- 1
- 2
- 3
- 4
- 5
- 6
- 7
- 8
- 9
- 10
2.3 运行结果
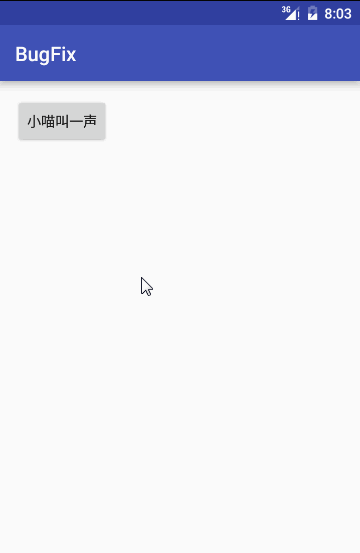
假设这是我们公司的开发项目,刚刚上线就发现了严重bug,猫会狗叫。
想修复bug,让用户再立刻更新一次显然很不友好,此时热补丁修复技术就有用了。
三、制作补丁
在加载dex的代码之前,我们先来制作补丁。
1. 首先我们将Cat类修复,汪汪汪改成喵喵喵,然后重新编译项目。(Rebuild一下就行了)
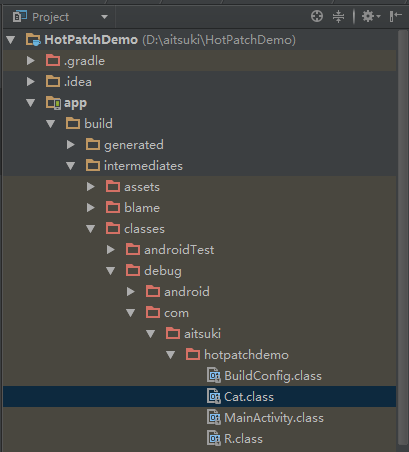
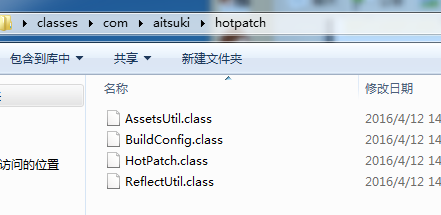
2. 去保存项目的地方,将Cat.class文件拷贝出来,在这里
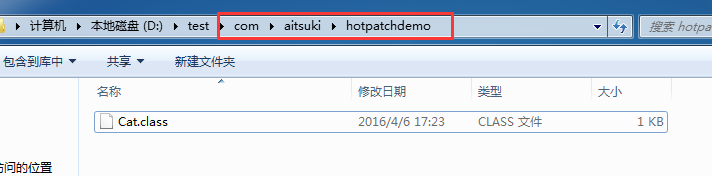
3. 新建文件夹,要和该Cat.class文件的包名一致,然后将Cat.class复制到这里,如图
4. 命令行进入到图中的test目录,运行一下命令,打包补丁。如图:
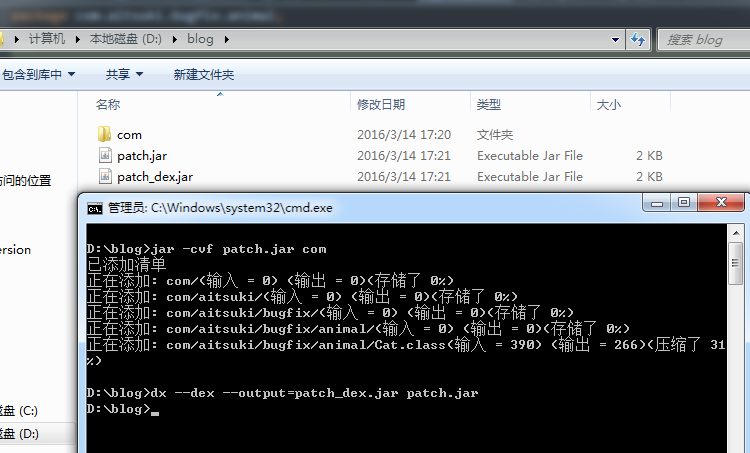
然后test目录是这样的

patch_dex.jar就是我们打包好的补丁了,我们将它放到sdCard中,待会从这里加载补丁。
关于什么用这么复杂的方法打包补丁的说明:
你也可以直接将java文件拷出来,通过javac -d带包编译再转成jar。
但我这么麻烦是有原因的,因为用这种方法你可能会遇到ParseException,原因是jar包版本和dx工具版本不一致。
而从项目中直接将编译好的class直接转成jar就没问题,因为java会向下兼容,打出来的jar包和class版本是一致的。
总而言之,dx版本要和class编译版本对应。
四、加载补丁
4.1 思路
通过上一篇博文,我们知道dex保存在这个位置
BaseDexClassLoader–>pathList–>dexElements
- apk的classes.dex可以从应用本身的DexClassLoader中获取。
- path_dex的dex需要new一个DexClassLoader加载后再获取。
- 分别通过反射取出dex文件,重新合并成一个数组,然后赋值给盈通本身的ClassLoader的dexElements
4.2 代码实现
加载外部dex,我们可以在Application中操作。
首先新建一个HotPatchApplication,然后在清单文件中配置,顺便加上读取sdcard的权限,因为补丁就保存在那里。
HotPatchApplication代码如下:
- 1
- 2
- 3
- 4
- 5
- 6
- 7
- 8
- 9
- 10
- 11
- 12
- 13
- 14
- 15
- 16
- 17
- 18
- 19
- 20
- 21
- 22
- 23
- 24
- 25
- 26
- 27
- 28
- 29
- 30
- 31
- 32
- 33
- 34
- 35
- 36
- 37
- 38
- 39
- 40
- 41
- 42
- 43
- 44
- 45
- 46
- 47
- 48
- 49
- 50
- 51
- 52
- 53
- 54
- 55
- 56
- 57
- 58
- 59
- 60
- 61
- 62
- 63
- 64
- 65
- 66
- 67
- 68
- 69
- 70
- 71
- 72
- 73
- 74
- 75
- 76
- 77
- 78
- 79
- 80
- 81
- 82
- 83
- 84
- 85
- 86
- 87
- 88
- 89
- 90
- 91
- 92
- 93
- 94
- 95
- 96
- 97
- 98
- 99
- 100
- 101
- 102
- 103
- 104
- 105
- 106
- 107
五、CLASS_ISPREVERIFIED
运行一下Demo,报以下错误。(AndroidStudio 2.0可能不会报错,需要打包的时候才会出现错误,这是Instant run导致的)
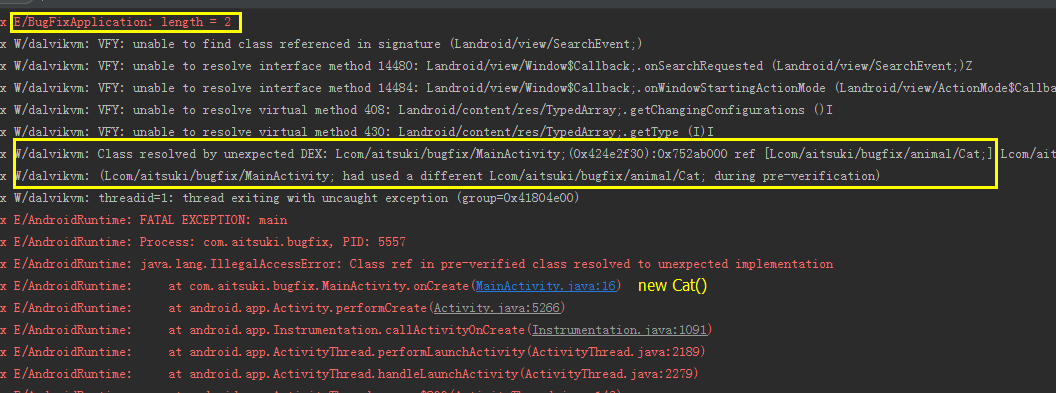
dexElements的length = 2,看来我们的patch_dex已经成功添加进去了。
但是从黄色框框和黄色框上面那一段log提示中可以看出,MainActivity引用了Cat,但是发现他们在不同的Dex中。
看到这里可能就会问:
为什么之前那么多项目都采用分包方案,但是却不会出现这个错误呢?
我在这里总结了一个过程,想知道详细分析过程的请看QQ空间开发团队的原文。
- 在apk安装的时候,虚拟机会将dex优化成odex后才拿去执行。在这个过程中会对所有class一个校验。
- 校验方式:假设A该类在它的static方法,private方法,构造函数,override方法中直接引用到B类。如果A类和B类在同一个dex中,那么A类就会被打上CLASS_ISPREVERIFIED标记
- 被打上这个标记的类不能引用其他dex中的类,否则就会报图中的错误
- 在我们的Demo中,MainActivity和Cat本身是在同一个dex中的,所以MainActivity被打上了CLASS_ISPREVERIFIED。而我们修复bug的时候却引用了另外一个dex的Cat.class,所以这里就报错了
- 而普通分包方案则不会出现这个错误,因为引用和被引用的两个类一开始就不在同一个dex中,所以校验的时候并不会被打上CLASS_ISPREVERIFIED
- 补充一下第二条:A类如果还引用了一个C类,而C类在其他dex中,那么A类并不会被打上标记。换句话说,只要在static方法,构造方法,private方法,override方法中直接引用了其他dex中的类,那么这个类就不会被打上CLASS_ISPREVERIFIED标记。
5.1 解决方案
根据上面的第六条,我们只要让所有类都引用其他dex中的某个类就可以了。
下面是QQ控件给出的解决方案
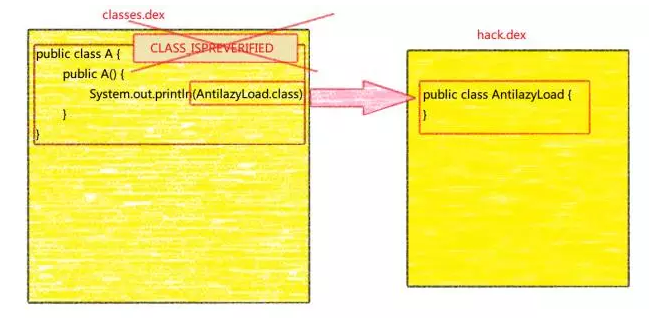
- 在所有类的构造函数中插入这行代码
System.out.println(AntilazyLoad.class);
这样当安装apk的时候,classes.dex内的类都会引用一个在不相同dex中的AntilazyLoad类,这样就防止了类被打上CLASS_ISPREVERIFIED的标志了,只要没被打上这个标志的类都可以进行打补丁操作。 - hack.dex在应用启动的时候就要先加载出来,不然AntilazyLoad类会被标记为不存在,即使后面再加载hack.dex,AntilazyLoad类还是会提示不存在。该类只要一次找不到,那么就会永远被标上找不到的标记了。
- 我们一般在Application中执行dex的注入操作,所以在Application的构造中不能加上
System.out.println(AntilazyLoad.class);这行代码,因为此时hack.dex还没有加载进来,AntilazyLoad并不存在。 - 之所以选择构造函数是因为他不增加方法数,一个类即使没有显式的构造函数,也会有一个隐式的默认构造函数。
5.2 插入代码的难点
- 首先在源码中手动插入不太可行,hack.dex此时并没有加载进来,AntilazyLoad.class并不存在,编译不通过。
- 所以我们需要在源码编译成字节码之后,在字节码中进行插入操作。对字节码进行操作的框架有很多,但是比较常用的则是ASM和javaassist
- 但AndroidStudio是使用Gradle构建项目,编译-打包都是自动化的,我们怎么操作呢。敬请期待下一篇博客
六、写在后面
其实整个热补丁技术最难的地方不是原理,不是注入dex,而是字节码的注入。
这需要我们队Gradle构建脚本,Groovy语言有一定的了解。其中的知识量实在是太过庞大,这里推荐几篇博文预习一下。
Gradle学习系列之一——Gradle快速入门
深入理解Android之Gradle——by 阿拉神农
ps:有些朋友可能会发现我的一些图片存在问题…… 比如运行结果那张图,标题是Bugfix。
命令行那张图,进的是blog目录……
因为研究这个热补丁技术的周期比较长,而且是一边写博客,所以有些图片弄错了……
---------------------------------------------------------------------------------------------------------
上一篇博客中,我们通过介绍dex分包原理引出了Android的热补丁技术,而现在我们将解决两个问题。
1. 怎么将修复后的Bug类打包成dex
2. 怎么将外部的dex插入到ClassLoader中
二、建立测试Demo
2.1 目录结构
2.2 源码
activity_main.xml
- 1
- 2
- 3
- 4
- 5
- 6
- 7
- 8
- 9
- 10
- 11
- 12
- 13
- 14
- 15
- 16
- 17
- 1
- 2
- 3
- 4
- 5
- 6
- 7
- 8
- 9
- 10
- 11
- 12
- 13
- 14
- 15
- 16
- 17
MainActivity.class
- 1
- 2
- 3
- 4
- 5
- 6
- 7
- 8
- 9
- 10
- 11
- 12
- 13
- 14
- 15
- 16
- 17
- 18
- 19
- 20
- 21
- 22
- 1
- 2
- 3
- 4
- 5
- 6
- 7
- 8
- 9
- 10
- 11
- 12
- 13
- 14
- 15
- 16
- 17
- 18
- 19
- 20
- 21
- 22
Cat.class
- 1
- 2
- 3
- 4
- 5
- 6
- 7
- 8
- 9
- 10
- 1
- 2
- 3
- 4
- 5
- 6
- 7
- 8
- 9
- 10
2.3 运行结果
假设这是我们公司的开发项目,刚刚上线就发现了严重bug,猫会狗叫。
想修复bug,让用户再立刻更新一次显然很不友好,此时热补丁修复技术就有用了。
三、制作补丁
在加载dex的代码之前,我们先来制作补丁。
1. 首先我们将Cat类修复,汪汪汪改成喵喵喵,然后重新编译项目。(Rebuild一下就行了)
2. 去保存项目的地方,将Cat.class文件拷贝出来,在这里
3. 新建文件夹,要和该Cat.class文件的包名一致,然后将Cat.class复制到这里,如图
4. 命令行进入到图中的test目录,运行一下命令,打包补丁。如图:
然后test目录是这样的
patch_dex.jar就是我们打包好的补丁了,我们将它放到sdCard中,待会从这里加载补丁。
关于什么用这么复杂的方法打包补丁的说明:
你也可以直接将java文件拷出来,通过javac -d带包编译再转成jar。
但我这么麻烦是有原因的,因为用这种方法你可能会遇到ParseException,原因是jar包版本和dx工具版本不一致。
而从项目中直接将编译好的class直接转成jar就没问题,因为java会向下兼容,打出来的jar包和class版本是一致的。
总而言之,dx版本要和class编译版本对应。
四、加载补丁
4.1 思路
通过上一篇博文,我们知道dex保存在这个位置
BaseDexClassLoader–>pathList–>dexElements
- apk的classes.dex可以从应用本身的DexClassLoader中获取。
- path_dex的dex需要new一个DexClassLoader加载后再获取。
- 分别通过反射取出dex文件,重新合并成一个数组,然后赋值给盈通本身的ClassLoader的dexElements
4.2 代码实现
加载外部dex,我们可以在Application中操作。
首先新建一个HotPatchApplication,然后在清单文件中配置,顺便加上读取sdcard的权限,因为补丁就保存在那里。
HotPatchApplication代码如下:
- 1
- 2
- 3
- 4
- 5
- 6
- 7
- 8
- 9
- 10
- 11
- 12
- 13
- 14
- 15
- 16
- 17
- 18
- 19
- 20
- 21
- 22
- 23
- 24
- 25
- 26
- 27
- 28
- 29
- 30
- 31
- 32
- 33
- 34
- 35
- 36
- 37
- 38
- 39
- 40
- 41
- 42
- 43
- 44
- 45
- 46
- 47
- 48
- 49
- 50
- 51
- 52
- 53
- 54
- 55
- 56
- 57
- 58
- 59
- 60
- 61
- 62
- 63
- 64
- 65
- 66
- 67
- 68
- 69
- 70
- 71
- 72
- 73
- 74
- 75
- 76
- 77
- 78
- 79
- 80
- 81
- 82
- 83
- 84
- 85
- 86
- 87
- 88
- 89
- 90
- 91
- 92
- 93
- 94
- 95
- 96
- 97
- 98
- 99
- 100
- 101
- 102
- 103
- 104
- 105
- 106
- 107
- 1
- 2
- 3
- 4
- 5
- 6
- 7
- 8
- 9
- 10
- 11
- 12
- 13
- 14
- 15
- 16
- 17
- 18
- 19
- 20
- 21
- 22
- 23
- 24
- 25
- 26
- 27
- 28
- 29
- 30
- 31
- 32
- 33
- 34
- 35
- 36
- 37
- 38
- 39
- 40
- 41
- 42
- 43
- 44
- 45
- 46
- 47
- 48
- 49
- 50
- 51
- 52
- 53
- 54
- 55
- 56
- 57
- 58
- 59
- 60
- 61
- 62
- 63
- 64
- 65
- 66
- 67
- 68
- 69
- 70
- 71
- 72
- 73
- 74
- 75
- 76
- 77
- 78
- 79
- 80
- 81
- 82
- 83
- 84
- 85
- 86
- 87
- 88
- 89
- 90
- 91
- 92
- 93
- 94
- 95
- 96
- 97
- 98
- 99
- 100
- 101
- 102
- 103
- 104
- 105
- 106
- 107
五、CLASS_ISPREVERIFIED
运行一下Demo,报以下错误。(AndroidStudio 2.0可能不会报错,需要打包的时候才会出现错误,这是Instant run导致的)
dexElements的length = 2,看来我们的patch_dex已经成功添加进去了。
但是从黄色框框和黄色框上面那一段log提示中可以看出,MainActivity引用了Cat,但是发现他们在不同的Dex中。
看到这里可能就会问:
为什么之前那么多项目都采用分包方案,但是却不会出现这个错误呢?
我在这里总结了一个过程,想知道详细分析过程的请看QQ空间开发团队的原文。
- 在apk安装的时候,虚拟机会将dex优化成odex后才拿去执行。在这个过程中会对所有class一个校验。
- 校验方式:假设A该类在它的static方法,private方法,构造函数,override方法中直接引用到B类。如果A类和B类在同一个dex中,那么A类就会被打上CLASS_ISPREVERIFIED标记
- 被打上这个标记的类不能引用其他dex中的类,否则就会报图中的错误
- 在我们的Demo中,MainActivity和Cat本身是在同一个dex中的,所以MainActivity被打上了CLASS_ISPREVERIFIED。而我们修复bug的时候却引用了另外一个dex的Cat.class,所以这里就报错了
- 而普通分包方案则不会出现这个错误,因为引用和被引用的两个类一开始就不在同一个dex中,所以校验的时候并不会被打上CLASS_ISPREVERIFIED
- 补充一下第二条:A类如果还引用了一个C类,而C类在其他dex中,那么A类并不会被打上标记。换句话说,只要在static方法,构造方法,private方法,override方法中直接引用了其他dex中的类,那么这个类就不会被打上CLASS_ISPREVERIFIED标记。
5.1 解决方案
根据上面的第六条,我们只要让所有类都引用其他dex中的某个类就可以了。
下面是QQ控件给出的解决方案
- 在所有类的构造函数中插入这行代码
System.out.println(AntilazyLoad.class);
这样当安装apk的时候,classes.dex内的类都会引用一个在不相同dex中的AntilazyLoad类,这样就防止了类被打上CLASS_ISPREVERIFIED的标志了,只要没被打上这个标志的类都可以进行打补丁操作。 - hack.dex在应用启动的时候就要先加载出来,不然AntilazyLoad类会被标记为不存在,即使后面再加载hack.dex,AntilazyLoad类还是会提示不存在。该类只要一次找不到,那么就会永远被标上找不到的标记了。
- 我们一般在Application中执行dex的注入操作,所以在Application的构造中不能加上
System.out.println(AntilazyLoad.class);这行代码,因为此时hack.dex还没有加载进来,AntilazyLoad并不存在。 - 之所以选择构造函数是因为他不增加方法数,一个类即使没有显式的构造函数,也会有一个隐式的默认构造函数。
5.2 插入代码的难点
- 首先在源码中手动插入不太可行,hack.dex此时并没有加载进来,AntilazyLoad.class并不存在,编译不通过。
- 所以我们需要在源码编译成字节码之后,在字节码中进行插入操作。对字节码进行操作的框架有很多,但是比较常用的则是ASM和javaassist
- 但AndroidStudio是使用Gradle构建项目,编译-打包都是自动化的,我们怎么操作呢。敬请期待下一篇博客
六、写在后面
其实整个热补丁技术最难的地方不是原理,不是注入dex,而是字节码的注入。
这需要我们队Gradle构建脚本,Groovy语言有一定的了解。其中的知识量实在是太过庞大,这里推荐几篇博文预习一下。
Gradle学习系列之一——Gradle快速入门
深入理解Android之Gradle——by 阿拉神农
ps:有些朋友可能会发现我的一些图片存在问题…… 比如运行结果那张图,标题是Bugfix。
命令行那张图,进的是blog目录……
因为研究这个热补丁技术的周期比较长,而且是一边写博客,所以有些图片弄错了……
Android热补丁动态修复技术(三)这篇博文其实在4月8日的晚上已经发布了,然后紧接着写第四篇,但是我将(四)保存到草稿箱时,发现已经发布的(三)消失了,取而代之的是第四篇博文。
在论坛问过版主,可能是因为我误操作导致的,第三篇博文已经无法恢复。
真是手贱!写了好几天的东西啊,不过比起误操作我更倾向认为这是csdn的bug……
markdown编辑器绝对有坑!光是写新文章时不会自动清楚缓存我认为就是一个很严重的Bug了!
二、前言
因为第三篇博文消失的原因,伴随着演示的Demo项目也修改了很多内容,我也没那么精力重新写一篇,就和第四篇博文合并在一起当做第三篇吧,这可能导致内容跨度有些大,并且不会像之前的博文这么详细,希望大家多多支持和理解。
上一篇博客中,我们再Application中成功注入了patch_dex.jar到ClassLoader中。
但是伴随着CLASS_ISPREVERIFIED问题,解决方式就在在所有类的构造函数中添加一行代码System.out.println(AntilazyLoad.class);
三、Gradle, Transfrom, Task, Plugin
我们来分析一下如何在所有类的构造函数中添加System.out.println(AntilazyLoad.class);
- 在源码中直接添加,这个不行。AntilazyLoad.class这个类找不到,编译不通过
- 绕过编译,使用javassist操作字节码,直接注入代码。
第二点是可行的,但是AndroidStudio项目是使用Gradle构建的,编译-打包-签名都是自动化。
我们在什么时候注入代码?
看过我上一篇博文推荐的文章就知道,Gradle是通过一个一个Task执行完成整个流程的,其中肯定也有将所有class打包成dex的task。
(在gradle plugin 1.5 以上和以下版本有些不同)
- 1.5以下,preDex这个task会将依赖的module编译后的class打包成jar,然后dex这个task则会将所有class打包成dex
- 1.5以上,preDex和Dex这两个task已经消失,取而代之的是TransfromClassesWithDexForDebug
3.1 Transfrom
Transfrom是Gradle 1.5以上新出的一个api,其实它也是Task,不过定义方式和Task有点区别。
对于热补丁来说,Transfrom反而比原先的Task更好用。
-
在Transfrom这个api出来之前,想要在项目被打包成dex之前对class进行操作,必须自定义一个Task,然后插入到predex或者dex之前,在自定义的Task中可以使用javassist或者asm对class进行操作。
-
而Transform则更为方便,Transfrom会有他自己的执行时机,不需要我们插入到某个Task前面。Tranfrom一经注册便会自动添加到Task执行序列中,并且正好是项目被打包成dex之前。
而本文就是使用Gradle1.5以上版本,下面则是Google对Transfrom的描述文档。
http://tools.android.com/tech-docs/new-build-system/transform-api
有时候会访问不了,你可能需要一把梯子……
3.2 Task的inputs和outputs
Gradle可以看做是一个脚本,包含一系列的Task,依次执行这些task后,项目就打包成功了。
而Task有一个重要的概念,那就是inputs和outputs。
Task通过inputs拿到一些东西,处理完毕之后就输出outputs,而下一个Task的inputs则是上一个Task的outputs。
例如:一个Task的作用是将java编译成class,这个Task的inputs就是java文件的保存目录,outputs这是编译后的class的输出目录,它的下一个Task的inputs就会是编译后的class的保存目录了。
3.3 Plugin
Gradle中除了Task这个重要的api,还有一个就是Plugin。
Plugin的作用是什么呢,这一两句话比较难以说明。
Gralde只能算是一个构建框架,里面的那么多Task是怎么来的呢,谁定义的呢?
是Plugin,细心的网友会发现,在module下的build.gradle文件中的第一行,往往会有apply plugin : 'com.android.application'亦或者apply plugin : 'com.android.library'。
com.android.application:这是app module下Build.gradle的
com.android.library:这是app依赖的module中的Builde.gradle的
就是这些Plugin为项目构建提供了Task,使用不同的plugin,module的功能也就不一样。
可以简单的理解为: Gradle只是一个框架,真正起作用的是plugin。而plugin的主要作用是往Gradle脚本中添加Task。
当然,实际上这些是很复杂的东西,plugin还有其他作用这里用不上。
四、如何注册一个Transfrom
我们可以自定义一个plugin,然后使用plugin注册一个Transfrom。
4.1 apply plugin
在此之前,先教大家怎么自定义一个plugin。
1. 新建一个module,选择library module,module名字必须叫BuildSrc
2. 删除module下的所有文件,除了build.gradle,清空build.gradle中的内容
3. 然后新建以下目录 src-main-groovy
4. 修改build.gradle如下,同步
```
apply plugin: 'groovy'

repositories {
    jcenter()
}

dependencies {
    compile gradleApi()
    compile 'com.android.tools.build:gradle:1.5.0'
    compile 'org.javassist:javassist:3.20.0-GA'
}
```
5. 这时候就可以像普通module一样新建package和类了,不过这里的类是以groovy结尾,新建类的时候选择file,并且以.groovy作为后缀。
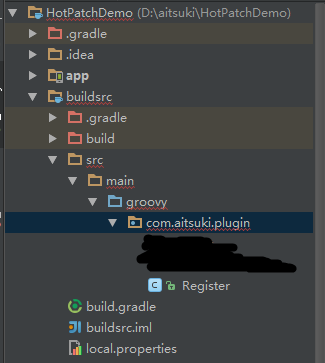
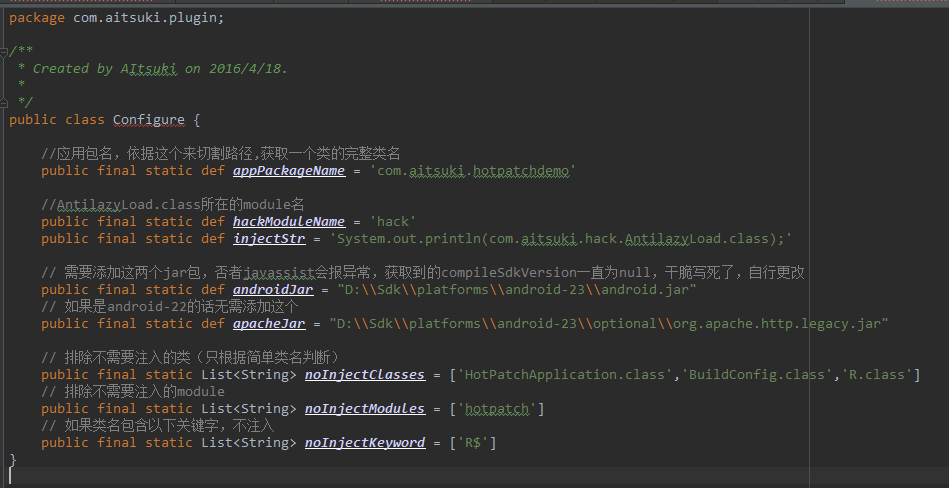
Register就是我自定义个Plugin(无视黑色涂块,Demo被我修改太多了,再次鄙视csdn)
代码如下
- 1
- 2
- 3
- 4
- 5
- 6
- 7
- 8
- 9
- 10
- 11
- 12
- 13
- 14
- 1
- 2
- 3
- 4
- 5
- 6
- 7
- 8
- 9
- 10
- 11
- 12
- 13
- 14
在app module下的buiil.gradle中添apply 插件
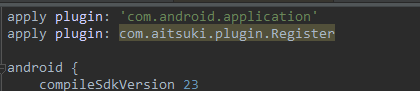
说明:如果plugin所在的module名不叫BuildSrc,这里是无法apply包名的,会提示找不到。所以之前也说明取名一定要叫buildsrc
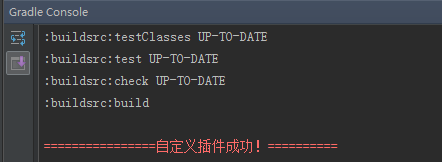
运行一下项目就可以看到”================自定义插件成功!==========”这句话了
和gradle有关的输出都会显示在gradle console这个窗口中。
4.2 自定义Transfrom
新建一个groovy继承Transfrom,注意这个Transfrom是要com.android.build.api.transform.Transform这个包的
要先添加依赖才能导入此包,如下
- 1
- 2
- 3
- 4
- 5
- 1
- 2
- 3
- 4
- 5
javassist待会要用到,顺便添加进来了。
我们定义一个PreDexTransform,代码如下
- 1
- 2
- 3
- 4
- 5
- 6
- 7
- 8
- 9
- 10
- 11
- 12
- 13
- 14
- 15
- 16
- 17
- 18
- 19
- 20
- 21
- 22
- 23
- 24
- 25
- 26
- 27
- 28
- 29
- 30
- 31
- 32
- 33
- 34
- 35
- 36
- 37
- 38
- 39
- 40
- 41
- 42
- 43
- 44
- 45
- 46
- 47
- 48
- 1
- 2
- 3
- 4
- 5
- 6
- 7
- 8
- 9
- 10
- 11
- 12
- 13
- 14
- 15
- 16
- 17
- 18
- 19
- 20
- 21
- 22
- 23
- 24
- 25
- 26
- 27
- 28
- 29
- 30
- 31
- 32
- 33
- 34
- 35
- 36
- 37
- 38
- 39
- 40
- 41
- 42
- 43
- 44
- 45
- 46
- 47
- 48
然后再Register这个plugin的apply方法中添加一下代码,注册Transfrom
- 1
- 2
- 1
- 2
再次运行项目(需要先clean项目,否则apply plugin不会重新编译)
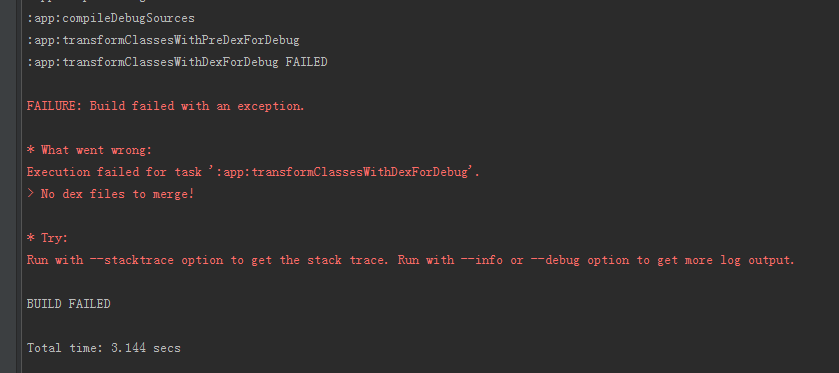
首先,我们看到自定义的PreDexTransfrom已经运行了,但是接下来的DexTransform却报错了。
那是因为我们自定义的Transfrom的transfrom方法为空,没有将inputs输出到outputs,DexTransfrom是在PreDexTransfrom下面,获取到的inputs为空,所以就报错了。
我们只需要在Tranfrom中将inputs文件复制到ouputs目录就可以了,代码如下。
- 1
- 2
- 3
- 4
- 5
- 6
- 7
- 8
- 9
- 10
- 11
- 12
- 13
- 14
- 15
- 16
- 17
- 18
- 19
- 20
- 21
- 22
- 23
- 24
- 25
- 26
- 27
- 28
- 29
- 30
- 1
- 2
- 3
- 4
- 5
- 6
- 7
- 8
- 9
- 10
- 11
- 12
- 13
- 14
- 15
- 16
- 17
- 18
- 19
- 20
- 21
- 22
- 23
- 24
- 25
- 26
- 27
- 28
- 29
- 30
加入这段代码到transform方法中再次运行就没问题了,再次说明:要先Clean项目!
上面有两个TODO注释,我们在获取inputs复制到outpus目录之前,可以在这里对class注入代码!
4.3 查看inputs和ouputs
我们先来看看Transfrom的inputs和outputs,这里有个方法:
在app module下的build.gradle中添加以下代码即可。
- 1
- 2
- 3
- 4
- 5
- 6
- 7
- 8
- 9
- 10
- 11
- 12
- 13
- 14
- 15
- 16
- 17
- 18
- 19
- 20
- 21
- 22
- 23
- 24
- 1
- 2
- 3
- 4
- 5
- 6
- 7
- 8
- 9
- 10
- 11
- 12
- 13
- 14
- 15
- 16
- 17
- 18
- 19
- 20
- 21
- 22
- 23
- 24
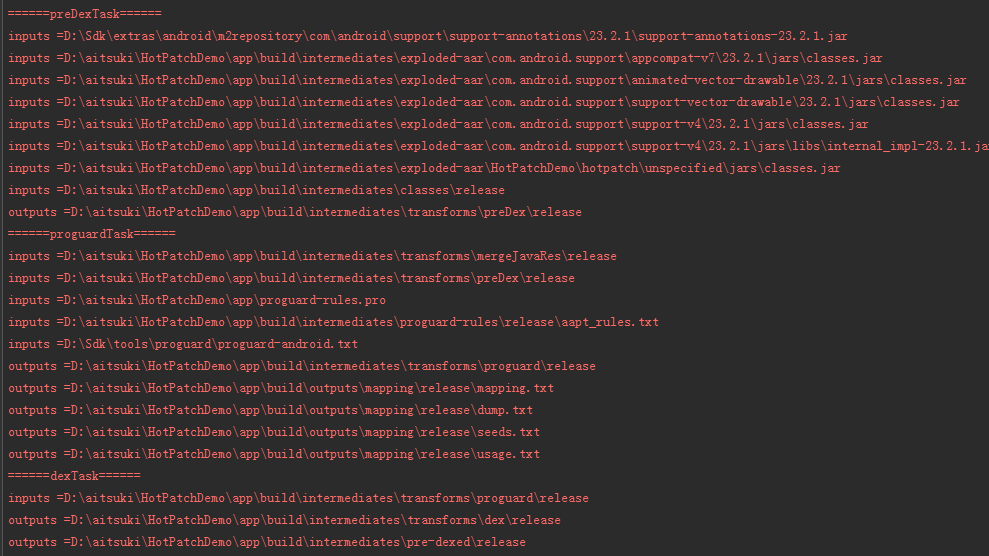
输出如下:
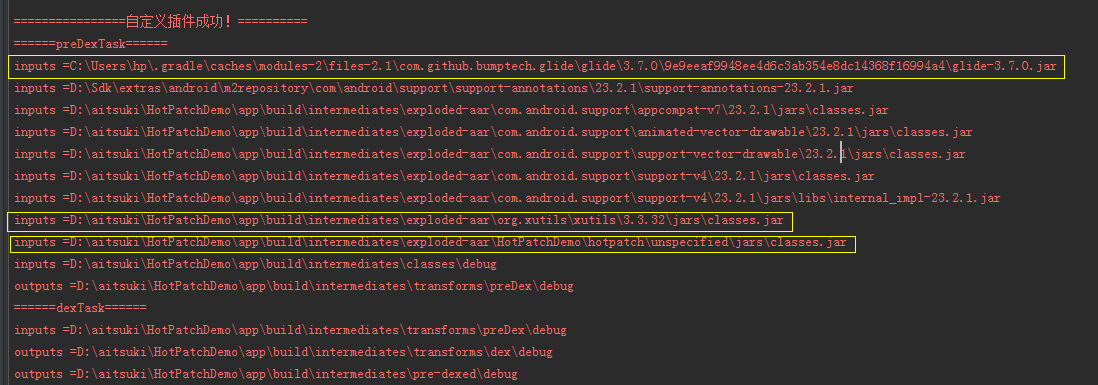
glide和xutils是app依赖的jar包
hotpatch是我将application中加载dex的代码抽取成独立module后,app依赖此module的结果
其余的则是项目默认依赖的jar包。
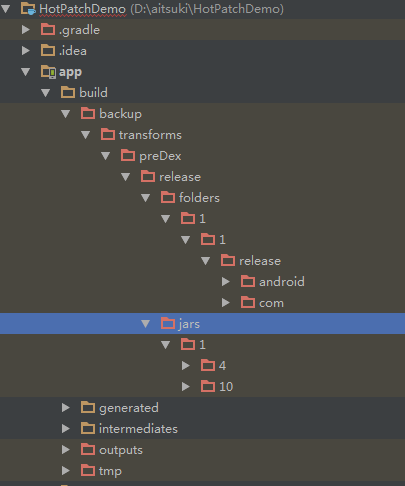
得出一个结论,app依赖的module在dex之前会被打包成classes.jar,和其他依赖的jar包一起放到exploded-arr这个目录。
而依赖的module会放在exploded-arr\项目名\module名这个目录下
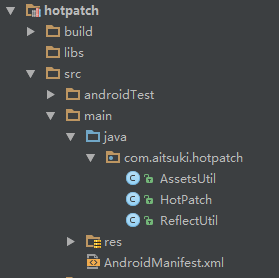
附上hotPatch这个将application中的代码打包好的module
然后这是inputs =D:\aitsuki\HotPatchDemo\app\build\intermediates\exploded-aar\HotPatchDemo\hotpatch\unspecified\jars\classes.jar解压后的结果
五、使用javassist注入代码
建议先去了解下javassit的最基本使用方法,否则可能看不懂我在说什么。
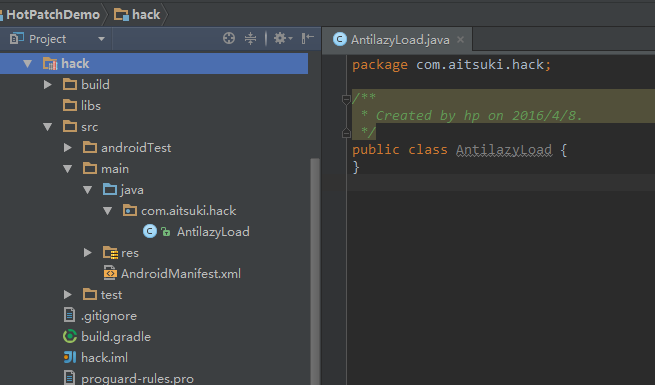
5.1 建立Hack Module
注入System.out.println(AntilazyLoad.class);这行代码的时候,如果javasssit找到AntilazyLoad.class这个类就会抛异常
所以创建AntilazyLoad.class,并且将AntilazyLoad.class所在的路径append到ClassPool的classpath中。
首先我们建一个hack module,如下
5.2 制作hack.jar
制作方式在上一篇博客中就有。
将AntilazyLoad.class复制到同包名的文件夹下,然后运行打包命令,不重复赘述了。
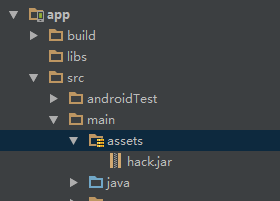
然后将hack.jar放到app module中的assets文件夹中,如图
然后我们在加载patch_dex之前就要先将这个hack加载进classLoader,加载hack的方式和步骤跟加载补丁是一摸一样的,不再赘述,具体请直接看Demo,最后面有下载链接。
5.3 使用javassist注入代码
代码量稍多,我就不那么详细的解释了,这里说下最基本的两点
- app module编译后class文件保存在debug目录,直接遍历这个目录使用javassist注入代码就行了
- app module依赖的module,编译后会被打包成jar,放在exploded-aar这个目录,需要将jar包解压–遍历注入代码–重新打包成jar
首先我们专门写一个用来操作javassist注入代码的inject类。
- 1
- 2
- 3
- 4
- 5
- 6
- 7
- 8
- 9
- 10
- 11
- 12
- 13
- 14
- 15
- 16
- 17
- 18
- 19
- 20
- 21
- 22
- 23
- 24
- 25
- 26
- 27
- 28
- 29
- 30
- 31
- 32
- 33
- 34
- 35
- 36
- 37
- 38
- 39
- 40
- 41
- 42
- 43
- 44
- 45
- 46
- 47
- 48
- 49
- 50
- 51
- 52
- 53
- 54
- 55
- 56
- 57
- 58
- 59
- 60
- 61
- 62
- 63
- 64
- 65
- 66
- 67
- 68
- 69
- 70
- 71
- 72
- 73
- 74
- 75
- 76
- 77
- 78
- 79
- 80
- 81
- 82
- 83
- 84
- 85
- 86
- 87
- 88
- 89
- 90
- 91
- 92
- 93
- 94
- 95
- 96
- 97
- 98
- 99
- 100
- 101
- 102
- 103
- 104
- 105
- 106
- 107
- 108
- 109
- 110
- 111
- 112
- 113
- 114
- 115
- 116
- 117
- 118
- 119
下面这是解压缩jar包的类
- 1
- 2
- 3
- 4
- 5
- 6
- 7
- 8
- 9
- 10
- 11
- 12
- 13
- 14
- 15
- 16
- 17
- 18
- 19
- 20
- 21
- 22
- 23
- 24
- 25
- 26
- 27
- 28
- 29
- 30
- 31
- 32
- 33
- 34
- 35
- 36
- 37
- 38
- 39
- 40
- 41
- 42
- 43
- 44
- 45
- 46
- 47
- 48
- 49
- 50
- 51
- 52
- 53
- 54
- 55
- 56
- 57
- 58
- 59
- 60
- 61
- 62
- 63
- 64
- 65
- 66
- 67
- 68
- 69
- 70
然后再Transfrom中这么使用,我将整个类再贴一遍好了
- 1
- 2
- 3
- 4
- 5
- 6
- 7
- 8
- 9
- 10
- 11
- 12
- 13
- 14
- 15
- 16
- 17
- 18
- 19
- 20
- 21
- 22
- 23
- 24
- 25
- 26
- 27
- 28
- 29
- 30
- 31
- 32
- 33
- 34
- 35
- 36
- 37
- 38
- 39
- 40
- 41
- 42
- 43
- 44
- 45
- 46
- 47
- 48
- 49
- 50
- 51
- 52
- 53
- 54
- 55
- 56
- 57
- 58
- 59
- 60
- 61
- 62
- 63
- 64
- 65
- 66
- 67
- 68
- 69
- 70
- 71
- 72
- 73
- 74
- 75
- 76
- 77
- 78
- 79
- 80
- 81
- 82
- 83
- 84
- 85
- 86
- 87
然后运行项目(最后再重复一次:记得先clean项目!),成功注入补丁!不报错了
六、Demo的GIF演示

关于SDCard:如果手机支持TF卡,那么请将补丁复制到内部存储。
还有这里是下载地址, 补丁已经放在根目录
http://download.csdn.net/detail/u010386612/9490542
七、写在后面
补充一点:在上面代码中,我们为所有的module编译后的jar注入了代码。
实际上在hotpatch这个module是不需要注入代码的,因为这个module是用于加载dex的,而执行该module的时候,AntilazyLoad.class肯定没加载进来,所以注入代码毫无作用,应该排除这个module
这篇博文解决了class_ispreverified问题,并且成功使用javassist注入字节码,完成了热补丁框架的雏形。
但是还有几个需要解决的问题
1. 补丁没有签名校验,不安全,容易被恶意注入代码
2. 混淆开启的情况下,类名可能被更换,补丁打包不成功。
下一篇博文可能是关于混淆或者补丁签名
---------------------------------------------------------------------------------------------------------
在上一章中,我们使用javassist成功为项目注入了System.out.println(AntilazyLoad.class);这行代码,解决了class_ispreverified问题,可以正常使用了,但肯定还存在着很多未知的问题。
- 首先是javassist的问题
- class中使用到的类,必须添加到classpool的classpath中,我在Demo中写了一个自定义控件,注入代码的时候报错,提示没有找到Context,然后我将android.jar整个添加到classpath之后成功
- 如果该类是一个接口,会提示没有构造函数的异常。所以需要判断构造函数是否为null
- 如果该类的构造函数是私有的,也会报错。所以要使用getDeclaredConstructors这种方式获取,和反射有点像。
- 自定义控件使用问题
- 自定义控件在使用的时候,预览界面会出现异常,找不到AntilazyLoad.class类,这时候只能clean或者rebuild项目
- 代码写死问题
- 说实话,我对于代码封装不太在行,没有封装经验,对设计模式也只会用用单例。所以有一些东西是写死了的。
- 我将写死的东西先放到一个类里面去了,如下
这几个问题目前来说还不是很重要,而且我也没有比较好的解决方案,只能写完这个系列的博客后再慢慢重构,如果大家有兴趣的话希望能帮忙改进。
二、Transform的坑
在前几篇博文中,我们都是建立在不混淆的基础上完成热补丁框架的。
那么,如果开启混淆后会出现什么问题呢?
可能有网友会说,这还不简单嘛,补丁无效呗,因为混淆之后类名已经变了,而我们的补丁还是原来的类名,包括里面的成员变量。
这是一个问题,也是本篇博文重点内容。
然而这之前还有个奇葩问题得先解决,如果现在开启混淆,紧接着打包,那么会报错。
因为我们是通过注册Transform注入代码的,而这个Transfrom在proguardTransform之前就已经执行。而混淆的时候发现找不到AntilazyLoad,然后就会报classNotFound错误。
所以,如果我们开启混淆的话,在Transfrom中注入代码是不可行的。因为我们无法改变Transfrom的执行顺序,我们注册的PreDexTransfrom肯定在ProguardTransform之前执行,而ProguardTransform混淆又会因为找不到类而报错。
以上说的就是Transform的坑了!
早知道我就不搞什么Transfrom了,直接使用task hook一下也不会麻烦到哪里去。
不过研究了半天还是有了个解决方案,就是在ProguardTransform执行之前将注入的代码移除,然后再ProguardTransfrom执行之后再次注入代码。
2.1 开启混淆后Task的inputs和outputs
没有开启混淆的时候,我们注册的preDexTransform就在DexTransform之前执行,PreDexTransform的outputs就是DexTransfrom的inputs
而开启混淆后,其实没有多大变化,直接PreDexTransfrom与DexTransform之间间多了一个ProguardTask,他们的inputs和outputs我就不多说了,记住相邻的两个Task,前一个的outputs必然是下一个Task的inputs。
2.2 取消注入
那么我们怎么移除掉System.out.println(AntilazyLoad.class);这行代码呢?
再次使用javassist显然太费劲了,我们可以在PreDexTransfrom注入代码之前,将文件先备份到某个文件夹。如果发现使用了Proguard,那么将备份的文件还原就行了。
备份到哪里呢,app的build目录就可以了,因为执行clean的时候会清除这个目录。
下面是Transform修改后的代码
- 1
- 2
- 3
- 4
- 5
- 6
- 7
- 8
- 9
- 10
- 11
- 12
- 13
- 14
- 15
- 16
- 17
- 18
- 19
- 20
- 21
- 22
- 23
- 24
- 25
- 26
- 27
- 28
- 29
- 30
- 31
- 32
- 33
- 34
- 35
- 36
- 37
- 38
- 39
- 40
- 41
- 42
- 43
- 44
- 45
- 46
- 47
- 48
- 49
- 50
- 51
- 52
- 53
- 54
- 55
- 56
- 57
- 58
- 59
- 60
- 61
- 62
- 63
- 64
- 65
- 66
- 67
- 68
- 69
- 70
- 71
- 72
- 73
然后我们需要在proguardTransform执行之前将备份还原
- 1
- 2
- 3
- 4
- 5
- 6
- 7
- 8
- 9
- 10
- 11
- 12
- 13
- 14
- 15
- 16
- 17
- 18
- 19
- 20
- 21
- 22
- 23
- 24
- 25
- 26
- 27
- 28
- 29
- 30
- 31
- 32
- 33
- 34
- 35
- 36
- 37
- 38
- 39
- 40
- 41
- 42
- 43
- 44
- 1
- 2
- 3
- 4
- 5
- 6
- 7
- 8
- 9
- 10
- 11
- 12
- 13
- 14
- 15
- 16
- 17
- 18
- 19
- 20
- 21
- 22
- 23
- 24
- 25
- 26
- 27
- 28
- 29
- 30
- 31
- 32
- 33
- 34
- 35
- 36
- 37
- 38
- 39
- 40
- 41
- 42
- 43
- 44
再次开启混淆,运行Generate Signed Apk已经可以成功签名打包了,但是很明显,我们的代码也没有注入,因为已经还原备份了。
2.3 补充
看看我们的备份
然后看看preDex, proguard,dex三个task的inputs和outpus。
看到输出我们也知道了,需要混淆的代码就保存在
\app\build\intermediates\transforms\proguard\release
当然,如果你用debug的话最后这里就是proguard\debug
比如这么设置,然后BuildApk
三、混淆后的代码注入
在上面的dolast中就可以有个todo注释,在那里注入代码就可以了,注入的方式和上一篇博客一样。
但是特别有一点提醒一下,混淆后的输出目录只有一个main.jar包(目前试了几个项目都是……不知道有没有特殊情况),直接解压这个jar包注入就可以了
但是,混淆后怎么打包补丁呢,难道解压main.jar,从里面复制么。类名已经变了,找起来太费劲了啊。继续往下看,教你实现自动化打包补丁!
四、自动化打包补丁
4.1 思路
Transfrom的问题已经解决了,回归到最开始的问题。
混淆之后,类名,方法名,变量名都可能已经改变,那么我们如何注入dex修复bug呢?
按照之前的制作补丁方法(在我的热补丁系列第二篇博文中有)肯定是不行了,我们制作的补丁必须是已经混淆过的类,而不能直接从debug中直接获取。
所以,我们需要为这个框架加入自动化生成补丁的功能!
那么怎么生成自动化补丁呢?
首先我们来想一下我们热补丁的需求;
- 发布正式版本(release)的时候,我们会将项目copy一份作为备份(target)
- 如果线上的release版本出现了问题,我们就会到target项目中去修复bug
- 修复完毕后,我们直接在target中运行打包,就会自动生成补丁保存到指定的目录。
那么如何实现上面的需求呢
- 在release版本发布的时候,我们可以生成所有.class文件的md5
- 然后将该.class对应的完整类名和md5作为键值对保存到某个文件
- 当我们在target中修复了bug,打包项目的时候,再次生成所有.class文件的md5
- 将target的md5和release的md5作对比,如果md5不一致,那么代表这个类的代码已经变更,将这个class拷贝出来。这些拷贝出阿里的class就是应该打补丁的类了
4.2 实现自动化打包补丁
首先,我们需要生成所有类的md5,保存到app module的根目录下
怎么遍历所有的类, 在这之前我们已经做过备份了,可以直接遍历备份文件夹生成md5.
在Transfrom方面最后面加上这段代码
- 1
- 2
- 3
- 4
- 5
- 6
- 7
- 8
- 9
- 10
- 11
- 12
- 13
- 14
- 15
- 16
- 17
- 18
- 19
- 20
- 21
- 22
- 23
- 24
- 25
- 26
- 27
- 28
- 29
- 30
- 31
- 32
- 33
- 34
- 35
- 36
- 37
- 38
- 39
- 40
- 41
- 42
- 43
- 44
- 45
- 46
- 47
- 48
- 49
- 50
- 1
- 2
- 3
- 4
- 5
- 6
- 7
- 8
- 9
- 10
- 11
- 12
- 13
- 14
- 15
- 16
- 17
- 18
- 19
- 20
- 21
- 22
- 23
- 24
- 25
- 26
- 27
- 28
- 29
- 30
- 31
- 32
- 33
- 34
- 35
- 36
- 37
- 38
- 39
- 40
- 41
- 42
- 43
- 44
- 45
- 46
- 47
- 48
- 49
- 50
我们现在签名打包一下release版本
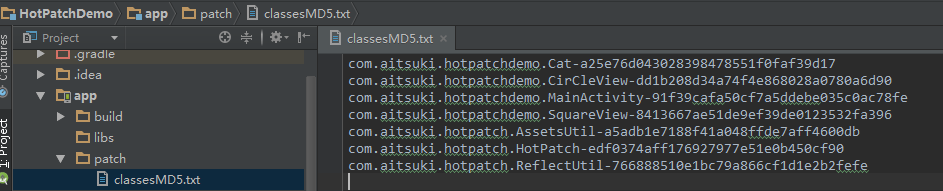
可以看到在app module下生成了classesMd5文件,如图(过滤了support包的class,但是没有过滤掉hotpatch module的,目前项目比较乱,等写完这章之后就重构一下)
MD5是成功生成了,但是我们怎么校验呢,什么时候校验呢?
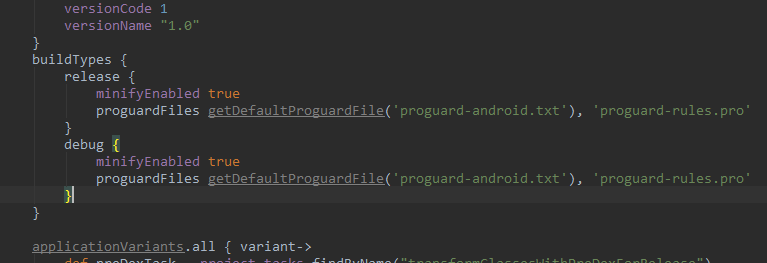
我们都知道打包可以选择Debug版本或者Release版本,但是不知道我们也可以自己添加一个版本,其实更标准的说法是变体,variant。
在build.gradle的BuildTypes中这样写,就成功添加了一个dopatch的变体了。
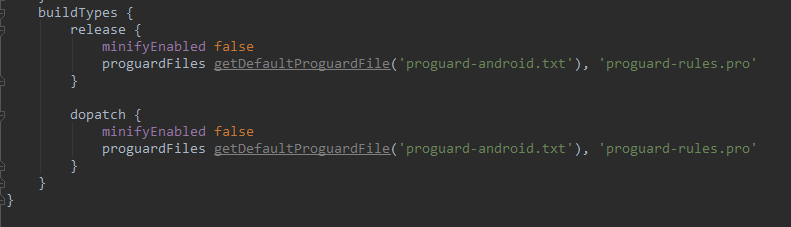
签名打包的时候可以选择打包哪一个,使用过多渠道打包的应该有点了解
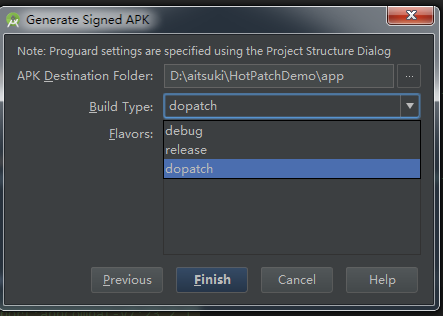
我们现在就来约定一下规则,只要打包这个dopatch,就证明我们已经修复好bug,会自动生成补丁包
在transfrom中,我们继续加入以下代码
- 1
- 2
- 3
- 4
- 5
- 6
- 7
- 8
- 9
- 10
- 11
- 12
- 13
- 14
- 15
- 16
- 17
- 18
- 19
- 20
- 21
- 22
- 23
- 24
- 25
- 26
- 27
- 28
- 29
- 30
- 31
- 32
- 33
- 34
- 35
- 36
- 37
- 38
- 39
- 40
- 41
- 42
- 43
- 44
- 45
- 46
- 47
- 48
- 49
- 50
- 51
- 52
- 53
- 54
- 55
- 56
- 57
- 58
- 59
- 60
- 61
- 62
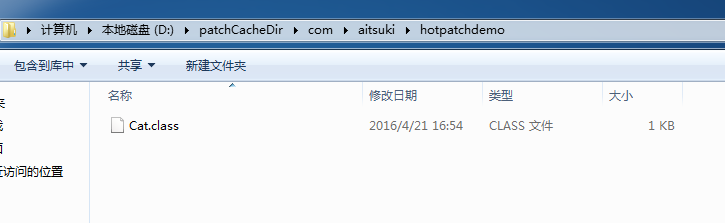
现在我们去修改一下cat类,将cat的汪汪汪改成喵喵喵!
然后运行签名打包,记得打包的时候使用dopatch这个BuildType
锵锵锵锵!!!已经自动将改变过的类复制出来了
然后我们进入命令行
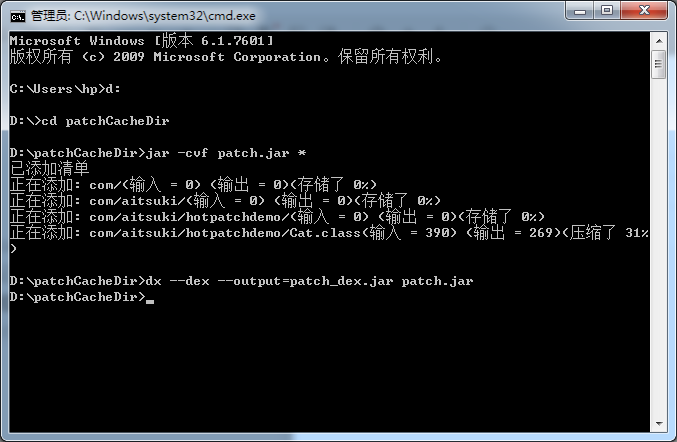
这样就成功生成补丁了!

是不是比之前手动打包补丁方便多了呢?
但是,自动生成补丁包最重要的一点不是为了方便,而是为了生成混淆后的补丁包,因为混淆后的补丁我们是很难手动制作的。
4.3 实现混淆后的自动化打包补丁
那么混淆后,我们怎么自动打包补丁呢,其实也不难。
因为在混淆签名打包后,会在outputs目录中生成一个mapping文件,里面记录了混淆的规则。如图
我们可以将这个mapping文件保存起来,下次执行dopatch自动化打包的时候,解析这个mapping就知道我们需要打包哪些类了。
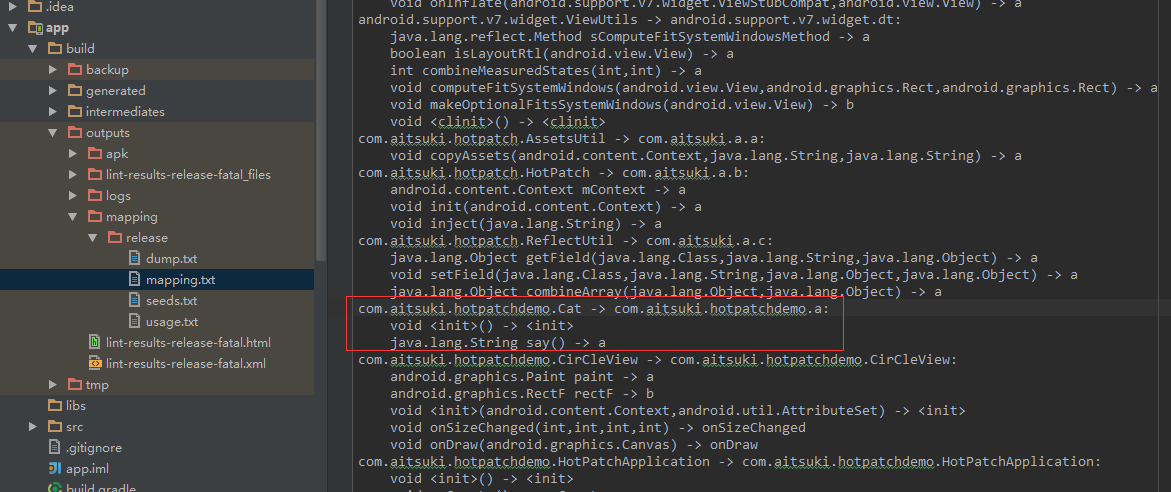
具体思路是这样子的:
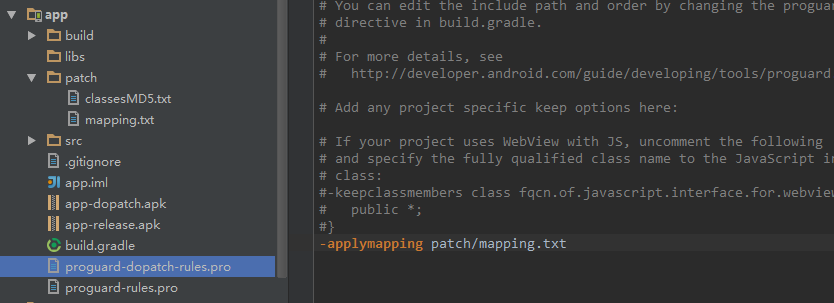
- dopatch引用一个新的混淆文件,里面使用release的mapping(-apply mapping)
然后build.gradle中可以这样使用
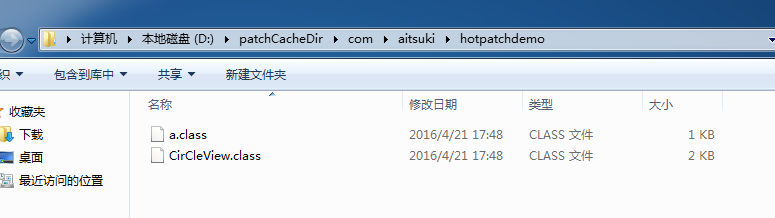
- 在transform中,我们已经将需要打包成补丁的class文件事先复制到了patchCacheDir目录中
- 遍历patchCacheDir目录,获取到所有类的完整类名。
- 解析mapping文件,获取到该类名对应的混淆类名
- 这个获取到的混淆类名就是我们需要打包成补丁的类了!

然后代码实现
在Register这个类中,hook proguardTransfrom这个task,在dolast中这么做,博文开头也提到过
- 1
- 2
- 3
- 4
- 5
- 6
- 7
- 8
- 9
- 10
- 11
- 12
- 13
- 14
- 15
- 16
- 17
- 18
- 19
- 20
- 21
- 22
- 23
- 24
- 25
- 26
- 27
- 28
- 29
- 30
- 31
- 32
- 33
- 34
- 35
- 36
- 37
- 38
- 39
- 40
- 41
- 42
- 43
- 44
- 45
- 46
- 47
- 48
- 49
- 50
- 51
- 52
- 53
- 54
- 55
- 56
- 57
- 58
- 59
- 60
- 61
- 62
- 63
- 64
- 65
- 66
- 67
- 68
- 69
- 70
- 71
- 72
- 73
- 74
- 75
- 76
- 77
- 78
- 79
- 80
- 81
- 82
- 83
- 84
- 85
- 86
- 87
- 88
- 89
- 90
代码的复用性有点差=。=,但是先别在意这个,现在我们来测试一下:
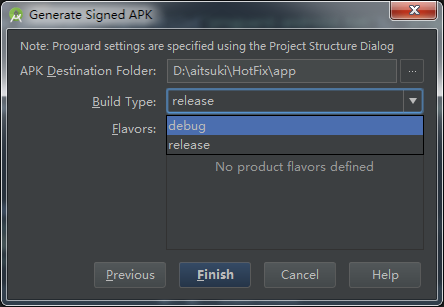
- 首先将Cat.class改回汪汪汪,然后release打开proguard,签名打包(记得选release的buildtypes)。发现patch文件夹中已经生成mapping.txt了
- 然后随意修改一下Cat.class,Circle.class(这次弄两个类测试好了……)
- 然后dopatch也打开proguard,签名打包(记得选dopatch的buildtypes)
PS:记得每次打包前都Clean一下项目哦,否则可能会出现一些问题。比如代码重复注入,反编译可能看到有多行’System.out.println(AntilazyLoad.class)’
锵锵锵锵!自动打包补丁成功!(=。=,自己手动命令行打包吧,用java代码总是说找不到dx工具,有空再找找原因)
五、写在后面
热补丁框架算是完成了,剩下一个补丁包的签名校验问题,目前也不太想研究,想重构一下项目再说。
这是重构之前的项目下载地址,乱起八糟的,有兴趣的可以下载玩玩。
http://download.csdn.net/detail/u010386612/9498420
下一章博客,我准备重构项目,可能会舍弃掉Transfrom这个api,如果不混淆的话还是很好用的,混淆的话我觉得有点反人类了!
这热补丁研究了好长时间了,算是告一段落了,感谢大家支持。
---------------------------------------------------------------------------------------------------------
Android热补丁动态修复技术(一):从Dex分包原理到热补丁
Android热补丁动态修复技术(二):实战!CLASS_ISPREVERIFIED问题!
Android热补丁动态修复技术(三)—— 使用Javassist注入字节码,完成热补丁框架雏形(可使用)
Android热补丁动态修复技术(四):自动化生成补丁——解决混淆问题
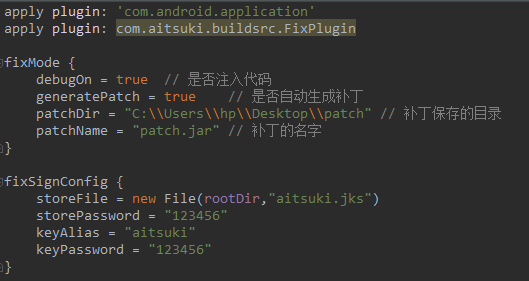
前两篇博文主要是介绍热补丁修复技术的一些原理和实现方案。
而后面两篇博文主要是介绍如何使用代码实现整个热补丁框架,但是框架写的真的很糟糕,很多多余的操作。而这很大一部分原因是使用了transform,在混淆的时候transform并不好用。
以下是我在github上重构好的热补丁框架,求star (。・`ω´・)
https://github.com/AItsuki/HotFix
1. 支持混淆
2. 自动生成带签名的补丁包
3. 加载补丁包时会进行签名校验
图中的patch文件夹就是自动生成的补丁包保存目录了,里面有打成jar包之前的class,如果patch.jar打包失败,还能继续手动打包。
更详细的介绍和使用方式请移步到github,再说一次:求star (。・`ω´・)
二、框架的实现思路
在第四篇博文中,我们发现在混淆的情况下,transform使用起来真的很反人类,因为transform只能在混淆之前对class进行操作,无法将transform添加到混淆之后。
所以以下思路,我放弃了使用transform,而是直接在dextransform这个任务的dofirst中进行操作。
在重构项目之前,我先记录下了这些思路和流程,然后根据这个流程来实现热补丁框架,效率真的快了很多。
2.1 定义热补丁框架的使用方式
-
release签名打包作为发布版本,每次release打包都会重新生成hash.txt和mapping.txt(开启混淆的情况下才有mapping)
-
每次debug运行的时候(直接运行项目或者buildapk),都会通过校验hash.txt和mapping.txt生成已签名补丁包。
直接将补丁包放到sdcard中即可完成热修复 -
加载补丁的时候需要进行签名校验,防止恶意代码注入
2.2 代码流程
抛弃transform,使用纯hook的方式实现。
主要hook的task有这几个:
- transformClassesWithDexForRelease
- transformClassesWithDexForDebug
- transformClassesAndResourcesWithProguardForRelease
- transformClassesAndResourcesWithProguardForDebug
不混淆的情况:
transformClassesWithDexForRelease
dofirst —— 遍历输入文件,生成md5保存好(hash.txt),然后注入代码
transformClassesWithDexForDebug
dofirst —— 遍历输入文件,生成md5,和hash对比,将改变过的类复制到补丁文件夹,然后注入代码
混淆的情况:
transformClassesAndResourcesWithProguardForRelease
dolast —— 遍历输出文件,生成md5保存好(hash.txt),然后注入代码,将mapping保存好
transformClassesAndResourcesWithProguardForDebug(需要使用applymapping)
dolast —— 遍历输出文件,生成md5,和hash对比,将改变过的类复制到补丁文件夹,然后注入代码
开启混淆后task的执行顺序是proguard –> dex
因为dex永远是在最后面执行,所以注入代码和生成补丁这些操作都只需要hook dex就可以了
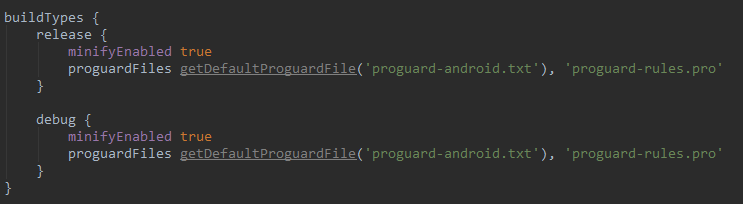
但是开启混淆的时候,dex dofirst需要做的事情还是有点不同的,我们可以通过一个变量来控制 def minify = false
hook proguard,在proguardTransform执行的时候复制minify = true
这样就可以控制混淆和不混淆两种情况了。
2.3 实际遇到的问题
1、 不clean项目,第二次运行release打包不会注入代码
这是因为gradle的增量式构建,up-to-date,task不执行
解决方式:
dexRelease.outputs.upToDateWhen {false} 让task一直都执行
http://stackoverflow.com/questions/7289874/resetting-the-up-to-date-property-of-gradle-tasks
2、如果有使用到自定义控件,在xml的preView窗口会报空指针异常
这是因为自定义控件已经被注入了代码,而预览窗口的时候并没有加载hack.jar,找不到AntilazyLoad.class,所以报空指针。
解决方式:
使用pluginExtention,在build.gradle中配置变量,控制在debug模式下是否注入代码。
如图,这里添加了两个Extention
3、如何applymapping
applymapping的作用是复用上一次的混淆规则。
所以我们需要将release生成的mapping.txt应用到debug的混淆上,否则可能无法正确的生成补丁。
解决方式:
第一种:
手动配置debug的混淆文件
第二种:
1. 在gradle 1.5以下时,可以直接task.applyMapping(File file)的方式在代码中动态添加
2. 在gradle1.5以上时,因为proguard的transform是一个特殊的task,所以并不能直接applyMapping,需要做一些强转。
(proguardDebug即transformClassesAndResourcesWithProguardForDebug)

4、开启混淆后的Release签名打包,如果debug模式不开启混淆的话,会将所有类都打包成补丁。
这是因为,如果debug模式不开启混淆,那么就会拿不混淆的代码和Release已经混淆的代码进行校验,md5肯定不一致,所以会将所有类打包成补丁包。
解决方式:
暂时没有好办法,老老实实开启混淆吧。Debug是否开启混淆要和Release保持一致
5、如何签名补丁
补丁的签名主要用到的是jdk的工具,jarsigner.exe。使用代码调用命令行即可
6、如何进行签名校验
首先,debug安装的app不需要进行校验,这是检测当前app是否是debug签名的方法。
http://blog.csdn.net/luohai859/article/details/44679085
然后,这是校验补丁包和app签名是否一致
http://blog.csdn.net/hudashi/article/details/8245105
7、Android 6.0无法从sdcard加载补丁包
运行时权限机制的问题,可以将补丁包放到app私有空间加载。
8、 androidStudio 2.0以上用到了instantRun,这是否会对debug自动生成补丁包产生影响。
这个问题我还没有测试,如果真的有影响的话也有很简单的解决方式,直接使用签名打包debug也可以生成补丁包。
三、参考项目
https://github.com/jasonross/Nuwa
https://github.com/bunnyblue/DroidFix
https://github.com/Livyli/AndHotFix
主要是第三个,签名校验的思路来源于它
四、写在后面
终于算是完成了热补丁框架了,其中过程真的累人啊!
整个框架的实现思路比较清晰简单,代码量也不超过1000行,很适合正在学习这个技术的朋友们。
求star,求star,第一个上传到github的项目求star (。・`ω´・)
https://github.com/AItsuki/HotFix
原文链接:http://blog.csdn.net/u010386612/article/category/6169715


 9324
9324

 被折叠的 条评论
为什么被折叠?
被折叠的 条评论
为什么被折叠?
 到【灌水乐园】发言


