


之前在 http://blog.csdn.net/fengbingchun/article/details/50987185 中仿照Caffe中的examples实现对手写数字进行识别,这里详细介绍下其执行流程并精简了实现代码,使用Caffe对MNIST数据集进行train的文章可以参考 http://blog.csdn.net/fengbingchun/article/details/68065338 :
1. 先注册所有层,执行layer_factory.hpp中类LayerRegisterer的构造函数,类LayerRegistry的AddCreator和Registry静态函数;关于Caffe中Layer的注册可以参考: http://blog.csdn.net/fengbingchun/article/details/54310956
2. 指定执行mode是采用CPU还是GPU;
3. 指定需要的.prototxt和.caffemodel文件:注意此处的.prototxt文件(lenet_train_test_.prototxt)与train时.prototxt文件(lenet_train_test.prototxt)在内容上的差异。.caffemodel文件即是train后最终生成的二进制文件lenet_iter_10000.caffemodel,里面存放着所有层的权值和偏置。lenet_train_test_.prototxt文件内容如下:
name: "LeNet" # net名
layer { # memory required: (784+1)*4=3140
name: "data" # layer名字
type: "MemoryData" # layer类型,Data enters Caffe through data layers,read data directly from memory
top: "data" # top名字, shape: 1 1 28 28 (784)
top: "label" # top名字, shape: 1 (1) #感觉并无实质作用,仅用于增加一个top blob,不可去掉
memory_data_param { # 内存数据参数
batch_size: 1 # 指定待识别图像一次的数量
channels: 1 # 指定待识别图像的通道数
height: 28 # 指定待识别图像的高度
width: 28 # 指定待识别图像的宽度
}
transform_param { # 图像预处理参数
scale: 0.00390625 # 对图像像素值进行scale操作,范围[0, 1)
}
}
layer { # memory required: 11520*4=46080
name: "conv1" # layer名字
type: "Convolution" # layer类型,卷积层
bottom: "data" # bottom名字
top: "conv1" # top名字, shape: 1 20 24 24 (11520)
param { # Specifies training parameters
lr_mult: 1 # The multiplier on the global learning rate
}
param { # Specifies training parameters
lr_mult: 2 # The multiplier on the global learning rate
}
convolution_param { # 卷积参数
num_output: 20 # 输出特征图(feature map)数量
kernel_size: 5 # 卷积核大小(卷积核其实就是权值)
stride: 1 # 滑动步长
weight_filler { # The filler for the weight
type: "xavier" # 权值使用xavier滤波
}
bias_filler { # The filler for the bias
type: "constant" # 偏置使用常量滤波
}
}
}
layer { # memory required: 2880*4=11520
name: "pool1" # layer名字
type: "Pooling" # layer类型,Pooling层
bottom: "conv1" # bottom名字
top: "pool1" # top名字, shape: 1 20 12 12 (2880)
pooling_param { # pooling parameter,pooling层参数
pool: MAX # pooling方法:最大值采样
kernel_size: 2 # 滤波器大小
stride: 2 # 滑动步长
}
}
layer { # memory required: 3200*4=12800
name: "conv2" # layer名字
type: "Convolution" # layer类型,卷积层
bottom: "pool1" # bottom名字
top: "conv2" # top名字, shape: 1 50 8 8 (3200)
param { # Specifies training parameters
lr_mult: 1 # The multiplier on the global learning rate
}
param { # Specifies training parameters
lr_mult: 2 # The multiplier on the global learning rate
}
convolution_param { # 卷积参数
num_output: 50 # 输出特征图(feature map)数量
kernel_size: 5 # 卷积核大小(卷积核其实就是权值)
stride: 1 # 滑动步长
weight_filler { # The filler for the weight
type: "xavier" # 权值使用xavier滤波
}
bias_filler { # The filler for the bias
type: "constant" # 偏置使用常量滤波
}
}
}
layer { # memory required: 800*4=3200
name: "pool2" # layer名字
type: "Pooling" # layer类型,Pooling层
bottom: "conv2" # bottom名字
top: "pool2" # top名字, shape: 1 50 4 4 (800)
pooling_param { # pooling parameter,pooling层参数
pool: MAX # pooling方法:最大值采样
kernel_size: 2 # 滤波器大小
stride: 2 # 滑动步长
}
}
layer { # memory required: 500*4=2000
name: "ip1" # layer名字
type: "InnerProduct" # layer类型,全连接层
bottom: "pool2" # bottom名字
top: "ip1" # top名字, shape: 1 500 (500)
param { # Specifies training parameters
lr_mult: 1 # The multiplier on the global learning rate
}
param { # Specifies training parameters
lr_mult: 2 # The multiplier on the global learning rate
}
inner_product_param { # 全连接层参数
num_output: 500 # 输出特征图(feature map)数量
weight_filler { # The filler for the weight
type: "xavier" # 权值使用xavier滤波
}
bias_filler { # The filler for the bias
type: "constant" # 偏置使用常量滤波
}
}
}
# ReLU: Given an input value x, The ReLU layer computes the output as x if x > 0 and
# negative_slope * x if x <= 0. When the negative slope parameter is not set,
# it is equivalent to the standard ReLU function of taking max(x, 0).
# It also supports in-place computation, meaning that the bottom and
# the top blob could be the same to preserve memory consumption
layer { # memory required: 500*4=2000
name: "relu1" # layer名字
type: "ReLU" # layer类型
bottom: "ip1" # bottom名字
top: "ip1" # top名字 (in-place), shape: 1 500 (500)
}
layer { # memory required: 10*4=40
name: "ip2" # layer名字
type: "InnerProduct" # layer类型,全连接层
bottom: "ip1" # bottom名字
top: "ip2" # top名字, shape: 1 10 (10)
param { # Specifies training parameters
lr_mult: 1 # The multiplier on the global learning rate
}
param { # Specifies training parameters
lr_mult: 2 # The multiplier on the global learning rate
}
inner_product_param {
num_output: 10 # 输出特征图(feature map)数量
weight_filler { # The filler for the weight
type: "xavier" # 权值使用xavier滤波
}
bias_filler { # The filler for the bias
type: "constant" # 偏置使用常量滤波
}
}
}
layer { # memory required: 10*4=40
name: "prob" # layer名字
type: "Softmax" # layer类型
bottom: "ip2" # bottom名字
top: "prob" # top名字, shape: 1 10 (10)
}
# 占用总内存大小为:3140+46080+11520+12800+3200+2000+2000+40+40=80820
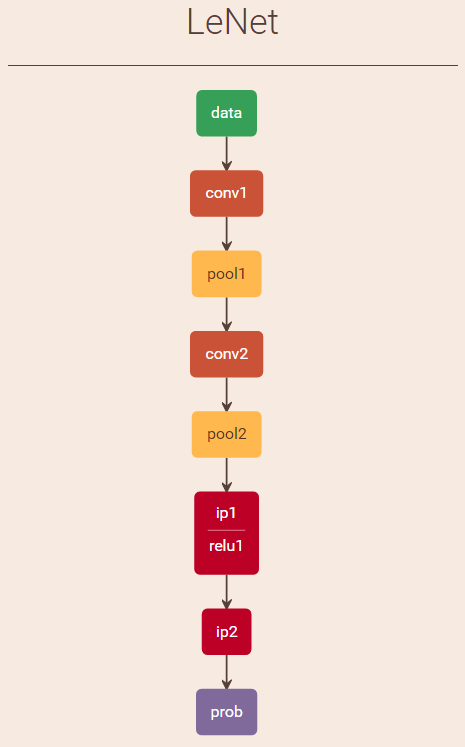
lenet_train_test_.prototxt可视化结果( http://ethereon.github.io/netscope/quickstart.html )如下图:
train时lenet_train_test.prototxt与识别时用到的lenet_train_test_.prototxt差异:
(1)、数据层:训练时用Data,是以lmdb数据存储方式载入网络的,而识别时用MemoryData方式直接从内存载入网络;
(2)、Accuracy层:仅训练时用到,用以计算test集的准确率;
(3)、输出层Softmax/SoftmaxWithLoss层:训练时用SoftmaxWithLoss,输出loss值,识别时用Softmax输出10类数字的概率值。
4. 创建Net对象并初始化,有两种方法:一个是通过传入string类型(.prototxt文件)参数创建,一个是通过传入NetParameter参数;
5. 调用Net的CopyTrainedLayersFrom函数加载在train时生成的二进制文件.caffemodel即lenet_iter_10000.caffemodel,有两种方法,一个是通过传入string类型(.caffemodel文件)参数,一个是通过传入NetParameter参数;
6. 获取Net相关参数在后面识别时需要用到:
(1)、通过调用Net的blob_by_name函数获得待识别图像所要求的通道数、宽、高;
(2)、通过调用Net的output_blobs函数获得输出blob的数目及大小,注:这里输出2个blob,第一个是label,count为1,第二个是prob,count为10,即表示数字识别结果的概率值。
7. 开始进行手写数字识别:
(1)、通过opencv的imread函数读入图像;
(2)、根据从Net中获得的需要输入图像的要求对图像进行颜色空间转换和缩放;
(3)、因为MNIST train时,图像为前景为白色,背景为黑色,而现在输入图像为前景为黑色,背景为白色,因此需要对图像进行取反操作;
(4)、将图像数据传入Net,有两种方法:一种是通过MemoryDataLayer类的Reset函数,一种是通过MemoryDataLayer类的AddMatVector函数传入Mat参数;
(5)、调用Net的ForwardPrefilled函数进行前向计算;
(6)、输出识别结果,注,前向计算完返回的Blob有两个,第二个Blob中的数据才是最终的识别结果的概率值,其中最大值的索引即是识别结果。
8. 通过lenet_train_test_.prototxt文件分析各层的权值、偏置和神经元数量,共9层:
(1)、data数据层:无权值和偏置,神经元数量为1*1*28*28+1=785;
(2)、conv1卷积层:卷积窗大小为5*5,输出特征图数量为20,卷积窗种类为20,输出特征图大小为24*24,可训练参数(权值+阈值(偏置))为 20*1*5*5+20=520,神经元数量为1*20*24*24=11520;
(3)、pool1降采样层:滤波窗大小为2*2,输出特征图数量为20,滤波窗种类为20,输出特征图大小为12*12,可训练参数(权值+偏置)为1*20+20=40,神经元数量为1*20*12*12=2880;
(4)、conv2卷积层:卷积窗大小为5*5,输出特征图数量为50,卷积窗种类为50*20,输出特征图大小为8*8,可训练参数(权值+偏置)为50*20*5*5+50=25050,神经元数量为1*50*8*8=3200;
(5)、pool2降采样层:滤波窗大小为2*2,输出特征图数量为50,滤波窗种类为50,输出特征图大小为4*4,可训练参数(权值+偏置)为1*50+50=100,神经元数量为1*50*4*4=800;
(6)、ip1全连接层:滤波窗大小为1*1,输出特征图数量为500,滤波窗种类为500*800,输出特征图大小为1*1,可训练参数(权值+偏置)为500*800*1*1+500=400500,神经元数量为1*500*1*1=500;
(7)、relu1层:in-placeip1;
(8)、ip2全连接层:滤波窗大小为1*1,输出特征图数量为10,滤波窗种类为10*500,输出特征图大小为1*1,可训练参数(权值+偏置)为10*500*1*1+10=5010,神经元数量为1*10*1*1=10;
(9)、prob输出层:神经元数量为1*10*1*1+1=11。
精简后的手写数字识别测试代码如下:
int mnist_predict()
{
caffe::Caffe::set_mode(caffe::Caffe::CPU);
const std::string param_file{ "E:/GitCode/Caffe_Test/test_data/model/mnist/lenet_train_test_.prototxt" };
const std::string trained_filename{ "E:/GitCode/Caffe_Test/test_data/model/mnist/lenet_iter_10000.caffemodel" };
const std::string image_path{ "E:/GitCode/Caffe_Test/test_data/images/" };
// 有两种方法可以实例化net
// 1. 通过传入参数类型为std::string
caffe::Net<float> caffe_net(param_file, caffe::TEST);
caffe_net.CopyTrainedLayersFrom(trained_filename);
// 2. 通过传入参数类型为caffe::NetParameter
//caffe::NetParameter net_param1, net_param2;
//caffe::ReadNetParamsFromTextFileOrDie(param_file, &net_param1);
//net_param1.mutable_state()->set_phase(caffe::TEST);
//caffe::Net<float> caffe_net(net_param1);
//caffe::ReadNetParamsFromBinaryFileOrDie(trained_filename, &net_param2);
//caffe_net.CopyTrainedLayersFrom(net_param2);
int num_inputs = caffe_net.input_blobs().size(); // 0 ??
const boost::shared_ptr<caffe::Blob<float> > blob_by_name = caffe_net.blob_by_name("data");
int image_channel = blob_by_name->channels();
int image_height = blob_by_name->height();
int image_width = blob_by_name->width();
int num_outputs = caffe_net.num_outputs();
const std::vector<caffe::Blob<float>*> output_blobs = caffe_net.output_blobs();
int require_blob_index{ -1 };
const int digit_category_num{ 10 };
for (int i = 0; i < output_blobs.size(); ++i) {
if (output_blobs[i]->count() == digit_category_num)
require_blob_index = i;
}
if (require_blob_index == -1) {
fprintf(stderr, "ouput blob don't match\n");
return -1;
}
std::vector<int> target{ 0, 1, 2, 3, 4, 5, 6, 7, 8, 9 };
std::vector<int> result;
for (auto num : target) {
std::string str = std::to_string(num);
str += ".png";
str = image_path + str;
cv::Mat mat = cv::imread(str.c_str(), 1);
if (!mat.data) {
fprintf(stderr, "load image error: %s\n", str.c_str());
return -1;
}
if (image_channel == 1)
cv::cvtColor(mat, mat, CV_BGR2GRAY);
else if (image_channel == 4)
cv::cvtColor(mat, mat, CV_BGR2BGRA);
cv::resize(mat, mat, cv::Size(image_width, image_height));
cv::bitwise_not(mat, mat);
// 将图像数据载入Net网络,有2种方法
boost::shared_ptr<caffe::MemoryDataLayer<float> > memory_data_layer =
boost::static_pointer_cast<caffe::MemoryDataLayer<float>>(caffe_net.layer_by_name("data"));
// 1. 通过MemoryDataLayer类的Reset函数
mat.convertTo(mat, CV_32FC1, 0.00390625);
float dummy_label[1] {0};
memory_data_layer->Reset((float*)(mat.data), dummy_label, 1);
// 2. 通过MemoryDataLayer类的AddMatVector函数
//std::vector<cv::Mat> patches{mat}; // set the patch for testing
//std::vector<int> labels(patches.size());
//memory_data_layer->AddMatVector(patches, labels); // push vector<Mat> to data layer
float loss{ 0.0 };
const std::vector<caffe::Blob<float>*>& results = caffe_net.ForwardPrefilled(&loss); // Net forward
const float* output = results[require_blob_index]->cpu_data();
float tmp{ -1 };
int pos{ -1 };
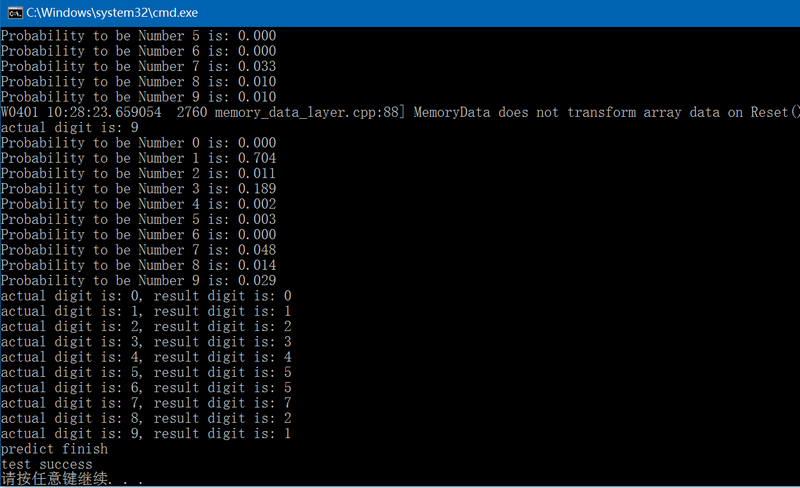
fprintf(stderr, "actual digit is: %d\n", target[num]);
for (int j = 0; j < 10; j++) {
printf("Probability to be Number %d is: %.3f\n", j, output[j]);
if (tmp < output[j]) {
pos = j;
tmp = output[j];
}
}
result.push_back(pos);
}
for (auto i = 0; i < 10; i++)
fprintf(stderr, "actual digit is: %d, result digit is: %d\n", target[i], result[i]);
fprintf(stderr, "predict finish\n");
return 0;
}
测试结果如下:
GitHub:https://github.com/fengbingchun/Caffe_Test
---------------------
作者:fengbingchun
来源:CSDN
原文:https://blog.csdn.net/fengbingchun/article/details/69001433
版权声明:本文为博主原创文章,转载请附上博文链接!
---------------------
作者:fengbingchun
来源:CSDN
原文:https://blog.csdn.net/fengbingchun/article/details/69001433
版权声明:本文为博主原创文章,转载请附上博文链接!


 1万+
1万+


 被折叠的 条评论
为什么被折叠?
被折叠的 条评论
为什么被折叠?
 到【灌水乐园】发言


