


一般的项目都会运行在不同的环境上,比如我们有本地环境、开发环境、测试环境、生产环境等等。这些不同的环境,必然有不同的配置。比如日志级别,开发环境我们一般设置成debug,而生产环境一般设置成warn。我们肯定不希望:手动修改项目配置文件,然后才打包发布到不同的环境。
这个时候我们可以使用maven的profile,在pom.xml中为不同的环境配置不同的profile。
<project>
	<profiles>
        <profile>
            <id>local</id>
            <activation>
                <activeByDefault>true</activeByDefault>
            </activation>
            <properties>
                <zoo.url>172.17.103.107:2181</zoo.url>
                <log.level>DEBUG</log.level>
            </properties>
        </profile>
		<profile>
            <id>dev</id>
            <activation>
                <activeByDefault>false</activeByDefault>
            </activation>
            <properties>
                <zoo.url>172.17.103.108:2181</zoo.url>
                <log.level>INFO</log.level>
            </properties>
        </profile>
	</profiles>
</project>
如果我们需要打本地环境的包,可以激活本地环境的profile:
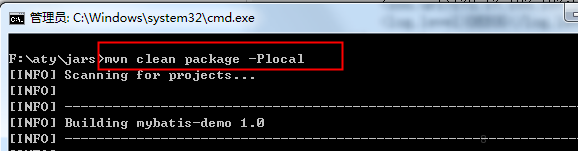
如果我们需要打开发环境的包,可以激活开发环境的profile:
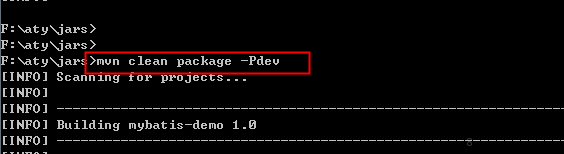
可以看到:我们只需要执行不同的打包脚本,就可以打出不同环境需要的包,而不需要去修改项目中的配置文件,这就是profile的作用。
那什么是maven的资源过滤?很简单,上面我们为本地环境和开发环境配置了不同的profile,我们代码怎么去读取这些配置的值呢?我们可以定义一个config.properties,放在src/main/resources/下面:
zoo.url=${zoo.url}
log.level=${log.level}
<build>
	<!-- 替换配置文件中的数据项 start -->
	<resources>
		<resource>
			<directory>src/main/resources</directory>
			<filtering>true</filtering>
		</resource>
	</resources>
	<testResources>
		<testResource>
			<directory>src/test/resources</directory>
			<filtering>true</filtering>
		</testResource>
	</testResources>
	<!-- 替换配置文件中的数据项 end -->


</build>
如果我们激活本地环境的profile,可以看到最终构建出的config.properties内容如下:

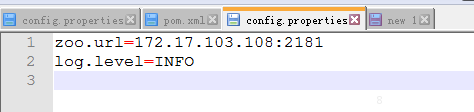
如果我们激活开发环境的profile,可以看到最终构建出的config.properties内容如下:
通过maven的profile和资源过滤,我们只需要在不同的环境激活对应的profile,配置信息就会自动改变,不需要我们取修改项目中的代码或者配置文件,所有变量都是定义在pom.xml中的。


 635
635


 被折叠的 条评论
为什么被折叠?
被折叠的 条评论
为什么被折叠?
 到【灌水乐园】发言


