


肖哥弹架构 跟大家“弹弹” 大模型Agent设计与实战应用,需要代码关注
欢迎 关注,点赞,留言。
关注公号Solomon肖哥弹架构获取更多精彩内容
历史热点文章
⚠️ 原译文不易 搬运必究
OxyGent 是一个功能强大且高度灵活的智能体系统框架,支持从环境配置、多模型调用到复杂多智能体协作的全流程开发。本文详细介绍了 OxyGent 的安装与启动方法、系统配置、智能体调用与运行机制、多智能体协作原理、模型能力增强(如RAG与工具集成)以及系统管理与调试技巧。无论你是初学者还是资深开发者,都能通过本指南快速掌握如何利用 OxyGent 构建高效、可扩展的AI应用,实现从简单对话到分布式多模态任务的全面覆盖。
一、 安装与启动
1.安装
1.1. 安装OxyGent
1.1.1 如何配置环境?
我们支持通过conda或者uv配置环境。
- 创建运行环境(conda)
   conda create -n oxy_env python==3.10
   conda activate oxy_env
或者(uv)
   curl -LsSf https://astral.sh/uv/install.sh | sh
   uv python install 3.10
   uv venv .venv --python 3.10
   source .venv/bin/activate
- 下载发行包(conda)
pip install oxygent
或者(uv)
uv pip install oxygent
1.1.2 可不可以使用其他python版本?
建议您现在使用Python 3.10运行OxyGent。未来版本将兼容最新的python包。
1.1.3 是否需要配置其他环境选项?
不需要,OxyGent的核心是纯Python。但是为了您的使用体验,建议您先安装好Node.js。
1.1.4 如何安装OxyGent?
   pip install oxygent # conda
   uv pip install oxygent # uv
1.1.5 安装OxyGent网速太慢怎么办?
您可以使用镜像安装,比如
uv pip install oxygent -i https://pypi.tuna.tsinghua.edu.cn/simple
或者从github直接下载oxygent文件夹,放在项目根目录下。(使用本地包需要先安装requirements.txt)
OxyGent会优先引用本地包。
2.启动
2.1. 运行demo
使用python直接运行我们的任意一个demo。
2.1.1 为什么下载后直接运行demo系统不启动?
OxyGent只是智能体系统框架,本身不提供LLM服务。因此您需要在.env中设置自己的LLM api。
   export DEFAULT_LLM_API_KEY="your_api_key"
   export DEFAULT_LLM_BASE_URL="your_base_url"  # if you want to use a custom base URL
   export DEFAULT_LLM_MODEL_NAME="your_model_name"
   # create a .env file
   DEFAULT_LLM_API_KEY="your_api_key"
   DEFAULT_LLM_BASE_URL="your_base_url"
   DEFAULT_LLM_MODEL_NAME="your_model_name"
2.1.1 为什么我填好了环境变量,但是运行demo时报404?
首先,请您检查是否引入了不存在的环境变量。
如果不能解决问题,请查看 下面的节点 关于llm api
2.1.1 如何获得帮助?
您可以通过以下方式获得帮助:
- 在Github提交issue
- 加入交流讨论群(参见readme)
- 如果您有企业内部Slack,请直接联系OxyGent Core团队。
OxyGent未来将提供更完整的社区服务。
二、设置
1. OxyGent Config设置?
在 OxyGent 中,您可以使用 设置(Config) 来管理您的自定义内容。
1.1 设置 LLM 模型
如果您的多个 Agent 都使用相同的 LLM,您可以通过设置 LLM 来方便地管理这些 Agent,使得所有的 Agent 使用您指定的 llm_name:
Config.set_agent_llm_model("default_llm")
1.2. 加载设置
您可以通过加载设置的方法导入配置文件:
Config.load_from_json("./config.json", env="default")
1.3. 设置模型参数
您可以通过 Config.set_llm_config 方法设置模型的参数。例如,设置温度、最大 token 数量和 top-p:
Config.set_llm_config(
    {
        "temperature": 0.2,
        "max_tokens": 2048,
        "top_p": 0.9,
    }
)
1.4. 设置日志格式
您可以通过 Config.set_log_config 设置日志记录的详细信息,包括日志的路径、日志级别以及颜色等:
Config.set_log_config(
    {
        "path": "./cache_dir/demo.log",
        "level_root": "DEBUG",
        "level_terminal": "DEBUG",
        "level_file": "DEBUG",
        "color_is_on_background": True,
        "is_bright": True,
        "only_message_color": False,
        "color_tool_call": "MAGENTA",
        "color_observation": "GREEN",
        "is_detailed_tool_call": True,
        "is_detailed_observation": True,
    }
)
1.5. 设置智能体输入格式
您可以通过 Config.set_agent_input_schema 来设置智能体的输入格式,定义输入的属性及必需字段:
Config.set_agent_input_schema(
    {
        "properties": {
            "query": {"description": "Query question"},
            "path": {"description": "File path to save the result"},
        },
        "required": ["query"],
    }
)
1.6. 设置结果输出格式
您可以通过 Config.set_message_config 设置结果的输出格式,决定是否发送工具调用、观察信息、思考过程或最终答案:
Config.set_message_config(
    {
        "is_send_tool_call": False,
        "is_send_observation": False,
        "is_send_think": False,
        "is_send_answer": True,
    }
)
1.7. 完整的可运行样例
以下是可运行的完整代码示例:
import asyncio

from oxygent import MAS, oxy, Config
from oxygent.utils.env_utils import get_env_var
import prompts
import tools

Config.set_agent_llm_model("default_llm")

oxy_space = [
    oxy.HttpLLM(
        name="default_llm",
        api_key=get_env_var("DEFAULT_LLM_API_KEY"),
        base_url=get_env_var("DEFAULT_LLM_BASE_URL"),
        model_name=get_env_var("DEFAULT_LLM_MODEL_NAME"),
        llm_params={"temperature": 0.01},
        semaphore=4,
        timeout=240,
    ),
    tools.file_tools,
    oxy.ReActAgent(
        name="master_agent",
        is_master=True,
        tools=["file_tools"],
    ),
]


async def main():
    async with MAS(oxy_space=oxy_space) as mas:
        await mas.start_web_service(
            first_query="Hello!"
        )


if __name__ == "__main__":
    asyncio.run(main())
2. 数据库设置
OxyGent支持设置外部工具,比如您的数据库。现在OxyGent支持三种类型的外部数据库:
- Elasticsearch: https://www.elastic.co/elasticsearch
- Redis: https://redis.io/
- Vearch: https://github.com/vearch/vearch
以Elasticsearch为例,您可以在设置(Config)中输入数据库信息:
Config.set_es_config( # 请按照数据库实际类型调整
    {
        "hosts": ["${PROD_ES_HOST_1}", "${PROD_ES_HOST_2}", "${PROD_ES_HOST_3}"],
        "user": "${PROD_ES_USER}",
        "password": "${ES_TEST_PASSWORD}",
    }
)
在设置好数据库后,agent会自动使用数据库进行存储与检索。如果您没有设置数据库,OxyGent将会使用本地文件系统模拟数据库运行。
2.1. 完整的可运行样例
以下是可运行的完整代码示例:
"""Demo for using OxyGent with multiple LLMs and an agent."""

import asyncio

from oxygent import MAS, Config, oxy
from oxygent.utils.env_utils import get_env_var

Config.set_es_config(
    {
        "hosts": ["${PROD_ES_HOST_1}", "${PROD_ES_HOST_2}", "${PROD_ES_HOST_3}"],
        "user": "${PROD_ES_USER}",
        "password": "${ES_TEST_PASSWORD}",
    }
)
oxy_space = [
    oxy.HttpLLM(
        name="default_llm",
        api_key=get_env_var("DEFAULT_LLM_API_KEY"),
        base_url=get_env_var("DEFAULT_LLM_BASE_URL"),
        model_name=get_env_var("DEFAULT_LLM_MODEL_NAME"),
        llm_params={"temperature": 0.01},
        semaphore=4,
        timeout=240,
    ),
    oxy.ReActAgent(
        name="master_agent",
        is_master=True,
        llm_model="default_llm",
    ),
]


async def main():
    async with MAS(oxy_space=oxy_space) as mas:
        messages = [
            {"role": "system", "content": "You are a helpful assistant"},
            {"role": "user", "content": "hello"},
        ]
        result = await mas.call(callee="master_agent", arguments={"messages": messages})
        print(result)


if __name__ == "__main__":
    asyncio.run(main())
3. 系统全局数据设置
OxyGent支持使用非常简单的方式设置和修改系统全局数据,这些数据类似于全局变量,能够在MAS中使用OxyRequest进行更改与访问。
支持的方法包括:
get_global:使用(key,default_value)按键值访问全局数据set_global:使用(key,value)按键值修改全局数据get_all_global:获取所有的全局数据(返回dict)
下面使用全局数据实现简单的计数器。
class CounterAgent(BaseAgent):
    async def execute(self, oxy_request: OxyRequest):
        cnt = oxy_request.get_global("counter", 0) + 1 # 获取计数
        oxy_request.set_global("counter", cnt) # 存储计数+1

        return OxyResponse(
            state=OxyState.COMPLETED,
            output=f"This MAS has been called {cnt} time(s).",
            oxy_request=oxy_request,
        )
将这个CounterAgent作为master,就可以输出MAS被调用的次数。
oxy_space = [
    oxy.HttpLLM(
        name="default_llm",
        api_key=get_env_var("DEFAULT_LLM_API_KEY"),
        base_url=get_env_var("DEFAULT_LLM_BASE_URL"),
        model_name=get_env_var("DEFAULT_LLM_MODEL_NAME"),
        llm_params={"temperature": 0.01},
        semaphore=4,
        timeout=240,
    ),
    CounterAgent(
        name="master_agent",
        is_master=True,
    ),
]

async def main():
    async with MAS(name="global_demo", oxy_space=oxy_space) as mas:
        # 第一次调用 → counter = 1
        r1 = await mas.chat_with_agent({"query": "first"})
        print(r1.output)

        # 第二次调用 → counter = 2 (global_data persisted inside MAS)
        r2 = await mas.chat_with_agent({"query": "second"})
        print(r2.output)

        # 直接从MAS中获取:
        print("Current global_data:", mas.global_data)
    # 全局数据的生命周期和MAS相同
三、智能体调用与运行
1. 如何调用LLM模型?
OxyGent所指的LLM是传统的LLM形式,它支持输入一个字符串并输出一个字符串。您可以通过oxy.HttpLLM或者oxy.OpenAILLM调用模型。
1.1. 调用一般模型
    from oxygent.utils.env_utils import get_env_var

    oxy.HttpLLM(
        name="default_llm",
        api_key=get_env_var("DEFAULT_LLM_API_KEY"), # 或者使用 os.getenv("DEFAULT_LLM_API_KEY")
        base_url=get_env_var("DEFAULT_LLM_BASE_URL"),
        model_name=get_env_var("DEFAULT_LLM_MODEL_NAME"),
        llm_params={"temperature": 0.01},
        semaphore=4, # 并发量
        timeout=240, # 最大执行时间
    ),
对于常见的开源模型和闭源模型,OxyGent均支持以这种方式进行调用。
OxyGent支持直接url调用和加后缀
/chat/completions的模型调用。
1.2. 调用OpenAI接口模型
对于支持OpenAI接口的模型,可以使用以下方法进行调用:
    oxy.OpenAILLM(
        name="default_llm",
        api_key=get_env_var("DEFAULT_LLM_API_KEY"), # 或者使用 os.getenv("DEFAULT_LLM_API_KEY")
        base_url=get_env_var("DEFAULT_LLM_BASE_URL"),
        model_name=get_env_var("DEFAULT_LLM_MODEL_NAME"),
        llm_params={"temperature": 0.01},
        semaphore=4,
        timeout=240,
    ),
1.3. 调用ollama部署模型
如果您使用ollama在本地部署了模型,请使用以下方式进行调用:
    oxy.HttpLLM(
        name="local_gemma",
        # 注意不要传入api_key参数
        base_url="http://localhost:11434/api/chat", # 替换为本地的url接口
        model_name=get_env_var("DEFAULT_OLLAMA_MODEL"),
        llm_params={"temperature": 0.2},
        semaphore=1,
        timeout=240,
    ),
1.3.1 url补全说明
OxyGent支持自动补全url,补全逻辑简要如下:
        if is_gemini:
            if not url.endswith(":generateContent"):
                url = f"{url}/models/{self.model_name}:generateContent"
        elif use_openai:
            if not url.endswith("/chat/completions"):
                url = f"{url}/chat/completions"
        else:
            if not url.endswith("/api/chat"): # only support ollama
                url = f"{url}/api/chat"
因此,请您注意以下内容,如果您遇到404问题,大概率是url错误导致的:
- 使用Gemini是可以直接传入模型api,例如
https://generativelanguage.googleapis.com/v1beta - 使用通用开源模型(DeepSeek, Qwen)时,即使api_key为EMPTY,也请您写在环境变量中并传入
oxy.HttpLLM。 - 使用基于OpenAI协议的闭源模型(ChatGPT)时,请使用
oxy.OpenAILLM。 - 使用ollama模型时,不要传入
api_key参数。
1.4. 常用参数设置
OxyGent支持细致设置模型参数,您可以在调用时或者在设置里设置LLM参数。以下是一些常用的参数列表:
- category: 始终为"llm",表示这是LLM模型的配置。
- timeout: 最大执行时间,单位为秒。
- llm_params: 模型的额外参数(如温度设置等)。
- is_send_think: 是否向前端发送思考消息。
- friendly_error_text: 错误信息的用户友好提示。
- is_multimodal_supported: 模式是否支持多模态输入。
- is_convert_url_to_base64: 是否将媒体URL转换为base64格式。
- max_image_pixels: 图片处理的最大像素数。
- max_video_size: 视频处理的最大字节数。
OxyGent默认为每个agent提供单独的LLM。如果您需要配置统一的LLM,请参考如何调用LLM模型;如果您需要并行运行多种LLM,请参考如何并行运行智能体。
2. 如何并行运行智能体?
OxyGent 支持高兼容性的并行执行功能,允许您同时运行多个智能体并进行协作。
2.1. 并行执行多个智能体
例如,如果您需要同时对一篇文档进行数据分析、文字总结和纠错,您可以注册相应功能的智能体,并使用 oxy.ParallelAgent 来管理这些智能体。ParallelAgent 会负责并行处理并汇总各个智能体的结果。
您还可以通过semaphore参数设置每个智能体的最大并发度。
    oxy.ChatAgent( # 需要并行的agent
        name="text_summarizer",
        desc="A tool that can summarize markdown text",
        prompt=prompts.text_summarizer_prompt,
    ),
    oxy.ChatAgent(
        name="data_analyser",
        desc="A tool that can summarize echart data",
        prompt=prompts.data_analyser_prompt,
    ),
    oxy.ChatAgent(
        name="document_checker",
        desc="A tool that can find problems in document",
        prompt=prompts.document_checker_prompt,
    ),
    oxy.ParallelAgent( # 管理的上层agent
        name="analyzer",
        desc="A tool that analyze markdown document",
        permitted_tool_name_list=["text_summarizer", "data_analyser", "document_checker"]
    ),
ParallelAgent 会自动启动所有子智能体,进行并行计算,并最终返回所有任务的结果。
2.2. 同一智能体并行执行
如果您需要使同一个智能体并行运行多次,可以使用 start_batch_processing 方法来批量处理请求。以下是完整的可运行示例:
import asyncio

from pydantic import Field

from oxygent import MAS, Config, OxyRequest, oxy
from oxygent.utils.env_utils import get_env_var

Config.set_agent_llm_model("default_llm")

oxy_space = [
    oxy.HttpLLM(
        name="default_llm",
        api_key=get_env_var("DEFAULT_LLM_API_KEY"),
        base_url=get_env_var("DEFAULT_LLM_BASE_URL"),
        model_name=get_env_var("DEFAULT_LLM_MODEL_NAME"),
        llm_params={
            "temperature": 0.7,
            "max_tokens": 512,
            "chat_template_kwargs": {"enable_thinking": False},
        },
        semaphore=200,
    ),
    oxy.ReActAgent(
        name="master_agent",
        is_master=True,
        llm_model="default_llm",
        semaphore=200,
        timeout=100,
    ),
]


async def main():
    async with MAS(oxy_space=oxy_space) as mas:
        outs = await mas.start_batch_processing(["Hello!"] * 10, return_trace_id=True) #并行10次
        print(outs)


if __name__ == "__main__":
    asyncio.run(main())
2.3. 说明
start_batch_processing:该方法接收一个包含多个请求的列表,异步并行执行所有请求,并返回结果。如果您希望处理多次相同的请求或不同的请求,可以通过这个方法快速进行批量处理。semaphore:这是用来控制并发的参数。通过设置适当的并发数,您可以灵活控制系统的资源消耗,避免过多的并行请求导致性能瓶颈。return_trace_id=True:返回每个请求的 trace ID,便于追踪请求的执行过程和结果。
四、Oxygent 运行流程
1. 核心步骤功能
1.1. 创建第一个智能体
在OxyGent中,基础的智能体由智能体(Agent)和内部封装的大语言模型(LLM)组成。
对于新用户,您可以使用oxy.HttpLLM方法通过您的api_key注册LLM:
    oxy.HttpLLM(
        name="default_llm",
        api_key=get_env_var("DEFAULT_LLM_API_KEY"), # 或者使用 os.getenv("DEFAULT_LLM_API_KEY")
        base_url=get_env_var("DEFAULT_LLM_BASE_URL"),
        model_name=get_env_var("DEFAULT_LLM_MODEL_NAME"),
        llm_params={"temperature": 0.01},
        semaphore=4, # 并发量
        timeout=240, # 最大执行时间
    ),
其中
semaphore参数的详细说明请参见 并行 部分。
接下来,您可以使用oxy.ChatAgent或者oxy.ReActAgent封装您的第一个agent:
    oxy.ReActAgent(
        name="master_agent",
        prompt = master_prompt, # 支持自定义prompt
        is_master=True, # 设置为master
        llm_model="default_llm",
    ),
为了使 LLM 和智能体生效,它们需要被添加到 oxy_space 中。
1.1 完整的可运行样例
以下是可运行的完整代码示例:
import asyncio

from oxygent import MAS, oxy
from oxygent.utils.env_utils import get_env_var

master_prompt = """
你是一个文档分析专家,用户会向你提供文档,请为用户提供简要的文档摘要。
摘要可以是markdown格式。
"""

oxy_space = [
    oxy.HttpLLM(
        name="default_llm",
        api_key=get_env_var("DEFAULT_LLM_API_KEY"),
        base_url=get_env_var("DEFAULT_LLM_BASE_URL"),
        model_name=get_env_var("DEFAULT_LLM_MODEL_NAME"),
        llm_params={"temperature": 0.01},
        semaphore=4,
        timeout=240,
    ),
    oxy.ReActAgent(
        name="master_agent",
        prompt = master_prompt,
        is_master=True,
        llm_model="default_llm",
    ),
]


async def main():
    async with MAS(oxy_space=oxy_space) as mas:
        await mas.start_web_service(
            first_query="Hello!"
        )


if __name__ == "__main__":
    asyncio.run(main())
1.2. 选择智能体使用的LLM
1.2.1 如何调用LLM模型?
OxyGent所指的LLM是传统的LLM形式,它支持输入一个字符串并输出一个字符串。您可以通过oxy.HttpLLM或者oxy.OpenAILLM调用模型。
1.2.2 调用一般模型
    from oxygent.utils.env_utils import get_env_var

    oxy.HttpLLM(
        name="default_llm",
        api_key=get_env_var("DEFAULT_LLM_API_KEY"), # 或者使用 os.getenv("DEFAULT_LLM_API_KEY")
        base_url=get_env_var("DEFAULT_LLM_BASE_URL"),
        model_name=get_env_var("DEFAULT_LLM_MODEL_NAME"),
        llm_params={"temperature": 0.01},
        semaphore=4, # 并发量
        timeout=240, # 最大执行时间
    ),
对于常见的开源模型和闭源模型,OxyGent均支持以这种方式进行调用。
OxyGent支持直接url调用和加后缀
/chat/completions的模型调用。
1.2.3 调用OpenAI接口模型
对于支持OpenAI接口的模型,可以使用以下方法进行调用:
    oxy.OpenAILLM(
        name="default_llm",
        api_key=get_env_var("DEFAULT_LLM_API_KEY"), # 或者使用 os.getenv("DEFAULT_LLM_API_KEY")
        base_url=get_env_var("DEFAULT_LLM_BASE_URL"),
        model_name=get_env_var("DEFAULT_LLM_MODEL_NAME"),
        llm_params={"temperature": 0.01},
        semaphore=4,
        timeout=240,
    ),
1.2.4 调用ollama部署模型
如果您使用ollama在本地部署了模型,请使用以下方式进行调用:
    oxy.HttpLLM(
        name="local_gemma",
        # 注意不要传入api_key参数
        base_url="http://localhost:11434/api/chat", # 替换为本地的url接口
        model_name=get_env_var("DEFAULT_OLLAMA_MODEL"),
        llm_params={"temperature": 0.2},
        semaphore=1,
        timeout=240,
    ),
1.2.5 url补全说明
OxyGent支持自动补全url,补全逻辑简要如下:
        if is_gemini:
            if not url.endswith(":generateContent"):
                url = f"{url}/models/{self.model_name}:generateContent"
        elif use_openai:
            if not url.endswith("/chat/completions"):
                url = f"{url}/chat/completions"
        else:
            if not url.endswith("/api/chat"): # only support ollama
                url = f"{url}/api/chat"
因此,请您注意以下内容,如果您遇到404问题,大概率是url错误导致的:
- 使用Gemini是可以直接传入模型api,例如
https://generativelanguage.googleapis.com/v1beta - 使用通用开源模型(DeepSeek, Qwen)时,即使api_key为EMPTY,也请您写在环境变量中并传入
oxy.HttpLLM。 - 使用基于OpenAI协议的闭源模型(ChatGPT)时,请使用
oxy.OpenAILLM。 - 使用ollama模型时,不要传入
api_key参数。
1.2.6 常用参数设置
OxyGent支持细致设置模型参数,您可以在调用时或者在设置里设置LLM参数。以下是一些常用的参数列表:
- category: 始终为"llm",表示这是LLM模型的配置。
- timeout: 最大执行时间,单位为秒。
- llm_params: 模型的额外参数(如温度设置等)。
- is_send_think: 是否向前端发送思考消息。
- friendly_error_text: 错误信息的用户友好提示。
- is_multimodal_supported: 模式是否支持多模态输入。
- is_convert_url_to_base64: 是否将媒体URL转换为base64格式。
- max_image_pixels: 图片处理的最大像素数。
- max_video_size: 视频处理的最大字节数。
OxyGent默认为每个agent提供单独的LLM。如果您需要配置统一的LLM,请参考设置默认LLM;如果您需要并行运行多种LLM,请参考并行。
1.3 选择智能体种类
OxyGent提供了很多种预设智能体,这些智能体足以帮助您完成基础的MAS构建,以下是简要介绍:
1.3.1 oxy.ChatAgent
oxy.ChatAgent是最初级的聊天agent,功能和内部的LLM大致相同。您可以使用oxy.ChatAgent进行文本相关的工作。
    oxy.ChatAgent(
        name="planner_agent",
        desc="An agent capable of making plans",
        llm_model="default_llm",
        prompt="""
            For a given goal, create a simple and step-by-step executable plan. \
            The plan should be concise, with each step being an independent and complete functional module—not an atomic function—to avoid over-fragmentation. \
            The plan should consist of independent tasks that, if executed correctly, will lead to the correct answer. \
            Ensure that each step is actionable and includes all necessary information for execution. \
            The result of the final step should be the final answer. Make sure each step contains all the information required for its execution. \
            Do not add any redundant steps, and do not skip any necessary steps.
        """.strip(),
    )
1.3.2 oxy.WorkFlowAgent
在Chat的基础上增加工作流,可以自定义内部流程走向的Agent。
    oxy.WorkflowAgent(
        name='search_agent',
        desc='一个可以查询数据的工具',
        sub_agents=['ner_agent', 'nen_agent'],
        func_workflow=data_workflow,
        llm_model='default_llm',
    )
1.3.3 oxy.ReActAgent
一种支持规划、执行、观察、纠错重试的agent,适合进行复杂的工作, 常常作为master_agent。
    oxy.ReActAgent(
        name="master_agent",
        sub_agents=["knowledge_agent", "find_agent", "search_agent"],
        is_master=True,
        llm_model="default_llm",
    )
ReActAgent包含一些独特的可调节参数,包括:
max_react_rounds: int:最大react轮数trust_mode: bool:是否提供响应元数据func_parse_llm_response: Optional[Callable[[str], LLMResponse]]:处理LLM输出
1.3.4 oxy.SSEOxygent
支持分布式的agent。
    oxy.MASAgent(
        name = 'math_agent',
        desc = '一个可以查询圆周率的工具',
        server_url = 'http://127.0.0.1:8081'
    )
1.3.5 oxy.ParallelAgent
支持并行的agent。
    oxy.ParallelAgent(
        name="analyzer",
        desc="A tool that analyze markdown document",
        permitted_tool_name_list=["text_summarizer", "data_analyser", "document_checker"]
    ),
1.4. 如何向智能体传递prompt
1.4.1 使用自定义prompt
在OxyGent中,您可以通过预设prompt告知agent一些信息。例如:
text_summarizer_prompt = """
你是一个文件分析专家,用户会向你提供文档,你需要分析文件中的文字内容,并提供摘要
"""

data_analyser_prompt = """
你是一个数据分析专家,需要分析文档中的表格、图表、echart代码等数据,并提供文字版的分析结果。
"""

document_checker_prompt = """
你需要查看用户提供的文档,并尝试提出文档内容中存在的问题,例如前后矛盾、错误叙述等,帮助用户进行改进。
"""
之后,您可以在执行脚本中使用prompt参数调用prompt:
    oxy.ChatAgent(
        name="text_summarizer",
        desc="A tool that can summarize markdown text",
        prompt=text_summarizer_prompt,
    ),
    oxy.ChatAgent(
        name="data_analyser",
        desc="A tool that can summarize echart data",
        prompt=data_analyser_prompt,
    ),
    oxy.ChatAgent(
        name="document_checker",
        desc="A tool that can find problems in document",
        prompt=document_checker_prompt,
    ),
1.4.2 使用系统预设prompt
您也可以使用以下方式调用我们的默认prompts:
from oxygent.prompts import INTENTION_PROMPT
from oxygent.prompts import SYSTEM_PROMPT
from oxygent.prompts import SYSTEM_PROMPT_RETRIEVAL
from oxygent.prompts import MULTIMODAL_PROMPT
我们的默认 Prompts中包含了工具调用格式等关键信息。
因此在使用自定义 Prompt 之前,建议您先参考我们提供的默认 Prompts,以便更好地理解如何解析大模型的输出以及如何进行工具调用或回答处理。
我们也提供了传入您自定义解析函数的属性,以便更加灵活地处理输出。具体请您参考处理智能体输出。
如果您不对prompts进行任何指定,我们的智能体将默认使用系统prompts。您可以对系统prompts进行追加:
    oxy.ReActAgent(
        name="time_agent",
        desc="A tool for time query.",
        additional_prompt="Do not send other information except time.",
        tools=["time"],
    ),
1.5. 和智能体交流
OxyGent支持多种不同与智能体交流的方式。
1.5.1.可视化界面
假设您搭建了智能体系统,最简单的方式是使用start_web_service启动官方可视化工具,您可以像主流ai产品客户端一样使用聊天框和agent进行对话。
async def main():
    async with MAS(oxy_space=oxy_space) as mas:
        await mas.start_web_service(
            first_query="Hello!" #聊天框中的默认内容
        )
1.5.2. 命令行
此外,如果你更倾向与使用命令行进行交互,您可以使用start_cli_mode来启动您的智能体。
async def main():
    async with MAS(oxy_space=oxy_space) as mas:
        await mas.start_cli_mode(
            first_query="Hello!" #聊天框中的默认内容
        )
如果您只想调用与智能体交互一轮,可以使用chat_with_agent,并使用payload传递对话内容:
async def test():
    async with MAS(oxy_space=oxy_space) as mas:
        out = await mas.chat_with_agent(payload={"query": "The 30 positions of pi."})
        print("output:", out.output)
您还可以使用call方法与任意指定的agent进行交流:
async def main():
    async with MAS(oxy_space=oxy_space) as mas:
        messages = [
            {"role": "system", "content": "You are a helpful assistant"},
            {"role": "user", "content": "hello"},
        ]
        result = await mas.call(callee="master_agent", arguments={"messages": messages})
        print(result)
如果您希望对OxyGent进行开发,还可以采取其它更复杂而自定义的方式,例如直接编辑对话数据:
# find in ollama_demo.py
async def chat():
    async with MAS(oxy_space=oxy_space) as mas:
        history = [{"role": "system", "content": "You are a helpful assistant."}]

        while True:
            user_in = input("User: ").strip()
            if user_in.lower() in {"exit", "quit", "q"}:
                break

            history.append({"role": "user", "content": user_in})
            result = await mas.call(
                callee="master_agent",
                arguments={"messages": history},
            )
            assistant_out = result
            print(f"Assistant: {assistant_out}\n")
            history.append({"role": "assistant", "content": assistant_out})

if __name__ == "__main__":
    asyncio.run(chat())
五、多智能体协作方式与原理
1. 多智能体系统执行
1.1 创建简单的多agent系统
如果您认为单个智能体无法满足业务需求,使用多智能体系统可以有效地解决这个问题。
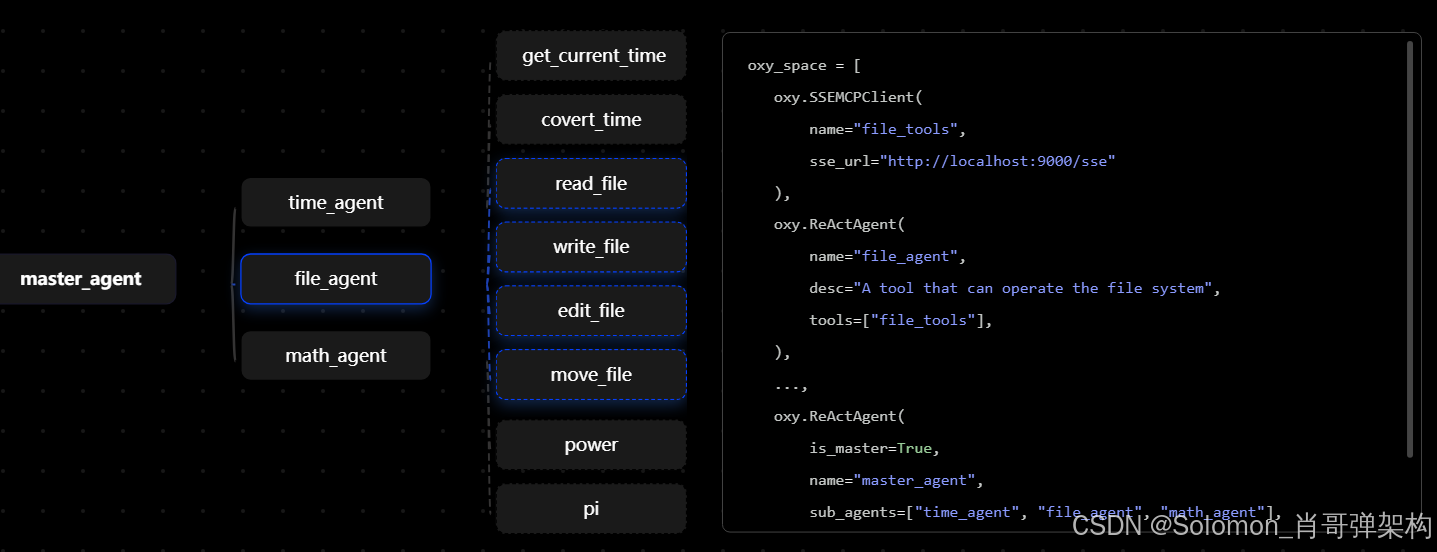
在下面的简单示例中,我们将功能相关的工具使用子智能体(subagent)进行管理。我们推荐新用户使用 oxy.ReActAgent 来调用这些工具:
    oxy.ReActAgent(
        name="file_agent",
        desc="A tool that can operate the file system",
        tools=["file_tools"],
    ),
    oxy.ReActAgent(
        name="time_agent",
        desc="A tool that can get current time",
        tools=["time_tools"],
    ),
    oxy.ReActAgent(
        name="math_agent",
        desc="A tool that can do math calculates",
        tools=["my_tools"],
    ),
接下来,您需要注册一个 master_agent,它负责在 MAS 中总调度其他智能体。将其他子智能体声明为 master_agent 的 sub_agents:
    oxy.ReActAgent(
        name="master_agent",
        is_master=True,
        sub_agents=["file_agent","time_agent","math_agent"],
    ),
OxyGent 的智能体系统结构非常灵活,这意味着您可以注册多层子智能体(subagent),而无需手动管理它们之间的协作关系。
1.1.1 完整的可运行样例
以下是可运行的完整代码示例:
"""Demo for using OxyGent with multiple LLMs and an agent."""

import asyncio

from oxygent import MAS, oxy, Config
from oxygent.utils.env_utils import get_env_var
import prompts
import tools

Config.set_agent_llm_model("default_llm")

oxy_space = [
    oxy.HttpLLM(
        name="default_llm",
        api_key=get_env_var("DEFAULT_LLM_API_KEY"),
        base_url=get_env_var("DEFAULT_LLM_BASE_URL"),
        model_name=get_env_var("DEFAULT_LLM_MODEL_NAME"),
        llm_params={"temperature": 0.01},
        semaphore=4,
        timeout=240,
    ),
    oxy.StdioMCPClient(
        name="time_tools",
        params={
            "command": "uvx",
            "args": ["mcp-server-time", "--local-timezone=Asia/Shanghai"],
        },
    ),
    oxy.StdioMCPClient(
        name="my_tools",
        params={
            "command": "uv",
            "args": ["--directory", "./mcp_servers", "run", "my_tools.py"],
        },
    ),
    tools.file_tools,
    oxy.ReActAgent(
        name="file_agent",
        desc="A tool that can operate the file system",
        tools=["file_tools"],
    ),
    oxy.ReActAgent(
        name="time_agent",
        desc="A tool that can get current time",
        tools=["time_tools"],
    ),
    oxy.ReActAgent(
        name="math_agent",
        desc="A tool that can do math calculates",
        tools=["my_tools"],
    ),
    oxy.ReActAgent(
        name="master_agent",
        is_master=True,
        sub_agents=["file_agent","time_agent","math_agent"],
    ),
]


async def main():
    async with MAS(oxy_space=oxy_space) as mas:
        await mas.start_web_service(
            first_query="Hello!"
        )

if __name__ == "__main__":
    asyncio.run(main())
1.2 复制相同智能体(集群能力)
如果您需要生成多个相同的智能体,您可以使用team_size参数快速复制智能体。
    oxy.ReActAgent(
        name="time_agent",
        desc="A tool for time query",
        tools=["time"],
        llm_model="default_llm",
        team_size=2,
    ),
team_size目前仅能复制较为简单的智能体,之后我们会支持更完备的智能体复制。
1.3 任务并行调用agent
如何并行运行智能体?
OxyGent 支持高兼容性的并行执行功能,允许您同时运行多个智能体并进行协作。
1.3.1. 并行执行多个智能体
例如,如果您需要同时对一篇文档进行数据分析、文字总结和纠错,您可以注册相应功能的智能体,并使用 oxy.ParallelAgent 来管理这些智能体。ParallelAgent 会负责并行处理并汇总各个智能体的结果。
您还可以通过semaphore参数设置每个智能体的最大并发度。
    oxy.ChatAgent( # 需要并行的agent
        name="text_summarizer",
        desc="A tool that can summarize markdown text",
        prompt=prompts.text_summarizer_prompt,
    ),
    oxy.ChatAgent(
        name="data_analyser",
        desc="A tool that can summarize echart data",
        prompt=prompts.data_analyser_prompt,
    ),
    oxy.ChatAgent(
        name="document_checker",
        desc="A tool that can find problems in document",
        prompt=prompts.document_checker_prompt,
    ),
    oxy.ParallelAgent( # 管理的上层agent
        name="analyzer",
        desc="A tool that analyze markdown document",
        permitted_tool_name_list=["text_summarizer", "data_analyser", "document_checker"]
    ),
ParallelAgent 会自动启动所有子智能体,进行并行计算,并最终返回所有任务的结果。
1.3.2. 同一智能体并行执行(并发)
如果您需要使同一个智能体并行运行多次,可以使用 start_batch_processing 方法来批量处理请求。以下是完整的可运行示例:
import asyncio

from pydantic import Field

from oxygent import MAS, Config, OxyRequest, oxy
from oxygent.utils.env_utils import get_env_var

Config.set_agent_llm_model("default_llm")

oxy_space = [
    oxy.HttpLLM(
        name="default_llm",
        api_key=get_env_var("DEFAULT_LLM_API_KEY"),
        base_url=get_env_var("DEFAULT_LLM_BASE_URL"),
        model_name=get_env_var("DEFAULT_LLM_MODEL_NAME"),
        llm_params={
            "temperature": 0.7,
            "max_tokens": 512,
            "chat_template_kwargs": {"enable_thinking": False},
        },
        semaphore=200,
    ),
    oxy.ReActAgent(
        name="master_agent",
        is_master=True,
        llm_model="default_llm",
        semaphore=200,
        timeout=100,
    ),
]


async def main():
    async with MAS(oxy_space=oxy_space) as mas:
        outs = await mas.start_batch_processing(["Hello!"] * 10, return_trace_id=True) #并行10次
        print(outs)


if __name__ == "__main__":
    asyncio.run(main())
1.3.3 说明
start_batch_processing:该方法接收一个包含多个请求的列表,异步并行执行所有请求,并返回结果。如果您希望处理多次相同的请求或不同的请求,可以通过这个方法快速进行批量处理。semaphore:这是用来控制并发的参数。通过设置适当的并发数,您可以灵活控制系统的资源消耗,避免过多的并行请求导致性能瓶颈。return_trace_id=True:返回每个请求的 trace ID,便于追踪请求的执行过程和结果。
2. 多智能体系统设置
2.1 提供响应元数据
如何获取智能体原始输出?
OxyGent提供了非常丰富的参数供您自定义智能体的工作模式,
如果您希望获取智能体的原始输出,只需将 trust_mode 设置为 True。启用信任模式后,智能体会直接返回工具的执行结果,而不是对其进行额外的处理或解析。
    oxy.ReActAgent(
        name="trust_agent",
        desc="a time query agent with trust mode enabled",
        tools=["time"],
        llm_model="default_llm",
        trust_mode=True,  # enable trust mode
        is_master=True,
    ),
例如,启用信任模式时,返回的原始输出可能如下所示:
trust mode output: Tool [get_current_time] execution result: {
  "timezone": "Asia/Shanghai",
  "datetime": "2025-07-24T20:26:19+08:00",
  "is_dst": false
}
如果开启了trust_mode,对于框架可以捕获的异常,或进行错误重试,否则ReActAgent会将错误上报。
2.1.1完整的可运行样例
以下是可运行的完整代码示例:
import asyncio
from oxygent import MAS, oxy
from oxygent.utils.env_utils import get_env_var

oxy_space = [
    # LLM configuration
    oxy.HttpLLM(
        name="default_llm",
        api_key=get_env_var("DEFAULT_LLM_API_KEY"),
        base_url=get_env_var("DEFAULT_LLM_BASE_URL"),
        model_name=get_env_var("DEFAULT_LLM_MODEL_NAME"),
        llm_params={"temperature": 0.01},
        semaphore=4,
    ),
    # time tool
    oxy.StdioMCPClient(
        name="time",
        params={
            "command": "uvx",
            "args": ["mcp-server-time", "--local-timezone=Asia/Shanghai"],
        },
    ),
    # normal mode ReActAgent
    oxy.ReActAgent(
        name="normal_agent",
        desc="a time query agent with trust mode disabled",
        tools=["time"],
        llm_model="default_llm",
        trust_mode=False,  # disable trust mode
    ),
    # trust mode ReActAgent
    oxy.ReActAgent(
        name="trust_agent",
        desc="a time query agent with trust mode enabled",
        tools=["time"],
        llm_model="default_llm",
        trust_mode=True,  # enable trust mode
        is_master=True,
    ),
]


async def main():
    async with MAS(oxy_space=oxy_space) as mas:
        query = "What is the current time"

        print("=== normal mode test ===")
        normal_result = await mas.call("normal_agent", {"query": query})
        print(f"normal mode output: {normal_result}")

        print("\n=== trust mode test ===")
        trust_result = await mas.call("trust_agent", {"query": query})
        print(f"trust mode output: {trust_result}")


if __name__ == "__main__":
    asyncio.run(main())
2.2 处理查询和提示词
如何自定义处理传递给子智能体的提示词?
在较为复杂的 MAS 系统中,您可能需要更新提示词,以防关键信息在智能体(Agent)之间传递时丢失。
OxyGent 支持通过外部方法处理提示词。例如,如果您在提示词中包含了文件内容,并希望确保每个 Agent 都能读取完整的提示词,可以使用 update_query 方法在查询中传递提示词。
2.2.1 示例:更新提示词
def update_query(oxy_request: OxyRequest):
    user_query = oxy_request.get_query(master_level=True)
    current_query = oxy_request.get_query()
    oxy_request.set_query(
        f"user query is {user_query}\ncurrent query is {current_query}"
    )
    return oxy_request
在上述代码中,我们通过 update_query 方法合并了 user_query 和 current_query,并将其设置为新的查询内容。
2.2.2 将更新方法应用于智能体
然后,您需要将 update_query 方法传递给 Agent 的输入处理函数 func_process_input 中,使得每个 Agent 都能使用自定义的处理逻辑:
    oxy.ReActAgent(
        name="file_agent",
        desc="A tool that can operate the file system",
        tools=["file_tools"],
        func_process_input=update_query, #假设您希望file_agent读到原始文件
    ),
    oxy.ReActAgent(
        name="time_agent",
        desc="A tool that can get current time",
        tools=["time_tools"], #您可以控制每个agent的处理方法
    ),
    # ...
2.2.3 完整的可运行样例
以下是可运行的完整代码示例:
import asyncio

from oxygent import MAS, oxy, Config, OxyRequest
from oxygent.utils.env_utils import get_env_var
import prompts
import tools

Config.set_agent_llm_model("default_llm")

def update_query(oxy_request: OxyRequest):
    user_query = oxy_request.get_query(master_level=True)
    current_query = oxy_request.get_query()
    oxy_request.set_query(
        f"user query is {user_query}\ncurrent query is {current_query}"
    )
    return oxy_request

oxy_space = [
    oxy.HttpLLM(
        name="default_llm",
        api_key=get_env_var("DEFAULT_LLM_API_KEY"),
        base_url=get_env_var("DEFAULT_LLM_BASE_URL"),
        model_name=get_env_var("DEFAULT_LLM_MODEL_NAME"),
        llm_params={"temperature": 0.01},
        semaphore=4,
        timeout=240,
    ),
    oxy.StdioMCPClient(
        name="time_tools",
        params={
            "command": "uvx",
            "args": ["mcp-server-time", "--local-timezone=Asia/Shanghai"],
        },
    ),
    tools.file_tools,
    oxy.ReActAgent(
        name="file_agent",
        desc="A tool that can operate the file system",
        tools=["file_tools"],
        func_process_input=update_query,
    ),
    oxy.ReActAgent(
        name="time_agent",
        desc="A tool that can get current time",
        tools=["time_tools"],
    ),
    oxy.ChatAgent(
        name="text_summarizer",
        desc="A tool that can summarize markdown text",
        prompt=prompts.text_summarizer_prompt,
        func_process_input=update_query,
    ),
    oxy.ChatAgent(
        name="data_analyser",
        desc="A tool that can summarize echart data",
        prompt=prompts.data_analyser_prompt,
        func_process_input=update_query,
    ),
    oxy.ChatAgent(
        name="document_checker",
        desc="A tool that can find problems in document",
        prompt=prompts.document_checker_prompt,
        func_process_input=update_query,
    ),
    oxy.ParallelAgent(
        name="analyzer",
        desc="A tool that analyze markdown document",
        permitted_tool_name_list=["text_summarizer", "data_analyser", "document_checker"],
        func_process_input=update_query,
    ),
    oxy.ReActAgent(
        name="master_agent",
        is_master=True,
        sub_agents=["file_agent","time_agent","analyzer"],
    ),
]

async def main():
    async with MAS(oxy_space=oxy_space) as mas:
        await mas.start_web_service(
            first_query="Hello!"
        )


if __name__ == "__main__":
    asyncio.run(main())
2.3 处理LLM和智能体输出
如何处理智能体输出?
OxyGent 默认使用一个简单的 JSON 解析器来处理智能体的输出。在默认状态下,Agent 的工具调用等指令性输出格式如下:
{
    "think": "Your thinking (if analysis is needed)",
    "tool_name": "Tool name",
    "arguments": {
        "parameter_name": "parameter_value"
    }
}
如果您需要定制智能体的输出处理方式,可以采用以下方法。
2.3.1 设置LLM的输出格式:
大部分情况下,您可以在 prompts 中设置提示,以让 LLM 输出特定格式。
例如,您可以使用以下格式来指导 LLM 返回工具调用的输出:
SYSTEM_PROMPT = """
You are a helpful assistant that can use these tools:
${tools_description}

Choose the appropriate tool based on the user's question.
If no tool is needed, respond directly.
If answering the user's question requires multiple tool calls, call only one tool at a time. After the user receives the tool result, they will provide you with feedback on the tool call result.

Important instructions:
1. When you have collected enough information to answer the user's question, please respond in the following format:
<think>Your thinking (if analysis is needed)</think>
Your answer content
2. When you find that the user's question lacks conditions, you can ask the user back, please respond in the following format:
<think>Your thinking (if analysis is needed)</think>
Your question to the user
3. When you need to use a tool, you must only respond with the exact JSON object format below, nothing else:
{
    "think": "Your thinking (if analysis is needed)",
    "tool_name": "Tool name",
    "arguments": {
        "parameter_name": "parameter_value"
    }
}

After receiving the tool's response:
1. Transform the raw data into a natural conversational response
2. The answer should be concise but rich in content
3. Focus on the most relevant information
4. Use appropriate context from the user's question
5. Avoid simply repeating the raw data

Please only use the tools explicitly defined above.
"""
2.3.2 设置LLM的输出解析器:
oxy.ReActAgent 支持在 func_parse_llm_response 中传入自定义的输出解析器。
例如,在 OxyGent 的默认设置中,JSON 格式的输出会被视为工具调用指令。如果您希望仅在 tool_name 合法时才尝试调用工具,而其他情况将 JSON 视为普通文本处理,可以自定义解析器,如下所示:
import json
import yaml
import xml.etree.ElementTree as ET
from oxy.schemas import LLMResponse, LLMState

def json_parser(ori_response: str) -> LLMResponse:
    try:
        data = json.loads(ori_response)

        # 只有当 data 是 dict 且存在非空 tool_name 才触发工具调用(换成您的要求)
        if isinstance(data, dict) and data.get("tool_name"):
            return LLMResponse(
                state=LLMState.TOOL_CALL,
                output=data,
                ori_response=ori_response
            )

        # 其他 JSON(包括数组或普通对象)一律当作回答文本返回
        return LLMResponse(
            state=LLMState.ANSWER,
            output=data,
            ori_response=ori_response
        )

    except json.JSONDecodeError as e:
        return LLMResponse(
            state=LLMState.ERROR_PARSE,
            output=f"Invalid JSON: {e}",
            ori_response=ori_response
        )
然后,您可以将该解析器传入 oxy.ReActAgent:
    oxy.ReActAgent(
        name="json_agent",
        desc="A tool that can convert plaintext into json text",
        func_parse_llm_response=json_parser, # 关键方法
    ),
2.3.3 在MAS中进行处理:
OxyGent 还支持使用外部方法对 oxy.Response 进行处理。例如,您可以自定义输出格式:
def format_output(oxy_response: OxyResponse) -> OxyResponse:
    oxy_response.output = "Answer: " + oxy_response.output
    return oxy_response
然后将该处理方法注入到对应的 Agent 中:
    oxy.ReActAgent(
        name="master_agent",
        sub_agents=["time_agent", "file_agent", "math_agent"],
        is_master=True,
        func_format_output=format_output, #关键方法
        timeout=100,
        llm_model="default_llm",
    ),
2.3.4 说明
func_parse_llm_response:用于将 LLM 的输出进行自定义解析。可以根据工具调用结果或普通文本的需求进行处理。func_format_output:该方法用于自定义oxy.Response的输出格式,帮助您控制最终结果的呈现方式。
2.4 反思重做模式
如何让智能体进行反思?
2.4.1 使用ReActAgent进行反思
oxy.ReActAgent支持传入反思函数进行反思。在未达到最大反思次数的情况下,Agent能够根据反思结果进行重做,直到返回要求的结果。
反思函数的形式非常自由,您可以要求对于特定的疑问返回特定的回答,或是要求过滤部分回答。如果反思结果不为None,Agent将根据反思进行重做:
def custom_reflexion(response: str, oxy_request: OxyRequest) -> str:
    """Custom reflexion function to evaluate response quality.

    Args:
        response (str): The agent's response to evaluate
        query (str): The original user query
        oxy_request: The current request context

    Returns:
        tuple[bool, str]: (is_acceptable, reflection_message)
    """
    # Basic checks from default implementation
    if not response or len(response.strip()) < 5:
        return "The response is too short or empty. Please provide a more detailed and helpful answer."

    # Custom business logic checks
    if "hello" in oxy_request.get_query().lower():
        # For greeting queries, expect friendly response
        if not any(word in response.lower() for word in ["hello", "hi", "hey", "greetings", "welcome"]):
            return "This is a greeting. Please respond in a more friendly and welcoming manner."

    if "math" in oxy_request.get_query().lower() or "calculate" in oxy_request.get_query().lower():
        # For math queries, expect numerical content
        if not any(char.isdigit() for char in response):
            return "This seems to be a math-related question but your answer doesn't contain any numbers. Please provide a numerical answer or calculation."

    if "explain" in oxy_request.get_query().lower():
        # For explanation requests, expect detailed responses
        if len(response.split()) < 20:
            return "The user asked for an explanation, but your response is too brief. Please provide a more detailed explanation."

    # Check for common unhelpful responses
    unhelpful_phrases = [
        "i don't know",
        "i can't help",
        "sorry, i cannot",
        "i'm not sure",
        "not possible"
    ]

    if any(phrase in response.lower() for phrase in unhelpful_phrases):
        return "Your response seems unhelpful. Please try to provide a more constructive answer or suggest alternative solutions."

    return None
反思函数可以嵌套,如果您希望对数学计算做更严格的反思,比如让Agent输出详细的步骤,可以采取如下方法:
def math_reflexion(response: str, oxy_request: OxyRequest) -> str:
    """Specialized reflexion function for mathematical problems."""
    # First apply basic checks
    basic_msg = custom_reflexion(response, oxy_request)
    if basic_msg:
        return basic_msg

    # Math-specific checks
    if any(word in oxy_request.get_query().lower() for word in ["calculate", "compute", "solve", "math", "equation"]):
        # Expect step-by-step solution
        if "step" not in response.lower() and "=" not in response:
            return "For mathematical problems, please provide a step-by-step solution showing your work."

    return None
反思需要指定oxy.ReActAgent执行。值得注意的是,如果您要让Master Agent输出反思后的结果,需要为每一层添加反思。
    oxy.ReActAgent(
        name="math_agent",
        desc="A specialized agent for mathematical problems with advanced reflexion",
        llm_model="default_llm",
        func_reflexion=math_reflexion, # 关键参数
        max_react_rounds=30, # 指定最大重做次数
        # ...
    ),
    # Master agent that coordinates others
    oxy.ReActAgent(
        name="master_agent",
        sub_agents=["basic_agent", "smart_agent", "math_agent"],
        is_master=True,
        llm_model="default_llm",
        func_reflexion=math_reflexion,
        # ...
    ),
2.4.2 使用流进行反思
我们提供了流oxy.Reflexion用于一般任务的反思,oxy.MathReflexion用于计算任务的反思或验算。您可以使用以下的方法调用:
    Reflexion(
        name="general_reflexion",
        worker_agent="worker_agent", # 工作智能体
        reflexion_agent="reflexion_agent", # 反思智能体
        evaluation_template="...", # 反思模板
        max_reflexion_rounds=3, # 反思轮数
    ),

    MathReflexion(
        name="math_reflexion",
        worker_agent="worker_agent", # 工作智能体
        reflexion_agent="reflexion_agent", # 反思智能体
        evaluation_template="...", # 反思模板
        max_reflexion_rounds=3, # 反思轮数
    ),
2.4.3 使用工作流进行反思
在一些情况下,您可能希望使用一个智能体而不是固定的方法进行反思。此时您可以指定一个oxy.ChatAgent或其他类型的Agent进行反思:
    # Reflexion Agent - responsible for evaluating answer quality
    oxy.ChatAgent(
        name="reflexion_agent",
        desc="Reflexion agent responsible for evaluating answer quality and providing improvement suggestions",
        llm_model="default_llm",
    ),
您可以使用一个工作流管理反思过程。以下展示了利用查询更新进行反思的全流程:
# Reflexion Workflow Core Logic
async def reflexion_workflow(oxy_request: OxyRequest):
    """
    Workflow implementing external reflexion process:
    1. Get user query
    2. Let worker_agent generate initial answer
    3. Let reflexion_agent evaluate answer quality
    4. If unsatisfactory, provide improvement suggestions and regenerate
    5. Return final satisfactory answer
    """

    # Step 1: 获取原始查询
    user_query = oxy_request.get_query(master_level=True)
    print(f"=== User Query ===\n{user_query}\n")

    max_iterations = 3
    current_iteration = 0

    while current_iteration < max_iterations:
        current_iteration += 1
        print(f"=== Reflexion Round {current_iteration} ===")

        # Step 2: 执行
        worker_resp = await oxy_request.call(
            callee="worker_agent",
            arguments={"query": user_query}
        )
        worker_answer = worker_resp.output
        print(f"Worker Answer:\n{worker_answer}\n")

        # Step 3: 输入要反思的内容
        evaluation_query = f"""
Please evaluate the quality of the following answer:

Original Question: {user_query}

Answer: {worker_answer}

Please return evaluation results in the following format:
Evaluation Result: [Satisfactory/Unsatisfactory]
Evaluation Reason: [Specific reason]
Improvement Suggestions: [If unsatisfactory, provide specific improvement suggestions]
"""

        reflexion_resp = await oxy_request.call(
            callee="reflexion_agent",
            arguments={"query": evaluation_query}
        )
        reflexion_result = reflexion_resp.output
        print(f"Reflexion Evaluation:\n{reflexion_result}\n")

        # Step 4: 获取反思结果
        if "Satisfactory" in reflexion_result and "Unsatisfactory" not in reflexion_result:
            print("=== Reflexion Complete, Answer Quality Satisfactory ===")
            return f"Final answer optimized through {current_iteration} rounds of reflexion:\n\n{worker_answer}"

        # Step 5: 使用反思结果更新查询
        improvement_suggestion = ""
        lines = reflexion_result.split('\n')
        for line in lines:
            if "Improvement Suggestions" in line:
                improvement_suggestion = line.split(":", 1)[-1].strip()
                break

        if improvement_suggestion:
            user_query = f"{oxy_request.get_query(master_level=True)}\n\nPlease note the following improvement suggestions: {improvement_suggestion}"
            print(f"Updated query with improvement suggestions:\n{user_query}\n")

    # 如果重做次数用尽,返回当前最好结果
    print(f"=== Reached maximum iterations ({max_iterations}), returning current best answer ===")
    return f"Answer after {max_iterations} rounds of reflexion attempts:\n\n{worker_answer}"
最后您需要使用oxy.WorkFlowAgent管理反思过程:
    oxy.WorkflowAgent(
        name="general_reflexion_agent",
        desc="Workflow agent that optimizes answer quality through external reflexion",
        sub_agents=["worker_agent", "reflexion_agent"],
        func_workflow=reflexion_workflow,
        llm_model="default_llm",
    ),
3. 多模态操作
3.1 使用多模态智能体
如何使用多模态?
OxyGent 当前版本支持图片和视频的多模态输入。通过多模态,您可以将图像和视频等附件作为输入,结合文本进行处理,从而实现更丰富的交互。
3.1.1 配置多模态模型
首先,您需要声明您的多模态模型,特别是需要设置 is_multimodal_supported 为 True,以启用多模态支持:
oxy.HttpLLM(
    name="default_vlm",
    api_key=get_env_var("DEFAULT_VLM_API_KEY"),
    base_url=get_env_var("DEFAULT_VLM_BASE_URL"),
    model_name=get_env_var("DEFAULT_VLM_MODEL_NAME"),
    llm_params={"temperature": 0.6, "max_tokens": 2048},
    max_pixels=10000000,  # 设置最大像素大小
    is_multimodal_supported=True,  # 开启多模态支持
    is_convert_url_to_base64=True,  # 如果需要,将 URL 转换为 base64 格式
    semaphore=4,
)
3.1.2 传入附件
一旦启用多模态支持,您可以通过 attachments 参数(或可视化界面)传入附件,OxyGent 会自动处理这些附件并将其与查询一起传递:
async with MAS(oxy_space=oxy_space) as mas:
    """单轮对话"""
    payload = {
        "query": "What is it in the picture?",  # 提问
        "attachments": [get_env_var("DEFAULT_IMAGE_URL")],  # 传入图片附件
    }
    oxy_response = await mas.chat_with_agent(payload=payload)
    print("LLM: ", oxy_response.output)
在这个例子中,attachments 包含了图片的 URL,OxyGent 会自动从 URL 中获取图片并进行处理。
3.1.3 完整的可运行示例
以下是一个完整的可运行示例,展示了如何配置和使用多模态输入:
import asyncio

from oxygent import MAS, Config, OxyRequest, OxyResponse, oxy
from oxygent.utils.env_utils import get_env_var

# 设置 LLM 模型
Config.set_agent_llm_model("default_vlm")


async def master_workflow(oxy_request: OxyRequest) -> OxyResponse:
    # 调用 generate_agent 处理图片描述
    generate_agent_oxy_response = await oxy_request.call(
        callee="generate_agent",
        arguments={
            "query": oxy_request.get_query(),
            "attachments": oxy_request.arguments.get("attachments", []),
            "llm_params": {"temperature": 0.6},
        },
    )
    # 调用 discriminate_agent 判断图片描述是否准确
    discriminate_agent_oxy_response = await oxy_request.call(
        callee="discriminate_agent",
        arguments={
            "query": str(generate_agent_oxy_response.output),
            "attachments": oxy_request.arguments.get("attachments", []),
        },
    )
    return f"generate_agent output: {generate_agent_oxy_response.output} \n discriminate_agent output: {discriminate_agent_oxy_response.output}"


# 初始化 oxy_space
oxy_space = [
    oxy.HttpLLM(
        name="default_vlm",
        api_key=get_env_var("DEFAULT_VLM_API_KEY"),
        base_url=get_env_var("DEFAULT_VLM_BASE_URL"),
        model_name=get_env_var("DEFAULT_VLM_MODEL_NAME"),
        llm_params={"temperature": 0.6, "max_tokens": 2048},
        max_pixels=10000000,  # 设置最大像素数
        is_multimodal_supported=True,  # 开启多模态支持
        is_convert_url_to_base64=True,  # 将图片 URL 转换为 base64 格式
        semaphore=4,
    ),
    oxy.ChatAgent(
        name="generate_agent",
        prompt="You are a helpful assistant. Please describe the content of the image in detail.",
    ),
    oxy.ChatAgent(
        name="discriminate_agent",
        prompt="Please determine whether the following text is a description of the content of the image. If it is, please output 'True', otherwise output 'False'.",
    ),
    oxy.Workflow(
        name="master_agent",
        is_master=True,
        permitted_tool_name_list=["generate_agent", "discriminate_agent"],
        func_workflow=master_workflow,
    ),
]

# 主函数
async def main():
    # 多模态输入
    async with MAS(oxy_space=oxy_space) as mas:
        """单轮对话"""
        payload = {
            "query": "What is it in the picture?",
            "attachments": [get_env_var("DEFAULT_IMAGE_URL")],  # 传入图片 URL
        }
        oxy_response = await mas.chat_with_agent(payload=payload)
        print("LLM: ", oxy_response.output)


if __name__ == "__main__":
    asyncio.run(main())
3.1.4 说明
is_multimodal_supported=True:启用多模态支持,允许您将图像、视频等附件作为输入。attachments:用于传入图像或其他附件。您可以提供 URL 或 Base64 编码的文件。get_env_var("DEFAULT_IMAGE_URL"):获取环境变量中定义的图像 URL,您也可以根据需要传入其他图像资源。
3.2 导入附件
如何导入附件?
OxyGent支持导入简单的附件。OxyGent能够接受的附件格式包括:
.txt文件.jpg/.jpeg/.png/.mp4文件(需要配合多模态模型).xlsx/.xls/.docx/.doc文件(需要提供能够访问文件的工具或环境,或者在preset_tools/file_tools中启用默认阅读器).pdf文件(需要提供能够访问文件的工具或环境).csv/.tsv文件.py/.md/.json文件(需要提供能够访问文件的工具或环境,或者在preset_tools/file_tools中启用默认阅读器)
您可以使用以下方式导入附件:
3.2.1 使用A2A风格导入附件
您可以使用A2A风格的query导入附件的路径或url:
    a2a_parts = [
        {
            "part": {
                "content_type": "path",
                "data": "/Users/zhangzeyu.35/local_oxygent/rebuttal.docx",
            }
        },
        {
            "part": {
                "content_type": "text/plain",
                "data": "Please introduce the content of the document.",
            }
        },
    ]

    async with MAS(oxy_space=oxy_space) as mas:
        payload = {
            "query": a2a_parts, }           # a2a style
        oxy_resp = await mas.chat_with_agent(payload=payload)
        print("LLM:\n", oxy_resp.output)
3.2.2 使用attachment导入附件
您也可以使用单独的attachment导入附件,目前前端使用此方法导入。
async with MAS(oxy_space=oxy_space) as mas:
        payload = {
            "query": "Please introduce the content of the document.",
            "attachments": ["sample.docx"],  } # Anthropic style
        oxy_resp = await mas.chat_with_agent(payload=payload)
        print("LLM:\n", oxy_resp.output)
对于小文件(默认2MB以下),OxyGent支持传递元数据;如果您需要对大文件进行处理,可能需要配置您的云服务并增加url解析工具。
4. 执行流
4.1 创建工作流
如何使用工作流?
4.1.1 简单实例
OxyGent支持以外部工作流控制智能体的工作次序。您可以通过在工作流中使用 call 方法指定智能体的任务执行顺序。例如,在 demo.py 中,我们使用工作流确保智能体在计算 Pi 之前首先查询时间:
async def workflow(oxy_request: OxyRequest):
    short_memory = oxy_request.get_short_memory()
    print("--- History record --- :", short_memory)
    master_short_memory = oxy_request.get_short_memory(master_level=True)
    print("--- History record-User layer --- :", master_short_memory)
    print("user query:", oxy_request.get_query(master_level=True))
    await oxy_request.send_message("msg")
    oxy_response = await oxy_request.call(
        callee="time_agent",
        arguments={"query": "What time is it now in Asia/Shanghai?"},
    )
    print("--- Current time --- :", oxy_response.output)
    oxy_response = await oxy_request.call(
        callee="default_llm",
        arguments={
            "messages": [
                {"role": "system", "content": "You are a helpful assistant."},
                {"role": "user", "content": "Hello!"},
            ],
            "llm_params": {"temperature": 0.6},
        },
    )
    print(oxy_response.output)
    import re

    numbers = re.findall(r"\d+", oxy_request.get_query())
    if numbers:
        n = numbers[-1]
        oxy_response = await oxy_request.call(callee="calc_pi", arguments={"prec": n})
        return f"Save {n} positions: {oxy_response.output}"
    else:
        return "Save 2 positions: 3.14, or you could ask me to save how many positions you want."
在此工作流中,我们先查询时间,再进行文档分析,并最终保存计算结果。工作流需要一个上层的 Agent 进行执行,您可以使用 oxy.WorkflowAgent 来控制工作流:
    oxy.WorkflowAgent(
        name="math_agent",
        desc="A tool for pi query",
        sub_agents=["time_agent"],
        tools=["my_tools"],
        func_workflow=workflow,
        is_retain_master_short_memory=True,
    ),
完整的样例请参考demo.py。
4.1.2 构建 Workflow 流程
4.1.2.1 构建 Workflow
Workflow是一种非常精细的方法,下面将以如何自定义处理提示词?中的例子入手,逐步写一个可以运行的workflow。
(1). 假设的工作需求
假设我们的工作需求是:
为用户输入的文档写一段总结,并将带时间的总结存储在
output.txt文件里。
可以将工作流拆分为如下步骤:
- 获取时间(不需要原始输入)
- 分析文档(需要用户原始输入)
- 写入文件(需要前两步的输出)
(2).将步骤转化为代码
- 获取时间(不需要原始输入)
    time_resp = await oxy_request.call(
        callee="time_agent", arguments={"query": "现在的北京时间是?"}
    )
    current_time = time_resp.output
- 分析文档(需要用户原始输入)
    # 使用get_query获取用户原始输入
    user_query = oxy_request.get_query(master_level=True)

    analysis_resp = await oxy_request.call(
        callee="analyzer",
        arguments={"query": f"请分析文档:{user_query}"},
    )
    analysis_result = analysis_resp.output
- 写入文件(需要前两步的输出)
final_content = f"时间:{current_time}\n\n分析结果:{analysis_result}"
    file_resp = await oxy_request.call(
        callee="file_agent",
        arguments={"query": f"请将以下内容写入 output.txt:\n{final_content}"},
    )
4.1.2.2 包装一个workflow
将上述步骤按照顺序包装成一个工作流,需要传入一个 OxyRequest 对象作为参数:
async def workflow(oxy_request: OxyRequest):
    # Step 1: 获取时间
    time_resp = await oxy_request.call(
        callee="time_agent", arguments={"query": "现在的北京时间是?"}
    )
    current_time = time_resp.output
    print("== 当前时间 ==\n", current_time)

    # 后续的steps...
    return "流程完成,output.txt 写入成功"
4.1.2.3 指定一个调用workflow的agent
通过 oxy.WorkflowAgent 控制整个工作流,并指定其调用的 subagent 和所需工具:
    oxy.WorkflowAgent(
        name="workflow_agent",
        desc="时间获取 + 文档分析 + 写入文件的工作流",
        sub_agents=["file_agent", "time_agent", "analyzer"],
        func_workflow=workflow,
        llm_model="default_llm",
    ),
    oxy.ReActAgent(
        name="master_agent",
        is_master=True,
        sub_agents=["workflow_agent"],
    ),
预期的输出结果是:
时间:当前的北京时间是2025年7月25日09:27:01。

分析结果:Based on the parallel execution of the tasks, the following summary has been compiled and stored in the `output.txt` file:

---

**当前时间:2023-12-05 10:00:00**

**总结:**

...

---

以上总结已存储在`output.txt`文件中。
4.1.3 完整的可运行样例
以下是可运行的完整代码示例:
import asyncio
from oxygent import MAS, OxyRequest, Config, oxy
from oxygent.utils.env_utils import get_env_var
import tools
import prompts

# 设置 LLM 模型
Config.set_agent_llm_model("default_llm")

# Workflow 核心逻辑
async def workflow(oxy_request: OxyRequest):
    # Step 1: 获取时间
    time_resp = await oxy_request.call(
        callee="time_agent", arguments={"query": "现在的北京时间是?"}
    )
    current_time = time_resp.output
    print("== 当前时间 ==\n", current_time)

    # Step 2: 获取用户原始 markdown 文件 query
    user_query = oxy_request.get_query(master_level=True)

    # Step 3: 分析文档(保留原始 query 作为文件路径)
    analysis_resp = await oxy_request.call(
        callee="analyzer",
        arguments={"query": f"请分析文档:{user_query}"},
    )
    analysis_result = analysis_resp.output
    print("== 分析结果 ==\n", analysis_result)

    # Step 4: 写入文件
    final_content = f"时间:{current_time}\n\n分析结果:{analysis_result}"
    file_resp = await oxy_request.call(
        callee="file_agent",
        arguments={"query": f"请将以下内容写入 output.txt:\n{final_content}"},
    )
    print("== 写入文件结果 ==\n", file_resp.output)
    return "流程完成,output.txt 写入成功"

oxy_space = [
    oxy.HttpLLM(
        name="default_llm",
        api_key=get_env_var("DEFAULT_LLM_API_KEY"),
        base_url=get_env_var("DEFAULT_LLM_BASE_URL"),
        model_name=get_env_var("DEFAULT_LLM_MODEL_NAME"),
        llm_params={"temperature": 0.01},
        semaphore=4,
        timeout=240,
    ),
    oxy.StdioMCPClient(
        name="time_tools",
        params={
            "command": "uvx",
            "args": ["mcp-server-time", "--local-timezone=Asia/Shanghai"],
        },
    ),
    tools.file_tools,
    oxy.ReActAgent(
        name="file_agent",
        desc="A tool that can operate the file system",
        tools=["file_tools"],
    ),
    oxy.ReActAgent(
        name="time_agent",
        desc="A tool that can get current time",
        tools=["time_tools"],
    ),
    oxy.ChatAgent(
        name="text_summarizer",
        desc="A tool that can summarize markdown text",
        prompt=prompts.text_summarizer_prompt,
    ),
    oxy.ChatAgent(
        name="data_analyser",
        desc="A tool that can summarize echart data",
        prompt=prompts.data_analyser_prompt,
    ),
    oxy.ChatAgent(
        name="document_checker",
        desc="文档校验器",
        prompt=prompts.document_checker_prompt,
    ),
    oxy.ParallelAgent(
        name="analyzer",
        desc="A tool that analyze markdown document",
        permitted_tool_name_list=["text_summarizer", "data_analyser", "document_checker"],
    ),
    oxy.WorkflowAgent(
        name="workflow_agent",
        desc="时间获取 + 文档分析 + 写入文件的工作流",
        sub_agents=["file_agent", "time_agent", "analyzer"],
        func_workflow=workflow,
        llm_model="default_llm",
    ),
    oxy.ReActAgent(
        name="master_agent",
        is_master=True,
        sub_agents=["workflow_agent"],
    ),
]


async def main():
    async with MAS(oxy_space=oxy_space) as mas:
        await mas.start_web_service(
            first_query="Hello!"
        )

if __name__ == "__main__":
    asyncio.run(main())
4.2 创建自定义流
如何使用预设的流(Flow)?
对于开发者来说,将常用的工作流封装为预设的 [流 (Flow)] 是非常必要的。
您可以通过继承 BaseFlow 类来创建自己的流,并在 _execute() 方法中实现流的具体工作逻辑。流接受一个 oxy.OxyRequest 作为输入,并以 oxy.Response 作为输出,因此能够在 MAS 系统中像正常的 Agent 一样运行,不会发生兼容性问题。
下面以 OxyGent 预设的 PlanAndSolve 流为例,演示如何创建一个流。
4.2.1 数据类
1. Plan(计划)
- 作用:定义未来需要执行的步骤。
- 核心字段:
steps: List[str]:排序后的任务步骤。
class Plan(BaseModel):
    """Plan to follow in future."""
    steps: List[str] = Field(
        description="different steps to follow, should be in sorted order"
    )
2. Response(直接响应)
- 作用:当不需要再执行工具时,直接返回答案给用户。
- 核心字段:
response: str
class Response(BaseModel):
    """Response to user."""
    response: str
3. Action(动作)
- 作用:封装下一步的动作。
- 核心字段:
action: Union[Response, Plan]:可以是一个新的计划,也可以是直接的响应。
class Action(BaseModel):
    """Action to perform."""
    action: Union[Response, Plan] = Field(
        description="Action to perform. If you want to respond to user, use Response. "
                    "If you need to further use tools to get the answer, use Plan."
    )
4.2.2 主流程类
PlanAndSolve(主流程类):继承自 BaseFlow
核心属性:
planner_agent_name:负责生成计划的 agent。executor_agent_name:执行每个步骤的 agent。enable_replanner:是否允许在执行中动态调整计划。pydantic_parser_planner:将 LLM 输出解析成 Plan。pydantic_parser_replanner:将 LLM 输出解析成 Action。max_replan_rounds:最大迭代次数。
class PlanAndSolve(BaseFlow):
    """Plan-and-Solve Prompting Workflow."""

    max_replan_rounds: int = Field(30, description="Maximum retries for operations.")

    planner_agent_name: str = Field("planner_agent", description="planner agent name")
    pre_plan_steps: List[str] = Field(None, description="pre plan steps")

    enable_replanner: bool = Field(False, description="enable replanner")

    executor_agent_name: str = Field(
        "executor_agent", description="executor agent name"
    )

    llm_model: str = Field("default_llm", description="LLM model name for fallback")

    func_parse_planner_response: Optional[Callable[[str], LLMResponse]] = Field(
        None, exclude=True, description="planner response parser"
    )

    pydantic_parser_planner: PydanticOutputParser = Field(
        default_factory=lambda: PydanticOutputParser(output_cls=Plan),
        description="planner pydantic parser",
    )

    func_parse_replanner_response: Optional[Callable[[str], LLMResponse]] = Field(
        None, exclude=True, description="replanner response parser"
    )

    pydantic_parser_replanner: PydanticOutputParser = Field(
        default_factory=lambda: PydanticOutputParser(output_cls=Action),
        description="replanner pydantic parser",
    )

    def __init__(self, **kwargs):
        super().__init__(**kwargs)

        self.add_permitted_tools(
            [
                self.planner_agent_name,
                self.executor_agent_name,
            ]
        )

    async def _execute(self, oxy_request: OxyRequest) -> OxyResponse:
        pass
4.2.3 工作流逻辑
1. 规划阶段:
- 调用
planner_agent→ 生成Plan.steps
2. 执行阶段:
- 逐个执行
steps,每个步骤由executor_agent完成。
3. 重规划(可选):
- 如果开启
enable_replanner,执行后可动态调整计划。
4. 结束阶段:
- 如果步骤执行完毕或
replanner返回Response,输出最终结果。
对应的代码逻辑如下:
    async def _execute(self, oxy_request: OxyRequest) -> OxyResponse:
        plan_str = ""
        past_steps = ""
        original_query = oxy_request.get_query()
        plan_steps = self.pre_plan_steps
        for current_round in range(self.max_replan_rounds + 1):
            if (current_round == 0) and (self.pre_plan_steps is None):
                if self.pydantic_parser_planner:
                    query = self.pydantic_parser_planner.format(original_query)
                else:
                    query = original_query.copy()

                oxy_response = await oxy_request.call(
                    callee=self.planner_agent_name,
                    arguments={"query": query},
                )
                if self.pydantic_parser_planner:
                    plan_response = self.pydantic_parser_planner.parse(
                        oxy_response.output
                    )
                else:
                    plan_response = self.func_parse_planner_response(
                        oxy_response.output
                    )
                plan_steps = plan_response.steps
                plan_str = "\n".join(
                    f"{i + 1}. {step}" for i, step in enumerate(plan_steps)
                )

            task = plan_steps[0]
            task = plan_steps[0]
            task_formatted = f"""
                We have finished the following steps: {past_steps}
                The current step to execute is:{task}
                You should only execute the current step, and do not execute other steps in our plan. Do not execute more than one step continuously or skip any step.
            """.strip()
            excutor_response = await oxy_request.call(
                callee=self.executor_agent_name,
                arguments={"query": task_formatted},
            )
            past_steps = (
                past_steps
                + "\n"
                + f"task:{task}, execute task result:{excutor_response.output}"
            )
            if self.enable_replanner:
                # Replanning logic
                query = """
                The target of user is:
                {input}

                The origin plan is:
                {plan}

                We have finished the following steps:
                {past_steps}

                Please update the plan considering the mentioned information. If no more operation is supposed, Use **Response** to answer the user.
                Otherwise, please update the plan. The plan should only contain the steps to be executed, and do not
                include the past steps or any other information.
                """.format(input=original_query, plan=plan_str, past_steps=past_steps)
                if self.pydantic_parser_replanner:
                    query = self.pydantic_parser_replanner.format(query)

                replanner_response = await oxy_request.call(
                    callee=self.replanner_agent_name,
                    arguments={
                        "query": query,
                    },
                )
                if self.pydantic_parser_replanner:
                    plan_response = self.pydantic_parser_replanner.parse(
                        replanner_response.output
                    )
                else:
                    plan_response = self.func_parse_planner_response(
                        replanner_response.output
                    )

                if hasattr(plan_response.action, "response"):
                    return OxyResponse(
                        state=OxyState.COMPLETED,
                        output=plan_response.action.response,
                    )
                else:
                    plan_response = plan_response.action
                    plan_steps = plan_response.steps
                    plan_str = "\n".join(
                        f"{i + 1}. {step}" for i, step in enumerate(plan_steps)
                    )
            else:
                plan_steps = plan_steps[1:]

                if 0 == len(plan_steps):
                    return OxyResponse(
                        state=OxyState.COMPLETED,
                        output=excutor_response.output,
                    )

        plan_steps = plan_response.steps
        plan_str = "\n".join(f"{i + 1}. {step}" for i, step in enumerate(plan_steps))
        user_input_with_results = f"Your objective was this:{oxy_request.get_query()}\n---\nFor the following plan:{plan_str}"
        temp_messages = [
            Message.system_message(
                "Please answer user questions based on the given plan."
            ),
            Message.user_message(user_input_with_results),
        ]
        oxy_response = await oxy_request.call(
            callee=self.llm_model,
            arguments={"messages": [msg.to_dict() for msg in temp_messages]},
        )
        return OxyResponse(
            state=OxyState.COMPLETED,
            output=oxy_response.response,
        )
4.2.4 执行流
OxyGent 支持像 Agent 一样调用 Flow。您可以通过以下方式调用您的自定义流:
    oxy.PlanAndSolve(
        # 对于自定义 flow,按照您的方法调用
        name="master_agent",
        is_discard_react_memory=True,
        llm_model="default_llm",
        is_master=True,
        planner_agent_name="planner_agent",
        executor_agent_name="executor_agent",
        enable_replanner=False,
        timeout=100,
    )
4.3 获取记忆和重新生成
如何修改记忆节点?
OxyGent支持读取记忆及重新执行功能。您可以在chat_with_agent方法中指定要访问的节点,您可以修改节点内容并从被修改的节点开始重新运行系统。
async def main():
    async with MAS(oxy_space=oxy_space) as mas:
        # 第一次运行
        payload = {
            "query": "Get what time it is in America/New_York and save in `log.txt` under `./local_file`",
        }
        oxy_response = await mas.chat_with_agent(payload=payload)
        from_trace_id = oxy_response.oxy_request.current_trace_id
        print("LLM: ", oxy_response.output, from_trace_id)
假设在这一次运行中,您想要修改以下节点的内容:
2025-07-29 23:21:45,029 - INFO - i4oNVqcwQjz6KVg6 - 6m8jX6xmQF4xXzpo - user <<< master_agent <<< time_agent <<< get_current_time  : {
  "timezone": "America/New_York",
  "datetime": "2025-07-30T02:21:45-04:00",
  "is_dst": true
}
您可以记录需要修改的节点编号,并在payload中使用如下方法修改:
async def main():
    async with MAS(oxy_space=oxy_space) as mas:
        # 第二次运行
        payload = {
            "query": "Get what time it is in America/New_York and save in `log.txt` under `./local_file`",
            "from_trace_id": "",
            "reference_trace_id": "i4oNVqcwQjz6KVg6",  #trace编号(可选)
            "restart_node_id": "6m8jX6xmQF4xXzpo", #节点编号(必要)
            "restart_node_output": """{
                "timezone": "America/New_York",
                "datetime": "2024-07-21T05:32:43-04:00",
                "is_dst": true
            }""", #要修改的输出(注意格式最好保持一致)
        }
        oxy_response = await mas.chat_with_agent(payload=payload)
        from_trace_id = oxy_response.oxy_request.current_trace_id
        print("LLM: ", oxy_response.output, from_trace_id)
重新运行之后,系统的输出将会是您设定的2024-07-21T05:32:43-04:00。
2025-07-29 23:22:46,506 - INFO - qgk2gECEE7GFiB7X - ci4fmTXrvn35YSTV - user <<< master_agent <<< default_llm  Wrote by user: {
                "timezone": "America/New_York",
                "datetime": "2024-07-21T05:39:43-04:00",
                "is_dst": true
            }
...
LLM:  The current time in America/New_York has been successfully recorded as 05:39 AM, and the information has been saved in the file `./local_file/log.txt`. qgk2gECEE7GFiB7X
您也可以在可视化界面进行详细调试和重新运行。
4.4 创建分布式系统
如何分布式运行智能体?
OxyGent MAS支持操作简单的分布式调用。您可以使用oxy.SSEOxyGent连接远端运行的agent,能够和本地agent以相同的方式运行。
考虑如何自定义处理提示词?中的例子入手,我们可以创建一一个分布式的获取时间的智能体:
# app_time_agent.py
from oxygent import MAS, Config, oxy
from oxygent.utils.env_utils import get_env_var

Config.set_app_name("app-time")
Config.set_server_port(8082) # 替换为实际端口

oxy_space = [
    oxy.HttpLLM(
        name="default_name",
        api_key=get_env_var("DEFAULT_LLM_API_KEY"),
        base_url=get_env_var("DEFAULT_LLM_BASE_URL"),
        model_name=get_env_var("DEFAULT_LLM_MODEL_NAME"),
        llm_params={"temperature": 0.01},
        semaphore=4,
    ),
    oxy.StdioMCPClient(
        name="time",
        params={
            "command": "uvx",
            "args": ["mcp-server-time", "--local-timezone=Asia/Shanghai"],
        },
    ),
    oxy.ReActAgent(
        name="time_agent",
        desc="A tool for time query",
        is_master=True,
        tools=["time"],
        llm_model="default_name",
        timeout=10,
    ),
]


async def main():
    async with MAS(oxy_space=oxy_space) as mas:
        await mas.start_web_service(first_query="What time is it now?")


if __name__ == "__main__":
    import asyncio

    asyncio.run(main())
然后您可以使用oxy.SSEOxyGent替代原有的time_agent:
    oxy.SSEOxyGent(
        name="time_agent",
        desc="Remote time query agent",
        server_url="http://127.0.0.1:8082", # 替换为app_time_agent.py实际所在的位置
    ),
如果您使用localhost,可以使用以下的简单脚本启动分布式服务:
#!/bin/bash

set -e

RED='\033[0;31m'
GREEN='\033[0;32m'
NC='\033[0m' # No Color

log() {
    echo -e "${GREEN}[$(date +'%Y-%m-%d %H:%M:%S')]${NC} $1"
}

error() {
    echo -e "${RED}[$(date +'%Y-%m-%d %H:%M:%S')] ERROR:${NC} $1"
}

cleanup() {
    log "Cleaning up processes..."
    jobs -p | xargs -r kill 2>/dev/null || true
    wait 2>/dev/null || true
    log "Cleanup complete"
}

trap cleanup EXIT INT TERM

start_service() {
    local cmd=$1
    local name=$2
    local wait_time=${3:-5}

    log "Starting $name..."
    $cmd &
    local pid=$!

    sleep $wait_time

    # Check if the process is still running
    if kill -0 $pid 2>/dev/null; then
        log "$name started successfully (PID: $pid)"
        return 0
    else
        error "$name failed to start"
        return 1
    fi
}

main() {
    log "Starting distributed services..."

    start_service "python -m app_time_agent" "TimeAgent" 5
    start_service "python -m your_master_agent" "MasterAgent" 5

    log "All services have been started"
    log "Press Ctrl+C to stop all services"

    wait
}

main "$@"
4.4.1 完整的可运行样例
以下是可运行的完整代码示例(启动需配合上面的bash脚本):
import asyncio

from oxygent import MAS, oxy, Config, OxyRequest
from oxygent.utils.env_utils import get_env_var
import prompts
import tools

Config.set_agent_llm_model("default_llm")

def update_query(oxy_request: OxyRequest):
    user_query = oxy_request.get_query(master_level=True)
    current_query = oxy_request.get_query()
    oxy_request.set_query(
        f"user query is {user_query}\ncurrent query is {current_query}"
    )
    return oxy_request

oxy_space = [
    oxy.HttpLLM(
        name="default_llm",
        api_key=get_env_var("DEFAULT_LLM_API_KEY"),
        base_url=get_env_var("DEFAULT_LLM_BASE_URL"),
        model_name=get_env_var("DEFAULT_LLM_MODEL_NAME"),
        llm_params={"temperature": 0.01},
        semaphore=4,
        timeout=240,
    ),
    oxy.StdioMCPClient(
        name="time_tools",
        params={
            "command": "uvx",
            "args": ["mcp-server-time", "--local-timezone=Asia/Shanghai"],
        },
    ),
    tools.file_tools,
    oxy.ReActAgent(
        name="file_agent",
        desc="A tool that can operate the file system",
        tools=["file_tools"],
        func_process_input=update_query,
    ),
    oxy.SSEOxyGent(
        name="time_agent",
        desc="Remote time query agent",
        server_url="http://127.0.0.1:8082",
    ),
    oxy.ChatAgent(
        name="text_summarizer",
        desc="A tool that can summarize markdown text",
        prompt=prompts.text_summarizer_prompt,
        func_process_input=update_query,
    ),
    oxy.ChatAgent(
        name="data_analyser",
        desc="A tool that can summarize echart data",
        prompt=prompts.data_analyser_prompt,
        func_process_input=update_query,
    ),
    oxy.ChatAgent(
        name="document_checker",
        desc="A tool that can find problems in document",
        prompt=prompts.document_checker_prompt,
        func_process_input=update_query,
    ),
    oxy.ParallelAgent(
        name="analyzer",
        desc="A tool that analyze markdown document",
        permitted_tool_name_list=["text_summarizer", "data_analyser", "document_checker"],
        func_process_input=update_query,
    ),
    oxy.ReActAgent(
        name="master_agent",
        is_master=True,
        sub_agents=["file_agent","time_agent","analyzer"],
    ),
]


async def main():
    async with MAS(oxy_space=oxy_space) as mas:
        await mas.start_web_service(
            first_query="Hello!"
        )


if __name__ == "__main__":
    asyncio.run(main())
六、模型能力增强
1. RAG功能增强
1.1 检索增强生成(RAG)
如何进行检索增强生成?
OxyGent支持通过knowledge参数向prompts注入知识。以下将展示一个最简单的RAG示例:
如果您还没有学习如何处理提示词,建议阅读如何自定义处理提示词?。
您需要先创建一个retrieval方法:
def retrieval(query):
    # 替换为实际的数据库
    return "\n".join(["knowledge1", "knowledge2", "knowledge3"])
然后,需要在update_query中将检索的知识进行注入:
def update_query(oxy_request: OxyRequest):
    current_query = oxy_request.get_query()

    def retrieval(query):
        return "\n".join(["knowledge1", "knowledge2", "knowledge3"])

    oxy_request.arguments["knowledge"] = retrieval(current_query) # 关键方法
    return oxy_request
1.1.1 完整的可运行样例
以下是可运行的完整代码示例:
import asyncio

from oxygent import MAS, OxyRequest, oxy
from oxygent.utils.env_utils import get_env_var

INSTRUCTION = """
You are a helpful assistant and can use these tools:
${tools_description}

Experience in choosing tools:
${knowledge}

Select the appropriate tool based on the user's question.
If no tool is needed, reply directly.
If answering the user's question requires calling multiple tools, call only one tool at a time. After the user receives the tool result, they will give you feedback on the tool call result.

Important notes:
1. When you have collected enough information to answer the user's question, please respond in the following format:
<think>Your reasoning (if analysis is needed)</think>
Your response content
2. When you find that the user's question lacks certain conditions, you can ask them back. Please respond in the following format:
<think>Your reasoning (if analysis is needed)</think>
Your follow-up question to the user
3. When you need to use a tool, you must respond **only** with the following exact JSON object format, and nothing else:

{
    "think": "Your reasoning (if analysis is needed)",
    "tool_name": "Tool name",
    "arguments": {
        "Parameter name": "Parameter value"
    }
}
"""


def update_query(oxy_request: OxyRequest):
    current_query = oxy_request.get_query()

    def retrieval(query):
        return "\n".join(["knowledge1", "knowledge2", "knowledge3"])

    oxy_request.arguments["knowledge"] = retrieval(current_query)
    return oxy_request


oxy_space = [
    oxy.HttpLLM(
        name="default_llm",
        api_key=get_env_var("DEFAULT_LLM_API_KEY"),
        base_url=get_env_var("DEFAULT_LLM_BASE_URL"),
        model_name=get_env_var("DEFAULT_LLM_MODEL_NAME"),
        llm_params={"temperature": 0.01},
        semaphore=4,
    ),
    oxy.ReActAgent(
        name="master_agent",
        is_master=True,
        llm_model="default_llm",
        timeout=100,
        prompt=INSTRUCTION,
        func_process_input=update_query,
    ),
]


async def main():
    async with MAS(oxy_space=oxy_space) as mas:
        await mas.start_web_service(
            first_query="This is an example for rag. Please modify it according to the specific needs",
        )

if __name__ == "__main__":
    asyncio.run(main())
1.2 生成训练样本
如何使用 OxyGent 训练我的模型?
OxyGent 支持通过自动存储所有中间节点的数据,来帮助您生成 SFT训练样本,并支持 GRPO 多智能体联合训练的采样过程。由于训练过程较为复杂,本文档将提供一个最简单的生成 SFT 样本的例子,您可以使用这些样本进行下一轮训练。
1.2.1 步骤 1:从数据库抽取历史调用记录
首先,您需要从数据库中检索历史的调用记录。以下是使用 es_client 从 Elasticsearch 中检索数据的示例:
es_response = await mas.es_client.search(...) # 替换为真实数据库
1.2.2 步骤 2:构建样本结构
然后,您需要将数据构建为训练样本的格式:
{
  "node_id": "...",
  "input": { "messages": [...] },
  "output": "..."  # 模型给出的回复
}
1.2.3 步骤 3:使用 sft_agent 自动打标签
通过 sft_agent,您可以自动打上标签并生成训练数据。
1.2.4 步骤 4:写入训练集文件
最后,将生成的训练样本写入文件以供后续使用:
with open(to_jsonl_path, "w") as f:
    f.write("\n".join(datasets))  # 保存的文件可以直接用于下一轮训练
1.2.5 完整的可运行样例
以下是可运行的完整代码示例:
"""Demo for using OxyGent with SFT data review agent."""

import json
import os
import re

from oxygent import MAS, oxy


sft_prompt = """
    **Your Task**
    Act as a strict **SFT data reviewer**. Each time, you will evaluate **a single sample**, which includes:

    ```json
    {
    "node_id": "9rZhhWFhiZkrnUMf",
    "input": "<A JSON string containing a messages array: each item has a role and content>",
    "output": "<Candidate assistant reply>"
    }
    ```

    You need to parse the `messages` inside `input`, and based on the *system instructions* and *user queries*, determine whether the `output` qualifies as a high-quality SFT positive sample.

    **Evaluation Criteria** (All must be satisfied to mark as "keep")

    1. **Follows system instructions / tool invocation rules**
    - If the system requires calling a specific agent or outputting JSON, the `output` must follow.
    - If the system explicitly prohibits directly answering professional questions but the `output` does so → discard.
    2. **Fulfills user needs and is factually correct**
    - The response must be logically sound, factually accurate, properly formatted, and polite.
    3. **No violations / low-quality content**
    - No privacy breaches, offensive language, or meaningless filler.
    4. **Clear and fluent language**
    - The language should be smooth and clear (in a single language or with reasonable multilingual use).

    **Output Format**
    Output a single JSON object **only** (no extra text):

    ```json
    {
    "node_id": "9rZhhWFhiZkrnUMf",
    "keep": true | false,          // true = suitable for SFT; false = discard
    "reason": "<within 20 characters>"
    }
    ```

    Example `reason`s: `"Follows flow"`, `"Missing agent call"`, `"Irrelevant answer"`, `"Format error"`.

    **Additional Notes**

    - Only evaluate the current sample; do not consider cross-sample context.
    - If the `input` cannot be parsed, return `"keep": false`, `"reason": "Invalid input"`.
    - Your output **must strictly follow the JSON format** above, or it will be treated as invalid.
"""
oxy_space = [
    oxy.HttpLLM(
        name="default_llm",
        api_key=os.getenv("DEFAULT_LLM_API_KEY"),
        base_url=os.getenv("DEFAULT_LLM_BASE_URL"),
        model_name=os.getenv("DEFAULT_LLM_MODEL_NAME"),
        semaphore=4,
        is_save_data=False,
    ),
    oxy.ChatAgent(
        name="sft_agent",
        prompt=sft_prompt,
        llm_model="default_llm",
        is_save_data=False,
    ),
]


async def get_llm_node_data(mas):
    es_response = await mas.es_client.search(
        mas.name + "_node",
        {
            "query": {"term": {"node_type": "llm"}},
            "size": 32,
            "sort": [{"create_time": {"order": "desc"}}],
        },
    )
    app_node_data = []
    datas = []
    if es_response["hits"]["hits"]:
        for data in es_response["hits"]["hits"]:
            item = data["_source"]
            llm_input = json.loads(item["input"])
            app_node_data.append(f"""{{
                "node_id": "{item["node_id"]}",
                "input": {llm_input["arguments"]},
                "output": "{item["output"]}"
            }}""")
            datas.append(
                json.dumps(llm_input["arguments"]["messages"], ensure_ascii=False)
            )
    return app_node_data, datas


def parse_results(to_jsonl_path, datas, results):
    datasets = []
    pattern = r"```json\s*(.*?)\s*```"
    for data, result in zip(datas, results):
        match = re.search(pattern, result, re.DOTALL)
        if match:
            json_str = match.group(1)
            rs = json.loads(json_str)
            if rs.get("keep", False):
                datasets.append(data)
    print(
        f"Filter out {len(datas) - len(datasets)} samples and keep {len(datasets)} samples."
    )
    with open(to_jsonl_path, "w") as f:
        f.write("\n".join(datasets))
    print(f"The SFT training data has been generated to the directory {to_jsonl_path}.")


async def main():
    to_jsonl_path = "./sft_dataset.jsonl"
    async with MAS(oxy_space=oxy_space) as mas:
        app_node_data, datas = await get_llm_node_data(mas)
        results = await mas.start_batch_processing(app_node_data)
        parse_results(to_jsonl_path, datas, results)


if __name__ == "__main__":
    import asyncio

    asyncio.run(main())
2. 工具增强
2.1 注册一个工具
如何注册一个本地工具?
在OxyGent中,建议通过function hub注册本地工具。您也可可以使用MCP注册工具,具体参考使用MCP自定义工具或使用MCP开源工具。
2.1.1 步骤 1:创建工具文件
首先,您可以创建一个新的 tools.py 文件,并使用 FunctionHub 注册一个工具包:
# in tools.py
import os
from pydantic import Field
from oxygent.oxy import FunctionHub

# 注册工具包
file_tools = FunctionHub(name="file_tools")
2.1.2 步骤 2:注册工具
接下来,您可以使用 @file_tools.tool() 装饰器将 Python 函数注册为工具,例如,您可以注册一些基础的文件操作工具:
# in tools.py
@file_tools.tool(
    description="Create a new file or completely overwrite an existing file with new content. Use with caution as it will overwrite existing files without warning. Handles text content with proper encoding. Only works within allowed directories."
)
def write_file(
    path: str = Field(description=""), content: str = Field(description="")
) -> str:
    with open(path, "w", encoding="utf-8") as file:
        file.write(content)
    return "Successfully wrote to " + path

# other tools...
2.1.3 步骤 3:将工具添加到 Agent
将注册的工具放入 Agent 可以调用的权限域中。Agent 将根据工具的描述自动调用相应工具:
# in execute file
oxy_space = [
    oxy.HttpLLM(
        name="default_llm",
        api_key=get_env_var("DEFAULT_LLM_API_KEY"),
        base_url=get_env_var("DEFAULT_LLM_BASE_URL"),
        model_name=get_env_var("DEFAULT_LLM_MODEL_NAME"),
        llm_params={"temperature": 0.01},
        semaphore=4,
        timeout=240,
    ),
    tools.file_tools,
    oxy.ReActAgent(
        name="master_agent",
        is_master=True,
        tools=["file_tools"],
        llm_model="default_llm",
    ),
]
2.1.4 完整的可运行样例
以下是完整的代码示例,包括如何创建工具并将其集成到 Agent 中:
import asyncio

from oxygent import MAS, oxy
from oxygent.utils.env_utils import get_env_var
import prompts
import tools

oxy_space = [
    oxy.HttpLLM(
        name="default_llm",
        api_key=get_env_var("DEFAULT_LLM_API_KEY"),
        base_url=get_env_var("DEFAULT_LLM_BASE_URL"),
        model_name=get_env_var("DEFAULT_LLM_MODEL_NAME"),
        llm_params={"temperature": 0.01},
        semaphore=4,
        timeout=240,
    ),
    tools.file_tools, # 工具包可以整个放入oxy_space
    oxy.ReActAgent(
        name="master_agent",
        is_master=True,
        tools=["file_tools"], # 在这里放入工具
        llm_model="default_llm",
    ),
]


async def main():
    async with MAS(oxy_space=oxy_space) as mas:
        await mas.start_web_service(
            first_query="Hello!"
        )


if __name__ == "__main__":
    asyncio.run(main())
2.1.5 工具文件示例
以下是 tools.py 文件中注册的一些常用工具:
import os

from pydantic import Field

from oxygent.oxy import FunctionHub

file_tools = FunctionHub(name="file_tools")

@file_tools.tool(
    description="Create a new file or completely overwrite an existing file with new content. Use with caution as it will overwrite existing files without warning. Handles text content with proper encoding. Only works within allowed directories."
)
def write_file(
    path: str = Field(description=""), content: str = Field(description="")
) -> str:
    with open(path, "w", encoding="utf-8") as file:
        file.write(content)
    return "Successfully wrote to " + path


@file_tools.tool(
    description="Read the content of a file. Returns an error message if the file does not exist."
)
def read_file(path: str = Field(description="Path to the file to read")) -> str:
    if not os.path.exists(path):
        return f"Error: The file at {path} does not exist."
    with open(path, "r", encoding="utf-8") as file:
        return file.read()


@file_tools.tool(
    description="Delete a file. Returns a success message if the file is deleted, or an error if the file does not exist."
)
def delete_file(path: str = Field(description="Path to the file to delete")) -> str:
    if not os.path.exists(path):
        return f"Error: The file at {path} does not exist."
    os.remove(path)
    return f"Successfully deleted the file at {path}"
2.2 使用MCP开源工具
如何使用开源MCP工具?
在使用MCP的过程中,您可能希望使用外部工具。OxyGent支持如同本地工具一样集成外部的开源工具,您可以使用基于MCP协议的oxy.StdioMCPClient引入外部工具。
例如,如果您希望使用工具获取时间,您可以使用mcp-server-time工具:
oxy.StdioMCPClient(
    name="time_tools",
    params={
        "command": "uvx",
        "args": ["mcp-server-time", "--local-timezone=Asia/Shanghai"],
    },
),
2.2.1 完整的可运行样例
以下是可运行的完整代码示例:
import asyncio

from oxygent import MAS, oxy, Config
from oxygent.utils.env_utils import get_env_var
import prompts
import tools

Config.set_agent_llm_model("default_llm")

oxy_space = [
    oxy.HttpLLM(
        name="default_llm",
        api_key=get_env_var("DEFAULT_LLM_API_KEY"),
        base_url=get_env_var("DEFAULT_LLM_BASE_URL"),
        model_name=get_env_var("DEFAULT_LLM_MODEL_NAME"),
        llm_params={"temperature": 0.01},
        semaphore=4,
        timeout=240,
    ),
    oxy.StdioMCPClient(
        name="time_tools",
        params={
            "command": "uvx",
            "args": ["mcp-server-time", "--local-timezone=Asia/Shanghai"],
        },
    ),
    tools.file_tools,
    oxy.ReActAgent(
        name="master_agent",
        is_master=True,
        tools=["file_tools","time_tools"],
    ),
]


async def main():
    async with MAS(oxy_space=oxy_space) as mas:
        await mas.start_web_service(
            first_query="Hello!"
        )


if __name__ == "__main__":
    asyncio.run(main())
2.3 使用MCP自定义工具
如何使用自定义MCP工具?
在OxyGent中,您可以通过本地模式或SSE模式注册自定义MCP工具。
2.3.1. 本地MCP工具
首先,创建一个 mcp_servers 文件夹,并在 /mcp_servers/my_tools.py 文件中使用 FastMCP 声明一个 MCP 实例:
# mcp_servers/my_tools.py
import math
from decimal import Decimal, getcontext

from mcp.server.fastmcp import FastMCP
from pydantic import Field

# Initialize FastMCP server instance
mcp = FastMCP()
接着,您可以使用类似 FunctionHub 的方式注册工具:
# mcp_servers/my_tools.py
@mcp.tool(description="Index tool")
def power(
    n: int = Field(description="base"), m: int = Field(description="index", default=2)
) -> int:
    return math.pow(n, m)
# other tools...
然后,您可以在 oxy_space 中调用这些工具:
    oxy.StdioMCPClient(
        name="my_tools",
        params={
            "command": "uv",
            "args": ["--directory", "./mcp_servers", "run", "my_tools.py"],
        },
    ),
2.3.2. 完整的可运行样例
以下是完整的代码示例,展示了如何在 OxyGent 中使用多个 LLM 和一个 Agent,并调用自定义的 MCP 工具:
"""Demo for using OxyGent with multiple LLMs and an agent."""

import asyncio

from oxygent import MAS, oxy, Config
from oxygent.utils.env_utils import get_env_var
import prompts
import tools

Config.set_agent_llm_model("default_llm")

oxy_space = [
    oxy.HttpLLM(
        name="default_llm",
        api_key=get_env_var("DEFAULT_LLM_API_KEY"),
        base_url=get_env_var("DEFAULT_LLM_BASE_URL"),
        model_name=get_env_var("DEFAULT_LLM_MODEL_NAME"),
        llm_params={"temperature": 0.01},
        semaphore=4,
        timeout=240,
    ),
    oxy.StdioMCPClient(
        name="time_tools",
        params={
            "command": "uvx",
            "args": ["mcp-server-time", "--local-timezone=Asia/Shanghai"],
        },
    ),
    oxy.StdioMCPClient(
        name="my_tools",
        params={
            "command": "uv",
            "args": ["--directory", "./mcp_servers", "run", "my_tools.py"],
        },
    ),
    tools.file_tools,
    oxy.ReActAgent(
        name="master_agent",
        is_master=True,
        tools=["file_tools","time_tools","my_tools"],
    ),
]


async def main():
    async with MAS(oxy_space=oxy_space) as mas:
        await mas.start_web_service(
            first_query="Hello!"
        )


if __name__ == "__main__":
    asyncio.run(main())
#mcp_servers/my_tools.py
import math
from decimal import Decimal, getcontext

from mcp.server.fastmcp import FastMCP
from pydantic import Field

# Initialize FastMCP server instance
mcp = FastMCP()


@mcp.tool(description="Index tool")
def power(
    n: int = Field(description="base"), m: int = Field(description="index", default=2)
) -> int:
    return math.pow(n, m)


@mcp.tool(description="Pi tool")
def calc_pi(prec: int = Field(description="How many digits after the dot")) -> float:
    """
    Calculate pi using the Chudnovsky algorithm for high precision.

    This implementation uses the Chudnovsky algorithm, which converges very rapidly.
    Each term in the series provides approximately 8 decimal digits of precision.

    Args:
        prec: The number of decimal places to calculate

    Returns:
        float: The value of pi with the specified precision
    """
    getcontext().prec = prec
    x = 0
    for k in range(
        int(prec / 8) + 1
    ):  # Calculate the series: each iteration provides ~8 decimal digits of precision
        a = 2 * Decimal.sqrt(Decimal(2)) / 9801
        b = math.factorial(4 * k) * (1103 + 26390 * k)
        c = pow(math.factorial(k), 4) * pow(396, 4 * k)
        x = x + a * b / c
    return 1 / x

# ---------------------------------------------------------------

# Entry point: run the MCP server when script is executed directly
if __name__ == "__main__":
    mcp.run()
2.3.3. SSE MCP工具
如果需要使用SSE MCP工具,您可以在声明FastMCP对象时增加端口参数:
mcp = FastMCP("my_tools", port=9000)
然后您可以通过在sse_url中传入端口的方式注册工具到OxyGent:
oxy.SSEMCPClient(
    name="my_tools",
    sse_url="http://127.0.0.1:9000/sse"
),
2.4 管理工具调用
如何管理智能体使用工具的行为?
在默认情况下,agent对工具的调用由内部的LLM负责,但是OxyGent提供了一系列参数帮助您管理agent调用工具的方案,以下是您可能用到的参数:
- 允许/禁止智能体使用工具
    oxy.LocalAgent(
        name="time_agent",
        desc="A tool that can get current time",
        tools=["time_tools"], # 允许使用
        except_tools=["math_tools"], #禁止使用
    ),
- 管理智能体检索工具
    oxy.LocalAgent(
        name="time_agent",
        desc="A tool that can get current time",
        tools=["time_tools"],
        is_sourcing_tools = True, # 是否检索工具
        is_retain_subagent_in_toolset = True, # 是否将subagent放入工具集
        top_k_tools = 10; #检索返回的工具数量
        is_retrieve_even_if_tools_scarce = True, # 是否在工具数量不足时保持检索
    ),


 被折叠的 条评论
为什么被折叠?
被折叠的 条评论
为什么被折叠?
 到【灌水乐园】发言


