


http://mengxx.blog.51cto.com/2502718/767085
android voice recognition,语音识别作为Service实现。 语音识别API在android.speech中 API大致分成应用端API和service端API
RecognizerIntent
顾名思义,在自己的程序中,需要语音识别了,发出这个intent,如果已经安装了google voice search应用,谷歌的activity,service就会跳出来帮你。 http://download.csdn.net/source/2591401有三个例子。 例子1基本就实现了这样一个应用。 例子1实际上很简单,就靠RecognizerIntent,intent发出后,相应的service会处理intent。 基本上是借鉴了google官方sample:http://developer.android.com/resources/articles/speech-input.html 和 http://developer.android.com/resources/samples/ApiDemos/src/com/example/android/apis/app/VoiceRecognition.html
(运行例子1的前提是,google voice search应用已经安装,这样确保Service已经安装了) 注意,需要微调程序中的RecognizerIntent的三个参数,可以得到不同的运行效果,简单,参考javadoc即可。
Intent intent = new Intent(RecognizerIntent.ACTION_WEB_SEARCH);
intent.putExtra(RecognizerIntent.EXTRA_LANGUAGE_MODEL,
RecognizerIntent.LANGUAGE_MODEL_FREE_FORM);
以上是最简单的方式,只需要RecognizerIntent一个类就搞定
重点内容
自己实现RecognitionService
如果要自己做一个识别引擎Service,是可以的。Android提供了RecognitionService抽象类 识别引擎作为Service存在,要实现这个抽象类. This RecognitionService class should be extended only in case you wish to implement a new speech recognizer.
Android SDK提供了一个sample VoiceRecognitionService extends RecognitionService,是一个假的引擎,识别结果固定为abc或者123。 这个引擎不读取麦克风,也不含麦克风dialog界面。稍候 在SpeechRecognizer处介绍如何使用这个假service.
RecognitionService比较朴素,提供三个方法:
复制代码
abstract void   onStartListening(Intent recognizerIntent, RecognitionService.Callback listener)
Notifies the service that it should start listening for speech. 开始识别,intent发过来了
abstract void   onStopListening(RecognitionService.Callback listener)
Notifies the service that it should stop listening for speech. 结束识别
abstract void   onCancel(RecognitionService.Callback listener)
Notifies the service that it should cancel the speech recognition. 取消识别
RecognitionService是无状态的,不能并行开始识别多个音频流,三个方法必须按照开始–>结束/取消,再开始–>结束/取消,这样顺序调用,否则报错。
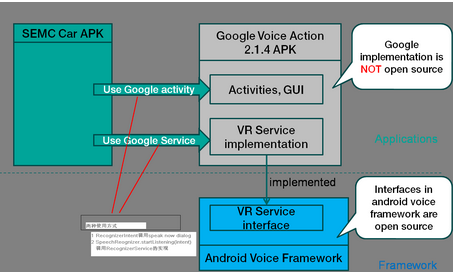
谷歌的Service实现,不开源
AOSP里面没有实现RecognitionService的代码。所以默认的AOSP编出来的android SDK都是不带语言识别Service的,SDK桌面的google search widget没有麦克风,就说明识别Service还没装。
google自己实现了RecognitionService,装了voicesearch 2.1.4之后(一般手机都已经预置),桌面的google search widget也会出现小麦克了点击小麦克出现”speak now”对话框。同时settings voice input output的识别引擎选择框会出现google的选项。谷歌的service叫 com.google.android.voicesearch.RecognitionService 这个程序也不开源,无法深度定制谷歌那个”speak now”对话框。
P.S. google的识别是基于网络的。 google voice search小应用client不开源,网络端更不开源,网络API尚未开放,但有些人已经研究出来了… refer to:
http://stackoverflow.com/questions/2080401/is-there-a-speech-to-text-api-by-google
https://github.com/taf2/speech2text
https://github.com/taf2/audiosplit
http://mikepultz.com/2011/03/accessing-google-speech-api-chrome-11 比较牛
vlingo virtual assistant也实现了RecognitionService,不开源
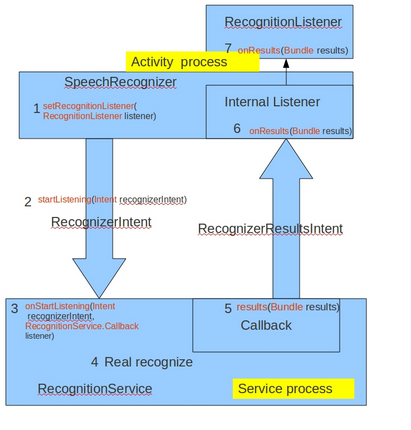
RecognitionService.Callback 的作用
上面三个方法都有一个参数是Callback类形。callback类是个二传手,被service调用,并通过ipc转发结果给RecognitionListener。
The RecognitionService.Callback class receives callbacks from the RecognitionService and forwards them to the RecognitionListener
RecognitionListener是用户自己进程中实现的,RecognitionService是在service进程中的,service没法直接调用listener,就通过callback类转发。
callback帮助自己做service的人处理了ipc,aidl等问题,挺好的。
SpeechRecognizer 使用service的
This class provides access to the speech recognition service. 给应用程序进程用的,方便对RecognitionService的访问
This class’s methods must be invoked only from the main application thread. 只有主应用线程中可以调用…为什么呢…可能因为service会弹出识别的dialog…?
Please note that the application must have RECORD_AUDIO permission to use this class. 程序必须有录音权限
packages/inputmethods/LatinIME/java/src/com/android/inputmethod/voice/VoiceInput.java 可以参考
例子3 MyStt3Activity也是个参考,但要给识别intent加一行,否则出现error 5
intent.putExtra(“calling_package”, “”);
在例子3中,按下speak按钮之后,程序用SpeechRecognizer.startListening(intent); 开启了麦克风等待用户说话,不会弹出google的“speak now”麦克风的dialog,直接说就行了。
如果此时settings里面设定默认engine为demo的com.example.android.voicerecognitionservice假引擎,则干脆不会读取麦克风,直接返回abc或者123的假结果。
我也试验了vlingo virtual assistant的引擎,也可以用。
多个RecognitionService实现并存,是允许的。不通过settings的默认设置,程序化指定Service,怎么做?todo intent.setClassName不行
RecognizerResultsIntent 略
开源SREC库,是nuance贡献给AOSP的
利用 srec 里面的动态插入语音标签功能( Voice Enrollment ) , 添加事先录好的普通话短语,之后就可以对其做语音识别了,
例子2 是调用SREC的,可以参考 (由于SREC的API为@Hide,玩转例子2需要点小技巧)
非google的风格的识别
最后,有的厂商自己搞voice framework,不走google android.speech的任何代码,从activity到intent到service到widget全都自己设计,也行。超出本文范围。
refer to:
http://blog.csdn.net/lzf_china/article/details/4510980
http://topic.csdn.net/u/20100817/15/bcc84f6f-1fec-4e73-9dbf-9ef595597926.html


 1318
1318


 被折叠的 条评论
为什么被折叠?
被折叠的 条评论
为什么被折叠?
 到【灌水乐园】发言


