


因为最近跑深度学习的实验,发现作者提供的算法是使用theano框架的,自己之前一直使用的是tensorflow框架,所以又安装了theano框架。安装theano过程中自己也遇到了不少坑,这里简单的总结一下,避免不必要的弯路。
1. 安装
1.1 在本地安装theano
其实安装theano网上有很多的方法,说是先安装各种包,顺序还不能安装错误,还需要安装numpy还有scipy之类的,看着很是吓人。
但其实了如果安装了Anaconda之后,再去安装theano其实也是非常的简单了,具体安装Anaconda等环境的搭建,可以参考我之前写的一篇文章,深度学习基本环境搭建(ubutu16+Anaconda+Pycharm+Tensorflow)这里也就不详细介绍如何安装Anaconda了。利用Anaconda安装theano也就一句代码就可以搞定
conda install theano
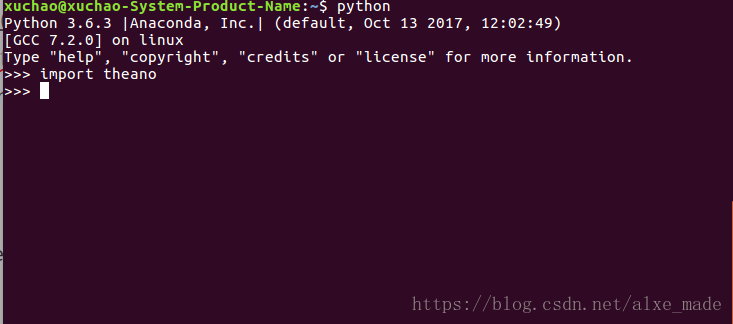
这样我们在控制台输入python,然后输入import theano,如果不报错表示安装成功。
1.2 在服务器上安装theano
theano在cpu上跑并不是很快,现在我们准备在服务器上在安装Theano, 这里默认已经安装好了cuda。cuda的安装网上教程很多,同样也是五花八门,由于服务器已经安装好了cuda,安装过程我就省略了。其实在服务器安装过程也是很简单的,这里注意一点,因为一个服务器集群中存在很多用户,所以安装都是在自己的用户下(非root用户),所以我们最好不要使用sudo命令,这样避免对整个环境造成影响。
安装过程类似,首先使用命令:
conda install theano
列举一下我安装的各个theano版本:
theano:  1.0.2
pygpu:  0.7.6
libgcc-ng:  7.2.0
...
然后我们需要配置一些环境,首先我们自己创建一个 .theanorc 文件。
首先我们进入根目录:
cd ~
然后:
vim .theanorc # 如果不存在该文件则会建立,不需要使用sudo命令!
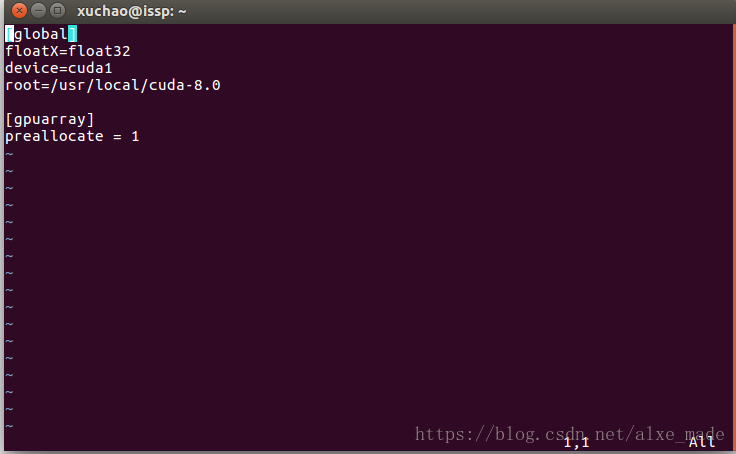
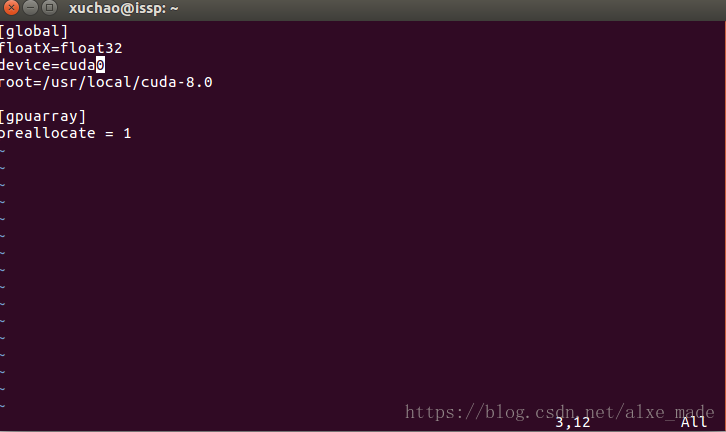
然后在 .theanorc 中添加配置如下:
[global]
floatX=float32
device=cuda1
root=/usr/local/cuda-8.0  # 这个是自己cuda的安装路径

[gpuarray]
preallocate = 1
其实我说的坑就是这里,因为网上好多设置GPU的时候将这里device=gpu ,这样的话就会导致错误比如类似这种,说是old GPU back-end。另外还有一些设置nvcc变量的。
...
ValueError: You are tring to use the old GPU back-end. It was removed from Theano. Use device=cuda* now. See for more information.
(py27) iMacvanQuinten:AI_Writer quintendewilde$ python -c "from theano.sandbox.cuda.dnn import dnn_available as d; print(d() or d.msg)"
Traceback (most recent call last)
...
其实哩,不能说是上面的device=gpu 错误,只能说Theano版本更新了,以前的不支持了。其实我们可以看一下Theano的发行版本就知道了,2017/08/09已经移除了device=gpu了。
2017/11/15: Release of Theano 1.0.0. Everybody is encouraged to update.
2017/10/30: Release of Theano 1.0.0rc1, new features and many bugfixes, final release to coming.
2017/10/16: Release of Theano 0.10.0beta4, new features and many bugfixes, release candidate to coming.
2017/09/28: IMPORTANT: MILA will stop developing Theano and the next release (renamed to 1.0) will be the last main release.
2017/09/20: Release of Theano 0.10.0beta3, new features and many bugfixes, release candidate to coming.
2017/09/07: Release of Theano 0.10.0beta2, new features and many bugfixes, release candidate to coming.
2017/08/09: Release of Theano 0.10.0beta1, many improvements and bugfixes, release candidate to coming.
Removed support for the old (device=gpu) backend. Use the new backend (device=cuda) for gpu computing. See Converting to the new gpu back end(gpuarray) for help with conversion.
2017/03/20: Release of Theano 0.9.0. Everybody is encouraged to update.
2017/03/13: Release of Theano 0.9.0rc4, with crash fixes and bug fixes.
2017/03/06: Release of Theano 0.9.0rc3, with crash fixes, bug fixes and improvements.
2017/02/27: Release of Theano 0.9.0rc2, with crash fixes, bug fixes and improvements.
2017/02/20: Release of Theano 0.9.0rc1, many improvements and bugfixes, final release to coming.
2017/01/24: Release of Theano 0.9.0beta1, many improvements and bugfixes, release candidate to coming.
2016/05/09: New technical report on Theano: Theano: A Python framework for fast computation of mathematical expressions. This is the new preferred reference.
2016/04/21: Release of Theano 0.8.2, adding support for CuDNN v5
...
那么我们的解决方式可以参考官网的API介绍,里面一段话说的很清楚了
你可以使用以下设备:
String value: either 'cpu', 'cuda', 'cuda0', 'cuda1', 'opencl0:0', 'opencl0:1', ...

Default device for computations. If 'cuda*, change the default to try to move computation to the GPU using CUDA libraries. If 'opencl*', the OpenCL libraries will be used. To let the driver select the device, use 'cuda' or 'opencl'. If we are not able to use the GPU, either we fall back on the CPU, or an error is raised, depending on the force_device flag.
另外有一些Theano config keys 也是被废除了, Converting to the new gpu back end(gpuarray)
The following Theano config keys sections don't have any effect on the new backend and should be removed:
1. nvcc.*
2. cuda.root
3. lib.cnmem (replace by gpuarray.preallocate)
Important: The default changed to be faster, but cause more memory fragmentation. To keep the speed and remove the fragmentation, use the flag gpuarray.preallocate=1 (or any value greater then 0, see the dot. To have the old default of Theano, use the flag: gpuarray.preallocate=-1
然而这样配置完了之后,我运行了theano的代码,并没与调用gpu. 我们还需要将CUDA的路径添加到环境变量中。参考这两篇文章Linux下非root用户安装Theano并配置GPU(以及集群上安装自己所需要的python依赖, Checking cuda for theano errors… #839
vim ~/.bashrc
然后添加代码:
export LD_LIBRARY_PATH=$LD_LIBRARY_PATH:/usr/local/cuda/lib64:/usr/local/cuda/
export PATH=$PATH:/usr/local/cuda/bin
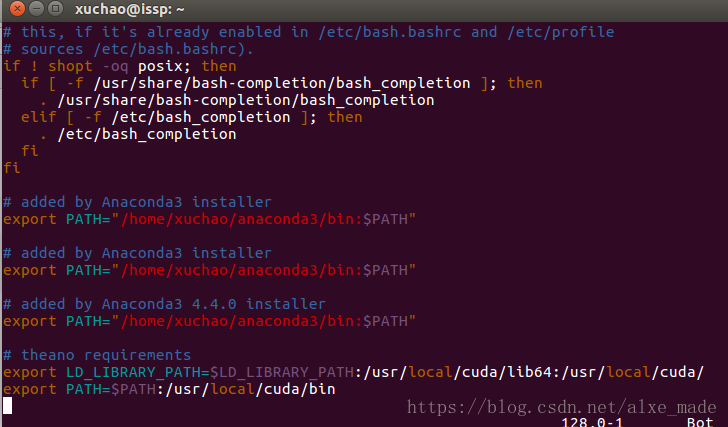
这样我们的环境算是搭建好了。
2. 测试
为了测试theano在cpu和gpu分别的表现,我们按照网上推荐的代码,测试Theano使用GPU并行计算,以验证环境搭建是否成功
首先我们创建一个test.py文件
添加如下内容:
from theano import function, config, shared, sandbox
import theano.tensor as T
import numpy
import time

vlen = 10 * 30 * 768  # 10 x #cores x # threads per core
iters = 1000

rng = numpy.random.RandomState(22)
x = shared(numpy.asarray(rng.rand(vlen), config.floatX))
f = function([], T.exp(x))
print(f.maker.fgraph.toposort())
t0 = time.time()
for i in range(iters):
    r = f()
t1 = time.time()
print("Looping %d times took %f seconds" % (iters, t1 - t0))
print("Result is %s" % (r,))
if numpy.any([isinstance(x.op, T.Elemwise) for x in f.maker.fgraph.toposort()]):
    print('Used the cpu')
else:
    print('Used the gpu')
然后保存文件。
2.1 使用cpu跑这个代码
首先我们更改 .theanorc 这个文件,将其中device=cpu,
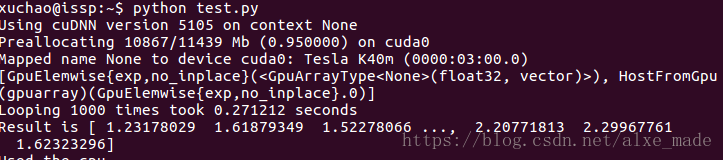
然后我们在终端输入命令: python test.py 测试结果如下:
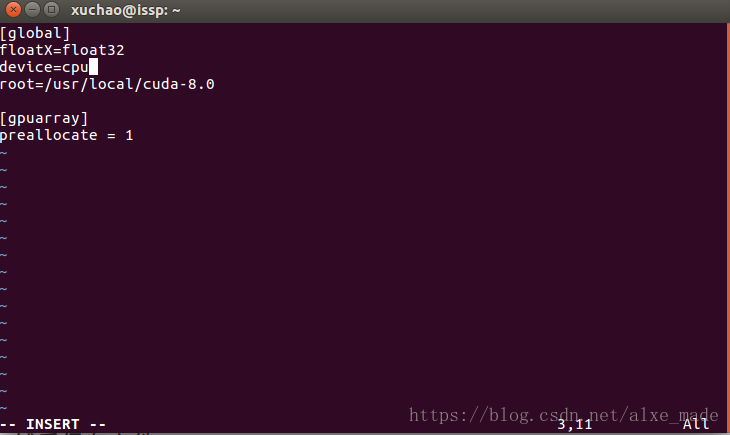
需要时间2.53s

2.2 使用gpu跑这个代码
首先我们更改 .theanorc 这个文件,将其中device=cuda0,
python test.py 测试结果如下:
需要时间0.27s
3. 展望
好像theano在去年已经不进行更新了,MILA will stop developing Theano,如何看待 Yoshua Bengio 宣布停止 Theano 维护与开发?经历了十个年头,已经完成了他的使命了,好多开发人员都转去开发其他框架了,比如tensorflow了。其实我只是取跑一个实验,咋就写了这么多了~~
4. 参考
- anaconda新建虚拟环境安装各个依赖包
- ImportError: cannot import name inplace_increment
- Anaconda找包,安装包时,遇到PackageNotFoundError: ''Package missing in current channels"
- ubuntu16.04安装lasagne
- python 无法加载downsample模型问题
- [python:cannot import name downsample](python:cannot import name downsample)


 367
367


 被折叠的 条评论
为什么被折叠?
被折叠的 条评论
为什么被折叠?
 到【灌水乐园】发言


