没有Kotlin基础的小伙伴先进这里↓
Koltin基础文章
Kotlin网络模型的实现↓
Kotlin网络模型的实现
1、项目开发为什么要用MVP
说到MVP就先来说一说MVC,其实MVC是一个伟大的一种模式,只不过随着项目越来越大,在Android中MVC就显得不太好用,Activity承载了太多,既承担view的责任又称但控制层的责任,有时候还捎带model的东西,违反了单一职责原则,项目比较大的话,如果使用MVC,Activity上千行代码是很常见的,MVP就应运而生

在开发的过程中,也不是说我们非得用MVP,架构模式没有必须用和不用,只有合适不合适,根据项目选用正确的架构模式,才是以为优秀的程序员做的事情,比如非常小的项目 就不需要用MVP,MVP的缺点要写好多接口和实现类比较麻烦,实现一个很小的一个项目用MVP就有点浪费时间。项目比较大,项目的模块类就比较多,所以用MVP就很容易实现分层和解耦,就相比较MVC来说比较容易维护
2、接口和实现类的设计
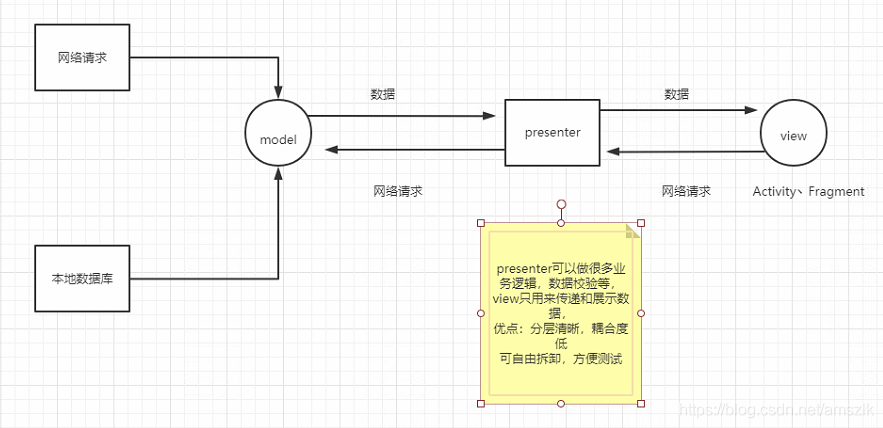
为了方便大家理解,画一张图

2.1、View层的实现
View层只负责数据的展示,并向Presenter层发出网络请求命令,接收Presenter层的数据回调
BaseActivity
//P extends BasePresenter          KT      P:IBasePresenter
//P extends BasePresenter &Serializable   KT  class BaseActivity<P>:AppCompatActivity() where P:IBasePresenter,P:Serializable
 abstract  class BaseActivity<P:IBasePresenter>:AppCompatActivity(){
     lateinit var presenter:P
    override fun onCreate(savedInstanceState: Bundle?) {
        super.onCreate(savedInstanceState)
        presenter=createP()
        setContentView(getLayoutID())
    }

    abstract fun getLayoutID(): Int

    abstract fun createP(): P

    override fun onDestroy() {
        super.onDestroy()
        recycle()
    }

    abstract fun recycle()
}
LoginView
//View层
interface LoginView {
    //把结果显示到Activity/Fragment层
    fun loginSuccess(loginBean:LoginResponse?)
    fun loginFialure(errorMsg:String?)

}
LoginActivity
class LoginActivity : BaseActivity<LoginPresenter>(),LoginView {


    private lateinit var mMediaPlayer:MediaPlayer
    override fun onCreate(savedInstanceState: Bundle?) {
        super.onCreate(savedInstanceState)
        initView()
    }

    private fun initView() {
       user_login_bt.setOnClickListener {

           doLogin()
       }
    }

    private fun doLogin() {
        val userName=user_phone_et.text.toString()
        val pwd=user_password_et.text.toString()
        //只关心P层
        presenter.loginAction(this@LoginActivity,userName,pwd)
//            .
    }
    override fun getLayoutID(): Int = R.layout.activity_login

    override fun createP(): LoginPresenter =LoginPresenterImpl(this)

    override fun recycle() {
        presenter.unAttachView()
    }

    override fun loginSuccess(loginBean: LoginResponse?) {
//        TODO("not implemented") //To change body of created functions use File | Settings | File Templates.
        Toast.makeText(this@LoginActivity,"登陆成功嘿嘿~",Toast.LENGTH_SHORT).show()
    }

    override fun loginFialure(errorMsg: String?) {
//        TODO("not implemented") //To change body of created functions use File | Settings | File Templates.
        Toast.makeText(this@LoginActivity,errorMsg,Toast.LENGTH_SHORT).show()
    }
}
2.2、Presenter层的实现
Presenter类的完全把Model层和View层进行隔离,Model和View要产生联系,所以Presenter必须拿到Model层和View层
IBasePrensenter
interface IBasePresenter {
//    fun attachView()
    //视图离开了
    fun  unAttachView()
}
LoginPresenter
//Presenter 层
interface LoginPresenter:IBasePresenter {
    //登录
    fun loginAction(context:Context,userName:String,password:String)

    //监听回调
    interface  OnLoginListener{
        fun loginSuccess(loginBean: LoginResponse?)
        fun loginFialure(errrMsg:String?)
    }
}
LoginPresenterImpl
//P 层是需要拿到 Model和View两边的
class LoginPresenterImpl(var loginView: LoginView?) :LoginPresenter,LoginPresenter.OnLoginListener {

    //Model  请求服务器
    private val loginModel=LoginModelImpl()
    //view 去更新UI

    override fun loginAction(context: Context, userName: String, password: String) {
        //        TODO("not implemented") //To change body of created functions use File | Settings | File Templates.
        //做很多事情 校验 啊
        // TODO 调用模型层
        loginModel.login(context,userName,password,this)
    }

    //接收Model的结果
    override fun loginSuccess(loginBean: LoginResponse?) {
     //   TODO("not implemented")校验 结果集
        //...
        //回调到View层 更新UI
        loginView?.loginSuccess(loginBean)
    }

    override fun loginFialure(errrMsg: String?) {
        //   TODO("not implemented")校验 结果集
        //...
        //回调到View层 更新UI
        loginView?.loginFialure(errrMsg)
    }
    override fun unAttachView() {
//        TODO("not implemented") //To change body of created functions use File | Settings | File Templates.
        loginView= null
        loginModel.cancelRequest()
    }
}
2.3、Model层实现
LoginModel
interface LoginModel {
    fun cancelRequest()
    //登录
    fun login(context: Context,userName:String,password:String,
              //把结果回调 给P层
    onLoginListener: LoginPresenter.OnLoginListener)


}
LoginModelImpl
在此进行网络请求,并将结果回调给Presenter
class LoginModelImpl :LoginModel{
    override fun cancelRequest() {
//        TODO("not implemented") //To change body of created functions use File | Settings | File Templates.
    }

    override fun login(
        context: Context,
        userName: String,
        password: String,
        onLoginListener: LoginPresenter.OnLoginListener
    ) =
//        TODO("not implemented") //To change body of created functions use File | Settings | File Templates.
        APIClient.instance.instanceRetrofit(WanAndroidAPI::class.java)
            .loginAction(userName,password)
            .subscribeOn(Schedulers.io())//在IO线程进行网络请求
            .observeOn(AndroidSchedulers.mainThread())//在主线程更新UI
            .subscribe(object: APIResponse<LoginResponse>(context){
                override fun onSuccess(data: LoginResponse?) {

                    onLoginListener.loginSuccess(data)
                }

                override fun onFailure(errorMsg: String?) {
//                    TODO("not implemented") //To change body of created functions use File | Settings | File Templates.
//                    Toast.makeText(this@LoginActivity,errorMsg,Toast.LENGTH_SHORT).show()
                    //回调给P层
                    onLoginListener.loginFialure(errorMsg)
                }

            })

}
这一样一个简单版Kotlin版MVP模式的登录功能就完成了,分层就非常的清晰,可以自由拆卸测试,维护起来也比MVC好维护一些
3、总结
这篇文章我们熟悉了MVP模式的特点和缺点,也用Kotlin实现了MVP版的登录,还是主要熟悉用Kotlin开发项目的感觉,如有错误之处,还请大佬在评论区指出,xdm一键三连!


 1831
1831


 被折叠的 条评论
为什么被折叠?


