


现在WebWork+Spring+Hibernate这种框架已经越来越得到人们地推荐使用,至于这种框架的优越性以及为什么选择这种框架的结合不在本文范畴;另外对于一些项目中基本的构建将不在本文中详细叙述;下面就开始正题,如何建立这种框架应用:
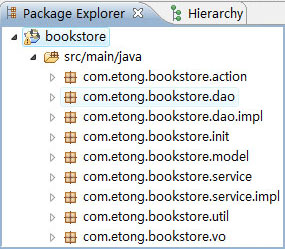
第一步:当然是首先要构建一个Java web project项目,建立好项目以后创建包的命名。在本例中建立了项目目录与包结构如下图:

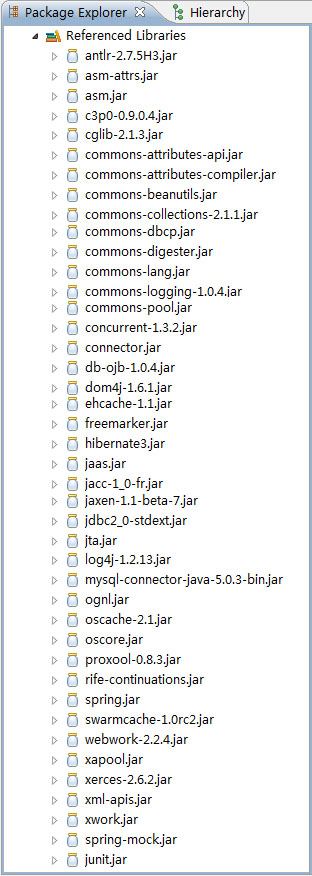
第二步:导入所有须要的资源类库:
第三步:项目搭建好以后,开始正式的程序编写开发工作。
首先在com.etong.bookstore.vo包面分别建立以下几个类(Book、Catalog、Orderitem、Orders、User)。
由于受篇幅所限,本实例中只列出User类的相关代码。
 package
com.etong.bookstore.vo;
import
java.util.HashSet;
import
java.util.Set;
package
com.etong.bookstore.vo;
import
java.util.HashSet;
import
java.util.Set;
 /** */
/**
/** */
/** * * <p>Title:</p> * <pre>Description:com.etong.bookstore.vo.User.java</pre> * <p>Copyright:Copyright (c) 2008 </p> * Jan 16, 2008 * @author Allen * @version 1.0 * @hibernate.class
 */
@SuppressWarnings(
"
serial
"
)
public
class
User
implements
java.io.Serializable
...
{ // Fields
*/
@SuppressWarnings(
"
serial
"
)
public
class
User
implements
java.io.Serializable
...
{ // Fields 
 /** *//** * @hibernate.id * generator-class = "native"
 */ private Integer userid; /** *//** * @hibernate.property not-null = "true" length = "20" */ private String username; /** *//** * @hibernate.property not-null = "true" length = "20" */ private String password; /** *//** * @hibernate.property length = "4" */ private String sex; /** *//** * @hibernate.property */ private Integer age; /** *//** * @hibernate.set cascade = "delete" inverse = "true" * @hibernate.key column = "userid" * @hibernate.one-to-many * class = "com.etong.bookstore.vo.Orders" */ @SuppressWarnings("unchecked") private Set orderses = new HashSet(0); // Constructors /** *//** default constructor */ public User() ...{ } /** *//** minimal constructor */ public User(String username, String password) ...{ this.username = username; this.password = password; } /** *//** full constructor */ @SuppressWarnings("unchecked") public User(String username, String password, String sex, Integer age, Set orderses) ...{ this.username = username; this.password = password; this.sex = sex; this.age = age; this.orderses = orderses; } // Property accessors public Integer getUserid() ...{ return this.userid; } public void setUserid(Integer userid) ...{ this.userid = userid; } public String getUsername() ...{ return this.username; } public void setUsername(String username) ...{ this.username = username; } public String getPassword() ...{ return this.password; } public void setPassword(String password) ...{ this.password = password; } public String getSex() ...{ return this.sex; } public void setSex(String sex) ...{ this.sex = sex; } public Integer getAge() ...{ return this.age; } public void setAge(Integer age) ...{ this.age = age; } @SuppressWarnings("unchecked") public Set getOrderses() ...{ return this.orderses; } @SuppressWarnings("unchecked") public void setOrderses(Set orderses) ...{ this.orderses = orderses; } }
将相关的所有数据库类文件建立好以后,就可以通过Ant来构建hbm.xml以及hibernate.cfg.xml文件了。
第四步:利用Ant来进行构建生成hbm.xml文件.其中Ant代码内容如下:
<?
xml version="1.0" encoding="GBK"
?>
<!--
作者:Allen create date: 2007-08-20
-->
<
project
name
="bookstore"
default
="compile"
basedir
="."
>
<!--
数据库相关信息
-->
<
property
name
="jdbcdriver"
value
="com.mysql.jdbc.Driver"
/>
<
property
name
="jdbcurl"
value
="jdbc:mysql://localhost:3306/bookstore"
/>
<
property
name
="dialect"
value
="org.hibernate.dialect.MySQLDialect"
/>
<
property
name
="jdbcusername"
value
="root"
/>
<
property
name
="jdbcpassword"
value
="Allen"
/>
<
property
name
="jdbcpoolsize"
value
="1"
/>
<
property
name
="showsql"
value
="true"
/>
<!--
properies 源文件夹
-->
<
property
name
="main.java.dir"
value
="src/main/java"
/>
<
property
name
="main.resource.dir"
value
="src/main/resources"
/>
<
property
name
="junitsrc.dir"
value
="src/test/java"
/>
<
property
name
="junitsrc.resource.dir"
value
="src/test/resources"
/>
<!--
temporary build directory names 编译及引用类库文件夹
-->
<
property
name
="classes.dir"
value
="build/classes"
/>
<
property
name
="bin.dir"
value
="bin"
/>
<
property
name
="dist.dir"
value
="dist"
/>
<
property
name
="lib.dir"
value
="WebRoot/WEB-INF/lib"
/>
<
property
name
="extend.lib.dir"
value
="vendor/lib"
/>
<
property
name
="xdoclet2.dir"
value
="vendor/xdoclet2"
/>
<!--
指定输出SQL语句的位置和名称
-->
<
property
name
="output"
value
="schema-export.sql"
/>
<!--
SystemInit info
-->
<
property
name
="initClassName"
value
="com.etong.bookstore.init.BookStoreSystemInit"
/>
<
property
name
="initSqlFile"
value
="systeminit-mssql.sql"
/>
<!--
定义web应用解压文件输出目录
-->
<
property
name
="war-output-file"
value
="D:/software_tools/apache-tomcat-6.0.14/webapps"
/>
<!--
定义classpath
-->
<
path
id
="master-classpath"
>
<!--
替换如下方式 <fileset dir="${lib.dir}"> <include name="**/*.jar" /> </fileset>
-->
<!--
也可以写成如下方式,此方式同上面方式基本一致,这种方式可以通过include来限定 导入的类库,如果不限定即可使用通配符**/*来替代!
-->
<
fileset
file
="${lib.dir}/*.jar"
/>
<
fileset
file
="${extend.lib.dir}/*.jar"
/>
<
pathelement
path
="${classes.dir}"
/>
</
path
>
<!--
初始化开始任务
-->
<
target
name
="init"
>
<
mkdir
dir
="${main.java.dir}"
/>
<
mkdir
dir
="${main.resource.dir}"
/>
<
mkdir
dir
="${junitsrc.dir}"
/>
<
mkdir
dir
="${junitsrc.resource.dir}"
/>
<
mkdir
dir
="${bin.dir}"
/>
<
mkdir
dir
="${dist.dir}"
/>
<
mkdir
dir
="${classes.dir}"
/>
<
mkdir
dir
="${extend.lib.dir}"
/>
</
target
>
<!--
清除任务
-->
<
target
name
="clean"
>
<
delete
dir
="${classes.dir}"
/>
</
target
>
<!--
清除所有任务
-->
<
target
name
="cleanAll"
depends
="clean"
>
<
delete
dir
="${main.java.dir}"
/>
<
delete
dir
="${bin.dir}"
/>
<
delete
dir
="${dist.dir}"
/>
</
target
>
<!--
================================= target: prepart 记录构建时间 =================================
-->
<
target
name
="prepart"
depends
="init"
description
="create the build dirdctories prior to a compile"
>
<
tstamp
>
<
format
property
="now"
pattern
="MMMM d yyyy hh:mm aa"
/>
<
format
property
="hour_earlier"
pattern
="MMMM d yyyy hh:mm aa"
offset
="-1"
unit
="hour"
/>
<
format
property
="minute_later"
pattern
="MMMM d yyyy hh:mm aa"
offset
="1"
unit
="minute"
/>
</
tstamp
>
<
echo
>
now=${now}
</
echo
>
</
target
>
<!--
编译构建文件
-->
<!--
编译
-->
<
target
name
="compile"
depends
="clean,prepart"
description
="compile the source files"
>
<!--
编译目录可以设置成多个,当为多个的时候,可以用:进行分割 如:srcdir="${main.java.dir}:${junitsrc.dir}"
-->
<
javac
srcdir
="${main.java.dir}"
destdir
="${classes.dir}"
target
="1.5"
>
<
classpath
refid
="master-classpath"
/>
</
javac
>
<
copy
todir
="${classes.dir}"
>
<
fileset
dir
="${main.resource.dir}"
includes
="**/*.properties"
/>
<
fileset
dir
="${main.resource.dir}"
includes
="**/*.xml"
/>
<
fileset
dir
="${main.java.dir}"
includes
="**/*.xml"
/>
<!--
copy the primary program and modules
-->
<
fileset
dir
="${junitsrc.resource.dir}"
includes
="*.properties"
/>
<
fileset
dir
="${junitsrc.resource.dir}"
includes
="**/*.xml"
/>
</
copy
>
</
target
>
<!--
打包成jar
-->
<
target
name
="jar"
depends
="compile"
description
="make .jar file"
>
<
delete
file
="${dist.dir}/${ant.project.name}.jar"
>
</
delete
>
<
jar
jarfile
="${dist.dir}/${ant.project.name}.jar"
basedir
="${classes.dir}"
>
<
exclude
name
="**/*Test.*"
/>
<
exclude
name
="**/Test*.*"
/>
</
jar
>
</
target
>
<!--
打包成war
-->
<
target
name
="war"
depends
="jar"
description
="make .war file"
>
<
delete
file
="${dist.dir}/${ant.project.name}.war"
>
</
delete
>
<
war
warfile
="${dist.dir}/${ant.project.name}.war"
webxml
="WebRoot/WEB-INF/web.xml"
>
<!--
由于fileset是从根目录下开始进行打包,已经包括了classes.dir和lib.dir了,所以下面两段可以注释掉
-->
<
fileset
dir
="WebRoot"
excludes
="${main.java.dir},${bin.dir},${dist.dir},**/*.classpath,**/*.project,**/*build.xml,**/*auto*.bat,**/*.psd,**/*.java"
/>
<!--
classes dir="${classes.dir}" includes="**/*.class"/
-->
<
lib
dir
="${dist.dir}"
includes
="${ant.project.name}.jar"
/>
</
war
>
</
target
>
<!--
解压war文件
-->
<
target
name
="unwar"
depends
="war"
description
="unmake .war file"
>
<
delete
dir
="${war-output-file}/${ant.project.name}"
>
</
delete
>
<
unwar
src
="${dist.dir}/${ant.project.name}.war"
dest
="${war-output-file}/${ant.project.name}"
></
unwar
>
</
target
>
<
target
name
="xdoclet2"
description
="定义xdoctlet2任务"
>
<
path
id
="xdoclet2-lib"
>
<
fileset
dir
="${xdoclet2.dir}"
>
<
include
name
="**/*.jar"
/>
</
fileset
>
</
path
>
<
taskdef
name
="xdoclet2"
classname
="org.xdoclet.ant.XDocletTask"
classpathref
="xdoclet2-lib"
/>
</
target
>
<
target
name
="remove"
depends
="xdoclet2"
>
<
delete
>
<
fileset
dir
="${main.java.dir}"
>
<
include
name
="**/*.hbm.xml"
/>
<
include
name
="hibernate.cfg.xml"
/>
</
fileset
>
</
delete
>
</
target
>
<
target
name
="generate-hbm"
depends
="remove"
>
<
xdoclet2
>
<!--
defines the file handled by xdoclet2
-->
<
fileset
dir
="${main.java.dir}"
>
<
include
name
="**/*.java"
/>
</
fileset
>
<!--
defines the processing of a plugin
-->
<
component
classname
="org.xdoclet.plugin.hibernate.HibernateMappingPlugin"
destdir
="${main.java.dir}"
version
="3.0"
/>
<
component
classname
="org.xdoclet.plugin.hibernate.HibernateConfigPlugin"
version
="3.0"
jdbcdriver
="${jdbcdriver}"
jdbcurl
="${jdbcurl}"
dialect
="${dialect}"
jdbcusername
="${jdbcusername}"
jdbcpassword
="${jdbcpassword}"
jdbcpoolsize
="${jdbcpoolsize}"
showsql
="${showsql}"
destdir
="${main.java.dir}"
/>
</
xdoclet2
>
</
target
>
<
target
name
="schemaexport"
depends
="generate-hbm,compile"
>
<
taskdef
name
="schemaexport"
classname
="org.hibernate.tool.hbm2ddl.SchemaExportTask"
classpathref
="master-classpath"
/>
<
delete
file
="${output}"
/>
<!--
可加入 namingstrategy="com.xxx.hibernate.xxxxxx"命名规则
-->
<
schemaexport
config
="${classes.dir}/hibernate.cfg.xml"
delimiter
=";"
output
="${output}"
>
<!--
配置其它包括**/*.hbm.xml文件的包 <fileset dir="${lib.dir}"> <include name="*.jar"/> </fileset>
-->
</
schemaexport
>
</
target
>
<
target
name
="schemaupdate"
depends
="generate-hbm,compile"
>
<
taskdef
name
="schemaupdate"
classname
="org.hibernate.tool.hbm2ddl.SchemaUpdateTask"
classpathref
="master-classpath"
/>
<!--
可加入 namingstrategy="com.xxx.hibernate.xxxxxx"命名规则
-->
<
schemaupdate
config
="${classes.dir}/hibernate.cfg.xml"
text
="no"
>
</
schemaupdate
>
</
target
>
<
target
name
="schemavalidator"
depends
="generate-hbm,compile"
>
<
taskdef
name
="schemavalidator"
classname
="org.hibernate.tool.hbm2ddl.SchemaValidatorTask"
classpathref
="master-classpath"
/>
<!--
可加入 namingstrategy="com.xxx.hibernate.xxxxxx"命名规则
-->
<
schemavalidator
config
="${classes.dir}/hibernate.cfg.xml"
/>
</
target
>
<
target
name
="rebuild"
depends
="clean,init,prepart,war"
>
</
target
>
<!--
利用SQL语句初始化环境
-->
<
target
name
="system_sql_init"
description
="make use of sql file progress system initializtion"
>
<
sql
driver
="${jdbcdriver}"
url
="${jdbcurl}"
userid
="${jdbcusername}"
password
="${jdbcpassword}"
src
="${initSqlFile}"
>
<
classpath
refid
="master-classpath"
/>
</
sql
>
</
target
>
<!--
利用java文件初始化环境
-->
<
target
name
="system_init_data"
depends
="compile"
description
="make use of Class file progress system initializtion"
>
<
java
classname
="${initClassName}"
>
<
classpath
>
<
fileset
file
="${lib.dir}/*.jar"
/>
<
pathelement
path
="${classes.dir}"
/>
</
classpath
>
</
java
>
</
target
>
</
project
>
通过” generate-hbm”任务即可生成hbm.xml文件了.
第五步:开始写DAO接口类与实现类,同样以User为例:
IUserDAO.java
package
com.etong.bookstore.dao;
import
com.etong.bookstore.vo.User;
public
interface
IUserDAO
...
{ public void saveUser(User user); public User validateUser(String username,String password);}
UserDAO.java
package
com.etong.bookstore.dao.impl;
import
java.util.List;
import
org.springframework.orm.hibernate3.support.HibernateDaoSupport;
import
com.etong.bookstore.dao.IUserDAO;
import
com.etong.bookstore.vo.User;
public
class
UserDAO
extends
HibernateDaoSupport
implements
IUserDAO
...
{ public void saveUser(User user) ...{ this.getHibernateTemplate().save(user); } @SuppressWarnings("unchecked") public User validateUser(String username, String password) ...{ String hql = "from User u where u.username=? and u.password=?"; List users = this.getHibernateTemplate().find(hql,new Object[]...{username,password}); if(users.size() != 0)...{ User user = (User)users.get(0); return user; } return null; }}
其中引入了HibernateDaoSupport这个类,主要是实现session事务处理交由Spring来去管理,而不是人为的去操作session事务处理。
第六步:建立user对象的service类:
IUserService.java
package
com.etong.bookstore.service;
import
com.etong.bookstore.vo.User;
public
interface
IUserService
...
{ public void saveUser(User user); public User validateUser(String username,String password);}
UserService.java
package
com.etong.bookstore.service.impl;
import
com.etong.bookstore.dao.IUserDAO;
import
com.etong.bookstore.service.IUserService;
import
com.etong.bookstore.vo.User;
public
class
UserService
implements
IUserService
...
{ private IUserDAO userDAO; public IUserDAO getUserDAO() ...{ return userDAO; } public void setUserDAO(IUserDAO userDAO) ...{ this.userDAO = userDAO; } public void saveUser(User user) ...{ userDAO.saveUser(user); } public User validateUser(String username, String password) ...{ return userDAO.validateUser(username, password); }}
大家可能会发现service类与DAO类基本一样,不错的确如此,那为什么要这样做呢,主是要由于设计模式上的考虑,使用service类在降低业务层与DAO之间的耦合度以外,可以更灵活的方式对外提供统一的接口服务,而不是直接将DAO暴露于客户。
第七步:Action类的编写工作,实现业务层与servivce接口的交互工作.
UserAction.java
package
com.etong.bookstore.action;
import
java.util.Map;
import
com.etong.bookstore.model.Cart;
import
com.etong.bookstore.service.IUserService;
import
com.etong.bookstore.vo.User;
import
com.opensymphony.xwork.ActionContext;
import
com.opensymphony.xwork.ActionSupport;@SuppressWarnings(
"
serial
"
)
public
class
UserAction
extends
ActionSupport
...
{ protected User user; protected IUserService userService; public IUserService getUserService() ...{ return userService; } public void setUserService(IUserService userService) ...{ this.userService = userService; } public User getUser() ...{ return user; } public void setUser(User user) ...{ this.user = user; } @SuppressWarnings("unchecked") @Override public String execute() throws Exception ...{ User u = userService.validateUser(user.getUsername(),user.getPassword()); if(u != null)...{ Map session = ActionContext.getContext().getSession(); session.put("user",u); Cart cart = new Cart(); session.put("cart",cart); return SUCCESS; } return ERROR; } public String register() throws Exception ...{ userService.saveUser(user); return SUCCESS; } @SuppressWarnings("unchecked") public String logout() throws Exception ...{ Map session = ActionContext.getContext().getSession(); session.remove("user"); session.remove("cart"); return SUCCESS; }}
第八步:完成这些工作以后,下面就是最重要的工作了,其中完成了多项事宜,实现了与Hibernate之间的融合,将数据库配置放入Hibernate配置文件中完成,同时Session的事务管理也交由Spring来去管理而不是由Hibernate自己操作,另外实现需事务操作对象自动注入统一事务处理(transactionManager)模板,而不用为每一个事务操作配置一个独立的事务Bean;如下内容完成Spring的配置文件.
Spring的配置文件内容如下(applicationContext.xml):
<?
xml version="1.0" encoding="UTF-8"
?>
<!
DOCTYPE beans PUBLIC "-//SPRING//DTD BEAN//EN" "http://www.springframework.org/dtd/spring-beans.dtd"
>
<
beans
>
<
bean
id
="sessionFactory"
class
="org.springframework.orm.hibernate3.LocalSessionFactoryBean"
>
<
property
name
="configLocation"
>
<
value
>
classpath:hibernate.cfg.xml
</
value
>
</
property
>
<
property
name
="hibernateProperties"
>
<
props
>
<
prop
key
="hibernate.dialect"
>
org.hibernate.dialect.MySQLDialect
</
prop
>
<
prop
key
="hibernate.show_sql"
>
false
</
prop
>
</
props
>
</
property
>
</
bean
>
<
bean
id
="transactionManager"
class
="org.springframework.orm.hibernate3.HibernateTransactionManager"
>
<
property
name
="sessionFactory"
>
<
ref
bean
="sessionFactory"
/>
</
property
>
</
bean
>
<
bean
id
="txTemplate"
class
="org.springframework.transaction.interceptor.TransactionProxyFactoryBean"
abstract
="true"
>
<
property
name
="transactionManager"
>
<
ref
bean
="transactionManager"
/>
</
property
>
<
property
name
="transactionAttributes"
>
<
props
>
<
prop
key
="*"
>
PROPAGATION_REQUIRED
</
prop
>
</
props
>
</
property
>
</
bean
>
<
bean
id
="userDAO"
class
="com.etong.bookstore.dao.impl.UserDAO"
>
<
property
name
="sessionFactory"
>
<
ref
bean
="sessionFactory"
/>
</
property
>
</
bean
>
<
bean
id
="catalogDAO"
class
="com.etong.bookstore.dao.impl.CatalogDAO"
>
<
property
name
="sessionFactory"
>
<
ref
bean
="sessionFactory"
/>
</
property
>
</
bean
>
<
bean
id
="bookDAO"
class
="com.etong.bookstore.dao.impl.BookDAO"
>
<
property
name
="sessionFactory"
>
<
ref
bean
="sessionFactory"
/>
</
property
>
</
bean
>
<
bean
id
="orderDAO"
class
="com.etong.bookstore.dao.impl.OrderDAO"
>
<
property
name
="sessionFactory"
>
<
ref
bean
="sessionFactory"
/>
</
property
>
</
bean
>
<
bean
id
="userService"
parent
="txTemplate"
>
<
property
name
="target"
>
<
bean
class
="com.etong.bookstore.service.impl.UserService"
autowire
="byName"
>
</
bean
>
</
property
>
</
bean
>
<
bean
id
="catalogService"
class
="com.etong.bookstore.service.impl.CatalogService"
>
<
property
name
="catalogDAO"
>
<
ref
bean
="catalogDAO"
/>
</
property
>
</
bean
>
<
bean
id
="bookService"
class
="com.etong.bookstore.service.impl.BookService"
>
<
property
name
="bookDAO"
>
<
ref
bean
="bookDAO"
/>
</
property
>
</
bean
>
<
bean
id
="orderService"
parent
="txTemplate"
>
<
property
name
="target"
>
<
bean
class
="com.etong.bookstore.service.impl.OrderService"
autowire
="byName"
>
</
bean
>
</
property
>
</
bean
>
<
bean
id
="userAction"
class
="com.etong.bookstore.action.UserAction"
>
<
property
name
="userService"
>
<
ref
bean
="userService"
/>
</
property
>
</
bean
>
<
bean
id
="bookAction"
class
="com.etong.bookstore.action.BookAction"
>
<
property
name
="catalogService"
>
<
ref
bean
="catalogService"
/>
</
property
>
<
property
name
="bookService"
>
<
ref
bean
="bookService"
/>
</
property
>
</
bean
>
<
bean
id
="shoppingAction"
autowire
="byName"
class
="com.etong.bookstore.action.ShoppingAction"
>
</
bean
>
</
beans
>
第九步:完成WebWork的配置文件:
WebWork框架其中最核心的内容就是xwork,下面就看看如何进行xwork.xml配置文件的编写:
xwork.xml文件代码内容如下:
<!
DOCTYPE xwork PUBLIC "-//OpenSymphony Group//XWork 1.0//EN""http://www.opensymphony.com/xwork/xwork-1.0.dtd"
>
<
xwork
>
<
include
file
="webwork-default.xml"
></
include
>
<
package
name
="default"
extends
="webwork-default"
>
<
action
name
="register"
class
="userAction"
method
="register"
>
<
result
name
="success"
>
/register_success.jsp
</
result
>
<
result
name
="invalid.token"
>
/repeaterror.jsp
</
result
>
<
interceptor-ref
name
="params"
></
interceptor-ref
>
<
interceptor-ref
name
="token"
></
interceptor-ref
>
</
action
>
<
action
name
="login"
class
="userAction"
>
<
result
name
="success"
>
/login_success.jsp
</
result
>
<
result
name
="error"
>
/login.jsp
</
result
>
</
action
>
<
action
name
="logout"
class
="userAction"
method
="logout"
>
<
result
name
="success"
>
index.jsp
</
result
>
</
action
>
<
action
name
="browseCatalog"
class
="bookAction"
method
="browseCatalog"
>
<
result
name
="success"
>
/jsp/browseCatalog.jsp
</
result
>
</
action
>
<
action
name
="browseBook"
class
="bookAction"
method
="browseBook"
>
<
result
name
="success"
>
/jsp/browseBook.jsp
</
result
>
</
action
>
<
action
name
="addToCart"
class
="shoppingAction"
method
="addToCart"
>
<
result
name
="success"
>
/jsp/addToCart_success.jsp
</
result
>
</
action
>
<
action
name
="updateCart"
class
="shoppingAction"
method
="updateCart"
>
<
result
name
="success"
>
/jsp/showCart.jsp
</
result
>
</
action
>
<
action
name
="checkout"
class
="shoppingAction"
method
="checkout"
>
<
result
name
="success"
>
/jsp/checkout_success.jsp
</
result
>
</
action
>
<
action
name
="searchBook"
class
="bookAction"
method
="searchBook"
>
<
result
name
="success"
>
/jsp/searchBook_result.jsp
</
result
>
</
action
>
</
package
>
</
xwork
>
第十步:如何实现WebWork与Spring之间的通信呢,那么接下来我们就将完成此事。
1.建立一个webwork.properties的配置文件,内容如下:
webwork.objectFactory
=
springwebwork.devMode
=
true
2.在web.xml文件中配置如下:
<?
xml version="1.0" encoding="ISO-8859-1"
?>
<
web-app
xmlns
="http://java.sun.com/xml/ns/javaee"
xmlns:xsi
="http://www.w3.org/2001/XMLSchema-instance"
xsi:schemaLocation
="http://java.sun.com/xml/ns/javaee http://java.sun.com/xml/ns/javaee/web-app_2_5.xsd"
version
="2.5"
>
<
display-name
>
bookstore
</
display-name
>
<
description
>
bookstore
</
description
>
<
filter
>
<
filter-name
>
webwork
</
filter-name
>
<
filter-class
>
com.opensymphony.webwork.dispatcher.FilterDispatcher
</
filter-class
>
</
filter
>
<
filter
>
<
filter-name
>
securityFilter
</
filter-name
>
<
filter-class
>
com.etong.bookstore.util.SecurityFilter
</
filter-class
>
</
filter
>
<
filter-mapping
>
<
filter-name
>
webwork
</
filter-name
>
<
url-pattern
>
/*
</
url-pattern
>
</
filter-mapping
>
<
filter-mapping
>
<
filter-name
>
securityFilter
</
filter-name
>
<
url-pattern
>
/jsp/*
</
url-pattern
>
</
filter-mapping
>
<
listener
>
<
listener-class
>
org.springframework.web.context.ContextLoaderListener
</
listener-class
>
</
listener
>
</
web-app
>
到此步即完成了这三种框架之间的有机结合,实现了以Spring为管理核心,WebWork与客户间的交互,Hibernate持久化的操作。本课到此结束!


 623
623

 被折叠的 条评论
为什么被折叠?
被折叠的 条评论
为什么被折叠?
 到【灌水乐园】发言


