大家都对ListView非常熟悉,目测也会经常使用ListView的一个方法setEmptyView,来设置当数据加载中或者数据加载失败的一个提醒的效果,这个方法虽然使用起来简单,但是如果你提供一个复杂的布局,例如:
在数据加载失败后,添加一个
Button让用户可以选择重新加载数据。
那么,你可能会这么做,find这个button,然后给button设置点击事件,好吧。。。一个两个的还可以忍受,那多了呢?比如我遇到的这个情况,在测试阶段,老板让加一个刷新的功能,要是按照这种方法,估计现在现在我还在加班(2015/7/27 23:00),那有没有一种更加方便的方式,几行代码就可以搞定?而且不需要写那些烦人的setOnClickListener?能不能提供一个不仅仅局限于ListView的EmptyView,因为我不仅仅在ListView上使用。
答案是肯定的,这篇博客,我们就去实现一个这样的组件,在实现之间,我们来看看ListView和他的EmptyView是怎么一个关系,首先定位到ListView.setEmptyView方法:
|
1
2
3
4
5
6
7
8
9
10
11
12
13
14
|
@android
.view.RemotableViewMethod
public
void
setEmptyView(View emptyView) {
mEmptyView = emptyView;
// If not explicitly specified this view is important for accessibility.
if
(emptyView !=
null
&& emptyView.getImportantForAccessibility() == IMPORTANT_FOR_ACCESSIBILITY_AUTO) {
emptyView.setImportantForAccessibility(IMPORTANT_FOR_ACCESSIBILITY_YES);
}
final
T adapter = getAdapter();
final
boolean
empty = ((adapter ==
null
) || adapter.isEmpty());
updateEmptyStatus(empty);
}
|
继续跟进代码updateEmptyStatus
|
1
2
3
4
5
6
7
8
9
10
11
12
13
14
15
16
17
18
19
20
21
22
23
24
25
|
private
void
updateEmptyStatus(
boolean
empty) {
if
(isInFilterMode()) {
empty =
false
;
}
if
(empty) {
if
(mEmptyView !=
null
) {
mEmptyView.setVisibility(View.VISIBLE);
setVisibility(View.GONE);
}
else
{
// If the caller just removed our empty view, make sure the list view is visible
setVisibility(View.VISIBLE);
}
// We are now GONE, so pending layouts will not be dispatched.
// Force one here to make sure that the state of the list matches
// the state of the adapter.
if
(mDataChanged) {
this
.onLayout(
false
, mLeft, mTop, mRight, mBottom);
}
}
else
{
if
(mEmptyView !=
null
) mEmptyView.setVisibility(View.GONE);
setVisibility(View.VISIBLE);
}
}
|
唉,原来也没啥,看代码31~37行,就是根据数据是否为空,来控制显示mEmptyView和ListView本身。
既然原理简单,那么我们完全可以自己实现一个。但是,我们的原理正好和ListView的这个相反:
ListView是通过绑定一个emptyView实现的
而我们,是通过EmptyView绑定ListView(其他view也ok)实现的。
我们的EmptyView提供一个通用的方式,加载中时提醒加载中,加载失败提醒加载失败,并提供一个Button供用户刷新使用。
分析完了,接下来就是编码了,首先我们继承一个RelativeLayout来实现这么一个布局:
|
1
2
3
4
5
6
7
8
9
10
|
public
class
EmptyView
extends
RelativeLayout {
private
String mText;
private
String mLoadingText;
private
TextView mTextView;
private
Button mButton;
private
View mBindView;
...
}
|
简单说一下4个变量的作用。
mText表示数据为空时提醒的文本。
mLoadingText表示加载中提醒的文本。
mTextView显示提醒文本。
mButton提供给用户刷新的按钮。
mBindView我们要绑定的view。
ok,继续代码:
|
1
2
3
4
5
6
7
8
9
10
11
12
13
14
|
public
class
EmptyView
extends
RelativeLayout {
...
public
EmptyView(Context context, AttributeSet attrs) {
super
(context, attrs);
TypedArray ta = context.obtainStyledAttributes(attrs, R.styleable.EmptyView,
0
,
0
);
String text = ta.getString(R.styleable.EmptyView_android_text);
String buttonText = ta.getString(R.styleable.EmptyView_buttonText);
mLoadingText = ta.getString(R.styleable.EmptyView_loadingText);
ta.recycle();
init(text, buttonText);
}
...
}
|
为了灵活性,这些文本内容我们定义成可以在xml中配置使用,哎?怎么还有一个buttonText,这个当然是按钮上的文字了。
继续代码,可以看到调用了init方法。
来看看:
|
1
2
3
4
5
6
7
8
9
10
11
12
13
14
15
16
17
18
19
20
21
22
23
24
25
26
|
public
class
EmptyView
extends
RelativeLayout {
...
private
void
init(String text, String buttonText) {
if
(TextUtils.isEmpty(text)) text =
"暂无数据"
;
if
(TextUtils.isEmpty(buttonText)) buttonText =
"重试"
;
if
(TextUtils.isEmpty(mLoadingText)) mLoadingText =
"加载中..."
;
mText = text;
mTextView =
new
TextView(getContext());
mTextView.setText(text);
LayoutParams textViewParams =
new
LayoutParams(
LayoutParams.WRAP_CONTENT, LayoutParams.WRAP_CONTENT);
textViewParams.addRule(RelativeLayout.CENTER_IN_PARENT);
mTextView.setId(R.id.id_empty_text);
addView(mTextView, textViewParams);
mButton =
new
Button(getContext());
mButton.setText(buttonText);
LayoutParams buttonParams =
new
LayoutParams(
LayoutParams.WRAP_CONTENT, LayoutParams.WRAP_CONTENT);
buttonParams.addRule(RelativeLayout.CENTER_HORIZONTAL);
buttonParams.addRule(RelativeLayout.BELOW, R.id.id_empty_text);
addView(mButton, buttonParams);
}
...
}
|
在init方法中,上来,我们去判断这些文本是否为空,如果为空,提供默认的文本。接下来new了一个TextView和Button并添加到该控件中,TextView和Button是上下排列的。至此,布局已经完成了,那怎么控制呢?我们想要的是什么效果呢?
在数据加载的时候调用
loading方法,显示正在加载中的文本。
在数据加载成,隐藏该view。
在数据加载失败,显示加载失败的文本,并提供一个按钮去刷新数据。
ok,我们按照这个条目一个个的来实现,首先是loading。
|
1
2
3
4
5
6
7
8
9
10
|
public
class
EmptyView
extends
RelativeLayout {
...
public
void
loading() {
if
(mBindView !=
null
) mBindView.setVisibility(View.GONE);
setVisibility(View.VISIBLE);
mButton.setVisibility(View.INVISIBLE);
mTextView.setText(mLoadingText);
}
...
}
|
loading方法很简单,首先判断mBindView是否为空,不为空则隐藏它,然后让该控件可见,继续让Button不可见,因为在加载中的时候,我们不允许点击的发生。最后就是让TextView显示正在加载中的文本。
继续看看加载成功的方法,这个更简单啦。
|
1
2
3
4
5
6
7
8
|
public
class
EmptyView
extends
RelativeLayout {
...
public
void
success() {
setVisibility(View.GONE);
if
(mBindView !=
null
) mBindView.setVisibility(View.VISIBLE);
}
...
}
|
只有两行代码,就是让该控件隐藏,让绑定的view显示。
那么加载失败呢?同样简单!
|
1
2
3
4
5
6
7
8
9
10
|
public
class
EmptyView
extends
RelativeLayout {
...
public
void
empty() {
if
(mBindView !=
null
) mBindView.setVisibility(View.GONE);
setVisibility(View.VISIBLE);
mButton.setVisibility(View.VISIBLE);
mTextView.setText(mText);
}
...
}
|
不多说了,唯一注意的就是我们让Button显示了。
至此,我们整个效果就完成了,在加载数据的时候调用loading方法来显示加载中的文本,加载失败后,调用empty来显示加载失败的文本和刷新的按钮,在加载成功后直接隐藏控件!
控件倒是完成了,我们还不知道mBindView怎么来的,其实也很简单。我们在代码中需要调用bindView(View view)方法来指定。
|
1
2
3
4
5
6
7
|
public
class
EmptyView
extends
RelativeLayout {
...
public
void
bindView(View view) {
mBindView = view;
}
...
}
|
哈哈,剩下最后一个问题了,按钮的点击事件怎么做?难道要在使用的时候添加onClick事件?哎,那样太麻烦了,要知道,我有很多文件要改的,我希望一行代码就可以搞定!
亮点来了:
|
1
2
3
4
5
6
7
8
9
10
11
12
13
14
15
16
17
18
19
20
21
22
23
|
public
class
EmptyView
extends
RelativeLayout {
...
public
void
buttonClick(
final
Object base,
final
String method,
final
Object... parameters) {
mButton.setOnClickListener(
new
OnClickListener() {
public
void
onClick(View v) {
int
length = parameters.length;
Class<?>[] paramsTypes =
new
Class<?>[length];
for
(
int
i =
0
; i < length; i++) {
paramsTypes[i] = parameters[i].getClass();
}
try
{
Method m = base.getClass().getDeclaredMethod(method, paramsTypes);
m.setAccessible(
true
);
m.invoke(base, parameters);
}
catch
(Exception e) {
e.printStackTrace();
}
}
});
}
...
}
|
利用反射去做,我们只需要指定调用哪个对象上的哪个方法,需要参数的话就传入参数即可。
这段代码简单说一下,首先我们给button设置了一个点击事件,在事件响应的时候,首先遍历参数,获取参数的类型。然后根据方法名反射出方法,最后直接invoke去执行。这样我们使用起来就非常方便了,完成了我们一行代码搞定的目标。
好激动,来测试一下吧:
先看xml布局。
|
1
2
3
4
5
6
7
8
9
10
11
12
13
14
15
16
17
|
android:layout_width
=
"match_parent"
android:layout_height
=
"match_parent"
tools:context
=
".MainActivity"
>
<
loader.org.emptyview.EmptyView
android:id
=
"@+id/empty_view"
android:layout_width
=
"match_parent"
android:layout_height
=
"match_parent"
/>
<
TextView
android:id
=
"@+id/name"
android:layout_width
=
"match_parent"
android:layout_height
=
"wrap_content"
/>
</
RelativeLayout
>
|
我们没有使用ListView,而是使用了一个TextView,再来看看在Activity中怎么调用:
|
1
2
3
4
5
6
7
8
9
10
11
12
13
14
15
16
17
18
19
20
21
22
23
24
25
26
27
28
29
30
31
32
33
34
35
36
37
38
39
40
41
|
public
class
MainActivity
extends
AppCompatActivity {
private
EmptyView mEmptyView;
private
TextView mTextView;
@Override
protected
void
onCreate(Bundle savedInstanceState) {
super
.onCreate(savedInstanceState);
setContentView(R.layout.activity_main);
mEmptyView = (EmptyView) findViewById(R.id.empty_view);
mTextView = (TextView) findViewById(R.id.name);
mEmptyView.bindView(mTextView);
// 设置bindView
mEmptyView.buttonClick(
this
,
"loadData"
);
// 当button点击时调用哪个方法
loadData();
}
/**
* 加载数据
*/
private
void
loadData() {
mEmptyView.loading();
// 加载中
// 2s后出结果
new
Handler().postDelayed(
new
Runnable() {
@Override
public
void
run() {
Random r =
new
Random();
int
res = r.nextInt(
2
);
// 失败
if
(res ==
0
) {
mEmptyView.empty();
// 显示失败
}
else
{
// 成功
mEmptyView.success();
mTextView.setText(
"success"
);
}
}
},
2000
);
}
}
|
首先,我们通过mEmptyView.bindView(mTextView)来设置要绑定的view,这里当然是TextView了。
接下来,通过mEmptyView.buttonClick(this, "loadData")设置按钮点击后执行哪个方法,这里是当前对象上的loadData方法,并且没有参数。
在getData中模拟延迟2s后获取数据,数据的成功失败是随机的,当失败了,调用empty方法,成功后调用success方法。
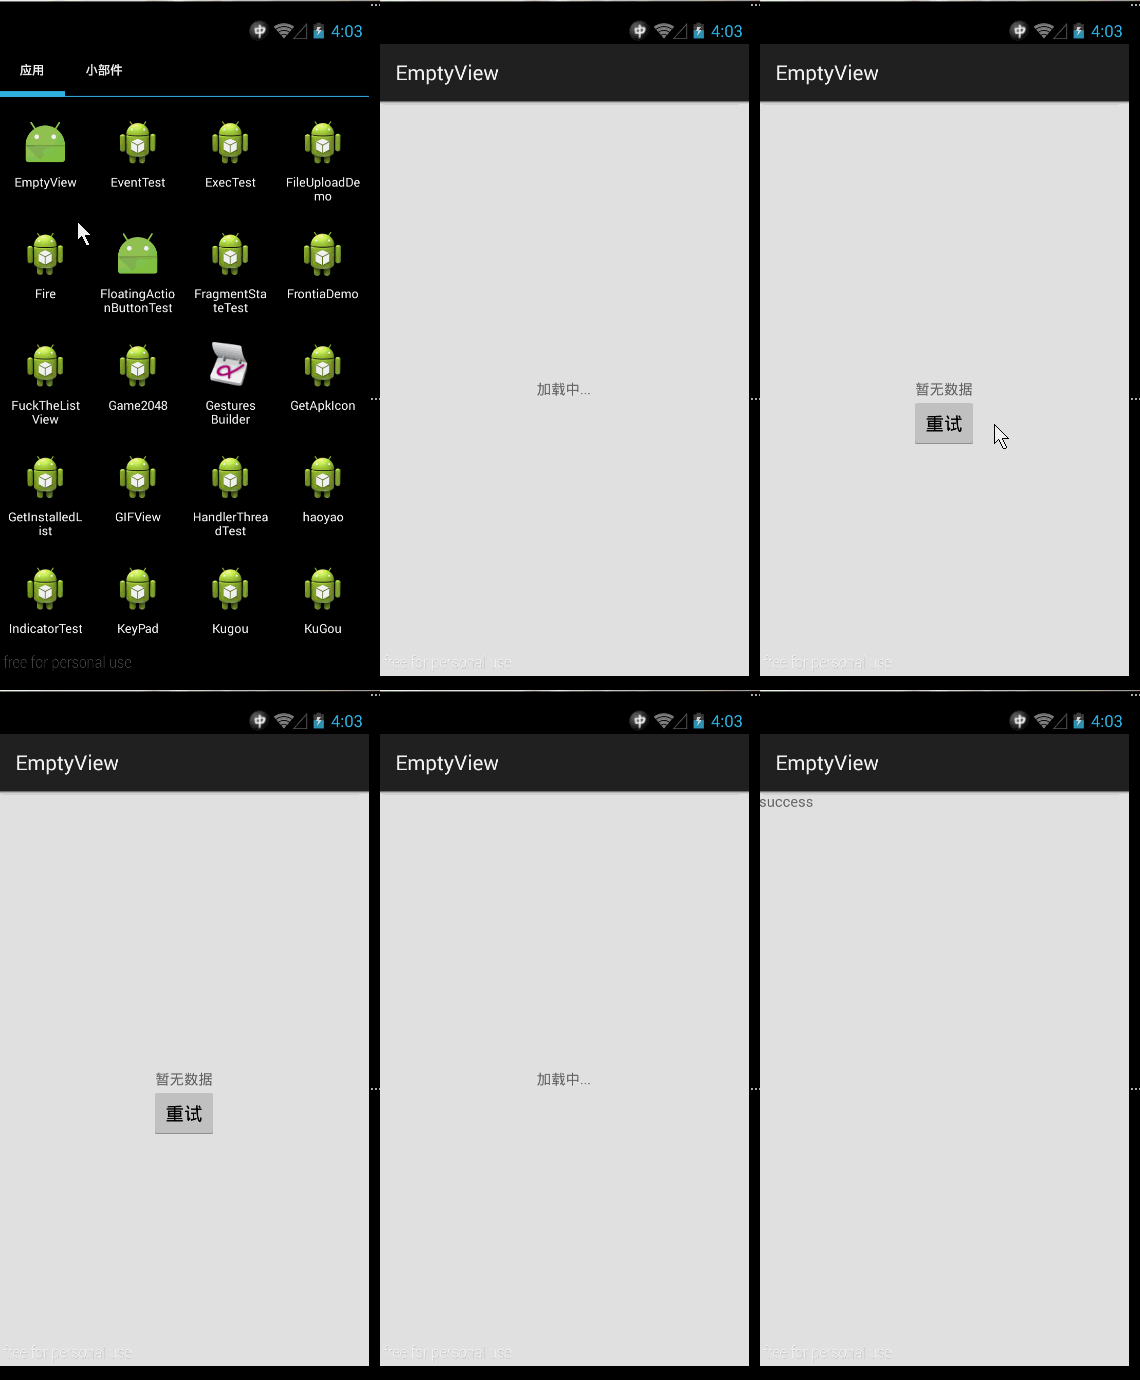
哈哈,就是这么简单,来看看代码的效果:
ok~ok~,非常完美。


 4351
4351

 被折叠的 条评论
为什么被折叠?


