


把Maven配置到Eclipse
1、修改本地仓库路径:打开Maven目录D:\Java\apache-maven-3.3.9\conf,修改settings.xml文件
<localRepository>D:\Java\repository</localRepository>
2、配置Maven程序:打开Eclipse-->Window-->Preferences-->Maven-->Installations

3、配置User Settings,让eclipse知道Maven仓库位置

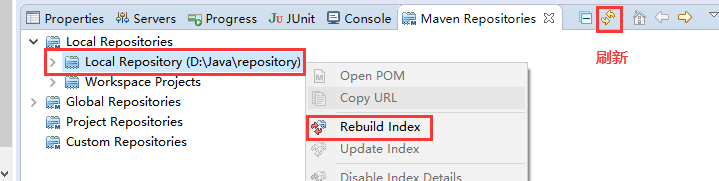
4、构建索引:打开Eclipse-->Window-->Show View-->Other-->Maven Repositories,右键Local Repositoy(注意后面仓库路径是否正确,如不正确请刷新),点击Rebuild Index
Eclipse新建Maven项目
1、新建Maven Project

2、跳过原型选择,创建相对完整目录结构的Maven项目

3、填写项目信息

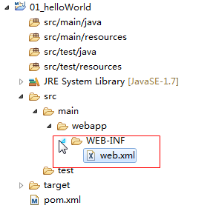
4、创建好的web项目会报错,在src/main/webapp新建WEB-INF,创建web.xml
5、原来jdk编译版本1.5,在pom.xml中添加插件,修改jdk版本信息,并刷新Maven项目
-
<!-- 添加项目jdk编译插件 -->
-
<build>
-
<plugins>
-
<plugin>
-
<groupId>org.apache.maven.plugin
</groupId>
-
<artifactId>maven-compiler-plugin
</artifactId>
-
<version>3.5.1
</version>
-
<configuration>
-
<source>1.7
</source>
-
<target>1.7
</target>
-
<encoding>UTF-8
</encoding>
-
</configuration>
-
</plugin>
-
</plugins>
-
</build>
6、查找依赖

依赖范围

Maven项目标准目录结构

坐标定义

pom基本设置

-
<!-- 指定了当前pom的版本 -->
-
<modelVersion>4.0.0
</modelVersion>
-
<!-- 反写的公司网址+项目名 -->
-
<groupId>cn.feicui
</groupId>
-
<!-- 项目名+模块名 -->
-
<artifactId>BOS_1
</artifactId>
-
<!-- 0.0.1:第一个0表示大版本号,第二个0表示分支版本号,第三个0表示小版本号 -->
-
<!-- snapshot快照,alpha内部测试,beta公测,release稳定,GA正式发布 -->
-
<version>0.0.1-SNAPSHOT
</version>
-
<!-- war,jar,pom -->
-
<packaging>war
</packaging>
-
<!-- 项目描述名 -->
-
<name>
</name>
-
<!-- 项目地址 -->
-
<url>
</url>
-
<!-- 项目描述 -->
-
<description>
</description>
-
<developers>
</developers>
-
<licenses>
</licenses>
-
<organization>
</organization>
-
-
<!-- 依赖列表 -->
-
<dependencies>
-
<dependency>
-
<groupId>
</groupId>
-
<artifactId>
</artifactId>
-
<version>
</version>
-
<type>
</type>
-
<!-- 依赖范围 -->
-
<!-- 1. complie 默认,所有范围 -->
-
<!-- 2. provided 编译和测试 -->
-
<!-- 3. runtime 测试和运行 -->
-
<!-- 4. test 只有测试Junit -->
-
<!-- 5. system 编译和测试,可移植性差 -->
-
<!-- 6. import 导入范围,只在实用dependencyManagement中表示从其他pom导入dependency -->
-
<scope>test
</scope>
-
<!-- 设置依赖是否可选,默认false继承,设置成true必须显示引入依赖-->
-
<optional>
</optional>
-
<!-- 排除依赖传递列表 -->
-
<exclusions>
-
<exclusion>
</exclusion>
-
</exclusions>
-
</dependency>
-
</dependencies>
-
-
<!-- 依赖的管理 -->
-
<dependencyManagement>
-
<dependencies>
-
<dependency>
</dependency>
-
</dependencies>
-
</dependencyManagement>
-
-
<build>
-
<!-- 插件列表 -->
-
<plugins>
-
<plugin>
-
<groupId>
</groupId>
-
<artifactId>
</artifactId>
-
<version>
</version>
-
</plugin>
-
</plugins>
-
</build>


 2266
2266


 被折叠的 条评论
为什么被折叠?
被折叠的 条评论
为什么被折叠?
 到【灌水乐园】发言


