EOS合约开发第六章-构建多节点私链

构建多节点私链

一、概述

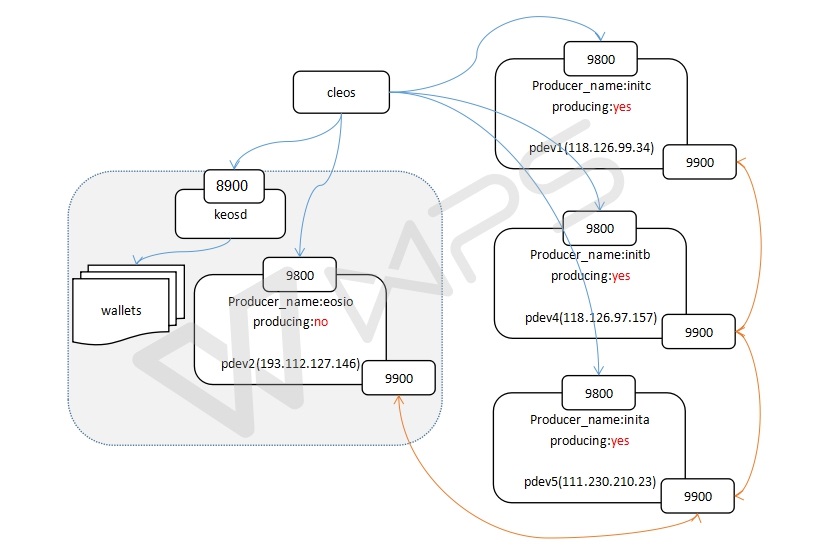
本教程介绍如何配置在多个主机上运行多个节点的EOSIO私链网络,即多主机多节点EOS私链网络,我们将在本地计算机上配置四个节点,并让它们互相通信,其中三个节点产快,一个节点非产快,主要会用到三个程序nodeos、keosd、cleos,以下是该私链网络结构图:


二、启动第一个节点

在第一个节点上,我们启动eos进程时启动钱包插件,在这个私有网络上我们使用这个节点上钱包。

第一个节点配置如下:

# The local IP and port to listen for incoming http connections; set blank to disable. (eosio::http_plugin)
http-server-address = 0.0.0.0:9800

# The actual host:port used to listen for incoming p2p connections. (eosio::net_plugin)
p2p-listen-endpoint = 0.0.0.0:9900


# The public endpoint of a peer node to connect to. Use multiple p2p-peer-address options as needed to compose a network. (eosio::net_plugin)
# p2p-peer-address = 
p2p-peer-address = 193.112.127.146:9900
p2p-peer-address = 118.126.97.157:9900
p2p-peer-address = 111.230.210.23:9900

producer-name = eosio

# Timeout for unlocked wallet in seconds (default 900 (15 minutes)). Wallets will automatically lock after specified number of seconds of inactivity. Activity is defined as any wallet command e.g. list-wallets. (eosio::wallet_plugin)
unlock-timeout = 90000

# Plugin(s) to enable, may be specified multiple times
# plugin = 
plugin = eosio::http_plugin
plugin = eosio::chain_api_plugin
plugin = eosio::net_api_plugin
plugin = eosio::wallet_api_plugin
plugin = eosio::history_api_plugin

主要配置本节点rpc监听地址,p2p监听地址,p2p连接地址,bp名称,因为启动有钱包插件,配置了钱包锁定的超时时间,同时加载了需要使用的插件,我们在这个节点加载钱包插件。

  • 0
    点赞
  • 8
    收藏
    觉得还不错? 一键收藏
  • 0
    评论
Ant是Java程序员的一个好的工具,主要可以帮助程序员进行java项目的的管理,包括批量编译、部署、文档生成等工作,其用途远不止如此,ant内置了大量的API进行各种文件系统操作,在各种应用服务器中都被广泛应用于程序和资源的部署。 Ant功能强大的地方在于,程序员不仅能通过编写Ant的脚本(build.xml)来进行各种文件部署管理操作,还可以通过调用Ant的丰富的API,甚至扩展Ant的API进行编程。 1. 目录操作: 1) 创建目录 1. Project prj=new Project(); 2. Mkdir mkdir=new Mkdir(); 3. mkdir.setProject(prj); 4. mkdir.setDir(new File("d:tempdir1")); 5. mkdir.execute(); 2) 删除目录 1. Project prj=new Project(); 2. Delete delete=new Delete(); 3. delete.setProject(prj); 4. delete.setDir(new File("d:tempdir1")); //可同时将子目录及所有文件删除 5. delete.execute(); 注:对每一个Ant Task,如Mkdir,Delete、Copy、Move、Zip等,都必须设置一个Project对象,可以几个Ant Task共用一个Project对象,但不能有Ant Task不设置Project对象。 2. 文件拷贝和移动、更名 1)文件copy 1. Project prj=new Project(); 2. Copy copy=new Copy(); 3. copy.setProject(prj); 4. copy.setFile(new File("d:tempf1.txt"); 5. copy.setTodir(new File("d:tempdir1")); 6. copy.execute(); //将f1.txt文件copy到dir1中 2)copy文件并同时替换其中的内容, 如将 xml中的 @eosapp_name@ 替换成真正的应用名称 1. Project prj=new Project(); 2. Copy copy = new Copy(); 3. copy.setEncoding("UTF-8"); 4. copy.setProject(prj); 5. copy.setTodir("d:temp"); 6. 7. FileSet fileSet=new FileSet(); 8. fileSet.setDir(new File(eosHome "/base/template.app")); 9. fileSet.setIncludes("**/*.xml"); 10. copy.addFileset(fileSet); 11. 12. FilterSet filter=copy.createFilterSet(); 13. filter.addFilter("eosapp_name","app1"); 14. copy.execute(); 2)文件或目录移动 Move的用法和Copy用法基本一致,Move本身为Copy的子类。 1. Project prj=new Project(); 2. Copy copy=new Copy(); 3. copy.setProject(prj); 4. copy.setFile(new File("d:tempf1.txt"); 5. copy.setTodir(new File("d:tempdir1")); 6. copy.execute(); //将f1.txt文件移动到dir1中 3)文件改名: 1. Project prj=new Project(); 2. Copy copy=new Copy(); 3. copy.setProject(prj); 4. copy.setFile(new File("d:tempf1.txt"); 5. copy.setTodir(new File("d:tempf2.txt")); 6. copy.execute(); //将f1.txt文件更名为f2.txt中 4)目录更名: 1. Project prj=new Project(); 2. Copy copy=new Copy(); 3. copy.setProject(prj); 4. copy.setFile(new File("d:tempdir1"); 5. copy.setTodir(new File("d:tempdir2")); 6. copy.execute(); //将dir1目录更名为dir2,相当于将dir1目录下的所有文件移到dir2目录下 3.使用文件集 FileSet 使用文件集可以同时将多个满足匹配条件的文件集合进行copy、move和压缩等操作。 1. Project prj=new Project(); 2. Copy copy=new Copy(); 3. copy.setProject(prj); 4. copy.setTodir(new File("d:temptodir")); 5. 6. FileSet fs=new FileSet(); 7. fs.setProject(prj); 8. fs.setDir(new File("d:javaprjsrc")); 9. fs.setIncludes("**/*.*"); //包含所有文件 10. fs.setExcludes("**/CVS,**/*.class"); //排除CVS相关文件,以及.class文件 11. copy.addFileset(fs); 12. 13. copy.execute(); 注: FileSetsetIncludes, 和setExcludes方法输入pattern, pattern是一个使用“,”或空格分隔的匹配字符串,其中, “**”代表所有文件或目录,“*.*”代表说有文件, “*.java”代表所有扩展名为java的文件。 4.目录扫描,查找文件 1. DirectoryScanner ds=new DirectoryScanner(); 2. ds.setBasedir(new File("d:tempwar")); 3. ds.setIncludes(new String[] ); 4. ds.scan(); 5. if(ds.getIncludedFilesCount()>0) { 6. System.out.println("found jsp!"); 7. String[] includeFiles=ds.getIncludedFiles(); 8. for(String file:includeFiles){ 9. System.out.println(file); 10. } 11. } 5.文件压缩,打包 //压缩为zip文件 1. Project prj=new Project(); 2. Zip zip=new Zip(); 3. zip.setProject(prj); 4. zip.setDestFile(new File("d:tempsrc.zip")); 5. FileSet fileSet=new FileSet(); 6. fileSet.setProject(prj); 7. fileSet.setDir(new File("d:javaprjprj1src")); 8. fileSet.setIncludes("**/*.java"); 9. zip.addFileset(fileSet); 10. zip.execute(); 11. 12. //将class文件打成jar包 13. Project prj=new Project(); 14. Jar jar=new Jar(); 15. jar.setProject(prj); 16. jar.setDestFile(new File("d:tempprj1.jar")); 17. FileSet fileSet=new FileSet(); 18. fileSet.setProject(prj); 19. fileSet.setDir(new File("d:javaprjprj1bin")); 20. fileSet.setIncludes("**/*.class,**/*.properties"); 21. jar.addFileset(fileSet); 22. jar.execute(); 6.文件解压 1)将压缩文件中的所有文件解压 1. Project prj=new Project(); 2. Expand expand=new Expand(); 3. expand.setProject(prj); 4. expand.setSrc(new File("d:tempsrc.zip")); 5. expand.setOverwrite(overwrite); 6. expand.setDest("d:tempoutsrc"); 7. expand.execute(); 2)将压缩文件中的符合匹配条件的文件解压 1. Project prj=new Project(); 2. Expand expand=new Expand(); 3. expand.setProject(prj); 4. expand.setSrc(new File("d:tempsrc.zip")); 5. expand.setOverwrite(overwrite); 6. expand.setDest("d:tempoutsrc"); 7. PatternSet patternset = new PatternSet(); 8. patternset.setIncludes("**/*.java"); 9. patternset.setProject(prj); 10. expand.addPatternset(patternset); 11. expand.execute(); 3)利用Mapper解压文件: 如将 .../lib/*.jar 解压到 .../WEB-INF/lib目录下(去除目录结构) 1. Expand expand = new Expand(); 2. expand.setProject(prj); 3. expand.setSrc(new File(zipFilePath)); 4. expand.setDest(new File(webDir "/WEB-INF/lib")); 5. 6. PatternSet pattern = new PatternSet(); 7. pattern.setIncludes("lib/*.jar"); 8. expand.addPatternset(pattern); 9. 10. FileNameMapper mapper=new FlatFileNameMapper(); 11. expand.add(mapper); 12. 13. /* another way using mapper 14. Mapper mapper=expand.createMapper(); 15. MapperType type=new MapperType(); 16. type.setValue("flatten"); 17. mapper.setType(type); 18. */ 19. expand.execute(); 7.读取zip文件 1) 读取zip文件中的文件和目录 1. ZipFile zipfile = new ZipFile(new File(filepath)); 2. for (Enumeration entries = zipfile.getEntries(); entries.hasMoreElements();) { 3. ZipEntry entry = (ZipEntry) entries.nextElement(); 4. if(entry.isDirectory()) 5. System.out.println("Directory: " entry.getName()); 6. else 7. System.out.println("file: " entry.getName()); 8. } 9. zipfile.close(); //ZipFile用完必须close,否则文件被锁定 2)zip文件扫描,在Zip文件中查找目录或文件 1. ZipScanner scan=new ZipScanner(); 2. scan.setSrc(new File("d:temptest.zip")); 3. scan.setIncludes(new String[] ); //查找目录(一、二级目录); 4. scan.scan(); 5. String dirs[]=scan.getIncludedDirectories(); 6. scan.setIncludes(new String[]); //查找文件 7. scan.scan(); 8. String files[]=scan.getIncludedFiles(); 从之前发布其他chm文件下载用户的反映看,有不少朋友反映下载后打开无法显示,这一般不是chm文件的问题,这里统一说明一下解决办法: 如果文件打开看不到右边的内容,是因为你的操作系统为了安全对下载的chm文件进行了锁定,只需要在打开前右键单击该chm文件选择“属性”,然后在“常规”选项卡的下方单击“解除锁定”按钮就可以了。如果还是不能看,请再查看一下你的chm文件所存储的目录或文件名是否有特殊字符如“#”号字符等,去掉特殊字符即可。

“相关推荐”对你有帮助么?

  • 非常没帮助
  • 没帮助
  • 一般
  • 有帮助
  • 非常有帮助
提交
评论
添加红包

请填写红包祝福语或标题

红包个数最小为10个

红包金额最低5元

当前余额3.43前往充值 >
需支付:10.00
成就一亿技术人!
领取后你会自动成为博主和红包主的粉丝 规则
hope_wisdom
发出的红包
实付
使用余额支付
点击重新获取
扫码支付
钱包余额 0

抵扣说明:

1.余额是钱包充值的虚拟货币,按照1:1的比例进行支付金额的抵扣。
2.余额无法直接购买下载,可以购买VIP、付费专栏及课程。

余额充值