


手机是现代人们必不可少的工具之一,而使用得最多的就是拨打电话接听电话,本文通过一个简单的例子实现这个功能。
首先,加入我们的电话处理类
PhoneUtil.java
package com.sl.callphonedemo;

import java.lang.reflect.InvocationTargetException;
import java.lang.reflect.Method;
import android.content.Context;
import android.content.Intent;
import android.media.AudioManager;
import android.net.Uri;
import android.os.Build;
import android.telephony.TelephonyManager;
import android.text.TextUtils;
import android.view.KeyEvent;

public class PhoneUtil
{
    public static String TAG = PhoneUtil.class.getSimpleName();

    /**
     * 挂断电话
     * @param context
     */
    public static void endCall(Context context) {
        try {
            Object telephonyObject = getTelephonyObject(context);
            if (null != telephonyObject) {
                Class telephonyClass = telephonyObject.getClass();

                Method endCallMethod = telephonyClass.getMethod("endCall");
                endCallMethod.setAccessible(true);

                endCallMethod.invoke(telephonyObject);
            }
        } catch (SecurityException e) {
            e.printStackTrace();
        } catch (NoSuchMethodException e) {
            e.printStackTrace();
        } catch (IllegalArgumentException e) {
            e.printStackTrace();
        } catch (IllegalAccessException e) {
            e.printStackTrace();
        } catch (InvocationTargetException e) {
            e.printStackTrace();
        }

    }

    private static Object getTelephonyObject(Context context) {
        Object telephonyObject = null;
        try {
            // 初始化iTelephony
            TelephonyManager telephonyManager = (TelephonyManager) context.getSystemService(Context.TELEPHONY_SERVICE);
            // Will be used to invoke hidden methods with reflection
            // Get the current object implementing ITelephony interface
            Class telManager = telephonyManager.getClass();
            Method getITelephony = telManager.getDeclaredMethod("getITelephony");
            getITelephony.setAccessible(true);
            telephonyObject = getITelephony.invoke(telephonyManager);
        } catch (SecurityException e) {
            e.printStackTrace();
        } catch (NoSuchMethodException e) {
            e.printStackTrace();
        } catch (IllegalArgumentException e) {
            e.printStackTrace();
        } catch (IllegalAccessException e) {
            e.printStackTrace();
        } catch (InvocationTargetException e) {
            e.printStackTrace();
        }
        return telephonyObject;
    }


    /**
     * 通过反射调用的方法,接听电话,该方法只在android 2.3之前的系统上有效。
     * @param context
     */
    private static void answerRingingCallWithReflect(Context context) {
        try {
            Object telephonyObject = getTelephonyObject(context);
            if (null != telephonyObject) {
                 Class telephonyClass = telephonyObject.getClass();
                 Method endCallMethod = telephonyClass.getMethod("answerRingingCall");
                 endCallMethod.setAccessible(true);

                 endCallMethod.invoke(telephonyObject);
                // ITelephony iTelephony = (ITelephony) telephonyObject;
                // iTelephony.answerRingingCall();
            }
        } catch (SecurityException e) {
            e.printStackTrace();
        } catch (IllegalArgumentException e) {
            e.printStackTrace();
        } catch (IllegalAccessException e) {
            e.printStackTrace();
        } catch (InvocationTargetException e) {
            e.printStackTrace();
        } catch (NoSuchMethodException e) {
            e.printStackTrace();
        }

    }

    /**
     * 伪造一个有线耳机插入,并按接听键的广播,让系统开始接听电话。
     * @param context
     */
    private static void answerRingingCallWithBroadcast(Context context){
        AudioManager localAudioManager = (AudioManager) context.getSystemService(Context.AUDIO_SERVICE);
        //判断是否插上了耳机
        boolean isWiredHeadsetOn = localAudioManager.isWiredHeadsetOn();
        if (!isWiredHeadsetOn) {
            Intent headsetPluggedIntent = new Intent(Intent.ACTION_HEADSET_PLUG);
            headsetPluggedIntent.putExtra("state", 1);
            headsetPluggedIntent.putExtra("microphone", 0);
            headsetPluggedIntent.putExtra("name", "");
            context.sendBroadcast(headsetPluggedIntent);

            Intent meidaButtonIntent = new Intent(Intent.ACTION_MEDIA_BUTTON);
            KeyEvent keyEvent = new KeyEvent(KeyEvent.ACTION_UP, KeyEvent.KEYCODE_HEADSETHOOK);
            meidaButtonIntent.putExtra(Intent.EXTRA_KEY_EVENT,keyEvent);
            context.sendOrderedBroadcast(meidaButtonIntent, null);

            Intent headsetUnpluggedIntent = new Intent(Intent.ACTION_HEADSET_PLUG);
            headsetUnpluggedIntent.putExtra("state", 0);
            headsetUnpluggedIntent.putExtra("microphone", 0);
            headsetUnpluggedIntent.putExtra("name", "");
            context.sendBroadcast(headsetUnpluggedIntent);

        } else {
            Intent meidaButtonIntent = new Intent(Intent.ACTION_MEDIA_BUTTON);
            KeyEvent keyEvent = new KeyEvent(KeyEvent.ACTION_UP, KeyEvent.KEYCODE_HEADSETHOOK);
            meidaButtonIntent.putExtra(Intent.EXTRA_KEY_EVENT,keyEvent);
            context.sendOrderedBroadcast(meidaButtonIntent, null);
        }
    }

    /**
     * 接听电话
     * @param context
     */
    public static void answerRingingCall(Context context) {
        if (Build.VERSION.SDK_INT >= Build.VERSION_CODES.GINGERBREAD) {  //2.3或2.3以上系统
            answerRingingCallWithBroadcast(context);
        } else {
            answerRingingCallWithReflect(context);
        }
    }

    /**
     * 打电话
     * @param context
     * @param phoneNumber
     */
    public static void callPhone(Context context, String phoneNumber) {
        if(!TextUtils.isEmpty(phoneNumber)){
            try {
                Intent callIntent = new Intent(Intent.ACTION_CALL, Uri.parse("tel:"+ phoneNumber));
                context.startActivity(callIntent);
            } catch (Exception e) {
                e.printStackTrace();
            }
        }
    }

    /**
     * 拨电话
     * @param context
     * @param phoneNumber
     */
    public static void dialPhone(Context context, String phoneNumber){
        if(!TextUtils.isEmpty(phoneNumber)){
            try {
                Intent callIntent = new Intent(Intent.ACTION_DIAL, Uri.parse("tel:"+ phoneNumber));
                context.startActivity(callIntent);
            } catch (Exception e) {
                e.printStackTrace();
            }
        }
    }
}
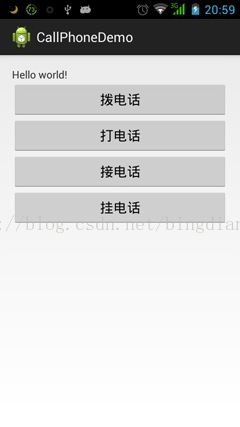
然后,在界面上增加四个操作按钮
activity_main.xml
<LinearLayout xmlns:android="http://schemas.android.com/apk/res/android"
    xmlns:tools="http://schemas.android.com/tools"
    android:layout_width="match_parent"
    android:layout_height="match_parent"
    android:paddingBottom="@dimen/activity_vertical_margin"
    android:paddingLeft="@dimen/activity_horizontal_margin"
    android:paddingRight="@dimen/activity_horizontal_margin"
    android:paddingTop="@dimen/activity_vertical_margin"
    tools:context=".MainActivity"
    android:orientation="vertical" >

    <TextView
        android:layout_width="wrap_content"
        android:layout_height="wrap_content"
        android:text="@string/hello_world" />
    <Button
        android:id="@+id/btn1"
        android:layout_width="fill_parent"
        android:layout_height="wrap_content"
        android:text="拨电话"/>
    <Button
        android:id="@+id/btn2"
        android:layout_width="fill_parent"
        android:layout_height="wrap_content"
        android:text="打电话"/>
    <Button
        android:id="@+id/btn3"
        android:layout_width="fill_parent"
        android:layout_height="wrap_content"
        android:text="接电话"/>
    <Button
        android:id="@+id/btn4"
        android:layout_width="fill_parent"
        android:layout_height="wrap_content"
        android:text="挂电话"/>

</LinearLayout>
package com.sl.callphonedemo;

import android.os.Bundle;
import android.app.Activity;
import android.content.Intent;
import android.view.Menu;
import android.view.View;
import android.view.View.OnClickListener;
import android.widget.Button;

public class MainActivity extends Activity
{
	Button btn1,btn2,btn3,btn4;

	@Override
	protected void onCreate(Bundle savedInstanceState)
	{
		super.onCreate(savedInstanceState);
		setContentView(R.layout.activity_main);

		btn1 = (Button)findViewById(R.id.btn1);
		btn2 = (Button)findViewById(R.id.btn2);
		btn3 = (Button)findViewById(R.id.btn3);
		btn4 = (Button)findViewById(R.id.btn4);
		btn1.setOnClickListener(listener);
		btn2.setOnClickListener(listener);
		btn3.setOnClickListener(listener);
		btn4.setOnClickListener(listener);
	}

	private OnClickListener listener = new OnClickListener()
	{
		@Override
		public void onClick(View v)
		{
			Button btn = (Button)v;
			Intent intent = new Intent();
			switch (btn.getId())
			{
			case R.id.btn1://拨电话
				PhoneUtil.dialPhone(MainActivity.this, "13123456789");
				break;
			case R.id.btn2://打电话
				PhoneUtil.callPhone(MainActivity.this, "13123456789");
				break;
			case R.id.btn3://接电话
				PhoneUtil.answerRingingCall(MainActivity.this);
				break;
			case R.id.btn4://挂电话
				PhoneUtil.endCall(MainActivity.this);
				break;
			default:
				break;
			}
		}
	};
}
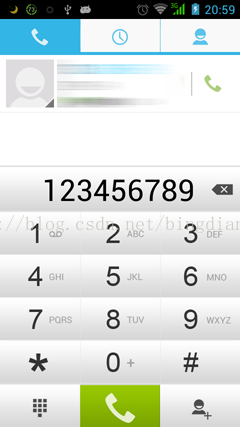
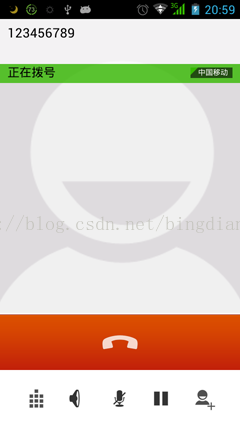
<uses-permission android:name="android.permission.CALL_PHONE"/>最后,我们来看看效果
拨电话效果
打电话效果
关于接电话和挂电话,我这里无法演示。以后如果需要可以在程序中调用这个功能。
好了,就到这了,谢谢大家的支持!


 415
415


 被折叠的 条评论
为什么被折叠?
被折叠的 条评论
为什么被折叠?
 到【灌水乐园】发言


