


介绍
一个强大的hook框架
可以编写自定义的模块来hook各种应用的api 从而达到劫持的效果(修改imei 修改地理位置等)
什么是hook
hook本质就是劫持函数调用
Hook的难点在于寻找函数的入口点、替换函数,这就涉及到函数的连接与加载机制。
基本原理
xposed 原理就是修改系统的关键文件,然后当APP调用系统API时,首先经过xposed,而这些基于xposed的模块就可以选择性的在App调用这些api的时候做一些自己想要的事
情,或者修改返回的结果。
这样app在运行的时候效果就会改变,但app本身并没有被破坏,只是调用系统api的时候,Android系统的表现发生了变化,Xposed作为Java层的重要Hook手段
在一些模拟的场合发挥了重要的作用,比如需要测试模拟的地理位置,就可以Hook掉相关的接口,返回我们需要的值即可,
Xposed的底层原理是通过替换/system/bin/app_precesss 程序控制zygote进程,使得它在系统启动的过程中会加载Xposed framework的一个jar文件即XposedBridge.jar,从而完成
对Zygote进程及其创建的Dalvik虚拟机的劫持,并且能够允许开发者独立的替代任何class,例如framework本身,系统UI又或者随意的一个app。
zygote进程是Android中所有进程的父进程,是init进程之后的第一个进程,所有的进程都是由zygote进程孵化出来,zygote进程会完成虚拟机的初始化,库的加载,
预置类库的加载和初始化等等操作,而以后如果需要开启新的应用程序,zygote进程便会Fork一份出来,从而使应用程序共享了已经加载的资源等等,加快了启动速度,也提高了
性能。而Xposed由于劫持了zygote进程,就相当于劫持了所有的应用程序,从而可以实现Hook掉目标程序达到自己想要的目的
开源地址
Xposed源码地址为:https://github.com/rovo89
Xposed文件下载地址为:http://dl-xda.xposed.info/framework/
The native part of the Xposed framework (mainly the modified app_process binary).
The Java part of the Xposed framework.
Xposed框架打包工具,用于生成不同平台不同android版本的框架文件
Xposed傻瓜式安装工具
框架安装
方式一
1:root
2:刷入recovery
3:刷入xposed framework
方式二
1:root
2:安装XposedInstall
3:使用XposedInstall进行安装
方式三
使用VirtualXposed 构建沙箱环境
VirtualXposed 基于 VirtualApp 框架
VirtualApp(以下称VA)是一个App虚拟化引擎(简称VA)。VirtualApp创建了一个虚拟空间,
你可以在虚拟空间内任意的安装、启动和卸载APK,这一切都与外部隔离,如同一个沙盒。运行在VA中的APK无需在Android系统中安装即可运行
由于沙盒的存在 Xposed可以很容易安装在这个沙盒里面
VirtualXposed = VirtualApp + XposedFramework
Xposed的攻与防 -----攻
Xposed的攻其实就是hook掉目标应用的过程,此处选择微信作为hook对象,实现简单的自动抢红包功能
一:搭建hook环境
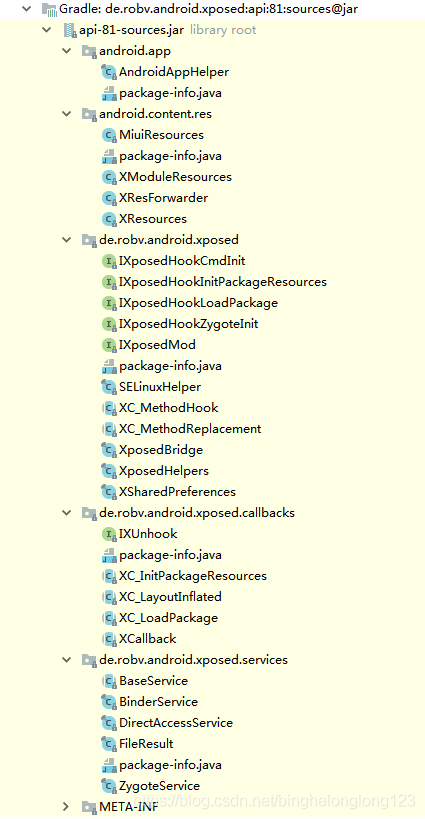
1:创建普通studio工程
2:gradle引入xposedBridge工具
provided 'de.robv.android.xposed:api:81'
provided 'de.robv.android.xposed:api:81:sources'
source是源码引入,方便阅读bridge源码
3:创建MainHook类
MainHook继承自IXposedHookLoadPackage,IXposedHookZygoteInit 并实现handleLoadPackage,initZygote方法
4:在assets目录下创建xposed_init文件并写入MainHook的全局路径
此处即完成了一个基础hook环境的搭建,MainHook的handleLoadPackage和initZygote方法就是hook旅程的出发点
二:认识xposedBridge工具
AndroidAppHelper
包含有关当前应用程序的各种方法
它包含了获取当前应用的包信息,进程信息,ApplicationInfo。Application,SharedPreferences等对象的方法
XModuleResources
XResForwarder
XResources
实现对资源的hook
IXposedHookCmdInit(hide)
在对java命令行初始化时进行hook后回调
IXposedHookInitPackageResources
在应用的资源文件被完成底层hook后调用,此时你可以进一步hook应用资源
IXposedHookLoadPackage
在应用程序源码被完成底层hook后调用,此时你可以进一步hook应用的api及各种源码
IXposedHookZygoteInit
该接口在zygote进程被xposed 底层hook的时候后被调用,在该接口的实现中,你可以初始化一些必要的类
也可以在该回调中对android框架的一些东西进行hook
XposedBridge
包含Xposed的核心逻辑,提供本地的初始化和各种回调,还提供了各种hook的方法
比如
log()提供log输出能力
hookAllMethods()hook方法
hookAllConstructors()hook构造方法
invokeOriginalMethod()调用应用的原始方法
XposedHelpers
工具类,帮助简化一些流程,对一些hook过程中使用的常用功能方法进行封装
XSharedPreferences
提供一个没有兼容性差别的读取Preferences的工具
当hook某个应用的某个方法时,就可以通过xposedbridge jar包里的XSharedPreferences类去加载指定路径下得xml文件来获取返回数据。所以XSharedPreferences不需要写进你编写的插件模块,只需编译即可。在gradle里要把compile或者implementation换成provided。
在主界面编写插件功能,一般都是通过Sharedprefences读写本地数据。XSharedPreferences是在重启手机后,initZygote时,通过XSharedPreferences去加载这个xml文件,把数据都读进内存。需要返回数据时就去map里去查找数据返回数据。
三:分析目标应用特征
分析流程:
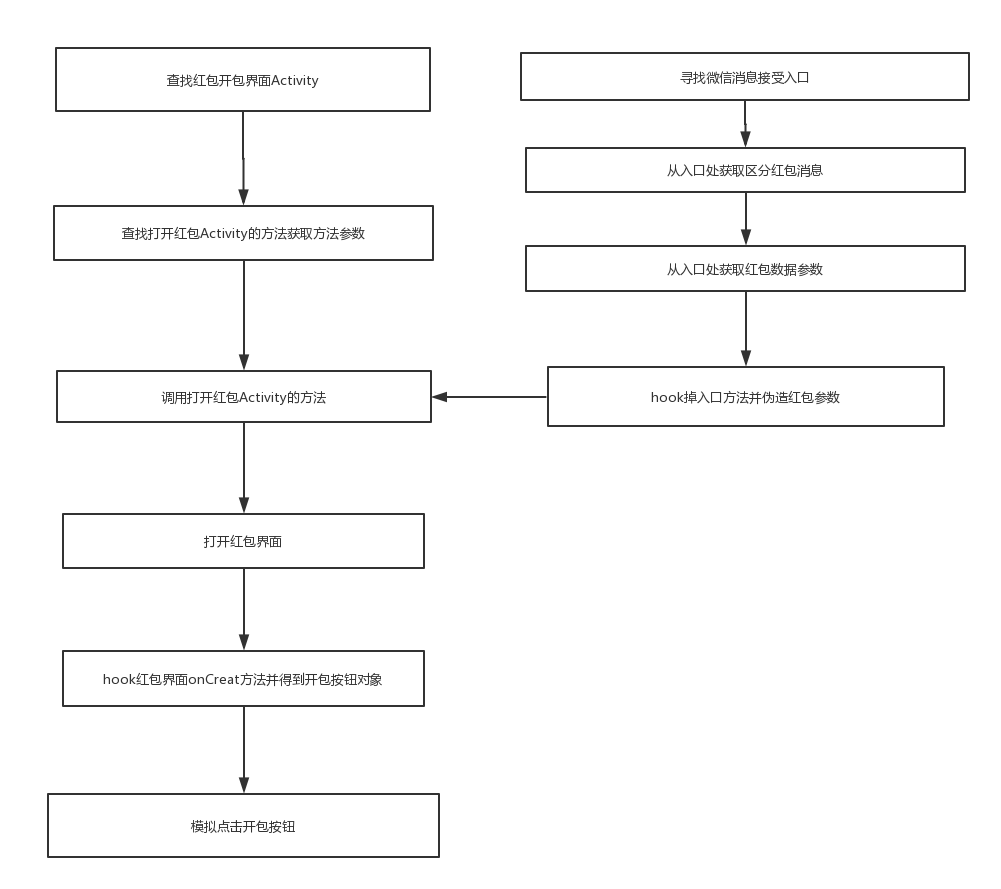
四:开始hook之旅
查找开包界面

打开红包领取界面执行
adb shell dumpsys activity activities 列出当前Acitivyt堆栈
|
|
可以看出当前红包领取界面的名称是
LuckyMoneyReceiveUI 下面开始反编译微信源码 获取LuckyMoneyReceiveUI 的调用逻辑
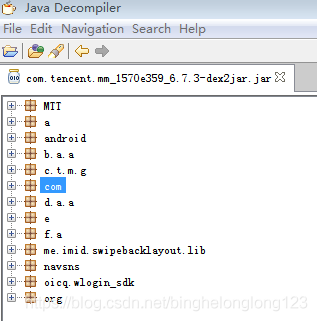
此处使用的工具是dex-tools和jd-gui-windows
dex-tools用于将微信apk反编译为jar文件
jd-gui-windows用于查看及全局检索jar代码
最终反编译结果如图
开始全局搜索LuckyMoneyReceiveUI
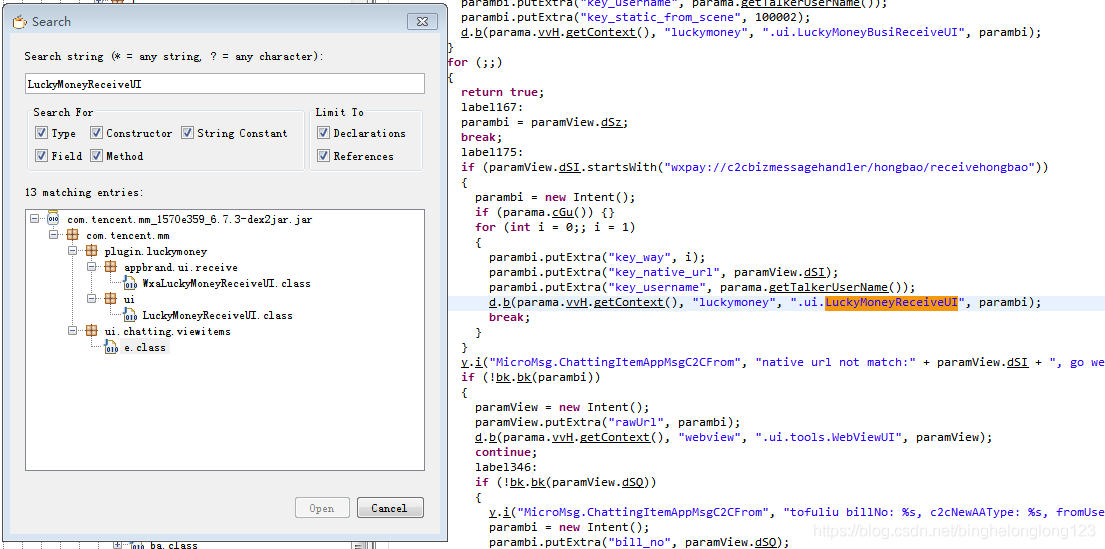
从搜索结果可以看出来 LuckyMoneyReceiveUI 的搜索结果并不多 上图橙色部位的代码应该就是调起红包界面的方法
由此可知 调用打开红包界面的类为 com.tencent.mm.bs.d.class 的 b(Context paramContext, String paramString1, String paramString2, Intent paramIntent)方法
b方法中需要三个参数
参数1:context或者Activity
参数2/参数3:固定值 “luckmoney” “.ui.LucyMonkeyReceiveUI”
参数4:Intent 包含key_way , key_native_url , key_username
那么现在进一步的目标就很了然了
我们要构造这个Intent 而构造这个Intent 需要三个参数
思路是这样
1:参数一定是跟对方发过来的红包有关系,或者说是包含在红包消息的数据包里面
2:红包消息在接收后一定是要存入到数据库里面 而且一般都是即时存入的
3:找到存数据库的地方 把数据先打印出来看看
OK 全局搜索SQLiteDatabase
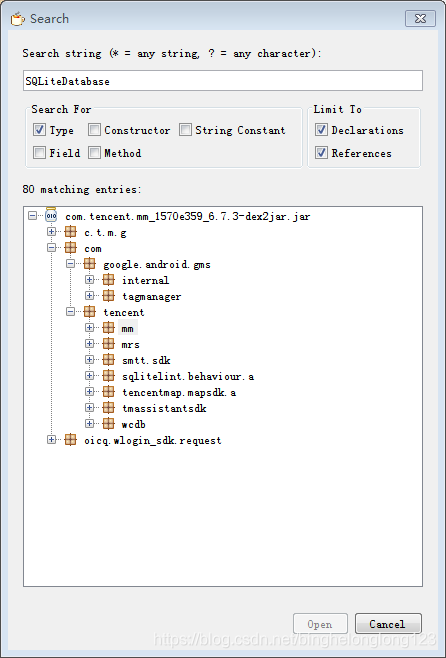
看到一个wcdb的包名
wcdb是一个微信开源的数据库组件,怀疑数据库读写就是在这个里面
从wcdb包下找到SQLiteDatabase这个类 查找insert方法 发现最终均调用insertWithOnConflict方法
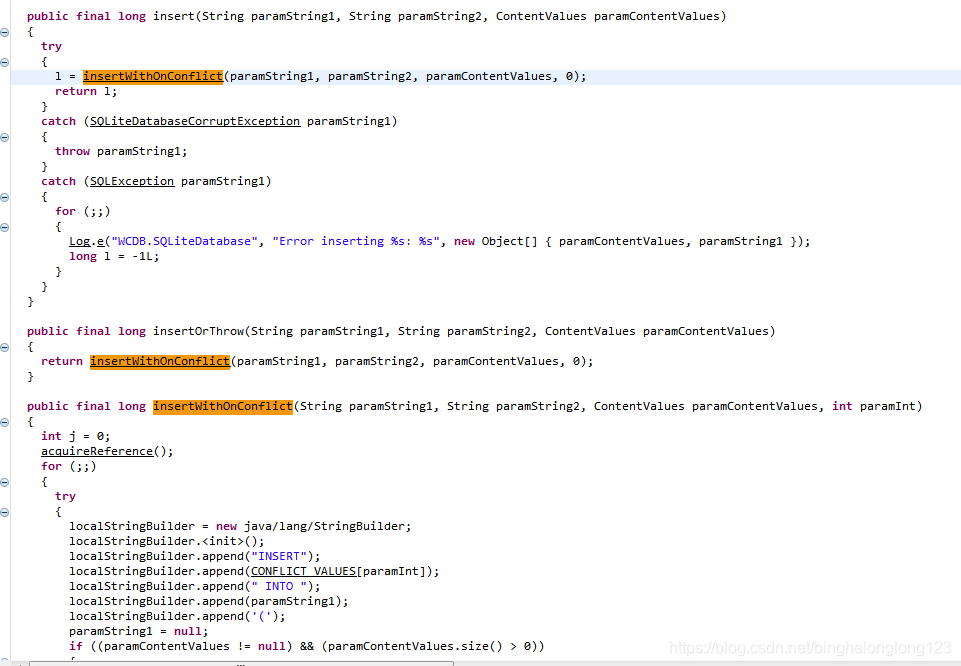
编写代码hook该方法 ,打印数据查看红包参数
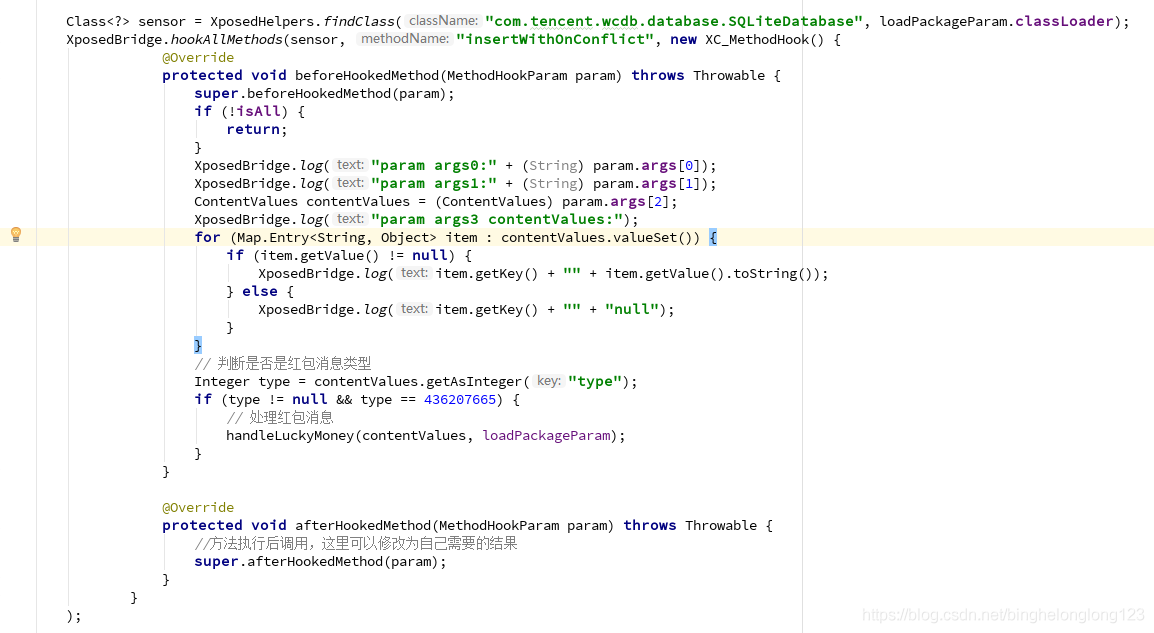
打印出来的信息如下所示
|
|
从这个红包数据里面我们可以得到几个信息
1:红包数据的type 是 type:436207665 这里可以用来判断数据是一个红包还是一个普通消息
2: key_native_url , key_username 这三个都有了 key_username 其实就是talker key_native_url就是native_url
只剩一个key_way 不知道是啥但是我们可以hook原先的方法把这个key_way 打印出来看 多次尝试之后 得知这个key_way其实是一个固定值1
数据都拿到了 我们就可以直接调用开红包的方法了 调用该方法需要用到一个context 这里我们直接使用AndroidAppHelper提供的当前的Application的Context
|
|
这个时候红包界面就弹出了
下一步就是点击红包界面上的按钮 领取红包
还是查看LuckyMoneyReceiveUI 的代码 找到界面View初始化的地方
|
|
关注一行
this.lNZ = ((Button)findViewById(a.f.lucky_money_recieve_open));傻子都能看出来“LNZ”按钮对象就是 打开红包的按钮 剩下的就是点击这个按钮
从源码可以看出来LNZ按钮在初始化之后并没有立刻设置onClick事件。因此我们找到设置事件的方法 这个方法被混淆后方法名称是c 没错 hook它
|
|
到此为止 全部完成 录个视频测试一下

Xposed的攻与防 -----防
转载自 https://blog.coderstory.cn/about-xposed/
1.尝试加载xposed的类,如果能加载则表示已经安装了
XposedHelpers类中存在fieldCache methodCache constructorCache 这三个静态成员,都是hashmap类型,凡是需要被hook的且已经被找到的对象都会被缓存到这三个map里面。
我们通过便利这三个map来找到相关hook信息。
方法a是检测xposed到底改了什么东西存放到a中可以收集相关信息并上报。
|
|
|
|
2.检测xposed相关文件
检测XposedBridge.jar这个文件和de.robv.android.xposed.XposedBridge
XposedBridge.jar存放在framework里面,de.robv.android.xposed.XposedBridge是开发xposed框架使用的主要接口。
在这个方法里读取了maps这个文件,在linux内核中,这个文件存储了进程映射了的内存区域和访问权限。在这里我们可以看到这个进程加载了那些文件。
如果进程加载了xposed相关的so库或者jar则表示xposed框架已注入。
|
|
3.检测堆栈信息
如果你的手机安装了xposed框架,那么你在查看app崩溃时候的堆栈信息,一定能在顶层找到xposed的类信息,
既然xposed想改你的信息,那么在调用栈里面肯定是有它的身影的。比如出现de.robv.android.xposed.XposedBridge这个类,方法被hook的时候调用栈里会出现de.robv.android.xposed.XposedBridge.handleHookedMethod 和de.robv.android.xposed.XposedBridge.invokeOriginalMethodNative这些xposed的方法,在dalvik.system.NativeStart.main方法后出现de.robv.android.xposed.XposedBridge.main调用
|
|
4.检测方法是否被篡改
Modifier.isNative方法判断是否是native修饰的方法,
xposedhook方法的时候,会把方法转位native方法,我们检测native方法中不该为native的方法来达到检测的目的,
比如getDeviceId,getMacAddress这些方法如果是native则表示已经被篡改了。
|
|
5.检测包名
这个是最简单也是最不靠谱的方法,因为只要禁止app读取应用列表就没办法了。
|
|
反制xposed
通过反射重写xposed设置,直接禁用
这个方法是酷安里中抄来的。重写application,在onCreate中写入
|
|
Xposed 在测试领域的应用
1:渗透测试
2:构造调试数据
3:自动化测试埋点
4:脚本录制
5:构造异常场景
6:app建模
本文仅做本人学习记录所用,感谢以下作者
https://blog.coderstory.cn/about-xposed/(摘抄Xposed防御部分段落)
https://blog.csdn.net/xiao_nian/article/details/79391417(提供抢红包思路及摘抄部分代码)
本文所描述的抢红包功能仅限学习交流Xposed使用,由该功能造成的法律问题由使用者承担


 1160
1160


 被折叠的 条评论
为什么被折叠?
被折叠的 条评论
为什么被折叠?
 到【灌水乐园】发言


![wx.gtimg.com/hongbao/1800/hb.png]]></thumburl](http://km.vivo.xyz/pages/wx.gtimg.com/hongbao/1800/hb.png%5D%5D%3E%3C/thumburl)
![wx.gtimg.com/hongbao/1800/hb.png]]></iconurl](http://km.vivo.xyz/pages/wx.gtimg.com/hongbao/1800/hb.png%5D%5D%3E%3C/iconurl)