


适用于:
- 想学习嵌入式开发,但又没有购买开发板的情况
- 开发测试阶段避免繁琐耗时下载到主板
- 便于调试驱动及内核
- 与外设关联不大时
环 境:
- vmare 15 pro
- ubuntu 18.04
- qemu 6.2.0
测试虚拟主板 :vexpress-a9 (ARM Versatile Express for Cortex-A9)
源码下载:
- qemu : https://download.qemu.org
- u-boot: ftp://ftp.denx.de/pub/u-boot/
- buildroot: https://buildroot.org/downloads/
需要的支持库:
apt-get install libpixman-1-dev

sudo apt-get install zlib1g-dev
sudo apt-get install libglib2.0-0
sudo apt-get install libglib2.0-dev
大概步骤:
- 一、下载安装qemu
- 二、下载安装交叉编译器
- 三、下载、编译u-boot (bootloader)
- 四、下载、编译、安装文件系统(buildroot制作)
- 五、内核zImage启动测试:(方法一,sd参数)
- 六、启动内核方法二(initrd参数)
- 七、启动内核方法三:(先启动u-boot - 加载内核到DRAM - bootz启动)
- 八、启动内核方法四:tftp-手动
- 九、启动内核方法五:nfs-手动
- 十、启动内核方法七:自动用tftp加载内核到DRAM并启动
- 十一、启动内核方法七:自动用nfs加载内核到DRAM并启动
- 十二、问题
- 十三、其它说明
安装qemu :
安装方法一:
命令:sudo apt-get install qemu
biren@ubuntu:~$ sudo apt-get install qemu

The following additional packages will be installed:
  binfmt-support cpu-checker ibverbs-providers ipxe-qemu
  ipxe-qemu-256k-compat-efi-roms libaio1 libcacard0 libfdt1 libibverbs1
  libiscsi7 libnl-route-3-200 librados2 librbd1 librdmacm1 libsdl1.2debian
  libspice-server1 libusbredirparser1 libxen-4.9 libxenstore3.0 msr-tools
  qemu-block-extra qemu-slof qemu-system qemu-system-arm qemu-system-common
  qemu-system-mips qemu-system-misc qemu-system-ppc qemu-system-s390x
  qemu-system-sparc qemu-system-x86 qemu-user qemu-user-binfmt qemu-utils
  seabios sharutils
Suggested packages:
  qemu-user-static samba vde2 qemu-efi openbios-ppc openhackware
  openbios-sparc sgabios ovmf debootstrap sharutils-doc bsd-mailx | mailx

0 upgraded, 37 newly installed, 0 to remove and 148 not upgraded.
Need to get 62.4 MB of archives.
After this operation, 341 MB of additional disk space will be used.
Do you want to continue? [Y/n]
此种安装方法的缺点是不能自主确定安装的版本。
安装方法二:
从qemu官网下载源码文件qemu-6.2.0.tar.xz
解压:
biren@ubuntu:~$ tar -xvf qemu-6.2.0.tar.xz编 译:
命令:./configure --prefix=/usr/local/qemu6.2.0
问题一 :
ERROR: pkg-config binary 'pkg-config' not found
biren@ubuntu:~$ cd qemu-6.2.0/
biren@ubuntu:~/qemu-6.2.0$ ./configure  --prefix=/usr/local/qemu6.2.0

ERROR: pkg-config binary 'pkg-config' not found
解决:
安装pkg-config
biren@ubuntu:~/qemu-6.2.0$ sudo apt-get install pkg-config

The following NEW packages will be installed:
  pkg-config
0 upgraded, 1 newly installed, 0 to remove and 235 not upgraded.
Need to get 45.0 kB of archives.
After this operation, 185 kB of additional disk space will be used.
Get:1 http://mirrors.aliyun.com/ubuntu bionic/main amd64 pkg-config amd64 0.29.1-0ubuntu2 [45.0 kB]
Fetched 45.0 kB in 0s (176 kB/s)
Selecting previously unselected package pkg-config.
(Reading database ... 140996 files and directories currently installed.)
Preparing to unpack .../pkg-config_0.29.1-0ubuntu2_amd64.deb ...
Unpacking pkg-config (0.29.1-0ubuntu2) ...
Setting up pkg-config (0.29.1-0ubuntu2) ...
Processing triggers for man-db (2.8.3-2ubuntu0.1) ...问题二:ERROR: Cannot find Ninja
biren@ubuntu:~/qemu-6.2.0$ ./configure --prefix=/usr/local/qemu6.2.0
Using './build' as the directory for build output

ERROR: Cannot find Ninja
解决:
安装ninja-build
biren@ubuntu:~/qemu-6.2.0$ sudo apt-get install ninja-build 问题三:ERROR: glib-2.56 gthread-2.0 is required to compile QEMU
biren@ubuntu:~/qemu-6.2.0$ ./configure --prefix=/usr/local/qemu6.2.0
Using './build' as the directory for build output

ERROR: glib-2.56 gthread-2.0 is required to compile QEMU
解决:
biren@ubuntu:~/qemu-6.2.0$ sudo apt-get install libglib2.0

Note, selecting 'libglib2.0-cil-dev' for regex 'libglib2.0'
Note, selecting 'libglib2.0-tests' for regex 'libglib2.0'
Note, selecting 'libglib2.0-0-dbg' for regex 'libglib2.0'
Note, selecting 'libglib2.0-dev-bin' for regex 'libglib2.0'
Note, selecting 'libglib2.0-bin' for regex 'libglib2.0'
Note, selecting 'libglib2.0-cil' for regex 'libglib2.0'
Note, selecting 'libglib2.0-dev' for regex 'libglib2.0'
Note, selecting 'libglib2.0-doc' for regex 'libglib2.0'
Note, selecting 'libglib2.0-data' for regex 'libglib2.0'
Note, selecting 'libglib2.0-0' for regex 'libglib2.0'
The following additional packages will be installed:
  binfmt-support ca-certificates-mono cli-common libmono-corlib4.5-cil
  libmono-i18n-west4.0-cil libmono-i18n4.0-cil libmono-security4.0-cil
  libmono-system-configuration4.0-cil libmono-system-security4.0-cil
  libmono-system-xml4.0-cil libmono-system4.0-cil mono-4.0-gac mono-gac
  mono-runtime mono-runtime-common mono-runtime-sgen
Suggested packages:
  monodoc-gtk2.0-manual devhelp libmono-i18n4.0-all libgamin0
The following NEW packages will be installed:
  binfmt-support ca-certificates-mono cli-common libglib2.0-cil
  libglib2.0-cil-dev libglib2.0-dev libglib2.0-dev-bin libglib2.0-doc
  libglib2.0-tests libmono-corlib4.5-cil libmono-i18n-west4.0-cil
  libmono-i18n4.0-cil libmono-security4.0-cil
  libmono-system-configuration4.0-cil libmono-system-security4.0-cil
  libmono-system-xml4.0-cil libmono-system4.0-cil mono-4.0-gac mono-gac
  mono-runtime mono-runtime-common mono-runtime-sgen
The following packages will be upgraded:
  libglib2.0-0 libglib2.0-bin libglib2.0-data
3 upgraded, 22 newly installed, 0 to remove and 232 not upgraded.
Need to get 10.1 MB/10.2 MB of archives.
After this operation, 56.2 MB of additional disk space will be used.
Do you want to continue? [Y/n] 问题四:ERROR: Dependency "pixman-1" not found
Run-time dependency appleframeworks found: NO (tried framework)
Found pkg-config: /usr/bin/pkg-config (0.29.1)
Run-time dependency pixman-1 found: NO (tried pkgconfig)

../meson.build:415:2: ERROR: Dependency "pixman-1" not found, tried pkgconfig
A full log can be found at /home/biren/qemu-6.2.0/build/meson-logs/meson-log.txt

ERROR: meson setup failed
解决:
biren@ubuntu:~/qemu-6.2.0$ sudo apt-get install libpixman-1-dev
The following NEW packages will be installed:
  libpixman-1-dev
0 upgraded, 1 newly installed, 0 to remove and 232 not upgraded.
Need to get 244 kB of archives.
After this operation, 959 kB of additional disk space will be used.
继续安装qemu...:
biren@ubuntu:~/qemu-6.2.0$ ./configure --prefix=/usr/local/qemu6.2.0
biren@ubuntu:~/qemu-6.2.0$ make -j4
biren@ubuntu:~/qemu-6.2.0$ make install
将bin目录添加到环境变量PATH:
biren@ubuntu:~$ export PATH=$PATH:/usr/local/qemu6.2.0/bin
或在home目录下的.bashrc文件里加入上面这句。
qemu安装完成。
查看支持的主板:qemu-system-arm -machine help
biren@ubuntu:~$ qemu-system-arm -machine help
Supported machines are:
akita                Sharp SL-C1000 (Akita) PDA (PXA270)
ast2500-evb          Aspeed AST2500 EVB (ARM1176)
ast2600-evb          Aspeed AST2600 EVB (Cortex-A7)
borzoi               Sharp SL-C3100 (Borzoi) PDA (PXA270)
canon-a1100          Canon PowerShot A1100 IS (ARM946)
cheetah              Palm Tungsten|E aka. Cheetah PDA (OMAP310)
collie               Sharp SL-5500 (Collie) PDA (SA-1110)
connex               Gumstix Connex (PXA255)
cubieboard           cubietech cubieboard (Cortex-A8)
emcraft-sf2          SmartFusion2 SOM kit from Emcraft (M2S010)
fp5280g2-bmc         Inspur FP5280G2 BMC (ARM1176)
fuji-bmc             Facebook Fuji BMC (Cortex-A7)
g220a-bmc            Bytedance G220A BMC (ARM1176)
highbank             Calxeda Highbank (ECX-1000)
imx25-pdk            ARM i.MX25 PDK board (ARM926)
integratorcp         ARM Integrator/CP (ARM926EJ-S)
kudo-bmc             Kudo BMC (Cortex-A9)
kzm                  ARM KZM Emulation Baseboard (ARM1136)
lm3s6965evb          Stellaris LM3S6965EVB (Cortex-M3)
lm3s811evb           Stellaris LM3S811EVB (Cortex-M3)
mainstone            Mainstone II (PXA27x)
mcimx6ul-evk         Freescale i.MX6UL Evaluation Kit (Cortex-A7)
mcimx7d-sabre        Freescale i.MX7 DUAL SABRE (Cortex-A7)
microbit             BBC micro:bit (Cortex-M0)
midway               Calxeda Midway (ECX-2000)
mps2-an385           ARM MPS2 with AN385 FPGA image for Cortex-M3
mps2-an386           ARM MPS2 with AN386 FPGA image for Cortex-M4
mps2-an500           ARM MPS2 with AN500 FPGA image for Cortex-M7
mps2-an505           ARM MPS2 with AN505 FPGA image for Cortex-M33
mps2-an511           ARM MPS2 with AN511 DesignStart FPGA image for Cortex-M3
mps2-an521           ARM MPS2 with AN521 FPGA image for dual Cortex-M33
mps3-an524           ARM MPS3 with AN524 FPGA image for dual Cortex-M33
mps3-an547           ARM MPS3 with AN547 FPGA image for Cortex-M55
musca-a              ARM Musca-A board (dual Cortex-M33)
musca-b1             ARM Musca-B1 board (dual Cortex-M33)
musicpal             Marvell 88w8618 / MusicPal (ARM926EJ-S)
n800                 Nokia N800 tablet aka. RX-34 (OMAP2420)
n810                 Nokia N810 tablet aka. RX-44 (OMAP2420)
netduino2            Netduino 2 Machine (Cortex-M3)
netduinoplus2        Netduino Plus 2 Machine (Cortex-M4)
none                 empty machine
npcm750-evb          Nuvoton NPCM750 Evaluation Board (Cortex-A9)
nuri                 Samsung NURI board (Exynos4210)
orangepi-pc          Orange Pi PC (Cortex-A7)
palmetto-bmc         OpenPOWER Palmetto BMC (ARM926EJ-S)
quanta-gbs-bmc       Quanta GBS (Cortex-A9)
quanta-gsj           Quanta GSJ (Cortex-A9)
quanta-q71l-bmc      Quanta-Q71l BMC (ARM926EJ-S)
rainier-bmc          IBM Rainier BMC (Cortex-A7)
raspi0               Raspberry Pi Zero (revision 1.2)
raspi1ap             Raspberry Pi A+ (revision 1.1)
raspi2b              Raspberry Pi 2B (revision 1.1)
realview-eb          ARM RealView Emulation Baseboard (ARM926EJ-S)
realview-eb-mpcore   ARM RealView Emulation Baseboard (ARM11MPCore)
realview-pb-a8       ARM RealView Platform Baseboard for Cortex-A8
realview-pbx-a9      ARM RealView Platform Baseboard Explore for Cortex-A9
romulus-bmc          OpenPOWER Romulus BMC (ARM1176)
sabrelite            Freescale i.MX6 Quad SABRE Lite Board (Cortex-A9)
smdkc210             Samsung SMDKC210 board (Exynos4210)
sonorapass-bmc       OCP SonoraPass BMC (ARM1176)
spitz                Sharp SL-C3000 (Spitz) PDA (PXA270)
stm32vldiscovery     ST STM32VLDISCOVERY (Cortex-M3)
supermicrox11-bmc    Supermicro X11 BMC (ARM926EJ-S)
swift-bmc            OpenPOWER Swift BMC (ARM1176) (deprecated)
sx1                  Siemens SX1 (OMAP310) V2
sx1-v1               Siemens SX1 (OMAP310) V1
tacoma-bmc           OpenPOWER Tacoma BMC (Cortex-A7)
terrier              Sharp SL-C3200 (Terrier) PDA (PXA270)
tosa                 Sharp SL-6000 (Tosa) PDA (PXA255)
verdex               Gumstix Verdex (PXA270)
versatileab          ARM Versatile/AB (ARM926EJ-S)
versatilepb          ARM Versatile/PB (ARM926EJ-S)
vexpress-a15         ARM Versatile Express for Cortex-A15
vexpress-a9          ARM Versatile Express for Cortex-A9
virt-2.10            QEMU 2.10 ARM Virtual Machine
virt-2.11            QEMU 2.11 ARM Virtual Machine
virt-2.12            QEMU 2.12 ARM Virtual Machine
virt-2.6             QEMU 2.6 ARM Virtual Machine
virt-2.7             QEMU 2.7 ARM Virtual Machine
virt-2.8             QEMU 2.8 ARM Virtual Machine
virt-2.9             QEMU 2.9 ARM Virtual Machine
virt-3.0             QEMU 3.0 ARM Virtual Machine
virt-3.1             QEMU 3.1 ARM Virtual Machine
virt-4.0             QEMU 4.0 ARM Virtual Machine
virt-4.1             QEMU 4.1 ARM Virtual Machine
virt-4.2             QEMU 4.2 ARM Virtual Machine
virt-5.0             QEMU 5.0 ARM Virtual Machine
virt-5.1             QEMU 5.1 ARM Virtual Machine
virt-5.2             QEMU 5.2 ARM Virtual Machine
virt-6.0             QEMU 6.0 ARM Virtual Machine
virt-6.1             QEMU 6.1 ARM Virtual Machine
virt                 QEMU 6.2 ARM Virtual Machine (alias of virt-6.2)
virt-6.2             QEMU 6.2 ARM Virtual Machine
witherspoon-bmc      OpenPOWER Witherspoon BMC (ARM1176)
xilinx-zynq-a9       Xilinx Zynq Platform Baseboard for Cortex-A9
z2                   Zipit Z2 (PXA27x)
安装交叉编译器:
命令:sudo apt-get install gcc-arm-linux-gnueabi
biren@ubuntu:~$ sudo apt-get install gcc-arm-linux-gnueabi

The following additional packages will be installed:
  binutils binutils-arm-linux-gnueabi binutils-common
  binutils-x86-64-linux-gnu cpp-7-arm-linux-gnueabi cpp-arm-linux-gnueabi
  gcc-7-arm-linux-gnueabi gcc-7-arm-linux-gnueabi-base gcc-7-cross-base
  gcc-8-cross-base libasan4-armel-cross libatomic1-armel-cross libbinutils
  libc6-armel-cross libc6-dev-armel-cross libcilkrts5-armel-cross
  libgcc-7-dev-armel-cross libgcc1-armel-cross libgomp1-armel-cross
  libstdc++6-armel-cross libubsan0-armel-cross linux-libc-dev-armel-cross
Suggested packages:
  binutils-doc gcc-7-locales cpp-doc gcc-7-multilib-arm-linux-gnueabi
  gcc-7-doc libgcc1-dbg-armel-cross libgomp1-dbg-armel-cross
  libitm1-dbg-armel-cross libatomic1-dbg-armel-cross libasan4-dbg-armel-cross
  liblsan0-dbg-armel-cross libtsan0-dbg-armel-cross libubsan0-dbg-armel-cross
  libcilkrts5-dbg-armel-cross libmpx2-dbg-armel-cross
  libquadmath0-dbg-armel-cross gdb-arm-linux-gnueabi gcc-doc
The following packages will be REMOVED:
  gcc-multilib
The following NEW packages will be installed:
  binutils-arm-linux-gnueabi cpp-7-arm-linux-gnueabi cpp-arm-linux-gnueabi
  gcc-7-arm-linux-gnueabi gcc-7-arm-linux-gnueabi-base gcc-7-cross-base
  gcc-8-cross-base gcc-arm-linux-gnueabi libasan4-armel-cross
  libatomic1-armel-cross libc6-armel-cross libc6-dev-armel-cross
  libcilkrts5-armel-cross libgcc-7-dev-armel-cross libgcc1-armel-cross
  libgomp1-armel-cross libstdc++6-armel-cross libubsan0-armel-cross
  linux-libc-dev-armel-cross
The following packages will be upgraded:
  binutils binutils-common binutils-x86-64-linux-gnu libbinutils
4 upgraded, 19 newly installed, 1 to remove and 228 not upgraded.
Need to get 23.9 MB of archives.
After this operation, 69.9 MB of additional disk space will be used.
Do you want to continue? [Y/n]
也可以直接下载对应文件后配置:
下载地址:
- http://releases.linaro.org/components/toolchain/binaries/
- https://launchpad.net/gcc-arm-embedded/+download
查询安装情况:
biren@ubuntu:~$ arm-linux-gnueabi-
arm-linux-gnueabi-addr2line     arm-linux-gnueabi-gcov-7
arm-linux-gnueabi-ar            arm-linux-gnueabi-gcov-dump
arm-linux-gnueabi-as            arm-linux-gnueabi-gcov-dump-7
arm-linux-gnueabi-c++filt       arm-linux-gnueabi-gcov-tool
arm-linux-gnueabi-cpp           arm-linux-gnueabi-gcov-tool-7
arm-linux-gnueabi-cpp-7         arm-linux-gnueabi-gprof
arm-linux-gnueabi-dwp           arm-linux-gnueabi-ld
arm-linux-gnueabi-elfedit       arm-linux-gnueabi-ld.bfd
arm-linux-gnueabi-gcc           arm-linux-gnueabi-ld.gold
arm-linux-gnueabi-gcc-7         arm-linux-gnueabi-nm
arm-linux-gnueabi-gcc-ar        arm-linux-gnueabi-objcopy
arm-linux-gnueabi-gcc-ar-7      arm-linux-gnueabi-objdump
arm-linux-gnueabi-gcc-nm        arm-linux-gnueabi-ranlib
arm-linux-gnueabi-gcc-nm-7      arm-linux-gnueabi-readelf
arm-linux-gnueabi-gcc-ranlib    arm-linux-gnueabi-size
arm-linux-gnueabi-gcc-ranlib-7  arm-linux-gnueabi-strings
arm-linux-gnueabi-gcov          arm-linux-gnueabi-strip
下载、编译uboot :
下载地址:ftp://ftp.denx.de/pub/u-boot/
解压:
biren@ubuntu:~$ tar -xvf u-boot-2019.10.tar.bz2

biren@ubuntu:~$ cd u-boot-2019.10/
biren@ubuntu:~/u-boot-2019.10$ ll configs/vexp*
-rw-rw-r-- 1 biren biren 1251 Oct  8  2019 configs/vexpress_aemv8a_juno_defconfig
-rw-rw-r-- 1 biren biren 1120 Oct  8  2019 configs/vexpress_aemv8a_semi_defconfig
-rw-rw-r-- 1 biren biren  963 Oct  8  2019 configs/vexpress_ca15_tc2_defconfig
-rw-rw-r-- 1 biren biren  905 Oct  8  2019 configs/vexpress_ca5x2_defconfig
-rw-rw-r-- 1 biren biren  936 Oct  8  2019 configs/vexpress_ca9x4_defconfig
以vexpress_ca9x4_defconfig为示例
编译u-boot :
biren@ubuntu:~/u-boot-2019.10$ make vexpress_ca9x4_defconfig
#
# configuration written to .config
#
biren@ubuntu:~/u-boot-2019.10$ make CROSS_COMPILE=arm-linux-gnueabi-  all
结果:
产生的主要文件:u-boot , u-boot.bin ...
biren@ubuntu:~/u-boot-2019.10$ ls
api        doc            Kbuild       README      u-boot.cfg.configs
arch       Documentation  Kconfig      scripts     u-boot.lds
board      drivers        lib          System.map  u-boot.map
cmd        dts            Licenses     test        u-boot-nodtb.bin
common     env            MAINTAINERS  tools       u-boot.srec
config.mk  examples       Makefile     u-boot      u-boot.sym
configs    fs             net          u-boot.bin
disk       include        post         u-boot.cfg
测试u_boot启动:
命令:qemu-system-arm -M vexpress-a9 -m 512M -kernel ~/u-boot-2019.10/u-boot -nographic
biren@ubuntu:~/buildroot-2019.11-rc1/output/images$ qemu-system-arm -M vexpress-a9 -m 512M -kernel ~/u-boot-2019.10/u-boot -nographic
U-Boot 2019.10 (Jun 23 2022 - 22:56:12 +0800)

DRAM:  512 MiB
WARNING: Caches not enabled
Flash: 128 MiB
MMC:   MMC: 0
*** Warning - bad CRC, using default environment

In:    serial
Out:   serial
Err:   serial
Net:   smc911x-0
Hit any key to stop autoboot:  0
MMC Device 1 not found
no mmc device at slot 1
Card did not respond to voltage select!
smc911x: MAC 52:54:00:12:34:56
smc911x: detected LAN9118 controller
smc911x: phy initialized
smc911x: MAC 52:54:00:12:34:56
BOOTP broadcast 1
DHCP client bound to address 10.0.2.15 (5 ms)
*** Warning: no boot file name; using '0A00020F.img'
Using smc911x-0 device
TFTP from server 10.0.2.2; our IP address is 10.0.2.15
Filename '0A00020F.img'.
smc911x: MAC 52:54:00:12:34:56
。。。。。。
Wrong Image Format for bootm command
ERROR: can't get kernel image!       (此时还不能启动内核)
=>
打印环境变量:
=> printenv
arch=arm
baudrate=38400
board=vexpress
board_name=vexpress
boot_a_script=load ${devtype} ${devnum}:${distro_bootpart} ${scriptaddr} ${prefix}${script}; source ${scriptaddr}
boot_extlinux=sysboot ${devtype} ${devnum}:${distro_bootpart} any ${scriptaddr} ${prefix}${boot_syslinux_conf}
boot_prefixes=/ /boot/
boot_script_dhcp=boot.scr.uimg
boot_scripts=boot.scr.uimg boot.scr
boot_syslinux_conf=extlinux/extlinux.conf
boot_targets=mmc1 mmc0 pxe dhcp
bootargs=root=/dev/sda1 rw console=ttyAMA0,38400n8 mem=1024M mtdparts=armflash:1M@0x800000(uboot),7M@0x1000000(kernel),24M@0x2000000(initrd) mmci.fmax=190000 devtmpfs.mount=0 vmalloc=256M
bootcmd=run distro_bootcmd; run bootflash
bootcmd_dhcp=if dhcp ${scriptaddr} ${boot_script_dhcp}; then source ${scriptaddr}; fi;
bootcmd_mmc0=devnum=0; run mmc_boot
bootcmd_mmc1=devnum=1; run mmc_boot
bootcmd_pxe=dhcp; if pxe get; then pxe boot; fi
bootdelay=2    自动启动内核延时
bootfile=boot.scr.uimg
bootflash=run flashargs; cp ${ramdisk_addr} ${ramdisk_addr_r} ${maxramdisk}; bootm ${kernel_addr} ${ramdisk_addr_r}
console=ttyAMA0,38400n8
cpu=armv7
distro_bootcmd=for target in ${boot_targets}; do run bootcmd_${target}; done
dram=1024M
ethact=smc911x-0
ethaddr=52:54:00:12:34:56
flashargs=setenv bootargs root=${root} console=${console} mem=${dram} mtdparts=${mtd} mmci.fmax=190000 devtmpfs.mount=0  vmalloc=256M
kernel_addr=0x44100000      内核地址
kernel_addr_r=0x80008000
loadaddr=0x80008000
maxramdisk=0x1800000
mmc_boot=if mmc dev ${devnum}; then devtype=mmc; run scan_dev_for_boot_part; fi
mtd=armflash:1M@0x800000(uboot),7M@0x1000000(kernel),24M@0x2000000(initrd)
pxefile_addr_r=0x88000000
ramdisk_addr=0x44800000    根文件系统地址
ramdisk_addr_r=0x61000000
root=/dev/sda1 rw
。。。
启动成功
退出qemu或u-boot命令模式:
- ctrl + a, 然后按x
- 另一终端窗口中输入killall qemu-system-arm
- poweroff
=====================================
下载、编译、安装文件系统(buildroot制作):
下载:https://buildroot.org/downloads/
(buildroot可用于制作交叉编译、根文件系统、kernel内核、设备树dtb等)
解压:
biren@ubuntu:~ $ tar -xvf buildroot-2019.11-rc1.bz2制作根文件、kernel方法一:自定义配置
配置:
biren@ubuntu:~$ cd buildroot-2019.11-rc1/
biren@ubuntu:~/buildroot-2019.11-rc1$ make menuconfig
Target options --->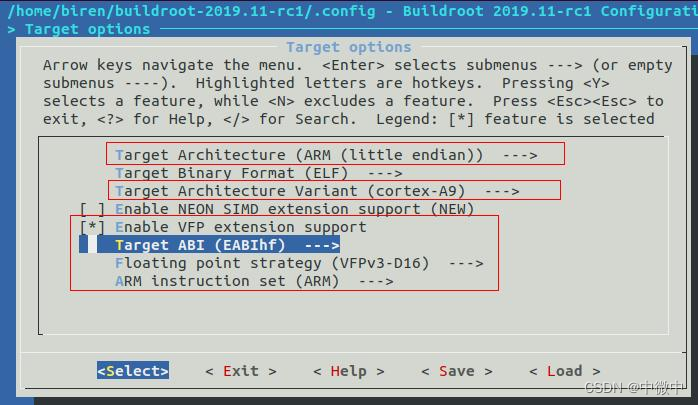
Toolchain --->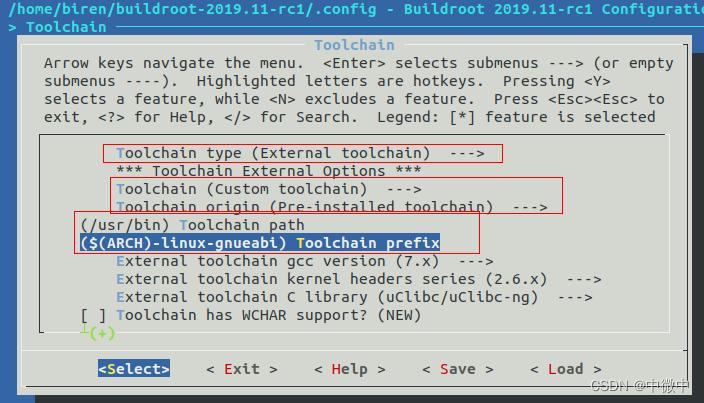
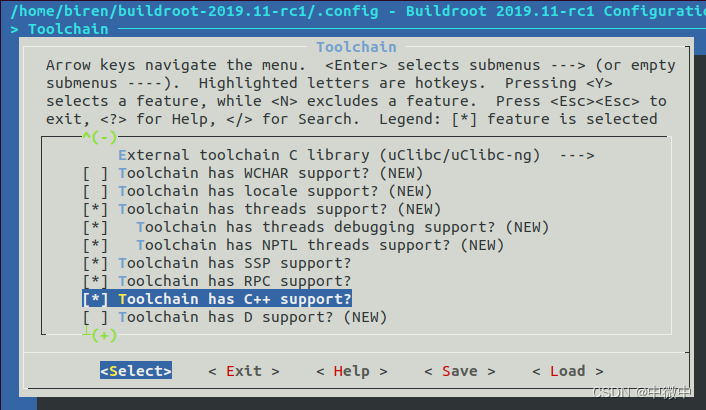
System configuration --->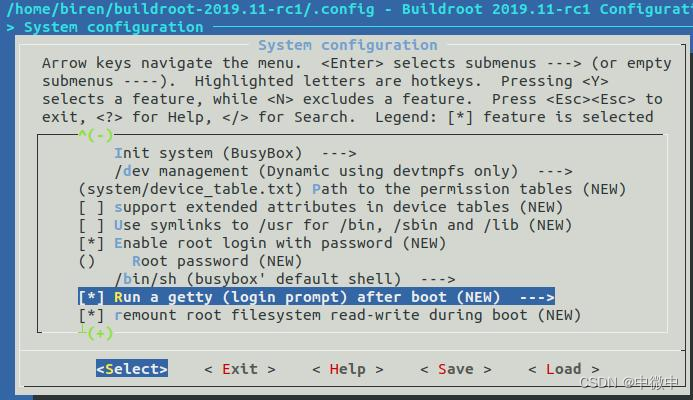
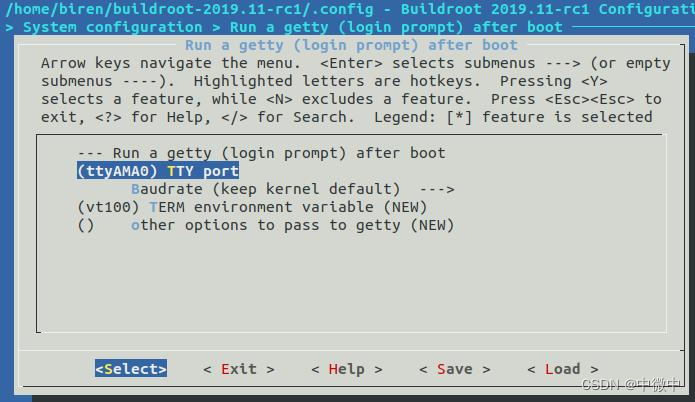
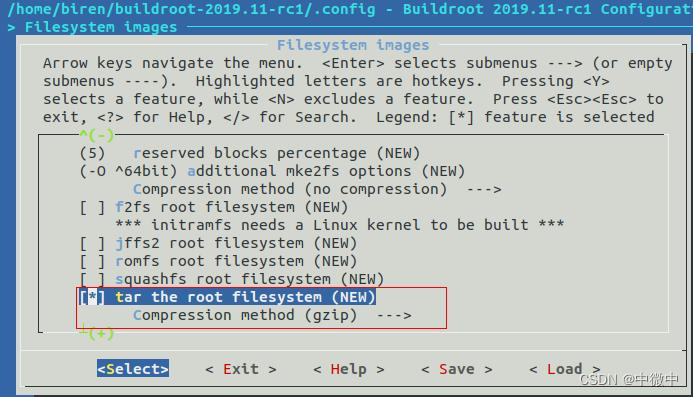
Filesystem images --->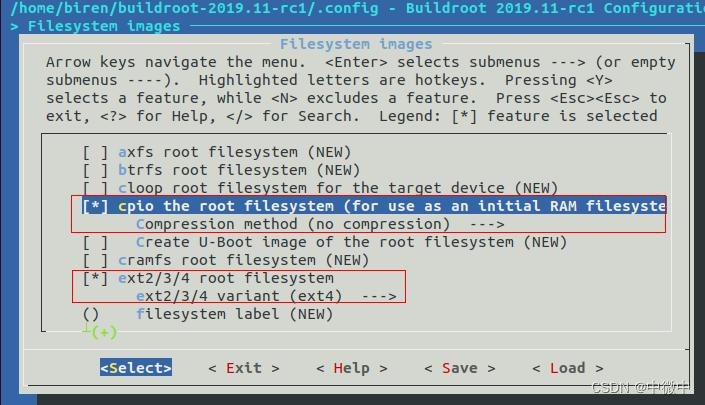
......
执行make:
biren@ubuntu:~/buildroot-2019.11-rc1$ make -j4制作根文件、kernel方法二:用预定义的配置
biren@ubuntu:~/buildroot-2019.11-rc1$ make qemu_arm_vexpress_defconfig
biren@ubuntu:~/buildroot-2019.11-rc1$ make -j4
。。。。。。
mke2fs 1.45.4 (23-Sep-2019)
Creating regular file /home/biren/buildroot-2019.11-rc1/output/images/rootfs.ext2
Creating filesystem with 61440 1k blocks and 15360 inodes
Filesystem UUID: 0bb88659-037f-4f5e-be71-e6117cb08767
Superblock backups stored on blocks:
	8193, 24577, 40961, 57345

Allocating group tables: done
Writing inode tables: done
Copying files into the device: done
Writing superblocks and filesystem accounting information: done
buildroot编译结果:
生成关键的三个文件:rootfs.ext2(根文件系统), vexpress-v2p-ca9.dtb(设备树), zImage(kernel内核)
biren@ubuntu:~/buildroot-2019.11-rc1$ ls
arch     Config.in         DEVELOPERS  linux            package  toolchain
board    Config.in.legacy  dl          Makefile         README   utils
boot     configs           docs        Makefile.legacy  support
CHANGES  COPYING           fs          output           system

biren@ubuntu:~/buildroot-2019.11-rc1$ ls output
build  host  images  staging  target

biren@ubuntu:~/buildroot-2019.11-rc1$ ll output/images/
total 7884
-rw-r--r-- 1 biren biren 62914560 Jun 25 11:37 rootfs.ext2
-rw-r--r-- 1 biren biren    14430 Jun 25 11:37 vexpress-v2p-ca9.dtb
-rw-r--r-- 1 biren biren  4134576 Jun 25 11:37 zImage
====================================
内核zImage启动测试:(方法一,用到-sd, mmcblk0参数)
启动命令:qemu-system-arm -M vexpress-a9 -m 512M -kernel zImage -dtb vexpress-v2p-ca9.dtb -nographic -sd rootfs.ext2 -append "root=/dev/mmcblk0 rw console=ttyAMA0 init=/linuxrc"
参数说明 :
- -kernel : 指定内核文件
- -dtb: 指定设备树文件
- -sd : 指定sd设备文件(此处存放根文件系统),类似有-hda(对应root=/dev/sda)
- -nographic : 非图形模式
- -append : 即bootargs启动命令行配置,root指定根文件系统挂载点,console指定输出接口,init指定启动后运行的第一个命令(程序 )
- -m : 内存大小
- -M : 指定虚拟主板
biren@ubuntu:~/buildroot-2019.11-rc1/output/images$ qemu-system-arm -M vexpress-a9 -m 512M -kernel zImage -dtb vexpress-v2p-ca9.dtb -append "root=/dev/mmcblk0 console=tty0 init=/linuxrc" -nographic -sd rootfs.ext2
WARNING: Image format was not specified for 'rootfs.ext2' and probing guessed raw.
         Automatically detecting the format is dangerous for raw images, write operations on block 0 will be restricted.
         Specify the 'raw' format explicitly to remove the restrictions.
qemu-system-arm: Invalid SD card size: 60 MiB
SD card size has to be a power of 2, e.g. 64 MiB.
You can resize disk images with 'qemu-img resize <imagefile> <new-size>'
(note that this will lose data if you make the image smaller than it currently is).
出现错误 :SD card size has to be a power of 2, e.g. 64 MiB.
即SD文件的大小应是2的n次方
解决:修改文件大小
命令:qemu-img resize <imagefile> <new-size>
biren@ubuntu:~/buildroot-2019.11-rc1/output/images$ cp rootfs.ext2 rootfs-copy.ext2
biren@ubuntu:~/buildroot-2019.11-rc1/output/images$ qemu-img resize rootfs.ext2 64M
Image resized.
或者用dd命令新建一个64M的rootfs.img镜像文件,然后将数据复制进去:
dd if=/dev/zero of=rootfs.img bs=1M count=64
biren@ubuntu:~/buildroot-2019.11-rc1/output/images$ dd if=/dev/zero of=rootfs.img bs=1M count=64
64+0 records in
64+0 records out
67108864 bytes (67 MB, 64 MiB) copied, 0.134254 s, 500 MB/s

biren@ubuntu:~/buildroot-2019.11-rc1/output/images$ mkfs.ext2 rootfs.img
mke2fs 1.44.1 (24-Mar-2018)
Discarding device blocks: done
Creating filesystem with 65536 1k blocks and 16384 inodes
Filesystem UUID: 01d8344a-685d-420e-82f6-6b6d24c6d2d7
Superblock backups stored on blocks:
	8193, 24577, 40961, 57345
Allocating group tables: done
Writing inode tables: done
Writing superblocks and filesystem accounting information: done

biren@ubuntu:~/buildroot-2019.11-rc1/output/images$ mkdir tmpfs
biren@ubuntu:~/buildroot-2019.11-rc1/output/images$ sudo mount rootfs-copy.ext2 tmpfs
biren@ubuntu:~/buildroot-2019.11-rc1/output/images$ sudo mount -o loop rootfs.img /mnt
biren@ubuntu:~/buildroot-2019.11-rc1/output/images$ sudo cp -a tmpfs/* /mnt

biren@ubuntu:~/buildroot-2019.11-rc1/output/images$ sudo umount tmpfs
biren@ubuntu:~/buildroot-2019.11-rc1/output/images$ sudo umount /mnt
新的文件:
biren@ubuntu:~/buildroot-2019.11-rc1/output/images$ ll
total 174457
-rw-r--r--  1 biren biren  62914560 Jun 30 17:04 rootfs-copy.ext2
-rw-r--r--  1 biren biren  67108864 Jun 30 16:54 rootfs.ext2 新的文件
-rw-rw-r--  1 biren biren  67108864 Jun 30 17:03 rootfs.img  新的文件
-rw-rw-r--  1 biren biren 134217728 Jun 28 16:49 sdcard.img
drwxr-xr-x 18 root  root       1024 Jun 25 11:37 tmpfs/
-rw-r--r--  1 biren biren     14430 Jun 25 11:37 vexpress-v2p-ca9.dtb
-rw-r--r--  1 biren biren   4134576 Jun 25 11:37 zImage
重新启动内核zImage:
根文件系统用rootfs.img或rootfs.ext2都行
(有些是没有dtb的,编译内核时有参数指定)
biren@ubuntu:~/buildroot-2019.11-rc1/output/images$ qemu-system-arm -M vexpress-a9 -m 512M -kernel zImage -dtb vexpress-v2p-ca9.dtb -nographic -sd rootfs.img -append "root=/dev/mmcblk0 console=ttyAMA0 init=/linuxrc"

WARNING: Image format was not specified for 'rootfs.img' and probing guessed raw.
         Automatically detecting the format is dangerous for raw images, write operations on block 0 will be restricted.
         Specify the 'raw' format explicitly to remove the restrictions.

Welcome to Buildroot  正常启动。。。。。。
buildroot login: root    (无密码)
#
# pwd
/root
# ls /
bin         lib         lost+found  opt         run         tmp
dev         lib32       media       proc        sbin        usr
etc         linuxrc     mnt         root        sys         var
警告:Image format was not specified for 'rootfs.img' and probing guessed raw.
可以用 -drive format=raw,file=rootfs.img解决
==================================
启动内核方法二:(用到-initrd,ram0参数)
命令:
qemu-system-arm -M vexpress-a9 -m 512M -kernel zImage -dtb vexpress-v2p-ca9.dtb -initrd rootfs.ext3 -nographic -append "root=/dev/ram0 rw console=ttyAMA0 init=/linuxrc"
与前面区别:这里没有用-sd选项,用的是-initrd rootfs.ext3
另外挂载点改为:root=/dev/ram0或root=/dev/ram
(此处的rootfs.ext3是从rootfs.ext2复制过来重新制成ext3格式,大小4M,可用dd制作)
(rootfs.ext3, rootfs.ext3.gz, rootfs.ext3.ramdisk都可用)
biren@ubuntu:~/buildroot-2019.11-rc1/output/images$ ll rootfs.ext3*
-rw-rw-r-- 1 biren biren 4194304 Jul 13 22:29 rootfs.ext3
-rw-rw-r-- 1 biren biren  789675 Jul  6 10:47 rootfs.ext3.gz   gzip压缩文件
-rw-rw-r-- 1 biren biren 4194368 Jul  6 11:24 rootfs.ext3.ramdisk  用mkimage制成的,加64字节头
值得注意的是编译内核时需要选上支持ram disk的相关选项:
配置buildroot:
命令:make qemu_arm_vexpress_defconfig
biren@ubuntu:~/buildroot-2019.11-rc1$ make qemu_arm_vexpress_defconfig
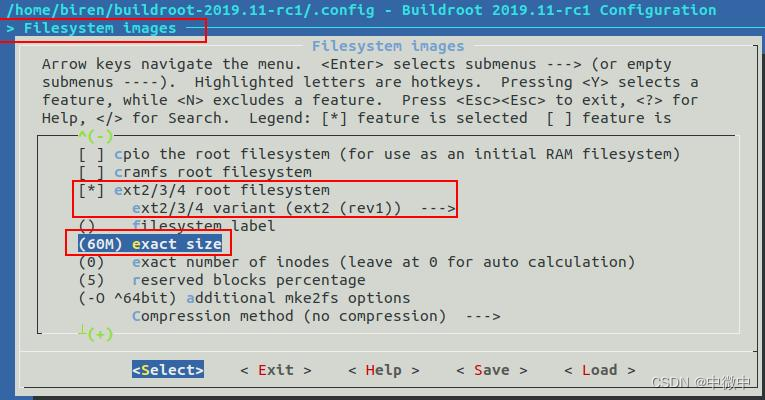
biren@ubuntu:~/buildroot-2019.11-rc1$ make menuconfig> Filesystem images :
- ext2/3/4 root filesystem
- (60M) exact size 根文件系统的大小为60M(实际只占用几百K)
配置内核:
命令:make linux-menuconfig
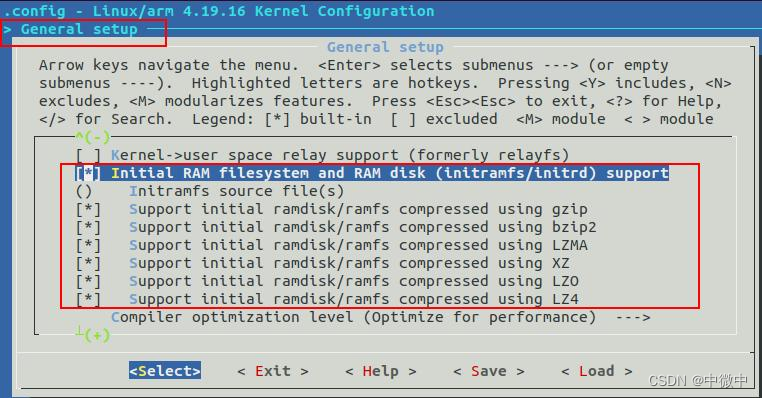
biren@ubuntu:~/buildroot-2019.11-rc1$ make linux-menuconfig> General setup :
- Initial RAM filesystem and RAM disk (initramfs/initrd) support
- Support initial ramdisk/ramfs compressed using gzip
> Device Drivers > Block devices :
Default RAM disk size (kbytes) 指定ramdisk的大小,启动时在-initrd参数中指定的文件大小不能超过此值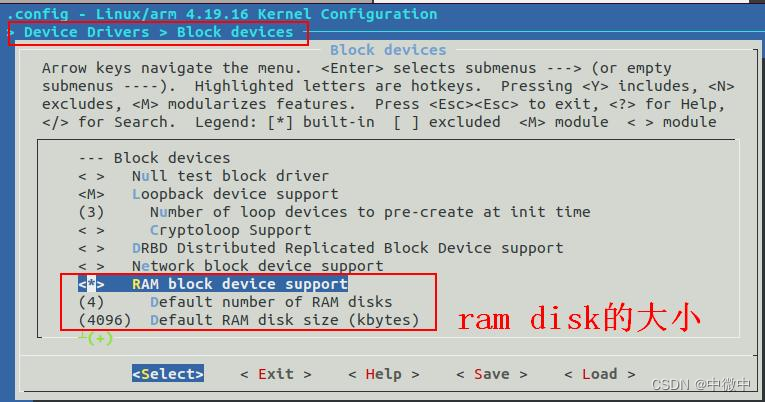
> File systems :
Second extended fs support (ext2) ...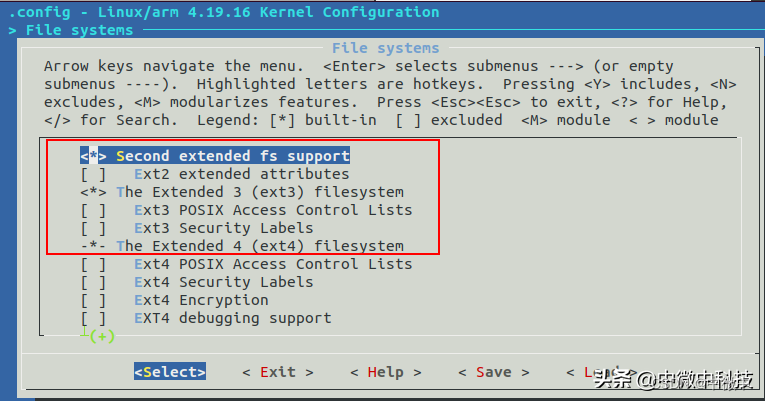
启动内核方法三:从MMC加载内核
(先启动u-boot - 加载内核到RAM - bootz启动)
一、先制作sdcard.img文件
- 创建128M文件
- 格式化为vfat
- 挂载到/mnt
- 复制zImage、rootfs.ext2、vexpress-v2p-ca9.dtb到/mnt
- 取消挂载点/mnt
biren@ubuntu:~/buildroot-2019.11-rc1/output/images$ dd if=/dev/zero of=sdcard.img bs=4096 count=32768
25600+0 records in
25600+0 records out
104857600 bytes (134 MB, 128 MiB) copied, 0.818929 s, 128 MB/s
biren@ubuntu:~/buildroot-2019.11-rc1/output/images$ mkfs.vfat sdcard.img
mkfs.fat 4.1 (2017-01-24)
biren@ubuntu:~/buildroot-2019.11-rc1/output/images$ sudo mount -rw -o loop sdcard.img /mnt
biren@ubuntu:~/buildroot-2019.11-rc1/output/images$ sudo cp zImage /mnt
biren@ubuntu:~/buildroot-2019.11-rc1/output/images$ sudo cp rootfs.ext2 /mnt
biren@ubuntu:~/buildroot-2019.11-rc1/output/images$ sudo cp vexpress-v2p-ca9.dtb /mnt
biren@ubuntu:~/buildroot-2019.11-rc1/output/images$ ll /mnt
total 65514
-rwxr-xr-x  1 root root 62914560 Jun 28 16:44 rootfs.ext2*
-rwxr-xr-x  1 root root    14430 Jun 28 16:44 vexpress-v2p-ca9.dtb*
-rwxr-xr-x  1 root root  4134576 Jun 28 16:44 zImage*
biren@ubuntu:~/buildroot-2019.11-rc1/output/images$ sudo umount /mnt
二、启动u-boot
命令:qemu-system-arm -M vexpress-a9 -m 512M -kernel /home/biren/u-boot-2019.10/u-boot -sd sdcard.img -nographic
biren@ubuntu:~/buildroot-2019.11-rc1/output/images$ qemu-system-arm -M vexpress-a9 -m 512M -kernel /home/biren/u-boot-2019.10/u-boot -nographic  -sd sdcard.img

WARNING: Image format was not specified for 'sdcard.img' and probing guessed raw.
         Automatically detecting the format is dangerous for raw images, write operations on block 0 will be restricted.
         Specify the 'raw' format explicitly to remove the restrictions.

U-Boot 2019.10 (Jun 23 2022 - 22:56:12 +0800)

DRAM:  512 MiB
WARNING: Caches not enabled
Flash: 128 MiB
MMC:   MMC: 0
*** Warning - bad CRC, using default environment

In:    serial
Out:   serial
Err:   serial
Net:   smc911x-0
Hit any key to stop autoboot:  0
MMC Device 1 not found
no mmc device at slot 1
switch to partitions #0, OK
mmc0 is current device
** Invalid partition 1 **
smc911x: MAC 52:54:00:12:34:56
smc911x: detected LAN9118 controller
smc911x: phy initialized
smc911x: MAC 52:54:00:12:34:56
。。。
TFTP error: trying to overwrite reserved memory...
smc911x: MAC 52:54:00:12:34:56
Wrong Image Format for bootm command
ERROR: can't get kernel image!  (此时还没有启动内核)
=>
三、将zImage、rootfs.ext2、vexpress-v2p-ca9.dtb从sd中加载到DRAM内存中:
命令:fatload mmc 0:0 0x62008000 zImage
(加载地址自拟,只要不重叠即可)
=> fatload mmc 0:0 0x62008000 zImage
4134576 bytes read in 2344 ms (1.7 MiB/s)
=> fatload mmc 0:0 0x62A08000 rootfs.ext2
62914560 bytes read in 36366 ms (1.6 MiB/s)
=> fatload mmc 0:0 0x68E08000 vexpress-v2p-ca9.dtb
14430 bytes read in 40 ms (351.6 KiB/s)
四、启动内核
命令:bootz [addr [initrd[:size]] [fdt]]
如:bootz 62008000 62A08000 68E08000
无initrd时用“-”代替
如:bootz 62008000 - 68E08000
=> bootz 62008000 62A08000 68E08000

Kernel image @ 0x62008000 [ 0x000000 - 0x3f16b0 ]
Wrong Ramdisk Image Format
Ramdisk image is corrupt or invalid
错误 :Wrong Ramdisk Image Format
解决:使用mkimage命令将根文件系统制成uImage格式的文件
命令:mkimage -n 'uboot ext2 ramdisk rootfs' -A arm -O linux -T ramdisk -C none -d rootfs.ext2 rootfs.ext2.ramdisk
biren@ubuntu:~/buildroot-2019.11-rc1/output/images$ mkimage -n 'uboot ext2 ramdisk rootfs' -A arm -O linux -T ramdisk -C none -d rootfs.ext2 rootfs.ext2.ramdisk
Image Name:   uboot ext2 ramdisk rootfs
Created:      Tue Jul  5 19:58:27 2022
Image Type:   ARM Linux RAMDisk Image (uncompressed)
Data Size:    62914560 Bytes = 61440.00 KiB = 60.00 MiB
Load Address: 00000000
Entry Point:  00000000
biren@ubuntu:~/buildroot-2019.11-rc1/output/images$ ll
-rwxr-xr-x 1 biren biren  62914560 Jun 28 16:44 rootfs.ext2*
-rw-rw-r-- 1 biren biren  62914624 Jul  5 19:58 rootfs.ext2.ramdisk
-rw-rw-r-- 1 biren biren 134217728 Jul  5 19:57 sdcard.img
drwxr-xr-x 2 root  root      16384 Jan  1  1970 tmpfs/
-rw-r--r-- 1 biren biren     14430 Jun 25 11:37 vexpress-v2p-ca9.dtb
-rw-r--r-- 1 biren biren   4134576 Jun 25 11:37 zImage
新的根文件系统文件:rootfs.ext2.ramdisk
将rootfs.ext2.ramdisk存入sdcard.img中:
biren@ubuntu:~/buildroot-2019.11-rc1/output/images$ sudo mount -o loop sdcard.img tmpfs
biren@ubuntu:~/buildroot-2019.11-rc1/output/images$ sudo cp rootfs.ext2.ramdisk tmpfs
biren@ubuntu:~/buildroot-2019.11-rc1/output/images$ sudo umount tmpfs再运行二到四步:
qemu-system-arm -M vexpress-a9 -m 512M -kernel /home/biren/u-boot-2019.10/u-boot -sd sdcard.img -nographic

fatload mmc 0:0 0x62008000 zImage;fatload mmc 0:0 0x62A08000 rootfs.ext2.ramdisk;fatload mmc 0:0 0x68E08000 vexpress-v2p-ca9.dtb

setenv bootargs root=/dev/ram rw console=ttyAMA0,115200 init=/linuxrc

bootz 62008000 62A08000 68E08000
启动内核方法四:用tftp加载内核
先进行qemu网络功能配置:
查看tun是否安装:
biren@ubuntu:~/buildroot-2019.11-rc1/output/images$ grep CONFIG_TUN= /boot/config-`uname -r`
CONFIG_TUN=y
或用如下查询 :
biren@ubuntu:~/buildroot-2019.11-rc1/output/images$ ll /dev/net/tun
crw-rw-rw- 1 root root 10, 200 Jul 17 10:51 /dev/net/tun
如果没有tun则用如下命令增加:
mknod /dev/net/tun c 10 200
ubuntu里安装桥接工具:
命令:sudo apt-get install uml-utilities bridge-utils
ubuntu里创建tap0 :
查看当前网络:
命令:ip addr 或ip a 或ip address
或用:ifconfig
biren@ubuntu:~$ ip a
1: lo: <LOOPBACK,UP,LOWER_UP> mtu 65536 qdisc noqueue state UNKNOWN group default qlen 1000
    link/loopback 00:00:00:00:00:00 brd 00:00:00:00:00:00
    inet 127.0.0.1/8 scope host lo
       valid_lft forever preferred_lft forever
    inet6 ::1/128 scope host
       valid_lft forever preferred_lft forever
2: ens33: <BROADCAST,MULTICAST,UP,LOWER_UP> mtu 1500 qdisc fq_codel state UP group default qlen 1000
    link/ether 00:0c:29:ad:94:63 brd ff:ff:ff:ff:ff:ff
    inet 192.168.153.146/24 brd 192.168.153.255 scope global dynamic noprefixroute ens33
       valid_lft 1657sec preferred_lft 1657sec
    inet6 fe80::1800:85cd:fb23:2de/64 scope link noprefixroute
       valid_lft forever preferred_lft forever
网口名是ens33,ip是192.168.153.146
虚拟机ubuntu与win10连接用的是NAT方式
创建tap0命令:
- sudo ip tuntap add dev tap0 mode tap
- sudo ip link set dev tap0 up
- sudo ip address add dev tap0 192.168.153.170/24
biren@ubuntu:~$ sudo ip tuntap add dev tap0 mode tap
biren@ubuntu:~$ sudo ip link set dev tap0 up
biren@ubuntu:~$ sudo ip address add dev tap0 192.168.153.170/24
biren@ubuntu:~$ ifconfig
ens33: flags=4163<UP,BROADCAST,RUNNING,MULTICAST>  mtu 1500
        inet 192.168.153.146  netmask 255.255.255.0  broadcast 192.168.153.255
        inet6 fe80::1800:85cd:fb23:2de  prefixlen 64  scopeid 0x20<link>
        ether 00:0c:29:ad:94:63  txqueuelen 1000  (Ethernet)
        RX packets 2430  bytes 3084008 (3.0 MB)
        RX errors 0  dropped 0  overruns 0  frame 0
        TX packets 1452  bytes 118503 (118.5 KB)
        TX errors 0  dropped 0 overruns 0  carrier 0  collisions 0

lo: flags=73<UP,LOOPBACK,RUNNING>  mtu 65536
        inet 127.0.0.1  netmask 255.0.0.0
        inet6 ::1  prefixlen 128  scopeid 0x10<host>
        loop  txqueuelen 1000  (Local Loopback)
        RX packets 207  bytes 16767 (16.7 KB)
        RX errors 0  dropped 0  overruns 0  frame 0
        TX packets 207  bytes 16767 (16.7 KB)
        TX errors 0  dropped 0 overruns 0  carrier 0  collisions 0

tap0: flags=4099<UP,BROADCAST,MULTICAST>  mtu 1500
        inet 192.168.153.170  netmask 255.255.255.0  broadcast 0.0.0.0
        ether be:6a:b3:80:db:9d  txqueuelen 1000  (Ethernet)
        RX packets 0  bytes 0 (0.0 B)
        RX errors 0  dropped 0  overruns 0  frame 0
        TX packets 0  bytes 0 (0.0 B)
        TX errors 0  dropped 0 overruns 0  carrier 0  collisions 0
配置TFTP服务器:
一、在主机ubuntu上搭建tftp服务器
安装tftp-hpa、 tftpd-hpa、 xinetd三个包文件
biren@ubuntu:~$ sudo apt-get install tftp-hpa tftpd-hpa xinetd二、建立ftp文件夹,并修改为777权限
biren@ubuntu:~$ mkdir tftpFile
biren@ubuntu:~$ chmod 777 tftpFile
三、修改/etc/default/tftpd-hpa
将
# /etc/default/tftpd-hpa

TFTP_USERNAME="tftp"
TFTP_DIRECTORY="/var/lib/tftpboot"
TFTP_ADDRESS=":69"
TFTP_OPTIONS="--secure"
修改为:
# /etc/default/tftpd-hpa

TFTP_USERNAME="tftp"
TFTP_DIRECTORY="/home/biren/tftpFile"
TFTP_ADDRESS=":69"
TFTP_OPTIONS="--secure"
四、新建/etc/xinetd.d/tftp文件,内容如下:
server tftp
{
   protocol = udp
   flags = IPv4
   socket_type = dgram
   user = root
	 server = /usr/sbin/in.tftpd
	 server_args = -s /home/biren/tftpFile
	 wait = yes
	 disable = no
	 per_source = 11
	 cps = 100 2
}
五、启动tftp服务
sudo service tftpd-hpa start

出现tftp>命令符正常:
biren@ubuntu:~$ tftp localhost
tftp>
六、将zImage、rootfs.ext3.ramdisk、vexpress-v2p-ca9.dtb复制到/home/biren/tftpFile/里
biren@ubuntu:~/tftpFile$ pwd
/home/biren/tftpFile
biren@ubuntu:~/tftpFile$ ll
total 8296
drwxrwxrwx  2 biren biren    4096 Aug 18 18:59 ./
drwxr-xr-x 32 biren biren    4096 Aug 18 16:15 ../
-rw-rw-r--  1 biren biren 4194368 Jul  6 11:24 rootfs.ext3.ramdisk
-rw-r--r--  1 biren biren   14430 Jul 13 17:24 vexpress-v2p-ca9.dtb
-rw-r--r--  1 biren biren 4268720 Jul 13 17:24 zImage
带网络参数的启动u-boot :
命令:sudo /usr/local/qemu6.2.0/bin/qemu-system-arm -M vexpress-a9 -m 512M -kernel /home/biren/u-boot-2019.10/u-boot -sd sdcard.img -nographic -net nic -net tap,ifname=tap0,script=no,downscript=no
参数说明:
- -net nic 建立虚拟网卡
- -net tap,ifname=tap0 在host上产生一个tap0接口
- script, donwscript指定启动时的网络配置脚本,如果不指定时则会自动查找/etc/qemu-ifup和/etc/qemu-ifdown来运行
启动后,设置qemu的ip为192.168.153.160 ,
设置serverip为192.168.153.170 :
=> setenv ipaddr 192.168.153.160
=> setenv serverip 192.168.153.170
=> ping 192.168.153.170
smc911x: MAC 52:54:00:12:34:56
smc911x: detected LAN9118 controller
smc911x: phy initialized
smc911x: MAC 52:54:00:12:34:56
Using smc911x-0 device
smc911x: MAC 52:54:00:12:34:56
host 192.168.153.170 is alive
=>
设置启动参数:
=> setenv bootargs 'root=/dev/mmcblk0 rw console=ttyAMA0 init=/linuxrc'用tftp命令加载启动文件到内存:
源:192.168.153.170:/home/biren/tftpFile/
目的地:qemu的起始地址为0x62008000、0x62508000、0x62a08000的内存处
命令:
- tftp 62008000 zImage 从/home/biren/tftpFile/加载内核
- tftp 62508000 rootfs.ext3.ramdisk 加载根文件系统
- tftp 62a08000 vexpress-v2p-ca9.dtb 加载设备树
=> tftp 62008000 zImage
smc911x: MAC 52:54:00:12:34:56
smc911x: detected LAN9118 controller
smc911x: phy initialized
smc911x: MAC 52:54:00:12:34:56
Using smc911x-0 device
TFTP from server 192.168.153.170; our IP address is 192.168.153.160
Filename 'zImage'.
Load address: 0x62008000
Loading: #########################
	 1.4 MiB/s
done
Bytes transferred = 4268720 (4122b0 hex)
smc911x: MAC 52:54:00:12:34:56

=> tftp 62508000 rootfs.ext3.ramdisk

=> tftp 62a08000 vexpress-v2p-ca9.dtb
启动内核:
=> bootz 62008000 62508000 62a08000启动到最后时出现错误:
can't open /dev/ttyAMA0: No such file or directory
解决方法一:
将启动bootargs参数
setenv bootargs 'root=/dev/mmcblk0 rw console=ttyAMA0 init=/linuxrc'
改为:
setenv bootargs 'root=/dev/ram rw console=ttyAMA0 init=/linuxrc'
解决方法二:
将启动命令:
sudo /usr/local/qemu6.2.0/bin/qemu-system-arm -M vexpress-a9 -m 512M -kernel /home/biren/u-boot-2019.10/u-boot -sd sdcard.img -nographic -net nic -net tap,ifname=tap0,script=no,downscript=no
改为:(即用-sd挂载根文件系统)
sudo /usr/local/qemu6.2.0/bin/qemu-system-arm -M vexpress-a9 -m 512M -kernel /home/biren/u-boot-2019.10/u-boot -sd rootfs.ext3 -nographic -net nic -net tap,ifname=tap0,script=no,downscript=no
将启动内核命令改为即可:
bootz 62008000 - 62a08000
另一个可能的原因是:
没有勾选devtmpfs filesystem
通过以下方式选中并重新编译
biren@ubuntu:~/buildroot-2019.11-rc1$ make linux-menuconfig
Device Drivers ---> Generic Driver Options --->
[*] Maintain a devtmpfs filesystem to mount at /dev
[*] Automount devtmpfs at /dev, after the kernel mounted the rootfs
启动内核方法五:用nfs加载内核(自动)
1、安装nfs-kernel-server , nfs-common
命令:sudo apt-get install nfs-kernel-server nfs-common
2、创建共享文件夹:
biren@ubuntu:~$ mkdir nfsFile
biren@ubuntu:~/nfsFile$ pwd
/home/biren/nfsFile3、在/etc/exports中加入一行:
/home/biren/nfsFile *(rw,sync,no_root_squash)
4、重启nfs服务:
sudo service nfs-kernel-server restart5、配置tap0网络命令(ubuntu):
- sudo ip tuntap add dev tap0 mode tap
- sudo ip link set dev tap0 up
- sudo ip address add dev tap0 192.168.153.170/24
也可以使用以下命令:
sudo tunctl -u $USER -t tap0      (生成一个tap0接口)
sudo ifconfig tap0 192.168.153.170
删除tap0接口:
sudo tunctl -d tap0
sudo ifconfig tap0 192.168.153.170 down  卸载网卡
删除网桥:
sudo brctl delbr br0
6、启动仿真qemu
命令:
sudo /usr/local/qemu6.2.0/bin/qemu-system-arm -M vexpress-a9 -m 512M -kernel zImage -dtb vexpress-v2p-ca9.dtb -sd sdcard.img -nographic -net nic -net tap,ifname=tap0,script=no,downscript=no -append "root=/dev/nfs rw nfsroot=192.168.153.170:/home/biren/nfsFile ip=192.168.153.160:192.168.153.170::::eth0:off console=ttyAMA0 init=/linuxrc"
错误一:
VFS: Cannot open root device "nfs" or unknown-block(2,0): error -6
VFS: Unable to mount root fs via NFS, trying floppy.
VFS: Cannot open root device "nfs" or unknown-block(2,0): error -6
Please append a correct "root=" boot option;
Kernel panic - not syncing: VFS: Unable to mount root fs on unknown-block(2,0)
原因:
内核的nfs版本要与ubuntu中的server nfs版本一致
内核支持的nfs版本:
> File systems > Network File Systems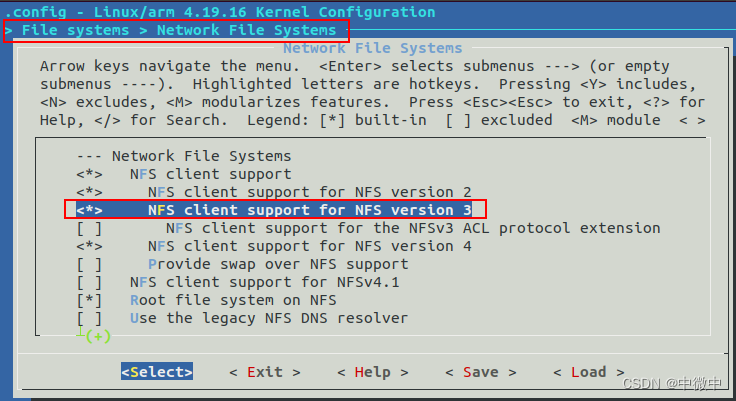
ubuntu server nfs版本查询命令:nfsstat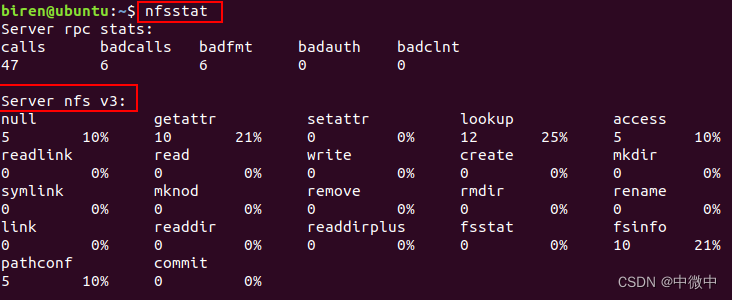
解决:
在启动命令上加入nfs版本v3
sudo /usr/local/qemu6.2.0/bin/qemu-system-arm -M vexpress-a9 -m 512M -kernel zImage -dtb vexpress-v2p-ca9.dtb -sd sdcard.img -nographic -net nic -net tap,ifname=tap0,script=no,downscript=no -append "root=/dev/nfs rw nfsroot=192.168.153.170:/home/biren/nfsFile,v3 ip=192.168.153.160:192.168.153.170::::eth0:off console=ttyAMA0 init=/linuxrc" -rtc base=localtime,clock=host
错误二:
devtmpfs: error mounting -2
end Kernel panic - not syncing: Requested init /linuxrc failed (error -2)
解决方法一:
将根文件系统挂载到nfsFile目录下:
biren@ubuntu:~$ sudo mount buildroot-2019.11-rc1/output/images/rootfs.ext3 ./nfsFile
或者直接将根文件系统里所有的资料都复制到/home/biren/nfsFile里面
biren@ubuntu:~$ sudo mount buildroot-2019.11-rc1/output/images/rootfs.ext3 ./nfsFile/
biren@ubuntu:~$ ls ./nfsFile/
bin  etc  lib32    lost+found  mnt  proc  run   sys  usr
dev  lib  linuxrc  media       opt  root  sbin  tmp  var
解决方法二:(可能的原因之一)
重新将busybox编译成静态的:
biren@ubuntu:~/buildroot-2019.11-rc1$ make qemu_arm_vexpress_defconfig
biren@ubuntu:~/buildroot-2019.11-rc1$ make help (查看可用的命令)
biren@ubuntu:~/buildroot-2019.11-rc1$ make busybox-menuconfig
位置:Settings ---> [*] Build static binary (no shared libs)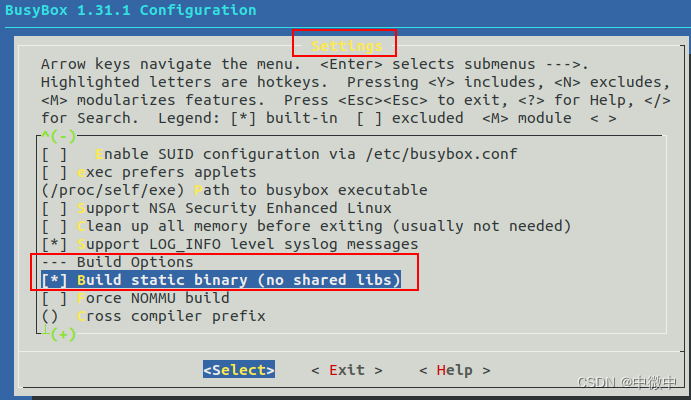
biren@ubuntu:~/buildroot-2019.11-rc1$ make -j4
启动内核方法五:用nfs加载内核(手动)
1、将rootfs.ext3 vexpress-v2p-ca9.dtb zImage复制到nfsFile目录里
2、tap0设置:与前同
3、启动u-boot命令:
sudo /usr/local/qemu6.2.0/bin/qemu-system-arm -M vexpress-a9 -m 512M -kernel /home/biren/u-boot-2019.10/u-boot -nographic -net nic -net tap,ifname=tap0,script=no,downscript=no -rtc base=localtime,clock=host
4、设置网址(以下在虚拟qemu里操作)
=> setenv ipaddr 192.168.153.160
=> setenv serverip 192.168.153.170
5、加载内核到DRAM内存
=> nfs 62008000 192.168.153.170:/home/biren/nfsFile/zImage
=> nfs 62a08000 192.168.153.170:/home/biren/nfsFile/vexpress-v2p-ca9.dtb
6、ubuntu里挂载根文件系统rootfs.ext3到nfsFile
biren@ubuntu:~$ sudo mount buildroot-2019.11-rc1/output/images/rootfs.ext3 ./nfsFile/
7、设置bootcmd/bootargs
=> setenv bootargs 'root=/dev/nfs rw nfsroot=192.168.153.170:/home/biren/nfsFile,v3 ip=192.168.153.160:192.168.153.170::::eth0:off console=ttyAMA0 init=/linuxrc'
8、启动内核:
=> bootz 62008000 - 62a08000
启动内核方法六:自动用tftp加载内核到DRAM并启动
1、修改/home/biren/u-boot-2019.10/include/configs/vexpress_common.h,加入以下内容:
#define CONFIG_BOOTCOMMAND \
        "tftp 0x62008000 zImage;\
	      tftp 0x62508000 rootfs.ext3.ramdisk;\
	      tftp 0x62a08000 vexpress-v2p-ca9.dtb;\
        setenv bootargs 'root=/dev/ram rw console=ttyAMA0 init=/linuxrc';\
        bootz 0x62008000 0x62508000 0x62a08000;"
#define CONFIG_IPADDR 192.168.153.160
#define CONFIG_NETMASK 255.255.255.0
#define CONFIG_SERVERIP 192.168.153.170
重新编译u-boot:
biren@ubuntu:~/u-boot-2019.10$ make ARCH=arm CROSS_COMPILE=arm-linux-gnueabi- -j4
2、tap0设置:与前同
3、启动u-boot(同时自动启动内核)命令:
sudo /usr/local/qemu6.2.0/bin/qemu-system-arm -M vexpress-a9 -m 512M -kernel /home/biren/u-boot-2019.10/u-boot -nographic -net nic -net tap,ifname=tap0,script=no,downscript=no -rtc base=localtime,clock=host
启动内核方法七:自动用nfs加载内核到DRAM并启动
1、修改/home/biren/u-boot-2019.10/include/configs/vexpress_common.h,加入以下内容:
#define CONFIG_BOOTCOMMAND \
        "nfs 62008000 192.168.153.170:/home/biren/nfsFile/zImage;\
	       nfs 62508000 192.168.153.170:/home/biren/nfsFile/rootfs.ext3.ramdisk;\
	      nfs 62a08000 192.168.153.170:/home/biren/nfsFile/vexpress-v2p-ca9.dtb;\
        setenv bootargs 'root=/dev/ram rw console=ttyAMA0 init=/linuxrc';\
        bootz 0x62008000 0x62508000 0x62a08000;"
#define CONFIG_IPADDR 192.168.153.160
#define CONFIG_NETMASK 255.255.255.0
#define CONFIG_SERVERIP 192.168.153.170
2、其它与“方法六”一样
==================================
问题说明 :
问题一:
end Kernel panic - not syncing: VFS: Unable to mount root fs on unknown-block
可能原因:
- root=/dev/ram(mmcblk0, sda, vda等)设置出错
- 编译内核时参数设置错误
- 启动时缺乏dtb参数等
......
VFS: Cannot open root device "(null)" or unknown-block(0,0): error -6
Please append a correct "root=" boot option; here are the available partitions:
1f00          131072 mtdblock0
 (driver?)
1f01           32768 mtdblock1
 (driver?)
Kernel panic - not syncing: VFS: Unable to mount root fs on unknown-block(0,0)
CPU: 0 PID: 1 Comm: swapper/0 Not tainted 4.19.16 #1
Hardware name: ARM-Versatile Express
[<80110dbc>] (unwind_backtrace) from [<8010c9f8>] (show_stack+0x10/0x14)
[<8010c9f8>] (show_stack) from [<806a8a80>] (dump_stack+0x88/0x9c)
[<806a8a80>] (dump_stack) from [<80120bf8>] (panic+0xf0/0x25c)
[<80120bf8>] (panic) from [<809015e8>] (mount_block_root+0x210/0x2bc)
[<809015e8>] (mount_block_root) from [<809017b4>] (mount_root+0x120/0x13c)
[<809017b4>] (mount_root) from [<80901920>] (prepare_namespace+0x150/0x198)
[<80901920>] (prepare_namespace) from [<80901190>] (kernel_init_freeable+0x354/0x364)
[<80901190>] (kernel_init_freeable) from [<806bcee0>] (kernel_init+0x8/0x110)
[<806bcee0>] (kernel_init) from [<801010e8>] (ret_from_fork+0x14/0x2c)
Exception stack(0x9f48ffb0 to 0x9f48fff8)
ffa0:                                     00000000 00000000 00000000 00000000
ffc0: 00000000 00000000 00000000 00000000 00000000 00000000 00000000 00000000
ffe0: 00000000 00000000 00000000 00000000 00000013 00000000
---[ end Kernel panic - not syncing: VFS: Unable to mount root fs on unknown-block(0,0) ]---
问题二:
/etc/qemu-ifup failed with status 256
biren@ubuntu:~/buildroot-2019.11-rc1/output/images$ sudo /usr/local/qemu6.2.0/bin/qemu-system-arm -M vexpress-a9 -m 512M -kernel /home/biren/u-boot-2019.10/u-boot -sd rootfs.ext3 -nographic -net nic -net tap,ifname=tap0
WARNING: Image format was not specified for 'rootfs.ext3' and probing guessed raw.
         Automatically detecting the format is dangerous for raw images, write operations on block 0 will be restricted.
         Specify the 'raw' format explicitly to remove the restrictions.
qemu-system-arm: -net tap,ifname=tap0: network script /usr/local/qemu6.2.0/bin/../etc/qemu-ifup failed with status 256
原因:是qemu-system-arm启动时会去查找/etc/qemu-ifup和/etc/qemu-ifdown并执行,这两个文件缺失或配置错误导致。
解决:
加上script=no,downscript=no参数即可
sudo /usr/local/qemu6.2.0/bin/qemu-system-arm -M vexpress-a9 -m 512M -kernel /home/biren/u-boot-2019.10/u-boot -sd rootfs.ext3 -nographic -net nic -net tap,ifname=tap0,script=no,downscript=no
问题三:
sudo: qemu-system-arm: command not found
biren@ubuntu:~/buildroot-2019.11-rc1/output/images$ sudo qemu-system-arm -M vexpress-a9 -m 512M -kernel /home/biren/u-boot-2019.10/u-boot -sd rootfs.ext3 -nographic -net nic -net tap,ifname=tap0,script=no,downscript=no
sudo: qemu-system-arm: command not found
原因:
是配置网络需要root权限,所以要用上sudo,而sudo是默认开启了- -with-secure-path选项
解决:
方法一:qemu-system-arm加上绝对路径
方法二:修改/etc/sudoers文件,将qemu-system-arm所在的目录加入Defaults secure_path="/usr/local/sbin:/usr/local/bin:/usr/sbin:/usr/bin:/sbin:/bin:/snap/bin"中
问题四:
qemu-system-arm: -net tap,ifname=tap0: could not configure /dev/net/tun (tap0): Operation not permitted
解决:在命令前加上sudo
问题五:
Unknown command 'nfs' - try 'help'
=> nfs 62008000 192.168.153.170:/home/biren/nfsFile/zImage
Unknown command 'nfs' - try 'help'

=> help nfs
Unknown command 'nfs' - try 'help' without arguments for list of all known commands
原因:
编译u-boot时没选上nfs
解决:
选上nfs选项后重新编译u-boot
biren@ubuntu:~/u-boot-2019.10$ make vexpress_ca9x4_defconfig
biren@ubuntu:~/u-boot-2019.10$ make menuconfig
位置:Command line interface --> Network commands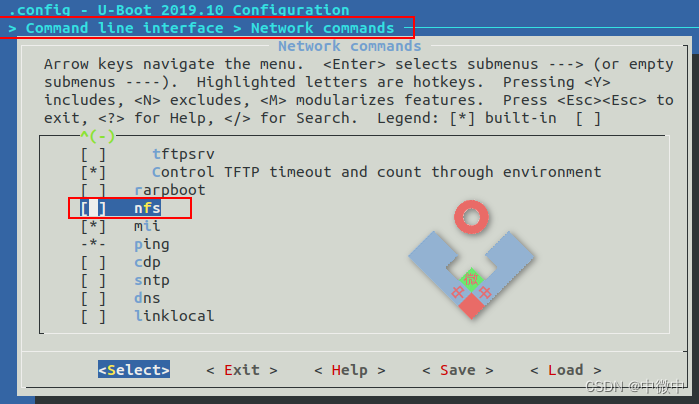
重新编译即可:
make CROSS_COMPILE=arm-linux-gnueabi- all
=====================================
其它说明 :
initrd(initial ramdisk)是在系统引导过程中挂载的一个临时根文件系统 ,用来支持两阶段的引导过程。initrd文件中包含了各种可执行程序和驱动程序,一般被用来临时的引导硬件到实际内核vmlinuz能够接管并继续引导的状态,也可以用来挂载实际的根文件系统,然后再将这个 initrd RAM 磁盘卸载,并释放内存。在很多嵌入式Linux 系统中,initrd 就是最终的根文件系统。
接口:tty0, ttyAMA0, ttySAC0, ttyS0
AMA:是Advanced Microcontroller Bus Architecture的缩写,是ARM的一种 UART设备(ARM AMBA PL011)
设置:mknod /dev/ttyAMA0 c 204 64
编译内核命令:
- make zImage //编译生成zImage镜像文件
- make dtbs //编译生成设备树镜像文件
- make LOADADDR=0x60003000 uImage -j4 指定uImage的加载地址
ubuntu中重启网络命令:
sudo service networking restart
或
sudo service network-manager restart
或
/etc/init.d/networking restart
或
sudo ifdown -a && sudo ifup -a


 594
594


 被折叠的 条评论
为什么被折叠?
被折叠的 条评论
为什么被折叠?
 到【灌水乐园】发言


