【啊我发现已经有人翻译过了!】
https://yq.aliyun.com/articles/202939?spm=5176.100239.0.0.b7vTwx
了解如何用tf实现lstm,以及掌握其细节。以mnist举例说明。
mnist数据集
mnist数据集包含手写数字的图像和对应的标签。我们可以在tf内部下载并读取数据:
from tensorflow.examples.tutorials.mnist import input_data
mnist = input_data.read_data_sets("/tmp/data/", one_hot=True)
数据集分为三个部分:
- 训练数据(
mnist.train) - 55000张训练图片 - 测试数据(
mnist.test) - 10000 images of test data - 交叉验证数据(
mnist.validation) -5000 images of validation data.
shape of mnist
训练集包括55000个图片,size是28x28。这些784(28x28)个像素值被拉成了一维的向量,所有的55000个像素向量都存储在numpy的array里面,(55000,784),这就是mnist.train.images。
所有训练图片都和一个label相关,label代表所属的类别。在这里,有十个类别,即(0,1,2,…,9)。所有lable都用one-hot编码。所以label也存储于一个numpy的array里面,形状(55000,10),这就是mnist.train.labels。
why mnist?
lstm一般用于复杂的序列相关问题,比如包含NLP的word embedding,encoder等。这些问题自身就需要花很多时间去理解了。如果能够先把这些理解放在一边,单纯的接入lstm的实现细节那当然就非常nice啦~ 所以mnist给了我们这个机会,输入很简单,无需过多的预处理,可以很容易的格式化这些数据,然后focus on实现细节~
实现
看代码之前,先梳理一下实现框架。
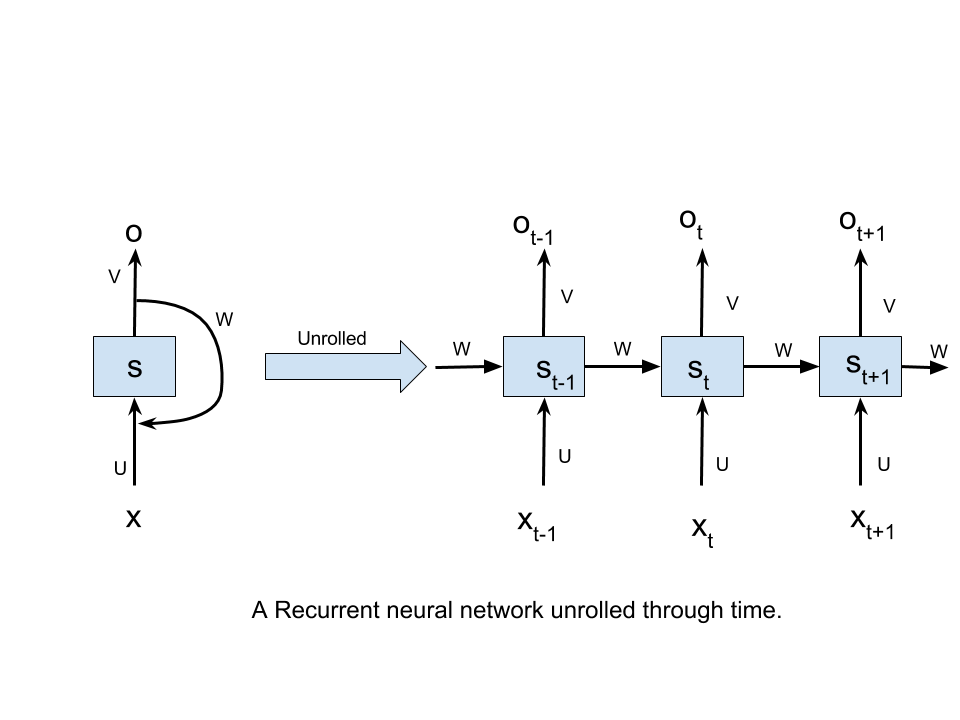
普通RNN

- xt :时间t的输入。
- st :时间t处的隐藏状态。可视化为网络的内存。
- Ot :时间t的输出。
-
U
,
V , W <script type="math/tex" id="MathJax-Element-6">W</script>:所有时间共享的参数。该参数共享的意义在于,模型在不同时间不同输入的时候可以执行相同的任务。
通过RNN想要说明,在每一步,考虑到前一个单元的输出,网络都可以可视化为前馈网络。
Two caveats
实现随着两个概念而定(hinge upon),:
- tf中LSTM细胞的解释
- 在把数据feed进入RNN之前将输入格式化
Interpretation of LSTM cells in tensorflow
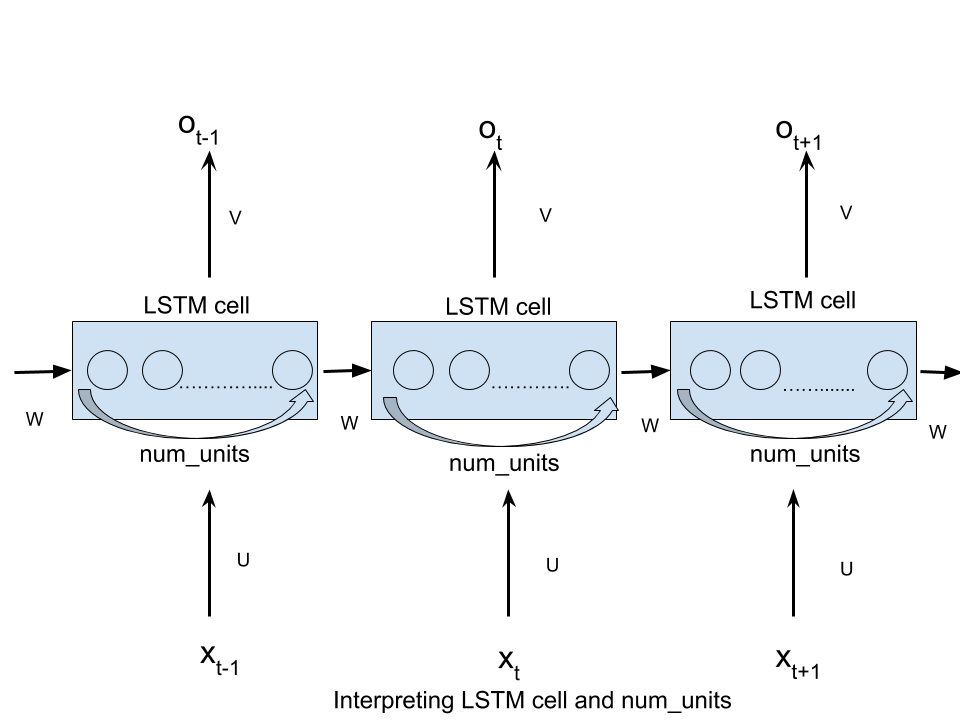
A basic LSTM cell is declared in tensorflow as-
tf.contrib.rnn.BasicLSTMCell(num_units)num_units指的是lstm中的单位数。可以解释为前馈神经网络的隐藏层,在网络中,每个时间t,前馈神经网络的节点数量都等于num_units。

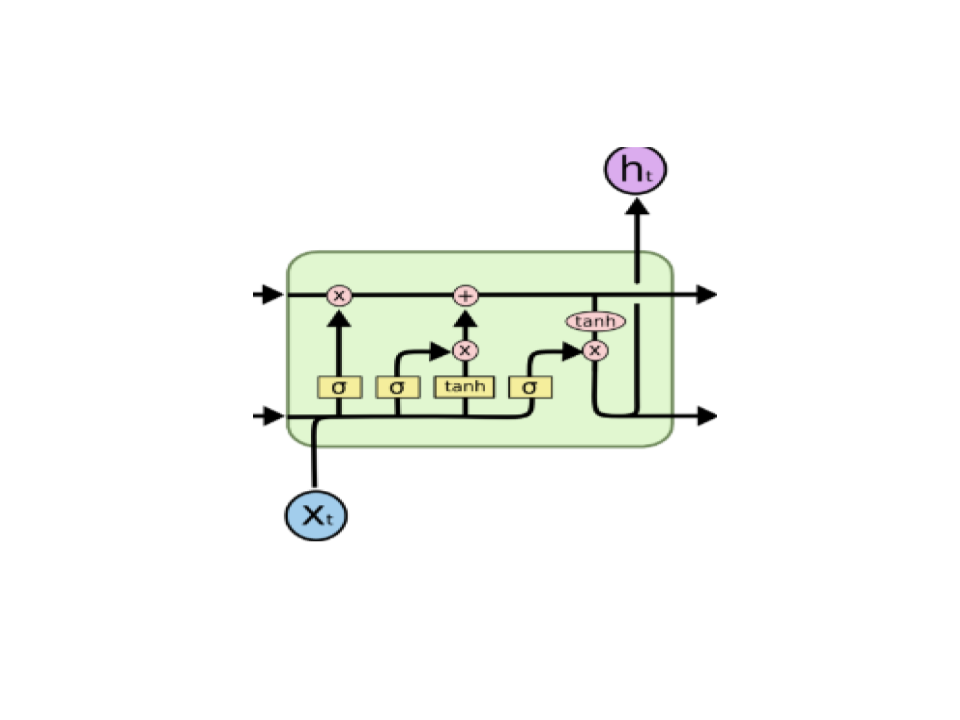
每个LSTM单元都可以看做标准的LSTM单元:

格式化输入
tf中最简单的RNN形式是 static_rnn,在tf中如下定义:
tf.static_rnn(cell,inputs)还有其他参数,不过在此不做讨论。
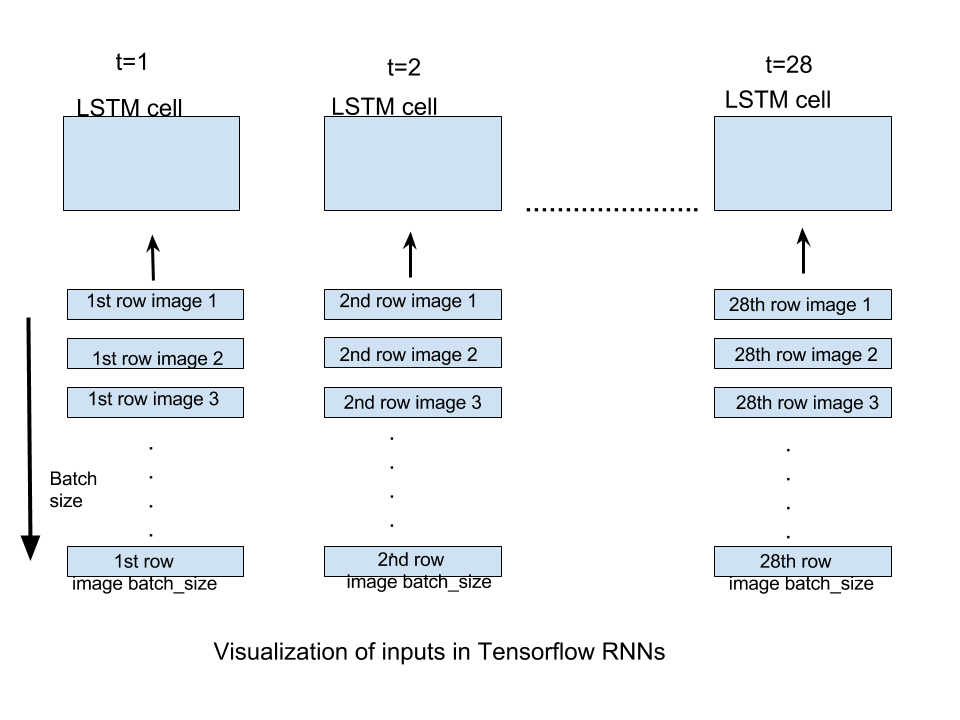
input : 接收形如[batch_size,input_size]的张量。列表长度为网络展开的时间长度,每个元素即每个时间t的输入。
以下来自: link
对于我们的MNIST图像的情况,我们有大小为28X28的图像。它们可以被推断为具有28行28像素的图像。我们将通过28个时间步骤展开我们的网络,使得在每个时间步长,我们可以输入一行28像素(input_size),从而通过28个时间步长输入完整的图像。如果我们提供batch_size图像的数量,每个时间步长将提供相应的batch_size图像行。下图应该可以解释上述描述:

生成的输出static_rnn是形状的张量列表[batch_size,n_hidden]。列表的长度是网络展开的时间步长数,即每个时间步长的一个输出张量。在这个实现中,我们将只关注最后时间的输出,当图像的所有行被提供给RNN时,即在最后时间步长将产生预测。
我们已经准备好编写代码了。如果一旦上述概念很清楚,编写部分很简单。
Code
首先,可以导入必需的依赖项、数据集并声明一些常量。我们将使用batch_size=128和num_units=128。
import tensorflow as tf
from tensorflow.contrib import rnn
#import mnist dataset
from tensorflow.examples.tutorials.mnist import input_data
mnist=input_data.read_data_sets("/tmp/data/",one_hot=True)
#define constants
#unrolled through 28 time steps
time_steps=28
#hidden LSTM units
num_units=128
#rows of 28 pixels
n_input=28
#learning rate for adam
learning_rate=0.001
#mnist is meant to be classified in 10 classes(0-9).
n_classes=10
#size of batch
batch_size=128现在让我们来声明将其用于形状的输出转换占位符和权重及偏置变量[batch_size,num_units],[batch_size,n_classes]。
#weights and biases of appropriate shape to accomplish above task
out_weights=tf.Variable(tf.random_normal([num_units,n_classes]))
out_bias=tf.Variable(tf.random_normal([n_classes]))
#defining placeholders
#input image placeholder
x=tf.placeholder("float",[None,time_steps,n_input])
#input label placeholder
y=tf.placeholder("float",[None,n_classes])我们正在接收形状的输入[batch_size,time_steps,n_input],我们需要将其转换成长度形状[batch_size,n_inputs]的张量列表,time_steps是以便它可以被馈送到static_rnn。
#processing the input tensor from [batch_size,n_steps,n_input] to "time_steps" number of [batch_size,n_input] tensors
input=tf.unstack(x ,time_steps,1)现在我们准备定义我们的网络。我们将使用一层BasicLSTMCell,使我们的static_rnn网络脱颖而出。
#defining the network
#这里原文写的是n_hidden,其实不应当!应该把n_hidden改为num_units
#或者在前面再定义一个n_hidden = 128

lstm_layer=rnn.BasicLSTMCell(n_hidden,forget_bias=1)
outputs,_=rnn.static_rnn(lstm_layer,input,dtype="float32")
由于我们要的是预测的结果,所以我们只考虑最后一步的输入。
#converting last output of dimension [batch_size,num_units] to [batch_size,n_classes] by out_weight multiplication
prediction=tf.matmul(outputs[-1],out_weights)+out_bias
定义损失、优化器和准确性。
#loss_function
loss=tf.reduce_mean(tf.nn.softmax_cross_entropy_with_logits(logits=prediction,labels=y))
#optimization
opt=tf.train.AdamOptimizer(learning_rate=learning_rate).minimize(loss)
#model evaluation
correct_prediction=tf.equal(tf.argmax(prediction,1),tf.argmax(y,1))
accuracy=tf.reduce_mean(tf.cast(correct_prediction,tf.float32))
现在我们已经定义了图,我们可以运行它。
#initialize variables
init=tf.global_variables_initializer()
with tf.Session() as sess:
    sess.run(init)
    iter=1
    while iter<800:
      batch_x,batch_y=mnist.train.next_batch(batch_size=batch_size)
        batch_x=batch_x.reshape((batch_size,time_steps,n_input))
        sess.run(opt, feed_dict={x: batch_x, y: batch_y})
       if iter %10==0:
            acc=sess.run(accuracy,feed_dict={x:batch_x,y:batch_y})
            los=sess.run(loss,feed_dict={x:batch_x,y:batch_y})
            print("For iter ",iter)
            print("Accuracy ",acc)
            print("Loss ",los)
            print("__________________")
        iter=iter+1
这里要注意的一个关键点,我们的图像基本上是被平坦化为一个单一的维度矢量784。函数
next_batch(batch_size)必然返回batch_size为784维度向量的批次,因此它们被重塑为[batch_size,time_steps,n_input]可以被占位符接受。
我们还可以计算我们的模型的测试精度:
#记得这一段要缩进到session里面
#calculating test accuracy
test_data = mnist.test.images[:128].reshape((-1, time_steps, n_input))
test_label = mnist.test.labels[:128]
print("Testing Accuracy:", sess.run(accuracy, feed_dict={x: test_data, y: test_label}))
运行时,模型运行测试精度为99.21%。
这个博客目的是让读者对张量流中RNN的实现细节有所了解。以便我们建立了一些更复杂的模型,以有效地在张量流中使用RNN。


 1192
1192

 被折叠的 条评论
为什么被折叠?


