原文来自http://www.aviyehuda.com/blog/2010/12/20/android-multithreading-in-a-ui-environment/

为什么需要在Andriod里多线程编程?
让我们说下如何在由用户按下按键来执行一个长操作吧。
如果你不用另外的线程,它会看起来像:
1 | ((Button)findViewById(R.id.Button01)).setOnClickListener( |
2 | new OnClickListener() { |
5 | public void onClick(View v) { |
6 | int result = doLongOperation(); |
这将发生什么?UI卡住了。程序还有可能当掉。
这个问题可以利用多线程。哦,那如果在其他线程里运行这个长操作,将会发生什么呢?来看看一个简单的例子:
01 | ((Button)findViewById(R.id.Button01)).setOnClickListener( |
02 | new OnClickListener() { |
05 | public void onClick(View v) { |
07 | (new Thread(new Runnable() { |
11 | int result = doLongOperation(); |
结果是程序当掉了:
12-07 16:24:29.089: ERROR/AndroidRuntime(315): FATAL EXCEPTION: Thread-8
 12-07 16:24:29.089: ERROR/AndroidRuntime(315): android.view.ViewRoot$CalledFromWrongThreadException: Only the original thread that created a view hierarchy can touch its views.
 12-07 16:24:29.089: ERROR/AndroidRuntime(315): at ...
很显然Andriod系统让线程而不是主线程更新UI元素。
但是为什么?Andriod UI象其他UI环境一样,不是线程安全的。
解决方案:
- 消息队列。每个消息是一个将被处理的任务。
- 线程能够增加消息
- 只有一个线程从队列里取消息
同样的解决方案在swing里也有(Event dispatching thread 和 SwingUtilities.invokeLater() )
Handler
Handler是新线程和消息队列之间的中介
选择1-运行新线程,用handler发消息
01 | final Handler myHandler = new Handler(){ |
03 | public void handleMessage(Message msg) { |
04 | updateUI((String)msg.obj);//在主线程执行 |
09 | (new Thread(new Runnable() { |
13 | Message msg = myHandler.obtainMessage(); |
15 | msg.obj = doLongOperation();//在新线程执行长操作 |
17 | myHandler.sendMessage(msg); |
记住updateUI应该是个短操作,不然它会阻塞主线程。
其他的选择是:
handler.obtainMessage with parameters
handler.sendMessageAtFrontOfQueue()
handler.sendMessageAtTime()
handler.sendMessageDelayed()
handler.sendEmptyMessage()
选择2:运行新线程并用handler来投递一个runnable来更新UI
01 | final Handler myHandler = new Handler(); |
03 | (new Thread(new Runnable() { |
07 | final String res = doLongOperation(); |
08 | myHandler.post(new Runnable() { |
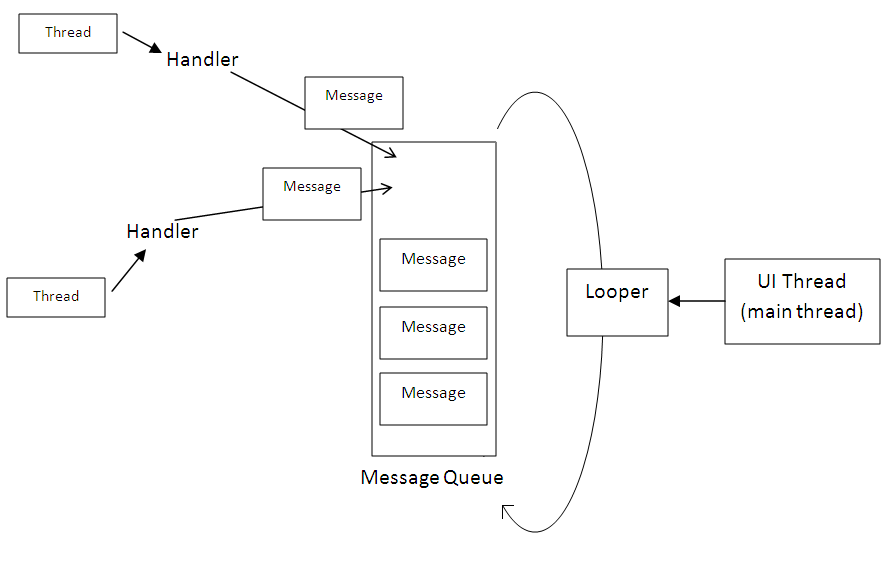
Looper
如果我们要深入andriod机制,我们必须理解Looper。我们已经谈到消息队列是主线程pull消息并执行它;每个创建的handler用这个队列的引用。
没有说道的是主线程用Looper的引用。Lpper给予访问消息队列的权限。只要主线程你呢个默认操作Looper。
Looper:
创建一个新线程,可以在这个线程里利用消息队列。
01 | (new Thread(new Runnable() { |
06 | innerHandler = new Handler(); |
08 | Message message = innerHandler.obtainMessage(); |
09 | innerHandler.dispatchMessage(message); |
再次我们创建了一个线程,并用handler来把消息放进消息队列里。
结果是:
12-10 20:41:51.807: ERROR/AndroidRuntime(254): Uncaught handler: thread Thread-8 exiting due to uncaught exception
 12-10 20:41:51.817: ERROR/AndroidRuntime(254): java.lang.RuntimeException: Can't create handler inside thread that has not called Looper.prepare()
 12-10 20:41:51.817: ERROR/AndroidRuntime(254): at android.os.Handler.(Handler.java:121)
 12-10 20:41:51.817: ERROR/AndroidRuntime(254): at ...
新线程没有管理的Looper,只有UI线程有。我们可以为新线程新建一个Looper。我们需要两个函数: Looper.prepare() andLooper.loop().
01 | (new Thread(new Runnable() { |
07 | innerHandler = new Handler(); |
09 | Message message = innerHandler.obtainMessage(); |
10 | innerHandler.dispatchMessage(message); |
如果利用这些,不要忘记用quit()来清理当Looper不在执行时。
2 | protected void onDestroy() { |
3 | innerHandler.getLooper().quit(); |
AsyncTask
I have explained to you that a Handler is the new thread’s way to communicate with the UI thread.
If while reading this you were thinking to yourself, isn’t there an easier way to do all of that… well, you know what?! There is.
Android team has created a class called AsyncTask which is in short a thread that can handle UI.
Just like in java you extend the class Thread and a SwingWorker in Swing, in Android you extend the class AsyncTask.
There is no interface here like Runnable to implement I’m afraid.
01 | class MyAsyncTask extends AsyncTask<Integer, String, Long> { |
04 | protected Long doInBackground(Integer... params) { |
06 | long start = System.currentTimeMillis(); |
07 | for (Integer integer : params) { |
08 | publishProgress("start processing "+integer); |
10 | publishProgress("done processing "+integer); |
13 | return start - System.currentTimeMillis(); |
19 | protected void onProgressUpdate(String... values) { |
24 | protected void onPostExecute(Long time) { |
25 | updateUI("Done with all the operations, it took:"+ |
26 | time + " millisecondes"); |
30 | protected void onPreExecute() { |
31 | updateUI("Starting process"); |
35 | public void doLongOperation() { |
39 | } catch (InterruptedException e) { |
开启新线程:
1 | MyAsyncTask aTask = new MyAsyncTask(); |
2 | aTask.execute(1, 2, 3, 4, 5); |
AsyncTask defines 3 generic types:
AsyncTask<{type of the input}, {type of the update unit}, {type of the result}>
You don’t have to use all of them – simply use ‘Void’ for any of them.
Notice that AsyncTask has 4 operations, which are executed by order.
1. onPreExecute() – is invoked before the execution.
2. onPostExecute() - is invoked after the execution.
3. doInBackground() - the main operation. Write your heavy operation here.
4. onProgressUpdate() – Indication to the user on progress. It is invoked every time publishProgress() is called.
* Notice: doInBackground() is invoked on a background thread where onPreExecute(), onPostExecute() and onProgressUpdate() are invoked on the UI thread since their purpose is to update the UI.
Android developer website also mentions these 4 rules regarding the AsyncTask:
- The task instance must be created on the UI thread.
- execute(Params…) must be invoked on the UI thread.
- Do not call onPreExecute(), onPostExecute(Result), doInBackground(Params…), onProgressUpdate(Progress…) manually.
- The task can be executed only once (an exception will be thrown if a second execution is attempted.)
Timer + TimerTask
Another option is to use a Timer.
Timer is a comfortable way to dispatch a thread in the future, be it once or more.
Instead of doing this:
01 | Runnable threadTask = new Runnable() { |
09 | } catch (InterruptedException e) { |
18 | (new Thread(threadTask)).start(); |
do this:
1 | TimerTask timerTask = new TimerTask() { |
8 | Timer timer = new Timer(); |
9 | timer.schedule(timerTask, 2000,2000); |
which is a bit more elegant.
Bare in mind, you still have to use Handler if you need to do UI operations.


 71
71


 被折叠的 条评论
为什么被折叠?
被折叠的 条评论
为什么被折叠?
 到【灌水乐园】发言


