


文章来源:http://blog.csdn.net/wwwgeyang777/article/details/19928631
最近一直研究SOAP消息的安全通信方式,没在网上搜到啥靠谱的,就一步一步摸索,终于成功了,把过程整理出来,供大家参考。
废话不多说,关于怎么用Axis2发布Web Service,WS-Security是啥,什么是Rampart、和WSS4J又是什么关系,SOAP消息等等的问题不是本文的重点,这里推荐一篇文章,是用Axis2+Rampart实现证书认证方式的WS-Security,写的比较好,对相关的概念也有部分介绍,必须得赞一个,一系列的文章也都写的非常好,值得细细品读。
地址:http://blog.csdn.net/lifetragedy/article/details/7844589
1、 服务端
最终建好的工程截图如下:
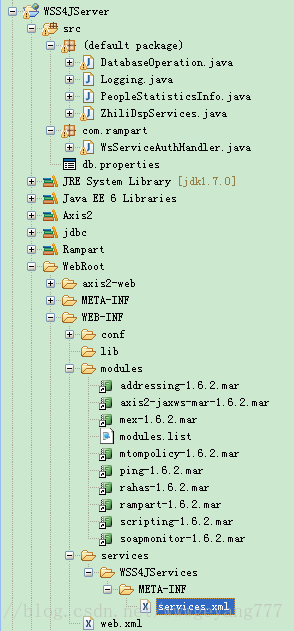
a) 建立Axis2的工程
b) 添加相关的Jar包,Axis2、Rampart的jar包都需要有,由于本项目中还用到了数据库,所以也添加了jdbc的jar包。
c) 之后在WEB-INF/modules目录下添加rampart模块,将rampart-1.6.2.mar和rahas-1.6.2.mar两个文件直接拷过来即可。
d) 之后就是在配置文件services.xml中添加rampart的配置,内容如下:
- <module ref="rampart" />
- <!--
- <parameter name="OutflowSecurity">
- <action>
- <items>UsernameToken</items>
- <user>administrator</user>
- <passwordCallbackClass>com.rampart.client.ClientAuthHandler
- </passwordCallbackClass>
- </action>
- </parameter>
- -->
- <parameter name="InflowSecurity">
- <action>
- <items>UsernameToken</items>
- <passwordCallbackClass>com.rampart.WsServiceAuthHandler</passwordCallbackClass>
- </action>
- </parameter>
因为服务端只是对访问请求进行验证,所以对OutflowSecurity参数不做设置。InflowSecurity参数项配置里面的passwordCallbackClass需要配置自己写的回调函数的类名,代码如下:
- package com.rampart;
- import java.io.IOException;
- import javax.security.auth.callback.Callback;
- import javax.security.auth.callback.CallbackHandler;
- import javax.security.auth.callback.UnsupportedCallbackException;
- import org.apache.log4j.Logger;
- import org.apache.ws.security.WSPasswordCallback;
- public class WsServiceAuthHandler implements CallbackHandler
- {
- private final static String USERNAME = "administrator";
- private final static String PASSWORD = "123456";
- private Logger log = Logger.getLogger(WsServiceAuthHandler.class);
- /**
- * 〈一句话功能简述〉 〈功能详细描述〉
- *
- * @see javax.security.auth.callback.CallbackHandler#handle(javax.security.auth.callback.Callback[])
- * @param callbacks
- * @throws IOException
- * @throws UnsupportedCallbackException
- */
- @Override
- public void handle(Callback[] callbacks) throws IOException,
- UnsupportedCallbackException
- {
- WSPasswordCallback pCallback = (WSPasswordCallback) callbacks[0];
- // 标识符
- String id = pCallback.getIdentifier();
- // 此处获取到的password为null,但是并不代表服务端没有拿到该属性。
- // 这是因为客户端提交过来的密码在SOAP 消息中已经被加密为MD5
- // 的字符串,如果我们要在回调方法中作比较,那么第一步要做的就是把服务端准备好的密码加密为MD5 字符串,由于MD5
- // 算法参数不同结果也会有差别,另外,这样的工作由框架替我们完成不是更简单吗?
- String password = pCallback.getPassword();
- System.out.println("接收到WebService请求,userName[" + id + "],password["
- + password + "]......");
- if (null == USERNAME)
- {
- System.out.println("验证用户失败,原因:您没有权限访问,用户名为空!");
- throw new UnsupportedCallbackException(pCallback, "您没有权限访问,用户名为空!");
- }
- else if (!USERNAME.equals(id))
- {
- System.out.println("验证用户失败,原因:您没有权限访问,用户名错误!");
- throw new UnsupportedCallbackException(pCallback, "您没有权限访问,用户名错误!");
- }
- else
- {
- /**
- * 此处应该这样做:
- * 1. 查询数据库,得到数据库中该用户名对应密码
- * 2. 设置密码,wss4j会自动将你设置的密码与客户端传递的密码进行匹配
- * 3. 如果相同,则放行,否则返回权限不足信息
- */
- pCallback.setPassword(PASSWORD);
- /*
- * if (!PASSWORD.equals(password)) {
- * System.out.println("验证用户失败,原因:您没有权限访问,密码错误!"); throw new
- * UnsupportedCallbackException(pCallback, "您没有权限访问,密码错误!"); }
- */
- }
- pCallback.setIdentifier("service");
- }
- }
具体什么什么的看注释就行了,可以说是综合了网上能找的所有资料里面感觉有道理的说明的总和了。
e) 再然后就发布服务就行了。
2、 客户端
客户端的配置相对来说就比较麻烦了,一步一步来吧。
客户端只要建立普通的Java工程就行了,最终工程截图如下:
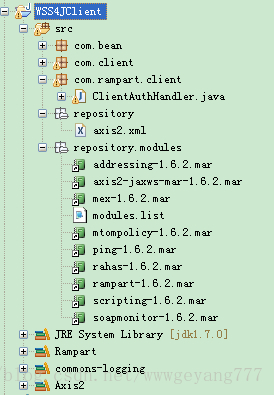
a) 新建Java工程
b) 同样添加相关的Jar包,Axis2、Rampart的jar包都需要有。
c) 这里就在src下面新建个repository的目录,将axis2.xml文件从Axis2的conf目录下拷过来,然后再将modules目录全部拷过来。
d) 之后是新建类,编写调用的客户端代码,其中的关键代码如下:
- package com.client;
- import java.util.ArrayList;
- import java.util.Iterator;
- import java.util.List;
- import org.apache.axiom.om.OMAbstractFactory;
- import org.apache.axiom.om.OMElement;
- import org.apache.axiom.om.OMFactory;
- import org.apache.axiom.om.OMNamespace;
- import org.apache.axiom.om.OMNode;
- import org.apache.axis2.addressing.EndpointReference;
- import org.apache.axis2.client.Options;
- import org.apache.axis2.client.ServiceClient;
- import org.apache.axis2.context.ConfigurationContext;
- import org.apache.axis2.context.ConfigurationContextFactory;
- import org.apache.axis2.databinding.utils.BeanUtil;
- import org.apache.axis2.engine.DefaultObjectSupplier;
- import com.bean.PeopleStatisticsInfo;
- public class DocumentClient
- {
- private static EndpointReference targetEPR = new EndpointReference(
- "http://localhost:1235/WSS4JServer/services/ZhiliDspServices");
- private String getAxis2ConfPath()
- {
- StringBuilder confPath = new StringBuilder();
- confPath.append(this.getClass().getResource("/").getPath());
- confPath.append("repository");
- return confPath.toString();
- }
- private String getAxis2ConfFilePath()
- {
- String confFilePath = "";
- confFilePath = getAxis2ConfPath() + "/axis2.xml";
- return confFilePath;
- }
- public void invokeRampartService()
- {
- System.out
- .println("****** Invoking function: invokeRampartService ******");
- Options options = new Options();
- options.setTo(targetEPR);
- options.setAction("urn:getAllPeopleStatistics");
- ServiceClient sender = null;
- try
- {
- String confPath = getAxis2ConfPath();
- String confFilePath = getAxis2ConfFilePath();
- System.out.println("confPath ====== " + confPath);
- System.out.println("confFilePath ==== " + confFilePath);
- ConfigurationContext configContext = ConfigurationContextFactory
- .createConfigurationContextFromFileSystem(confPath,
- confFilePath);
- sender = new ServiceClient(configContext, null);
- sender.setOptions(options);
- OMFactory fac = OMAbstractFactory.getOMFactory();
- OMNamespace omNs = fac.createOMNamespace(
- "http://ws.apache.org/axis2", "");
- OMElement callMethod = fac.createOMElement(
- "getAllPeopleStatistics", omNs);
- OMElement response = sender.sendReceive(callMethod);
- System.out.println("response ====>" + response);
- System.out.println(response.getFirstElement().getText());
- }
- catch (Exception e)
- {
- e.printStackTrace();
- }
- finally
- {
- if (sender != null)
- sender.disengageModule("addressing");
- try
- {
- sender.cleanup();
- }
- catch (Exception e)
- {
- }
- }
- }
- public static void main(String[] args)
- {
- DocumentClient documentClient = new DocumentClient();
- documentClient.invokeRampartService();
- }
- }
e) 这样就能调用了吗?还没有完,还要配置?对,就是配置,不过这里配置的是拷过来axis2.xml文件,添加内容如下:
- <module ref="rampart" />
- <parameter name="OutflowSecurity">
- <action>
- <items>UsernameToken</items>
- <user>administrator</user>
- <passwordCallbackClass>com.rampart.client.ClientAuthHandler
- </passwordCallbackClass>
- </action>
- </parameter>
- <!--
- <parameter name="InflowSecurity">
- <action>
- <items>UsernameToken</items>
- <passwordCallbackClass>com.rampart.client.ServiceAuthHandler
- </passwordCallbackClass>
- </action>
- </parameter>
- -->
因为是调用的代码,只需要配置OutflowSecurity就行了,不需要的InflowSecurity给注释掉。OutflowSecurity中设置的passwordCallbackClass多对应的回调函数的代码也给贴出来了,如下:
- package com.rampart.client;
- import java.io.IOException;
- import javax.security.auth.callback.Callback;
- import javax.security.auth.callback.CallbackHandler;
- import javax.security.auth.callback.UnsupportedCallbackException;
- import org.apache.log4j.Logger;
- import org.apache.ws.security.WSPasswordCallback;
- public class ClientAuthHandler implements CallbackHandler
- {
- private final static String USERNAME = "administrator";
- private final static String PASSWORD = "123456";
- private Logger log = Logger.getLogger(ClientAuthHandler.class);
- /**
- * 〈一句话功能简述〉 〈功能详细描述〉
- *
- * @see javax.security.auth.callback.CallbackHandler#handle(javax.security.auth.callback.Callback[])
- * @param callbacks
- * @throws IOException
- * @throws UnsupportedCallbackException
- */
- @Override
- public void handle(Callback[] callbacks) throws IOException,
- UnsupportedCallbackException
- {
- System.out.println("客户端 wss4j内容加密并发送到服务端......");
- for (int i = 0; i < callbacks.length; i++)
- {
- WSPasswordCallback pCallback = (WSPasswordCallback) callbacks[i];
- String id = pCallback.getIdentifier();
- if (USERNAME.equals(id))
- {
- pCallback.setPassword(PASSWORD);
- }
- // pCallback.setPassword(PASSWORD);
- // pCallback.setIdentifier(USERNAME);
- }
- }
- }
f) 好了,可以调用了,是不是很兴奋啊!
3、测试
这么多的配置到底是为了什么呢?监听下SOAP请求信息,看到request的信息如下:
<?xml version="1.0" encoding="http://schemas.xmlsoap.org/soap/envelope/" standalone="no"?>
- <soapenv:Envelope xmlns:soapenv="http://schemas.xmlsoap.org/soap/envelope/">
- <soapenv:Header xmlns:wsa="http://www.w3.org/2005/08/addressing">
- <wsse:Security
- xmlns:wsse="http://docs.oasis-open.org/wss/2004/01/oasis-200401-wss-wssecurity-secext-1.0.xsd"
- xmlns:wsu="http://docs.oasis-open.org/wss/2004/01/oasis-200401-wss-wssecurity-utility-1.0.xsd"
- soapenv:mustUnderstand="1">
- <wsse:UsernameToken wsu:Id="UsernameToken-1">
- <wsse:Username>administrator</wsse:Username>
- <wsse:Password
- Type="http://docs.oasis-open.org/wss/2004/01/oasis-200401-wss-username-token-profile-1.0#PasswordDigest">1Rjr1XAOJQMeRGzxq5uNVRuoux8=</wsse:Password>
- <wsse:Nonce
- EncodingType="http://docs.oasis-open.org/wss/2004/01/oasis-200401-wss-soap-message-security-1.0#Base64Binary">aHlI/3CcTUy4xlGS8caxuQ==</wsse:Nonce>
- <wsu:Created>2014-02-25T00:53:15.832Z</wsu:Created>
- </wsse:UsernameToken>
- </wsse:Security>
- <wsa:To>http://localhost:1235/WSS4JServer/services/ZhiliDspServices
- </wsa:To>
- <wsa:MessageID>urn:uuid:43409459-de4c-4e92-9a11-d67a42afce31
- </wsa:MessageID>
- <wsa:Action>urn:getAllPeopleStatistics</wsa:Action>
- </soapenv:Header>
- <soapenv:Body>
- <getAllPeopleStatistics xmlns="http://ws.apache.org/axis2" />
- </soapenv:Body>
- </soapenv:Envelope>
可以看到,这里面把密码给加密了,然后还有一堆乱七八糟看不懂的东西,安全性算是有一定程度的保障吧。
由于代码有很多的涉及业务范围的东西,就不贴出了,有问题的话可以留言或者发消息。
写的有点仓促,很多东西都很浅显,敬请谅解!


 1万+
1万+

 被折叠的 条评论
为什么被折叠?
被折叠的 条评论
为什么被折叠?
 到【灌水乐园】发言


