


/ 今日科技快讯 /
昨天下午,小米发布了国内首款5G手机:小米9Pro 5G版以及概念手机MIX Alpha。雷军表示,MIX Alpha不是折叠屏手机,不是双面屏手机,也不是瀑布屏手机,而是代表未来形态的概念型手机。另外,据雷军透露,MIX Alpha早在2年前开始研发,前后投入了1000位工程师,总投入达到了5亿元人民币。
/ 作者简介 /
本篇文章来自rain9155的投稿,分享了他对okhttp3中拦截器源码的分析和理解,相信会对大家有所帮助!同时也感谢作者贡献的精彩文章。文章有点长,需要细细品味哦~
rain9155的博客地址:
https://juejin.im/user/5b437173e51d45191d79c27a
/ 前言 /
拦截器是okhttp的一个重要的核心功能,在分析各个拦截器功能的同时又会牵扯出okhttp的缓存机制、连接机制。
本文源码基于okhttp3.14.x。
https://github.com/square/okhttp
/ 拦截器的简单使用 /
自定义一个拦截器需要实现Interceptor接口,接口定义如下:
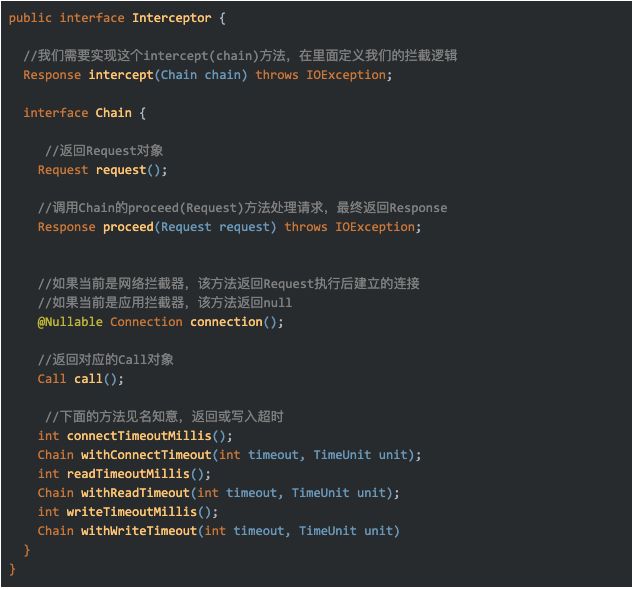
可以看到Interceptor由两部分组成:intercept(Chain)方法和内部接口Chain,下面是自定义一个拦截器的通用逻辑,如下:
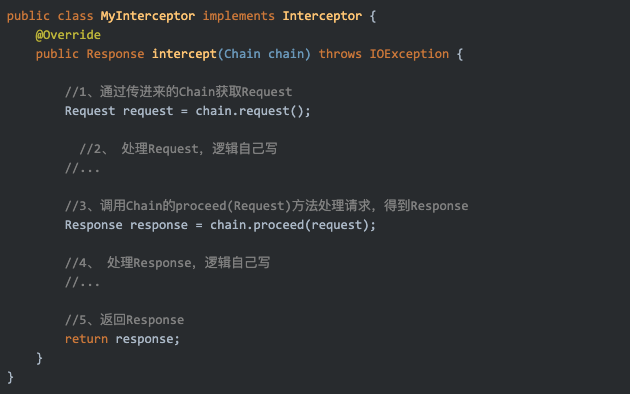
上述就是一个拦截器的通用逻辑,首先我们继承Interceptor实现intercept(Chain)方法,完成我们自己的拦截逻辑,即根据需要进行1、2、3、4、5步,不管是自定义拦截器还是后面介绍的okhttp默认的拦截器大概都是这个模板实现,定义完拦截器后,我们在构造OkhttpChient时就可以通过addInterceptor(Interceptor)或addNetworkInterceptor(Interceptor)添加自定义拦截器,如下:
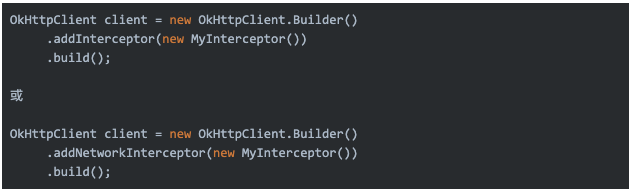
这样okhttp在链式调用拦截器处理请求时就会调用到我们自定义的拦截器,那么addInterceptor(Interceptor)和addNetworkInterceptor(Interceptor)有什么不一样呢?它们一个是添加应用拦截器,一个是添加网络拦截器,主要是调用的时机不一样,更多区别可以参考官方WIKI文档Okhttp-wiki 之 Interceptors 拦截器,当我们平时做应用开发使用addInterceptor(Interceptor)就行了。
上述是我们自定义的拦截器,下面我们来看看okhttp默认的拦截器都干了什么。
RealCall :: getResponseWithInterceptorChain()
在知道RealCall的getResponseWithInterceptorChain()是处理、发送请求并且返回响应的地方,我们再看一遍getResponseWithInterceptorChain()方法的源码,如下:
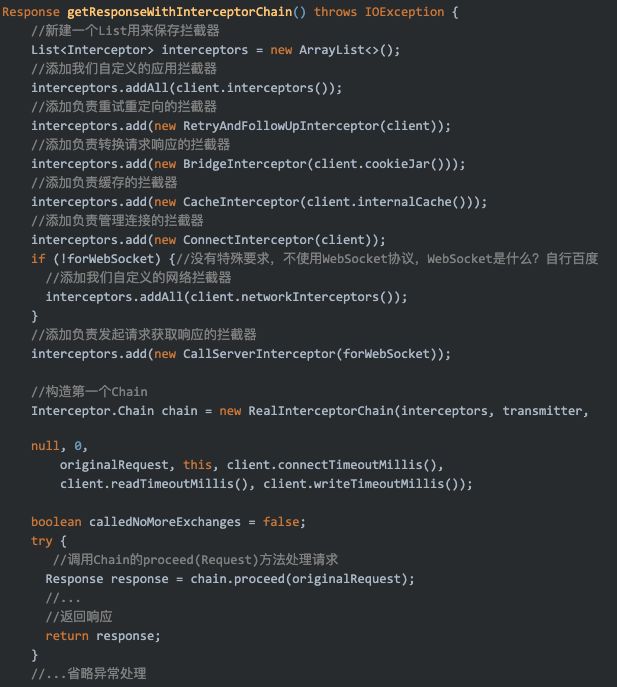
getResponseWithInterceptorChain()干了三件事:
添加拦截器到interceptors列表中;
构造第一个Chain;
调用Chain的proceed(Request)方法处理请求。
下面分别介绍:
添加拦截器到interceptors列表中
除了添加我们自定义的拦截器外,还添加了默认的拦截器,如下:
RetryAndFollowUpInterceptor:负责失败重试和重定向。
BridgeInterceptor:负责把用户构造的Request转换为发送给服务器的Request和把服务器返回的Response转换为对用户友好的Response。
CacheInterceptor:负责读取缓存以及更新缓存。
ConnectInterceptor:负责与服务器建立连接并管理连接。
CallServerInterceptor:负责向服务器发送请求和从服务器读取响应。
这几个默认的拦截器是本文的重点,在后面会分别介绍。
构造第一个Chain
Chain是Interceptor的一个内部接口,它的实现类是RealInterceptorChain,我们要对它的传进来的前6个构造参数有个印象,如下:
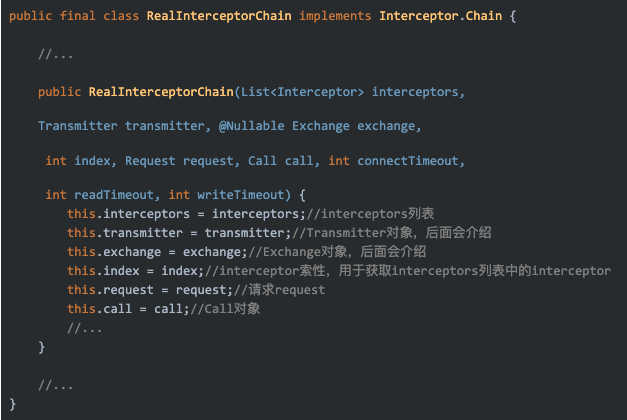
在后面的拦截器中都可以通过Chain获取这些传进来的参数。我们知道,为了让每个拦截器都有机会处理请求,okhttp使用了责任链模式来把各个拦截器串联起来,拦截器就是责任链的节点,而Chain就是责任链中各个节点之间的连接点,负责把各个拦截器连接起来。那么是怎么连接的?看下面的Chain的proceed方法。
调用Chain的proceed(Request)方法处理请求
实际是RealInterceptorChain的proceed(Request)方法,如下:
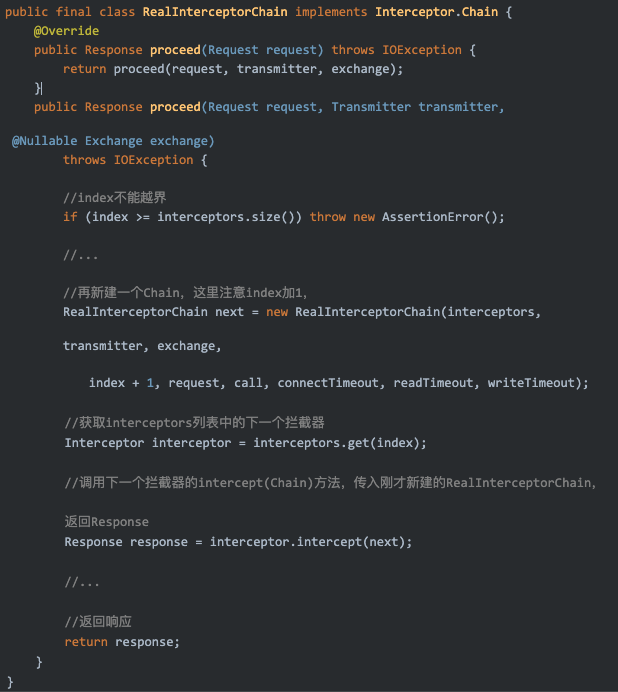
proceed方法里面首先会再新建一个Chain并且index + 1作为构造参数传了进去,然后通过index从interceptors列表中获取了一个拦截器,接着就会调用拦截器的intercept方法,并把刚刚新建的Chain作为参数传给拦截器,我们再回顾一下上面所讲的拦截器intercept方法的模板,intercept方法处理完Request逻辑后,会再次调用传入的Chain的proceed(Request)方法。
这样又会重复Chain的proceed方法中的逻辑,由于index已经加1了,所以这次Chain就会通过index获取下一个拦截器,并调用下一个拦截器的intercept(Chain)方法,然后如此循环重复下去,这样就把每个拦截器通过一个个Chain连接起来,形成一条链,把Request沿着链传递下去,直到请求被处理,然后返回Response,响应同样的沿着链传递上去,如下:
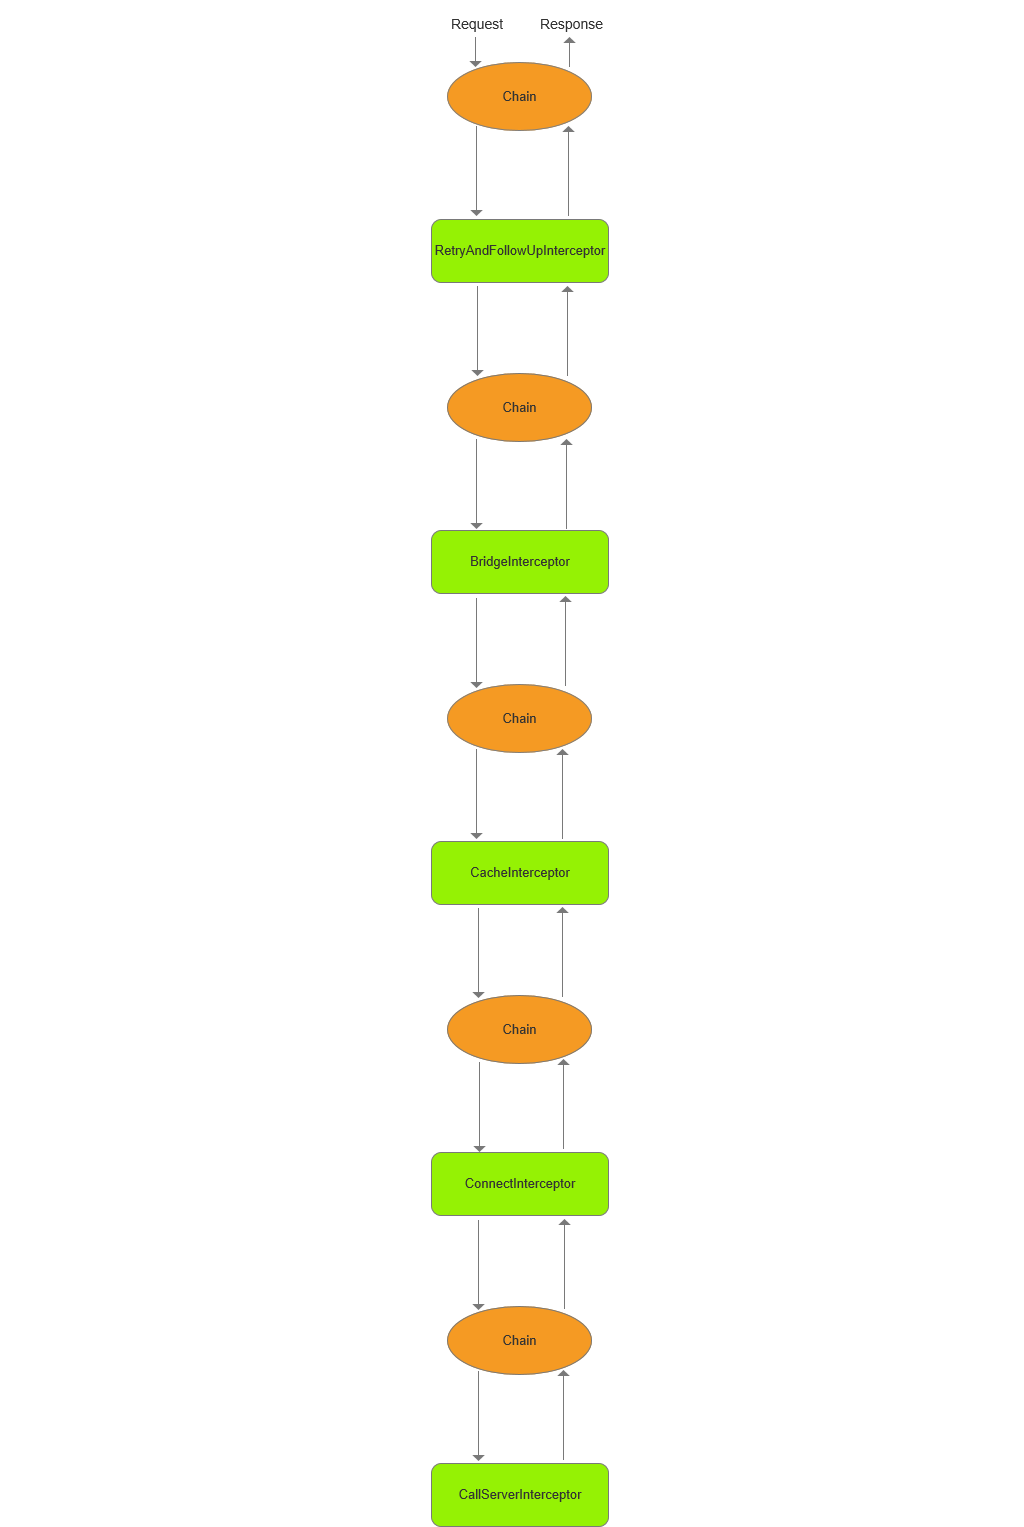
从上图可知,责任链首节点就是RetryAndFollowUpInterceptor,尾节点就是CallServerInterceptor,Request按照拦截器的顺序正向处理,Response则逆向处理,每个拦截器都有机会处理Request和Response,一个完美的责任链模式的实现。
知道了getResponseWithInterceptorChain()的整体流程后,下面分别介绍各个默认拦截器的功能。
RetryAndFollowUpInterceptor
在自定义拦截器的时候就讲过,Interceptor的intercept(Chain)方法就是拦截器的拦截实现,RetryAndFollowUpInterceptor的intercept(Chain)方法如下:
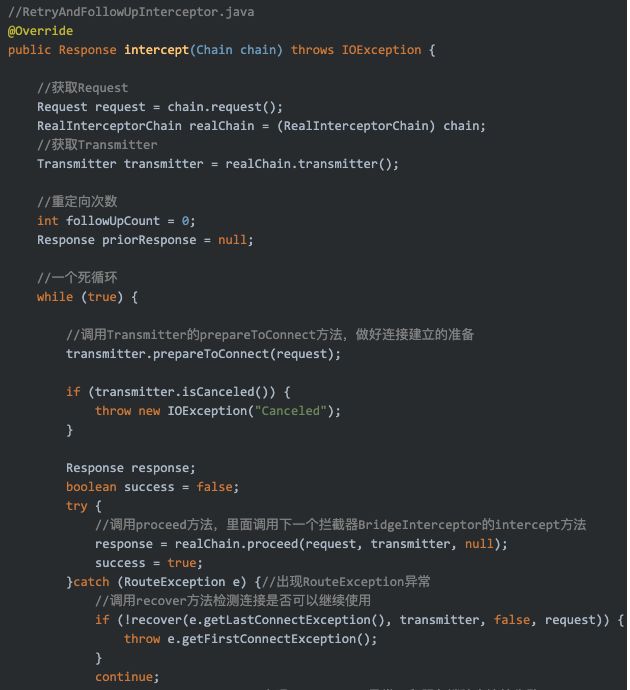
RetryAndFollowUpInterceptor的intercept(Chain)方法中主要是失败重试和重定向的逻辑,该方法流程如下:
首先获取Transmitter类;
然后进入一个死循环,先调用Transmitter的prepareToConnect方法,准备建立连接;(连接真正的建立在ConnectInterceptor中)
接着调用Chain的proceed方法,继续执行下一个拦截器BridgeInterceptor的intercept方法:
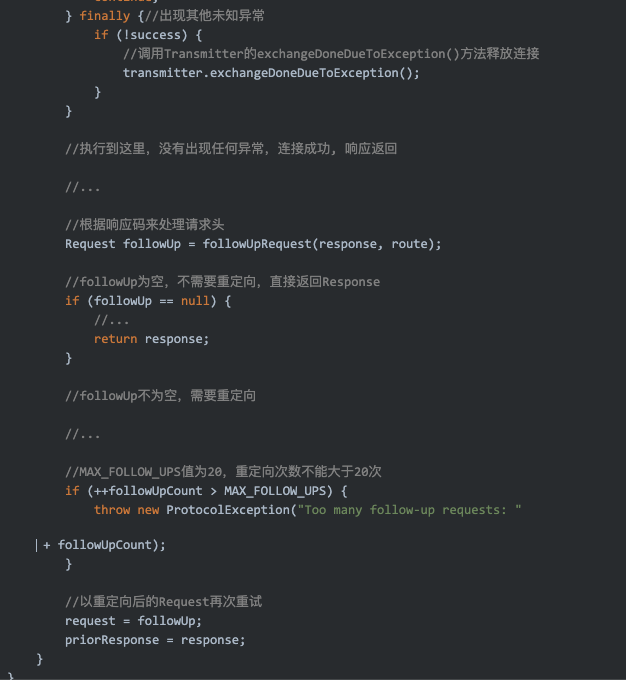
如果在请求的过程中抛出RouteException异常或IOException异常,就会调用recover方法检测连接是否可以继续使用,如果不可以继续使用就抛出异常,整个过程结束,否则就再次重试,这就是失败重试;如果在请求的过程中抛出除了3.1之外的异常,就会调用Transmitter的exchangeDoneDueToException()方法释放连接,整个过程结束。
没有任何异常抛出,当响应Response返回后,就会调用followUpRequest方法,里面根据返回的Response的响应码来决定是否需要重定向(构造followUp请求),如果不需要重定向,就直接返回Response,如果需要重定向,那么以重定向后的Request再次重试,重定向次数不能大于20次。
Transmitter
在整个方法的流程中出现了一个Transmitter,这里介绍一下,它是okhttp中应用层和网络层的桥梁,管理同一个Cal的所有连接、请求、响应和IO流之间的关系,它在RealCall创建后就被创建了,如下:
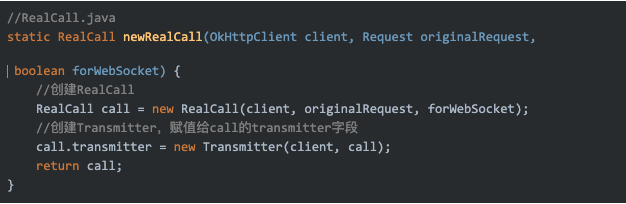
创建后,在构造节点Chain时作为参数传了进去,在getResponseWithInterceptorChain方法中有讲到,所以在intercept方法中它可以通过chain.transmitter()获得,它的整个生命周期贯穿了所有拦截器,在接下来的ConnectInterceptor和CallServerInterceptor中你都可以见到它的身影,我们看一下它的主要成员,如下:
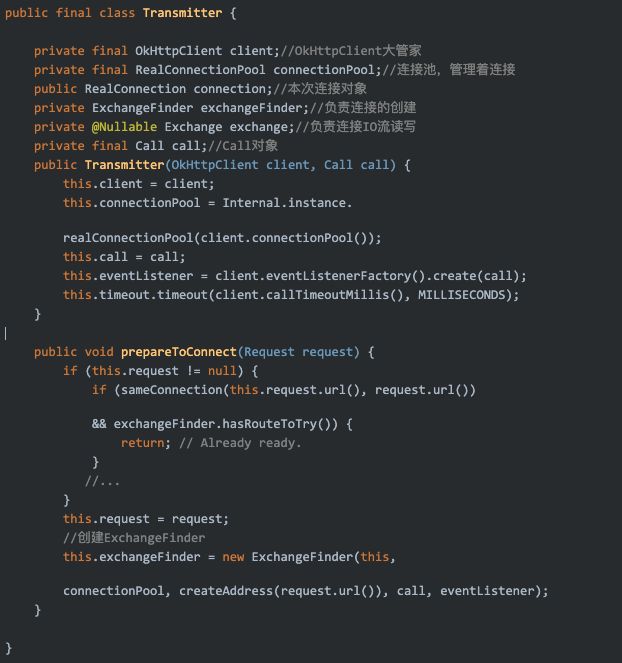
在Transmitter中client和call我们都认识,剩下的RealConnectionPool、RealConnection、ExchangeFinder、Exchange都和okhttp的连接机制有关,都会在ConnectInterceptor中介绍,Transmitter就是负责管理它们之间的关系。这里我们只要记住,Transmitter的prepareToConnect方法中主要是创建了一个ExchangeFinder,为在ConnectInterceptor中连接的建立做了一个准备。
BridgeInterceptor
BridgeInterceptor的intercept(Chain)方法如下:
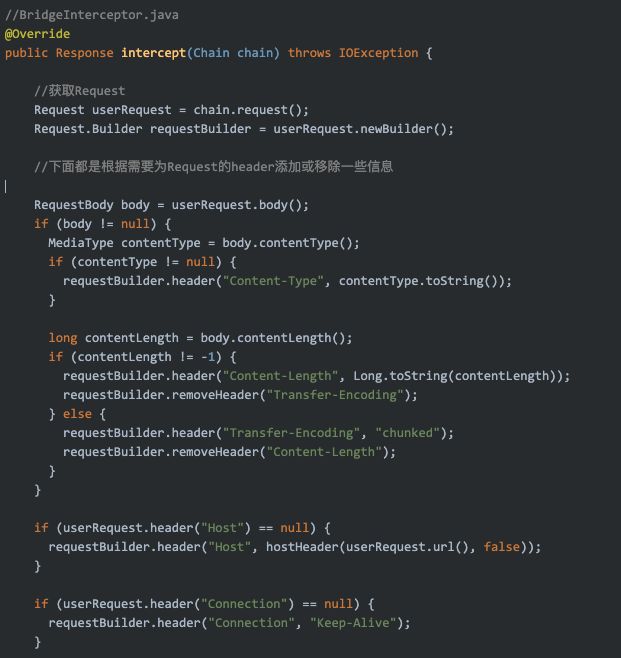
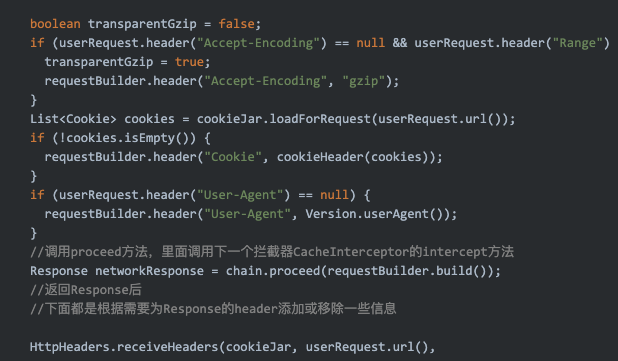
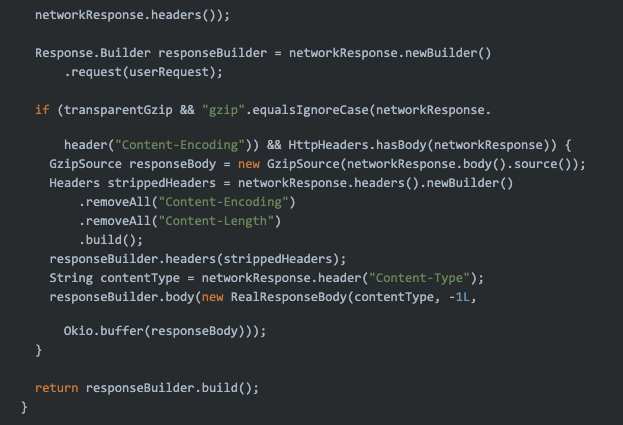
BridgeInterceptor中的逻辑是在所有默认拦截器中是最简单,它主要就是对Request或Response的header做了一些处理,把用户构造的Request转换为发送给服务器的Request,还有把服务器返回的Response转换为对用户友好的Response。例如,对于Request,当开发者没有添加Accept-Encoding时,它会自动添加Accept-Encoding : gzip,表示客户端支持使用gzip;对于Response,当Content-Encoding是gzip方式并且客户端是自动添加gzip支持时,它会移除Content-Encoding、Content-Length,然后重新解压缩响应的内容。
CacheInterceptor
CacheInterceptor的intercept(Chain)方法如下:
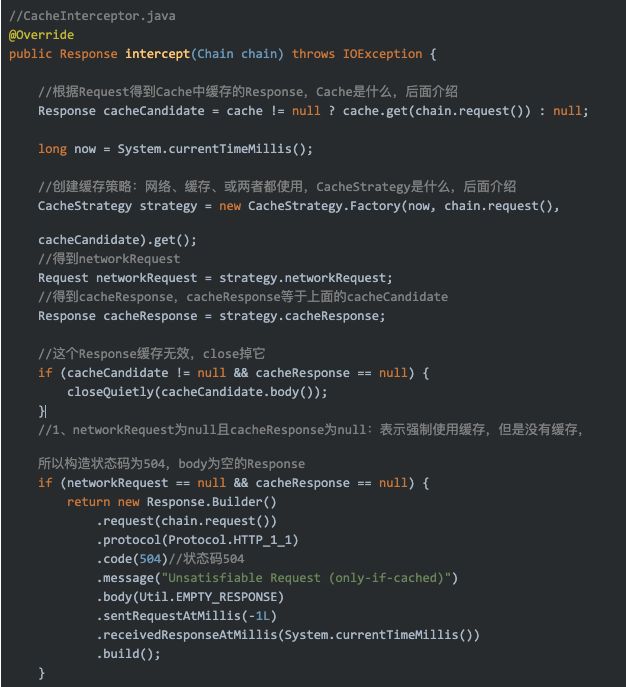
CacheInterceptor的intercept(Chain)里面定义了okhttp的缓存机制,我们先来了解两个类:Cache和CacheStrategy,这样才能看懂intercept(Chain)里面的逻辑。
Cache - 缓存实现
Cache是okhttp中缓存的实现,内部使用了DiskLruCache,如下:
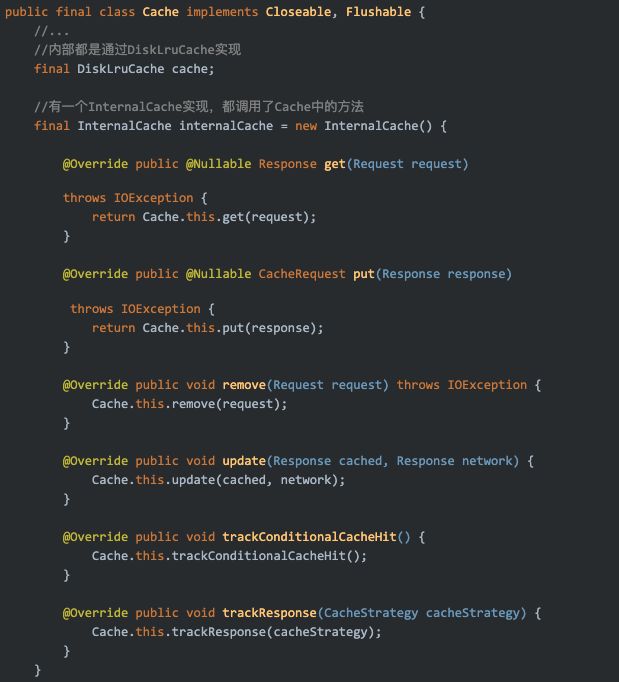
Cache中有一个内部实现类InternalCache,见名知意,它是okhttp内部使用的,它实现了InternalCache接口,接口中的方法都和Cache中的方法同名,而且这个实现类的所有方法都是调用了Cache中相应的方法,也就是说InternalCache的方法实现和Cache相应的方法一样。
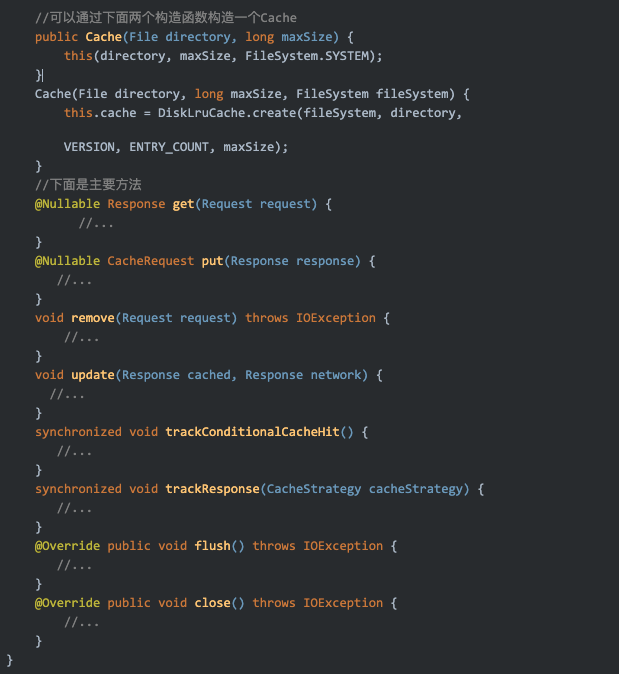
但Cache和InternalCache不一样的是,Cache比InternalCache多了一些方法供外部调用如flush()、 close()等,提供了更多对缓存的控制,而InternalCache中的方法都只是缓存的基本操作,如get、put、remove、update等方法,这些方法的逻辑都是基于Cache中的DiskLruCache实现,详情可以看DiskLruCache的原理实现。要知道,okhttp默认是不使用缓存,也就是Cache为null,如果要使用缓存,我们需要自行配置,通过下面方法使用okhttp的缓存机制:
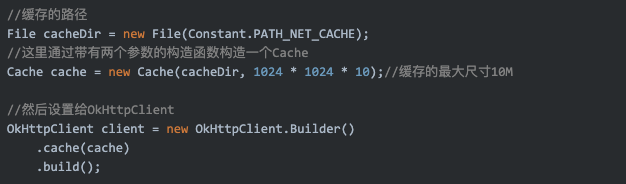
通过上面全局设置后,Cache和InternalCache都不会为null,因为在创建Cache时InternalCache也一起创建了,okhttp的缓存机制就会生效。
我们先回到CacheInterceptor的intercept方法,它首先一开始就要判断cache是否等于null,那么CacheInterceptor的cache在哪里来的呢?是在构造函数中,如下:
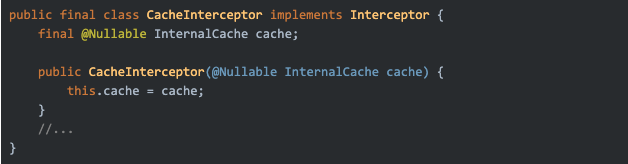
可用看到它是InternalCache实例,在 getResponseWithInterceptorChain()中添加拦截器时就通过client为这个InternalCache赋值了,如下:
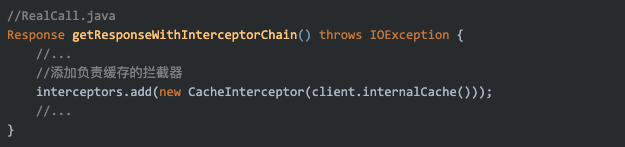
注意到new CacheInterceptor(client.internalCache()),所以我们看client的internalCache方法,如下:

cache就是上面全局设置的cache实例,所以不为null,返回cache中的internalCache实例,这样CacheInterceptor中就持有internalCache实例。
CacheStrategy - 缓存策略
CacheStrategy是okhttp缓存策略的实现,okhttp缓存策略遵循了HTTP缓存策略,了解了HTTP缓存策略后,我们再来看CacheStrategy,如下:
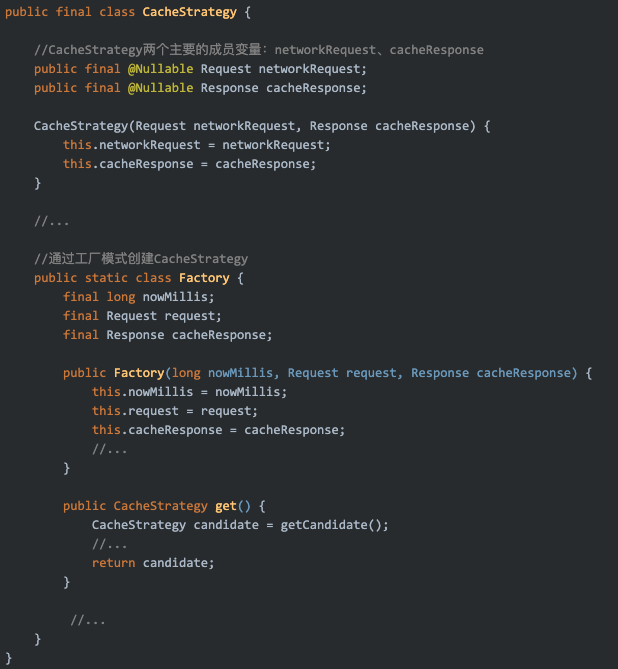
CacheStrategy是通过工厂模式创建的,它有两个主要的成员变量:networkRequest、cacheResponse,CacheInterceptor的intercept方法通过CacheStrategy的networkRequest和cacheResponse的组合来判断执行什么策略,networkRequest是否为空决定是否请求网络,cacheResponse是否为空决定是否使用缓存,networkRequest和cacheResponse的4种组合和对应的缓存策略如下:
networkRequest为null且cacheResponse为null:没有缓存使用,又不进行网络请求,构造状态码为504的Response
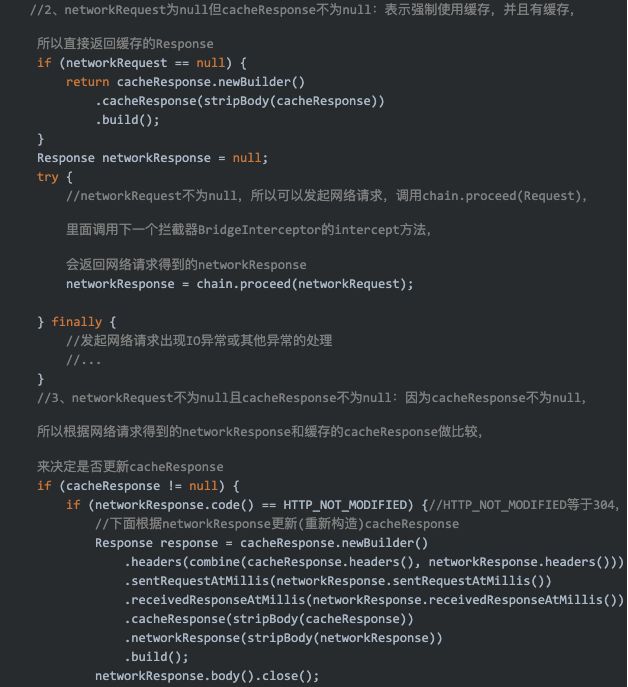
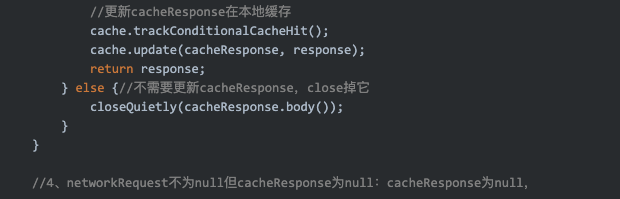
networkRequest为null但cacheResponse不为null:有缓存使用,且缓存在有效期内,所以直接返回缓存的Response
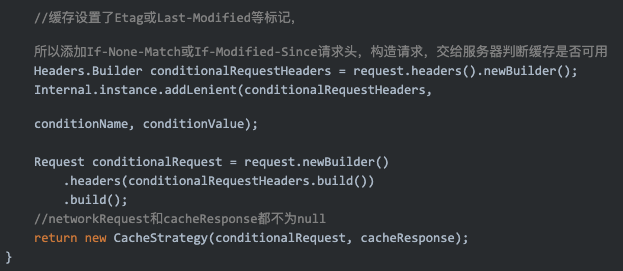
networkRequest不为null且cacheResponse不为null:有缓存使用,但缓存在客户端的判断中表示过期了,所以请求服务器进行决策,来决定是否使用缓存的Response
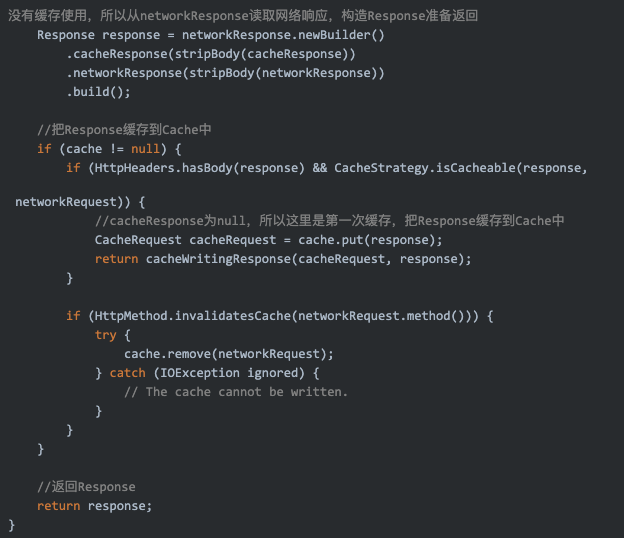
networkRequest不为null但cacheResponse为null:没有缓存使用,所以直接使用服务器返回的Response
networkRequest和cacheResponse在创建CacheStrategy时通过构造参数赋值,那么CacheStrategy在那里被创建呢?当调用CacheStrategy.Factory(long, Request, Response).get()时就会返回一个CacheStrategy实例,所以CacheStrategy在Factory的get方法中被创建,我们来看Factory的get方法,如下:
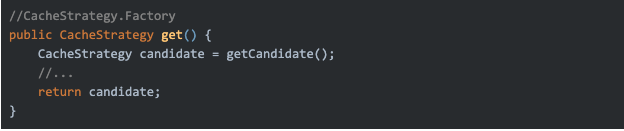
可以看到CacheStrategy通过Factory的getCandidate方法创建,getCandidate方法如下:
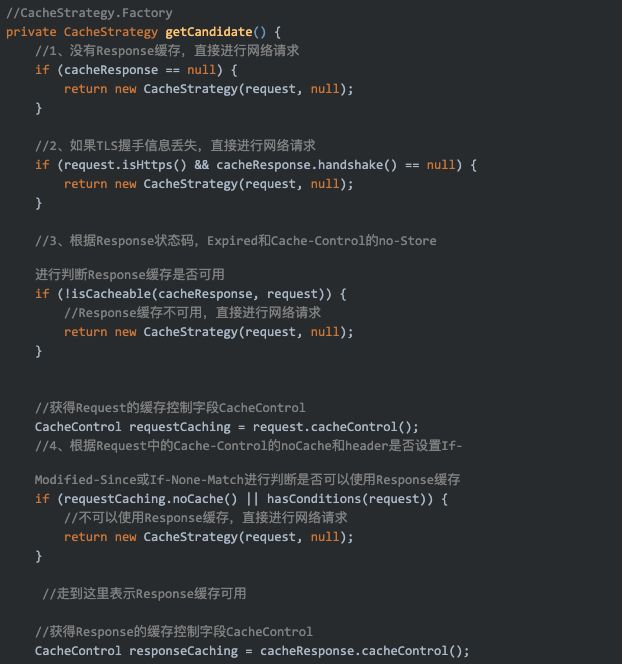
决定networkRequest和cacheResponse的组合,从getCandidate()方法中我们可以看到HTTP的缓存策略分为两种:
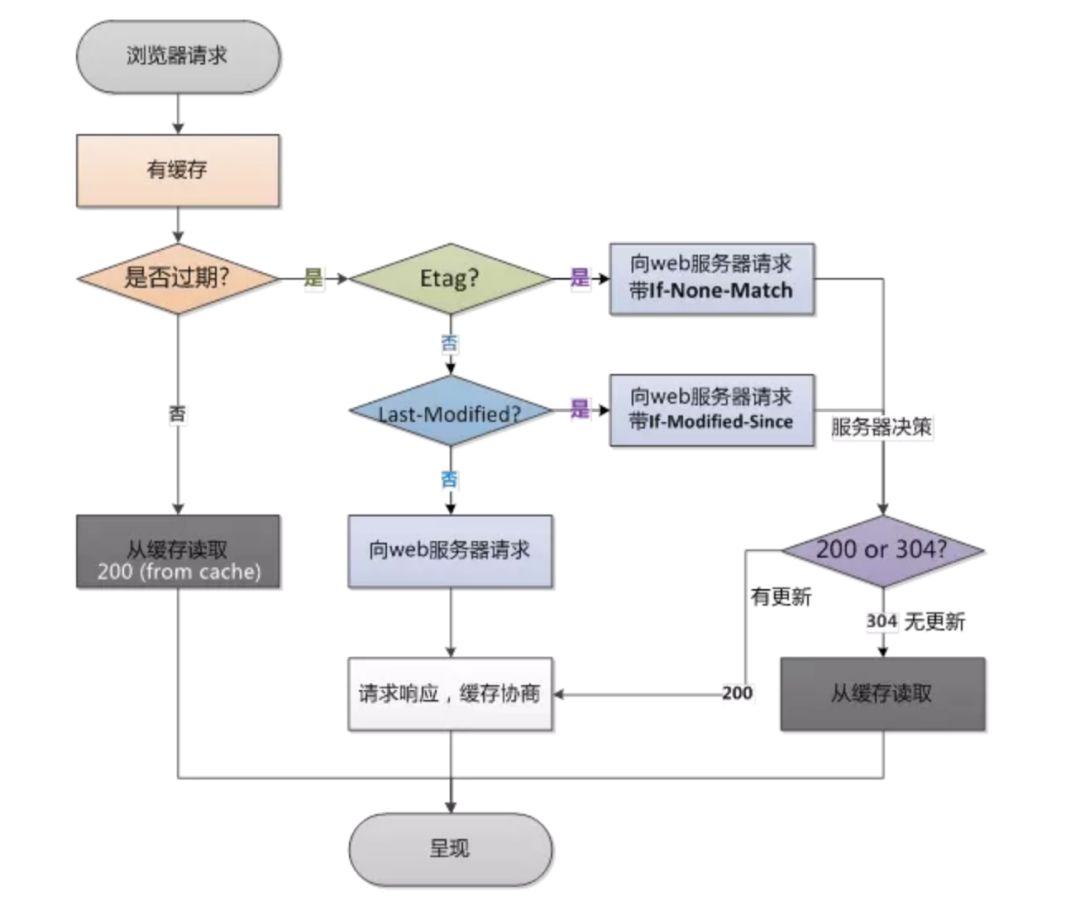
强制缓存:客户端参与决策决定是否继续使用缓存,客户端第一次请求数据时,服务端返回了缓存的过期时间:Expires或Cache-Control,当客户端再次请求时,就判断缓存的过期时间,没有过期就可以继续使用缓存,否则就不使用,重新请求服务端。
对比缓存:服务端参与决策决定是否继续使用缓存,客户端第一次请求数据时,服务端会将缓存标识:Last-Modified/If-Modified-Since、Etag/If-None-Match和数据一起返回给客户端 ,当客户端再次请求时,客户端将缓存标识发送给服务端,服务端根据缓存标识进行判断,如果缓存还没有更新,可以使用,则返回304,表示客户端可以继续使用缓存,否则客户端不能继续使用缓存,只能使用服务器返回的新的响应。
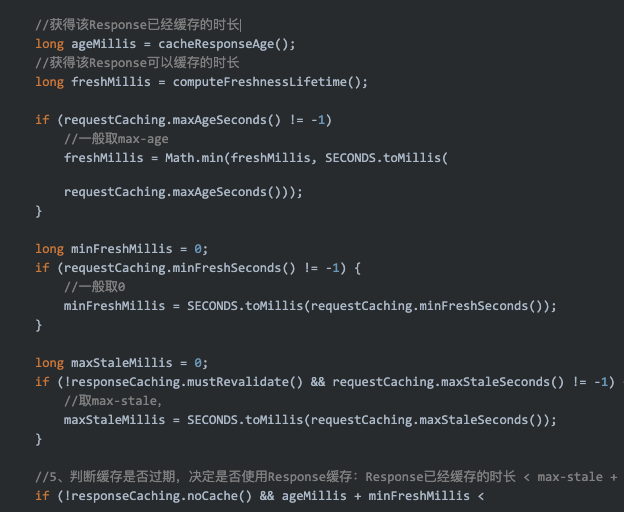
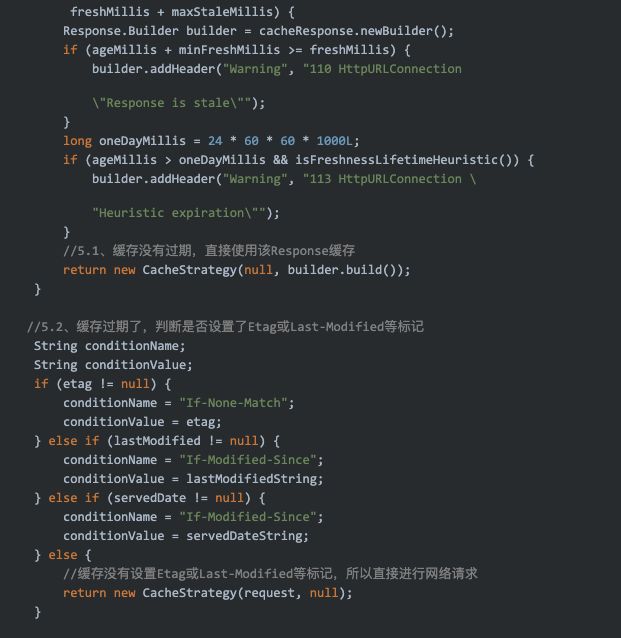
而且强制缓存优先于对比缓存,我们再贴出来自HTTP 协议缓存机制详解的一张图,它很好的解释了getCandidate()方法中1~5步骤流程,如下:
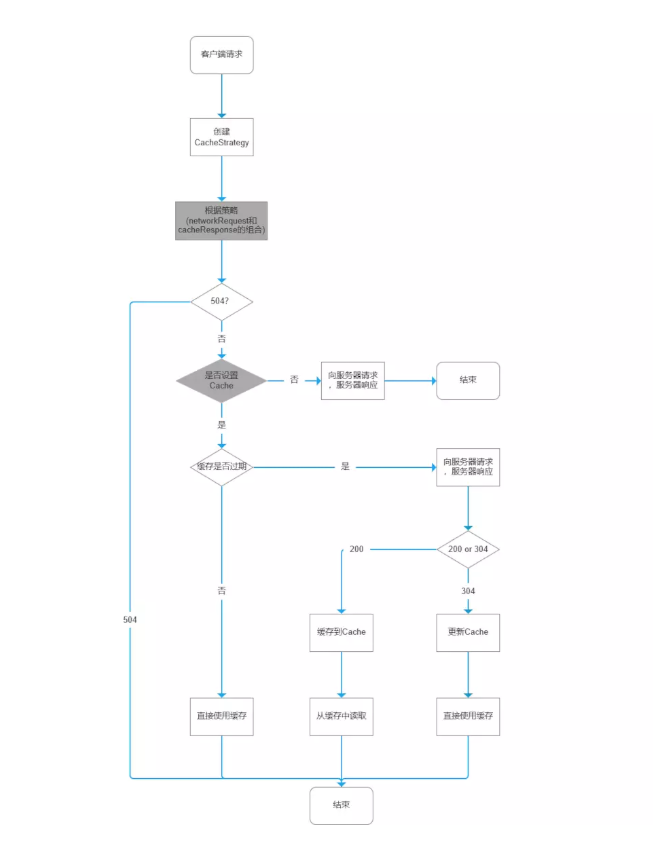
缓存机制
我们再回到CacheInterceptor的intercept方法,它的1~4步骤就是CacheStrategy的networkRequest和cacheResponse的4种组合情况,都有详细的注释,每一种组合对应一种缓存策略,而缓存策略又是基于getCandidate()方法中写死的HTTP缓存策略,再结合okhttp本地缓存的实现Cache,我们得出结论:okhttp的缓存机制 = Cache缓存实现 + 基于HTTP的缓存策略,整个流程图如下:
了解了okhttp的缓存机制后,我们接着下一个拦截器ConnectInterceptor。
ConnectInterceptor
ConnectInterceptor的intercept(Chain)方法如下:
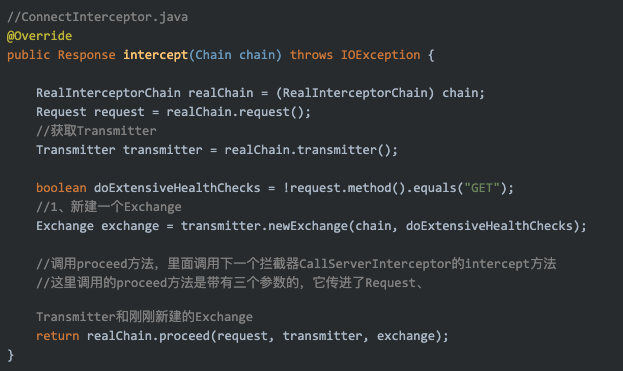
ConnectInterceptor的intercept(Chain)方法很简洁,里面定义了okhttp的连接机制,它首先获取Transmitter,然后通过Transmitter的newExchange方法创建一个Exchange,把它传到下一个拦截器CallServerInterceptor,Exchange是什么?
Exchange负责从创建的连接的IO流中写入请求和读取响应,完成一次请求/响应的过程,在CallServerInterceptor中你会看到它真正的作用,这里先忽略。所以注释1的newExchange方法是连接机制的主要逻辑实现,我们继续看Transmitter的newExchange方法,如下:
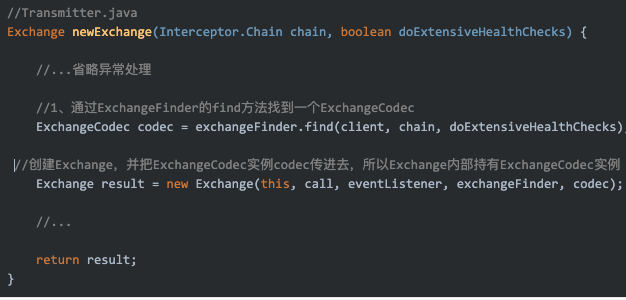
重点是注释1,ExchangeFinder对象早在RetryAndFollowUpInterceptor中通过Transmitter的prepareToConnect方法创建,它的find方法是连接真正创建的地方,ExchangeFinder是什么?ExchangeFinder就是负责连接的创建,把创建好的连接放入连接池,如果连接池中已经有该连接,就直接取出复用,所以ExchangeFinder管理着两个重要的角色:RealConnection、RealConnectionPool,下面讲解一下RealConnectionPool和RealConnection,有助于连接机制的理解。
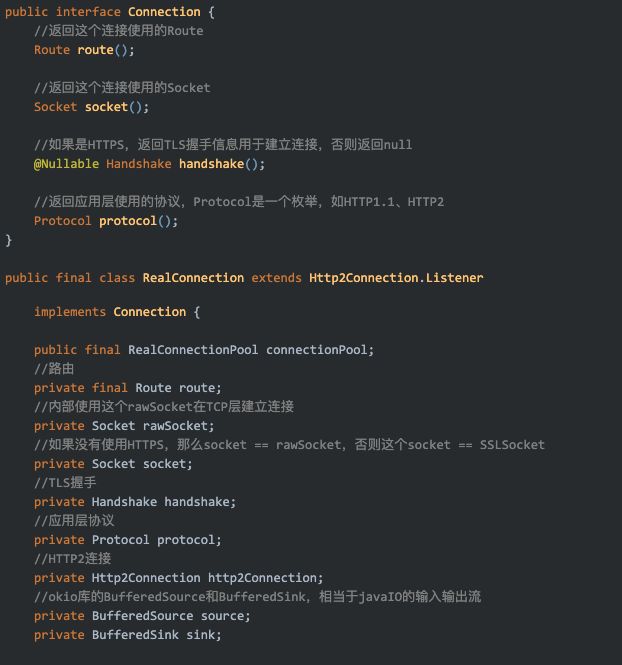
RealConnection - 连接实现
连接的真正实现,实现了Connection接口,内部利用Socket建立连接,如下:
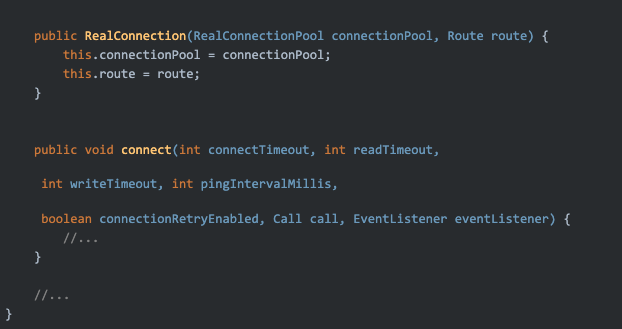
RealConnection中有一个connect方法,外部可以调用该方法建立连接,connect方法如下:
//RealConnection.java
public void connect(int connectTimeout, int readTimeout, int writeTimeout, int pingIntervalMillis, boolean connectionRetryEnabled, Call call, EventListener eventListener) {
if (protocol != null) throw new IllegalStateException("already connected");
RouteException routeException = null;
List<ConnectionSpec> connectionSpecs = route.address().connectionSpecs();
ConnectionSpecSelector connectionSpecSelector = new ConnectionSpecSelector(connectionSpecs);
//路由选择
if (route.address().sslSocketFactory() == null) {
if (!connectionSpecs.contains(ConnectionSpec.CLEARTEXT)) {
throw new RouteException(new UnknownServiceException(
"CLEARTEXT communication not enabled for client"));
}
String host = route.address().url().host();
if (!Platform.get().isCleartextTrafficPermitted(host)) {
throw new RouteException(new UnknownServiceException(
"CLEARTEXT communication to " + host + " not permitted by network security policy"));
}
} else {
if (route.address().protocols().contains(Protocol.H2_PRIOR_KNOWLEDGE)) {
throw new RouteException(new UnknownServiceException(
"H2_PRIOR_KNOWLEDGE cannot be used with HTTPS"));
}
}
//开始连接
while (true) {
try {
if (route.requiresTunnel()) {//如果是通道模式,则建立通道连接
connectTunnel(connectTimeout, readTimeout, writeTimeout, call, eventListener);
if (rawSocket == null) {
// We were unable to connect the tunnel but properly closed down our resources.
break;
}
} else {//1、否则进行Socket连接,大部分是这种情况
connectSocket(connectTimeout, readTimeout, call, eventListener);
}
//建立HTTPS连接
establishProtocol(connectionSpecSelector, pingIntervalMillis, call, eventListener);
break;
}
//...省略异常处理
if (http2Connection != null) {
synchronized (connectionPool) {
allocationLimit = http2Connection.maxConcurrentStreams();
}
}
}
我们关注注释1,一般会调用connectSocket方法建立Socket连接,connectSocket方法如下:
//RealConnection.java
private void connectSocket(int connectTimeout, int readTimeout, Call call,
EventListener eventListener) throws IOException {
Proxy proxy = route.proxy();
Address address = route.address();
//根据代理类型的不同创建Socket
rawSocket = proxy.type() == Proxy.Type.DIRECT || proxy.type() == Proxy.Type.HTTP
? address.socketFactory().createSocket()
: new Socket(proxy);
eventListener.connectStart(call, route.socketAddress(), proxy);
rawSocket.setSoTimeout(readTimeout);
try {
//1、建立Socket连接
Platform.get().connectSocket(rawSocket, route.socketAddress(), connectTimeout);
}
//...省略异常处理
try {
//获得Socket的输入输出流
source = Okio.buffer(Okio.source(rawSocket));
sink = Okio.buffer(Okio.sink(rawSocket));
}
//...省略异常处理
}
我们关注注释1,Platform是okhttp中根据不同Android版本平台的差异实现的一个兼容类,这里就不细究,Platform的connectSocket方法最终会调用rawSocket的connect()方法建立其Socket连接,建立Socket连接后,就可以通过Socket连接获得输入输出流source和sink,okhttp就可以从source读取或往sink写入数据,source和sink是BufferedSource和BufferedSink类型,它们是来自于okio库,它是一个封装了java.io和java.nio的库,okhttp底层依赖这个库读写数据。
RealConnectionPool - 连接池
连接池,用来管理连接对象RealConnection,如下:
public final class RealConnectionPool {
//线程池
private static final Executor executor = new ThreadPoolExecutor(
0 /* corePoolSize */,
Integer.MAX_VALUE /* maximumPoolSize */,
60L /* keepAliveTime */,
TimeUnit.SECONDS,
new SynchronousQueue<>(),
Util.threadFactory("OkHttp ConnectionPool", true));
boolean cleanupRunning;
//清理连接任务,在executor中执行
private final Runnable cleanupRunnable = () -> {
while (true) {
//调用cleanup方法执行清理逻辑
long waitNanos = cleanup(System.nanoTime());
if (waitNanos == -1) return;
if (waitNanos > 0) {
long waitMillis = waitNanos / 1000000L;
waitNanos -= (waitMillis * 1000000L);
synchronized (RealConnectionPool.this) {
try {
//调用wait方法进入等待
RealConnectionPool.this.wait(waitMillis, (int) waitNanos);
} catch (InterruptedException ignored) {
}
}
}
}
};
//双端队列,保存连接
private final Deque<RealConnection> connections = new ArrayDeque<>();
void put(RealConnection connection) {
if (!cleanupRunning) {
cleanupRunning = true;
//使用线程池执行清理任务
executor.execute(cleanupRunnable);
}
//将新建连接插入队列
connections.add(connection);
}
long cleanup(long now) {
//...
}
//...
}
RealConnectionPool 在内部维护了一个线程池,用来执行清理连接任务cleanupRunnable,还维护了一个双端队列connections,用来缓存已经创建的连接。要知道创建一次连接要经历TCP握手,如果是HTTPS还要经历TLS握手,握手的过程都是耗时的,所以为了提高效率,就需要connections来对连接进行缓存,从而可以复用;还有如果连接使用完毕,长时间不释放,也会造成资源的浪费,所以就需要cleanupRunnable定时清理无用的连接,okhttp支持5个并发连接,默认每个连接keepAlive为5分钟,keepAlive就是连接空闲后,保持存活的时间。
当我们第一次调用RealConnectionPool 的put方法缓存新建连接时,如果cleanupRunnable还没执行,它首先会使用线程池执行cleanupRunnable,然后把新建连接放入双端队列,cleanupRunnable中会调用cleanup方法进行连接的清理,该方法返回现在到下次清理的时间间隔,然后调用wiat方法进入等待状态,等时间到了后,再次调用cleanup方法进行清理,就这样往复循环。我们来看一下cleanup方法的清理逻辑:
//RealConnectionPool.java
long cleanup(long now) {
int inUseConnectionCount = 0;//正在使用连接数
int idleConnectionCount = 0;//空闲连接数
RealConnection longestIdleConnection = null;
long longestIdleDurationNs = Long.MIN_VALUE;
synchronized (this) {
//遍历所有连接,记录空闲连接和正在使用连接各自的数量
for (Iterator<RealConnection> i = connections.iterator(); i.hasNext(); ) {
RealConnection connection = i.next();
//如果该连接还在使用,pruneAndGetAllocationCount种通过引用计数的方式判断一个连接是否空闲
if (pruneAndGetAllocationCount(connection, now) > 0) {
//使用连接数加1
inUseConnectionCount++;
continue;
}
//该连接没有在使用
//空闲连接数加1
idleConnectionCount++;
//记录keepalive时间最长的那个空闲连接
long idleDurationNs = now - connection.idleAtNanos;
if (idleDurationNs > longestIdleDurationNs) {
longestIdleDurationNs = idleDurationNs;
//这个连接很可能被移除,因为空闲时间太长
longestIdleConnection = connection;
}
}
//跳出循环后
//默认keepalive时间keepAliveDurationNs最长为5分钟,空闲连接数idleConnectionCount最大为5个
if (longestIdleDurationNs >= this.keepAliveDurationNs || idleConnectionCount > this.maxIdleConnections) {//如果longestIdleConnection的keepalive时间大于5分钟 或 空闲连接数超过5个
//把longestIdleConnection连接从队列清理掉
connections.remove(longestIdleConnection);
} else if (idleConnectionCount > 0) {//如果空闲连接数小于5个 并且 longestIdleConnection连接还没到期清理
//返回该连接的到期时间,下次再清理
return keepAliveDurationNs - longestIdleDurationNs;
} else if (inUseConnectionCount > 0) {//如果没有空闲连接 且 所有连接都还在使用
//返回keepAliveDurationNs,5分钟后再清理
return keepAliveDurationNs;
} else {
// 没有任何连接,把cleanupRunning复位
cleanupRunning = false;
return -1;
}
}
//把longestIdleConnection连接从队列清理掉后,关闭该连接的socket,返回0,立即再次进行清理
closeQuietly(longestIdleConnection.socket());
return 0;
}
从cleanup方法得知,okhttp清理连接的逻辑如下:
首先遍历所有连接,记录空闲连接数idleConnectionCount和正在使用连接数inUseConnectionCount,在记录空闲连接数时,还要找出空闲时间最长的空闲连接longestIdleConnection,这个连接是很有可能被清理的;
遍历完后,根据最大空闲时长和最大空闲连接数来决定是否清理longestIdleConnection,如果longestIdleConnection的空闲时间大于最大空闲时长 或 空闲连接数大于最大空闲连接数,那么该连接就会被从队列中移除,然后关闭该连接的socket,返回0,立即再次进行清理;如果空闲连接数小于5个 并且 longestIdleConnection的空闲时间小于最大空闲时长即还没到期清理,那么返回该连接的到期时间,下次再清理;
如果没有空闲连接 且 所有连接都还在使用,那么返回默认的keepAlive时间,5分钟后再清理;没有任何连接,idleConnectionCount和inUseConnectionCount都为0,把cleanupRunning复位,等待下一次put连接时,再次使用线程池执行cleanupRunnable。
了解了RealConnectionPool和RealConnection后,我们再回到ExchangeFinder的find方法,这里是连接创建的地方。
连接创建(连接机制)
ExchangeFinder的fing方法如下:
//ExchangeFinder.java
public ExchangeCodec find( OkHttpClient client, Interceptor.Chain chain, boolean doExtensiveHealthChecks) {
//...
try {
//调用findHealthyConnection方法,返回RealConnection
RealConnection resultConnection = findHealthyConnection(connectTimeout, readTimeout, writeTimeout, pingIntervalMillis, connectionRetryEnabled, doExtensiveHealthChecks);
return resultConnection.newCodec(client, chain);
}
//...省略异常处理
}
private RealConnection findHealthyConnection(int connectTimeout, int readTimeout, int writeTimeout, int pingIntervalMillis, boolean connectionRetryEnabled, boolean doExtensiveHealthChecks) throws IOException {
//一个死循环
while (true) {
//调用findConnection方法,返回RealConnection
RealConnection candidate = findConnection(connectTimeout, readTimeout, writeTimeout,
pingIntervalMillis, connectionRetryEnabled);
//...
//判断连接是否可用
if (!candidate.isHealthy(doExtensiveHealthChecks)) {
candidate.noNewExchanges();
continue;
}
return candidate;
}
ExchangeFinder的find方法会调用findHealthyConnection方法,里面会不断调用findConnection方法,直到找到一个可用的连接返回。ExchangeFinder的findConnection方法如下:
//ExchangeFinder.java
private RealConnection findConnection(int connectTimeout, int readTimeout, int writeTimeout, int pingIntervalMillis, boolean connectionRetryEnabled) throws IOException {
boolean foundPooledConnection = false;
RealConnection result = null;//返回结果,可用的连接
Route selectedRoute = null;
RealConnection releasedConnection;
Socket toClose;
synchronized (connectionPool) {
if (transmitter.isCanceled()) throw new IOException("Canceled");
hasStreamFailure = false; .
//1、尝试使用已经创建过的连接,已经创建过的连接可能已经被限制创建新的流
releasedConnection = transmitter.connection;
//1.1、如果已经创建过的连接已经被限制创建新的流,就释放该连接(releaseConnectionNoEvents中会把该连接置空),并返回该连接的Socket以关闭
toClose = transmitter.connection != null && transmitter.connection.noNewExchanges
? transmitter.releaseConnectionNoEvents()
: null;
//1.2、已经创建过的连接还能使用,就直接使用它当作结果、
if (transmitter.connection != null) {
result = transmitter.connection;
releasedConnection = null;
}
//2、已经创建过的连接不能使用
if (result == null) {
//2.1、尝试从连接池中找可用的连接,如果找到,这个连接会赋值先保存在Transmitter中
if (connectionPool.transmitterAcquirePooledConnection(address, transmitter, null, false)) {
//2.2、从连接池中找到可用的连接
foundPooledConnection = true;
result = transmitter.connection;
} else if (nextRouteToTry != null) {
selectedRoute = nextRouteToTry;
nextRouteToTry = null;
} else if (retryCurrentRoute()) {
selectedRoute = transmitter.connection.route();
}
}
}
closeQuietly(toClose);
//...
if (result != null) {
//3、如果在上面已经找到了可用连接,直接返回结果
return result;
}
//走到这里没有找到可用连接
//看看是否需要路由选择,多IP操作
boolean newRouteSelection = false;
if (selectedRoute == null && (routeSelection == null || !routeSelection.hasNext())) {
newRouteSelection = true;
routeSelection = routeSelector.next();
}
List<Route> routes = null;
synchronized (connectionPool) {
if (transmitter.isCanceled()) throw new IOException("Canceled");
//如果有下一个路由
if (newRouteSelection) {
routes = routeSelection.getAll();
//4、这里第二次尝试从连接池中找可用连接
if (connectionPool.transmitterAcquirePooledConnection(address, transmitter, routes, false)) {
//4.1、从连接池中找到可用的连接
foundPooledConnection = true;
result = transmitter.connection;
}
}
//在连接池中没有找到可用连接
if (!foundPooledConnection) {
if (selectedRoute == null) {
selectedRoute = routeSelection.next();
}
//5、所以这里新创建一个连接,后面会进行Socket连接
result = new RealConnection(connectionPool, selectedRoute);
connectingConnection = result;
}
}
// 4.2、如果在连接池中找到可用的连接,直接返回该连接
if (foundPooledConnection) {
eventListener.connectionAcquired(call, result);
return result;
}
//5.1、调用RealConnection的connect方法进行Socket连接,这个在RealConnection中讲过
result.connect(connectTimeout, readTimeout, writeTimeout, pingIntervalMillis, connectionRetryEnabled, call, eventListener);
connectionPool.routeDatabase.connected(result.route());
Socket socket = null;
synchronized (connectionPool) {
connectingConnection = null;
//如果我们刚刚创建了同一地址的多路复用连接,释放这个连接并获取那个连接
if (connectionPool.transmitterAcquirePooledConnection(address, transmitter, routes, true)) {
result.noNewExchanges = true;
socket = result.socket();
result = transmitter.connection;
} else {
//5.2、把刚刚新建的连接放入连接池
connectionPool.put(result);
//5.3、把刚刚新建的连接保存到Transmitter的connection字段
transmitter.acquireConnectionNoEvents(result);
}
}
closeQuietly(socket);
eventListener.connectionAcquired(call, result);
//5.4、返回结果
return result;
}
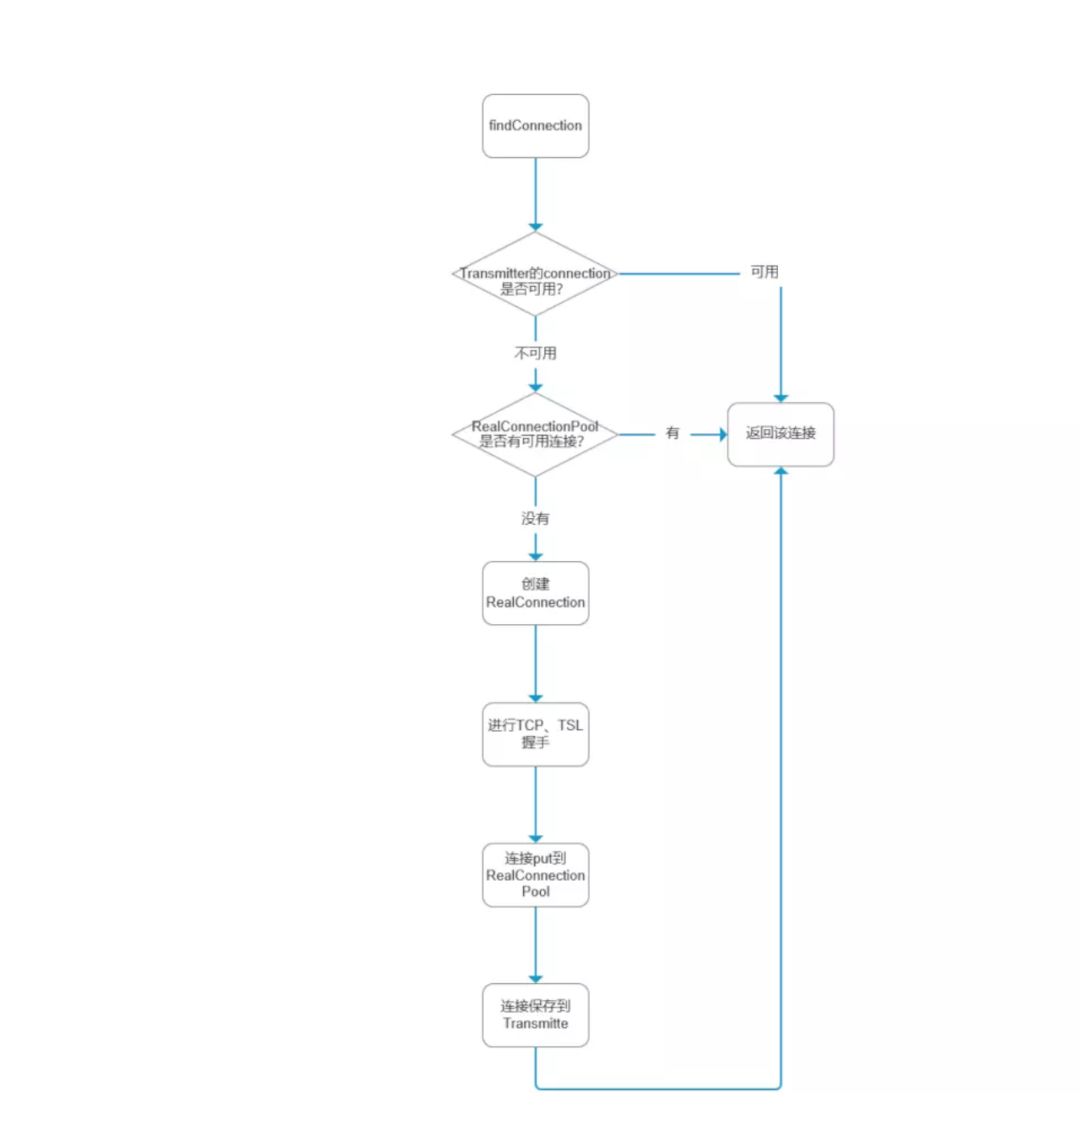
这个findConnection方法就是整个ConnectInterceptor的核心,我们忽略掉多IP操作和多路复用(HTTP2),假设现在我们是第一次请求,连接池和Transmitter中没有该连接,所以跳过1、2、3,直接来到5,创建一个新的连接,然后把它放入连接池和Transmitter中;接着我们用同一个Call进行了第二次请求,这时连接池和Transmitter中有该连接,所以就会走1、2、3,如果Transmitter中的连接还可用就返回,否则从连接池获取一个可用连接返回,所以整个连接机制的大概过程如下:
Transmitter中的连接和连接池中的连接有什么区别?我们知道每创建一个Call,就会创建一个对应的Transmitter,一个Call可以发起多次请求(同步、异步),不同的Call有不同的Transmitter,连接池是在创建OkhttpClient时创建的,所以连接池是所有Call共享的,即连接池中的连接所有Call都可以复用,而Transmitter中的那个连接只是对应它相应的Call,只能被本次Call的所有请求复用。
了解了okhttp的连接机制后,我们接着下一个拦截器CallServerInterceptor。
CallServerInterceptor
CallServerInterceptor的intercept(Chain)方法如下:
//CallServerInterceptor.java
public Response intercept(Chain chain) throws IOException {
RealInterceptorChain realChain = (RealInterceptorChain) chain;
//获取Exchange
Exchange exchange = realChain.exchange();
//获取Request
Request request = realChain.request();
//通过Exchange的writeRequestHeaders(request)方法写入请求的header
exchange.writeRequestHeaders(request);
boolean responseHeadersStarted = false;
Response.Builder responseBuilder = null;
if (HttpMethod.permitsRequestBody(request.method()) && request.body() != null) {
//...
if (responseBuilder == null) {
//通过okio写入请求的body
if (request.body().isDuplex()) {
exchange.flushRequest();
BufferedSink bufferedRequestBody = Okio.buffer(
exchange.createRequestBody(request, true));
request.body().writeTo(bufferedRequestBody);
} else {
BufferedSink bufferedRequestBody = Okio.buffer(
exchange.createRequestBody(request, false));
request.body().writeTo(bufferedRequestBody);
bufferedRequestBody.close();
}
} else {
//...
}
} else {
exchange.noRequestBody();
}
//...
//下面开始获取网络请求返回的响应
//通过Exchange的readResponseHeaders(boolean)方法读取响应的header
if (responseBuilder == null) {
responseBuilder = exchange.readResponseHeaders(false);
}
//获取响应后,通过Builder模式构造Response
Response response = responseBuilder
.request(request)
.handshake(exchange.connection().handshake())
.sentRequestAtMillis(sentRequestMillis)
.receivedResponseAtMillis(System.currentTimeMillis())
.build();
//...
//构造Response的body
if (forWebSocket && code == 101) {
//构造一个空的body的Response
response = response.newBuilder()
.body(Util.EMPTY_RESPONSE)
.build();
} else {
//通过Exchange的openResponseBody(Response)方法读取响应的body,然后通过响应的body继续构造Response
response = response.newBuilder()
.body(exchange.openResponseBody(response))
.build();
}
//...
//返回响应Response
return response;
}
在ConnectInterceptor中我们已经建立了连接,连接到了服务器,获取了输入输出流,所以CallServerInterceptor的intercept(Chain)方法逻辑就是把请求发送到服务器,然后获取服务器的响应,如下:
发送请求
通过Exchange的writeRequestHeaders(request)方法写入请求的header;如果请求的body不为空,通过okio写入请求的body。
获取响应
通过Exchange的readResponseHeaders(boolean)方法读取响应的header;通过Exchange的openResponseBody(Response)方法读取响应的body。
这个发送获取的过程通过Exchange进行,前面已经讲过它在ConnectInterceptor中创建,在process方法中传进来,所以这里可以通过Chain获取Exchange,Exchange它是负责从IO流中写入请求和读取响应,完成一次请求/响应的过程,它内部的读写都是通过一个ExchangeCodec类型的codec来进行,而ExchangeCodec内部又是通过Okio的BufferedSource和BufferedSink进行IO读写,这个过程在上一篇文章已经分析过了,这里不在累述。
/ 结语 /
首先,我们会在请求的时候初始化一个Call的实例,然后执行它的execute()方法或enqueue()方法,内部最后都会执行到getResponseWithInterceptorChain()方法,这个方法里面通过拦截器组成的责任链,依次经过用户自定义普通拦截器、重试拦截器、桥接拦截器、缓存拦截器、连接拦截器和用户自定义网络拦截器和访问服务器拦截器等拦截处理过程,来获取到一个响应并交给用户。okhttp的请求流程、缓存机制和连接机制是当中的重点,在阅读源码的过程中也学习到很多东西。
推荐阅读:
欢迎关注我的公众号
学习技术或投稿
![]()

长按上图,识别图中二维码即可关注


 431
431


 被折叠的 条评论
为什么被折叠?
被折叠的 条评论
为什么被折叠?
 到【灌水乐园】发言


