


/ 今日科技快讯 /
近日,中国信息通信研究院推出了手机号“一键查询”和“一键解绑”服务,可以查询并解除本人手机账号或前手机账号主人所绑定的互联网关联账号。尽管很快有工作人员向媒体回应称,该功能尚处于内测阶段,还没有正式对外发布,但网友对此呼声极高。
/ 作者简介 /
明天就是周五啦,提前祝大家周末愉快!
本篇转自TechMerger的博客,文章主要分享了系统返回手势的原理,相信会对大家有所帮助!
原文地址:
https://juejin.cn/post/7103503592119599117
/ 前言 /
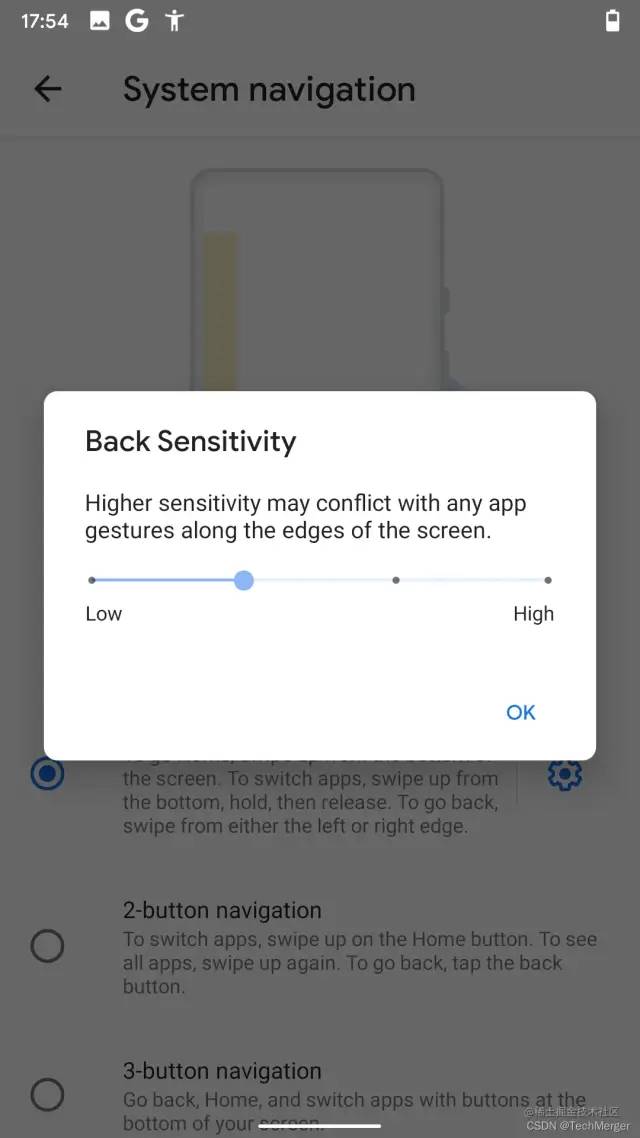
Android 10 正式引入了全屏手势导航(Gesture Navigation),Home 键和 History 键的功能借助上滑和悬停手势得以保留,而 Back 键则以返回手势(Back Gesture)重新与大家见面。
相较 iOS 早期便有的全局返回功能,Android 直到版本 10 才姗姗来迟。但 Google 给这个功能添加了视图、动画和角度展示,更是向用户开放了手势敏感度的设置入口。
本文就这个系统功能一探其实现原理,了解之后:
作为 FW 开发者可以在 SystemUI 中优化 AsIs 的手势效果:包括图标、动画等角度
还可以知道 InputMonitor 和 InputManager 的作用,在需要的时候去监视和注入事件
源码版本:
Android 12
目录前瞻:
SystemUI 启动返回手势功能
监听返回手势停用区域
Monitor 监视 Input 事件
创建返回手势视图
预处理 Touch 事件
展示返回手势和触发返回
InputManager 注入返回事件
Dispatcher 分发返回事件
App 收到返回事件
/ 正文 /
1. SystemUI 启动返回手势功能
SystemUI App 的 NavigationBarView 在构造的时候通过 DI 创建 EdgeBackGestureHandler 实例,其是整个返回手势的核心管理类。
// NavigationBarView.java
    public NavigationBarView(Context context, AttributeSet attrs) {
        ...
        mEdgeBackGestureHandler = Dependency.get(EdgeBackGestureHandler.Factory.class)
                .create(mContext);
        mEdgeBackGestureHandler.setStateChangeCallback(this::updateStates);
        ...
    }
EdgeBackGestureHandler 类在构造的时候初始化一些手势判断需要的参数和变量。
// EdgeBackGestureHandler.java
    EdgeBackGestureHandler(...) {
        super(broadcastDispatcher);
        mContext = context;
        mDisplayId = context.getDisplayId();
        ...
        mLongPressTimeout = Math.min(MAX_LONG_PRESS_TIMEOUT,
                ViewConfiguration.getLongPressTimeout());

        mGestureNavigationSettingsObserver = new GestureNavigationSettingsObserver(
                mContext.getMainThreadHandler(), mContext, this::onNavigationSettingsChanged);

        updateCurrentUserResources();
    }
NavigationBarView 初次添加到 Window 上的时候会调用 EdgeBackGestureHandler 开始工作。
// NavigationBarView.java
    protected void onAttachedToWindow() {
        ...
        mEdgeBackGestureHandler.onNavBarAttached();
        ...
    }
onNavBarAttached() 里会根据开启或关闭的状态做些准备工作:
监听 Settings app 关于 Back Gesture 的手势参数调整
监听 WMS 里保存 App 设置的手势停用区域
向 InputFlinger 中注册事件监视器 InputMonitor 以及事件的回调方 InputEventReceiver
创建和添加 NavigationBarEdgePanel 作为手势视图的实现
// EdgeBackGestureHandler.java
    public void onNavBarAttached() {
        ...
        updateIsEnabled();
    }

    private void updateIsEnabled() {
        boolean isEnabled = mIsAttached && mIsGesturalModeEnabled;
        if (isEnabled == mIsEnabled) {
            return;
        }
        mIsEnabled = isEnabled;
        // 如果无效的话结束监听 Input
        disposeInputChannel();
        ...

        // 无效的话
        if (!mIsEnabled) {
            // 注销监听返回手势参数的设置变化
            mGestureNavigationSettingsObserver.unregister();
            ...
            // 注销 WMS 里保存的除外区域监听
            try {
                mWindowManagerService.unregisterSystemGestureExclusionListener(
                        mGestureExclusionListener, mDisplayId);
            ...
            }
        } else {
            // 监听返回手势参数的设置变化
            mGestureNavigationSettingsObserver.register();
            ...

            // 监听 WMS 里保存的除外区域
            try {
                mWindowManagerService.registerSystemGestureExclusionListener(
                        mGestureExclusionListener, mDisplayId);
            ...
            }

            // 注册名为 edge-swipe 的InputMonitor
            mInputMonitor = InputManager.getInstance().monitorGestureInput(
                    "edge-swipe", mDisplayId);

            // 设置 Input 事件回调为 onInputEvent()
            mInputEventReceiver = new InputChannelCompat.InputEventReceiver(
                    mInputMonitor.getInputChannel(), Looper.getMainLooper(),
                    Choreographer.getInstance(), this::onInputEvent);

            // 添加 NavigationBarEdgePanel 为 Edge Back 事件的处理实现
            setEdgeBackPlugin(new NavigationBarEdgePanel(mContext));
            ...
        }
        ...
    }
2. 监听返回手势停用区域
EdgeBackGestureHandler 通过 WMS 注册了返回手势停用区域的监听者,他们的 Binder 接口最终被存放在 DisplayContent 中。
// WindowManagerService.java
    public void registerSystemGestureExclusionListener(...) {
        synchronized (mGlobalLock) {
            final DisplayContent displayContent = mRoot.getDisplayContent(displayId);
            displayContent.registerSystemGestureExclusionListener(listener);
        }
    }

// DisplayContent.java
    void registerSystemGestureExclusionListener(ISystemGestureExclusionListener listener) {
        // 监听实例缓存
        mSystemGestureExclusionListeners.register(listener);
        final boolean changed;
        // 立即检查一次是否恰好发生了变化
        if (mSystemGestureExclusionListeners.getRegisteredCallbackCount() == 1) {
            changed = updateSystemGestureExclusion();
        } else {
            changed = false;
        }

        // 立马回调一次
        if (!changed) {
            final Region unrestrictedOrNull = mSystemGestureExclusionWasRestricted
                    ? mSystemGestureExclusionUnrestricted : null;
            try {
                listener.onSystemGestureExclusionChanged(...);
            ...
            }
        }
    }
区域变化时 WMS 将通过 Binder 将区域回调过来,EdgeBackGestureHandler 遂更新存放当前 Display 停用手势区域的 mExcludeRegion 变量。
// EdgeBackGestureHandler.java
    private ISystemGestureExclusionListener mGestureExclusionListener =
            new ISystemGestureExclusionListener.Stub() {
                @Override
                public void onSystemGestureExclusionChanged(int displayId,
                        Region systemGestureExclusion, Region unrestrictedOrNull) {
                    if (displayId == mDisplayId) {
                        mMainExecutor.execute(() -> {
                            mExcludeRegion.set(systemGestureExclusion);
                            ...
                        });
                    }
                }
            };
DisplayContent 里的停用区域 Region 来自于 App 的设置,而 App 一般会在需要停用返回手势的 View 视图里覆写这两个方法,并设置停用区域的 Rect List。
// XXXView.kt
    var exclusionRects = listOf(rect1, rect2, rect3)

    fun onLayout( ... ) {
      setSystemGestureExclusionRects(exclusionRects)
    }

    fun onDraw(canvas: Canvas) {
      setSystemGestureExclusionRects(exclusionRects)
    }
父类 View 负责将区域通过 Handler 交给根 View 管理者 ViewRootImpl。
// View.java
    public void setSystemGestureExclusionRects(@NonNull List<Rect> rects) {
        // List 为空并且 ListenerInfo 也不存在的话
        // 不处理
        if (rects.isEmpty() && mListenerInfo == null) return;

        final ListenerInfo info = getListenerInfo();
        // 如果已存在,先清除再添加;反之,创建一个
        if (info.mSystemGestureExclusionRects != null) {
            info.mSystemGestureExclusionRects.clear();
            info.mSystemGestureExclusionRects.addAll(rects);
        } else {
            info.mSystemGestureExclusionRects = new ArrayList<>(rects);
        }
        if (rects.isEmpty()) {
            // rects 是空的话移除更新的监听
            if (info.mPositionUpdateListener != null) {
                mRenderNode.removePositionUpdateListener(info.mPositionUpdateListener);
            }
        } else {
            // rects 合法但更新的监听尚未建立的话
            if (info.mPositionUpdateListener == null) {
                info.mPositionUpdateListener = new RenderNode.PositionUpdateListener() {
                    ...
                };
                // 创建一个并放入 RenderNode 中
                mRenderNode.addPositionUpdateListener(info.mPositionUpdateListener);
            }
        }
        // 向 ViewRootImpl 中 Handler
        // 发送插队 Message
        // 任务是向 ViewRootImpl 发出进一步请求
        postUpdateSystemGestureExclusionRects();
    }

    void postUpdateSystemGestureExclusionRects() {
        // Potentially racey from a background thread. It's ok if it's not perfect.
        final Handler h = getHandler();
        if (h != null) {
            h.postAtFrontOfQueue(this::updateSystemGestureExclusionRects);
        }
    }

    void updateSystemGestureExclusionRects() {
        final AttachInfo ai = mAttachInfo;
        if (ai != null) {
            ai.mViewRootImpl.updateSystemGestureExclusionRectsForView(this);
        }
    }
ViewRootImpl 是 View 树和 WMS 产生联系的桥梁,其继续将 Rect 通过 WindowSession 进一步交给系统。
// ViewRootImpl.java
    void updateSystemGestureExclusionRectsForView(View view) {
        mGestureExclusionTracker.updateRectsForView(view);
        mHandler.sendEmptyMessage(MSG_SYSTEM_GESTURE_EXCLUSION_CHANGED);
    }

    // 发送的 msg 为如下函数处理
    void systemGestureExclusionChanged() {
        final List<Rect> rectsForWindowManager = mGestureExclusionTracker.computeChangedRects();
        if (rectsForWindowManager != null && mView != null) {
            try {
                mWindowSession.reportSystemGestureExclusionChanged(mWindow, rectsForWindowManager);
            } catch (RemoteException e) {
                throw e.rethrowFromSystemServer();
            }
            // 回调监听停用区域变化的 Observer
            mAttachInfo.mTreeObserver
                    .dispatchOnSystemGestureExclusionRectsChanged(rectsForWindowManager);
        }
    }
Binder 调用之后 Session 抵达,之后交给 WMS 并将区域存放在对应的 WindowState 中,管理起来。
// Session.java
    public void reportSystemGestureExclusionChanged(IWindow window, List<Rect> exclusionRects) {
        final long ident = Binder.clearCallingIdentity();
        try {
            mService.reportSystemGestureExclusionChanged(this, window, exclusionRects);
        } finally {
            Binder.restoreCallingIdentity(ident);
        }
    }

// WindowManagerService.java
    void reportSystemGestureExclusionChanged(Session session, IWindow window,
            List<Rect> exclusionRects) {
        synchronized (mGlobalLock) {
            final WindowState win = windowForClientLocked(session, window, true);
            // 区域保存在在 WindowState 中
            // 并告知 DisplayContent 刷新和回调监听者
            if (win.setSystemGestureExclusion(exclusionRects)) {
                win.getDisplayContent().updateSystemGestureExclusion();
            }
        }
    }

// WindowState.java
    boolean setSystemGestureExclusion(List<Rect> exclusionRects) {
        // 检查区域是否发生变化
        if (mExclusionRects.equals(exclusionRects)) {
            return false;
        }
        // 清空 & 放入全新的 List
        mExclusionRects.clear();
        mExclusionRects.addAll(exclusionRects);
        return true;
    }
同时要求 DisplayContent 立即检查区域是否发生更新,这里面将需要从 WindowState 中取出管理着的 Rect List,封装和转换成 Region。
// DisplayContent.java
    boolean updateSystemGestureExclusion() {
        ...
        final Region systemGestureExclusion = Region.obtain();
        // 取得当前的停用区域
        mSystemGestureExclusionWasRestricted = calculateSystemGestureExclusion(
                systemGestureExclusion, mSystemGestureExclusionUnrestricted);
        try {
            // 没有发生变化不用通知
            if (mSystemGestureExclusion.equals(systemGestureExclusion)) {
                return false;
            }
            ...
            // 遍历监听者和回调
            for (int i = mSystemGestureExclusionListeners.beginBroadcast() - 1; i >= 0; --i) {
                try {
                    mSystemGestureExclusionListeners.getBroadcastItem(i)
                            .onSystemGestureExclusionChanged(mDisplayId, systemGestureExclusion,
                                    unrestrictedOrNull);
                }
            }
            ...
        }
    }

boolean calculateSystemGestureExclusion(Region outExclusion, @Nullable
            Region outExclusionUnrestricted) {
        // 遍历 WindowState 获取停用区域
        forAllWindows(w -> {
            ...
            if (w.isImplicitlyExcludingAllSystemGestures()) {
                local.set(touchableRegion);
            } else {
                rectListToRegion(w.getSystemGestureExclusion(), local);
                ...
                local.op(touchableRegion, Op.INTERSECT);
            }
            ...
        return remainingLeftRight[0] < mSystemGestureExclusionLimit
                || remainingLeftRight[1] < mSystemGestureExclusionLimit;
    }
3. Monitor 监视 Input 事件
InputManager 经过 Binder 将 monitorGestureInput() 的调用传递到 InputManagerService。
// InputManagerService.java
    public InputMonitor monitorGestureInput(String inputChannelName, int displayId) {
        ...
        try {
            InputChannel inputChannel = nativeCreateInputMonitor(
                    mPtr, displayId, true /*isGestureMonitor*/, inputChannelName, pid);
            InputMonitorHost host = new InputMonitorHost(inputChannel.getToken());
            return new InputMonitor(inputChannel, host);
        } finally {
            Binder.restoreCallingIdentity(ident);
        }
    }
IMS 的 JNI 将负责向 InputDispatcher 发出调用,并将其创建的 Client 端 InputChannel 实例转为 Java 实例返回。
虽然命名为 InputMonitor 事实上还是 InputChannel,只不过要和普通的 Window 所创建的 InputChannel 区分开来。
可以说留给某些特权 App 监视输入事件的后门吧,比如这次的 SystemUI。
// com_android_server_input_InputManagerService.cpp
static jobject nativeCreateInputMonitor(JNIEnv* env, jclass /* clazz */, jlong ptr, jint displayId,
                                        jboolean isGestureMonitor, jstring nameObj, jint pid) {
    NativeInputManager* im = reinterpret_cast<NativeInputManager*>(ptr);
    ...
    // 调用 NativeInputManager
    base::Result<std::unique_ptr<InputChannel>> inputChannel =
            im->createInputMonitor(env, displayId, isGestureMonitor, name, pid);
    ...
    // 将 Native 端返回的实例转为 Java 对象
    jobject inputChannelObj =
            android_view_InputChannel_createJavaObject(env, std::move(*inputChannel));
    if (!inputChannelObj) {
        return nullptr;
    }
    return inputChannelObj;
}

// 从持有的 InputManager 实例中
// 取出 InputDispatcher 实例
// 发出创建 Monitor 请求
base::Result<std::unique_ptr<InputChannel>> NativeInputManager::createInputMonitor(...) {
    ATRACE_CALL();
    return mInputManager->getDispatcher()->createInputMonitor(...);
}
InputDispatcher 创建 InputMonitor 的流程和普通 InputChannel 差不多,区别体现在 Server 端 InputChannel 需要额外存放在 mGestureMonitorsByDisplay Map 中。
// InputDispatcher.cpp
Result<std::unique_ptr<InputChannel>> InputDispatcher::createInputMonitor(...) {
    std::shared_ptr<InputChannel> serverChannel;
    std::unique_ptr<InputChannel> clientChannel;
    status_t result = openInputChannelPair(name, serverChannel, clientChannel);

    { // acquire lock
        std::scoped_lock _l(mLock);

        sp<Connection> connection = new Connection(serverChannel, true /*monitor*/, mIdGenerator);
        const sp<IBinder>& token = serverChannel->getConnectionToken();
        const int fd = serverChannel->getFd();

        mConnectionsByToken.emplace(token, connection);
        std::function<int(int events)> callback = std::bind(&InputDispatcher::handleReceiveCallback,
                                                            this, std::placeholders::_1, token);

        auto& monitorsByDisplay =
                isGestureMonitor ? mGestureMonitorsByDisplay : mGlobalMonitorsByDisplay;
        monitorsByDisplay[displayId].emplace_back(serverChannel, pid);

        mLooper->addFd(fd, 0, ALOOPER_EVENT_INPUT, new LooperEventCallback(callback), nullptr);
    }

    // Wake the looper because some connections have changed.
    mLooper->wake();
    return clientChannel;
}
4. 创建返回手势视图
InputMonitor 创建完毕之后,EdgeBackGestureHandler 将立即创建手势视图即 NavigationBarEdgePanel 实例。并通过 setEdgeBackPlugin() 将其缓存,同时准备好承载该视图的 Window 参数一并传递过去。
// EdgeBackGestureHandler.java
    private void setEdgeBackPlugin(NavigationEdgeBackPlugin edgeBackPlugin) {
        if (mEdgeBackPlugin != null) {
            mEdgeBackPlugin.onDestroy();
        }
        // 缓存 NavigationEdgeBackPlugin 实现
        mEdgeBackPlugin = edgeBackPlugin;
        // 向 NavigationEdgeBackPlugin 注册 Back 手势的触发回调
        mEdgeBackPlugin.setBackCallback(mBackCallback);
        // 准备好手势视图的 Window 参数
        mEdgeBackPlugin.setLayoutParams(createLayoutParams());
        updateDisplaySize();
    }

    // 配置返回手势 Window 的参数
    // 包括 flag、type、title 等属性
    private WindowManager.LayoutParams createLayoutParams() {
        Resources resources = mContext.getResources();
        WindowManager.LayoutParams layoutParams = new WindowManager.LayoutParams(
                resources.getDimensionPixelSize(R.dimen.navigation_edge_panel_width),
                resources.getDimensionPixelSize(R.dimen.navigation_edge_panel_height),
                WindowManager.LayoutParams.TYPE_NAVIGATION_BAR_PANEL,
                WindowManager.LayoutParams.FLAG_NOT_FOCUSABLE
                        | WindowManager.LayoutParams.FLAG_NOT_TOUCHABLE
                        | WindowManager.LayoutParams.FLAG_LAYOUT_IN_SCREEN,
                PixelFormat.TRANSLUCENT);
        ...
        layoutParams.setTitle(TAG + mContext.getDisplayId());
        layoutParams.setFitInsetsTypes(0 /* types */);
        layoutParams.setTrustedOverlay();
        return layoutParams;
    }
NavigationBarEdgePanel 构造函数将准备视图相关的描画、动画等相关初始化工作。
比如:
持有 WindowManager 为后续添加试图到 Window 上做准备
持有发出振动用的 mVibratorHelper,以进行后续的 click 振动
配置描画用的 Paint 属性
初始化返回箭头的颜色、淡入、角度动画
设置读取手势阈值 mSwipeThreshold
等
// NavigationBarEdgePanel.java
    public NavigationBarEdgePanel(Context context) {
        super(context);
        mWindowManager = context.getSystemService(WindowManager.class);
        mVibratorHelper = Dependency.get(VibratorHelper.class);
        ...

        mPaint.setStrokeWidth(mArrowThickness);
        mPaint.setStrokeCap(Paint.Cap.ROUND);
        ...

        mArrowColorAnimator = ValueAnimator.ofFloat(0.0f, 1.0f);
        mArrowColorAnimator.setDuration(COLOR_ANIMATION_DURATION_MS);
        mArrowColorAnimator.addUpdateListener(animation -> {
            int newColor = ColorUtils.blendARGB(
                    mArrowStartColor, mArrowColor, animation.getAnimatedFraction());
            setCurrentArrowColor(newColor);
        });

        mArrowDisappearAnimation = ValueAnimator.ofFloat(0.0f, 1.0f);
        mArrowDisappearAnimation.setDuration(DISAPPEAR_ARROW_ANIMATION_DURATION_MS);
        mArrowDisappearAnimation.setInterpolator(Interpolators.FAST_OUT_SLOW_IN);
        mArrowDisappearAnimation.addUpdateListener(animation -> {
            mDisappearAmount = (float) animation.getAnimatedValue();
            invalidate();
        });

        mAngleAnimation =
                new SpringAnimation(this, CURRENT_ANGLE);
        mAngleAppearForce = new SpringForce()
                .setStiffness(500)
                .setDampingRatio(0.5f);
        ...

        mSwipeThreshold = context.getResources()
                .getDimension(R.dimen.navigation_edge_action_drag_threshold);
        setVisibility(GONE);
        ...
    }
其后 NavigationBarEdgePanel 复写的 setLayoutParams() 会被 EdgeBackGestureHandler 调用。拿到 Handler 为其准备的 Window 参数后将本视图添加到一个专用 Window。
注意:此时 View 还是不可见的,后续事件产生的时候会进行展示和刷新。
// NavigationBarEdgePanel.java
    public void setLayoutParams(WindowManager.LayoutParams layoutParams) {
        mLayoutParams = layoutParams;
        mWindowManager.addView(this, mLayoutParams);
    }
5. 预处理Touch事件
当 InputDispatcher 收到 InputReader 传递过来的事件,在分发前会从 mGestureMonitorsByDisplay Map 中收集对应 Display 的 Monitor 实例,并将其中的 Server 端 InputChannel 一并放入到 Input Target 中。
// InputDispatcher.cpp
InputEventInjectionResult InputDispatcher::findTouchedWindowTargetsLocked( ... ) {
    ...
    if (newGesture || (isSplit && maskedAction == AMOTION_EVENT_ACTION_POINTER_DOWN)) {
        ...
        // 取出 InputMonitor
        std::vector<TouchedMonitor> newGestureMonitors = isDown
                ? findTouchedGestureMonitorsLocked(displayId, tempTouchState.portalWindows)
                : std::vector<TouchedMonitor>{};
        ...
        newGestureMonitors = selectResponsiveMonitorsLocked(newGestureMonitors);
        ...

        if (newTouchedWindowHandle != nullptr) {
            ...
            tempTouchState.addOrUpdateWindow(newTouchedWindowHandle, targetFlags, pointerIds);
        }

        // 添加 Monitors 到 TouchedState
        tempTouchState.addGestureMonitors(newGestureMonitors);
    }
    ...
    // 将 TouchedState 中 Touched Window 添加到 InputTargets 中
    for (const TouchedWindow& touchedWindow : tempTouchState.windows) {
        addWindowTargetLocked(touchedWindow.windowHandle, touchedWindow.targetFlags,
                              touchedWindow.pointerIds, inputTargets);
    }

    // 将 TouchedState 中 Monitors 添加到 InputTargets 中
    for (const TouchedMonitor& touchedMonitor : tempTouchState.gestureMonitors) {
        addMonitoringTargetLocked(touchedMonitor.monitor, touchedMonitor.xOffset,
                                  touchedMonitor.yOffset, inputTargets);
    }
    ...
    return injectionResult;
}

// 从 mGestureMonitorsByDisplay map 中
// 按照 Display Id 取出 Vector 返回出去
std::vector<TouchedMonitor> InputDispatcher::findTouchedGestureMonitorsLocked( ... ) const {
    std::vector<TouchedMonitor> touchedMonitors;

    std::vector<Monitor> monitors = getValueByKey(mGestureMonitorsByDisplay, displayId);
    addGestureMonitors(monitors, touchedMonitors);
    for (const sp<InputWindowHandle>& portalWindow : portalWindows) {
        const InputWindowInfo* windowInfo = portalWindow->getInfo();
        ...
    }
    return touchedMonitors;
}

// 提取 Monitor 中的 Server InputChannerl
// 放入到 InputTarget Vector
void InputDispatcher::addMonitoringTargetLocked( ... ) {
    InputTarget target;
    target.inputChannel = monitor.inputChannel;
    target.flags = InputTarget::FLAG_DISPATCH_AS_IS;
    ui::Transform t;
    t.set(xOffset, yOffset);
    target.setDefaultPointerTransform(t);
    inputTargets.push_back(target);
}
之后 dispatchEventLocked 将遍历 InputTarget Vector 实例,逐一使用其 InputChannel 实例通过 Socket 向 App 进程和 SystemUI 进程发送事件。
// InputDispatcher.cpp
void InputDispatcher::dispatchEventLocked( ... ) {
    ...
    for (const InputTarget& inputTarget : inputTargets) {
        sp<Connection> connection =
                getConnectionLocked(inputTarget.inputChannel->getConnectionToken());
        if (connection != nullptr) {
            prepareDispatchCycleLocked(currentTime, connection, eventEntry, inputTarget);
        }
    }
}
监听 Socket FD 写入的消费端 Looper 将触发 LooperCallback,进而从 Client 端 Socket 读取事件,最后通过 InputEventReceiver 回调。
// android_view_InputEventReceiver.cpp
int NativeInputEventReceiver::handleEvent(int receiveFd, int events, void* data) {
    ...
    // 通过 Client Socket 读取事件
    if (events & ALOOPER_EVENT_INPUT) {
        JNIEnv* env = AndroidRuntime::getJNIEnv();
        status_t status = consumeEvents(env, false /*consumeBatches*/, -1, nullptr);
        mMessageQueue->raiseAndClearException(env, "handleReceiveCallback");
        return status == OK || status == NO_MEMORY ? KEEP_CALLBACK : REMOVE_CALLBACK;
    }
    ...
    return KEEP_CALLBACK;
}

status_t NativeInputEventReceiver::consumeEvents(JNIEnv* env,
        bool consumeBatches, nsecs_t frameTime, bool* outConsumedBatch) {
    ...
    for (;;) {
        // 通过 Client InputChannel 发出读取事件请求
        status_t status = mInputConsumer.consume(&mInputEventFactory,
                consumeBatches, frameTime, &seq, &inputEvent);
        ...
        if (!skipCallbacks) {
            ...
            switch (inputEvent->getType()) {
            ...
            case AINPUT_EVENT_TYPE_MOTION: {
                MotionEvent* motionEvent = static_cast<MotionEvent*>(inputEvent);
                if ((motionEvent->getAction() & AMOTION_EVENT_ACTION_MOVE) && outConsumedBatch) {
                    *outConsumedBatch = true;
                }
                inputEventObj = android_view_MotionEvent_obtainAsCopy(env, motionEvent);
                break;
            }
            ...

            // 调用 InputEventReceiver Java 端
            // dispatchInputEvent()
            if (inputEventObj) {
                env->CallVoidMethod(receiverObj.get(),
                        gInputEventReceiverClassInfo.dispatchInputEvent, seq, inputEventObj);
                ...
            }...
        }
    }
}
InputEventReceiver 的 dispatchInputEvent() 会回调 onInputEvent()。
// InputEventReceiver.java
    private void dispatchInputEvent(int seq, InputEvent event) {
        mSeqMap.put(event.getSequenceNumber(), seq);
        onInputEvent(event);
    }
onInputEvent() 作为 SystemUI 监视到系统 Input 事件回调的入口,将展开整个返回手势的判断、视图和动画的刷新以及返回事件的触发。
首先将检查一下是否是 Touch 的 MotionEvent 类型,之后交给onMotionEvent() 预处理。
// EdgeBackGestureHandler.java
    private void onInputEvent(InputEvent ev) {
        if (!(ev instanceof MotionEvent)) return;
        MotionEvent event = (MotionEvent) ev;
        ...
        onMotionEvent(event);
    }
onMotionEvent() 将先进行共通的事件拦截和停用区域检查,通过后交给返回手势视图即 EdgeBackPlugin 进一步处理。
// EdgeBackGestureHandler.java
    private void onMotionEvent(MotionEvent ev) {
        int action = ev.getActionMasked();
        if (action == MotionEvent.ACTION_DOWN) {
            mInputEventReceiver.setBatchingEnabled(false);
            mIsOnLeftEdge = ev.getX() <= mEdgeWidthLeft + mLeftInset;
            mMLResults = 0;
            mLogGesture = false;
            mInRejectedExclusion = false;
            boolean isWithinInsets = isWithinInsets((int) ev.getX(), (int) ev.getY());
            // 根据返回手势是否有效、
            // 点击区域是否是停用区域等条件
            // 得到当前是否允许视图处理该手势
            mAllowGesture = !mDisabledForQuickstep && mIsBackGestureAllowed && isWithinInsets
                    && !mGestureBlockingActivityRunning
                    && !QuickStepContract.isBackGestureDisabled(mSysUiFlags)
                    && isWithinTouchRegion((int) ev.getX(), (int) ev.getY());
            if (mAllowGesture) {
                // 更新当前是屏幕左侧还是右侧
                mEdgeBackPlugin.setIsLeftPanel(mIsOnLeftEdge);
                // 发射事件给视图
                mEdgeBackPlugin.onMotionEvent(ev);
            }
        } else if (mAllowGesture || mLogGesture) {
            if (!mThresholdCrossed) {
                mEndPoint.x = (int) ev.getX();
                mEndPoint.y = (int) ev.getY();
                // 多个手指按下的话取消事件处理
                if (action == MotionEvent.ACTION_POINTER_DOWN) {
                    if (mAllowGesture) {
                        logGesture(SysUiStatsLog.BACK_GESTURE__TYPE__INCOMPLETE_MULTI_TOUCH);
                        cancelGesture(ev);
                    }
                    mLogGesture = false;
                    return;
                } else if (action == MotionEvent.ACTION_MOVE) {
                    // 手指移动超过长按阈值的话
                    // 也要取消事件处理
                    if ((ev.getEventTime() - ev.getDownTime()) > mLongPressTimeout) {
                        if (mAllowGesture) {
                            logGesture(SysUiStatsLog.BACK_GESTURE__TYPE__INCOMPLETE_LONG_PRESS);
                            cancelGesture(ev);
                        }
                        mLogGesture = false;
                        return;
                    }
                    ...
                }
            }

            // 通过上述检查的话
            // 将 MOVE、UP 交给视图
            if (mAllowGesture) {
                // forward touch
                mEdgeBackPlugin.onMotionEvent(ev);
            }
        }

        mProtoTracer.scheduleFrameUpdate();
    }
6.展示返回手势和触发返回
NavigationBarEdgePanel 继续进行后面的工作:手势的判断、视图的刷新、动画的展示。
onMotionEvent() 的逻辑:
DOWN 的时候先让视图变为可见 VISIBLE
MOVE 的处理通过 handleMoveEvent() 判断距离,决定是否要更新赋予 mTriggerBack
UP 的时候将检查该变量决定是否触发返回动作即 triggerBack()
// NavigationBarEdgePanel.java
    public void onMotionEvent(MotionEvent event) {
        if (mVelocityTracker == null) {
            mVelocityTracker = VelocityTracker.obtain();
        }
        mVelocityTracker.addMovement(event);
        switch (event.getActionMasked()) {
            case MotionEvent.ACTION_DOWN:
                mDragSlopPassed = false;
                resetOnDown();
                mStartX = event.getX();
                mStartY = event.getY();
                setVisibility(VISIBLE);
                updatePosition(event.getY());
                mRegionSamplingHelper.start(mSamplingRect);
                mWindowManager.updateViewLayout(this, mLayoutParams);
                break;
            case MotionEvent.ACTION_MOVE:
                handleMoveEvent(event);
                break;
            case MotionEvent.ACTION_UP:
                if (mTriggerBack) {
                    triggerBack();
                } else {
                    cancelBack();
                }
                ...
        }
    }
handleMoveEvent() 则是重要的环节:判断 x 轴的 offset 数值是否达到了阈值 mSwipeThreshold,进而调用 setTriggerBack() 更新 mTriggerBack 变量、同时实时展示角度动画。
// NavigationBarEdgePanel.java
    private void handleMoveEvent(MotionEvent event) {
        float x = event.getX();
        float y = event.getY();
        float touchTranslation = MathUtils.abs(x - mStartX);
        float yOffset = y - mStartY;
        float delta = touchTranslation - mPreviousTouchTranslation;
        ...
        mPreviousTouchTranslation = touchTranslation;

        // 已经超过阈值的话
        // 设置达到触发返回事件条件
        if (!mDragSlopPassed && touchTranslation > mSwipeThreshold) {
            mDragSlopPassed = true;
            mVibratorHelper.vibrate(VibrationEffect.EFFECT_TICK);
            mVibrationTime = SystemClock.uptimeMillis();

            mDisappearAmount = 0.0f;
            setAlpha(1f);
            setTriggerBack(true /* triggerBack */, true /* animated */);
        }
        ...

        boolean triggerBack = mTriggerBack;
        if (Math.abs(mTotalTouchDelta) > mMinDeltaForSwitch) {
            triggerBack = mTotalTouchDelta > 0;
        }

        // 计算方向和偏移值
        mVelocityTracker.computeCurrentVelocity(1000);
        float xVelocity = mVelocityTracker.getXVelocity();
        float yVelocity = mVelocityTracker.getYVelocity();
        float velocity = MathUtils.mag(xVelocity, yVelocity);
        mAngleOffset = Math.min(velocity / 1000 * ARROW_ANGLE_ADDED_PER_1000_SPEED,
                ARROW_MAX_ANGLE_SPEED_OFFSET_DEGREES) * Math.signum(xVelocity);
        if (mIsLeftPanel && mArrowsPointLeft || !mIsLeftPanel && !mArrowsPointLeft) {
            mAngleOffset *= -1;
        }

        // 如果纵向偏移值达到了横向偏移两倍
        // 取消返回事件触发
        if (Math.abs(yOffset) > Math.abs(x - mStartX) * 2) {
            triggerBack = false;
        }
        setTriggerBack(triggerBack, true /* animated */);

        if (!mTriggerBack) {
            touchTranslation = 0;
        } else if (mIsLeftPanel && mArrowsPointLeft
                || (!mIsLeftPanel && !mArrowsPointLeft)) {
            // 更新角度
            touchTranslation -= getStaticArrowWidth();
        }
        setDesiredTranslation(touchTranslation, true /* animated */);
        // 更新角度动画
        updateAngle(true /* animated */);
        ...
    }

    private void setTriggerBack(boolean triggerBack, boolean animated) {
        if (mTriggerBack != triggerBack) {
            mTriggerBack = triggerBack;
            mAngleAnimation.cancel();
            updateAngle(animated);
            mTranslationAnimation.cancel();
        }
    }
7. InputManager 注入返回事件
NavigationBarEdgePanel 收到 UP 时,发现已经设置触发返回事件标志的话将通过 triggerBack() 发出注入返回事件的请求。
该函数首先会取出返回手势视图创建时带入的 BackCallback 实例并将触发 Back 手势的回调发射出去。其后就振动的触发、动画的结束、可见性改回 GONE 等收尾工作。
// NavigationBarEdgePanel.java
    private void triggerBack() {
        mBackCallback.triggerBack();

        // 产生 click 振动
        if (isSlow
                || SystemClock.uptimeMillis() - mVibrationTime >= GESTURE_DURATION_FOR_CLICK_MS) {
            mVibratorHelper.vibrate(VibrationEffect.EFFECT_CLICK);
        }

        ...
        // 隐藏动画的执行
        Runnable translationEnd = () -> {
            mAngleOffset = Math.max(0, mAngleOffset + 8);
            updateAngle(true /* animated */);

            mTranslationAnimation.setSpring(mTriggerBackSpring);
            setDesiredTranslation(mDesiredTranslation - dp(32), true /* animated */);
            // 最终将视图隐藏
            animate().alpha(0f).setDuration(DISAPPEAR_FADE_ANIMATION_DURATION_MS)
                    .withEndAction(() -> setVisibility(GONE));
            mArrowDisappearAnimation.start();
            scheduleFailsafe();
        };
        ...
    }
回调的函数也叫 triggerBack()。其工作是准备 Code 为 KEYCODE_BACK的 KeyEvent 并通过 InputManager#injectInputEvent() 注入到 InputDispatcher,等待 Input 系统的进一步处理和发出。
// EdgeBackGestureHandler.java
    private final NavigationEdgeBackPlugin.BackCallback mBackCallback =
            new NavigationEdgeBackPlugin.BackCallback() {
                @Override
                public void triggerBack() {
                    mFalsingManager.isFalseTouch(BACK_GESTURE);
                    // 发送返回按键的按下和抬起事件
                    boolean sendDown = sendEvent(KeyEvent.ACTION_DOWN, KeyEvent.KEYCODE_BACK);
                    boolean sendUp = sendEvent(KeyEvent.ACTION_UP, KeyEvent.KEYCODE_BACK);
                    ...
                }
                ...
            };

    private boolean sendEvent(int action, int code) {
        long when = SystemClock.uptimeMillis();
        // 构建 KeyEvent Java 实例
        final KeyEvent ev = new KeyEvent(when, when, action, code, 0 /* repeat */,
                0 /* metaState */, KeyCharacterMap.VIRTUAL_KEYBOARD, 0 /* scancode */,
                KeyEvent.FLAG_FROM_SYSTEM | KeyEvent.FLAG_VIRTUAL_HARD_KEY,
                InputDevice.SOURCE_KEYBOARD);

        // 赋值 DisplayId 并注入
        ev.setDisplayId(mContext.getDisplay().getDisplayId());
        return InputManager.getInstance()
                .injectInputEvent(ev, InputManager.INJECT_INPUT_EVENT_MODE_ASYNC);
    }
8. Dispatcher 分发返回事件
InputManager 将通过 IMS 和 JNI 最终向 InputDispatcher 注入 KeyEvent。
先将注入的 InputEvent 转换为 KeyEvent
加工成 KeyEvent 先交给 PhoneWindowManager 拦截处理
之后封装成 KeyEntry 并 push 到 queue 中
queue 中 Entry 取出并通过 enqueueInboundEventLocked() 放入存放待分发事件的 mInboundQueue 中
唤醒 InputDispatcher 的 Looper 进入 Thread 的 dispatchOnce() 准备分发
// InputDispatcher.cpp
InputEventInjectionResult InputDispatcher::injectInputEvent(const InputEvent* event...) {
    ...
    std::queue<std::unique_ptr<EventEntry>> injectedEntries;
    switch (event->getType()) {
        // 判断注入事件类型
        case AINPUT_EVENT_TYPE_KEY: {
            const KeyEvent& incomingKey = static_cast<const KeyEvent&>(*event);
            int32_t action = incomingKey.getAction();
            ...
            KeyEvent keyEvent;
            keyEvent.initialize(...);
            // 按键事件的话需要 PhoneWindowManager 预处理
            if (!(policyFlags & POLICY_FLAG_FILTERED)) {
                android::base::Timer t;
                mPolicy->interceptKeyBeforeQueueing(&keyEvent, /*byref*/ policyFlags);
            }
            ...
            // 之后再放入到待注入队列中
            std::unique_ptr<KeyEntry> injectedEntry =
                    std::make_unique<KeyEntry>(...);
            injectedEntries.push(std::move(injectedEntry));
            break;
        }
        ...
    }

    ...
    // 取出注入事件放入待分发队列
    while (!injectedEntries.empty()) {
        needWake |= enqueueInboundEventLocked(std::move(injectedEntries.front()));
        injectedEntries.pop();
    }

    mLock.unlock();

    // 唤醒 Looper 去分发
    if (needWake) {
        mLooper->wake();
    }

    // 返回注入结果
    InputEventInjectionResult injectionResult;
    { // acquire lock
        std::unique_lock _l(mLock);

        if (syncMode == InputEventInjectionSync::NONE) {
            injectionResult = InputEventInjectionResult::SUCCEEDED;
        ...
        }

        injectionState->release();
    } // release lock

    return injectionResult;
}
篇幅原因,省略了 InputDispatcher 分发按键事件的后续(事实上和前面讲述分发 Input 事件的流程大同小异)。
最终通过 InputChannel 抵达当前 Window 中 DecorView 的 dispatchKeyEvent()
9. App 收到返回事件
篇幅原因,省略 DecorView 树分发 KeyEvent 按键事件的流程。
一般来说 View 树不会拦截返回按键,最终将抵达 Activity#onBackPressed()
它进而决定是 Fragment 处理返回还是 Activity 进行 finish(当然 App 可以覆写它以改写行为)
// Activity.java
    public void onBackPressed() {
        ...
        FragmentManager fragmentManager = mFragments.getFragmentManager();
        // Fragment 先处理
        if (!fragmentManager.isStateSaved() && fragmentManager.popBackStackImmediate()) {
            return;
        }
        // Activity 自己处理
        if (!isTaskRoot()) {
            finishAfterTransition();
            return;
        }
        ...
    }
/ 结语 /

回顾一下 Back Gesture 响应的整体流程:
NavigationBarView 添加到 Window 上去的时候创建管理类 EdgeBackGestureHandler
EdgeBackGestureHandler 向 WMS 注册返回手势停用的监听者 SystemGestureExclusionListener
通过 InputManager 向 InputDispatcher 注入 InputMonitor 以监听系统 Input 事件
EdgeBackGestureHandler 创建手势视图 NavigationBarEdgePanel 的 Window 参数并将该视图添加到 Window
InputDispacher 将 Input 事件分发给见识者即 EdgeBackGestureHandler 定义的 InputEventReceiver 回调,并判断停用区域进行预处理
手势视图 NavigationBarEdgePanel 收到事件后进一步进行动画、角度和阈值的判断,决定是否触发返回事件
EdgeBackGestureHandler 收到触发请求通过 InputManager 注入 BACK 按键的返回事件
InputDispatcher 将 BACK 按键分发到背面 App 的 DecorView
经过 View 树的按键分发,Activity 的 onBackPressed 进行 Fragment 或 Activity 的返回处理
简单来讲,SystemUI 利用 InputMonitor 监视系统 Touch 事件、监听和获取 WMS 中保存的手势停用区域 Region、依据 Touch 事件展示动画和触发返回、通过 InputManager 注入返回按键事件、最终抵达背面 App。
整体篇幅挺大,还省略了诸多细节。感兴趣的朋友可以跟踪下整个流程,如果发现错误或笔者错过的重要细节,欢迎留言。
参考文章 : https://developer.android.google.cn/training/gestures/gesturenav
推荐阅读:
欢迎关注我的公众号
学习技术或投稿


长按上图,识别图中二维码即可关注


 2553
2553


 被折叠的 条评论
为什么被折叠?
被折叠的 条评论
为什么被折叠?
 到【灌水乐园】发言


