


今日科技快讯
据国外多家媒体发布消息称,全世界最大的网约车公司Uber将会在当地时间周四向美国证券交易委员会提交上市申请。知情人士表示,Uber首次公开发行规模可能有多大,这是该公司备受关注的一个因素。知情人士称,Uber告诉一些投资者,该公司股票发行的估值可能高达1000亿美元。
作者简介
明天就是周六啦,提前祝大家周末愉快!
本篇文章来自 flutterall.com 的投稿,使用Flutter实现了列表弹出功能,希望对大家有所帮助!
flutterall.com的博客地址:
https://blog.csdn.net/helloxjh
前言
我们在APP中经常可以看到各种抽屉,比如:某音的评论以及经典的豆瓣评论。这种抽屉效果,都是十分好看经典的设计。
但是在flutter中,只有侧边抽屉,没看到有上拉的抽屉。项目中UI需要下面的效果:
本文更多是传递flutter学习与开发自定义Widget的一个思想。能够更好的理解Flutter的GestureRecognizer、Transform、AnimationController等等
分析
遇到一个问题或者需求,我更建议大家把需求细化,细分。然后逐个分析,个个击破。
抽屉里存放列表数据。上拉小于一定值 ,自动回弹到底部
当抽屉未到达顶部时,上拉列表,抽屉上移。
当抽屉到到达顶部时,上拉列表,抽屉不动,列表数据移动。
抽屉的列表数据,下拉时,出现最后一条数据时,整个抽屉随之下拉
抽屉上拉时,有一个向上的加速度时,手指离开屏幕,抽屉会自动滚到顶部
解决方案
GestureRecognizer
母庸质疑,这里涉及到更多的是监听手势。监听手指按下、移动、抬起以及加速度移动等。这些,通过flutter强大的GestureRecognizer就可以搞定。
Flutter Gestures (https://flutter-io.cn/docs/development/ui/advanced/gestures)中简单来说就是可以监听用户的以下手势:
Tap
onTabDown 按下
onTapUp 抬起
onTap 点击
onTapCancel
Double tap 双击
Vertical drag 垂直拖动屏幕
onVerticalDragStart
onVerticalDragUpdate
onVerticalDragEnd
Horizontal drag 水平拖动屏幕
onHorizontalDragStart
onHorizontalDragUpdate
onHorizontalDragEnd
Pan
onPanStart 可能开始水平或垂直移动。如果设置了onHorizontalDragStart或onVerticalDragStart回调,则会导致崩溃 。
onPanUpdate 触摸到屏幕并在垂直或水平方移动。如果设置了onHorizontalDragUpdate或onVerticalDragUpdate回调,则会导致崩溃 。
onPanEnd 在停止接触屏幕时以特定速度移动。如果设置了onHorizontalDragEnd或onVerticalDragEnd回调,则会导致崩溃 。
每个行为,均有着对应的Recognizer去处理。
分别对应着下面:
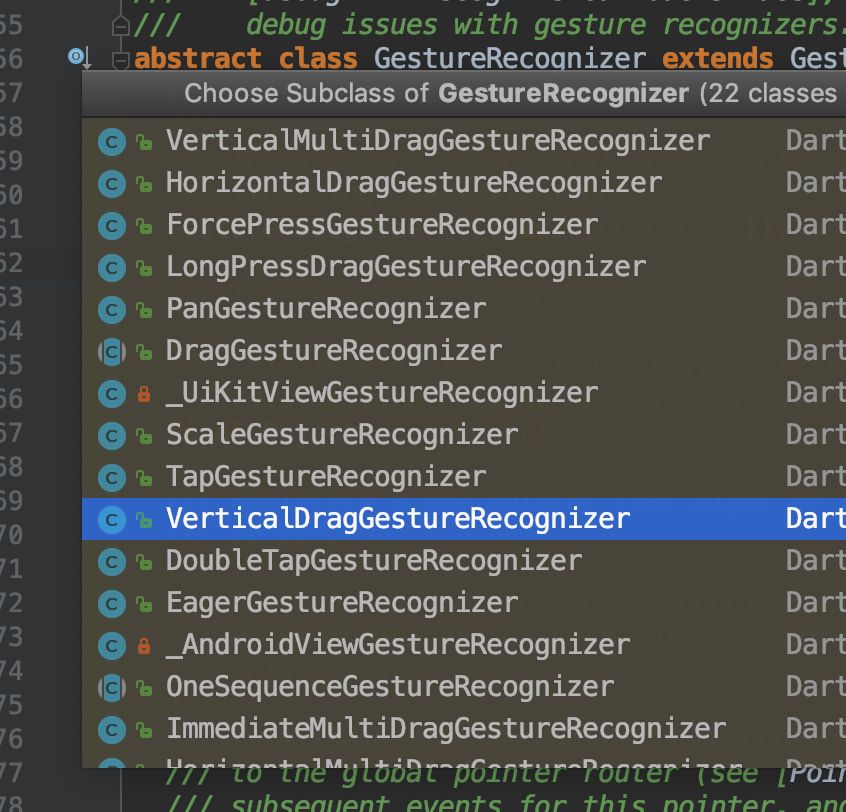
在这里我们用到的就是VerticalDragGestureRecognizer,用来监听控件垂直方向接收的行为。
import 'package:flutter/gestures.dart';
import 'package:flutter/material.dart';

class BottomDragWidget extends StatefulWidget {
  @override
  _BottomDragWidgetState createState() => _BottomDragWidgetState();
}

class _BottomDragWidgetState extends State<BottomDragWidget> {
  @override
  Widget build(BuildContext context) {
    return Stack(children: <Widget>[
      Align(
        alignment: Alignment.bottomCenter,
        child: DragContainer(),
      )
    ],);
  }
}

class DragContainer extends StatefulWidget {
  @override
  _DragContainerState createState() => _DragContainerState();
}

class _DragContainerState extends State<DragContainer> {
  double offsetDistance = 0.0;

  @override
  Widget build(BuildContext context) {
    ///使用Transform.translate 移动drag的位置
    return Transform.translate(
      offset: Offset(0.0, offsetDistance),
      child: RawGestureDetector(
        gestures: {MyVerticalDragGestureRecognizer: getRecognizer()},
        child: Container(
          width: 100.0,
          height: 100.0,
          color: Colors.brown,
        ),
      ),
    );
  }

  GestureRecognizerFactoryWithHandlers<MyVerticalDragGestureRecognizer>
      getRecognizer() {
    return GestureRecognizerFactoryWithHandlers(
        () => MyVerticalDragGestureRecognizer(), this._initializer);
  }

  void _initializer(MyVerticalDragGestureRecognizer instance) {
    instance
      ..onStart = _onStart
      ..onUpdate = _onUpdate
      ..onEnd = _onEnd;
  }

  ///接受触摸事件
  void _onStart(DragStartDetails details) {
    print('触摸屏幕${details.globalPosition}');
  }

  ///垂直移动
  void _onUpdate(DragUpdateDetails details) {
    print('垂直移动${details.delta}');
    offsetDistance = offsetDistance + details.delta.dy;
    setState(() {});
  }

  ///手指离开屏幕
  void _onEnd(DragEndDetails details) {
    print('离开屏幕');
  }
}

class MyVerticalDragGestureRecognizer extends VerticalDragGestureRecognizer {
  MyVerticalDragGestureRecognizer({Object debugOwner})
      : super(debugOwner: debugOwner);
}
很简单的,我们就完成了widget跟随手指上下移动。
使用动画
之前我们有说道,当我们松开手时,控件会自动跑到最下面,或者跑到最顶端。这里呢,我们就需要使用到AnimationController了
 animalController = AnimationController(
        vsync: this, duration: const Duration(milliseconds: 250));

///easeOut 先快后慢
    final CurvedAnimation curve =
        new CurvedAnimation(parent: animalController, curve: Curves.easeOut);
    animation = Tween(begin: start, end: end).animate(curve)
      ..addListener(() {
        offsetDistance = animation.value;
          setState(() {});
      });

    ///自己滚动
    animalController.forward();

在手指离开屏幕的回调方法中,在void _onEnd(DragEndDetails details)使用animalController,也就是当手指离开屏幕,将上层的DragContainer归到原位。
到这里,已经解决了。滚动,自动归位。下一步,就是解决比较困难的情况。
解决嵌套列表数据
在抽屉中,我们经常存放的是列表数据。所以,会有下面的情况:
也就是说,在下拉列表时,只有第一条显示后,整个DragContainer才会随之下移。但是在Flutter中,并没有可以判断显示第一条数据的回调监听。但是官方,有**NotificationListener**,用来进行滑动监听的。

ScrollStartNotification 部件开始滑动
ScrollUpdateNotification 部件位置发生改变
OverscrollNotification 表示窗口小部件未更改它的滚动位置,因为更改会导致滚动位置超出其滚动范围
ScrollEndNotification 部件停止滚动
可以有童鞋有疑问,为什么使用监听垂直方向的手势去移动位置,而不用 ScrollUpdateNotification去更新DragContainer的位置。这是因为:ScrollNotification这个东西是一个滑动通知,他的通知是有延迟的!
官方有说:Any attempt to adjust the build or layout based on a scroll notification would result in a layout that lagged one frame behind, which is a poor user experience.
也就是说,我们可以将DragContainer放在NotificationListener中,当触发了ScrollEndNotification的时候,也就是说整个列表数据需要向下移动了。
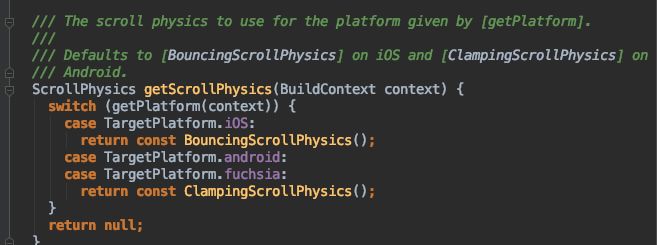
///在ios中,默认返回BouncingScrollPhysics,对于[BouncingScrollPhysics]而言,
///由于   double applyBoundaryConditions(ScrollMetrics position, double value) => 0.0;
///会导致:当listview的第一条目显示时,继续下拉时,不会调用上面提到的Overscroll监听。
///故这里,设定为[ClampingScrollPhysics]
class OverscrollNotificationWidget extends StatefulWidget {
  const OverscrollNotificationWidget({
    Key key,
    @required this.child,
//    this.scrollListener,
  })  : assert(child != null),
        super(key: key);

  final Widget child;
//  final ScrollListener scrollListener;

  @override
  OverscrollNotificationWidgetState createState() =>
      OverscrollNotificationWidgetState();
}

/// Contains the state for a [OverscrollNotificationWidget]. This class can be used to
/// programmatically show the refresh indicator, see the [show] method.
class OverscrollNotificationWidgetState
    extends State<OverscrollNotificationWidget>
    with TickerProviderStateMixin<OverscrollNotificationWidget> {
  final GlobalKey _key = GlobalKey();

  ///[ScrollStartNotification] 部件开始滑动
  ///[ScrollUpdateNotification] 部件位置发生改变
  ///[OverscrollNotification] 表示窗口小部件未更改它的滚动位置,因为更改会导致滚动位置超出其滚动范围
  ///[ScrollEndNotification] 部件停止滚动
  ///之所以不能使用这个来build或者layout,是因为这个通知的回调是会有延迟的。
  ///Any attempt to adjust the build or layout based on a scroll notification would
  ///result in a layout that lagged one frame behind, which is a poor user experience.

  @override
  Widget build(BuildContext context) {
    print('NotificationListener build');
    final Widget child = NotificationListener<ScrollStartNotification>(
      key: _key,
      child: NotificationListener<ScrollUpdateNotification>(
        child: NotificationListener<OverscrollNotification>(
          child: NotificationListener<ScrollEndNotification>(
            child: widget.child,
            onNotification: (ScrollEndNotification notification) {
              _controller.updateDragDistance(
                  0.0, ScrollNotificationListener.end);
              return false;
            },
          ),
          onNotification: (OverscrollNotification notification) {
            if (notification.dragDetails != null &&
                notification.dragDetails.delta != null) {
              _controller.updateDragDistance(notification.dragDetails.delta.dy,
                  ScrollNotificationListener.edge);
            }
            return false;
          },
        ),
        onNotification: (ScrollUpdateNotification notification) {
          return false;
        },
      ),
      onNotification: (ScrollStartNotification scrollUpdateNotification) {
        _controller.updateDragDistance(0.0, ScrollNotificationListener.start);
        return false;
      },
    );

    return child;
  }
}

enum ScrollNotificationListener {
  ///滑动开始
  start,

  ///滑动结束
  end,

  ///滑动时,控件在边缘(最上面显示或者最下面显示)位置
  edge
}
通过这个方案,我们就解决了列表数据的问题。最后一个问题,当手指快速向上滑动的时候然后松开手的时候,让列表数据自动滚动顶端。这个快速上滑,如何解决。
坑
当dragContainer中使用的如果是ScrollView,一定要将physics的值设定为ClampingScrollPhysics,否则不能监听到ScrollEndNotification。这是平台不一致性导致的。在scroll_configuration.dart中,有这么一段:
判断Fling
对于这个,是我在由项目需求,魔改源码的时候,无意中看到的。所以需要翻源码了。在DragGestureRecognizer中,官方有一个也是判断Filing的地方
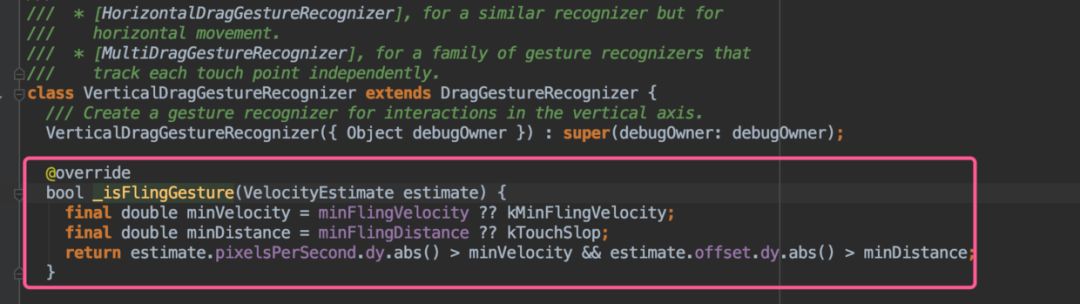
不过这个方法是私有的,我们无法调用。(虽然dart可以反射,但是不建议。),我们就按照官方的思路一样的写就好了。
///MyVerticalDragGestureRecognizer 负责任务
///1.监听child的位置更新
///2.判断child在手松的那一刻是否是出于fling状态
class MyVerticalDragGestureRecognizer extends VerticalDragGestureRecognizer {
  final FlingListener flingListener;

  /// Create a gesture recognizer for interactions in the vertical axis.
  MyVerticalDragGestureRecognizer({Object debugOwner, this.flingListener})
      : super(debugOwner: debugOwner);

  final Map<int, VelocityTracker> _velocityTrackers = <int, VelocityTracker>{};

  @override
  void handleEvent(PointerEvent event) {
    super.handleEvent(event);
    if (!event.synthesized &&
        (event is PointerDownEvent || event is PointerMoveEvent)) {
      final VelocityTracker tracker = _velocityTrackers[event.pointer];
      assert(tracker != null);
      tracker.addPosition(event.timeStamp, event.position);
    }
  }

  @override
  void addPointer(PointerEvent event) {
    super.addPointer(event);
    _velocityTrackers[event.pointer] = VelocityTracker();
  }

  ///来检测是否是fling
  @override
  void didStopTrackingLastPointer(int pointer) {
    final double minVelocity = minFlingVelocity ?? kMinFlingVelocity;
    final double minDistance = minFlingDistance ?? kTouchSlop;
    final VelocityTracker tracker = _velocityTrackers[pointer];

    ///VelocityEstimate 计算二维速度的
    final VelocityEstimate estimate = tracker.getVelocityEstimate();
    bool isFling = false;
    if (estimate != null && estimate.pixelsPerSecond != null) {
      isFling = estimate.pixelsPerSecond.dy.abs() > minVelocity &&
          estimate.offset.dy.abs() > minDistance;
    }
    _velocityTrackers.clear();
    if (flingListener != null) {
      flingListener(isFling);
    }

    ///super.didStopTrackingLastPointer(pointer) 会调用[_handleDragEnd]
    ///所以将[lingListener(isFling);]放在前一步调用
    super.didStopTrackingLastPointer(pointer);
  }

  @override
  void dispose() {
    _velocityTrackers.clear();
    super.dispose();
  }
}
好的,这就解决了Filing的判断。
最后效果
源码地址:
https://github.com/kaina404/flutterDemo/tree/master/lib/widgets
推荐阅读:
欢迎关注我的公众号,学习技术或投稿
![]()

长按上图,识别图中二维码即可关注


 576
576


 被折叠的 条评论
为什么被折叠?
被折叠的 条评论
为什么被折叠?
 到【灌水乐园】发言


