


我们常用的APP中,每到节假日都会换上不一样的主题背景,换成对应节日的皮肤,像这种换肤肯定不是为了某一个节日单独发一个版本,这样的话也太麻烦了,很多大厂都有自己的换肤技术,不需要通过发版就可以实时换肤,活动结束之后自动恢复,所以有哪些资源可以通过换肤来进行切换的呢?
作者:像程序那样去思考
链接:https://www.jianshu.com/p/433fc51a8881其实在Android的res目录下所有资源都可以进行换肤,像图片、文字颜色、字体、背景等都可以通过换肤来进行无卡顿切换,那么究竟如何才能高效稳定地实现换肤,我们需要对于View的生命周期以及加载流程有一定的认识。
1 XML布局的解析流程
如果没有使用Compose,我们现阶段的Android开发布局依然是在XML文件中,如下所示:
<?xml version="1.0" encoding="utf-8"?>
<androidx.coordinatorlayout.widget.CoordinatorLayout xmlns:android="http://schemas.android.com/apk/res/android"
    android:layout_width="match_parent"
    android:layout_height="match_parent"
    xmlns:app="http://schemas.android.com/apk/res-auto"
    android:orientation="vertical">


    <TextView
        android:layout_width="match_parent"
        android:layout_height="80dp"
        android:background="#2196F3"
        android:text="这是顶部TextView"
        android:gravity="center"
        android:textColor="#FFFFFF"
        app:layout_behavior=".behavior.ScrollBehavior"/>
    <androidx.recyclerview.widget.RecyclerView
        android:id="@+id/rv_child"
        android:layout_width="match_parent"
        android:layout_height="wrap_content"
        android:layout_marginTop="80dp"
        app:layout_behavior=".behavior.RecyclerViewBehavior"/>


</androidx.coordinatorlayout.widget.CoordinatorLayout>
所以如果想要改变字体颜色,就需要动态修改textColor属性;如果想改变背景,就需要修改background属性;当一个Activity想要加载某个布局文件的时候,就需要调用setContentView方法,实例化View;
setContentView(R.layout.activity_main)那么我们是否能够改变系统加载布局文件的逻辑,让其加载我们自己的皮肤包,那这样是不是就能够实现动态换肤?
1.1 setContentView源码分析
我这边看的是Android 11的源码,算是比较新的了吧,伙伴们可以跟着看一下。
@Override
public void setContentView(@LayoutRes int layoutResID) {
    initViewTreeOwners();
    getDelegate().setContentView(layoutResID);
}
一般情况下,我们传入的就是一个布局id,内部实现是调用了AppCompatDelegate实现类的setContentView方法,AppCompatDelegate是一个抽象类,它的实现类为AppCompatDelegateImpl。
@NonNull
public AppCompatDelegate getDelegate() {
    if (mDelegate == null) {
        mDelegate = AppCompatDelegate.create(this, this);
    }
    return mDelegate;
}
所以我们看下AppCompatDelegateImpl的setContentView方法。
@Override
public void setContentView(int resId) {
    ensureSubDecor();
    ViewGroup contentParent = mSubDecor.findViewById(android.R.id.content);
    contentParent.removeAllViews();
    LayoutInflater.from(mContext).inflate(resId, contentParent);
    mAppCompatWindowCallback.bypassOnContentChanged(mWindow.getCallback());
}
首先调用了ensureSubDecor方法,这里我就不细说了,这个方法的目的就是保证DecorView创建成功,我们看下这个图,布局的层级是这样的。
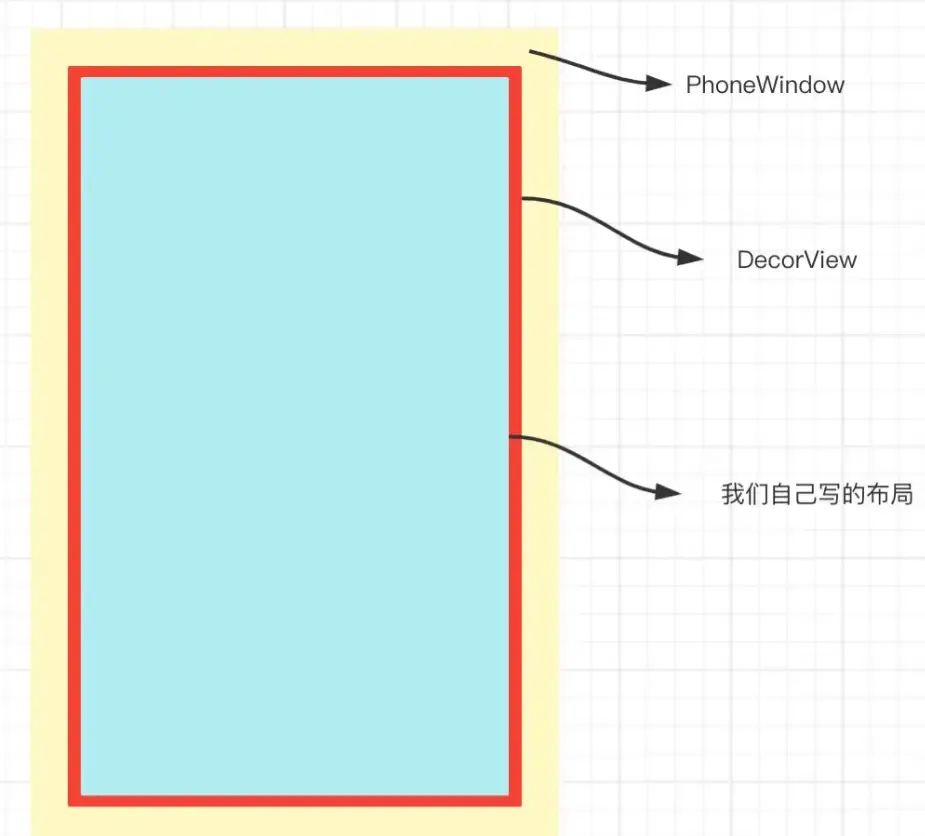
我们所有的自定义布局,都是加载在DecorView这个容器上,我们看下面这个布局:
<androidx.appcompat.widget.ActionBarOverlayLayout
        xmlns:android="http://schemas.android.com/apk/res/android"
        xmlns:app="http://schemas.android.com/apk/res-auto"
        android:id="@+id/decor_content_parent"
        android:layout_width="match_parent"
        android:layout_height="match_parent"
        android:fitsSystemWindows="true">


    <!--布局id为 action_bar_activity_content---->
    <include layout="@layout/abc_screen_content_include"/>


    <androidx.appcompat.widget.ActionBarContainer
            android:id="@+id/action_bar_container"
            android:layout_width="match_parent"
            android:layout_height="wrap_content"
            android:layout_alignParentTop="true"
            style="?attr/actionBarStyle"
            android:touchscreenBlocksFocus="true"
            android:gravity="top">


        <androidx.appcompat.widget.Toolbar
                android:id="@+id/action_bar"
                android:layout_width="match_parent"
                android:layout_height="wrap_content"
                app:navigationContentDescription="@string/abc_action_bar_up_description"
                style="?attr/toolbarStyle"/>


        <androidx.appcompat.widget.ActionBarContextView
                android:id="@+id/action_context_bar"
                android:layout_width="match_parent"
                android:layout_height="wrap_content"
                android:visibility="gone"
                android:theme="?attr/actionModeTheme"
                style="?attr/actionModeStyle"/>


    </androidx.appcompat.widget.ActionBarContainer>


</androidx.appcompat.widget.ActionBarOverlayLayout>看布局你可能会觉得,这个是啥?这个是系统appcompat包中的一个布局文件,名字为adb_screen_toolbar.xml,当我们新建一个app项目的时候,见到的第一个页面,如下图所示
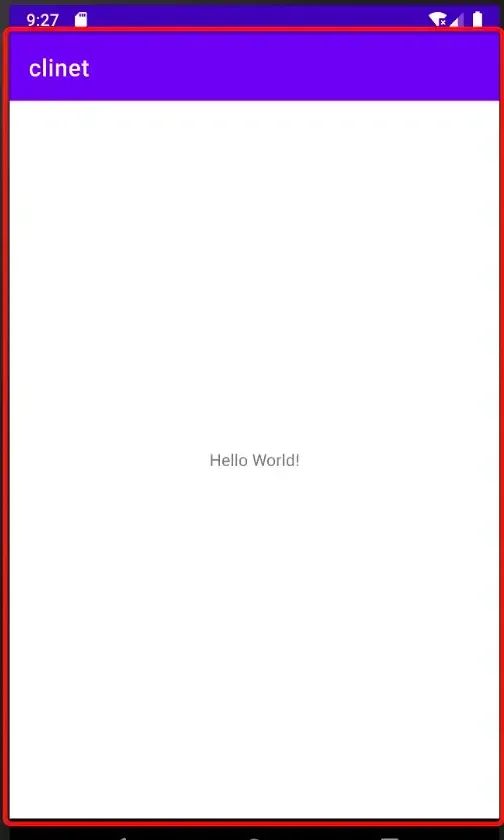
红框展示的布局就是上面这个XML,也就是DecorView加载的布局文件R.layout.adb_screen_toolbar.xml。
final ContentFrameLayout contentView = (ContentFrameLayout) subDecor.findViewById(
        R.id.action_bar_activity_content);


final ViewGroup windowContentView = (ViewGroup) mWindow.findViewById(android.R.id.content);
if (windowContentView != null) {
    // There might be Views already added to the Window's content view so we need to
    // migrate them to our content view
    while (windowContentView.getChildCount() > 0) {
        final View child = windowContentView.getChildAt(0);
        windowContentView.removeViewAt(0);
        contentView.addView(child);
    }


    // Change our content FrameLayout to use the android.R.id.content id.
    // Useful for fragments.
    windowContentView.setId(View.NO_ID);
    contentView.setId(android.R.id.content);


    // The decorContent may have a foreground drawable set (windowContentOverlay).
    // Remove this as we handle it ourselves
    if (windowContentView instanceof FrameLayout) {
        ((FrameLayout) windowContentView).setForeground(null);
    }
}对于DecorView的加载,因为设置不同主题就会加载不同的XML,这里我不做过多的讲解,因为主要目标是换肤,但是上面这段代码需要关注一下,就是DecorView布局加载出来之后,获取了include中的id为action_bar_activity_content的容器,将其id替换成了content。
我们再回到setContentView方法中,我们看又是通过mSubDecor获取到了content这个id对应的容器,通过Inflate的形式将我们的布局加载到这个容器当中,所以核心点就是Inflate是如何加载并实例化View的。
1.2 LayoutInflater源码分析
我们换肤的重点就是对于LayoutInflater源码的分析,尤其是inflate方法,直接返回了一个View。
public View inflate(@LayoutRes int resource, @Nullable ViewGroup root, boolean attachToRoot) {
    final Resources res = getContext().getResources();
    if (DEBUG) {
        Log.d(TAG, "INFLATING from resource: "" + res.getResourceName(resource) + "" ("
              + Integer.toHexString(resource) + ")");
    }


    View view = tryInflatePrecompiled(resource, res, root, attachToRoot);
    if (view != null) {
        return view;
    }
    // 这里是进行XML布局解析
    XmlResourceParser parser = res.getLayout(resource);
    try {
        return inflate(parser, root, attachToRoot);
    } finally {
        parser.close();
    }
}
首先是通过XmlParser工具进行布局解析,这部分就不讲了没有意义,重点看下面的代码实现:
public View inflate(XmlPullParser parser, @Nullable ViewGroup root, boolean attachToRoot) {
    synchronized (mConstructorArgs) {
        Trace.traceBegin(Trace.TRACE_TAG_VIEW, "inflate");


        final Context inflaterContext = mContext;
        final AttributeSet attrs = Xml.asAttributeSet(parser);
        Context lastContext = (Context) mConstructorArgs[0];
        mConstructorArgs[0] = inflaterContext;
        View result = root;


        try {
            advanceToRootNode(parser);
            // 代码 - 1
            final String name = parser.getName();
            // ...... 省略部分代码


            if (TAG_MERGE.equals(name)) {
                if (root == null || !attachToRoot) {
                    throw new InflateException("<merge /> can be used only with a valid "
                            + "ViewGroup root and attachToRoot=true");
                }


                rInflate(parser, root, inflaterContext, attrs, false);
            } else {
                // Temp is the root view that was found in the xml
                // 代码 - 2
                final View temp = createViewFromTag(root, name, inflaterContext, attrs);


                ViewGroup.LayoutParams params = null;


                if (root != null) {
                    if (DEBUG) {
                        System.out.println("Creating params from root: " +
                                root);
                    }
                    // Create layout params that match root, if supplied
                    params = root.generateLayoutParams(attrs);
                    if (!attachToRoot) {
                        // Set the layout params for temp if we are not
                        // attaching. (If we are, we use addView, below)
                        temp.setLayoutParams(params);
                    }
                }


                if (DEBUG) {
                    System.out.println("-----> start inflating children");
                }


                // Inflate all children under temp against its context.
                rInflateChildren(parser, temp, attrs, true);


                if (DEBUG) {
                    System.out.println("-----> done inflating children");
                }


                // We are supposed to attach all the views we found (int temp)
                // to root. Do that now.
                if (root != null && attachToRoot) {
                    root.addView(temp, params);
                }


                // Decide whether to return the root that was passed in or the
                // top view found in xml.
                if (root == null || !attachToRoot) {
                    result = temp;
                }
            }


        }


        return result;
    }
}
伙伴们从代码中标记的tag,自行找对应的代码讲解
代码 - 1
前面我们通过XML布局解析,拿到了布局文件中的信息,这个name其实就是我们在XML中写的控件的名称,例如TextView、Button、LinearLayout、include、merge......
如果是merge标签的话,跟其他控件走的渲染方式不一样,我们重点看 代码-2 中的实现。
代码 - 2
这里有一个核心方法,createViewFromTag,最终返回了一个View,这里就包含系统创建并实例化View的秘密。
View createViewFromTag(View parent, String name, Context context, AttributeSet attrs,
        boolean ignoreThemeAttr) {
    if (name.equals("view")) {
        name = attrs.getAttributeValue(null, "class");
    }


    // Apply a theme wrapper, if allowed and one is specified.
    if (!ignoreThemeAttr) {
        final TypedArray ta = context.obtainStyledAttributes(attrs, ATTRS_THEME);
        final int themeResId = ta.getResourceId(0, 0);
        if (themeResId != 0) {
            context = new ContextThemeWrapper(context, themeResId);
        }
        ta.recycle();
    }


    try {
        // 代码 - 3
        View view = tryCreateView(parent, name, context, attrs);
        // 代码 - 4
        if (view == null) {
            final Object lastContext = mConstructorArgs[0];
            mConstructorArgs[0] = context;
            try {
                if (-1 == name.indexOf('.')) {
                    view = onCreateView(context, parent, name, attrs);
                } else {
                    view = createView(context, name, null, attrs);
                }
            } finally {
                mConstructorArgs[0] = lastContext;
            }
        }


        return view;
    }
}
代码 - 3
其实createViewFromTag这个方法中,最终的一个方法就是tryCreateView,在这个方法中返回的View就是createViewFromTag的返回值,当然也有可能创建失败,最终走到 代码-4中,但我们先看下这个方法。
public final View tryCreateView(@Nullable View parent, @NonNull String name,
    @NonNull Context context,
    @NonNull AttributeSet attrs) {
    if (name.equals(TAG_1995)) {
        // Let's party like it's 1995!
        return new BlinkLayout(context, attrs);
    }


    View view;
    if (mFactory2 != null) {
        view = mFactory2.onCreateView(parent, name, context, attrs);
    } else if (mFactory != null) {
        view = mFactory.onCreateView(name, context, attrs);
    } else {
        view = null;
    }


    if (view == null && mPrivateFactory != null) {
        view = mPrivateFactory.onCreateView(parent, name, context, attrs);
    }


    return view;
}
在这个方法中,我们看到创建View,其实是通过两个Factory,分别是:mFactory2和mFactory,通过调用它们的onCreateView方法进行View的实例化,如果这两个Factory都没有设置,那么最终返回的view = null;当然后面也有一个兜底策略,如果view = null,但是mPrivateFactory(其实也是Factory2)不为空,也可以通过mPrivateFactory创建。
1.3 Factory接口
在前面我们提到两个成员变量,分别是:mFactory2和mFactory,这两个变量是LayoutInflater中的成员变量,我们看下是在setFactory和setFactory2中进行赋值的。
public void setFactory(Factory factory) {
    if (mFactorySet) {
        throw new IllegalStateException("A factory has already been set on this LayoutInflater");
    }
    if (factory == null) {
        throw new NullPointerException("Given factory can not be null");
    }
    mFactorySet = true;
    if (mFactory == null) {
        mFactory = factory;
    } else {
        mFactory = new FactoryMerger(factory, null, mFactory, mFactory2);
    }
}


/**
 * Like {@link #setFactory}, but allows you to set a {@link Factory2}
 * interface.
 */
public void setFactory2(Factory2 factory) {
    if (mFactorySet) {
        throw new IllegalStateException("A factory has already been set on this LayoutInflater");
    }
    if (factory == null) {
        throw new NullPointerException("Given factory can not be null");
    }
    mFactorySet = true;
    if (mFactory == null) {
        mFactory = mFactory2 = factory;
    } else {
        mFactory = mFactory2 = new FactoryMerger(factory, factory, mFactory, mFactory2);
    }
}
我们系统在进行布局解析的时候,肯定也是设置了自己的Factory,这样的话就直接走系统的初始化流程;
protected LayoutInflater(LayoutInflater original, Context newContext) {
    StrictMode.assertConfigurationContext(newContext, "LayoutInflater");
    mContext = newContext;
    mFactory = original.mFactory;
    mFactory2 = original.mFactory2;
    mPrivateFactory = original.mPrivateFactory;
    setFilter(original.mFilter);
    initPrecompiledViews();
}
但是如果我们想实现换肤,是不是也可自定义换肤的Factory来代替系统的Factory,以此实现我们想要的效果,e.g. 我们在XML布局中设置了一个TextView
<?xml version="1.0" encoding="utf-8"?>
<androidx.constraintlayout.widget.ConstraintLayout xmlns:android="http://schemas.android.com/apk/res/android"
    android:layout_width="match_parent"
    android:layout_height="match_parent"
    android:id="@+id/cs_root"
    xmlns:app="http://schemas.android.com/apk/res-auto">


    <TextView
        android:id="@+id/tv_skin"
        android:layout_width="wrap_content"
        android:layout_height="wrap_content"
        android:text="开启换肤"
        android:textColor="#000000"
        android:textStyle="bold"
        app:layout_constraintStart_toStartOf="parent"
        app:layout_constraintTop_toTopOf="parent"
        app:layout_constraintEnd_toEndOf="parent"
        app:layout_constraintBottom_toBottomOf="parent"/>


</androidx.constraintlayout.widget.ConstraintLayout>
我们通过自定义的Factory2,在onCreateView中创建一个Button替代TextView。
class MainActivity : AppCompatActivity() {


override fun onCreate(savedInstanceState: Bundle?) {
    // 代码 - 5
    super.onCreate(savedInstanceState)
    val inflater = LayoutInflater.from(this)
    inflater.factory2 = object : LayoutInflater.Factory2 {
        override fun onCreateView(
            parent: View?,
            name: String,
            context: Context,
            attrs: AttributeSet
        ): View? {


            if (name == "TextView") {
                val button = Button(context)
                button.setText("换肤")
                return button
            }
            return null
        }


        override fun onCreateView(name: String, context: Context, attrs: AttributeSet): View? {
            return null
        }


    }
    val view = inflater.inflate(R.layout.layout_skin, findViewById(R.id.cs_root), false)
    setContentView(view)


}
但是运行之后,我们发现报错了:
Caused by: java.lang.IllegalStateException: A factory has already been set on this LayoutInflater
        at android.view.LayoutInflater.setFactory2(LayoutInflater.java:314)
at com.lay.learn.asm.MainActivity.onCreate(Unknown Source:22)看报错的意思是已经设置了一个factory,不能重复设置。这行报错信息,我们在1.3开头的代码中就可以看到,有一个标志位mFactorySet,如果mFactorySet = true,那么就直接报错了,但是在LayoutInflater源码中,只有在调用setFactory和setFactory2方法的时候,才会将其设置为true,那为什么还报错呢?
代码 - 5
既然只有在调用setFactory和setFactory2方法的时候,才会设置mFactorySet为true,那么原因只会有一个,就是重复调用。我们看下super.onCreate(saveInstanceState)做了什么。
因为当前Activity继承了AppCompatActivity,在AppCompatActivity的构造方法中调用了initDelegate方法。
@ContentView
public AppCompatActivity(@LayoutRes int contentLayoutId) {
    super(contentLayoutId);
    initDelegate();
}


private void initDelegate() {
    // TODO: Directly connect AppCompatDelegate to SavedStateRegistry
    getSavedStateRegistry().registerSavedStateProvider(DELEGATE_TAG,
            new SavedStateRegistry.SavedStateProvider() {
                @NonNull
                @Override
                public Bundle saveState() {
                    Bundle outState = new Bundle();
                    getDelegate().onSaveInstanceState(outState);
                    return outState;
                }
            });
    addOnContextAvailableListener(new OnContextAvailableListener() {
        @Override
        public void onContextAvailable(@NonNull Context context) {
            final AppCompatDelegate delegate = getDelegate();
            delegate.installViewFactory();
            delegate.onCreate(getSavedStateRegistry()
                    .consumeRestoredStateForKey(DELEGATE_TAG));
        }
    });
}
最终会调用AppCompatDelegateImpl的installViewFactory方法。
@Override
public void installViewFactory() {
    LayoutInflater layoutInflater = LayoutInflater.from(mContext);
    if (layoutInflater.getFactory() == null) {
        LayoutInflaterCompat.setFactory2(layoutInflater, this);
    } else {
        if (!(layoutInflater.getFactory2() instanceof AppCompatDelegateImpl)) {
            Log.i(TAG, "The Activity's LayoutInflater already has a Factory installed"
                    + " so we can not install AppCompat's");
        }
    }
}在这个方法中,我们可以看到,如果LayoutInflater获取到factory为空,那么就会调用setFactory2方法,这个时候mFactorySet = true,当我们再次调用setContentView的时候,就直接报错,所以我们需要在super.onCreate之前进行换肤的操作。
当然我们也可以通过反射的方式,在setFactory的时候将mFactorySet设置为false。
1.4 小结
所以最终换肤的方案:通过Hook的形式,修改替代系统的Factory,从而自行完成组件的实例化,达到与系统行为一致的效果。
代码 - 4
如果有些View通过Factory没有实例化的,此时view为空,那么会通过反射的方式来完成组件实例化,像一些带包名的系统组件,或者自定义View。
2 换肤框架搭建
其实在搭建换肤框架的时候,我们肯定不可能对所有的控件都进行换肤,所以对于XML布局中的组件,我们需要进行一次标记,那么标记的手段有哪些呢?
(1)创建一个接口,e.g. ISkinChange接口,然后重写系统所有需要换肤的控件实现这个接口,然后遍历获取XML中需要换肤的控件,进行换肤,这个是一个方案,但是成本比较高。
(2)自定义属性,因为对于每个控件来说都有各自的属性,如果我们通过自定义属性的方式给每个需要换肤的控件加上这个属性,在实例化View的时候就可以进行区分。
<?xml version="1.0" encoding="utf-8"?>
<resources>
    <declare-styleable name="Skinable">
        <attr name="isSupport" format="boolean"/>
    </declare-styleable>
</resources>
第一步:创建View并返回
这里我们创建了一个SkinFactory,实现了LayoutInflater.Factory2接口,这个类就是用于收集需要换肤的组件,并实现换肤的功能。
class SkinFactory : LayoutInflater.Factory2 {


    override fun onCreateView(
        parent: View?,
        name: String,
        context: Context,
        attrs: AttributeSet
    ): View? {


        //创建View


        //收集可以换肤的组件


        return null
    }


    override fun onCreateView(name: String, context: Context, attrs: AttributeSet): View? {
        return null
    }
}
首先在onCreateView中,需要创建一个View并返回,我们看下系统是怎么完成的。
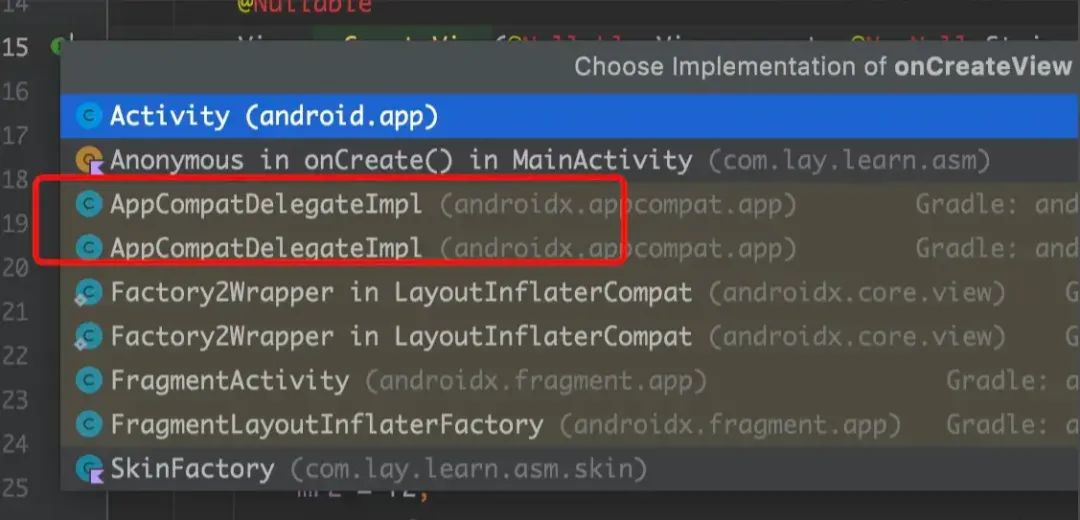
通过上面的截图我们知道,通过AppCompatDelegate的实现类就能够实现view的创建。
override fun onCreateView(
    parent: View?,
    name: String,
    context: Context,
    attrs: AttributeSet
): View? {


    //创建View
    val view = delegate.createView(parent, name, context, attrs)
    if (view == null) {
        //TODO 没有创建成功,需要通过反射来创建
    }
    //收集可以换肤的组件
    if (view != null) {
        collectSkinComponent(attrs, context, view)
    }
    return view
}


/**
 * 收集能够进行换肤的控件
 */
private fun collectSkinComponent(attrs: AttributeSet, context: Context, view: View) {
    //获取属性
    val skinAbleAttr = context.obtainStyledAttributes(attrs, R.styleable.Skinable, 0, 0)
    val isSupportSkin = skinAbleAttr.getBoolean(R.styleable.Skinable_isSupport, false)
    if (isSupportSkin) {
        val attrsMap: MutableMap<String, String> = mutableMapOf()
        //收集起来
        for (index in 0 until attrs.attributeCount) {
            val name = attrs.getAttributeName(index)
            val value = attrs.getAttributeValue(index)
            attrsMap[name] = value
        }
        val skinView = SkinView(view, attrsMap)
        skinList.add(skinView)
    }


    skinAbleAttr.recycle()
}
所以我们在SkinFactory中传入一个AppCompatDelegate的实现类,调用createView方法先创建一个View,如果这个view不为空,那么会收集每个View的属性,看是否支持换肤。
收集能够换肤的组件,其实就是根据自定义属性划分,通过获取View中自带全部属性判断,如果支持换肤,那么就存储起来,这部分还是比较简单的。
第二步:换肤逻辑与Activity基类抽取
如果我们想要进行换肤,例如更换背景、或者更换字体颜色等等,因此我们需要设置几个换肤的类型如下:
sealed class SkinType{
    /**
     * 更换背景颜色
     * @param color 背景颜色
     */
    class BackgroundSkin(val color:Int):SkinType()


    /**
     * 更换背景图片
     * @param drawable 背景图片资源id
     */
    class BackgroundDrawableSkin(val drawable:Int):SkinType()


    /**
     * 更换字体颜色
     * @param color 字体颜色
     * NOTE 这个只能TextView才能是用
     */
    class TextColorSkin(val color: Int):SkinType()


    /**
     * 更换字体类型
     * @param textStyle 字体型号
     * NOTE 这个只能TextView才能是用
     */
    class TextStyleSkin(val textStyle: Typeface):SkinType()
}当开启换肤之后,需要遍历skinList中支持换肤的控件,然后根据SkinType来对对应的控件设置属性,例如TextStyleSkin这类换肤类型,只能对TextView生效,因此需要根据view的类型来进行属性设置。
/**
 * 一键换肤
 */
fun changedSkin(vararg skinType: SkinType) {
    Log.e("TAG","skinList $skinList")
    skinList.forEach { skinView ->
        changedSkinInner(skinView, skinType)
    }
}


/**
 * 换肤的内部实现类
 */
private fun changedSkinInner(skinView: SkinView, skinType: Array<out SkinType>) {
    skinType.forEach { type ->
        Log.e("TAG", "changedSkinInner $type")
        when (type) {
            is SkinType.BackgroundSkin -> {
                skinView.view.setBackgroundColor(type.color)
            }


            is SkinType.BackgroundDrawableSkin -> {
                skinView.view.setBackgroundResource(type.drawable)
            }


            is SkinType.TextStyleSkin -> {
                if (skinView.view is TextView) {
                    //只有TextView可以换
                    skinView.view.typeface = type.textStyle
                }
            }


            is SkinType.TextColorSkin -> {
                if (skinView.view is TextView) {
                    //只有TextView可以换
                    skinView.view.setTextColor(type.color)
                }
            }
        }
    }
}
所以针对换肤的需求,我们可以抽出一个抽象的Activity基类,叫做SkinActivity。
abstract class SkinActivity : AppCompatActivity() {


    private lateinit var skinFactory: SkinFactory


    override fun onCreate(savedInstanceState: Bundle?) {
        super.onCreate(savedInstanceState)
        Log.e("TAG", "onCreate")
        val inflate = LayoutInflater.from(this)
        //恢复标志位
        resetmFactorySet(inflate)
        //开启换肤模式
        skinFactory = SkinFactory(delegate)
        inflate.factory2 = skinFactory
        setContentView(inflate.inflate(getLayoutId(), getViewRoot(), false))
        initView()
    }


    open fun initView() {


    }


    protected fun changedSkin(vararg skinType: SkinType) {
        Log.e("TAG", "changedSkin")
        skinFactory.changedSkin(*skinType)
    }


    @SuppressLint("SoonBlockedPrivateApi")
    private fun resetmFactorySet(instance: LayoutInflater) {
        val mFactorySetField = LayoutInflater::class.java.getDeclaredField("mFactorySet")
        mFactorySetField.isAccessible = true
        mFactorySetField.set(instance, false)
    }


    abstract fun getLayoutId(): Int
    abstract fun getViewRoot(): ViewGroup?
}
在onCreate方法中,主要就是进行Factory的设置,这里就是我们前面提到的SkinFactory(实现了Factory2接口),然后定义了一个方法changedSkin,在任意子类中都可以调用。
class SkinChangeActivity : SkinActivity() {


    override fun initView() {
        findViewById<Button>(R.id.btn_skin).setOnClickListener {
            Toast.makeText(this,"更换背景",Toast.LENGTH_SHORT).show()
            changedSkin(
                SkinType.BackgroundSkin(Color.parseColor("#B81A1A"))
            )
        }
        findViewById<Button>(R.id.btn_skin_textColor).setOnClickListener {
            Toast.makeText(this,"更换字体颜色",Toast.LENGTH_SHORT).show()
            changedSkin(
                SkinType.TextColorSkin(Color.parseColor("#FFEB3B")),
                SkinType.BackgroundSkin(Color.WHITE)
            )
        }
        findViewById<Button>(R.id.btn_skin_textStyle).setOnClickListener {
            Toast.makeText(this,"更换字体样式",Toast.LENGTH_SHORT).show()
            changedSkin(
                SkinType.TextStyleSkin(Typeface.DEFAULT_BOLD),
            )
        }
    }


    override fun getLayoutId(): Int {
        return R.layout.activity_skin_change
    }


    override fun getViewRoot(): ViewGroup? {
        return findViewById(R.id.cs_root)
    }


}
具体的效果可以看下图:
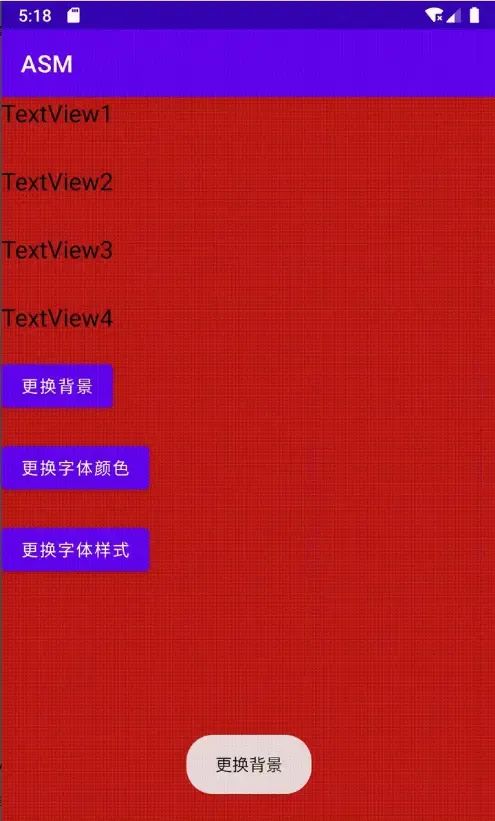

其实这里只是实现了一个简单的换肤效果,其实在业务代码中,可能存在上千个View,那么通过这种方式就能够避免给每个View都去设置一遍背景、字体颜色......关键还是在于原理的理解,其实真正的换肤现在主流的都是插件化换肤,通过下载皮肤包自动配置到App中,后续我们就会介绍插件化换肤的核心思想。
关注我获取更多知识或者投稿


 209
209


 被折叠的 条评论
为什么被折叠?
被折叠的 条评论
为什么被折叠?
 到【灌水乐园】发言


