


我们的Android手机的屏幕是十分有限的,怎么在有限的屏幕展示足够多的内容一直是我们不懈的追求。而折叠悬浮效果正是这个需求的实现,且兼顾了美观。话不多说,先上效果图。
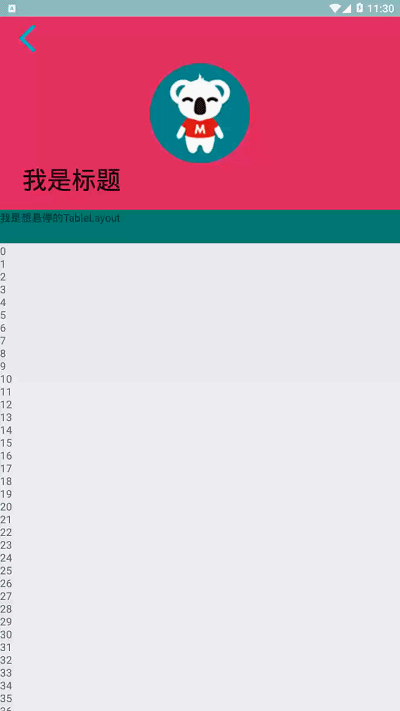
内容大致分两部分,当完全展开的时候,上半部分展示标题,且可展示额外的如背景图、头像等信息。下半部分是可滚动的控件或包含可滚动控件的控件(如ViewPager)。而还有一个特殊的部分是当折叠的时候会停留下页面顶部的部分,一般做导航指示器。这样,当完全展开的时候,可以展示足够多的内容。而当完全折叠的时候,有可以将屏幕控件基本全部留给列表,使列表的可展示区域最大化。
那么这个效果是如何实现的呢,其实是使用了CoordinatorLayout+AppBarLayout+可滚动列表作为核心来实现的。请注意,这里的可滚动列表不能用之前的ListView、GridView,而必须使用实现了NestedScrollingParent、NestedScrollingChild的如NestedScrollView、RecyclerView这种控件。而之所以能实现这种折叠悬浮的效果也正是由于CoordinatorLayout也实现了NestedScrollingParent、NestedScrollingChild,这样它们之间的滚动才能联动起来,知道列表滚动到了哪儿,是否该折叠或者悬浮。
我这里为了兼容androidX对引入的控件包做了兼容,下面给出包。如果没兼容androidX的话按原控件包引入。
implementation 'androidx.appcompat:appcompat:1.0.2'
implementation 'androidx.constraintlayout:constraintlayout:1.1.3'
androidTestImplementation 'androidx.test.espresso:espresso-core:3.2.0'
先看下布局代码:
<?xml version="1.0" encoding="utf-8"?>
<androidx.coordinatorlayout.widget.CoordinatorLayout xmlns:android="http://schemas.android.com/apk/res/android"
    xmlns:app="http://schemas.android.com/apk/res-auto"
    xmlns:tools="http://schemas.android.com/tools"
    android:layout_width="match_parent"
    android:layout_height="match_parent"
    tools:context=".MainActivity">

    <com.google.android.material.appbar.AppBarLayout
        android:id="@+id/appBarLayout2"
        android:layout_width="match_parent"
        android:layout_height="wrap_content">

        <com.google.android.material.appbar.CollapsingToolbarLayout
            android:id="@+id/collapsingToolbar"
            android:layout_width="match_parent"
            android:layout_height="wrap_content"
            app:layout_scrollFlags="scroll|exitUntilCollapsed">
            <RelativeLayout
                android:layout_width="match_parent"
                android:layout_height="300dp"
                app:layout_collapseMode="parallax"
                app:layout_collapseParallaxMultiplier="0.5" >
                <ImageView
                    android:layout_width="wrap_content"
                    android:layout_height="wrap_content"
                    android:layout_centerInParent="true"
                    android:src="@drawable/ic_sys_notification"/>
            </RelativeLayout>

            <androidx.appcompat.widget.Toolbar
                android:id="@+id/toolbar"
                android:layout_width="match_parent"
                android:layout_height="?attr/actionBarSize"
                android:textAlignment="center"
                android:minHeight="?attr/actionBarSize"
                app:layout_collapseMode="pin">

            </androidx.appcompat.widget.Toolbar>
        </com.google.android.material.appbar.CollapsingToolbarLayout>
        <TableLayout
            android:layout_width="match_parent"
            android:layout_height="50dp"
            android:layout_gravity="center"
            app:layout_scrollFlags="scroll|enterAlways|snap">
            <TextView
                android:layout_width="match_parent"
                android:layout_height="wrap_content"
                android:text="我是想悬停的TableLayout"/>
        </TableLayout>
    </com.google.android.material.appbar.AppBarLayout>

    <androidx.core.widget.NestedScrollView
        android:id="@+id/nestedScrollView2"
        android:layout_width="match_parent"
        android:layout_height="wrap_content"
        app:layout_behavior="@string/appbar_scrolling_view_behavior">
        <TextView
            android:id="@+id/tv"
            android:layout_width="match_parent"
            android:layout_height="wrap_content" />
    </androidx.core.widget.NestedScrollView>
</androidx.coordinatorlayout.widget.CoordinatorLayout>
CoordinatorLayout包裹了一个AppBarLayout和一个NestedScrollView(或者RecyclerView),且滚动控件添加代码app:layout_behavior="@string/appbar_scrolling_view_behavior",AppBarLayout内部控件通过app:layout_scrollFlags来设置联动方式及悬浮。
以上布局就实现了折叠悬浮的页面,基本不需要额外的代码介入。可以发现Google其实已经为我们实现了许多有趣而又好用的控件等待我们去发现呢!
国际惯例,代码地址:https://gitee.com/calm1516/CHover.git


 948
948


 被折叠的 条评论
为什么被折叠?
被折叠的 条评论
为什么被折叠?
 到【灌水乐园】发言


