


系统安装需求,CentOS6.5,能连接互联网,下面是安装步骤
1.yum install libevent-devel
2.wget http://memcached.org/latest
3.wget http://www.memcached.org/files/memcached-1.4.20.tar.gz
下载最新的安装文件memcached-1.4.20.tar.gz
4.tar -zxvf memcached-1.4.20.tar.gz
5.cd memcached-1.4.20
6。 ./configure && make && make test && sudo make install
提示报错:
checking build system type... x86_64-unknown-linux-gnu
checking host system type... x86_64-unknown-linux-gnu
checking target system type... x86_64-unknown-linux-gnu
checking for a BSD-compatible install... /usr/bin/install -c
checking whether build environment is sane... yes
checking for a thread-safe mkdir -p... /bin/mkdir -p
checking for gawk... gawk
checking whether make sets $(MAKE)... yes
checking for gcc... no
checking for cc... no
checking for cl.exe... no
configure: error: in `/opt/memcached-1.4.20':
configure: error: no acceptable C compiler found in $PATH
See `config.log' for more details.
7.yum -y install gcc
系统会下载gcc安装包,自动安装。时间较漫长,大约装30分钟。(只能吐槽国内网速)
8.yum -y install gcc-c++
再下一遍安装包,这次速度快点。
9。再次执行第6步,直到看到成功编译的提示。
......
prove ./t
make: prove: Command not found
make: *** [test] Error 127
10.第9步报错误, 重新执行make install
没有提示错误。
解决安装memcache出现configure: error: libevent is required. If it's already installed, specify its path using –with-libevent=/dir/
id="iframeu859190_0" src="http://pos.baidu.com/fcym?rdid=859190&dc=2&exps=112006&di=u859190&dri=0&dis=0&dai=1&ps=847x1045&dcb=BAIDU_SSP_define&dtm=BAIDU_DUP_SETJSONADSLOT&dvi=0.0&dci=-1&dpt=none&tsr=0&tpr=1467105049902&ti=%E8%A7%A3%E5%86%B3%E5%AE%89%E8%A3%85memcache%E5%87%BA%E7%8E%B0configure%3A%20error%3A%20libevent%20is%20required.%20If%20it%27&ari=1&dbv=2&drs=1&pcs=1263x675&pss=1263x1057&cfv=18&cpl=37&chi=1&cce=true&cec=UTF-8&tlm=1376991643&rw=675<u=http%3A%2F%2Fwww.wp31.com%2F1022.html<r=https%3A%2F%2Fwww.baidu.com%2Flink%3Furl%3DFnJadz_tsSOa6s7MTW7LrnDuikVg6JHRDT-ME6JidxAT6Tmc0RUUzOgNwJHtCdBz%26wd%3D%26eqid%3D9b02c8bf0000156f0000000257723dfc&ecd=1&psr=1280x800&par=1280x760&pis=-1x-1&ccd=24&cja=true&cmi=82&col=zh-CN&cdo=-1&tcn=1467105050&qn=3a1bd104164ed542&tt=1467105049883.25.226.229" width="200" height="200" align="center,center" vspace="0" hspace="0" marginwidth="0" marginheight="0" scrolling="no" frameborder="0" allowtransparency="true" style="border-width: 0px; vertical-align: bottom; margin: 0px;">
这里要安装memcached.但在编译的时候提示需要指定libevent库,可是在安装lnmp的候默认是已经安装过的.解决办法如下:
memcached需要libevent支持,所以首先安装libevent
查看系统是否已经安装libevent
# rpm -qa|grep libevent
如果有,不要高兴,先升级
#yum -y install libevent
测试libevent是不是已经安装成功
#ls -al /usr/lib | grep libevent
可以看到多个已经安装的类包
安装memcached(http://memcached.org/)
可以先查看编译参数
可以先查看编译参数
# wget http://memcached.googlecode.com/files/memcached-1.4.8.tar.gz
# tar zxvf memcached-1.4.8.tar.gz
# cd memcached-1.4.8
# ./configure –help
# ./configure –prefix=/usr/local/memcached
# make
# make install
在这个时候,不一定会编译通过,依旧会出现:
checking for libevent directory… configure: error: libevent is required. You can get it from http://www.monkey.org/~provos/libevent/
If it’s already installed, specify its path using –with-libevent=/dir/
因为libevent 这个包是系统默认安装的,没有安装相应的开发所用的头文件。
所以,还要使用如下命令来安装:
所以,还要使用如下命令来安装:
yum install libevent-devel
再编辑,即可通过。。
启用Memcached,
/usr/local/memcached/bin/memcached -d -m 128 -l 192.168.1.1 -p 11211 -u root
============================================
memcached 启动报error while loading shared libraries: libevent-1.4.s解决办法:
原因是找不到libevent-1.4.so.2类库,解决办法如下:
使用LD_DEBUG=help ./memcached -v来确定 加载的类库路径,方法如下:
ln -s /usr/local/lib/libevent-1.4.so.2 /lib/libevent-1.4.so.2
貌似用ldconfig也能解决问题
11.启动和停止memcached
# ./memcached -d -m 1024 -u root -l 10.11.1.219 -p 11211 -c 256 -P /tmp/memcached.pid //启动memcached 启动参数说明:
启动参数说明:
-d 选项是启动一个守护进程,
-m 是分配给Memcache使用的内存数量,单位是MB,默认64MB
-M return error on memory exhausted (rather than removing items)
-u 是运行Memcache的用户,如果当前为root 的话,需要使用此参数指定用户。
-l 是监听的服务器IP地址,默认为所有网卡。
-p 是设置Memcache的TCP监听的端口,最好是1024以上的端口
-c 选项是最大运行的并发连接数,默认是1024
-P 是设置保存Memcache的pid文件
-f <factor> chunk size growth factor (default: 1.25)
-I Override the size of each slab page. Adjusts max item size(1.4.2版本新增)
也可以启动多个守护进程,但是端口不能重复
停止Memcache进程:
kill `cat /tmp/memcached.pid`
12.测试memcached,
使用另外一台机器,telnet 10.11.1.219 11211
如果需要,先关闭linux防火墙。关闭linux防火墙的命令:service iptables stop
连接成功输入命令:
stats
显示正常结果,说明服务成功启动了。
stats
STAT pid 2940
STAT uptime 407
STAT time 1409821965
STAT version 1.4.20
STAT libevent 1.4.13-stable
STAT pointer_size 64
STAT rusage_user 0.000000
STAT rusage_system 0.029995
STAT curr_connections 5
STAT total_connections 6
STAT connection_structures 6
STAT reserved_fds 20
STAT cmd_get 0
STAT cmd_set 0
STAT cmd_flush 0
STAT cmd_touch 0
STAT get_hits 0
STAT get_misses 0
STAT delete_misses 0
STAT delete_hits 0
STAT incr_misses 0
STAT incr_hits 0
STAT decr_misses 0
STAT decr_hits 0
13。java客户端上的开发
java memcached client下载地址https://github.com/gwhalin/Memcached-Java-Client/downloads
将下载的ava_memcached-release_2.6.6.zip解压,jar包全部导入到java项目。
测试程序:
import java.util.ArrayList;
import com.danga.MemCached.*;
public class MyClass {
// create a static client as most installs only need
// a single instance
protected static MemCachedClient mcc = new MemCachedClient();
// set up connection pool once at class load
static {
// server list and weights
// String[] servers = { "server1.mydomain.com:1624",
// "server2.mydomain.com:1624", "server3.mydomain.com:1624" };
String[] servers = { "10.11.1.219:11211" };
// Integer[] weights = { 3, 3, 2 };
Integer[] weights = { 3};
// grab an instance of our connection pool
SockIOPool pool = SockIOPool.getInstance();
// set the servers and the weights
pool.setServers(servers);
pool.setWeights(weights);
// set some basic pool settings
// 5 initial, 5 min, and 250 max conns
// and set the max idle time for a conn
// to 6 hours
pool.setInitConn(5);
pool.setMinConn(5);
pool.setMaxConn(250);
pool.setMaxIdle(1000 * 60 * 60 * 6);
// set the sleep for the maint thread
// it will wake up every x seconds and
// maintain the pool size
pool.setMaintSleep(30);
// set some TCP settings
// disable nagle
// set the read timeout to 3 secs
// and don't set a connect timeout
pool.setNagle(false);
pool.setSocketTO(3000);
pool.setSocketConnectTO(0);
// initialize the connection pool
pool.initialize();
// lets set some compression on for the client
// compress anything larger than 64k
// mcc.setCompressEnable(true);
// mcc.setCompressThreshold(64 * 1024);
}
// from here on down, you can call any of the client calls
public static void examples() {
mcc.set("foo", "This is a test String");
ArrayList a1=new ArrayList();
a1.add(0);
a1.add(388);
a1.add(989);
a1.add("中文内容");
mcc.set("foo2", a1);
String bar = (String)mcc.get("foo");
ArrayList a2 = (ArrayList)mcc.get("foo2");
System.out.println(bar);
System.out.println(a2.toString());
}
public static void main(String[] args) {
// TODO Auto-generated method stub
MyClass cs1=new MyClass();
cs1.examples();
}
}
运行结果:
This is a test String
[0, 388, 989, 中文内容]
说明:本程序在jdk7下测试通过,由于只使用了一个节点的memcached ,所以去掉了集群配置。
典型集群部署图:
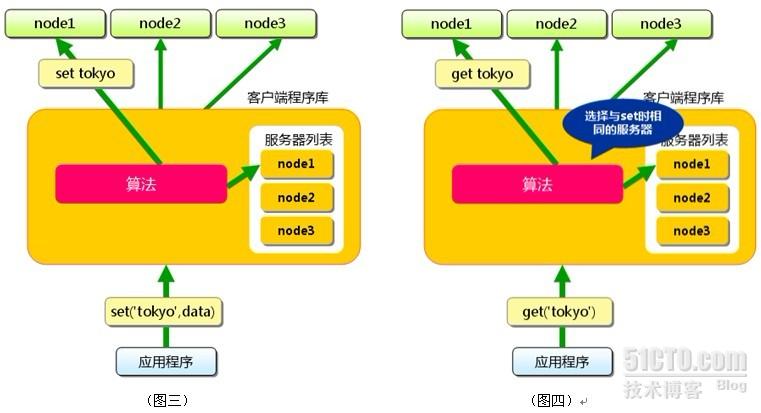
node的选择通过集群的Hash算法来实现,并且互相独立,没有备份。
转自:http://blog.csdn.net/rishengcsdn/article/details/39048477


 1291
1291

 被折叠的 条评论
为什么被折叠?
被折叠的 条评论
为什么被折叠?
 到【灌水乐园】发言


