Layout对于迅速的搭建界面和提高界面在不同分辨率的屏幕上的适应性具有很大的作用。这里简要介绍Android的Layout和研究一下它的实现。
Android有Layout:FrameLayout,LinearLayout,TableLayout,RelativeLayout,AbsoluteLayout。
放入Layout中进行排布的View的XML属性:
1.几种Layout中Item所共有的XML属性:
- (1)layout_width
- (2)layout_height
注: (1)和(2)用来确定放入Layout中的View的宽度和高度:它们的可能取值为fill_parent,wrap_content或者固定的像素值。
- (3)layout_marginLeft --->paddingLeft
- (4)layout_marginTop --->paddingTop
- (5)layout_marginRight --->paddingRight
- (6)layout_marginBottom --->paddingBottom
- (补)layout_margin --->padding
注:(3)(4)(5)(6)是放入Layout中的View期望它能够和Layout的边界或者其他View之间能够相距一段距离。
注:(7)用来确定View在Layout中的停靠位置。
FrameLayout是最简单的Layout,就只具有这些属性。
LinearLayout还会有:
注: (8)用于在LinearLayout中把所有子View排布之后的剩余空间按照它们的layout_weight分配给各个拥有这个属性的View。
TableLayout的行TableRow是一个横向的(horizontal)的LinearLayout
RelativeLayout有16个align相关的XML属性:
- (9 )layout_alignParentBottom 当前控件低端与父控件的低端对齐(重合)
- (10)layout_alignParentLeft 当前控件左端与父控件的左端对齐(重合)
- (11)layout_alignParentRight 当前控件右端与父控件的右端对齐(重合)
- (12)layout_alignParentTop 当前控件上端与父控件的上端对齐(重合)
- (13)layout_centerHorizontal 当前控件位于父控件的横向中间位置(水平方向上的中间)
- (14)layout_centerInParent 当前控件位于父控件的纵横向中间位置(垂直方向上的中间)
- (15)layout_centerVertical 当前控件位于父控件的纵向中间位置(平面上的正中间)
- (16)layout_above 使当前控件位于给出id控件的上方
- (17)layout_below 使当前控件位于给出id控件的下方
- (18)layout_toLeftOf 使当前控件位于给出id控件的左侧
- (19)layout_toRightOf 使当前控件位于给出id控件的右侧
- (20)layout_alignBottom 使当前控件与给出id控件的底部部重合(注意可用和给出id控件来对齐)
- (21)layout_alignLeft 使当前控件与给出id控件的左边重合
- (22)layout_alignRight 使当前控件与给出id控件的右边重合
- (23)layout_alignTop 使当前控件与给出id控件的顶部重合
- (24)layout_alignBaseline 使当前控件的BaseLine与给出id控件t的BaseLine重合,这个主要用于Label或者其他包含文本的widgets。
注:(9)到(24)用来确定RelativeLayout中的View相对于Layout或者Layout中的其他View的位置。
++++++++++++++++++++++++++++++++++++++++++++++++++++++++++++++++++++++
根据Android的文档,Android会对Layou和View嵌套组成的这棵树进行2次遍历,一次是measure调用,用来确定Layout或者View的大小;一次是layout调用,用来确定Layout或者view的位置。当然后来我自己的山寨实现把这2次调用合并到了一起。那就是Layout在排布之前都对自己进行measure一次,然后对View递归调用Layout方法。这样子的大小肯定是确定了的。然后用确定了的大小来使用gravity或者align属性来定位,使用margin来调整位置。
+++++++++++++++++++++++++++++++++++++++++++++++++++++++++++++++++++++++
补充:
1.android:paddingLeft与android:layout_marginLeft的区别:
padding margin都是边距的含义,关键问题得明白是什么相对什么的边距.
padding是控件的内容相对控件的边缘的边距.
layout_margin是控件边缘相对父空间的边距.
2.android gravity和layout_gravity区别
android:gravity 属性是对该view 内容的限定.比如一个button 上面的text. 你可以设置该text 在view的靠左,靠右等位置.该属性就干了这个.
android:layout_gravity是用来设置该view相对与起父view 的位置.比如一个button 在linearlayout里,你想把该button放在靠左靠右等位置就可以通过该属性设置.
这样就解释了,有什么我们弄个最外布局,然后里面包了几个布局,如果要使这几个布局都靠底,就可以在最外布局的属性里设置androi:gravity="botton" 因为gravity是对里面的内容起作用
01
Android中gravity与layout_gravity的区别
LinearLayout有两个非常相似的属性:android:gravity与android:layout_gravity。他们的区别在于:android:gravity用于设置View组件的对齐方式,而android:layout_gravity用于设置Container组件的对齐方式。
举个例子,我们可以通过设置android:gravity="center"来让EditText中的文字在EditText组件中居中显示;同时我们设置EditText的android:layout_gravity="right"来让EditText组件在LinearLayout中居中显示。来实践以下: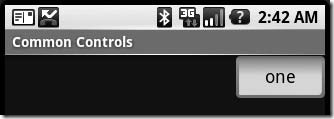
正如我们所看到的,在EditText中,其中的文字已经居中显示了,而EditText组件自己也对齐到了LinearLayout的右侧。
<LinearLayout
xmlns:android="http://schemas.android.com/apk/res/android"
android:orientation="vertical"
android:layout_width="fill_parent"
android:layout_height="fill_parent">
<EditText
android:layout_width="wrap_content"
android:gravity="center"
android:layout_height="wrap_content"
android:text="one"
android:layout_gravity="right"/>
</LinearLayout>
在网上看了一些对Layout_weight的讲解,有些说的比较片面,只列举了一种情况,然后自己通过实验和一些比较好的文章总结了一下,特此记录下来,以备以后所用。Layout_weight是线性布局,也就是LinearLayout里面用到的,下面通过实验来看这个Layout_weight的特性。
1.当控件的属性android:layout_width="fill_parent"时,布局文件如下:
- <?xml version="1.0" encoding="utf-8"?>
- <LinearLayout xmlns:android="http://schemas.android.com/apk/res/android"
- android:orientation="horizontal" android:layout_width="fill_parent"
- android:layout_height="fill_parent">
- <Button android:layout_width="fill_parent"
- android:layout_height="wrap_content" android:layout_weight="1"
- android:text="Button1" />
- <Button android:layout_width="fill_parent"
- android:layout_height="wrap_content" android:layout_weight="2"
- android:text="Button2" />
- </LinearLayout>
在这里Button1的Layout_weight=1,Buttong2的Layout_weight=2,运行效果为:

我们看到,Button1占了2/3,Button2占了1/3。如果此时把button2的weight设置成2000,不是说Button2就消失了,而是Button1的宽度几乎占满了屏幕宽度,而屏幕最后一丝细条则是留给Button2的,已近非常小了,没有显示出来。截图如下:

得出结论:在layout_width设置为fill_parent的时候,layout_weight代表的是你的控件要优先尽可能的大,但尽可能大是有限度的,即fill_parent.
2.当控件的属性android:layout_width="wrap_content"时,布局文件如下:
- <?xml version="1.0" encoding="utf-8"?>
- <LinearLayout xmlns:android="http://schemas.android.com/apk/res/android"
- android:orientation="horizontal" android:layout_width="fill_parent"
- android:layout_height="fill_parent">
- <Button android:layout_width="wrap_content"
- android:layout_height="wrap_content" android:layout_weight="1"
- android:text="Button1" />
- <Button android:layout_width="wrap_content"
- android:layout_height="wrap_content" android:layout_weight="2"
- android:text="Button2" />
- </LinearLayout>
同样,Button1的weight设置为1,Button2的weight设置为2,但是效果与fill_parent的效果截然相反。运行效果如下:

这时,和fill_parent正好相反,Button1的宽度占据了屏幕宽度的1/3,而Button2的宽度占据了屏幕的2/3,如果此时把Button1的weight设置为2000,按照之前理解,Button1应该小的几乎在屏幕上看不到,但是错了,实验告诉我们,当Button1的weight非常小时,也要"wrap_content",也就是要保证Button1至少能够显示。以下是Button1设置weight为2000时的运行截图:

我们看到,Button1已经足够小,但是要保证他能显示出来,因此得出结论:
在layout_width设置为wrap_content的时候,layout_weight代表的是你的控件要优先尽可能的小,但这个小是有限度的,即wrap_content.
当了解这些后,我们再设计程序时,为了能够自适应屏幕,不想给控件一个指定的宽度和高度,就可以使用这个weight属性来让它按自己比例来划分屏幕高度或者宽度了。


 855
855

 被折叠的 条评论
为什么被折叠?
被折叠的 条评论
为什么被折叠?
 到【灌水乐园】发言


